转自:http://blog.csdn.net/leixiaohua1020/article/details/50534150
=====================================================
视音频数据处理入门系列文章:
视音频数据处理入门:RGB、YUV像素数据处理
视音频数据处理入门:PCM音频采样数据处理
视音频数据处理入门:H.264视频码流解析
视音频数据处理入门:AAC音频码流解析
视音频数据处理入门:FLV封装格式解析
视音频数据处理入门:UDP-RTP协议解析
=====================================================
有段时间没有写博客了,这两天写起博客来竟然感觉有些兴奋,仿佛找回了原来的感觉。前一阵子在梳理以前文章的时候,发现自己虽然总结了各种视音频应用程序,却还缺少一个适合无视音频背景人员学习的“最基础”的程序。因此抽时间将以前写过的代码整理成了一个小项目。这个小项目里面包含了一系列简单的函数,可以对RGB/YUV视频像素数据、PCM音频采样数据、H.264视频码流、AAC音频码流、FLV封装格式数据、UDP/RTP协议数据进行简单处理。这个项目的一大特点就是没有使用任何的第三方类库,完全借助于C语言的基本函数实现了功能。通过对这些代码的学习,可以让初学者迅速掌握视音频数据的基本格式。有关上述几种格式的介绍可以参考文章《[总结]视音频编解码技术零基础学习方法》。
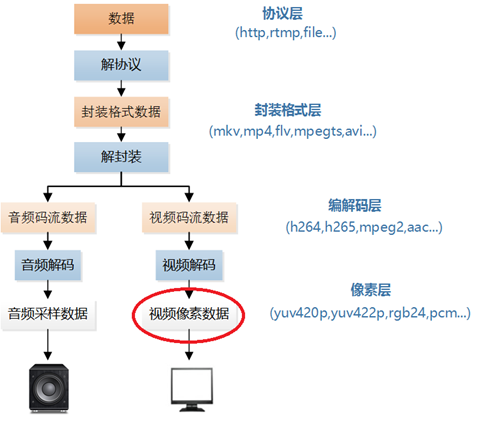
从这篇文章开始打算写6篇文章分别记录上述6种不同类型的视音频数据的处理方法。本文首先记录第一部分即RGB/YUV视频像素数据的处理方法。视频像素数据在视频播放器的解码流程中的位置如下图所示。
本文分别介绍如下几个RGB/YUV视频像素数据处理函数:
分离YUV420P像素数据中的Y、U、V分量
分离YUV444P像素数据中的Y、U、V分量
将YUV420P像素数据去掉颜色(变成灰度图)
将YUV420P像素数据的亮度减半
将YUV420P像素数据的周围加上边框
生成YUV420P格式的灰阶测试图
计算两个YUV420P像素数据的PSNR
分离RGB24像素数据中的R、G、B分量
将RGB24格式像素数据封装为BMP图像
将RGB24格式像素数据转换为YUV420P格式像素数据
生成RGB24格式的彩条测试图
本文中的RGB/YUV文件需要使用RGB/YUV播放器才能查看。YUV播放器种类比较多,例如YUV Player Deluxe,或者开源播放器(参考文章《修改了一个YUV/RGB播放器》)等。
函数列表
(1) 分离YUV420P像素数据中的Y、U、V分量
本程序中的函数可以将YUV420P数据中的Y、U、V三个分量分离开来并保存成三个文件。函数的代码如下所示。
- /**
- * Split Y, U, V planes in YUV420P file.
- * @param url Location of Input YUV file.
- * @param w Width of Input YUV file.
- * @param h Height of Input YUV file.
- * @param num Number of frames to process.
- *
- */
- int simplest_yuv420_split(char *url, int w, int h,int num){
- FILE *fp=fopen(url,"rb+");
- FILE *fp1=fopen("output_420_y.y","wb+");
- FILE *fp2=fopen("output_420_u.y","wb+");
- FILE *fp3=fopen("output_420_v.y","wb+");
- unsigned char *pic=(unsigned char *)malloc(w*h*3/2);
- for(int i=0;i<num;i++){
- fread(pic,1,w*h*3/2,fp);
- //Y
- fwrite(pic,1,w*h,fp1);
- //U
- fwrite(pic+w*h,1,w*h/4,fp2);
- //V
- fwrite(pic+w*h*5/4,1,w*h/4,fp3);
- }
- free(pic);
- fclose(fp);
- fclose(fp1);
- fclose(fp2);
- fclose(fp3);
- return 0;
- }
调用上面函数的方法如下所示。
- simplest_yuv420_split("lena_256x256_yuv420p.yuv",256,256,1);
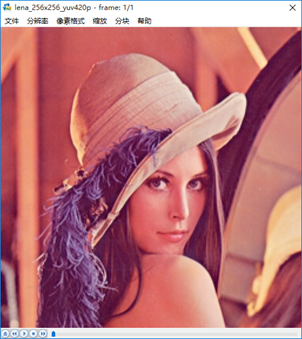
从代码可以看出,如果视频帧的宽和高分别为w和h,那么一帧YUV420P像素数据一共占用w*h*3/2 Byte的数据。其中前w*h Byte存储Y,接着的w*h*1/4 Byte存储U,最后w*h*1/4 Byte存储V。上述调用函数的代码运行后,将会把一张分辨率为256x256的名称为lena_256x256_yuv420p.yuv的YUV420P格式的像素数据文件分离成为三个文件:
output_420_y.y:纯Y数据,分辨率为256x256。
output_420_u.y:纯U数据,分辨率为128x128。output_420_v.y:纯V数据,分辨率为128x128。
注:本文中像素的采样位数一律为8bit。由于1Byte=8bit,所以一个像素的一个分量的采样值占用1Byte。
程序输入的原图如下所示。

lena_256x256_yuv420p.yuv
程序输出的三个文件的截图如下图所示。在这里需要注意输出的U、V分量在YUV播放器中也是当做Y分量进行播放的。
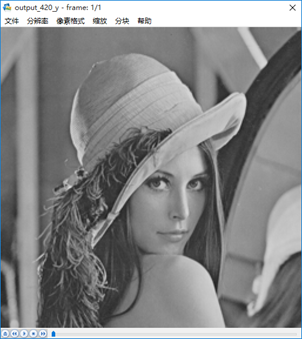
output_420_y.y

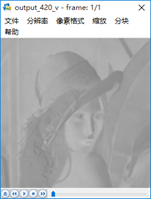
output_420_u.y和output_420_v.y
(2)分离YUV444P像素数据中的Y、U、V分量
本程序中的函数可以将YUV444P数据中的Y、U、V三个分量分离开来并保存成三个文件。函数的代码如下所示。
- /**
- * Split Y, U, V planes in YUV444P file.
- * @param url Location of YUV file.
- * @param w Width of Input YUV file.
- * @param h Height of Input YUV file.
- * @param num Number of frames to process.
- *
- */
- int simplest_yuv444_split(char *url, int w, int h,int num){
- FILE *fp=fopen(url,"rb+");
- FILE *fp1=fopen("output_444_y.y","wb+");
- FILE *fp2=fopen("output_444_u.y","wb+");
- FILE *fp3=fopen("output_444_v.y","wb+");
- unsigned char *pic=(unsigned char *)malloc(w*h*3);
- for(int i=0;i<num;i++){
- fread(pic,1,w*h*3,fp);
- //Y
- fwrite(pic,1,w*h,fp1);
- //U
- fwrite(pic+w*h,1,w*h,fp2);
- //V
- fwrite(pic+w*h*2,1,w*h,fp3);
- }
- free(pic);
- fclose(fp);
- fclose(fp1);
- fclose(fp2);
- fclose(fp3);
- return 0;
- }
调用上面函数的方法如下所示。
- simplest_yuv444_split("lena_256x256_yuv444p.yuv",256,256,1);
从代码可以看出,如果视频帧的宽和高分别为w和h,那么一帧YUV444P像素数据一共占用w*h*3 Byte的数据。其中前w*h Byte存储Y,接着的w*h Byte存储U,最后w*h Byte存储V。上述调用函数的代码运行后,将会把一张分辨率为256x256的名称为lena_256x256_yuv444p.yuv的YUV444P格式的像素数据文件分离成为三个文件:
output_444_y.y:纯Y数据,分辨率为256x256。
output_444_u.y:纯U数据,分辨率为256x256。
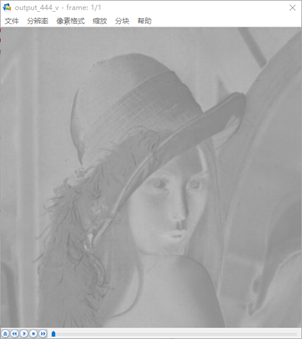
output_444_v.y:纯V数据,分辨率为256x256。
输入的原图如下所示。
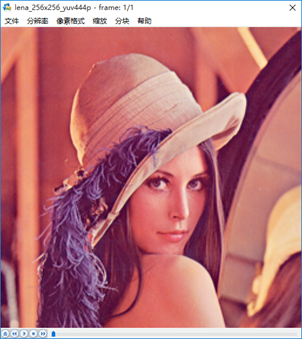
输出的三个文件的截图如下图所示。

output_444_y.y
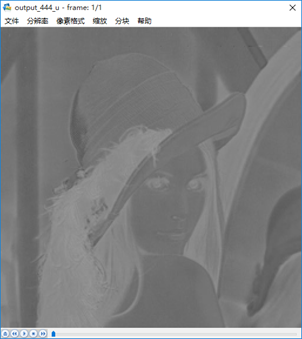
output_444_u.y
(3) 将YUV420P像素数据去掉颜色(变成灰度图)
本程序中的函数可以将YUV420P格式像素数据的彩色去掉,变成纯粹的灰度图。函数的代码如下。
- /**
- * Convert YUV420P file to gray picture
- * @param url Location of Input YUV file.
- * @param w Width of Input YUV file.
- * @param h Height of Input YUV file.
- * @param num Number of frames to process.
- */
- int simplest_yuv420_gray(char *url, int w, int h,int num){
- FILE *fp=fopen(url,"rb+");
- FILE *fp1=fopen("output_gray.yuv","wb+");
- unsigned char *pic=(unsigned char *)malloc(w*h*3/2);
- for(int i=0;i<num;i++){
- fread(pic,1,w*h*3/2,fp);
- //Gray
- memset(pic+w*h,128,w*h/2);
- fwrite(pic,1,w*h*3/2,fp1);
- }
- free(pic);
- fclose(fp);
- fclose(fp1);
- return 0;
- }
调用上面函数的方法如下所示。
- simplest_yuv420_gray("lena_256x256_yuv420p.yuv",256,256,1);
从代码可以看出,如果想把YUV格式像素数据变成灰度图像,只需要将U、V分量设置成128即可。这是因为U、V是图像中的经过偏置处理的色度分量。色度分量在偏置处理前的取值范围是-128至127,这时候的无色对应的是“0”值。经过偏置后色度分量取值变成了0至255,因而此时的无色对应的就是128了。上述调用函数的代码运行后,将会把一张分辨率为256x256的名称为lena_256x256_yuv420p.yuv的YUV420P格式的像素数据文件处理成名称为output_gray.yuv的YUV420P格式的像素数据文件。输入的原图如下所示。
处理后的图像如下所示。

(4)将YUV420P像素数据的亮度减半
本程序中的函数可以通过将YUV数据中的亮度分量Y的数值减半的方法,降低图像的亮度。函数代码如下所示。
- /**
- * Halve Y value of YUV420P file
- * @param url Location of Input YUV file.
- * @param w Width of Input YUV file.
- * @param h Height of Input YUV file.
- * @param num Number of frames to process.
- */
- int simplest_yuv420_halfy(char *url, int w, int h,int num){
- FILE *fp=fopen(url,"rb+");
- FILE *fp1=fopen("output_half.yuv","wb+");
- unsigned char *pic=(unsigned char *)malloc(w*h*3/2);
- for(int i=0;i<num;i++){
- fread(pic,1,w*h*3/2,fp);
- //Half
- for(int j=0;j<w*h;j++){
- unsigned char temp=pic[j]/2;
- //printf("%d,\n",temp);
- pic[j]=temp;
- }
- fwrite(pic,1,w*h*3/2,fp1);
- }
- free(pic);
- fclose(fp);
- fclose(fp1);
- return 0;
- }
调用上面函数的方法如下所示。
- simplest_yuv420_halfy("lena_256x256_yuv420p.yuv",256,256,1);
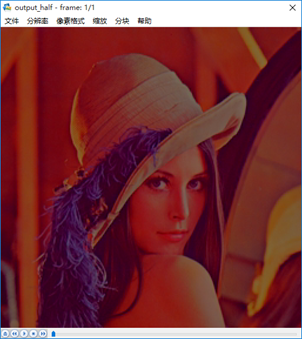
从代码可以看出,如果打算将图像的亮度减半,只要将图像的每个像素的Y值取出来分别进行除以2的工作就可以了。图像的每个Y值占用1 Byte,取值范围是0至255,对应C语言中的unsigned char数据类型。上述调用函数的代码运行后,将会把一张分辨率为256x256的名称为lena_256x256_yuv420p.yuv的YUV420P格式的像素数据文件处理成名称为output_half.yuv的YUV420P格式的像素数据文件。输入的原图如下所示。

处理后的图像如下所示。
(5)将YUV420P像素数据的周围加上边框
本程序中的函数可以通过修改YUV数据中特定位置的亮度分量Y的数值,给图像添加一个“边框”的效果。函数代码如下所示。
- /**
- * Add border for YUV420P file
- * @param url Location of Input YUV file.
- * @param w Width of Input YUV file.
- * @param h Height of Input YUV file.
- * @param border Width of Border.
- * @param num Number of frames to process.
- */
- int simplest_yuv420_border(char *url, int w, int h,int border,int num){
- FILE *fp=fopen(url,"rb+");
- FILE *fp1=fopen("output_border.yuv","wb+");
- unsigned char *pic=(unsigned char *)malloc(w*h*3/2);
- for(int i=0;i<num;i++){
- fread(pic,1,w*h*3/2,fp);
- //Y
- for(int j=0;j<h;j++){
- for(int k=0;k<w;k++){
- if(k<border||k>(w-border)||j<border||j>(h-border)){
- pic[j*w+k]=255;
- //pic[j*w+k]=0;
- }
- }
- }
- fwrite(pic,1,w*h*3/2,fp1);
- }
- free(pic);
- fclose(fp);
- fclose(fp1);
- return 0;
- }
调用上面函数的方法如下所示。
- simplest_yuv420_border("lena_256x256_yuv420p.yuv",256,256,20,1);
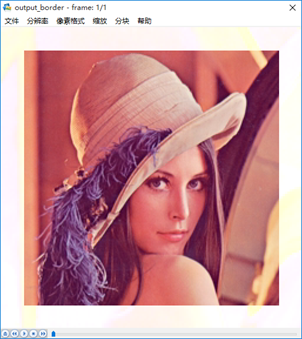
从代码可以看出,图像的边框的宽度为border,本程序将距离图像边缘border范围内的像素的亮度分量Y的取值设置成了亮度最大值255。上述调用函数的代码运行后,将会把一张分辨率为256x256的名称为lena_256x256_yuv420p.yuv的YUV420P格式的像素数据文件处理成名称为output_border.yuv的YUV420P格式的像素数据文件。输入的原图如下所示。

处理后的图像如下所示。
(6) 生成YUV420P格式的灰阶测试图
本程序中的函数可以生成一张YUV420P格式的灰阶测试图。函数代码如下所示。
- /**
- * Generate YUV420P gray scale bar.
- * @param width Width of Output YUV file.
- * @param height Height of Output YUV file.
- * @param ymin Max value of Y
- * @param ymax Min value of Y
- * @param barnum Number of bars
- * @param url_out Location of Output YUV file.
- */
- int simplest_yuv420_graybar(int width, int height,int ymin,int ymax,int barnum,char *url_out){
- int barwidth;
- float lum_inc;
- unsigned char lum_temp;
- int uv_width,uv_height;
- FILE *fp=NULL;
- unsigned char *data_y=NULL;
- unsigned char *data_u=NULL;
- unsigned char *data_v=NULL;
- int t=0,i=0,j=0;
- barwidth=width/barnum;
- lum_inc=((float)(ymax-ymin))/((float)(barnum-1));
- uv_width=width/2;
- uv_height=height/2;
- data_y=(unsigned char *)malloc(width*height);
- data_u=(unsigned char *)malloc(uv_width*uv_height);
- data_v=(unsigned char *)malloc(uv_width*uv_height);
- if((fp=fopen(url_out,"wb+"))==NULL){
- printf("Error: Cannot create file!");
- return -1;
- }
- //Output Info
- printf("Y, U, V value from picture's left to right:\n");
- for(t=0;t<(width/barwidth);t++){
- lum_temp=ymin+(char)(t*lum_inc);
- printf("%3d, 128, 128\n",lum_temp);
- }
- //Gen Data
- for(j=0;j<height;j++){
- for(i=0;i<width;i++){
- t=i/barwidth;
- lum_temp=ymin+(char)(t*lum_inc);
- data_y[j*width+i]=lum_temp;
- }
- }
- for(j=0;j<uv_height;j++){
- for(i=0;i<uv_width;i++){
- data_u[j*uv_width+i]=128;
- }
- }
- for(j=0;j<uv_height;j++){
- for(i=0;i<uv_width;i++){
- data_v[j*uv_width+i]=128;
- }
- }
- fwrite(data_y,width*height,1,fp);
- fwrite(data_u,uv_width*uv_height,1,fp);
- fwrite(data_v,uv_width*uv_height,1,fp);
- fclose(fp);
- free(data_y);
- free(data_u);
- free(data_v);
- return 0;
- }
调用上面函数的方法如下所示。
- simplest_yuv420_graybar(640, 360,0,255,10,"graybar_640x360.yuv");
从源代码可以看出,本程序一方面通过灰阶测试图的亮度最小值ymin,亮度最大值ymax,灰阶数量barnum确定每一个灰度条中像素的亮度分量Y的取值。另一方面还要根据图像的宽度width和图像的高度height以及灰阶数量barnum确定每一个灰度条的宽度。有了这两方面信息之后,就可以生成相应的图片了。上述调用函数的代码运行后,会生成一个取值范围从0-255,一共包含10个灰度条的YUV420P格式的测试图。测试图的内容如下所示。
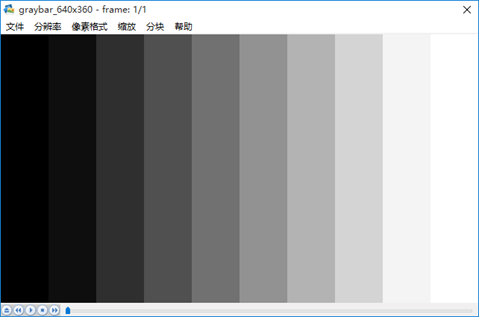
从程序也可以得到从左到右10个灰度条的Y、U、V取值,如下所示。
Y | U | V |
0 | 128 | 128 |
28 | 128 | 128 |
56 | 128 | 128 |
85 | 128 | 128 |
113 | 128 | 128 |
141 | 128 | 128 |
170 | 128 | 128 |
198 | 128 | 128 |
226 | 128 | 128 |
255 | 128 | 128 |
(7)计算两个YUV420P像素数据的PSNR
PSNR是最基本的视频质量评价方法。本程序中的函数可以对比两张YUV图片中亮度分量Y的PSNR。函数的代码如下所示。
- /**
- * Calculate PSNR between 2 YUV420P file
- * @param url1 Location of first Input YUV file.
- * @param url2 Location of another Input YUV file.
- * @param w Width of Input YUV file.
- * @param h Height of Input YUV file.
- * @param num Number of frames to process.
- */
- int simplest_yuv420_psnr(char *url1,char *url2,int w,int h,int num){
- FILE *fp1=fopen(url1,"rb+");
- FILE *fp2=fopen(url2,"rb+");
- unsigned char *pic1=(unsigned char *)malloc(w*h);
- unsigned char *pic2=(unsigned char *)malloc(w*h);
- for(int i=0;i<num;i++){
- fread(pic1,1,w*h,fp1);
- fread(pic2,1,w*h,fp2);
- double mse_sum=0,mse=0,psnr=0;
- for(int j=0;j<w*h;j++){
- mse_sum+=pow((double)(pic1[j]-pic2[j]),2);
- }
- mse=mse_sum/(w*h);
- psnr=10*log10(255.0*255.0/mse);
- printf("%5.3f\n",psnr);
- fseek(fp1,w*h/2,SEEK_CUR);
- fseek(fp2,w*h/2,SEEK_CUR);
- }
- free(pic1);
- free(pic2);
- fclose(fp1);
- fclose(fp2);
- return 0;
- }
调用上面函数的方法如下所示。
- simplest_yuv420_psnr("lena_256x256_yuv420p.yuv","lena_distort_256x256_yuv420p.yuv",256,256,1);
对于8bit量化的像素数据来说,PSNR的计算公式如下所示。

上述公式中mse的计算公式如下所示。
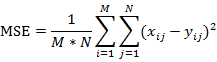
其中M,N分别为图像的宽高,xij和yij分别为两张图像的每一个像素值。PSNR通常用于质量评价,就是计算受损图像与原始图像之间的差别,以此来评价受损图像的质量。本程序输入的两张图像的对比图如下图所示。其中左边的图像为原始图像,右边的图像为受损图像。
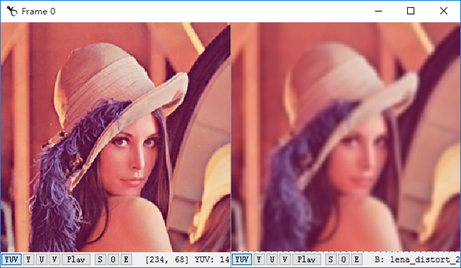
经过程序计算后得到的PSNR取值为26.693。PSNR取值通常情况下都在20-50的范围内,取值越高,代表两张图像越接近,反映出受损图像质量越好。
(8) 分离RGB24像素数据中的R、G、B分量
本程序中的函数可以将RGB24数据中的R、G、B三个分量分离开来并保存成三个文件。函数的代码如下所示。
- /**
- * Split R, G, B planes in RGB24 file.
- * @param url Location of Input RGB file.
- * @param w Width of Input RGB file.
- * @param h Height of Input RGB file.
- * @param num Number of frames to process.
- *
- */
- int simplest_rgb24_split(char *url, int w, int h,int num){
- FILE *fp=fopen(url,"rb+");
- FILE *fp1=fopen("output_r.y","wb+");
- FILE *fp2=fopen("output_g.y","wb+");
- FILE *fp3=fopen("output_b.y","wb+");
- unsigned char *pic=(unsigned char *)malloc(w*h*3);
- for(int i=0;i<num;i++){
- fread(pic,1,w*h*3,fp);
- for(int j=0;j<w*h*3;j=j+3){
- //R
- fwrite(pic+j,1,1,fp1);
- //G
- fwrite(pic+j+1,1,1,fp2);
- //B
- fwrite(pic+j+2,1,1,fp3);
- }
- }
- free(pic);
- fclose(fp);
- fclose(fp1);
- fclose(fp2);
- fclose(fp3);
- return 0;
- }
调用上面函数的方法如下所示。
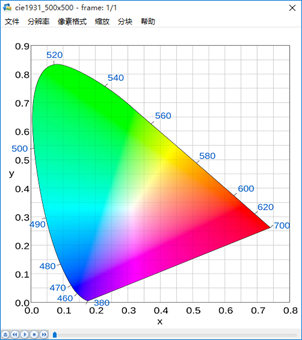
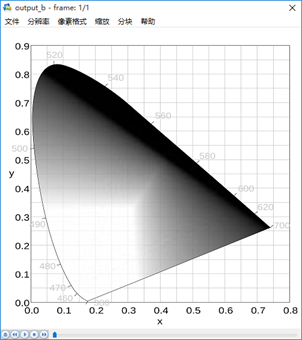
- simplest_rgb24_split("cie1931_500x500.rgb", 500, 500,1);
从代码可以看出,与YUV420P三个分量分开存储不同,RGB24格式的每个像素的三个分量是连续存储的。一帧宽高分别为w、h的RGB24图像一共占用w*h*3 Byte的存储空间。RGB24格式规定首先存储第一个像素的R、G、B,然后存储第二个像素的R、G、B…以此类推。类似于YUV420P的存储方式称为Planar方式,而类似于RGB24的存储方式称为Packed方式。上述调用函数的代码运行后,将会把一张分辨率为500x500的名称为cie1931_500x500.rgb的RGB24格式的像素数据文件分离成为三个文件:
output_r.y:R数据,分辨率为256x256。
output_g.y:G数据,分辨率为256x256。output_b.y:B数据,分辨率为256x256。
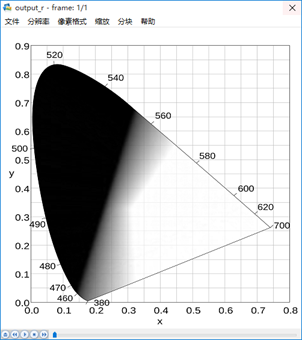
输入的原图是一张标准的CIE 1931色度图。该色度图右下为红色,上方为绿色,左下为蓝色,如下所示。
R数据图像如下所示。
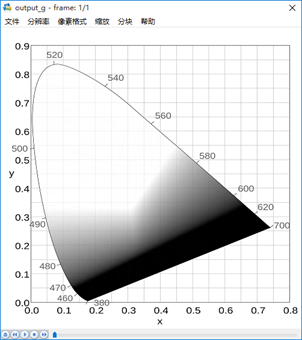
G数据图像如下所示。
B数据图像如下所示。
(9)将RGB24格式像素数据封装为BMP图像
BMP图像内部实际上存储的就是RGB数据。本程序实现了对RGB像素数据的封装处理。通过本程序中的函数,可以将RGB数据封装成为一张BMP图像。
- /**
- * Convert RGB24 file to BMP file
- * @param rgb24path Location of input RGB file.
- * @param width Width of input RGB file.
- * @param height Height of input RGB file.
- * @param url_out Location of Output BMP file.
- */
- int simplest_rgb24_to_bmp(const char *rgb24path,int width,int height,const char *bmppath){
- typedef struct
- {
- long imageSize;
- long blank;
- long startPosition;
- }BmpHead;
- typedef struct
- {
- long Length;
- long width;
- long height;
- unsigned short colorPlane;
- unsigned short bitColor;
- long zipFormat;
- long realSize;
- long xPels;
- long yPels;
- long colorUse;
- long colorImportant;
- }InfoHead;
- int i=0,j=0;
- BmpHead m_BMPHeader={0};
- InfoHead m_BMPInfoHeader={0};
- char bfType[2]={'B','M'};
- int header_size=sizeof(bfType)+sizeof(BmpHead)+sizeof(InfoHead);
- unsigned char *rgb24_buffer=NULL;
- FILE *fp_rgb24=NULL,*fp_bmp=NULL;
- if((fp_rgb24=fopen(rgb24path,"rb"))==NULL){
- printf("Error: Cannot open input RGB24 file.\n");
- return -1;
- }
- if((fp_bmp=fopen(bmppath,"wb"))==NULL){
- printf("Error: Cannot open output BMP file.\n");
- return -1;
- }
- rgb24_buffer=(unsigned char *)malloc(width*height*3);
- fread(rgb24_buffer,1,width*height*3,fp_rgb24);
- m_BMPHeader.imageSize=3*width*height+header_size;
- m_BMPHeader.startPosition=header_size;
- m_BMPInfoHeader.Length=sizeof(InfoHead);
- m_BMPInfoHeader.width=width;
- //BMP storage pixel data in opposite direction of Y-axis (from bottom to top).
- m_BMPInfoHeader.height=-height;
- m_BMPInfoHeader.colorPlane=1;
- m_BMPInfoHeader.bitColor=24;
- m_BMPInfoHeader.realSize=3*width*height;
- fwrite(bfType,1,sizeof(bfType),fp_bmp);
- fwrite(&m_BMPHeader,1,sizeof(m_BMPHeader),fp_bmp);
- fwrite(&m_BMPInfoHeader,1,sizeof(m_BMPInfoHeader),fp_bmp);
- //BMP save R1|G1|B1,R2|G2|B2 as B1|G1|R1,B2|G2|R2
- //It saves pixel data in Little Endian
- //So we change 'R' and 'B'
- for(j =0;j<height;j++){
- for(i=0;i<width;i++){
- char temp=rgb24_buffer[(j*width+i)*3+2];
- rgb24_buffer[(j*width+i)*3+2]=rgb24_buffer[(j*width+i)*3+0];
- rgb24_buffer[(j*width+i)*3+0]=temp;
- }
- }
- fwrite(rgb24_buffer,3*width*height,1,fp_bmp);
- fclose(fp_rgb24);
- fclose(fp_bmp);
- free(rgb24_buffer);
- printf("Finish generate %s!\n",bmppath);
- return 0;
- return 0;
- }
调用上面函数的方法如下所示。
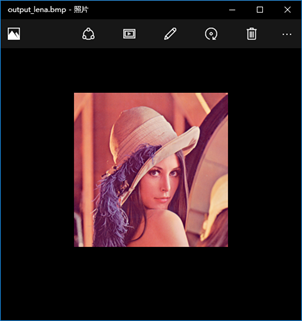
- simplest_rgb24_to_bmp("lena_256x256_rgb24.rgb",256,256,"output_lena.bmp");
通过代码可以看出,改程序完成了主要完成了两个工作:
1)将RGB数据前面加上文件头。
2)将RGB数据中每个像素的“B”和“R”的位置互换。
BMP文件是由BITMAPFILEHEADER、BITMAPINFOHEADER、RGB像素数据共3个部分构成,它的结构如下图所示。
BITMAPFILEHEADER |
BITMAPINFOHEADER |
RGB像素数据 |
其中前两部分的结构如下所示。在写入BMP文件头的时候给其中的每个字段赋上合适的值就可以了。
- typedef struct tagBITMAPFILEHEADER
- {
- unsigned short int bfType; //位图文件的类型,必须为BM
- unsigned long bfSize; //文件大小,以字节为单位
- unsigned short int bfReserverd1; //位图文件保留字,必须为0
- unsigned short int bfReserverd2; //位图文件保留字,必须为0
- unsigned long bfbfOffBits; //位图文件头到数据的偏移量,以字节为单位
- }BITMAPFILEHEADER;
- typedef struct tagBITMAPINFOHEADER
- {
- long biSize; //该结构大小,字节为单位
- long biWidth; //图形宽度以象素为单位
- long biHeight; //图形高度以象素为单位
- short int biPlanes; //目标设备的级别,必须为1
- short int biBitcount; //颜色深度,每个象素所需要的位数
- short int biCompression; //位图的压缩类型
- long biSizeImage; //位图的大小,以字节为单位
- long biXPelsPermeter; //位图水平分辨率,每米像素数
- long biYPelsPermeter; //位图垂直分辨率,每米像素数
- long biClrUsed; //位图实际使用的颜色表中的颜色数
- long biClrImportant; //位图显示过程中重要的颜色数
- }BITMAPINFOHEADER;
BMP采用的是小端(Little Endian)存储方式。这种存储方式中“RGB24”格式的像素的分量存储的先后顺序为B、G、R。由于RGB24格式存储的顺序是R、G、B,所以需要将“R”和“B”顺序作一个调换再进行存储。
下图为输入的RGB24格式的图像lena_256x256_rgb24.rgb。

下图分封装为BMP格式后的图像output_lena.bmp。封装后的图像使用普通的看图软件就可以查看。
(10)将RGB24格式像素数据转换为YUV420P格式像素数据
本程序中的函数可以将RGB24格式的像素数据转换为YUV420P格式的像素数据。函数的代码如下所示。
- unsigned char clip_value(unsigned char x,unsigned char min_val,unsigned char max_val){
- if(x>max_val){
- return max_val;
- }else if(x<min_val){
- return min_val;
- }else{
- return x;
- }
- }
- //RGB to YUV420
- bool RGB24_TO_YUV420(unsigned char *RgbBuf,int w,int h,unsigned char *yuvBuf)
- {
- unsigned char*ptrY, *ptrU, *ptrV, *ptrRGB;
- memset(yuvBuf,0,w*h*3/2);
- ptrY = yuvBuf;
- ptrU = yuvBuf + w*h;
- ptrV = ptrU + (w*h*1/4);
- unsigned char y, u, v, r, g, b;
- for (int j = 0; j<h;j++){
- ptrRGB = RgbBuf + w*j*3 ;
- for (int i = 0;i<w;i++){
- r = *(ptrRGB++);
- g = *(ptrRGB++);
- b = *(ptrRGB++);
- y = (unsigned char)( ( 66 * r + 129 * g + 25 * b + 128) >> 8) + 16 ;
- u = (unsigned char)( ( -38 * r - 74 * g + 112 * b + 128) >> 8) + 128 ;
- v = (unsigned char)( ( 112 * r - 94 * g - 18 * b + 128) >> 8) + 128 ;
- *(ptrY++) = clip_value(y,0,255);
- if (j%2==0&&i%2 ==0){
- *(ptrU++) =clip_value(u,0,255);
- }
- else{
- if (i%2==0){
- *(ptrV++) =clip_value(v,0,255);
- }
- }
- }
- }
- return true;
- }
- /**
- * Convert RGB24 file to YUV420P file
- * @param url_in Location of Input RGB file.
- * @param w Width of Input RGB file.
- * @param h Height of Input RGB file.
- * @param num Number of frames to process.
- * @param url_out Location of Output YUV file.
- */
- int simplest_rgb24_to_yuv420(char *url_in, int w, int h,int num,char *url_out){
- FILE *fp=fopen(url_in,"rb+");
- FILE *fp1=fopen(url_out,"wb+");
- unsigned char *pic_rgb24=(unsigned char *)malloc(w*h*3);
- unsigned char *pic_yuv420=(unsigned char *)malloc(w*h*3/2);
- for(int i=0;i<num;i++){
- fread(pic_rgb24,1,w*h*3,fp);
- RGB24_TO_YUV420(pic_rgb24,w,h,pic_yuv420);
- fwrite(pic_yuv420,1,w*h*3/2,fp1);
- }
- free(pic_rgb24);
- free(pic_yuv420);
- fclose(fp);
- fclose(fp1);
- return 0;
- }
调用上面函数的方法如下所示。
- simplest_rgb24_to_yuv420("lena_256x256_rgb24.rgb",256,256,1,"output_lena.yuv");
从源代码可以看出,本程序实现了RGB到YUV的转换公式:
Y= 0.299*R+0.587*G+0.114*B
V= 0.615*R-0.515*G-0.100*B
在转换的过程中有以下几点需要注意:
1) RGB24存储方式是Packed,YUV420P存储方式是Packed。
2) U,V在水平和垂直方向的取样数是Y的一半
转换前的RGB24格式像素数据lena_256x256_rgb24.rgb的内容如下所示。

转换后的YUV420P格式的像素数据output_lena.yuv的内容如下所示。

(11)生成RGB24格式的彩条测试图
本程序中的函数可以生成一张RGB24格式的彩条测试图。函数代码如下所示。
- /**
- * Generate RGB24 colorbar.
- * @param width Width of Output RGB file.
- * @param height Height of Output RGB file.
- * @param url_out Location of Output RGB file.
- */
- int simplest_rgb24_colorbar(int width, int height,char *url_out){
- unsigned char *data=NULL;
- int barwidth;
- char filename[100]={0};
- FILE *fp=NULL;
- int i=0,j=0;
- data=(unsigned char *)malloc(width*height*3);
- barwidth=width/8;
- if((fp=fopen(url_out,"wb+"))==NULL){
- printf("Error: Cannot create file!");
- return -1;
- }
- for(j=0;j<height;j++){
- for(i=0;i<width;i++){
- int barnum=i/barwidth;
- switch(barnum){
- case 0:{
- data[(j*width+i)*3+0]=255;
- data[(j*width+i)*3+1]=255;
- data[(j*width+i)*3+2]=255;
- break;
- }
- case 1:{
- data[(j*width+i)*3+0]=255;
- data[(j*width+i)*3+1]=255;
- data[(j*width+i)*3+2]=0;
- break;
- }
- case 2:{
- data[(j*width+i)*3+0]=0;
- data[(j*width+i)*3+1]=255;
- data[(j*width+i)*3+2]=255;
- break;
- }
- case 3:{
- data[(j*width+i)*3+0]=0;
- data[(j*width+i)*3+1]=255;
- data[(j*width+i)*3+2]=0;
- break;
- }
- case 4:{
- data[(j*width+i)*3+0]=255;
- data[(j*width+i)*3+1]=0;
- data[(j*width+i)*3+2]=255;
- break;
- }
- case 5:{
- data[(j*width+i)*3+0]=255;
- data[(j*width+i)*3+1]=0;
- data[(j*width+i)*3+2]=0;
- break;
- }
- case 6:{
- data[(j*width+i)*3+0]=0;
- data[(j*width+i)*3+1]=0;
- data[(j*width+i)*3+2]=255;
- break;
- }
- case 7:{
- data[(j*width+i)*3+0]=0;
- data[(j*width+i)*3+1]=0;
- data[(j*width+i)*3+2]=0;
- break;
- }
- }
- }
- }
- fwrite(data,width*height*3,1,fp);
- fclose(fp);
- free(data);
- return 0;
- }
调用上面函数的方法如下所示。
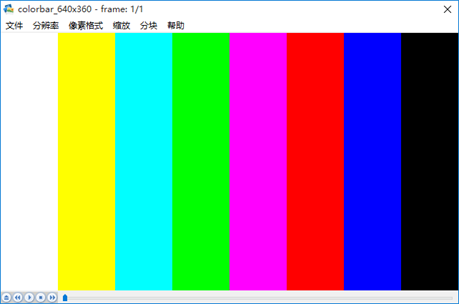
- simplest_rgb24_colorbar(640, 360,"colorbar_640x360.rgb");
从源代码可以看出,本程序循环输出“白黄青绿品红蓝黑”8种颜色的彩条。这8种颜色的彩条的R、G、B取值如下所示。
颜色 | (R, G, B) |
白 | (255, 255, 255) |
黄 | (255, 255, 0) |
青 | ( 0, 255, 255) |
绿 | ( 0, 255, 0) |
品 | (255, 0, 255) |
红 | (255, 0, 0) |
蓝 | ( 0, 0, 255) |
黑 | ( 0, 0, 0) |
生成的图像截图如下所示。
下载
Simplest mediadata test
项目主页
SourceForge:https://sourceforge.net/projects/simplest-mediadata-test/
Github:https://github.com/leixiaohua1020/simplest_mediadata_test
开源中国:http://git.oschina.net/leixiaohua1020/simplest_mediadata_test
CSDN下载地址:http://download.csdn.net/detail/leixiaohua1020/9422409
本项目包含如下几种视音频数据解析示例:
(1)像素数据处理程序。包含RGB和YUV像素格式处理的函数。
(2)音频采样数据处理程序。包含PCM音频采样格式处理的函数。
(3)H.264码流分析程序。可以分离并解析NALU。
(4)AAC码流分析程序。可以分离并解析ADTS帧。
(5)FLV封装格式分析程序。可以将FLV中的MP3音频码流分离出来。
(6)UDP-RTP协议分析程序。可以将分析UDP/RTP/MPEG-TS数据包。
雷霄骅 (Lei Xiaohua)
leixiaohua1020@126.com
http://blog.csdn.NET/leixiaohua1020