ORB特征(二)
-------------------------------------------------------------------------------------------------------------------------------
论文核心内容概述:
1.构造金字塔,在每层金字塔上采用Fast算法提取特征点,采用Harris角点响应函数,按角点响应值排序,选取前N个特征点。
2. oFast:计算每个特征点的主方向,灰度质心法,计算特征点半径为r的圆形邻域范围内的灰度质心位置。从中心位置到质心位置的向量,定义为该特 征点的主方向。
定义矩的计算公式,x,y∈[-r,r]:
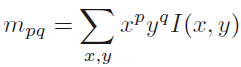
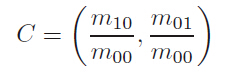
质心位置:
主方向:

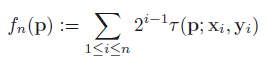
3.rBrief:为了解决旋转不变性,把特征点的Patch旋转到主方向上(steered Brief)。通过实验得到,描述子在各个维度上的均值比较离散(偏离0.5),同时维度间相关性很强,说明特征点描述子区分性不好,影响匹配的效果。论文中提出采取学习的方法,采用300K个训练样本点。每一个特征点,选取Patch大小为wp=31,Patch内每对点都采用wt=5大小的子窗口灰度均值做比较,子窗口的个数即为N=(wp-wt)*(wp-wt),从N个窗口中随机选两个做比较即构成描述子的一个bit,论文中采用M=205590种可能的情况:
---------------------------------------------------------------------------------
1.对所有样本点,做M种测试,构成M维的描述子,每个维度上非1即0;
2.按均值对M个维度排序(以0.5为中心),组成向量T;
3.贪婪搜索:把向量T中第一个元素移动到R中,然后继续取T的第二个元素,与R中的所有元素做相关性比较,如果相关性大于指定的阈值Threshold, 抛弃T的这个元素,否则加入到R中;
4.重复第3个步骤,直到R中有256个元素,若检测完毕,少于256个元素,则降低阈值,重复上述步骤;
----------------------------------------------------------------------------------
rBrief:通过上面的步骤取到的256对点,构成的描述子各维度间相关性很低,区分性好;
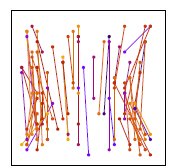
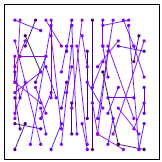
训练前 训练后
---------------------------------------------------------------------------------------------------------------------------------
ORB算法步骤,参考opencv源码:
1.首先构造尺度金字塔;
金字塔共n层,与SIFT不同,每层仅有一副图像;
第s层的尺度为
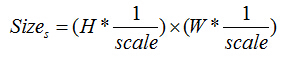
第s层图像大小:
2.在不同尺度上采用Fast检测特征点;在每一层上按公式计算需要提取的特征点数n,在本层上按Fast角点响应值排序,提取前2n个特征点,然后根据Harris 角点响应值排序, 取前n个特征点,作为本层的特征点;
3.计算每个特征点的主方向(质心法);
4.旋转每个特征点的Patch到主方向,采用上述步骤3的选取的最优的256对特征点做τ测试,构成256维描述子,占32个字节;

4.采用汉明距离做特征点匹配;
----------OpenCV源码解析-------------------------------------------------------
ORB类定义:位置..\features2d.hpp
nfeatures:需要的特征点总数;
scaleFactor:尺度因子;
nlevels:金字塔层数;
edgeThreshold:边界阈值;
firstLevel:起始层;
WTA_K:描述子形成方法,WTA_K=2表示,采用两两比较;
scoreType:角点响应函数,可以选择Harris或者Fast的方法;
patchSize:特征点邻域大小;
- /*!
- ORB implementation.
- */
- class CV_EXPORTS_W ORB : public Feature2D
- {
- public:
- // the size of the signature in bytes
- enum { kBytes = 32, HARRIS_SCORE=0, FAST_SCORE=1 };
- CV_WRAP explicit ORB(int nfeatures = 500, float scaleFactor = 1.2f, int nlevels = 8, int edgeThreshold = 31,//构造函数
- int firstLevel = 0, int WTA_K=2, int scoreType=ORB::HARRIS_SCORE, int patchSize=31 );
- // returns the descriptor size in bytes
- int descriptorSize() const; //描述子占用的字节数,默认32字节
- // returns the descriptor type
- int descriptorType() const;//描述子类型,8位整形数
- // Compute the ORB features and descriptors on an image
- void operator()(InputArray image, InputArray mask, vector<KeyPoint>& keypoints) const;
- // Compute the ORB features and descriptors on an image
- void operator()( InputArray image, InputArray mask, vector<KeyPoint>& keypoints, //提取特征点与形成描述子
- OutputArray descriptors, bool useProvidedKeypoints=false ) const;
- AlgorithmInfo* info() const;
- protected:
- void computeImpl( const Mat& image, vector<KeyPoint>& keypoints, Mat& descriptors ) const;//计算描述子
- void detectImpl( const Mat& image, vector<KeyPoint>& keypoints, const Mat& mask=Mat() ) const;//检测特征点
- CV_PROP_RW int nfeatures;//特征点总数
- CV_PROP_RW double scaleFactor;//尺度因子
- CV_PROP_RW int nlevels;//金字塔内层数
- CV_PROP_RW int edgeThreshold;//边界阈值
- CV_PROP_RW int firstLevel;//开始层数
- CV_PROP_RW int WTA_K;//描述子形成方法,默认WTA_K=2,两两比较
- CV_PROP_RW int scoreType;//角点响应函数
- CV_PROP_RW int patchSize;//邻域Patch大小
- };
特征提取及形成描述子:通过这个函数对图像提取Fast特征点或者计算特征描述子
_image:输入图像;
_mask:掩码图像;
_keypoints:输入角点;
_descriptors:如果为空,只寻找特征点,不计算特征描述子;
_useProvidedKeypoints:如果为true,函数只计算特征描述子;
- /** Compute the ORB features and descriptors on an image
- * @param img the image to compute the features and descriptors on
- * @param mask the mask to apply
- * @param keypoints the resulting keypoints
- * @param descriptors the resulting descriptors
- * @param do_keypoints if true, the keypoints are computed, otherwise used as an input
- * @param do_descriptors if true, also computes the descriptors
- */
- void ORB::operator()( InputArray _image, InputArray _mask, vector<KeyPoint>& _keypoints,
- OutputArray _descriptors, bool useProvidedKeypoints) const
- {
- CV_Assert(patchSize >= 2);
- bool do_keypoints = !useProvidedKeypoints;
- bool do_descriptors = _descriptors.needed();
- if( (!do_keypoints && !do_descriptors) || _image.empty() )
- return;
- //ROI handling
- const int HARRIS_BLOCK_SIZE = 9;//Harris角点响应需要的边界大小
- int halfPatchSize = patchSize / 2;.//邻域半径
- int border = std::max(edgeThreshold, std::max(halfPatchSize, HARRIS_BLOCK_SIZE/2))+1;//采用最大的边界
- Mat image = _image.getMat(), mask = _mask.getMat();
- if( image.type() != CV_8UC1 )
- cvtColor(_image, image, CV_BGR2GRAY);//转灰度图
- int levelsNum = this->nlevels;//金字塔层数
- if( !do_keypoints ) //不做特征点检测
- {
- // if we have pre-computed keypoints, they may use more levels than it is set in parameters
- // !!!TODO!!! implement more correct method, independent from the used keypoint detector.
- // Namely, the detector should provide correct size of each keypoint. Based on the keypoint size
- // and the algorithm used (i.e. BRIEF, running on 31x31 patches) we should compute the approximate
- // scale-factor that we need to apply. Then we should cluster all the computed scale-factors and
- // for each cluster compute the corresponding image.
- //
- // In short, ultimately the descriptor should
- // ignore octave parameter and deal only with the keypoint size.
- levelsNum = 0;
- for( size_t i = 0; i < _keypoints.size(); i++ )
- levelsNum = std::max(levelsNum, std::max(_keypoints[i].octave, 0));//提取特征点的最大层数
- levelsNum++;
- }
- // Pre-compute the scale pyramids
- vector<Mat> imagePyramid(levelsNum), maskPyramid(levelsNum);//创建尺度金字塔图像
- for (int level = 0; level < levelsNum; ++level)
- {
- float scale = 1/getScale(level, firstLevel, scaleFactor); //每层对应的尺度
- /*
- static inline float getScale(int level, int firstLevel, double scaleFactor)
- {
- return (float)std::pow(scaleFactor, (double)(level - firstLevel));
- }
- */
- Size sz(cvRound(image.cols*scale), cvRound(image.rows*scale));//每层对应的图像大小
- Size wholeSize(sz.width + border*2, sz.height + border*2);
- Mat temp(wholeSize, image.type()), masktemp;
- imagePyramid[level] = temp(Rect(border, border, sz.width, sz.height));
- if( !mask.empty() )
- {
- masktemp = Mat(wholeSize, mask.type());
- maskPyramid[level] = masktemp(Rect(border, border, sz.width, sz.height));
- }
- // Compute the resized image
- if( level != firstLevel ) //得到金字塔每层的图像
- {
- if( level < firstLevel )
- {
- resize(image, imagePyramid[level], sz, 0, 0, INTER_LINEAR);
- if (!mask.empty())
- resize(mask, maskPyramid[level], sz, 0, 0, INTER_LINEAR);
- }
- else
- {
- resize(imagePyramid[level-1], imagePyramid[level], sz, 0, 0, INTER_LINEAR);
- if (!mask.empty())
- {
- resize(maskPyramid[level-1], maskPyramid[level], sz, 0, 0, INTER_LINEAR);
- threshold(maskPyramid[level], maskPyramid[level], 254, 0, THRESH_TOZERO);
- }
- }
- copyMakeBorder(imagePyramid[level], temp, border, border, border, border,//扩大图像的边界
- BORDER_REFLECT_101+BORDER_ISOLATED);
- if (!mask.empty())
- copyMakeBorder(maskPyramid[level], masktemp, border, border, border, border,
- BORDER_CONSTANT+BORDER_ISOLATED);
- }
- else
- {
- copyMakeBorder(image, temp, border, border, border, border,//扩大图像的四个边界
- BORDER_REFLECT_101);
- if( !mask.empty() )
- copyMakeBorder(mask, masktemp, border, border, border, border,
- BORDER_CONSTANT+BORDER_ISOLATED);
- }
- }
- // Pre-compute the keypoints (we keep the best over all scales, so this has to be done beforehand
- vector < vector<KeyPoint> > allKeypoints;
- if( do_keypoints )//提取角点
- {
- // Get keypoints, those will be far enough from the border that no check will be required for the descriptor
- computeKeyPoints(imagePyramid, maskPyramid, allKeypoints, //对每一层图像提取角点,见下面(1)的分析
- nfeatures, firstLevel, scaleFactor,
- edgeThreshold, patchSize, scoreType);
- // make sure we have the right number of keypoints keypoints
- /*vector<KeyPoint> temp;
- for (int level = 0; level < n_levels; ++level)
- {
- vector<KeyPoint>& keypoints = all_keypoints[level];
- temp.insert(temp.end(), keypoints.begin(), keypoints.end());
- keypoints.clear();
- }
- KeyPoint::retainBest(temp, n_features_);
- for (vector<KeyPoint>::iterator keypoint = temp.begin(),
- keypoint_end = temp.end(); keypoint != keypoint_end; ++keypoint)
- all_keypoints[keypoint->octave].push_back(*keypoint);*/
- }
- else //不提取角点
- {
- // Remove keypoints very close to the border
- KeyPointsFilter::runByImageBorder(_keypoints, image.size(), edgeThreshold);
- // Cluster the input keypoints depending on the level they were computed at
- allKeypoints.resize(levelsNum);
- for (vector<KeyPoint>::iterator keypoint = _keypoints.begin(),
- keypointEnd = _keypoints.end(); keypoint != keypointEnd; ++keypoint)
- allKeypoints[keypoint->octave].push_back(*keypoint); //把角点信息存入allKeypoints内
- // Make sure we rescale the coordinates
- for (int level = 0; level < levelsNum; ++level) //把角点位置信息缩放到指定层位置上
- {
- if (level == firstLevel)
- continue;
- vector<KeyPoint> & keypoints = allKeypoints[level];
- float scale = 1/getScale(level, firstLevel, scaleFactor);
- for (vector<KeyPoint>::iterator keypoint = keypoints.begin(),
- keypointEnd = keypoints.end(); keypoint != keypointEnd; ++keypoint)
- keypoint->pt *= scale; //缩放
- }
- }
- Mat descriptors;
- vector<Point> pattern;
- if( do_descriptors ) //计算特征描述子
- {
- int nkeypoints = 0;
- for (int level = 0; level < levelsNum; ++level)
- nkeypoints += (int)allKeypoints[level].size();//得到所有层的角点总数
- if( nkeypoints == 0 )
- _descriptors.release();
- else
- {
- _descriptors.create(nkeypoints, descriptorSize(), CV_8U);//创建一个矩阵存放描述子,每一行表示一个角点信息
- descriptors = _descriptors.getMat();
- }
- const int npoints = 512;//取512个点,共256对,产生256维描述子,32个字节
- Point patternbuf[npoints];
- const Point* pattern0 = (const Point*)bit_pattern_31_;//训练好的256对数据点位置
- if( patchSize != 31 )
- {
- pattern0 = patternbuf;
- makeRandomPattern(patchSize, patternbuf, npoints);
- }
- CV_Assert( WTA_K == 2 || WTA_K == 3 || WTA_K == 4 );
- if( WTA_K == 2 ) //WTA_K=2使用两个点之间作比较
- std::copy(pattern0, pattern0 + npoints, std::back_inserter(pattern));
- else
- {
- int ntuples = descriptorSize()*4;
- initializeOrbPattern(pattern0, pattern, ntuples, WTA_K, npoints);
- }
- }
- _keypoints.clear();
- int offset = 0;
- for (int level = 0; level < levelsNum; ++level)//依次计算每一层的角点描述子
- {
- // Get the features and compute their orientation
- vector<KeyPoint>& keypoints = allKeypoints[level];
- int nkeypoints = (int)keypoints.size();//本层内角点个数
- // Compute the descriptors
- if (do_descriptors)
- {
- Mat desc;
- if (!descriptors.empty())
- {
- desc = descriptors.rowRange(offset, offset + nkeypoints);
- }
- offset += nkeypoints; //偏移量
- // preprocess the resized image
- Mat& workingMat = imagePyramid[level];
- //boxFilter(working_mat, working_mat, working_mat.depth(), Size(5,5), Point(-1,-1), true, BORDER_REFLECT_101);
- GaussianBlur(workingMat, workingMat, Size(7, 7), 2, 2, BORDER_REFLECT_101);//高斯平滑图像
- computeDescriptors(workingMat, keypoints, desc, pattern, descriptorSize(), WTA_K);//计算本层内角点的描述子,(3)
- }
- // Copy to the output data
- if (level != firstLevel) //角点位置信息返回到原图上
- {
- float scale = getScale(level, firstLevel, scaleFactor);
- for (vector<KeyPoint>::iterator keypoint = keypoints.begin(),
- keypointEnd = keypoints.end(); keypoint != keypointEnd; ++keypoint)
- keypoint->pt *= scale;
- }
- // And add the keypoints to the output
- _keypoints.insert(_keypoints.end(), keypoints.begin(), keypoints.end());//存入描述子信息,返回
- }
- }
(1)提取角点:computeKeyPoints
imagePyramid:即构造好的金字塔
- /** Compute the ORB keypoints on an image
- * @param image_pyramid the image pyramid to compute the features and descriptors on
- * @param mask_pyramid the masks to apply at every level
- * @param keypoints the resulting keypoints, clustered per level
- */
- static void computeKeyPoints(const vector<Mat>& imagePyramid,
- const vector<Mat>& maskPyramid,
- vector<vector<KeyPoint> >& allKeypoints,
- int nfeatures, int firstLevel, double scaleFactor,
- int edgeThreshold, int patchSize, int scoreType )
- {
- int nlevels = (int)imagePyramid.size(); //金字塔层数
- vector<int> nfeaturesPerLevel(nlevels);
- // fill the extractors and descriptors for the corresponding scales
- float factor = (float)(1.0 / scaleFactor);
- float ndesiredFeaturesPerScale = nfeatures*(1 - factor)/(1 - (float)pow((double)factor, (double)nlevels));//
- int sumFeatures = 0;
- for( int level = 0; level < nlevels-1; level++ ) //对每层图像上分配相应角点数
- {
- nfeaturesPerLevel[level] = cvRound(ndesiredFeaturesPerScale);
- sumFeatures += nfeaturesPerLevel[level];
- ndesiredFeaturesPerScale *= factor;
- }
- nfeaturesPerLevel[nlevels-1] = std::max(nfeatures - sumFeatures, 0);//剩下角点数,由最上层图像提取
- // Make sure we forget about what is too close to the boundary
- //edge_threshold_ = std::max(edge_threshold_, patch_size_/2 + kKernelWidth / 2 + 2);
- // pre-compute the end of a row in a circular patch
- int halfPatchSize = patchSize / 2; //计算每个特征点圆邻域的位置信息
- vector<int> umax(halfPatchSize + 2);
- int v, v0, vmax = cvFloor(halfPatchSize * sqrt(2.f) / 2 + 1);
- int vmin = cvCeil(halfPatchSize * sqrt(2.f) / 2);
- for (v = 0; v <= vmax; ++v) //
- umax[v] = cvRound(sqrt((double)halfPatchSize * halfPatchSize - v * v));
- // Make sure we are symmetric
- for (v = halfPatchSize, v0 = 0; v >= vmin; --v)
- {
- while (umax[v0] == umax[v0 + 1])
- ++v0;
- umax[v] = v0;
- ++v0;
- }
- allKeypoints.resize(nlevels);
- for (int level = 0; level < nlevels; ++level)
- {
- int featuresNum = nfeaturesPerLevel[level];
- allKeypoints[level].reserve(featuresNum*2);
- vector<KeyPoint> & keypoints = allKeypoints[level];
- // Detect FAST features, 20 is a good threshold
- FastFeatureDetector fd(20, true);
- fd.detect(imagePyramid[level], keypoints, maskPyramid[level]);//Fast角点检测
- // Remove keypoints very close to the border
- KeyPointsFilter::runByImageBorder(keypoints, imagePyramid[level].size(), edgeThreshold);//去除邻近边界的点
- if( scoreType == ORB::HARRIS_SCORE )
- {
- // Keep more points than necessary as FAST does not give amazing corners
- KeyPointsFilter::retainBest(keypoints, 2 * featuresNum);//按Fast强度排序,保留前2*featuresNum个特征点
- // Compute the Harris cornerness (better scoring than FAST)
- HarrisResponses(imagePyramid[level], keypoints, 7, HARRIS_K); //计算每个角点的Harris强度响应
- }
- //cull to the final desired level, using the new Harris scores or the original FAST scores.
- KeyPointsFilter::retainBest(keypoints, featuresNum);//按Harris强度排序,保留前featuresNum个
- float sf = getScale(level, firstLevel, scaleFactor);
- // Set the level of the coordinates
- for (vector<KeyPoint>::iterator keypoint = keypoints.begin(),
- keypointEnd = keypoints.end(); keypoint != keypointEnd; ++keypoint)
- {
- keypoint->octave = level; //层信息
- keypoint->size = patchSize*sf; //
- }
- computeOrientation(imagePyramid[level], keypoints, halfPatchSize, umax); //计算角点的方向,(2)分析
- }
- }
- static void computeOrientation(const Mat& image, vector<KeyPoint>& keypoints,
- int halfPatchSize, const vector<int>& umax)
- {
- // Process each keypoint
- for (vector<KeyPoint>::iterator keypoint = keypoints.begin(), //为每个角点计算主方向
- keypointEnd = keypoints.end(); keypoint != keypointEnd; ++keypoint)
- {
- keypoint->angle = IC_Angle(image, halfPatchSize, keypoint->pt, umax);//计算质心方向
- }
- }
- static float IC_Angle(const Mat& image, const int half_k, Point2f pt,
- const vector<int> & u_max)
- {
- int m_01 = 0, m_10 = 0;
- const uchar* center = &image.at<uchar> (cvRound(pt.y), cvRound(pt.x));
- // Treat the center line differently, v=0
- for (int u = -half_k; u <= half_k; ++u)
- m_10 += u * center[u];
- // Go line by line in the circular patch
- int step = (int)image.step1();
- for (int v = 1; v <= half_k; ++v) //每次处理对称的两行v
- {
- // Proceed over the two lines
- int v_sum = 0;
- int d = u_max[v];
- for (int u = -d; u <= d; ++u)
- {
- int val_plus = center[u + v*step], val_minus = center[u - v*step];
- v_sum += (val_plus - val_minus); //计算m_01时,位置上差一个符号
- m_10 += u * (val_plus + val_minus);
- }
- m_01 += v * v_sum;//计算上下两行的m_01
- }
- return fastAtan2((float)m_01, (float)m_10);//计算角度
- }
- static void computeDescriptors(const Mat& image, vector<KeyPoint>& keypoints, Mat& descriptors,
- const vector<Point>& pattern, int dsize, int WTA_K)
- {
- //convert to grayscale if more than one color
- CV_Assert(image.type() == CV_8UC1);
- //create the descriptor mat, keypoints.size() rows, BYTES cols
- descriptors = Mat::zeros((int)keypoints.size(), dsize, CV_8UC1);
- for (size_t i = 0; i < keypoints.size(); i++)
- computeOrbDescriptor(keypoints[i], image, &pattern[0], descriptors.ptr((int)i), dsize, WTA_K);
- }
- static void computeOrbDescriptor(const KeyPoint& kpt,
- const Mat& img, const Point* pattern,
- uchar* desc, int dsize, int WTA_K)
- {
- float angle = kpt.angle;
- //angle = cvFloor(angle/12)*12.f;
- angle *= (float)(CV_PI/180.f);
- float a = (float)cos(angle), b = (float)sin(angle);
- const uchar* center = &img.at<uchar>(cvRound(kpt.pt.y), cvRound(kpt.pt.x));
- int step = (int)img.step;
- #if 1
- #define GET_VALUE(idx) \ //取旋转后一个像素点的值
- center[cvRound(pattern[idx].x*b + pattern[idx].y*a)*step + \
- cvRound(pattern[idx].x*a - pattern[idx].y*b)]
- #else
- float x, y;
- int ix, iy;
- #define GET_VALUE(idx) \ //取旋转后一个像素点,插值法
- (x = pattern[idx].x*a - pattern[idx].y*b, \
- y = pattern[idx].x*b + pattern[idx].y*a, \
- ix = cvFloor(x), iy = cvFloor(y), \
- x -= ix, y -= iy, \
- cvRound(center[iy*step + ix]*(1-x)*(1-y) + center[(iy+1)*step + ix]*(1-x)*y + \
- center[iy*step + ix+1]*x*(1-y) + center[(iy+1)*step + ix+1]*x*y))
- #endif
- if( WTA_K == 2 )
- {
- for (int i = 0; i < dsize; ++i, pattern += 16)//每个特征描述子长度为32个字节
- {
- int t0, t1, val;
- t0 = GET_VALUE(0); t1 = GET_VALUE(1);
- val = t0 < t1;
- t0 = GET_VALUE(2); t1 = GET_VALUE(3);
- val |= (t0 < t1) << 1;
- t0 = GET_VALUE(4); t1 = GET_VALUE(5);
- val |= (t0 < t1) << 2;
- t0 = GET_VALUE(6); t1 = GET_VALUE(7);
- val |= (t0 < t1) << 3;
- t0 = GET_VALUE(8); t1 = GET_VALUE(9);
- val |= (t0 < t1) << 4;
- t0 = GET_VALUE(10); t1 = GET_VALUE(11);
- val |= (t0 < t1) << 5;
- t0 = GET_VALUE(12); t1 = GET_VALUE(13);
- val |= (t0 < t1) << 6;
- t0 = GET_VALUE(14); t1 = GET_VALUE(15);
- val |= (t0 < t1) << 7;
- desc[i] = (uchar)val;
- }
- }
- else if( WTA_K == 3 )
- {
- for (int i = 0; i < dsize; ++i, pattern += 12)
- {
- int t0, t1, t2, val;
- t0 = GET_VALUE(0); t1 = GET_VALUE(1); t2 = GET_VALUE(2);
- val = t2 > t1 ? (t2 > t0 ? 2 : 0) : (t1 > t0);
- t0 = GET_VALUE(3); t1 = GET_VALUE(4); t2 = GET_VALUE(5);
- val |= (t2 > t1 ? (t2 > t0 ? 2 : 0) : (t1 > t0)) << 2;
- t0 = GET_VALUE(6); t1 = GET_VALUE(7); t2 = GET_VALUE(8);
- val |= (t2 > t1 ? (t2 > t0 ? 2 : 0) : (t1 > t0)) << 4;
- t0 = GET_VALUE(9); t1 = GET_VALUE(10); t2 = GET_VALUE(11);
- val |= (t2 > t1 ? (t2 > t0 ? 2 : 0) : (t1 > t0)) << 6;
- desc[i] = (uchar)val;
- }
- }
- else if( WTA_K == 4 )
- {
- for (int i = 0; i < dsize; ++i, pattern += 16)
- {
- int t0, t1, t2, t3, u, v, k, val;
- t0 = GET_VALUE(0); t1 = GET_VALUE(1);
- t2 = GET_VALUE(2); t3 = GET_VALUE(3);
- u = 0, v = 2;
- if( t1 > t0 ) t0 = t1, u = 1;
- if( t3 > t2 ) t2 = t3, v = 3;
- k = t0 > t2 ? u : v;
- val = k;
- t0 = GET_VALUE(4); t1 = GET_VALUE(5);
- t2 = GET_VALUE(6); t3 = GET_VALUE(7);
- u = 0, v = 2;
- if( t1 > t0 ) t0 = t1, u = 1;
- if( t3 > t2 ) t2 = t3, v = 3;
- k = t0 > t2 ? u : v;
- val |= k << 2;
- t0 = GET_VALUE(8); t1 = GET_VALUE(9);
- t2 = GET_VALUE(10); t3 = GET_VALUE(11);
- u = 0, v = 2;
- if( t1 > t0 ) t0 = t1, u = 1;
- if( t3 > t2 ) t2 = t3, v = 3;
- k = t0 > t2 ? u : v;
- val |= k << 4;
- t0 = GET_VALUE(12); t1 = GET_VALUE(13);
- t2 = GET_VALUE(14); t3 = GET_VALUE(15);
- u = 0, v = 2;
- if( t1 > t0 ) t0 = t1, u = 1;
- if( t3 > t2 ) t2 = t3, v = 3;
- k = t0 > t2 ? u : v;
- val |= k << 6;
- desc[i] = (uchar)val;
- }
- }
- else
- CV_Error( CV_StsBadSize, "Wrong WTA_K. It can be only 2, 3 or 4." );
- #undef GET_VALUE
- }
- 具体参考opencv官网:opencv.org
相关文章:

【POJ】2377 Bad Cowtractors(最大生成树)
简单题,模板题 求解最大生成树,提交一直WA,感觉没有什么问题啊,就是在求解最小生成树的模板基础上稍加修改即可,后来发现在输出a,b,c给map二维数组的时候还必须有判断条件,略为有点…

使用let替换var实现块级作用域的小发现
在讲述javascript没有块级作用域的时候都会提到一个非常经典的例子: var obj{name:helo,age:15 }; var arr[];for(var i0;i<5;i){arr[i]i;console.log(i);} console.log(arr); console.log(i);因为javascript没有块级作用域,所以控制台打印出来的结果…
windows系统下node、npm的安装和卸载
Greta有话说:我是在有道云笔记只弄个记录的笔记,粘贴过来之后,没有图片,我的笔记地址为: 有道云笔记,请点我 一、卸载 1、node.js、nvm、 npm (1)在cmd中输入where node找到node…

OpenCV4Android开发实录(2): 使用OpenCV3.4.1库实现人脸检测
OpenCV4Android开发实录(2): 使用OpenCV3.3.0库实现人脸检测 转载请声明出处:http://write.blog.csdn.net/postedit/78992490OpenCV4Android系列: 1. OpenCV4Android开发实录(1):移植OpenCV3.3.0库到Android Studio 2.OpenCV4Andr…

活动|跟着微软一起,拥抱开源吧!
由开源社主办的中国开源年会2016 (COSCon16 - China Open Source Conference 2016) 即将于今年10月15日-16日在北京举办。微软大咖将为您呈现区块链,容器,大数据,Xamarin等时下热点技术,参会者还可获取价值1,500 元 Azure 服务使用…
【HDU/算法】最短路问题 杭电OJ 2544 (Dijkstra,Dijkstra+priority_queue,Floyd,Bellman_ford,SPFA)
最短路径问题是图论中很重要的问题。 解决最短路径几个经典的算法 1、Dijkstra算法 单源最短路径(贪心),还有用 priority_queue 进行优化的 Dijkstra 算法。 2、bellman-ford算法 例题:【ACM】POJ 3259 Wormholes 允许负权边…
javaSE基础知识 1.5整数类型
整数的四种声明类型它们分别是,byte,short,int,long,这四种类型所占用的空间是不同的byte是占用1个字节,它的取值范围是 -128~127,short是占用2个字节,他的取值范围是-32768~32767&a…
源码分析-GLSurfaceView的内部实现
GLSurfaceView类是继承自SurfaceView的,并且实现了SurfaceHolder.Callback2接口。GLSurfaceView内部管理着一个surface,专门负责OpenGL渲染。GLSurfaceView内部通过GLThread和EGLHelper为我们完成了EGL环境渲染和渲染线程的创建及管理,使我们…

【POJ/算法】 3259 Wormholes(Bellman-Ford算法, SPFA ,FLoyd算法)
Bellman-Ford算法 Bellman-Ford算法的优点是可以发现负圈,缺点是时间复杂度比Dijkstra算法高。而SPFA算法是使用队列优化的Bellman-Ford版本,其在时间复杂度和编程难度上都比其他算法有优势。 Bellman-Ford算法流程分为三个阶段: 第一步&am…

进程控制概念简介 多线程上篇(三)
进程控制 进程的基本数据信息是操作系统控制管理进程的数据集合,这些信息就是用来控制进程的,此处我们说的进程控制就是进程的管理。比如进程有状态,那么进程的创建、终止,状态的切换,这都不是进程自主进行的ÿ…

Android OpenGL使用GLSurfaceView预览视频
Android OpenGL使用GLSurfaceView预览视频第一章 相关知识介绍在介绍具体的功能之前,先对一些主要的类和方法进行一些介绍,这样可以更好的理解整个程序1.1 GLSurfaceView在谷歌的官方文档中是这样解释GLSurfaceView的:An implementation of S…

【Android 基础】Animation 动画介绍和实现
转载自:http://www.cnblogs.com/yc-755909659/p/4290114.html1.Animation 动画类型Android的animation由四种类型组成:XML中alph渐变透明度动画效果scale渐变尺寸伸缩动画效果translate画面转换位置移动动画效果rotate画面转移旋转动画效果JavaCode中Alp…
【Codeforces】1111B - Average Superhero Gang Power
http://codeforces.com/problemset/problem/1111/B n 表示要输入的数据的个数 k 最每一个数据最多可以进行多少次操作 m 一共可以进行多少次操作 一次操作:删除这个数,或者给这个数加1 如果n为1的话,那么只要找出m和k的最小值加到那个数…

刷前端面经笔记(七)
1.描述一下渐进增强和优雅降级 优雅降级(graceful degradation):一开始就构建站点的完整功能,然后针对浏览器测试和修复。渐进增强(progressive enhancement):一开始只构建站点的最少特性,然后不断针对各浏览器追加功能。 2.为什么…
AR资料与连接梳理
AR引擎相关技术 ------------------------------ ARcore:https://developers.google.cn/ar/discover/ ARkit:https://developer.apple.com/arkit/ 以上重点关注,比较新有一些新的功能大家可以自行体验。 ARToolkithttp://www.artoolkit.orght…

Queues 队列
1. Definiation What is a queue? A queue is a list. With a queue, inseration is done at one end (known as rear) whereas deletion is performed at the other end (known as front). 2. Operations 指针对列 无法自定义队长 // array queue #include<iostream> u…
【HDU】1005 Number Sequence (有点可爱)
http://acm.hdu.edu.cn/showproblem.php?pid1005 A number sequence is defined as follows: f(1) 1, f(2) 1, f(n) (A * f(n - 1) B * f(n - 2)) mod 7. Given A, B, and n, you are to calculate the value of f(n). 直接递归求解f(n)的话,会MLE 在计算…

CNCF案例研究:奇虎360
公司:奇虎360地点:中国北京行业:计算机软件 挑战 中国软件巨头奇虎360科技的搜索部门,so.com是中国第二大搜索引擎,市场份额超过35%。该公司一直在使用传统的手动操作来部署环境,随着项目数量的…
C#代码实现对Windows凭据的管理
今天有个任务,那就是使用C#代码实现对windows凭据管理的操作。例如:向windows凭据管理中添加凭据、删除凭据以及查询凭据等功能。于是乎,就开始在网上查找。经过漫长的查询路,终于在一片英文博客中找到了相关代码。经过实验&#…

Android:JNI 与 NDK到底是什么
前言 在Android开发中,使用 NDK开发的需求正逐渐增大但很多人却搞不懂 JNI 与 NDK 到底是怎么回事今天,我将先介绍JNI 与 NDK & 之间的区别,手把手进行 NDK的使用教学,希望你们会喜欢 目录 1. JNI介绍 1.1 简介 定义&…
【ACM】LightOJ - 1008 Fibsieve`s Fantabulous Birthday (找规律,找...)
https://vjudge.net/problem/LightOJ-1008 题目很好理解,第一行表示测试样例的个数,接下来输入一个大于等于1的数,按照格式输出这个数的坐标 蓝色的是 奇数的平方; 红色的是 偶数的平方; 黄色的是对角线:…

Computed property XXX was assigned to but it has no setter
报错视图: 原因: 组件中v-model“XXX”,而XXX是vuex state中的某个变量vuex中是单项流,v-model是vue中的双向绑定,但是在computed中只通过get获取参数值,没有set无法改变参数值解决方法: 1.在co…
OpenGL 矩阵变换
origin refer :http://www.songho.ca/opengl/gl_transform.html#modelviewOpenGL 矩阵变换Related Topics: OpenGL Pipeline, OpenGL Projection Matrix, OpenGL Matrix Class Download: matrixModelView.zip, matrixProjection.zipOverviewOpenGL Transform MatrixExample: GL…
2016.8.11 DataTable合并及排除重复方法
合并: DataTable prosxxx; DataTable pstaryyy; //将两张DataTable合成一张 foreach (DataRow dr in pstar.Rows) { pros.ImportRow(dr); } DataTable设置主键,并判断重复 DataTable allpros xxx; 单列设为主键: //设置第某列为主键 allpros.…
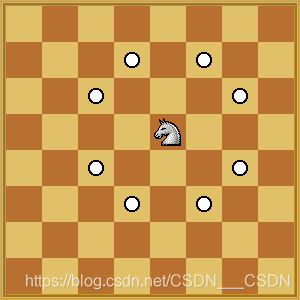
【ACM】LightOJ - 1010 Knights in Chessboard(不是搜索...)
https://vjudge.net/problem/LightOJ-1010 给定一个mn的棋盘,你想把棋子放在哪里。你必须找到棋盘上最多可以放置的骑士数量,这样就不会有两个骑士互相攻击。不熟悉棋手的注意,棋手可以在棋盘上攻击8个位置,如下图所示。 不论输入…
webpack-dev-server 和webapck --watch的区别
webpack-dev-server 和webapck --watch 都可以监测到代码变化 , 区别是:webpack-der-server 监测到代码变化后,浏览器可以看到及时更新的效果,但是并没有自动打包修改的代码; webpack --watch 在监测到代码变化后自动打…
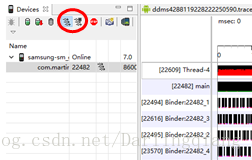
Android 应用进行性能分析/APP/系统性能分析
如何对 Android 应用进行性能分析记录一下自己在使用DDMS的过程:开启AS,打开并运行项目 找到TOOL/选择Android Device Monitor一款 App 流畅与否安装在自己的真机里,玩几天就能有个大概的感性认识。不过通过专业的分析工具可以使我们更好的分…

公钥与私钥,HTTPS详解
1.公钥与私钥原理1)鲍勃有两把钥匙,一把是公钥,另一把是私钥2)鲍勃把公钥送给他的朋友们----帕蒂、道格、苏珊----每人一把。3)苏珊要给鲍勃写一封保密的信。她写完后用鲍勃的公钥加密,就可以达到保密的效果。4)鲍勃收信后,用私钥…
【ACM】杭电OJ 4704 Sum (隔板原理+组合数求和公式+费马小定理+快速幂)
http://acm.hdu.edu.cn/showproblem.php?pid4704 1.隔板原理 1~N有N个元素,每个元素代表一个1.分成K个数,即在(N-1)个空挡里放置(K-1)块隔板 即求组合数C(N-1,0)C(N-1,1)...C(N-1,N-1) 2.组合数求和公式 C(n,0)C(…

Vue 中 CSS 动画原理
下面这段代码,是点击按钮实现hello world显示与隐藏 <div id"root"><div v-if"show">hello world</div><button click"handleClick">按钮</button> </div> let vm new Vue({el: #root,data: {s…