haproxy实现高可用及负载均衡
Haproxy简介:
Haproxy是一个使用c语言编写的自由开发源代码软件,它提供高可用性、负载均衡、以及基于http和tcp的应用程序代理。Haproxy特别使用于那些负载特别大的web站点。Haproxy运行在当前的硬件上,完全可以支持数以万计的并发连接,并且他的运行模式使得它可以很简单安全的整合进当前的架构中,同时也可以保护我们的web服务器不被暴露再网络上。
haproxy采用的八种算法
roundrobin 简单的轮询
static-rr 根据权重
leastconn 最少连接者先处理
source 根据请求源IP
uri 根据请求的URI
url_param 根据请求的URl参数
hdr(name) 根据HTTP请求头来锁定每一次HTTP请求
rdp-cookie(name) 根据cookie(name)来锁定并哈希每一次TCP请求
haproxy的安装配置及负载均衡
环境: rhel6.5
主机:foundations: 172.25.1.250 //用于客户端进行测试
test1: 172.25.1.11 //安装haproxy,用来实现负载均衡,但有瓶颈
test2: 172.25.1.12 //开启http服务 ,实现负载均衡的真实服务器
test3: 172.25.1.13 //开启http服务 ,实现负载均衡的真实服务器
test1端:
首先在test1中下载haproxy的源码包,解压
yum install rpm-build -y # 安装rpmbuild命令
rpmbuild -tb haproxy-1.6.13.tar.gz # 建立haproxy的二进制软件包, 有依赖性,需下载
yum install -y pcre-devel
rpmbuild -tb haproxy-1.6.13.tar.gz //再次执行
cd rpmbuild/RPMS/x86_64
rpm -ivh haproxy-1.6.13-1.x86_64.rpm # 安装haproxy软件包
rpm -ql haproxy # 查看软件相关文件的路径,生成haproxy的配置文件
cd /root/
tar zxf haproxy-1.6.13.tar.gz # 解压压缩包。
cd haproxy-1.6.13/examples
touch /etc/haproxy/haproxy.cfg # 若目录haproxy不存在,则须新建
cp content-sw-sample.cfg /etc/haproxy/haproxy.cfg
useradd haproxy //创建haproxy用户,并修改配置文件
id haproxy
![]()
vim /etc/haproxy/haproxy.cfg
# This is a sample configuration. It illustrates how to separate static objects
# traffic from dynamic traffic, and how to dynamically regulate the server load.
# It listens on 192.168.1.10:80, and directs all requests for Host 'img' or
# URIs starting with /img or /css to a dedicated group of servers. URIs
# starting with /admin/stats deliver the stats page.global
maxconn 10000 //最大连接数stats socket /var/run/haproxy.stat mode 600 level admin
log 127.0.0.1 local0 //日志设备uid 500 //用户的gid和uid
gid 500
chroot /var/empty //安全设置,根目录切换,锁在/var/empty下
daemon //设置为后台进程# The public 'www' address in the DMZ
frontend public
bind 172.25.1.11:1080 name clear
bind *:1080 //端口随意设置,但不可与其他服务冲突,默认1080
#bind 192.168.1.10:443 ssl crt /etc/haproxy/haproxy.pem
mode http //haproxy工作模式,四层工作模式为TCP,七层为HTTP
log global
option httplog //启用http日志
option dontlognull
monitor-uri /monitoruri
maxconn 8000 //每个进程的最大连接数,会覆盖global中的maxconn
timeout client 30s //客户端超时时长stats uri /admin/stats //监控页面的URL设置
# use_backend static if { hdr_beg(host) -i img }
# use_backend static if { path_beg /img /css }
default_backend static# The static backend backend for 'Host: img', /img and /css.
backend static
mode http
balance roundrobin //实现轮询
option prefer-last-server
retries 2 //服务器连接失败后的重试次数
option redispatch
timeout connect 5s //连接最大超时时间
timeout server 5s //服务器最大超时时间
server statsrv1 172.25.1.12:80 check inter 1000
server statsrv2 172.25.1.13:80 check inter 1000
修改内核最大文件数
vim /etc/security/limits.conf
haproxy - nofile 10000 //写在最后一行
启动服务,测试haproxy是否安装成功
/etc/init.d/haproxy start
netstat -antlp| grep 1080 # 查看1080端口是否开启

test2端和test3端:
yum install -y httpd //下载http服务
/etc/init.d/httpd start //开启服务
vim /var/www/html/index.html //写发布页面
test2 //为了方便观察哪个主机出现故障及是否轮询,故 如果是主机test3,发布页面就写test3
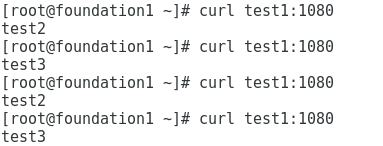
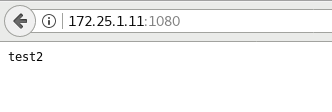
此时,在真机中进行负载均衡测试,轮询的方式
[root@foundation1 ~]# curl test1:1080
网页验证:
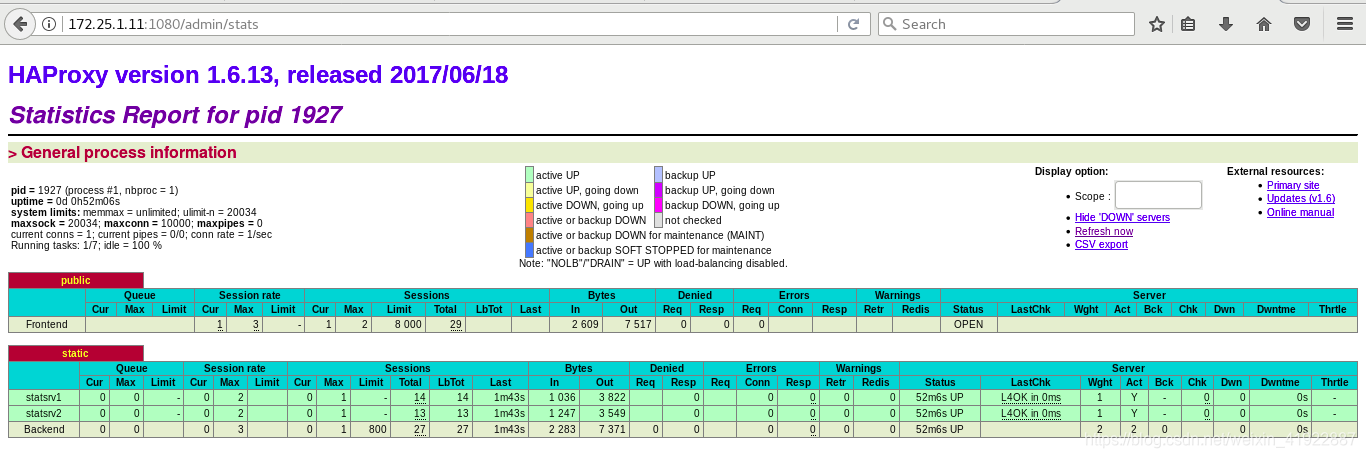
http://172.25.1.11:1080/admin/stats //对后端服务器管理和页面数据的监控
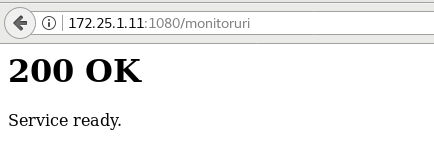
http://172.25.1.11:1080/monitoruri //网站健康检测URL,检测haproxy管理的网站是否可用,若正常则返回200 OK
基于tcp和http的应用程序代理
动态页面和静态页面的分离
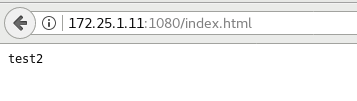
在test2中的httpd默认发布目录中编写文件index.html(test2);在test3中http默认发布目录编写文件index.php
test2: 页面不用变,即:
[root@test2 ~]# cat /var/www/html/index.html
![]()
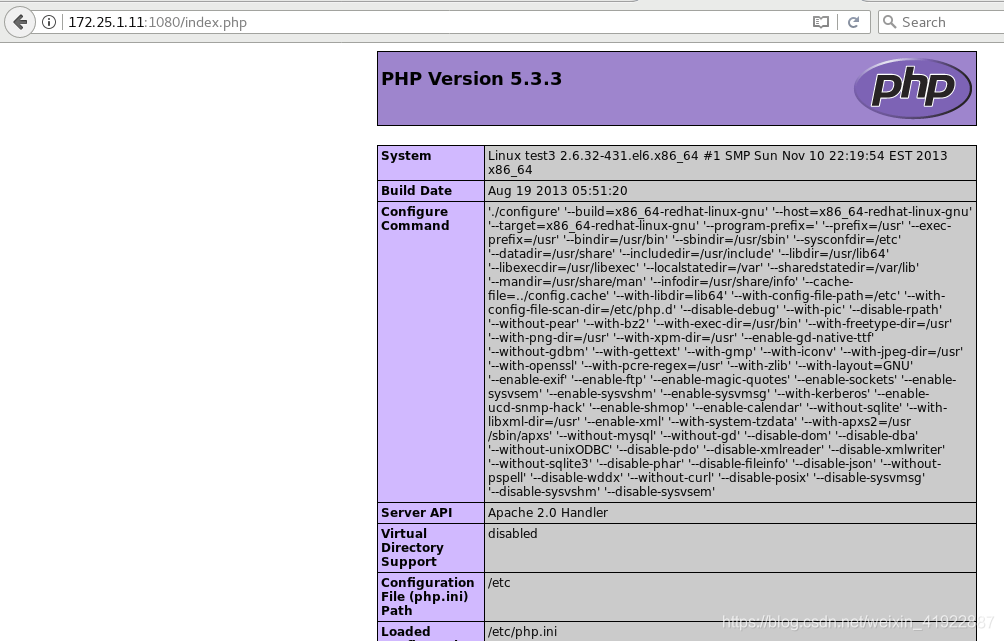
test3:
yum install -y php php-mysql # 在test3中安装php动态页面
vim /var/www/html/index.php

/etc/init.d/httpd restart
test1:
vim /etc/haproxy/haproxy.cfg //在haproxy的配置文件中修改访问动态页面和静态页面
# This is a sample configuration. It illustrates how to separate static objects
# traffic from dynamic traffic, and how to dynamically regulate the server load.
#
# It listens on 192.168.1.10:80, and directs all requests for Host 'img' or
# URIs starting with /img or /css to a dedicated group of servers. URIs
# starting with /admin/stats deliver the stats page.
#global
maxconn 10000
stats socket /var/run/haproxy.stat mode 600 level admin
log 127.0.0.1 local0
uid 500
gid 500
chroot /var/empty
daemon
defaultsmode http
log global
option httplog
option dontlognull
monitor-uri /monitoruri
maxconn 8000
timeout client 30s
stats uri /admin/stats
option prefer-last-server
retries 2
option redispatch
timeout connect 5s
timeout server 5s
# The public 'www' address in the DMZ
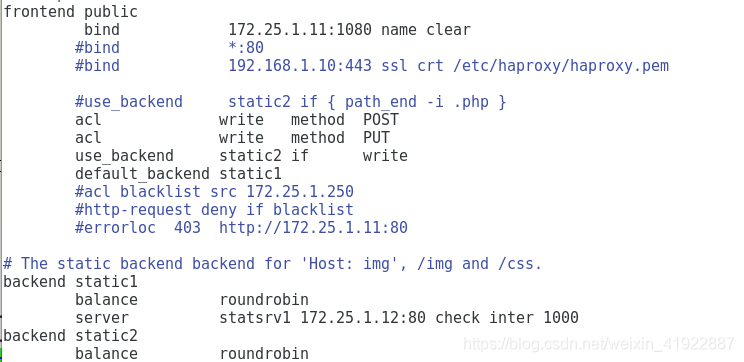
frontend public
bind 172.25.1.11:1080 name clear
#bind *:80
#bind 192.168.1.10:443 ssl crt /etc/haproxy/haproxy.pem #use_backend static if { hdr_beg(host) -i img }
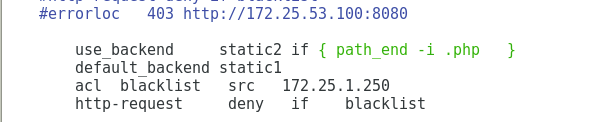
#use_backend static if { path_beg /img /css }use_backend static2 if { path_end -i .php } //如果以.php结尾,则显示static2,即172.25.1.13:80的内容
default_backend static1 //默认显示static1的内容,即172.25.1.12:80的内容#acl blacklist src 172.25.1.250
#http-request deny if blacklist
#errorloc 403 http://172.25.1.11:8080# The static backend backend for 'Host: img', /img and /css.
backend static1
balance roundrobin
server statsrv1 172.25.1.12:80 check inter 1000
backend static2
balance roundrobin
server statsrv2 172.25.1.13:80 check inter 1000
[root@test1 ~]# /etc/init.d/haproxy restart

[root@test1 ~]# netstat -antlp |grep haproxy

在浏览器中进行测试:
默认静态访问test2的index.html页面
动态访问test3的index.php界面
修改haproxy的日志文件
test1: 修改日志服务配置文件从而修改日志存储位置
vim /etc/rsyslog.conf
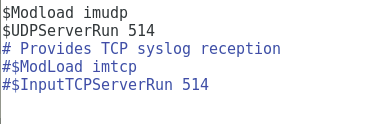


/etc/init.d/rsyslog restart //重启日志服务
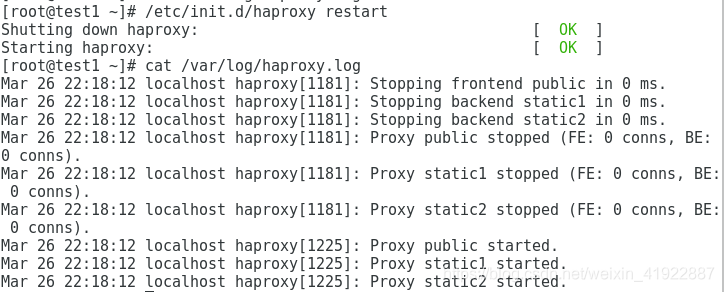
> /var/log/haproxy.log //将日志清空
/etc/init.d/haproxy restart //重启haproxy服务,
cat /var/log/haproxy.log # 查看是否生成日志
访问控制
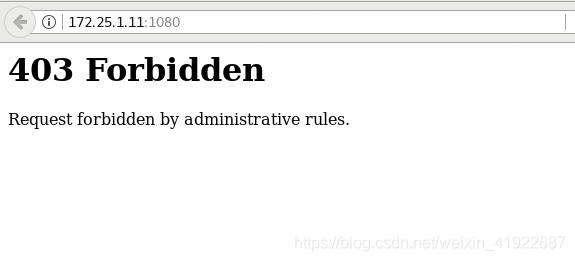
test1: 修改配置文件,添加访问控制的主机
vim /etc/haproxy/haproxy.conf //设置访问黑名单,在blacklist中的主机均不可访问,可写ip或网段
//这里设置不允许主机foundation1访问
/etc/init.d/haproxy restart
在浏览器测试:
http://172.25.1.11:1080/
重定向(当主机foundation1进行访问时,自动重定向到test1中)
vim /etc/haproxy/haproxy.conf # 打开httpd服务
acl blacklist src 172.25.1.250 //黑名单
http-request deny if blacklist //若是黑名单则服务拒绝
errorloc 403 http://172.25.1.11:80
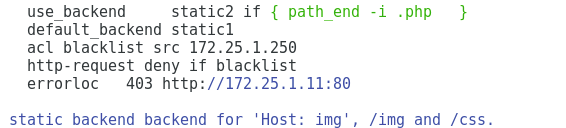
//如访问到403则直接重定向到172.25.1.11 的http服务,即test1的本机http服务,端口为http的端口,这里http端口是80
/etc/init.d/haproxy restart
vim /var/www/html/index.html //内容如下
<h1>服务正在维修,请等待......</h1>
/etc/init.d/httpd start
netstat -antlp | grep httpd
![]()
测试结果:
172.25.1.11:1080
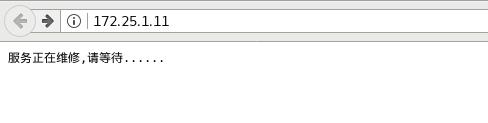
//已经重定位到了test1的http页面
读写分离
在test1中编辑配置文件
vim /etc/haproxy.haproxy.conf //当进行上传操作时,转到test3
acl write method POST //写的方式有 POST和PUT
acl write method PUT
use_backend static2 if write //当写的时候用static2
default_backend static1 //默认使用static1
/etc/init.d/haproxy restart

在test2和test3中安装php,把上传脚本放在http默认发布目录
yum install -y php
test3:
cd /root //注意:这里需要自己下载上传脚本,提前将上传脚本放到/root下
mv update /var/www/html
cd /var/www/html/
chmod 777 update
cd update
ls
mv * ..
此时,在浏览器进行访问:
在网页进行上传照片,然后在test3中的update目录下查看是否已经上传到update目录,已上传则表示测试成功。
corosync+pacemaker心跳组件实现haproxy的高可用
pacemaker是一个集群管理资源器。利用集群基础构件(corosync或heartbeat)提供消息和成员管理能力来探测并从节点或资源级别的故障恢复,以实现集群服务的最大可能性
为了实现test1与test4的集群管理,test4上与test1作相同的配置。当一个节点故障时,另一个节点会替代进行工作。
故在test4中安装haproxy服务。操作步骤与test1相同:
结果为:

在test1和test4中,开启corosync服务,执行下列操作:
yum install pacemaker corosync -y
cp /etc/corosync/corosync.conf.example /etc/corosync/corosync.conf
///安装crm管理工具,下面这两个软件须自行下载
yum install -y crmsh-1.2.6-0.rc2.2.1.x86_64.rpm pssh-2.3.1-4.1.x86_64.rpm
下载时需要依赖包,python-pssh,须自行下载
Requires: python-pssh = 2.3.1-4.1 //报错


yum install -y crmsh-1.2.6-0.rc2.2.1.x86_64.rpm pssh-2.3.1-4.1.x86_64.rpm python-pssh-2.3.1-4.1.x86_64.rpm
vim /etc/corosync/corosync.conf
compatibility: whitetank
totem {
version: 2
secauth: off
threads: 0
interface {
ringnumber: 0
bindnetaddr: 172.25.1.0
mcastaddr: 226.94.1.1
mcastport: 5405
ttl: 1
}
}
logging {
fileline: off
to_stderr: no
to_logfile: yes
to_syslog: yes
logfile: /var/log/cluster/corosync.log
debug: off
timestamp: on
logger_subsys {
subsys: AMF
debug: off
}
}
amf {
mode: disabled
}
service{
name:pacemaker
ver:0
}
aisexce {
user: root
group: root
}
quorum {
provider: corosync_votequorum
expected_votes: 2
two_node: 1
}
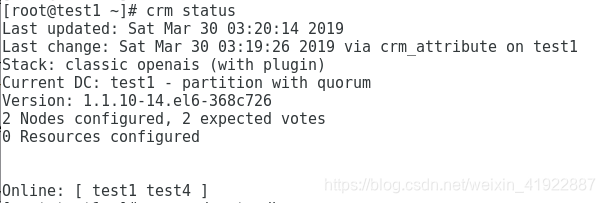
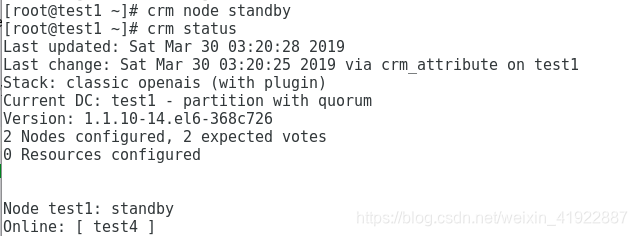
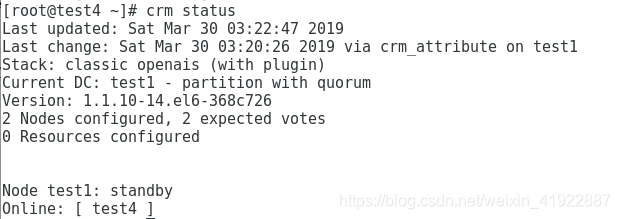
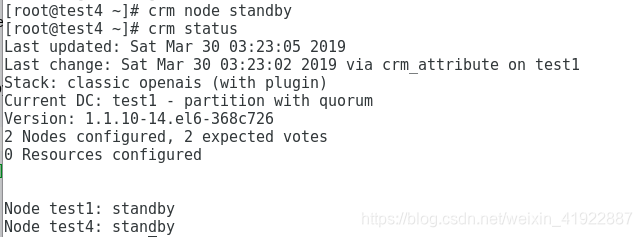
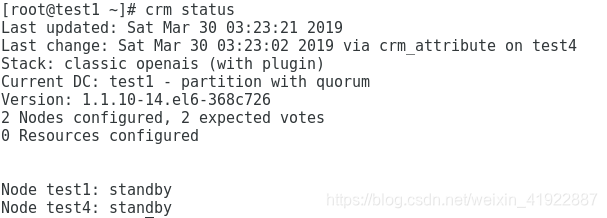
进行测试:
[root@test1 ~]# crm status

[root@test1 ~]# crm node standby
相关文章:

Apache转发到Tomcat
#vi /etc/httpd/conf/httpd.conf 添加下面配置 NameVirtualHost *:80 <VirtualHost *:80>ProxyPreserveHost OnServerName www.域名.comProxyPass / http://www.域名.com:8080/system/ErrorLog logs/error_logCustomLog logs/access_log common</VirtualHost> 作者…

.net基础问题
string sqlstr "select BranchCode,BranchName from t_sys_Branch where Jglx_DataDm{0} and IsVisible1"; sqlstr string.Format(sqlstr, departType); 上述代码运行之后 sqlstr"select BranchCode,BranchName from t_sys_Branch where Jglx_DataDmdepartTyp…

【iOS】NSDate分类,获得中国农历
1.说明: 参考网上代码写的一个分类,只需一句代码就可得到NSDate对象所对应的中国农历、星期。 2.使用方法: (1)导入分类头文件: #import "NSDateChineseDate.h"(2)NSDat…
LVS_NAT实现负载均衡
简介: 基于NAT机制实现。当用户请求到达director之后,director将请求报文的目标地址(即VIP)改成选定的realserver地址,同时将报文的目标端口也改成选定的realserver的相应端口,最后将报文请求发送到指定的realserver;…

自定义Push和Pop过渡动画
一、效果和源码 本文介绍如何实现一个NavigationController的自定义Push和Pop过渡动画,运行效果如下: 源码:https://github.com/dolacmeng/TransitionDemo 或http://download.csdn.net/detail/dolacmeng/9572384二、准备工作 首先࿰…
centos 安装 mysql 5.7
一,wget http://dev.mysql.com/get/mysql57-community-release-el6-8.noarch.rpm 二,yum localinstall mysql57-community-release-el6-8.noarch.rpm 三,yum install mysql-server 四,mysqld --initialize --usermysql 五…
c语言:婚礼上的谎言
/* 三对新人参加婚礼,三位新郎A,B,C,三位新娘X,Y,Z。 有人想知道谁与谁结婚,于是就问他们: A说他将和X结婚; X说他的未婚夫是C; C说他将和Z结婚。 这人时候知道他们都在说谎。编程求谁与谁结婚! */ /* 思路…

redis主从复制、高可用和集群
redis简介: redis是一个key-value存储系统.和Memcached类似,它支持存储的value类型相对更多,包括string(字符串)、list(链表)、set(集合)、zset(sorted set --有序集合)和hashs(哈希类型);这些数据类型都支持push/pop、…
对学习编译原理的看法
我认为编译原理这本书是一门与代码做斗争的课程,学习编译原理能够追寻程序设计语言的本质,了解计算机各种语言编译的原理。学习了编译原理能够更加深入的了解计算机各种高级语言使用的原理,能使自己更加容易更加好的学习好程序语言࿰…

iOS提示气泡,带动画
1.效果如图: 从项目中抠出来的,做了简单的封装。 2.用法: //顶部提示HYNoticeView *noticeTop [[HYNoticeView alloc] initWithFrame:CGRectMake(50, 66, 250, 40) text:"这里可以查询全城婚礼人的档期哦!" position:…
GIt/Github常用命令
1)git init:初始化本地仓库 2)创建文件:touch read.txt 3)当操作本地的文件时,使用常用的命令,如(mv,ls。。)就可以操作,当操作暂存区的文件时需要在命令前家…

python练习题(python之“求一个数的阶乘并求结果中从后向前数第一个不为0(零)的数” 等)
实验环境:python2.7 题目1:python之“求一个数的阶乘并求结果中从后向前数第一个不为0(零)的数”程序: import math def factorial(n): #定义一个函数,返回一个数的阶乘 if n0: return 1 else: sumn*factorial(n-…

【动画1】UIView动画
讲一下动画。将分为以下5篇博客。 一)UIView动画 二)Layer动画 三)3D动画 四)转场动画 五)第三方动画框架 相关代码:https://github.com/dolacmeng/AnimationDemo 参考资料:iOS Animation…
【python】解压文件
参考:http://essen.iteye.com/blog/1941489 tarfile模块 具体使用方法: https://docs.python.org/2/library/tarfile.html 例子:一次性解压所有文件 import tarfilet tarfile.open("abc.tgz", "r:gz")t.extractall(path…
JS设计模式——3.封装与信息隐藏
封装、信息隐藏与接口的关系 信息隐藏是目的,封装是手段。 接口提供了一份记载着可供公共访问的方法的契约。它定义了两个对象间可以具有的关系。只要接口不变,这个关系的双方都是可以替换的。 一个理想的软件系统应该为所有类定义接口。 创建对象的基本…

nginx源码编译、负载均衡及模块的扩展
1、nginx源码编译 实验环境: iptables和selinux关闭 redhat6.5 nginx:test1: 172.25.1.11 [roottest1 ~]# ls nginx-1.14.0.tar.gz [roottest1 ~]# tar zxf nginx-1.14.0.tar.gz [roottest1 ~]# useradd -s /sbin/nologin nginx [roottest1 ~]# i…
LinkedHashMap and LinkedHashSet
LinkedHashMap实现了Map接口,是HashMap的直接子类,它同时满足HashMap和linked list的某些特性。可将LinkedHashMap看作采用linked list增强的HashMap。 LinkedHashMap在HashMap的基础上,采用双向链表(doubly-linked listÿ…

Windows Phone开发(19):三维透视效果
Windows Phone开发(19):三维透视效果 原文:Windows Phone开发(19):三维透视效果 三维效果也可以叫透视效果,所以,我干脆叫三维透视效果。理论知识少讲,直接用例开场吧&am…

【动画2】CALayer动画
一)UIView动画 二)CoreAnimation动画 前言:上一篇已经介绍了UIKit给我们封装好的UIView动画的使用,UIKit动画是建立在CoreAnimation动画之上的,CoreAnimation是直接作用于CALayer上而非UIView。一、CoreAnimation动画…

nginx+tomcat+memcache实现负载均衡、session共享
实验架构图: Table of Contents 1、配置tomcat 2、安装memcache 3、查看tomcat和memcache是否配置好 4、nginx实现负载均衡: 5、客户端进行测试: 6、验证结论: 7、总结: 实验环境: linux redhat6.…
(转)二叉树系列面试问题
转自 :http://blog.csdn.net/luckyxiaoqiang/article/details/7518888/ 版权所有,转载请注明出处,谢谢!http://blog.csdn.net/walkinginthewind/article/details/7518888 树是一种比较重要的数据结构,尤其是二叉树。二…

百度UEditor开发案例(JSP)
本案例的开发环境:MyEclipsetomcatjdk 本案例的开发内容:用百度编辑器发布新闻(UEditor的初始化开发部署)编辑已发过的新闻(UEditor的应用——编辑旧文章)上传附件、图片等 由于百度编辑器强大的功能&a…

iOS中的动力学:Dynamics【1】
iOS7建议我们创建的界面具有物理特性,而不只是像素的集合,可以响应触摸、手势、屏幕方向改变等事件,让用户与界面之间有更深入的交互,而不是像iOS6那样在软件界面上模仿现实世界的纹理而已。或许你会认为创建感觉上真实的界面比创…

自动化运维工具Saltstack(一)
1、saltstack简介: 什么是saltstack? saltstack是基于python开发的一套C/S架构配置管理工具 使用SSL证书签方的方式进行认证管理 号称世界上最快的消息队列ZeroMQ使得SaltStack能快速在成千上万台机器上进行各种操作 采用RSA Key方式确认身份 传输采用AE…

【UIDynamic例子】挂起的方块
通过前面的动力学小Demo(本文默认你已经看过这篇Blog:传送门),我们对UIKit中的UIDynamic已经有了初步的认识。现在我们写个更加有趣的Demo:模拟一个用弹性绳子挂起的小方块,用户可以将它拖动到屏幕任意位置…
IIS7 配置PHP服务器
安装PHP Manager: 1)访问 http://phpmanager.codeplex.com/releases/view/69115 下载PHP Manager。其中,x86 为32位 Windows 系统使用,x64 为64位 Windows 系统使用,请根据使用的 Windows 系统情况下载 2)下…

在文本框中提示用户输入内容格式的方法
希望达到的效果: 方法一:鼠标点击文本框时文字消失 <input id"login_name" type"text" οnblur"javascript:check_login_name();" οnfοcus"if(this.value支持英文及数字组合) this.value;this.style.color#000&…

saltstack实现haproxy+keepalived负载均衡+高可用(二)
一键部署haproxykeepalived实现负载均衡高可用 实验环境: !!!! 特别注意: www.westos.org为test1的minion名字 test1: 172.25.1.11 nginx master minion test2: 172.25.…
iOS开发技巧(系列十八:扩展UIColor,支持十六进制颜色设置)
新建一个Category,命名为UIColorHex,表示UIColor支持十六进制Hex颜色设置。 UIColorHex.h文件, #import <UIKit/UIKit.h> #define RGBA_COLOR(R, G, B, A) [UIColor colorWithRed:((R) / 255.0f) green:((G) / 255.0f) blue:((B) / 255…

iOS顶部菜单栏
封装的一个顶部菜单栏,使用懒加载(选择后加载当前页及前后各一页),自适应标题长度。 下载: Github:https://github.com/dolacmeng/JXChannelSegment 用法: //init Segment segment [[JXSegme…