nginx源码编译、负载均衡及模块的扩展
1、nginx源码编译
实验环境:
iptables和selinux关闭
redhat6.5
nginx:test1: 172.25.1.11
[root@test1 ~]# ls
nginx-1.14.0.tar.gz
[root@test1 ~]# tar zxf nginx-1.14.0.tar.gz
[root@test1 ~]# useradd -s /sbin/nologin nginx
[root@test1 ~]# id nginx
![]()
[root@test1 ~]# cd nginx-1.14.0
[root@test1 nginx-1.14.0]# cd src/core/
[root@test1 core]# vim nginx.h
![]()
[root@test1 core]# cd -
/root/nginx-1.14.0
[root@test1 nginx-1.14.0]# cd auto/cc/
[root@test1 cc]# vim gcc //进行注释

[root@test1 cc]# cd -
/root/nginx-1.14.0
[root@test1 nginx-1.14.0]# yum install pcre-devel openssl-devel -y //下载所需的依赖包
[root@test1 nginx-1.14.0]# ./configure --help //查看模块
[root@test1 nginx-1.14.0]# ./configure --prefix=/usr/local/nginx --with-http_ssl_module --with-http_stub_status_module --with-threads --with-file-aio
[root@test1 nginx-1.14.0]# make && make install
[root@test1 nginx-1.14.0]# cd
[root@test1 ~]# ln -s /usr/local/nginx/sbin/nginx /sbin/
[root@test1 ~]# nginx -t //检查配置是否有错误

[root@test1 ~]# nginx //打开服务
[root@test1 ~]# nginx -s reload //重新加载
[root@test1 ~]# nginx -s stop //停止服务
[root@test1 html]# pwd
/usr/local/nginx/html
[root@test1 html]# vim test1.html

[root@test1 html]# nginx
网页进行访问


到此,nginx服务就搭建完成了。。。
2、实现负载均衡
nginx的负载均衡是基于反向代理之上实现的。自带的模块有:
ngx_http_proxy_module: proxy代理模块,把请求后抛给服务器节点或upstream服务器池
ngx_http_upstream_module: 负载均衡模块,可以实现网站的负载均衡及节点的健康检查功能
如下是HTTP负载均衡模块upstream 指定设置群服务器,服务器可以指定不同的权重
nginx支持5种方式的查询:
- 轮询 Nginx默认的查询方式 ,默认权重为1。 //下面的实验用到的即为这种方式
- weight 指定分配的轮询方式,根据后端服务器的性能来做权重。
- ip_hash 每个请求按照ip的hash结果分配,这样每个IP地址就可以固定的访问后端的一台服务器,解决了集群部署环境下session共享的问题。
- fair 第三方模块,这个原理是按照响应时间的优先来分配的。需要安装upstream_fair模块
- url_hash 按照url的hash结果来分配请求,使每个url定向到同一个后端的服务器。需要安装nginx的hash软件包
nginx对后端节点健康检查的方式主要有3种:
- ngx_http_proxy_module 模块和ngx_http_upstream_module模块(自带)
- nginx_upstream_check_module模块,需要安装
- ngx_http_healthcheck_module模块,需要安装
实验环境:
test1: nginx 172.25.1.11 调度器
test2: httpd 172.25.1.12 realserver
test2: httpd 172.25.1.13 realserver
foundation: 172.25.1.250 client
nginx常用命令:
nginx -t //nginx语法检查
nginx //查看nginx
nginx -s reload //刷新nginx服务
nginx -s stop //关闭nginx服务
在编译完成的情况下继续下一步
负载均衡原理图(盗用一下哈):

反向代理原理图:

对test1进行负载均衡的配置:
[root@test1 ~]# cd /usr/local/nginx/conf/
[root@test1 conf]# vim nginx.conf //记得提前备份一下
user nginx nginx; //用户名,可以不改使用默认
worker_processes 2; //一般跟CPU数保持一致events {
worker_connections 65535; //最大连接数,修改后需要修改变量
}http {
upstream server { //upstream模块,实现负载均衡#ip_hash; //ip不变时后端的真实服务器不变
server 172.25.1.12:80; //后端的真实服务器,可以添加权重,如server 172.25.1.12:80 weight=3;默认为1
server 172.25.1.13:80;
}
include mime.types;
default_type application/octet-stream;sendfile on;
keepalive_timeout 65; //长连接超时时间,单位是秒#gzip on;
server{
listen 80; //监听端口为80,这样访问的时候就不需要输端口,直接输入访问域名就可以
server_name www.westos.org; //访问的域名,可以有多个(用空格隔开)
location / {
proxy_pass http://server; //这里的server与upstream模块那里的名字保持一致
}error_page 500 502 503 504 /50x.html;
location = /50x.html {
root html;
}
}
}
[root@test1 conf]# vim /etc/security/limits.conf //在限制文件中的末尾行修改最大连接数

[root@test1 conf]# nginx -t //启动nginx前检查配置是否存在问题

[root@test1 conf]# nginx //启动nginx服务
[root@test1 conf]# nginx -s reload //重新加载
realserver端:
[root@test2 ~]# yum install -y httpd //下载http服务
[root@test2 ~]# vim /var/www/html/index.html
[root@test3 ~]# yum install -y httpd //与test2执行一样的动作
[root@test2 ~]# vim /var/www/html/index.html

客户端进行访问:
访问前客户端进行解析
[root@foundation1 ~]# vim /etc/hosts
172.25.1.11 test1 www.westos.org
[root@foundation1 ~]# curl www.westos.org

当test2挂掉时,访问的是服务器test3,没有出现错误,说明nginx自带健康检查的功能。
[root@test2 ~]# /etc/init.d/httpd stop

负载均衡到此也结束啦啦啦。。。接下来是扩展nginx模块
3、nginx模块的扩展
[root@test1 ~]# nginx -s stop //先关闭nginx服务
nginx的默认发布目录在 /usr/local/nginx/html
[root@test1 ~]# cd nginx-1.14.0
[root@test1 nginx-1.14.0]# pwd
/root/nginx-1.14.0
[root@test1 nginx-1.14.0]# ./configure --help //用./configure --help查看有哪些模块
第一种情况:若需要安装的模块在命令下有,则重新编译并添加需要编译的模块
例如:需要安装 --add-module=/data/software/ngx_http_google_filter_module模块,则执行:
[root@test1 ~]# nginx -V //查看已经编译了哪些模块

[root@test1 nginx-1.14.0]# ./configure --prefix=/usr/local/nginx --with-http_ssl_module --with-http_stub_status_module --with-threads --with-file-aio --add-module=/data/software/ngx_http_google_filter_module //已编译的和未编译的一块进行编译
[root@test1 nginx-1.14.0]# make //!!!必须要注意:不要make install,不然就被覆盖了
第二种情况:若需要安装的模块在命令下没有,则:
例如:nginx-sticky-module模块的介绍及扩展
sticky模块有什么用呢
使用nginx做负载均衡器时,经常会遇到一个问题,如何将来自同一用户的访问始终定向到一台后端设备进行响应?
nginx一般有两种办法来实现会话保持:
- ip_hash:nginx原生支持的基于IP地址来将不同的请求转发到同一台服务器进行响应,缺点就是如果前端用户都来自同一局域网,基于ip的负载方法会导致负载不均衡;
- sticky:基于cookie来进行负载转发,保证将来自同一cookie的访问始终定向到同一服务器响应,缺点就是需要编译模块,且cookie需要浏览器支持。
现在使用第一种ip_hash:
[root@test1 ~]# nginx -s stop
[root@test1 ~]# vim /usr/local/nginx/conf/nginx.conf

[root@test1 ~]# nginx -t //查看语句是否有问题
[root@test1 ~]# nginx //启动nginx
客户端进行访问:
注意:客户端需要对test1进行解析
[root@foundation1 ~]# for i in {1..5}; do curl www.westos.org; done;


这时只要客户端ip不变,则访问到的真实服务器为同一个,都是test3
我们换个客户端试一试,启动虚拟机test4并将其看作另一个客户端:
先进行解析
[root@test4 ~]# for i in {1..5};do curl www.westos.org;done;

访问到的也一直是test3,到这里我们就可以看出ip_hash的优点和缺点了,第一种情况就完成了。
现在使用第二种sticky模块:
由于上面的nginx版本不支持sticky模块,所以我们换个版本并将上一个版本服务关闭
[root@test1 ~]# nginx -s stop
[root@test1 ~]# tar zxf nginx-1.10.1.tar.gz
[root@test1 ~]# tar zxf nginx-sticky-module-ng.tar.gz
[root@test1 ~]# cd nginx-1.10.1
[root@test1 nginx-1.10.1]# ./configure --prefix=/opt/nginx --with-http_ssl_module --with-http_stub_status_module --with-threads --with-file-aio --add-module=/root/nginx-sticky-module-ng //添加模块
由于笔者上面已经在/usr/local/nginx/conf/nginx.conf 下有nginx1.14的配置文件,所以这里更换路径为/opt/nginx,所以配置文件在/opt/nginx/conf下才生效
[root@test1 nginx-1.10.1]# make && make install
[root@test1 nginx-1.10.1]# cd /opt/nginx/conf //配置文件生效的路径
[root@test1 conf]# cp /usr/local/nginx/conf/nginx.conf .
cp: overwrite `./nginx.conf'? yes
//由于上个实验已经配置了负载均衡,所以我们可以将上一个nginx服务的配置文件拷贝过来直接用
[root@test1 conf]# vim nginx.conf //只修改一处就好

[root@test1 conf]# /opt/nginx/sbin/nginx -t
[root@test1 conf]# /opt/nginx/sbin/nginx //检查并启动服务
此时客户端就可以访问啦
客户端访问时,统一主机用命令访问如下:

我们为您可以看到用curl命令访问时并没有实现session共享,访问还是轮询方式,这是为是那么呢
那是因为sticky模式有一个弊端:cookie需要浏览器支持。
我们用浏览器输入www.westos.org试一下:

不管刷新多少回,访问到的始终都是test3
补充一下:
笔者这里用的模块压缩包是nginx-sticky-module-ng.tar.gz大家也可以用nginx-sticky-module-1.1.tar.gz
我个人不太建议用这个压缩包,做的时候可能会有一点问题。
用第二个的话编译可能会报错,如
make[1]: *** [objs/addon/nginx-sticky-module-1.1/ngx_http_sticky_misc.o] Error 1
make[1]: Leaving directory `/root/nginx-1.8.1'
make: *** [build] Error 2
此时修改一下配置文件:
[root@test1 nginx-1.8.1]# pwd
root/nginx-1.8.1
[root@test1 nginx-1.8.1]# vim nginx-sticky-module-1.1/ngx_http_sticky_misc.c //修改第28
281 digest->len = ngx_sock_ntop(in,sizeof(struct sockaddr_in), digest->data, len, 1);

再次编译成功
[root@test1 nginx-1.8.1]# make && make install
相关文章:
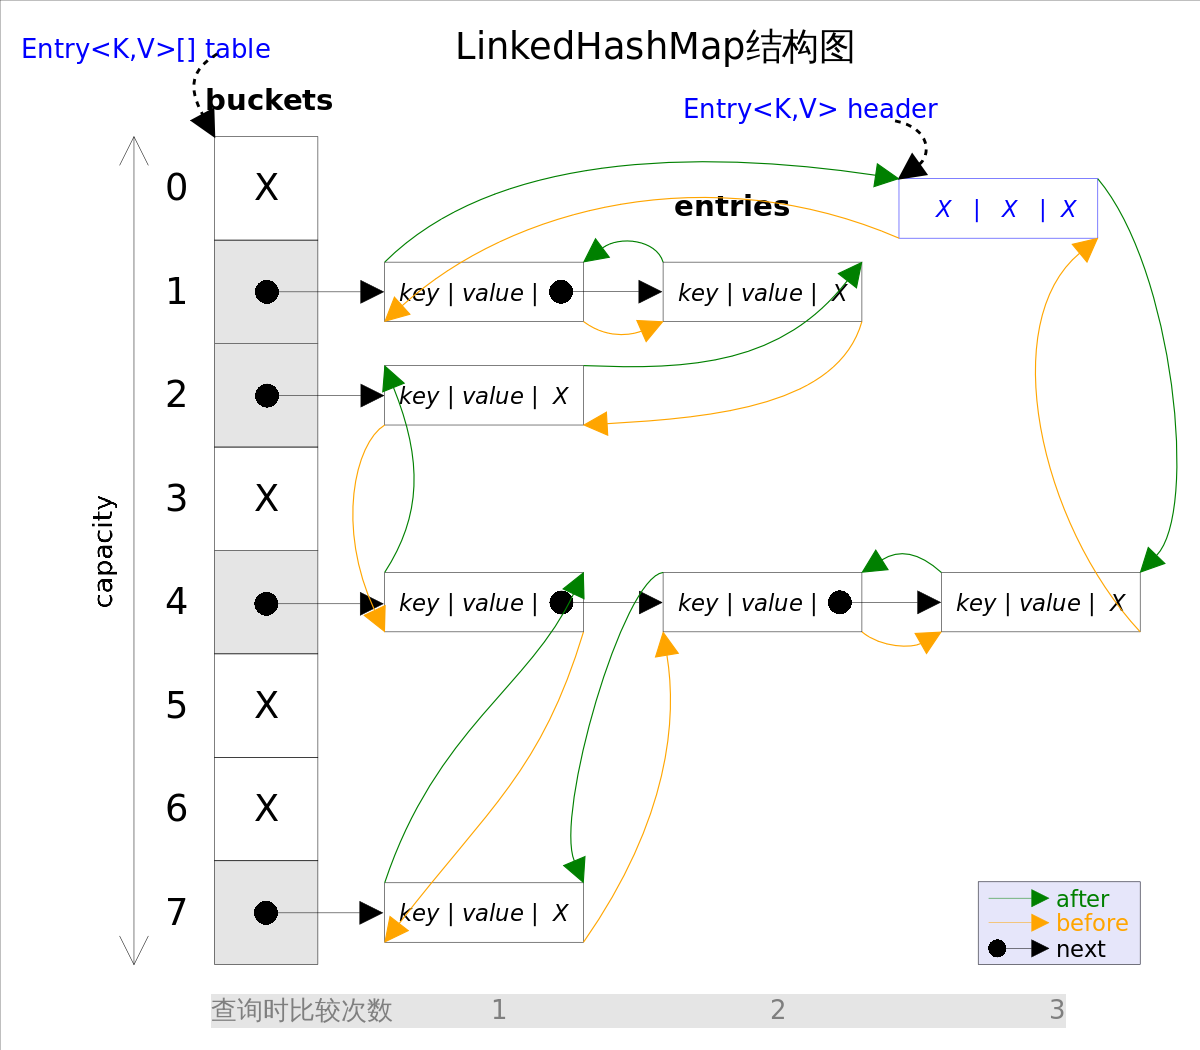
LinkedHashMap and LinkedHashSet
LinkedHashMap实现了Map接口,是HashMap的直接子类,它同时满足HashMap和linked list的某些特性。可将LinkedHashMap看作采用linked list增强的HashMap。 LinkedHashMap在HashMap的基础上,采用双向链表(doubly-linked listÿ…
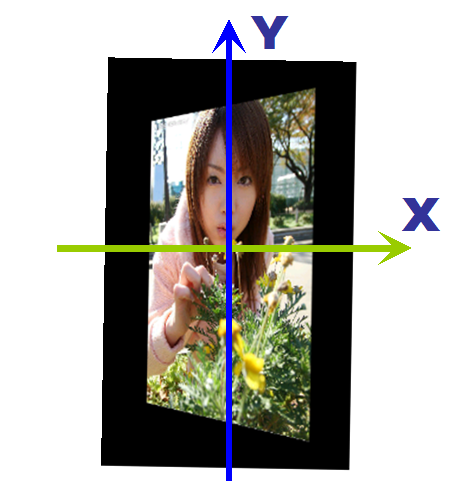
Windows Phone开发(19):三维透视效果
Windows Phone开发(19):三维透视效果 原文:Windows Phone开发(19):三维透视效果 三维效果也可以叫透视效果,所以,我干脆叫三维透视效果。理论知识少讲,直接用例开场吧&am…

【动画2】CALayer动画
一)UIView动画 二)CoreAnimation动画 前言:上一篇已经介绍了UIKit给我们封装好的UIView动画的使用,UIKit动画是建立在CoreAnimation动画之上的,CoreAnimation是直接作用于CALayer上而非UIView。一、CoreAnimation动画…

nginx+tomcat+memcache实现负载均衡、session共享
实验架构图: Table of Contents 1、配置tomcat 2、安装memcache 3、查看tomcat和memcache是否配置好 4、nginx实现负载均衡: 5、客户端进行测试: 6、验证结论: 7、总结: 实验环境: linux redhat6.…

(转)二叉树系列面试问题
转自 :http://blog.csdn.net/luckyxiaoqiang/article/details/7518888/ 版权所有,转载请注明出处,谢谢!http://blog.csdn.net/walkinginthewind/article/details/7518888 树是一种比较重要的数据结构,尤其是二叉树。二…

百度UEditor开发案例(JSP)
本案例的开发环境:MyEclipsetomcatjdk 本案例的开发内容:用百度编辑器发布新闻(UEditor的初始化开发部署)编辑已发过的新闻(UEditor的应用——编辑旧文章)上传附件、图片等 由于百度编辑器强大的功能&a…

iOS中的动力学:Dynamics【1】
iOS7建议我们创建的界面具有物理特性,而不只是像素的集合,可以响应触摸、手势、屏幕方向改变等事件,让用户与界面之间有更深入的交互,而不是像iOS6那样在软件界面上模仿现实世界的纹理而已。或许你会认为创建感觉上真实的界面比创…

自动化运维工具Saltstack(一)
1、saltstack简介: 什么是saltstack? saltstack是基于python开发的一套C/S架构配置管理工具 使用SSL证书签方的方式进行认证管理 号称世界上最快的消息队列ZeroMQ使得SaltStack能快速在成千上万台机器上进行各种操作 采用RSA Key方式确认身份 传输采用AE…

【UIDynamic例子】挂起的方块
通过前面的动力学小Demo(本文默认你已经看过这篇Blog:传送门),我们对UIKit中的UIDynamic已经有了初步的认识。现在我们写个更加有趣的Demo:模拟一个用弹性绳子挂起的小方块,用户可以将它拖动到屏幕任意位置…
IIS7 配置PHP服务器
安装PHP Manager: 1)访问 http://phpmanager.codeplex.com/releases/view/69115 下载PHP Manager。其中,x86 为32位 Windows 系统使用,x64 为64位 Windows 系统使用,请根据使用的 Windows 系统情况下载 2)下…

在文本框中提示用户输入内容格式的方法
希望达到的效果: 方法一:鼠标点击文本框时文字消失 <input id"login_name" type"text" οnblur"javascript:check_login_name();" οnfοcus"if(this.value支持英文及数字组合) this.value;this.style.color#000&…

saltstack实现haproxy+keepalived负载均衡+高可用(二)
一键部署haproxykeepalived实现负载均衡高可用 实验环境: !!!! 特别注意: www.westos.org为test1的minion名字 test1: 172.25.1.11 nginx master minion test2: 172.25.…
iOS开发技巧(系列十八:扩展UIColor,支持十六进制颜色设置)
新建一个Category,命名为UIColorHex,表示UIColor支持十六进制Hex颜色设置。 UIColorHex.h文件, #import <UIKit/UIKit.h> #define RGBA_COLOR(R, G, B, A) [UIColor colorWithRed:((R) / 255.0f) green:((G) / 255.0f) blue:((B) / 255…

iOS顶部菜单栏
封装的一个顶部菜单栏,使用懒加载(选择后加载当前页及前后各一页),自适应标题长度。 下载: Github:https://github.com/dolacmeng/JXChannelSegment 用法: //init Segment segment [[JXSegme…
Mac环境下svn的使用
CHENYILONG BlogMac环境下svn的使用 Mac环境下svn的使用 在Windows环境中,我们一般使用TortoiseSVN来搭建svn环境。在Mac环境下,由于Mac自带了svn的服务器端和客户端功能,所以我们可以在不装任何第三方软件的前提下使用svn功能,不…

zabbix简介及基本安装(一)
zabbix简单介绍: 官网:可以进官网查看一下:https://www.zabbix.com/cn/ //英语能力有限的读者可以将由上角的语言调成汉语方便查看 功能:网络监控、服务器监控、云监控、服务监控等。 介绍:zabbix([…
顺序表应用6:有序顺序表查询
顺序表应用6:有序顺序表查询 Time Limit: 7MS Memory Limit: 700KBSubmit StatisticProblem Description 顺序表内按照由小到大的次序存放着n个互不相同的整数(1<n<20000),任意输入一个整数,判断该整数在顺序表中是否存在。…
LA 5717枚举+最小生成树回路性质
1 /*LA 57172 《训练指南》P3433 最小生成树的回路性质4 在生成的最小生成树上,新增一条边e(u,v)5 若原图上u到v的路径的最大边大于e,则删除此边,加上e,否则不变。6 7 若原图上u到v的路径的最大边的产生:BFS/DFS都可 &…
【Runtime】动态添加方法demo
今天写一个小demo来演示下runtime的消息转发和动态添加方法。 一般项目中都会有保存当前登录用户资料的需求,我们可以直接将登录成功后的用户信息分别保存到NSUserDefaults中: [def setObject:"JackXu" forKey:"UserName"];[def set…

Zabbix之主机的添加与删除(二)
接着上一篇内容继续讲: 环境等都是建立在上一篇内容的基础上的,见https://blog.csdn.net/weixin_41922887/article/details/83755271 redhat6 test1: 172.25.1.11 zabbix-agent redhat7 server: 172.25.1.1 …
昨天网上感觉好冷,睡在席子上都是感觉打哈欠
今天爸妈也是休息一天,中午听说是要到外婆家去,不过家里就不知道会不会有一个团圆聚餐了,还有伴月就是国庆解,那时就要吧这个推掉值班的事情做好下。 转载于:https://www.cnblogs.com/bkchengzheng/p/5874328.html

几行代码实现神奇移动的过渡动画
1.效果如图: 2.实现: 假设需求为如上图,点击ViewController01后,ViewController01上的两张图片,移动到ViewContoller02中,其实两个ViewController的View上分别放置了这两张图,JXMagicMove就是实…
php字符串处理函数相关操作
<?php//获取tech和98426这两个字符串$str "http://info.meadin.com/tech/98426_1.shtml";echo $newstr substr($str,7,strlen($str)); //info.meadin.com/tech/98426_1.shtml$arr explode(/,$newstr);$num $arr[1];//tech$user strstr($arr[2], _, true); /…

介绍Zabbix的两种监控模式(主动模式和被动模式)
Zabbix agent检测分为两种模式:主动模式和被动模式 被动模式,也是默认的Zabbix监控模式,被动模式是相对于proxy来说的。proxy主动发送数据就是主动模式,proxy等待server的请求再发送数据就是被动模式。主动模式有个好处就是可以有…
【Step By Step】将Dotnet Core部署到Docker下
一、使用.Net Core构建WebAPI并访问Docker中的Mysql数据库 这个的过程大概与我之前的文章《尝试.Net Core—使用.Net Core Entity FrameWork Core构建WebAPI(一)》一致。 但是在我们这里,由于docker中无法部署sql server,所以我采…
ipad无法与itunes同步,提示因为这台电脑不再被授权使用在此ipad上购买的项目解决方案...
1、iOS设备用数据线连接到电脑;2、打开电脑上的iTunes 11,按CtrlB键调出菜单栏,按CtrlS键调出边栏;在边栏的 设备 下面看到你的iOS设备;3、点击菜单栏中的商店,点击 对这台电脑授权,输入你的App…
iOS根据字节数截取字符串
最近项目有个需求,文章的作者最多显示7个中文字,英文字符算半个中文字,超过7个中文字,则显示:前7个中文字...,使用NSString的length方法,不管是一个中文还是英文字符,都是返回1。因此…

搭建Zabbix分布式监控
1、实现zabbix监控nginx 实验环境: server1 172.25.1.1 server redhat7 test1 172.25.1.11 agent redhat7 在“手动添加”主机的基础上进行扩展 开启服务: [rootserver ~]# systemctl…
Codeforces Round #372 (Div. 2), problem: (B) Complete the Word
水题,每次截取长度为26的字符串,然后直接进行修改就可以 然而本弱渣昨天wa看很久 include<bits/stdc.h> using namespace std; int n,c; int ans[30]; int main() { string s; cin>>s; int tt0; int ns.size(); if(n<26) { cout<<&…
百练 2973 Skew数 解题报告
思路: 计算出每一个skew数的不同位数表示的权值,然后用该位与权值相乘。用int数组来装权值,用char数组来装skew数。 代码: #include<stdio.h> #include<string.h> int main() {int i, k, sum;int base[32];char skew[…