opencv 检测直线、线段、圆、矩形
转自:http://blog.csdn.net/byxdaz/archive/2009/12/01/4912136.aspx
检测直线:cvHoughLines,cvHoughLines2
检测圆:cvHoughCircles
检测矩形:opencv中没有对应的函数,下面有段代码可以检测矩形,是通过先找直线,然后找到直线平行与垂直的四根线。
检测直线代码:
/* This is a standalone program. Pass an image name as a first parameter of the program.
Switch between standard and probabilistic Hough transform by changing "#if 1" to "#if 0" and back */
#include <cv.h>
#include <highgui.h>
#include <math.h>
int main(int argc, char** argv)
{
const char* filename = argc >= 2 ? argv[1] : "pic1.png";
IplImage* src = cvLoadImage( filename, 0 );
IplImage* dst;
IplImage* color_dst;
CvMemStorage* storage = cvCreateMemStorage(0);
CvSeq* lines = 0;
int i;
if( !src )
return -1;
dst = cvCreateImage( cvGetSize(src), 8, 1 );
color_dst = cvCreateImage( cvGetSize(src), 8, 3 );
cvCanny( src, dst, 50, 200, 3 );
cvCvtColor( dst, color_dst, CV_GRAY2BGR );
#if 0
lines = cvHoughLines2( dst, storage, CV_HOUGH_STANDARD, 1, CV_PI/180, 100, 0, 0 );
for( i = 0; i < MIN(lines->total,100); i++ )
{
float* line = (float*)cvGetSeqElem(lines,i);
float rho = line[0];
float theta = line[1];
CvPoint pt1, pt2;
double a = cos(theta), b = sin(theta);
double x0 = a*rho, y0 = b*rho;
pt1.x = cvRound(x0 + 1000*(-b));
pt1.y = cvRound(y0 + 1000*(a));
pt2.x = cvRound(x0 - 1000*(-b));
pt2.y = cvRound(y0 - 1000*(a));
cvLine( color_dst, pt1, pt2, CV_RGB(255,0,0), 3, CV_AA, 0 );
}
#else
lines = cvHoughLines2( dst, storage, CV_HOUGH_PROBABILISTIC, 1, CV_PI/180, 50, 50, 10 );
for( i = 0; i < lines->total; i++ )
{
CvPoint* line = (CvPoint*)cvGetSeqElem(lines,i);
cvLine( color_dst, line[0], line[1], CV_RGB(255,0,0), 3, CV_AA, 0 );
}
#endif
cvNamedWindow( "Source", 1 );
cvShowImage( "Source", src );
cvNamedWindow( "Hough", 1 );
cvShowImage( "Hough", color_dst );
cvWaitKey(0);
return 0;
}
检测圆代码:
#include <cv.h>
#include <highgui.h>
#include <math.h>
int main(int argc, char** argv)
{
IplImage* img;
if( argc == 2 && (img=cvLoadImage(argv[1], 1))!= 0)
{
IplImage* gray = cvCreateImage( cvGetSize(img), 8, 1 );
CvMemStorage* storage = cvCreateMemStorage(0);
cvCvtColor( img, gray, CV_BGR2GRAY );
cvSmooth( gray, gray, CV_GAUSSIAN, 9, 9 ); // smooth it, otherwise a lot of false circles may be detected
CvSeq* circles = cvHoughCircles( gray, storage, CV_HOUGH_GRADIENT, 2, gray->height/4, 200, 100 );
int i;
for( i = 0; i < circles->total; i++ )
{
float* p = (float*)cvGetSeqElem( circles, i );
cvCircle( img, cvPoint(cvRound(p[0]),cvRound(p[1])), 3, CV_RGB(0,255,0), -1, 8, 0 );
cvCircle( img, cvPoint(cvRound(p[0]),cvRound(p[1])), cvRound(p[2]), CV_RGB(255,0,0), 3, 8, 0 );
}
cvNamedWindow( "circles", 1 );
cvShowImage( "circles", img );
}
return 0;
}
检测矩形代码:
/*在程序里找寻矩形*/
#ifdef _CH_
#pragma package <opencv>
#endif
#ifndef _EiC
#include "cv.h"
#include "highgui.h"
#include <stdio.h>
#include <math.h>
#include <string.h>
#endif
int thresh = 50;
IplImage* img = 0;
IplImage* img0 = 0;
CvMemStorage* storage = 0;
CvPoint pt[4];
const char* wndname = "Square Detection Demo";
// helper function:
// finds a cosine of angle between vectors
// from pt0->pt1 and from pt0->pt2
double angle( CvPoint* pt1, CvPoint* pt2, CvPoint* pt0 )
{
double dx1 = pt1->x - pt0->x;
double dy1 = pt1->y - pt0->y;
double dx2 = pt2->x - pt0->x;
double dy2 = pt2->y - pt0->y;
return (dx1*dx2 + dy1*dy2)/sqrt((dx1*dx1 + dy1*dy1)*(dx2*dx2 + dy2*dy2) + 1e-10);
}
// returns sequence of squares detected on the image.
// the sequence is stored in the specified memory storage
CvSeq* findSquares4( IplImage* img, CvMemStorage* storage )
{
CvSeq* contours;
int i, c, l, N = 11;
CvSize sz = cvSize( img->width & -2, img->height & -2 );
IplImage* timg = cvCloneImage( img ); // make a copy of input image
IplImage* gray = cvCreateImage( sz, 8, 1 );
IplImage* pyr = cvCreateImage( cvSize(sz.width/2, sz.height/2), 8, 3 );
IplImage* tgray;
CvSeq* result;
double s, t;
// create empty sequence that will contain points -
// 4 points per square (the square's vertices)
CvSeq* squares = cvCreateSeq( 0, sizeof(CvSeq), sizeof(CvPoint), storage );
// select the maximum ROI in the image
// with the width and height divisible by 2
cvSetImageROI( timg, cvRect( 0, 0, sz.width, sz.height ));
// down-scale and upscale the image to filter out the noise
cvPyrDown( timg, pyr, 7 );
cvPyrUp( pyr, timg, 7 );
tgray = cvCreateImage( sz, 8, 1 );
// find squares in every color plane of the image
for( c = 0; c < 3; c++ )
{
// extract the c-th color plane
cvSetImageCOI( timg, c+1 );
cvCopy( timg, tgray, 0 );
// try several threshold levels
for( l = 0; l < N; l++ )
{
// hack: use Canny instead of zero threshold level.
// Canny helps to catch squares with gradient shading
if( l == 0 )
{
// apply Canny. Take the upper threshold from slider
// and set the lower to 0 (which forces edges merging)
cvCanny( tgray, gray, 0, thresh, 5 );
// dilate canny output to remove potential
// holes between edge segments
cvDilate( gray, gray, 0, 1 );
}
else
{
// apply threshold if l!=0:
// tgray(x,y) = gray(x,y) < (l+1)*255/N ? 255 : 0
cvThreshold( tgray, gray, (l+1)*255/N, 255, CV_THRESH_BINARY );
}
// find contours and store them all as a list
cvFindContours( gray, storage, &contours, sizeof(CvContour),
CV_RETR_LIST, CV_CHAIN_APPROX_SIMPLE, cvPoint(0,0) );
// test each contour
while( contours )
{
// approximate contour with accuracy proportional
// to the contour perimeter
result = cvApproxPoly( contours, sizeof(CvContour), storage,
CV_POLY_APPROX_DP, cvContourPerimeter(contours)*0.02, 0 );
// square contours should have 4 vertices after approximation
// relatively large area (to filter out noisy contours)
// and be convex.
// Note: absolute value of an area is used because
// area may be positive or negative - in accordance with the
// contour orientation
if( result->total == 4 &&
fabs(cvContourArea(result,CV_WHOLE_SEQ)) > 1000 &&
cvCheckContourConvexity(result) )
{
s = 0;
for( i = 0; i < 5; i++ )
{
// find minimum angle between joint
// edges (maximum of cosine)
if( i >= 2 )
{
t = fabs(angle(
(CvPoint*)cvGetSeqElem( result, i ),
(CvPoint*)cvGetSeqElem( result, i-2 ),
(CvPoint*)cvGetSeqElem( result, i-1 )));
s = s > t ? s : t;
}
}
// if cosines of all angles are small
// (all angles are ~90 degree) then write quandrange
// vertices to resultant sequence
if( s < 0.3 )
for( i = 0; i < 4; i++ )
cvSeqPush( squares,
(CvPoint*)cvGetSeqElem( result, i ));
}
// take the next contour
contours = contours->h_next;
}
}
}
// release all the temporary images
cvReleaseImage( &gray );
cvReleaseImage( &pyr );
cvReleaseImage( &tgray );
cvReleaseImage( &timg );
return squares;
}
// the function draws all the squares in the image
void drawSquares( IplImage* img, CvSeq* squares )
{
CvSeqReader reader;
IplImage* cpy = cvCloneImage( img );
int i;
// initialize reader of the sequence
cvStartReadSeq( squares, &reader, 0 );
// read 4 sequence elements at a time (all vertices of a square)
for( i = 0; i < squares->total; i += 4 )
{
CvPoint* rect = pt;
int count = 4;
// read 4 vertices
memcpy( pt, reader.ptr, squares->elem_size );
CV_NEXT_SEQ_ELEM( squares->elem_size, reader );
memcpy( pt + 1, reader.ptr, squares->elem_size );
CV_NEXT_SEQ_ELEM( squares->elem_size, reader );
memcpy( pt + 2, reader.ptr, squares->elem_size );
CV_NEXT_SEQ_ELEM( squares->elem_size, reader );
memcpy( pt + 3, reader.ptr, squares->elem_size );
CV_NEXT_SEQ_ELEM( squares->elem_size, reader );
// draw the square as a closed polyline
cvPolyLine( cpy, &rect, &count, 1, 1, CV_RGB(0,255,0), 3, CV_AA, 0 );
}
// show the resultant image
cvShowImage( wndname, cpy );
cvReleaseImage( &cpy );
}
void on_trackbar( int a )
{
if( img )
drawSquares( img, findSquares4( img, storage ) );
}
char* names[] = { "pic1.png", "pic2.png", "pic3.png",
"pic4.png", "pic5.png", "pic6.png", 0 };
int main(int argc, char** argv)
{
int i, c;
// create memory storage that will contain all the dynamic data
storage = cvCreateMemStorage(0);
for( i = 0; names[i] != 0; i++ )
{
// load i-th image
img0 = cvLoadImage( names[i], 1 );
if( !img0 )
{
printf("Couldn't load %s/n", names[i] );
continue;
}
img = cvCloneImage( img0 );
// create window and a trackbar (slider) with parent "image" and set callback
// (the slider regulates upper threshold, passed to Canny edge detector)
cvNamedWindow( wndname, 1 );
cvCreateTrackbar( "canny thresh", wndname, &thresh, 1000, on_trackbar );
// force the image processing
on_trackbar(0);
// wait for key.
// Also the function cvWaitKey takes care of event processing
c = cvWaitKey(0);
// release both images
cvReleaseImage( &img );
cvReleaseImage( &img0 );
// clear memory storage - reset free space position
cvClearMemStorage( storage );
if( c == 27 )
break;
}
cvDestroyWindow( wndname );
return 0;
}
#ifdef _EiC
main(1,"squares.c");
#endif
其它参考博客:
1、http://blog.csdn.net/superdont/article/details/6664254
2、http://hi.baidu.com/%CE%C4%BF%A1%B5%C4%CF%A3%CD%FB/blog/item/3a5cb2079158b304738b65f2.html
#include <cv.h>
#include <highgui.h>
#include <math.h>
int main()
{
IplImage* src;
if( (src=cvLoadImage("5.bmp", 1)) != 0)
{
IplImage* dst = cvCreateImage( cvGetSize(src), 8, 1 );
IplImage* color_dst = cvCreateImage( cvGetSize(src), 8, 3 );
CvMemStorage* storage = cvCreateMemStorage(0);//存储检测到线段,当然可以是N*1的矩阵数列,如果
实际的直线数量多余N,那么最大可能数目的线段被返回
CvSeq* lines = 0;
int i;
IplImage* src1=cvCreateImage(cvSize(src->width,src->height),IPL_DEPTH_8U,1);
cvCvtColor(src, src1, CV_BGR2GRAY); //把src转换成灰度图像保存在src1中,注意进行边缘检测一定要
换成灰度图
cvCanny( src1, dst, 50, 200, 3 );//参数50,200的灰度变换
cvCvtColor( dst, color_dst, CV_GRAY2BGR );
#if 1
lines = cvHoughLines2( dst, storage, CV_HOUGH_STANDARD, 1, CV_PI/180, 150, 0, 0 );//标准霍夫变
换后两个参数为0,由于line_storage是内存空间,所以返回一个CvSeq序列结构的指针
for( i = 0; i < lines->total; i++ )
{
float* line = (float*)cvGetSeqElem(lines,i);//用GetSeqElem得到直线
float rho = line[0];
float theta = line[1];//对于SHT和MSHT(标准变换)这里line[0],line[1]是rho(与像素相关单位的距
离精度)和theta(弧度测量的角度精度)
CvPoint pt1, pt2;
double a = cos(theta), b = sin(theta);
if( fabs(a) < 0.001 )
{
pt1.x = pt2.x = cvRound(rho);
pt1.y = 0;
pt2.y = color_dst->height;
}
else if( fabs(b) < 0.001 )
{
pt1.y = pt2.y = cvRound(rho);
pt1.x = 0;
pt2.x = color_dst->width;
}
else
{
pt1.x = 0;
pt1.y = cvRound(rho/b);
pt2.x = cvRound(rho/a);
pt2.y = 0;
}
cvLine( color_dst, pt1, pt2, CV_RGB(255,0,0), 3, 8 );
}
#else
lines = cvHoughLines2( dst, storage, CV_HOUGH_PROBABILISTIC, 1, CV_PI/180, 80, 30, 10 );
for( i = 0; i < lines->total; i++ )
{
CvPoint* line = (CvPoint*)cvGetSeqElem(lines,i);
cvLine( color_dst, line[0], line[1], CV_RGB(255,0,0), 3, 8 );
}
#endif
cvNamedWindow( "Source", 1 );
cvShowImage( "Source", src );
cvNamedWindow( "Hough", 1 );
cvShowImage( "Hough", color_dst );
cvWaitKey(0);
}
}
line_storage
检测到的线段存储仓. 可以是内存存储仓 (此种情况下,一个线段序列在存储仓中被创建,并且由函数返回),或者是包含线段参数的特殊类型(见下面)的具有单行/单列的矩阵(CvMat*)。矩阵头为函数所修改,使得它的 cols/rows 将包含一组检测到的线段。如果 line_storage 是矩阵,而实际线段的数目超过矩阵尺寸,那么最大可能数目的线段被返回(线段没有按照长度、可信度或其它指标排序).
method
Hough 变换变量,是下面变量的其中之一:
CV_HOUGH_STANDARD - 传统或标准 Hough 变换. 每一个线段由两个浮点数 (ρ, θ) 表示,其中 ρ 是直线与原点 (0,0) 之间的距离,θ 线段与 x-轴之间的夹角。因此,矩阵类型必须是 CV_32FC2 type.
CV_HOUGH_PROBABILISTIC - 概率 Hough 变换(如果图像包含一些长的线性分割,则效率更高). 它返回线段分割而不是整个线段。每个分割用起点和终点来表示,所以矩阵(或创建的序列)类型是 CV_32SC4.
CV_HOUGH_MULTI_SCALE - 传统 Hough 变换的多尺度变种。线段的编码方式与 CV_HOUGH_STANDARD 的一致。
rho
与象素相关单位的距离精度
theta
弧度测量的角度精度
threshold
阈值参数。如果相应的累计值大于 threshold, 则函数返回的这个线段.
param1
第一个方法相关的参数:
对传统 Hough 变换,不使用(0).
对概率 Hough 变换,它是最小线段长度.
对多尺度 Hough 变换,它是距离精度 rho 的分母 (大致的距离精度是 rho 而精确的应该是 rho / param1 ).
param2
第二个方法相关参数:
对传统 Hough 变换,不使用 (0).
对概率 Hough 变换,这个参数表示在同一条直线上进行碎线段连接的最大间隔值(gap), 即当同一条直线上的两条碎线段之间的间隔小于param2时,将其合二为一。
对多尺度 Hough 变换,它是角度精度 theta 的分母 (大致的角度精度是 theta 而精确的角度应该是 theta / param2).
函数 cvHoughLines2 实现了用于线段检测的不同 Hough 变换方法. Example. 用 Hough transform 检测线段
3、http://www.opencv.org.cn/index.php/Hough%E7%BA%BF%E6%AE%B5%E6%A3%80%E6%B5%8B
相关文章:
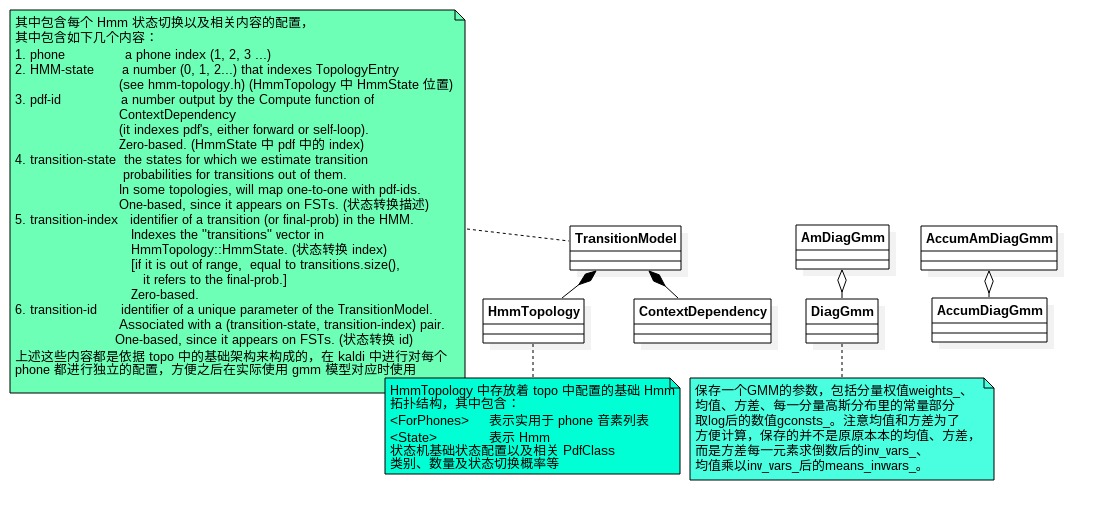
kaldi 源码分析(十) - gmm-init-mono.c分析
一直没有搞明白 hmm-gmm 之间是通过什么联系起来的,花了些时间查代码,看到最直观联系的就是 gmm-init-mono 工具。 gmm-init-mono 基础类通过上述看到,主要的配置都是 在 topo 文件中, 这里需要将一些常见的名称理解下来,这里直接…
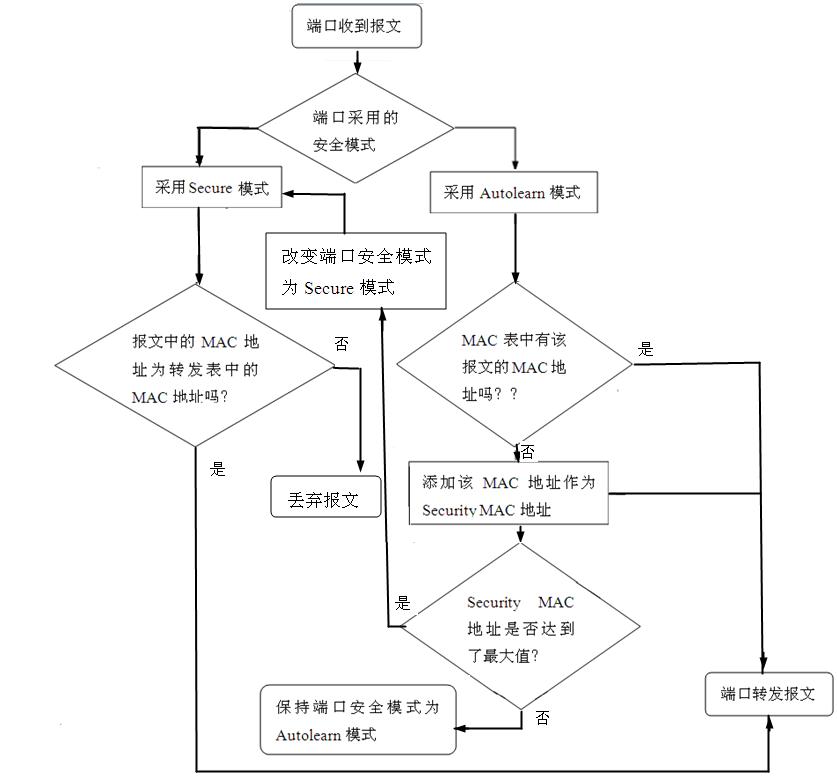
你最需要了解的H3C交换机端口安全模式
以下内容摘自正在全国热销的《Cisco/H3C交换机高级配置与管理技术手册》一书(畅销经典——《Cisco/H3C交换机配置与管理完全手册》(第二版)的配套姊妹篇)。目前京东网和卓越网上都有“满150元减50元,满300元减100元”的…

TCL发布7项AI合作项目,聘任蒋涛为技术顾问
作者 | 夕颜出品 | AI科技大本营(ID:rgznai100)2019 年 6 月 14 日,TCL 举办了以“技术无疆界,合作赢未来”为主题的技术合作开放大会。会上,TCL 面向全球发布了 13 项技术合作项目,其中包括 7 项人工智能技…

Microsoft Platform SDK Febrary 2003更新vc6的SDK网址
Microsoft Platform SDK Febrary 2003更新vc6的SDK网址,目前找到3处,分别为: 1、http://www.x86pro.com/plus/view.php?aid100 2、http://blog.csdn.net/Mobidogs/archive/2007/02/22/1512620.aspx 3、http://blog.chinaunix.net/u1/34831…
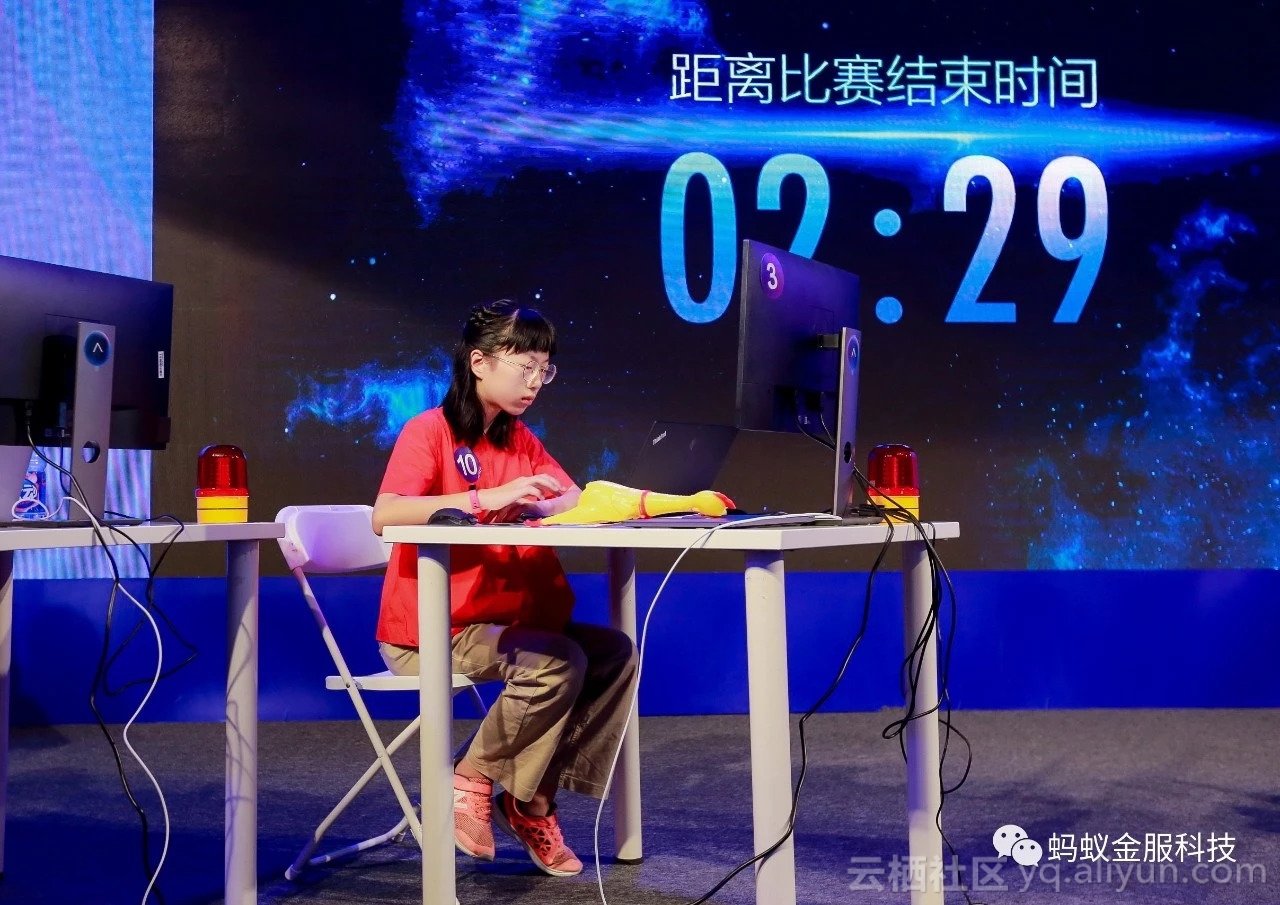
11岁姑娘挑战8分钟编程小程序!蚂蚁金服董事长井贤栋:欢迎加入
小蚂蚁说: 9月19日,在阿里巴巴云栖大会现场,一位年仅11岁的小学生万海妍报名参加了支付宝8分钟小程序挑战赛,成为现场最年轻选手。据悉,蚂蚁金服董事长兼CEO井贤栋在会后对万海妍十分赞赏,向她发出邀请&…
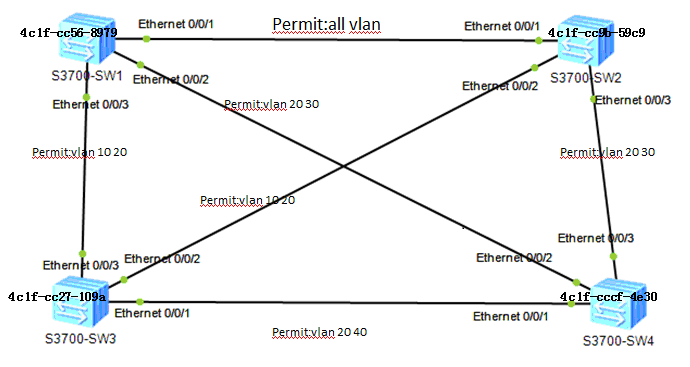
MST配置详解
一、 组网需求1. 网络中所有设备都属于同一个MST域。SW1和SW2为汇聚层设备,SW3和SW4为接入层设备。 2. 通过配置MSTP,使不同VLAN的报文按照不同的MSTI转发: VLAN10的报文沿MSTI1转发,VLAN30沿MSTI3转发&#…

CImg库的一个简单例子
转自:http://www.cppprog.com/2009/0424/106.html CImg是一个跨平台的C的图像处理库,提供了加载、处理、显示、保存等一系列功能,其中的图像处理功能尤其强大。 首先,建议先到这里欣赏一下使用CImg代码做的Demo,就是它…

继AutoML后,第四范式发布软硬一体化AI集成系统SageOne
作者 | 夕颜出品 | AI科技大本营(ID:rgznai100)6 月 20 日,AI产品和服务提供商第四范式宣布发布最新 AI 系列产品SageOne Appliance软硬一体化AI集成系统,性能较市面开源工具或GPU解决方案至少提高6倍。这是继 2018 年9 月 18 日第…

Apache 基金会宣布 Apache Pulsar 毕业成为顶级项目
开发四年只会写业务代码,分布式高并发都不会还做程序员? Apache 软件基金会宣布,Apache Pulsar 已经成功地从孵化毕业,成为基金会的一个新的顶级项目。Pulsar 是一个分布式的消息发布/订阅传递平台,旨在实现可扩展性…
CI报Disallowed Key Characters的解决
用CI框架时,有时候会遇到这么一个问题,打开网页,只显示 Disallowed Key Characters 错误提示。有人说 url 里有非法字符。但是确定 url 是纯英文的,问题还是出来了。但清空浏览器历史记录和cookies后。 刷新就没问题了。有时候。打…

刷新中文阅读理解水平,哈工大讯飞联合发布基于全词覆盖中文BERT预训练模型...
作者 | HFL来源 | 哈工大讯飞联合实验室(ID:rgznai100)为了进一步促进中文自然语言处理的研究发展,哈工大讯飞联合实验室发布基于全词覆盖(Whole Word Masking)的中文BERT预训练模型。我们在多个中文数据集上得到了较好…
CImg库中部分函数的作用和用法
部分内容来自于CImg参考手册或CImg的Doxygen手册 1、宏cimg_usage(usage):可以被用来描述程序的目的和使用情况。它通常被插入到 int main(int argc, char **argv)的定义之后。 参数:usage:描述程序目的和使用情况的字符串。 前置条件:使用ci…
golang通过itemid获取zabbix graph监控图
2019独角兽企业重金招聘Python工程师标准>>> #简述 本文将使用golang和第三方http client 库gorequest编写。如需要只使用golang 标准库可以参考我的另外一篇文章golang通过itemid获取zabbix graph监控图 #F&Q 为什么是golang? 网上很容易就能找到使…

n后问题-回溯法
问题描述: 在n*n的棋盘上放置彼此不受攻击的n个皇后。按国际象棋的规则,皇后可以与之处在同一行或者同一列或同一斜线上的棋子。 n后问题等价于在n*n格的棋盘上放置n皇后,任何2个皇后不放在同一行或同一列的斜线上。 算法设计: |i…
CImg库介绍
转自:http://www.cppprog.com/2009/0424/106.html CImg是一个跨平台的C的图像处理库,提供了加载、处理、显示、保存等一系列功能,其中的图像处理功能尤其强大。 首先,建议先到这里欣赏一下使用CImg代码做的Demo,就是它…
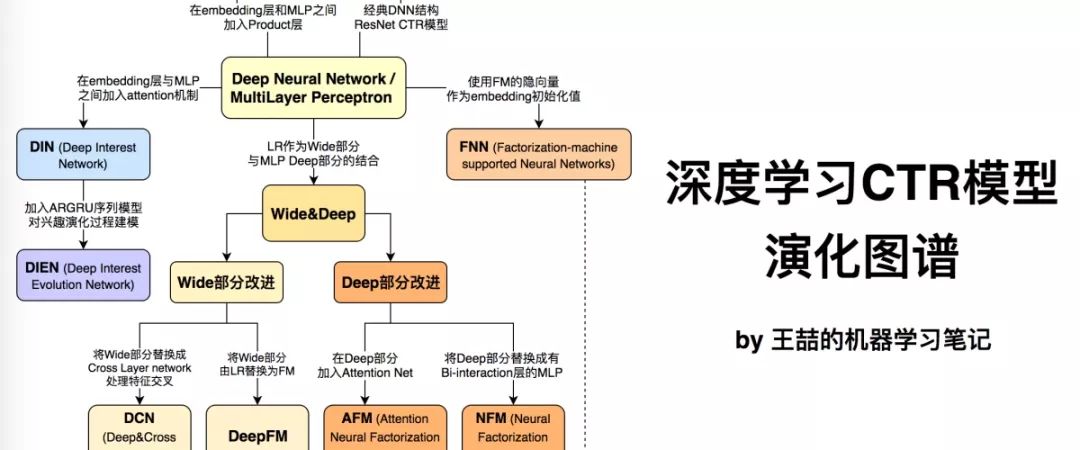
谷歌、阿里们的杀手锏:三大领域,十大深度学习CTR模型演化图谱
作者 | 王喆来源 | 转载自知乎专栏王喆的机器学习笔记今天我们一起回顾一下近3年来的所有主流深度学习CTR模型,也是我工作之余的知识总结,希望能帮大家梳理推荐系统、计算广告领域在深度学习方面的前沿进展。随着微软的Deep Crossing,Google的…
MariaDB 基金会 CEO 宣布将于 10 月 1 日卸任
开发四年只会写业务代码,分布式高并发都不会还做程序员? 近日,MariaDB 基金会 CEO Otto Keklinen 在官网宣布自己将在今年 10 月 1 日正式卸任 CEO,转而退居后线,以 CEO 特别顾问的身份辅助新 CEO 顺利渡过过渡期。从…
思科生成树命令之debug spanning-tree(本文转载自:www.91ccie.coml
debug spanning-tree 命令:debug spanning-treeno debug spanning-tree功能:打开MSTP 的调试信息;本命令的no 操作为关闭MSTP 调试信息。参数:无命令模式:特权模式使用指南:该命令是MSTP 庞大复杂debug 功能…

CImg库中CImg,CImgList,CImgDisplay三个类的介绍
转自:http://www.cppprog.com/2009/0426/108.html 本文简单介绍了CImg库中的三个大类:CImg,CImgList,CImgDisplay。然后给出了让CImg在HDC上绘图以及与HBITMAP互换的方法,为部署CImg到Windows GUI程序中提供了基本支持。 上回介绍了CImg模板…

这可能是Python面向对象编程的最佳实践
作者 | 崔庆才来源 | 进击的Coder(ID:FightingCoder)Python 是支持面向对象的,很多情况下使用面向对象编程会使得代码更加容易扩展,并且可维护性更高,但是如果你写的多了或者某一对象非常复杂了,其中的一些…
mysql之 CentOS系统针对mysql参数优化
内核相关参数(/etc/sysctl.conf) 以下参数可以直接放到sysctl.conf文件的末尾: net.core.somaxconn 65535 net.core.netdev_max_backlog 65535 net.ipv4.tcp_max_syn_backlog 65535 加快TCP连接的回收: net.i…
天猫双十一神话恐终结
2011年双十一大促,天猫商城创造了单日33.6亿的促销奇迹,是2010年同日交易额的近4倍。今年双十一即将来临,淘宝还能再创奇迹吗?何玺认为,淘宝双十一的神话恐终结,理由如下。 一、电商促销年消费被透支 年初 …
opencv图像旋转
转自:http://download.csdn.net/source/2642701 /* 程序名:rotate.c 功能:读入图像文件,做图像旋转转,然后显示图像在屏幕上 */ #include <stdlib.h> #include <stdio.h> #include <math.h> #inclu…

机器如何读懂人心:Keras实现Self-Attention文本分类
作者 | 小宋是呢转载自CSDN博客一、Self-Attention概念详解了解了模型大致原理,我们可以详细的看一下究竟Self-Attention结构是怎样的。其基本结构如下对于self-attention来讲,Q(Query), K(Key), V(Value)三个矩阵均来自同一输入,首先我们要计…

通俗易懂!使用Excel和TF实现Transformer
作者 | 石晓文转载自小小挖掘机(ID:wAIsjwj)本文旨在通过最通俗易懂的过程来详解Transformer的每个步骤!假设我们在做一个从中文翻译到英文的过程,我们的词表很简单如下:中文词表:[机、器、学、习] 英文词表…
通过注册表修改VC6.0的字体【转】
2019独角兽企业重金招聘Python工程师标准>>> 在VC6.0下更改字体,我们一般通过菜单-Tools-Options-Format来更改 但在我的win7 64位系统下这一选项下的字体和字体颜色是空的,无法选择 所以我想起来通过注册表来更改。 WinR输入“Regedit”&…
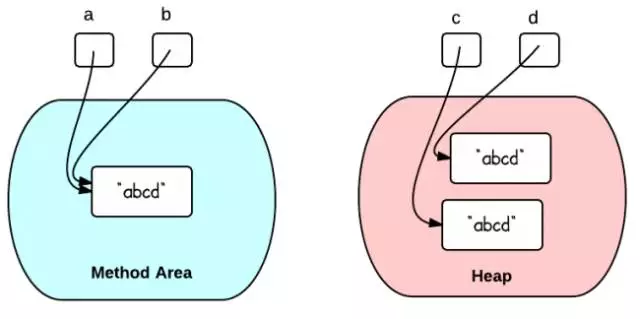
Java中创建String的两种方式差异
我们知道创建一个String类型的变量一般有以下两种方法: String str1 "abcd"; String str2 new String("abcd"); 那么为什么会存在这两种创建方式呢,它们在内存中的表现形式各有什么区别? 方法1: String a …
OpenCV支持的图像格式
OpenCV目前支持的图像格式包括: Windows位图文件 - BMP, DIB; JPEG文件 - JPEG, JPG, JPE; 便携式网络图片 - PNG; 便携式图像格式 - PBM,PGM,PPM; Sun rasters - SR,RASÿ…
Debian Linux下的Python学习——控制流
python中有三种控制流语句:if、for和while。 1. if语句用法( if..elif..else) 代码: 运行: 注意:raw_input函数要求输入一个字符串,int把这个字符串转换为整数 2.for语句用法 (for ... else) 代码: 运行: 注:else部分是可选的。如果包含else,它总是在for循环结束后…
如何运行ImageMagick的命令行工具
在http://www.imagemagick.org/script/index.php网站下载相应的执行文件,这里以下载ImageMagick-6.6.5-10-Q16-windows-static.exe为例说明。 将ImageMagick-6.6.5-10-Q16-windows-static.exe下载后,安装,然后将其中需要的命令行工具考到你需…