将labelme标注的人体姿态Json文件转成训练Yolov8-Pose的txt格式
最近在训练Yolov8-Pose时遇到一个问题,就是如何将自己使用labelme标注的Json文件转化成可用于Yolov8-Pose训练的txt文件。

具体代码有以下:

1、labelme2coco.py 将自己标注的人体姿态信息json文件格式合并转换成CoCo格式
import os
import json
import numpy as np
import glob
import shutil
np.random.seed(41)
import cv2

#0为背景
classname_to_id = {"person": 1}

class Lableme2CoCo:

    def __init__(self, splitDir=''):
        self.images = []
        self.annotations = []
        self.categories = []
        self.img_id = 0
        self.ann_id = 0
        self.splitDir = splitDir

    def save_coco_json(self, instance, save_path):
        json.dump(instance, open(save_path, 'w', encoding='utf-8'), ensure_ascii=False, indent=1)  # indent=2 更加美观显示

    # 由json文件构建COCO
    def to_coco(self, json_path_list):
        self._init_categories()
        for json_path in json_path_list:
            # print(type(json_path))
            obj = self.read_jsonfile(json_path)
            self.images.append(self._image(obj, json_path))

            shapes = obj['shapes']
            groupIds = []
            for shape in shapes:
                groupId = shape['group_id']
                groupIds.append(groupId)
            for i in set(groupIds):
                keyPoints = [0] * 51
                keyPointNum = 0
                bbox = []

                for shape in shapes:
                    if i != shape['group_id']:
                        continue
                    if shape['shape_type'] == "point":
                        labelNum = int(shape['label'])
                        keyPoints[labelNum * 3 + 0] = int(shape['points'][0][0] + 0.5)
                        keyPoints[labelNum * 3 + 1] = int(shape['points'][0][1] + 0.5)
                        keyPoints[labelNum * 3 + 2] = 2
                        keyPointNum += 1
                    if shape['shape_type'] == 'rectangle':
                        x0, y0, x1, y1 = shape['points'][0][0], shape['points'][0][1], \
                                         shape['points'][1][0], shape['points'][1][1]
                        xmin = min(x0, x1)
                        ymin = min(y0, y1)
                        xmax = max(x0, x1)
                        ymax = max(y0, y1)

                        bbox = [xmin, ymin, xmax - xmin, ymax - ymin]

                annotation = self._annotation(bbox, keyPoints, keyPointNum)
                self.annotations.append(annotation)
                self.ann_id += 1
            self.img_id += 1

            # for shape in shapes:
            #     label = shape['label']
            #     if label != 'person':
            #         continue
            #
            #     annotation = self._annotation(shape)
            #     self.annotations.append(annotation)
            #     self.ann_id += 1
            # self.img_id += 1
        instance = {}
        instance['info'] = 'spytensor created'
        instance['license'] = ['license']
        instance['images'] = self.images
        instance['annotations'] = self.annotations
        instance['categories'] = self.categories
        return instance

    # 构建类别
    def _init_categories(self):
        for k, v in classname_to_id.items():
            category = {}
            category['id'] = v
            category['name'] = k
            self.categories.append(category)

    # 构建COCO的image字段
    def _image(self, obj, jsonPath):
        image = {}
        # img_x = utils.img_b64_to_arr(obj['imageData'])
        # h, w = img_x.shape[:-1]
        jpgPath = jsonPath.replace('.json', '.jpg')
        jpgData = cv2.imread(jpgPath)
        h, w, _ = jpgData.shape

        image['height'] = h
        image['width'] = w
        image['id'] = self.img_id

        # image['file_name'] = os.path.basename(jsonPath).replace(".json", ".jpg")
        image['file_name'] = jpgPath.split(self.splitDir)[-1].replace('\\', '/')


        return image

    # 构建COCO的annotation字段
    def _annotation(self, bbox, keyPoints, keyNum):
        annotation = {}

        annotation['id'] = self.ann_id
        annotation['image_id'] = self.img_id
        annotation['category_id'] = 1
        # annotation['segmentation'] = [np.asarray(points).flatten().tolist()]
        annotation['segmentation'] = []
        annotation['bbox'] = bbox
        annotation['iscrowd'] = 0
        annotation['area'] = bbox[2] * bbox[3]
        annotation['keypoints'] = keyPoints
        annotation['num_keypoints'] = keyNum

        return annotation

    # 读取json文件,返回一个json对象
    def read_jsonfile(self, path):
        with open(path, "r", encoding='utf-8') as f:
            return json.load(f)

    # COCO的格式: [x1,y1,w,h] 对应COCO的bbox格式
    def _get_box(self, points):
        min_x = min_y = np.inf
        max_x = max_y = 0
        for x, y in points:
            min_x = min(min_x, x)
            min_y = min(min_y, y)
            max_x = max(max_x, x)
            max_y = max(max_y, y)
        return [min_x, min_y, max_x - min_x, max_y - min_y]


if __name__ == '__main__':

    labelme_path = r"G:\XRW\Data\selfjson"
    print(labelme_path)
    jsonName = labelme_path.split('\\')[-1]
    saved_coco_path = r"G:\XRW\Data\mycoco"
    print(saved_coco_path)
    #####################################
    # 这个一定要注意
    # 为了方便合入coco数据, 定义截断文件的文件夹与文件名字
    splitDirFlag = 'labelMePoint\\'
    ######################################

    # 创建文件
    if not os.path.exists("%s/annotations/"%saved_coco_path):
        os.makedirs("%s/annotations/"%saved_coco_path)
    json_list_path = glob.glob(os.path.join(labelme_path, '*.json'))

    train_path, val_path = json_list_path, ''
    # print(train_path)
    print("train_n:", len(train_path), 'val_n:', len(val_path))

    # 把训练集转化为COCO的json格式
    l2c_train = Lableme2CoCo(splitDirFlag)
    # print(train_path)
    train_instance = l2c_train.to_coco(train_path)
    l2c_train.save_coco_json(train_instance, '%s/annotations/%s.json'%(saved_coco_path, jsonName))
labelme_path:自己标注的json文件路径
saved_coco_path:生成的CoCo格式保存位置

运行代码得到


2、将生成的CoCo格式的Json文件转换成Yolov8-Pose格式的txt文件
utils.py
import glob
import os
import shutil
from pathlib import Path

import numpy as np
from PIL import ExifTags
from tqdm import tqdm

# Parameters
img_formats = ['bmp', 'jpg', 'jpeg', 'png', 'tif', 'tiff', 'dng']  # acceptable image suffixes
vid_formats = ['mov', 'avi', 'mp4', 'mpg', 'mpeg', 'm4v', 'wmv', 'mkv']  # acceptable video suffixes

# Get orientation exif tag
for orientation in ExifTags.TAGS.keys():
    if ExifTags.TAGS[orientation] == 'Orientation':
        break


def exif_size(img):
    # Returns exif-corrected PIL size
    s = img.size  # (width, height)
    try:
        rotation = dict(img._getexif().items())[orientation]
        if rotation in [6, 8]:  # rotation 270
            s = (s[1], s[0])
    except:
        pass

    return s


def split_rows_simple(file='../data/sm4/out.txt'):  # from utils import *; split_rows_simple()
    # splits one textfile into 3 smaller ones based upon train, test, val ratios
    with open(file) as f:
        lines = f.readlines()

    s = Path(file).suffix
    lines = sorted(list(filter(lambda x: len(x) > 0, lines)))
    i, j, k = split_indices(lines, train=0.9, test=0.1, validate=0.0)
    for k, v in {'train': i, 'test': j, 'val': k}.items():  # key, value pairs
        if v.any():
            new_file = file.replace(s, f'_{k}{s}')
            with open(new_file, 'w') as f:
                f.writelines([lines[i] for i in v])


def split_files(out_path, file_name, prefix_path=''):  # split training data
    file_name = list(filter(lambda x: len(x) > 0, file_name))
    file_name = sorted(file_name)
    i, j, k = split_indices(file_name, train=0.9, test=0.1, validate=0.0)
    datasets = {'train': i, 'test': j, 'val': k}
    for key, item in datasets.items():
        if item.any():
            with open(f'{out_path}_{key}.txt', 'a') as file:
                for i in item:
                    file.write('%s%s\n' % (prefix_path, file_name[i]))


def split_indices(x, train=0.9, test=0.1, validate=0.0, shuffle=True):  # split training data
    n = len(x)
    v = np.arange(n)
    if shuffle:
        np.random.shuffle(v)

    i = round(n * train)  # train
    j = round(n * test) + i  # test
    k = round(n * validate) + j  # validate
    return v[:i], v[i:j], v[j:k]  # return indices


def make_dirs(dir='new_dir/'):
    # Create folders
    dir = Path(dir)
    if dir.exists():
        shutil.rmtree(dir)  # delete dir
    for p in dir, dir / 'labels', dir / 'images':
        p.mkdir(parents=True, exist_ok=True)  # make dir
    return dir


def write_data_data(fname='data.data', nc=80):
    # write darknet *.data file
    lines = ['classes = %g\n' % nc,
             'train =../out/data_train.txt\n',
             'valid =../out/data_test.txt\n',
             'names =../out/data.names\n',
             'backup = backup/\n',
             'eval = coco\n']

    with open(fname, 'a') as f:
        f.writelines(lines)


def image_folder2file(folder='images/'):  # from utils import *; image_folder2file()
    # write a txt file listing all imaged in folder
    s = glob.glob(f'{folder}*.*')
    with open(f'{folder[:-1]}.txt', 'w') as file:
        for l in s:
            file.write(l + '\n')  # write image list


def add_coco_background(path='../data/sm4/', n=1000):  # from utils import *; add_coco_background()
    # add coco background to sm4 in outb.txt
    p = f'{path}background'
    if os.path.exists(p):
        shutil.rmtree(p)  # delete output folder
    os.makedirs(p)  # make new output folder

    # copy images
    for image in glob.glob('../coco/images/train2014/*.*')[:n]:
        os.system(f'cp {image} {p}')

    # add to outb.txt and make train, test.txt files
    f = f'{path}out.txt'
    fb = f'{path}outb.txt'
    os.system(f'cp {f} {fb}')
    with open(fb, 'a') as file:
        file.writelines(i + '\n' for i in glob.glob(f'{p}/*.*'))
    split_rows_simple(file=fb)


def create_single_class_dataset(path='../data/sm3'):  # from utils import *; create_single_class_dataset('../data/sm3/')
    # creates a single-class version of an existing dataset
    os.system(f'mkdir {path}_1cls')


def flatten_recursive_folders(path='../../Downloads/data/sm4/'):  # from utils import *; flatten_recursive_folders()
    # flattens nested folders in path/images and path/JSON into single folders
    idir, jdir = f'{path}images/', f'{path}json/'
    nidir, njdir = Path(f'{path}images_flat/'), Path(f'{path}json_flat/')
    n = 0

    # Create output folders
    for p in [nidir, njdir]:
        if os.path.exists(p):
            shutil.rmtree(p)  # delete output folder
        os.makedirs(p)  # make new output folder

    for parent, dirs, files in os.walk(idir):
        for f in tqdm(files, desc=parent):
            f = Path(f)
            stem, suffix = f.stem, f.suffix
            if suffix.lower()[1:] in img_formats:
                n += 1
                stem_new = '%g_' % n + stem
                image_new = nidir / (stem_new + suffix)  # converts all formats to *.jpg
                json_new = njdir / f'{stem_new}.json'

                image = parent / f
                json = Path(parent.replace('images', 'json')) / str(f).replace(suffix, '.json')

                os.system("cp '%s' '%s'" % (json, json_new))
                os.system("cp '%s' '%s'" % (image, image_new))
                # cv2.imwrite(str(image_new), cv2.imread(str(image)))

    print('Flattening complete: %g jsons and images' % n)


def coco91_to_coco80_class():  # converts 80-index (val2014) to 91-index (paper)
    # https://tech.amikelive.com/node-718/what-object-categories-labels-are-in-coco-dataset/
    x = [0, 1, 2, 3, 4, 5, 6, 7, 8, 9, 10, None, 11, 12, 13, 14, 15, 16, 17, 18, 19, 20, 21, 22, 23, None, 24, 25, None,
         None, 26, 27, 28, 29, 30, 31, 32, 33, 34, 35, 36, 37, 38, 39, None, 40, 41, 42, 43, 44, 45, 46, 47, 48, 49, 50,
         51, 52, 53, 54, 55, 56, 57, 58, 59, None, 60, None, None, 61, None, 62, 63, 64, 65, 66, 67, 68, 69, 70, 71, 72,
         None, 73, 74, 75, 76, 77, 78, 79, None]
    return x
slefjson2posetxt.py
import json

import cv2
import pandas as pd
from PIL import Image
from collections import defaultdict

from utils import *


def convert_coco_json(cocojsonpath, savepath,use_keypoints=False, cls91to80=True):
    """Converts COCO dataset annotations to a format suitable for training YOLOv5 models.

    Args:
        labels_dir (str, optional): Path to directory containing COCO dataset annotation files.
        use_segments (bool, optional): Whether to include segmentation masks in the output.
        use_keypoints (bool, optional): Whether to include keypoint annotations in the output.
        cls91to80 (bool, optional): Whether to map 91 COCO class IDs to the corresponding 80 COCO class IDs.

    Raises:
        FileNotFoundError: If the labels_dir path does not exist.

    Example Usage:
        convert_coco(labels_dir='../coco/annotations/', use_segments=True, use_keypoints=True, cls91to80=True)

    Output:
        Generates output files in the specified output directory.
    """
    # save_dir = make_dirs('yolo_labels')  # output directory
    save_dir = make_dirs(savepath)  # output directory
    coco80 = coco91_to_coco80_class()

    # Import json
    for json_file in sorted(Path(cocojsonpath).resolve().glob('*.json')):
        fn = Path(save_dir) / 'labels' / json_file.stem.replace('instances_', '')  # folder name
        fn.mkdir(parents=True, exist_ok=True)
        with open(json_file) as f:
            data = json.load(f)

        # Create image dict
        images = {f'{x["id"]:d}': x for x in data['images']}
        # Create image-annotations dict
        imgToAnns = defaultdict(list)
        for ann in data['annotations']:
            imgToAnns[ann['image_id']].append(ann)

        # Write labels file
        for img_id, anns in tqdm(imgToAnns.items(), desc=f'Annotations {json_file}'):
            img = images[f'{img_id:d}']
            h, w, f = img['height'], img['width'], img['file_name']

            bboxes = []
            segments = []
            keypoints = []
            for ann in anns:
                if ann['iscrowd']:
                    continue
                # The COCO box format is [top left x, top left y, width, height]
                box = np.array(ann['bbox'], dtype=np.float64)
                box[:2] += box[2:] / 2  # xy top-left corner to center
                box[[0, 2]] /= w  # normalize x
                box[[1, 3]] /= h  # normalize y
                if box[2] <= 0 or box[3] <= 0:  # if w <= 0 and h <= 0
                    continue

                cls = coco80[ann['category_id'] - 1] if cls91to80 else ann['category_id'] - 1  # class
                box = [cls] + box.tolist()
                if box not in bboxes:
                    bboxes.append(box)
                if use_keypoints and ann.get('keypoints') is not None:
                    k = (np.array(ann['keypoints']).reshape(-1, 3) / np.array([w, h, 1])).reshape(-1).tolist()
                    k = box + k
                    keypoints.append(k)

            # Write
            fname = f.split('/')[-1]
            # with open((fn / f).with_suffix('.txt'), 'a') as file:
            with open((fn / fname).with_suffix('.txt'), 'a') as file:
                for i in range(len(bboxes)):
                    if use_keypoints:
                        line = *(keypoints[i]),  # cls, box, keypoints
                    file.write(('%g ' * len(line)).rstrip() % line + '\n')
if __name__ == '__main__':
    source = 'COCO'
    cocojsonpath = r'G:\XRW\Data\mycoco\annotations'
    savepath = r'G:\XRW\Data\myposedata'
    if source == 'COCO':
        convert_coco_json(cocojsonpath,  # directory with *.json
                          savepath,
                          use_keypoints=True,
                          cls91to80=True)
运行代码得到:


<class-index>是对象的类的索引,<x> <y> <width> <height>是边界框的坐标,<px1> <py1> <px2> <py2> ... <pxn> <pyn>是关键点的像素坐标。坐标由空格分隔。
3、检查生成的txt是否准确
PoseVisualization.py:将txt的信息可视化在图片上进行验证。
import cv2
imgpath = r'G:\XRW\Data\selfjson\five_22101205_000930.jpg'
txtpath = r'G:\XRW\Data\myposedata\labels\selfjson\five_22101205_000930.txt'

f = open(txtpath,'r')
lines = f.readlines()
img = cv2.imread(imgpath)
h, w, c = img.shape
colors = [[255, 128, 0], [255, 153, 51], [255, 178, 102], [230, 230, 0], [255, 153, 255],
                                      [153, 204, 255], [255, 102, 255], [255, 51, 255], [102, 178, 255], [51, 153, 255],
                                      [255, 153, 153], [255, 102, 102], [255, 51, 51], [153, 255, 153], [102, 255, 102],
                                      [51, 255, 51], [0, 255, 0], [0, 0, 255], [255, 0, 0], [255, 255, 255]]
for line in lines:
    print(line)
    l = line.split(' ')
    print(len(l))
    cx = float(l[1]) * w
    cy = float(l[2]) * h
    weight = float(l[3]) * w
    height = float(l[4]) * h
    xmin = cx - weight/2
    ymin = cy - height/2
    xmax = cx + weight/2
    ymax = cy + height/2
    print((xmin,ymin),(xmax,ymax))
    cv2.rectangle(img,(int(xmin),int(ymin)),(int(xmax),int(ymax)),(0,255,0),2)
    kpts = []

    for i in range(17):
        x = float(l[5:][3*i]) * w
        y = float(l[5:][3*i+1]) * h
        s = int(l[5:][3*i+2])
        print(x,y,s)
        if s != 0:
            cv2.circle(img,(int(x),int(y)),1,colors[i],2)
        kpts.append([int(x),int(y),int(s)])
    print(kpts)
    kpt_line = [[16, 14], [14, 12], [17, 15], [15, 13], [12, 13], [6, 12], [7, 13], [6, 7], [6, 8], [7, 9],
                [8, 10], [9, 11], [2, 3], [1, 2], [1, 3], [2, 4], [3, 5], [4, 6], [5, 7]]
    for j in range(len(kpt_line)):
        m,n = kpt_line[j][0],kpt_line[j][1]
        if kpts[m-1][2] !=0 and kpts[n-1][2] !=0:
            cv2.line(img,(kpts[m-1][0],kpts[m-1][1]),(kpts[n-1][0],kpts[n-1][1]),colors[j],2)

img = cv2.resize(img, None, fx=0.5, fy=0.5)
cv2.imshow('1',img)
cv2.waitKey(0)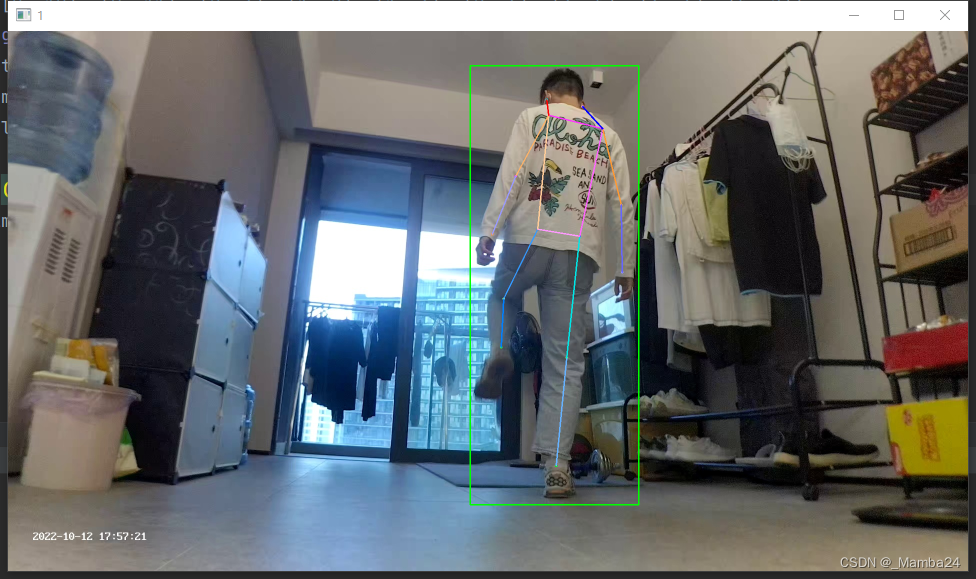
这样就将自己的Json格式转成训练Yolov8-Pose姿态的txt格式了。
4、将图片copy到对应路径中
以上步骤完成后只生成了txt,需要再将对应的图片copy到对应路径中。
pickImg.py
import glob
import os
import shutil
imgpath = r'G:\XRW\Data\selfjson'
txtpath = r'G:\XRW\Data\myposedata\labels\selfjson'
savepath = r'G:\XRW\Data\myposedata\images\selfjson'
os.makedirs(savepath,exist_ok=True)

imglist = glob.glob(os.path.join(imgpath ,'*.jpg'))
# print(imglist)
txtlist = glob.glob(os.path.join(txtpath ,'*.txt'))
# print(txtlist)
for img in imglist:
    name = txtpath + '\\' +img.split('\\')[-1].split('.')[0 ] +'.txt'
    print(name)
    if name in txtlist:
shutil.copy(img ,savepath)- imgpath CoCo数据集图片路径
- txtpath 生成的txt路径
- savepath 保存图片的路径


这样就将自己标注的数据集转换成Yolov8-Pose格式的txt了。
相关文章:

Yolov11-detect训练自己的数据集
至此,整个YOLOv11的训练预测阶段完成,与YOLOv8差不多。欢迎各位批评指正。
YOLOv10训练自己的数据集
至此,整个YOLOv10的训练预测阶段完成,与YOLOv8差不多。欢迎各位批评指正。
YOLOv10环境搭建、模型预测和ONNX推理
运行后会在文件yolov10s.pt存放路径下生成一个的yolov10s.onnxONNX模型文件。安装完成之后,我们简单执行下推理命令测试下效果,默认读取。终端,进入base环境,创建新环境。(1)onnx模型转换。
YOLOv7-Pose 姿态估计-环境搭建和推理
终端,进入base环境,创建新环境,我这里创建的是p38t17(python3.8,pytorch1.7)安装pytorch:(网络环境比较差时,耗时会比较长)下载好后打开yolov7-pose源码包。imgpath:需要预测的图片的存放路径。modelpath:模型的存放路径。Yolov7-pose权重下载。打开工程后,进入设置。

深度学习硬件基础:CPU与GPU
CPU:叫做中央处理器(central processing unit)作为计算机系统的运算和控制核心,是信息处理、程序运行的最终执行单元。[^3]可以形象的理解为有25%的ALU(运算单元)、有25%的Control(控制单元)、50%的Cache(缓存单元)GPU:叫做图形处理器。
YOLOv8-Detect训练CoCo数据集+自己的数据集
至此,整个训练预测阶段完成。此过程同样可以在linux系统上进行,在数据准备过程中需要仔细,保证最后得到的数据准确,最好是用显卡进行训练。有问题评论区见!

YOLOv5中Ghostbottleneck结构shortcut=True和shortcut=False有什么区别
GhostBotleneck结构中的shodcut=True和shorcut=False的区别在干是否使用残差连接。当shorcu=True时,使用残差连接,可以以加速模型的收敛速度和提高模型的准确率,当shorcu=False时,不使用残差连接,可以减少模型的参数数量和计算量。实际上不只是Ghostbottleneck具有残差连接,在C3、C2f等具有Bottleneck模块的结构均可根据此例举一反三。残差块是深度卷积神经网络中的一种基本模块,可以有效地解决梯度消失和梯度爆炸的问题。
基于深度学习的细胞感染性识别与判定
通过引入深度学习技术,我们能够更精准地识别细胞是否受到感染,为医生提供更及时的信息,有助于制定更有效的治疗方案。基于深度学习的方法通过学习大量样本,能够自动提取特征并进行准确的感染性判定,为医学研究提供了更高效和可靠的手段。通过引入先进的深度学习技术,我们能够实现更快速、准确的感染性判定,为医学研究和临床实践提供更为可靠的工具。其准确性和效率将为医学研究带来新的突破,为疾病的早期诊断和治疗提供更可靠的支持。通过大规模的训练,模型能够学到细胞感染的特征,并在未知数据上做出准确的预测。

windows安装conda环境,开发openai应用准备,运行第一个ai程序
作者开发第一个openai应用的环境准备、第一个openai程序调用成功,做个记录,希望帮助新来的你。第一次能成功运行的openai程序,狠开心。
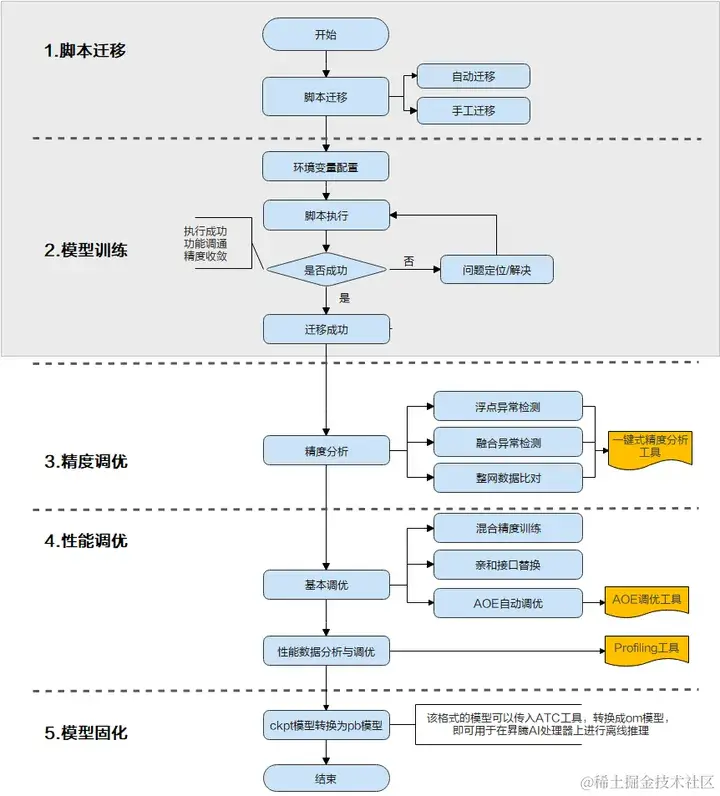
一文详解TensorFlow模型迁移及模型训练实操步骤
当前业界很多训练脚本是基于TensorFlow的Python API进行开发的,默认运行在CPU/GPU/TPU上,为了使这些脚本能够利用昇腾AI处理器的强大算力执行训练,需要对TensorFlow的训练脚本进行迁移。
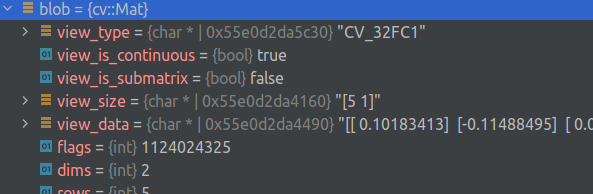
将 OpenCV 与 gdb 驱动的 IDE 结合使用
能力这个漂亮的打印机可以显示元素类型、标志和(可能被截断的)矩阵。众所周知,它可以在 Clion、VS Code 和 gdb 中工作。Clion 示例安装移入 .放在方便的地方,重命名并移动到您的个人文件夹中。将“source”行更改为指向您的路径。如果系统中安装的 python 3 版本与 gdb 中的版本不匹配,请使用完全相同的版本创建一个新的虚拟环境,相应地安装并更改 python3 的路径。用法调试器中以前缀为前缀的字段是为方便起见而添加的伪字段,其余字段保持原样。

改进的yolov5目标检测-yolov5替换骨干网络-yolo剪枝(TensorRT及NCNN部署)
改进的yolov5目标检测-yolov5替换骨干网络-yolo剪枝(TensorRT及NCNN部署)2021.10.30 复现TPH-YOLOv52021.10.31 完成替换backbone为Ghostnet2021.11.02 完成替换backbone为Shufflenetv22021.11.05 完成替换backbone为Mobilenetv3Small2021.11.10 完成EagleEye对YOLOv5系列剪枝支持2021.11.14 完成MQBench对YOLOv5系列量
PyTorch中nn.Module的继承类中方法foward是自动执行的么?
在 PyTorch的 nn.Module中,forward方法并不是自动执行的,但它是在模型进行前向传播时必须调用的一个方法。当你实例化一个继承自torch.nn.Module的自定义类并传入输入数据时,需要通过调用该实例来实现前向传播计算,这实际上会隐式地调用forward方法。
文本挖掘的几种常用的方法
1. 文本预处理:首先对文本数据进行清洗和预处理,如去除停用词(如“的”、“是”等常用词)、标点符号和特殊字符,并进行词干化或词形还原等操作,以减少数据噪声和提取更有意义的特征。3. 文本分类:将文本数据分为不同的类别或标签。文本挖掘是一种通过自动化地发现、提取和分析大量文本数据中的有趣模式、关联和知识的技术。这些示例代码只是简单的演示了各种方法的使用方式,具体的实现还需要根据具体的需求和数据进行适当的调整和优化。8. 文本生成:使用统计模型或深度学习模型生成新的文本,如机器翻译、文本摘要和对话系统等。

智能革命:揭秘AI如何重塑创新与效率的未来
智能革命:揭秘AI如何重塑创新与效率的未来

一文搞懂深度信念网络!DBN概念介绍与Pytorch实战
深度信念网络(Deep Belief Networks, DBNs)是一种深度学习模型,代表了一种重要的技术创新,具有几个关键特点和突出能力。首先,DBNs是由多层受限玻尔兹曼机(Restricted Boltzmann Machines, RBMs)堆叠而成的生成模型。这种多层结构使得DBNs能够捕获数据中的高层次抽象特征,对于复杂的数据结构具有强大的表征能力。其次,DBNs采用无监督预训练的方式逐层训练模型。
人工智能在现代科技中的应用和未来发展趋势
未来,深度学习将进一步发展,能够应用于更多的领域,如自动驾驶、智能制造和医疗辅助等。图像识别和计算机视觉:人工智能在图像识别和计算机视觉领域取得了巨大突破,能够自动识别和分类图像中的物体和场景。未来,随着人工智能技术的发展,自动化和机器人技术将实现更高的智能化程度,能够完成更加复杂的任务。语音识别和自然语言处理:人工智能已经实现了高度准确的语音识别技术,使得我们可以通过语音与智能助理交互,如苹果的Siri和亚马逊的Alexa。未来,语音识别技术将变得更加智能和自然,能够理解和回答更加复杂的问题。

在云计算环境中,如何利用 AI 改进云计算系统和数据库系统性能
2023年我想大家讨论最多,热度最大的技术领域就是 AIGC 了,AI绘画的兴起,ChatGPT的火爆,在微软背后推手的 OpenAI 大战 Google几回合后,国内各种的大语言模型产品也随之各家百花齐放,什么文心一言、通义千问、科大讯飞的星火以及华为的盘古等等,一下子国内也涌现出几十种人工智能的大语言模型产品。ChatGPT 爆火之后,你是否有冷静的思考过 AIGC 的兴起对我们有哪些机遇与挑战?我们如何将AI 应用到我们现有的工作学习中?_aigc k8s

神经网络中的分位数回归和分位数损失
分位数回归是一种强大的统计工具,对于那些关注数据分布中不同区域的问题,以及需要更加灵活建模的情况,都是一种有价值的方法。本文将介绍了在神经网络种自定义损失实现分位数回归,并且介绍了如何检测和缓解预测结果的"扁平化"问题。Quantile loss在一些应用中很有用,特别是在金融领域的风险管理问题中,因为它提供了一个在不同分位数下评估模型性能的方法。作者:Shiro Matsumoto。
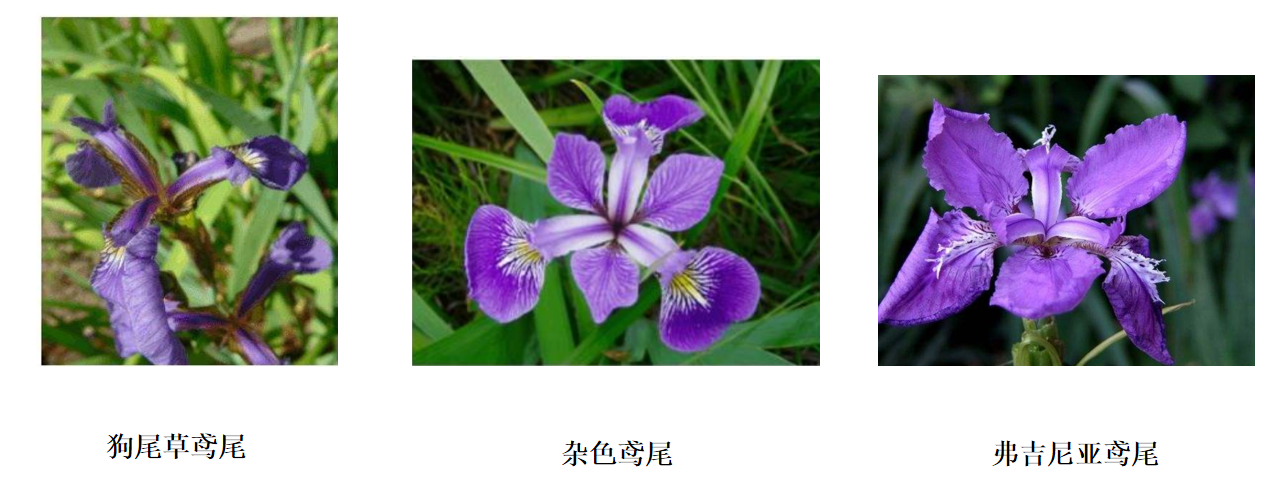
基于神经网络——鸢尾花识别(Iris)
鸢尾花识别是学习AI入门的案例,这里和大家分享下使用Tensorflow2框架,编写程序,获取鸢尾花数据,搭建神经网络,最后训练和识别鸢尾花。
深度学习知识点全面总结
深度学习定义:一般是指通过训练多层网络结构对未知数据进行分类或回归深度学习分类:有监督学习方法——深度前馈网络、卷积神经网络、循环神经网络等; 无监督学习方法——深度信念网、深度玻尔兹曼机,深度自编码器等。深度神经网络的基本思想是通过构建多层网络,对目标进行多层表示,以期通过多层的高层次特征来表示数据的抽象语义信息,获得更好的特征鲁棒性。神经网络的计算主要有两种:前向传播(foward propagation, FP)作用于每一层的输入,通过逐层计算得到输出结果;

为什么深度学习神经网络可以学习任何东西
尽管如此,神经网络在处理一些对计算机而言极具挑战性的任务上表现出色,特别是在需要直觉和模糊逻辑的领域,如计算机视觉和自然语言处理,神经网络已经彻底改变了这些领域的面貌。在探讨神经网络如何学习的过程中,我们首先遇到了一个基本问题:如果我们不完全知道一个函数的形式,只知道它的部分输入和输出值,我们能否对这个函数进行逆向工程?重要的是,只要知道了这个函数,就可以针对任意输入x计算出对应的输出y。一种简单而有力的思考世界的方式,通过结合简单的计算,我们可以让计算机构造任何我们想要的功能,神经网络,从本质上讲,

如何使用JuiceSSH实现手机端远程连接Linux服务器
处于内网的虚拟机如何被外网访问呢?如何手机就能访问虚拟机呢?cpolar+JuiceSSH 实现手机端远程连接Linux虚拟机(内网穿透,手机端连接Linux虚拟机)
深度学习与神经网络
神经网络是一种模拟人脑神经元行为的计算模型,神经网络由大量的神经元(在计算领域中常被称为“节点”或“单元”)组成,并且这些神经元被分为不同的层,分别为输入层、隐藏层和输出层。每一个神经元都与前一层的所有神经元相连接,连接的强度(或权重)代表了该连接的重要性。神经元接收前一层神经元的信息(这些信息经过权重加权),然后通过激活函数(如Sigmoid、ReLU等)处理,将结果传递到下一层。输入层接收原始数据,隐藏层负责处理这些数据,而输出层则将处理后的结果输出。
程序,进程,线程,超线程之间的联系和区别
当我们谈到计算机程序的执行时,经常会涉及到“程序”,“进程”,“线程”和“超线程”这些概念。通过理解这些概念及其之间的联系和区别,可以帮助我们更好地理解计算机程序的执行方式和并发处理机制。来源:6547网 http://www.6547.cn/blog/442。

绝地求生电脑版的最低配置要求?
更好的方式是通过官方的渠道购买游戏账号,并遵守游戏的规则和使用协议,以保证自己的游戏体验和账号安全性。但请注意,游戏的配置要求可能随着游戏的更新而有所改变,建议您在购买或升级电脑时,参考官方的配置要求以获得最佳游戏体验。如果您的电脑配备了更高性能的处理器,游戏的运行体验将更为流畅。绝地求生是一款较为复杂的游戏,需要较大的内存来加载游戏资源并确保游戏的流畅运行。所以在安装游戏之前,确保您的电脑有足够的存储空间。这些推荐配置可以使您在绝地求生中获得更高的帧率和更好的画面表现,提供更加顺畅和逼真的游戏体验。
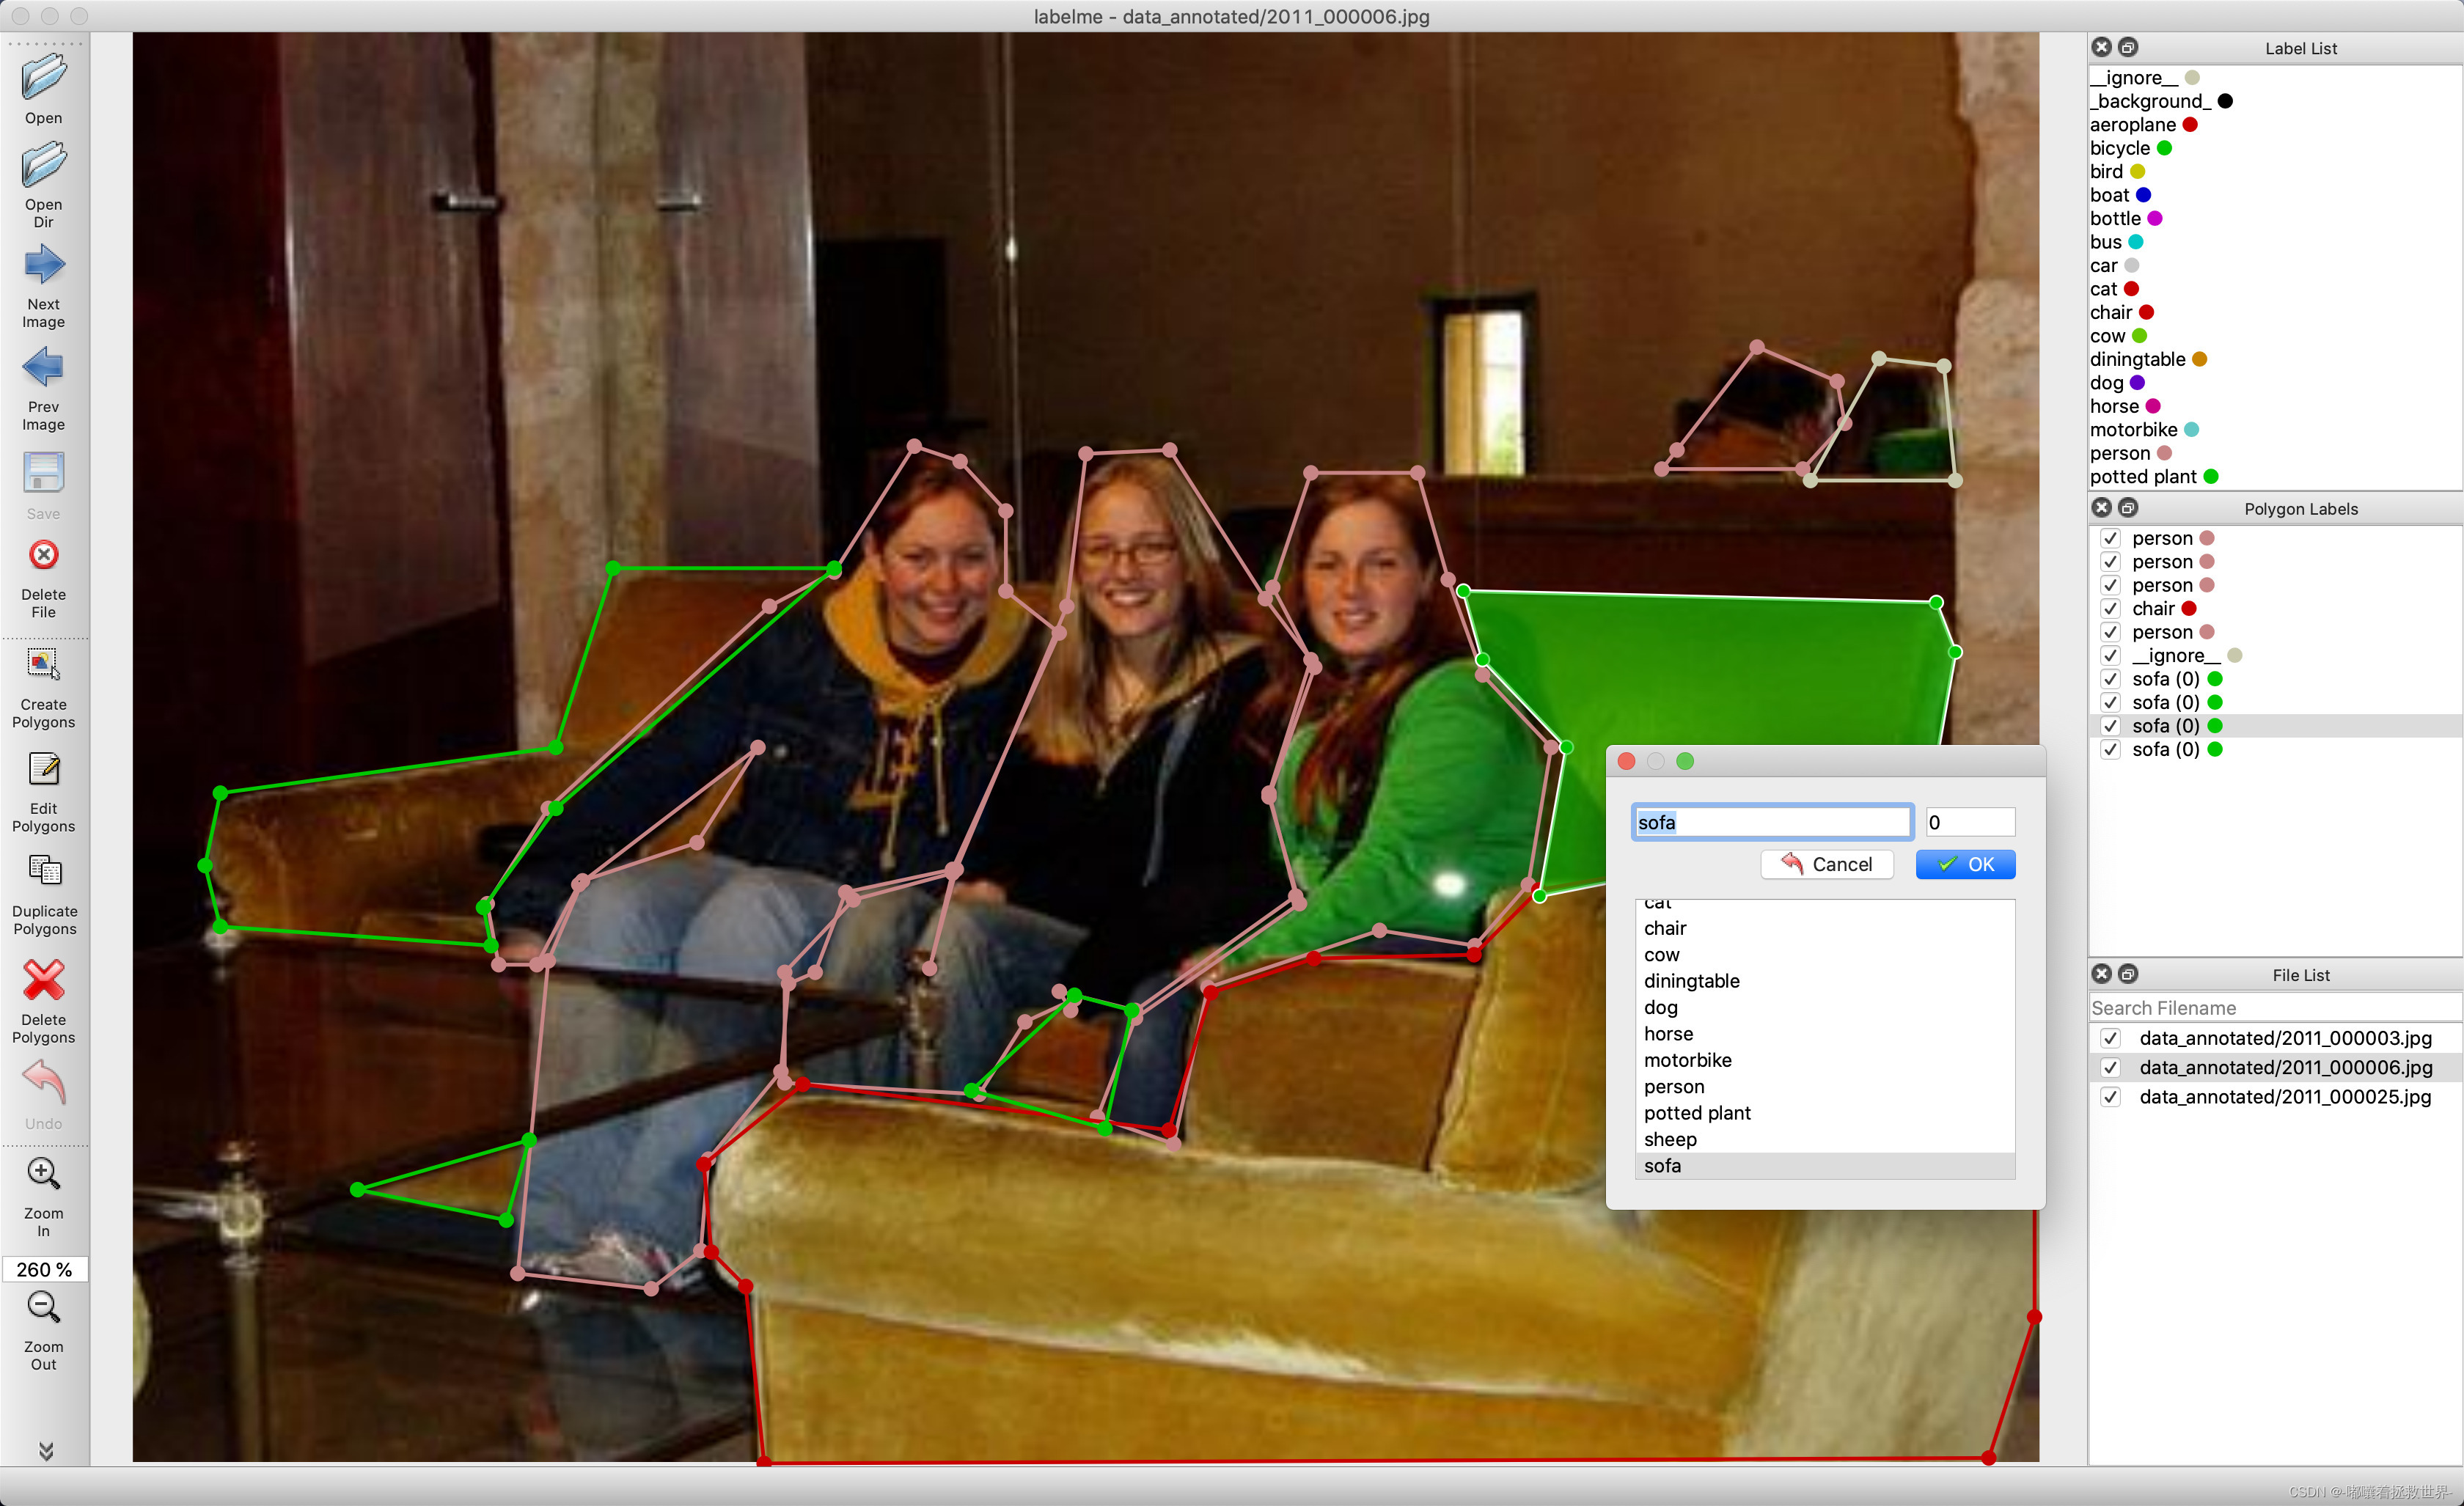
labelme安装与使用教程(内附一键运行包和转格式代码)
Labelme是一个开源的图像标注工具,由麻省理工学院的计算机科学和人工智能实验室(CSAIL)开发。它主要用于创建计算机视觉和机器学习应用所需的标记数据集。LabelMe让用户可以在图片上标注对象和区域,为机器学习模型提供训练数据。它支持多种标注类型,如矩形框、多边形和线条等。它是用 Python 编写的,并使用 Qt 作为其图形界面。
讲解mtrand.RandomState.randint low >= high
第一个例子生成了一个介于 0 和 10 之间(不包括 10)的随机整数,而第二个示例生成了一个形状为 (3, 2) 的二维数组,其中的元素是介于 1 和 100 之间(不包括 100)的随机整数。这样,我们就可以在实际的密码重置场景中使用 generate_reset_code() 函数来生成一个随机验证码,并将其发送给用户进行密码重置操作。这段代码的预期目标是生成一个范围为 [low, high) 的随机整数,即在 5 到 3 之间(不包括 3)生成一个整数。的问题,并生成所需范围内的随机整数。

讲解opencv检测黑色区域
本文介绍了使用OpenCV检测黑色区域的两种方法:阈值方法和颜色范围方法。阈值方法通过将图像转换为灰度图像并应用阈值处理来检测黑色区域。颜色范围方法通过在RGB或HSV颜色空间中定义合适的颜色范围来检测黑色区域。这些方法对于图像处理、目标定位和计算机视觉任务都非常有用。当用OpenCV检测黑色区域的一个实际应用场景是汽车驾驶辅助系统中的车道检测。import cv2# 转换为灰度图像# 应用阈值处理# 查找车道线轮廓# 找出最长的轮廓(假设为车道线)# 拟合多项式曲线。
讲解UserWarning: Update your Conv2D
Conv2D"告警信息是在旧版深度学习框架中使用较新的CNN模型时常见的问题。通过查阅官方文档并根据指导更新代码,我们能够适应新的API、参数或者用法,确保模型的正确性和性能。由于不同的框架和版本有所不同,我们需要根据具体情况来解决这个问题。及时更新框架和代码,保持与最新和推荐的版本保持同步,是进行深度学习研究和开发的重要环节。