【Smart_Point】unique_ptr中独占指针使用MakeFrame
1. DFrame使用方法
std::unique_ptr<deptrum::Frame> MakeFrame(deptrum::FrameType frame_type,int width,int height,int bytes_per_pixel,void* data,uint64_t timestamp,int index,float temperature) {std::unique_ptr<deptrum::Frame> frame{std::make_unique<deptrum::Frame>()};
frame->index = index;frame->size = width * height * bytes_per_pixel;frame->data = data;frame->timestamp = timestamp;frame->frame_type = frame_type;frame->temperature = temperature;frame->rows = height;frame->cols = width;frame->bytes_per_pixel = bytes_per_pixel;return frame;
}std::unique_ptr<deptrum::Frame> MakeFrame(deptrum::FrameType frame_type,int width,int height,int bytes_per_pixel,void* data,uint64_t timestamp = 0,int index = 0,float temperature = 0);
} // namespace depthstruct DFrame : public Frame {DFrame(){};DFrame(int rows, int cols, int bytes_per_pixel, FrameType frame_type, void* data) {this->index = 0;this->size = rows * cols * bytes_per_pixel;this->cols = cols;this->rows = rows;this->bytes_per_pixel = bytes_per_pixel;this->temperature = 0;this->frame_type = frame_type;this->timestamp = 0;this->data = data;}DFrame(int rows, int cols, int bytes_per_pixel, FrameType frame_type) {this->index = 0;this->size = rows * cols * bytes_per_pixel;this->cols = cols;this->rows = rows;this->bytes_per_pixel = bytes_per_pixel;this->temperature = 0;this->frame_type = frame_type;this->timestamp = 0;this->data = new uint8_t[size];}void FreeData() {if (data) {delete[](uint8_t*) data;data = nullptr;}}~DFrame() {
// if (data&&flag) {
// delete[](uint8_t*) data;
// data = nullptr;
// }
// private flag;
};void MainWindow::on_pushButton_clicked(bool checked)
{int32_t status=0;
//1.初始化深度库DepthMagic* deptrum_depth = nullptr;deptrum_depth = DepthMagic::Create(DepthInputFormat::kUint8);
DeviceType device_type = DeviceType::kAurora300;if (deptrum_depth->Initialize(FLAGS_config, device_type, 2) != 0) {if(deptrum_depth)DepthMagic::Destroy(deptrum_depth);return;}
//2.读图cv::Mat speckle_image = cv::imread(path_speckle, cv::IMREAD_ANYDEPTH);cv::Mat ir_image=cv::imread(path_ir, cv::IMREAD_ANYDEPTH);cv::transpose(ir_image, ir_image);cv::flip(ir_image, ir_image, 0);cv::resize(ir_image, ir_image, cv::Size(image_output_width_, image_output_height_));
//3.预处理uint8_t* blurred = new uint8_t[image_input_width_ * image_input_height_];uint8_t* flagged = new uint8_t[image_input_width_ * image_input_height_];Frame *blurred_frame=new Frame; blurred_frame->data=blurred;Frame* flagged_frame=new Frame; flagged_frame->data=flagged;
std::shared_ptr<deptrum::Frame> blu_share(blurred_frame,[blurred](deptrum::Frame* blurred_frame) {delete[] blurred;delete blurred_frame;});std::shared_ptr<deptrum::Frame> flg_share(flagged_frame,[flagged](deptrum::Frame* flagged_frame) {delete[] flagged;delete flagged_frame;});status = deptrum_depth->Preprocess(blu_share.get(),flg_share.get(),MakeFrame(deptrum::FrameType::kSpeckleFrame,1280,800,1,speckle_image.data).get());std::cout << "Preprocess status :" << status << std::endl;
//4.深度重建uint16_t depth_roi_mean = 0;uint16_t* depth_image = new uint16_t[400 * 640];status = deptrum_depth->GenerateDepthMap(depth_image,depth_roi_mean,blu_share.get(),MakeFrame(deptrum::FrameType::kIrFrame,400,640,1,ir_image.data).get(),flg_share.get(),1);
std::cout << "GenerateDepthMap status" << status << std::endl;cv::Mat raw_depth(640, 400, CV_16UC1, depth_image);cv::imwrite("D:\\depthrun\\untitled1\\release\\depth.png", raw_depth * 100);delete[] depth_image;speckle_image.release();ir_image.release();if(deptrum_depth)DepthMagic::Destroy(deptrum_depth);
}相关文章:

最大熵阈值分割
#include <opencv2/imgproc/imgproc.hpp> #include <opencv2/core/core.hpp> #include <opencv2/highgui/highgui.hpp> #include <iostream> using namespace std; using namespace cv; // 计算当前的位置的能量熵 float caculateCurrentE…
php登录注册
php 登录注册 注册代码:register.php <style type"text/css">form{width:300px;background-color:#EEE0E5;margin-left:300px;margin-top:30px;padding:30px;}button{margin-top:20px;} </style> <form method"post"> <la…
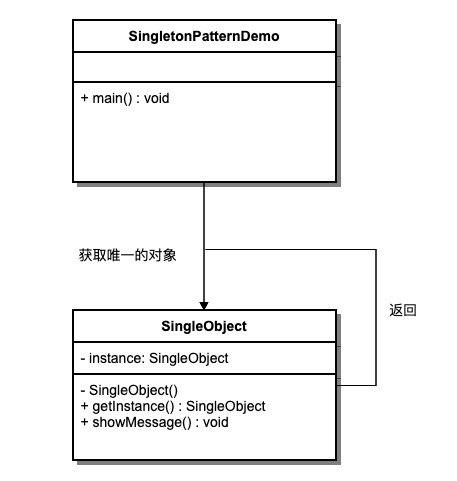
【C++】C/C++ 中的单例模式
目录 part 0:单例模式3种经典的实现方式 Meyers Singleton Meyers Singleton版本二 Lazy Singleton Eager Singleton Testing part 1:C之单例模式 动机 实现一[线程不安全版本] 实现二[线程安全,锁的代价过高] 锁机制 实现三[双检…
计算图像波峰点
#include "opencv2/highgui/highgui.hpp" #include "opencv2/imgproc/imgproc.hpp" #include <iostream> #include <stdio.h> #include <iostream> #include <vector> using namespace std; using namespace cv; // 计算图像的波峰…
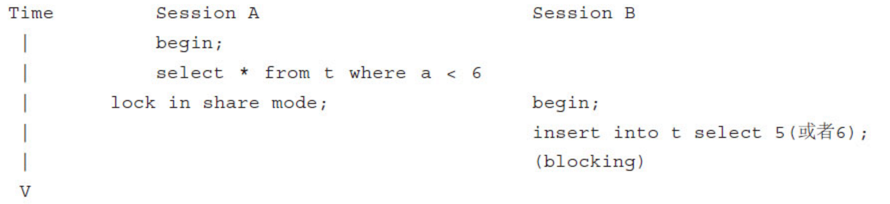
锁的算法,隔离级别的问题
锁的算法 InnoDB存储引擎有3中行锁的算法设计,分别是: Record Lock:单个行记录上的锁。Gap Lock:间隙锁,锁定一个范围,但不包含记录本身。Next-Key Lock:Gap LockRecord Lock,锁定一…
好程序员分享24个canvas基础知识小结
好程序员分享24个canvas基础知识小结,非常全面详尽,推荐给大家。 现把canvas的知识点总结如下,以便随时查阅。 1、填充矩形 fillRect(x,y,width,height); 2、绘制矩形边框 strokeRect(x,y,width,height); 3、擦除矩形 clearRect(x,y,width,he…

【leetcode】二叉树与经典问题
文章目录笔记leetcode [114. 二叉树展开为链表](https://leetcode-cn.com/problems/flatten-binary-tree-to-linked-list/)解法一: 后序遍历、递归leetcode [226. 翻转二叉树](https://leetcode-cn.com/problems/invert-binary-tree/)思路与算法复杂度分析leetcode [剑指 Offer…
PHP PSR-1 基本代码规范(中文版)
基本代码规范 本篇规范制定了代码基本元素的相关标准,以确保共享的PHP代码间具有较高程度的技术互通性。 关键词 “必须”("MUST")、“一定不可/一定不能”("MUST NOT")、“需要”("REQUIRED")、“将会”("SHALL")、“不会…
最近邻插值实现:图像任意尺寸变换
#<opencv2/imgproc/imgproc.hpp> #include <opencv2/core/core.hpp> #include <opencv2/highgui/highgui.hpp> #include <iostream> using namespace cv; using namespace std; // 实现最近邻插值图像缩放 cv::Mat nNeighbourInterpolatio…
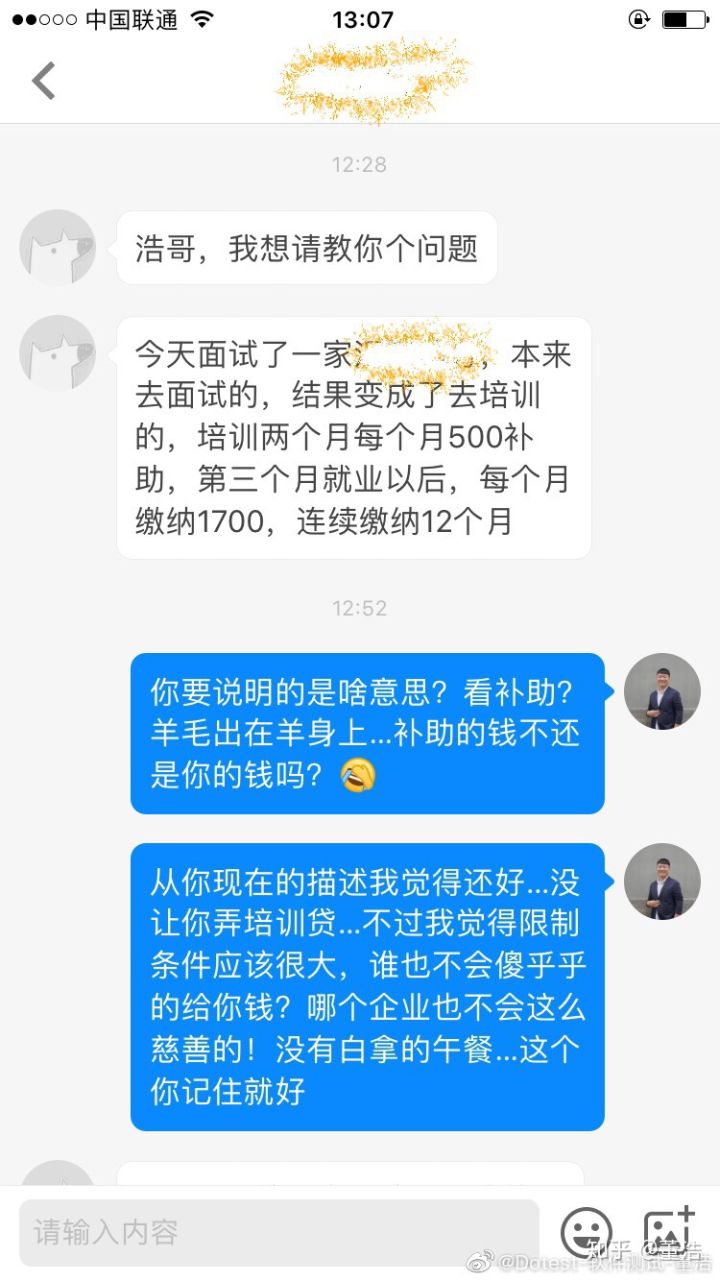
软件测试-培训的套路-log3
最新的套路!我是没了解过--下图中描述-log3 Dotest-董浩 但是我知道不管什么没有白吃的午餐而且还会给钱…如果真的有,请醒醒! 当然话又回来,套路不套路,关键看你是否需要;你如果需要我觉得是帮你…不需要&…

ALSA声卡驱动中的DAPM详解之四:在驱动程序中初始化并注册widget和route
前几篇文章我们从dapm的数据结构入手,了解了代表音频控件的widget,代表连接路径的route以及用于连接两个widget的path。之前都是一些概念的讲解以及对数据结构中各个字段的说明,从本章开始,我们要从代码入手,分析dapm的…
双线性插值实现
#include <opencv2/imgproc/imgproc.hpp> #include <opencv2/core/core.hpp> #include <opencv2/highgui/highgui.hpp> #include <iostream> // 实现双线性插值图像缩放 cv::Mat BilinearInterpolation(cv::Mat srcImage) {CV_Assert(srcI…

【C++】C++ 强制转换运算符
C 运算符 强制转换运算符是一种特殊的运算符,它把一种数据类型转换为另一种数据类型。强制转换运算符是一元运算符,它的优先级与其他一元运算符相同。 大多数的 C 编译器都支持大部分通用的强制转换运算符: (type) expression 其中&…
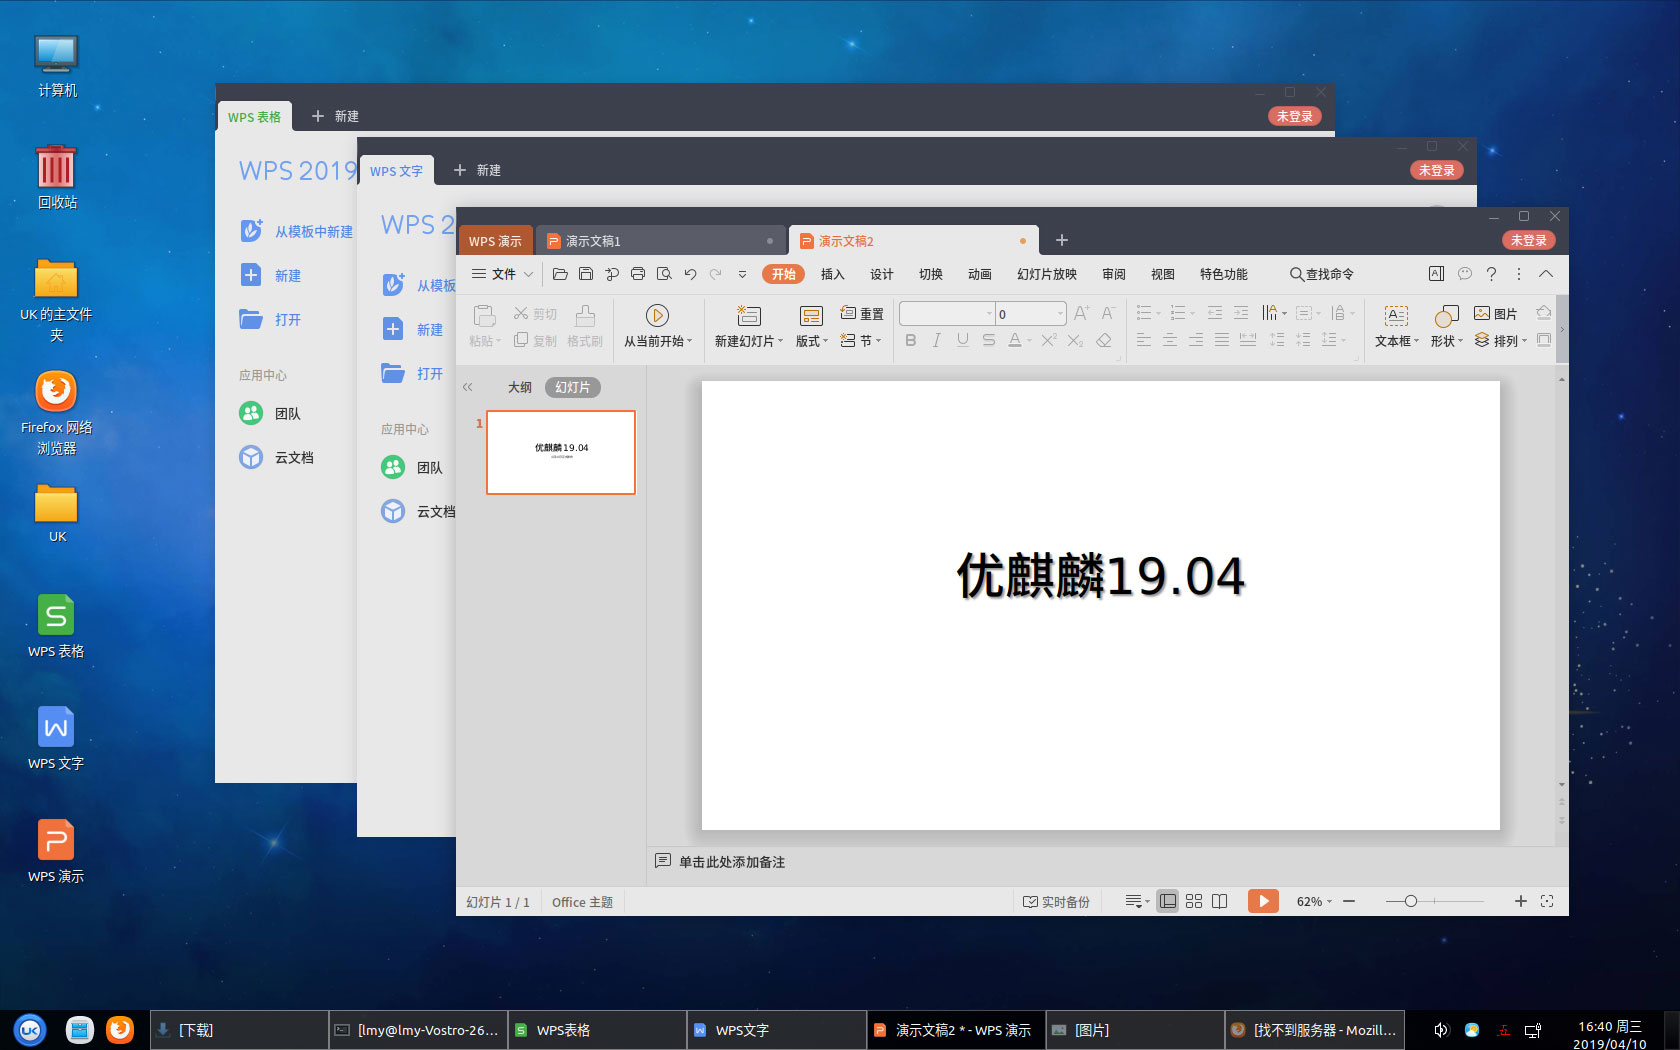
WPS 2019 更新版(8392)发布,搭配优麒麟 19.04 运行更奇妙!
WPS 2019 支持全新的外观界面、目录更新、方框打勾、智能填充、内置浏览器、窗口拆组、个人中心等功能。特别是全新的新建页面,让你可以整合最近打开的文档、本地模版、公文模版、在线模板等。 随着优麒麟即将发布的新版 19.04 的到来,金山办公软件也带来…
图像金字塔操作,上采样、下采样、缩放
#include "opencv2/imgproc/imgproc.hpp" #include "opencv2/highgui/highgui.hpp" #include <iostream> // 图像金子塔采样操作 void Pyramid(cv::Mat srcImage) {// 根据图像源尺寸判断是否需要缩放if(srcImage.rows > 400 && srcImage…
【C++】【OpenCv】图片加噪声处理,计时,及键盘事件响应捕捉
图像噪声添加 cv::Mat addGuassianNoise(cv::Mat& src, double a, double b) {cv::Mat temp src.clone();cv::Mat dst(src.size(), src.type()); // Construct a matrix containing Gaussian noisecv::Mat noise(temp.size(), temp.type());cv::RNG rng(time(NULL));//…

透视学理论(十四)
2019独角兽企业重金招聘Python工程师标准>>> 已知左右距点分别位于透视画面两侧,因此我们可以左距点来得出透视画面的纵深长度。 距点,指的是与透视画面成45的水平线的消失点。我们把画面边缘按1米的宽度(A点)…
适用于Mac上的SQL Server
适用于Mac上的SQL Server? 众所周知,很多人都在电脑上安装了SQL Server软件,普通用户直接去官网下载安装即可,Mac用户则该如何在Mac电脑上安装SQL Server呢?想要一款适用于Mac上的SQL Server?点击进入&…
【MATLAB】————拷贝指定文件路径下的有序文件(选择后),可处理固定规律的文件图片数据或者文件
总体上来说这种数据有2中处理思路。第一种如下所示,从一组数据中挑选出符合要求的数据; 第二中就是数据中不需要的数据删除,选择处理不需要的数据,留下的补集就是需要的数库。一般情况下需要看问题是否明确,需求明确的…
mouseover与mouseenter,mouseout与mouseleave的区别
mouseover与mouseenter 不论鼠标指针穿过被选元素或其子元素,都会触发 mouseover 事件。只有在鼠标指针穿过被选元素时,才会触发 mouseenter 事件。 mouseout与mouseleave不论鼠标指针离开被选元素还是任何子元素,都会触发 mouseout 事件。只…
图像掩码操作的两种实现
#include <opencv2/imgproc/imgproc.hpp> #include <opencv2/core/core.hpp> #include <opencv2/highgui/highgui.hpp> #include <iostream> #include <stdio.h> using namespace cv; using namespace std; // 基于像素邻域掩码操作…
控制反转 IOC
2019独角兽企业重金招聘Python工程师标准>>> 控制反转(Inversion of Control,缩写为IoC)面向对象设计原则,降低代码耦合度 依赖注入(Dependency Injection,简称DI) 依赖查找…
【C++】explicit关键字
explicit的优点是可以避免不合时宜的类型变换,缺点无。所以google约定所有单参数的构造函数都必须是显式的** explicit关键字只需用于类内的单参数构造函数前面。由于无参数的构造函数和多参数的构造函数总是显式调用,这种情况在构造函数前加explicit无…
mongodb3 分片集群平滑迁移
分片集群平滑迁移实验(成功)过程概述:为每个分片添加多个从节点,然后自动同步。同步完后,切换主节点到新服务器节点。导出原来的config 数据库,并导入到新服务器的config数据库停掉整个集群,可以使用kill 命令停掉新服…
图像添加椒盐噪声
#include <opencv2/core/core.hpp> #include <opencv2/highgui/highgui.hpp> #include <cstdlib> // 图像添加椒盐噪声 cv::Mat addSaltNoise(const cv::Mat srcImage, int n) {cv::Mat resultIamge srcImage.clone() ;for(int k0; k<n; k){// 随机取值行…
我用python10年后,我发现学python必看这三本书!
非常喜欢python 我非常喜欢python,在前面5年里,它一直是我热衷使用并不断研究的语言,迄今为止,python都非常友好并且易于学习! 它几乎可以做任何事,从简单的脚本创建、web,到数据可视化以及AI人…
【OpenCV】内核的形状函数使用记录
opencv getStructuringElement函数 为形态操作返回指定大小和形状的结构化元素。 该函数构造并返回结构化元素,这些元素可以进一步传递给侵蚀、扩张或morphologyEx。但是您也可以自己构造一个任意的二进制掩码,并将它用作结构化元素。 getStructuringE…
boxFilter 滤波器实现
cv::Ptr<cv::FilterEngine> cv::createBoxFilter( int srcType, int dstType, Size ksize,Point anchor, bool normalize, int borderType ) {// 基础参数设置 图像深度int sdepth CV_MAT_DEPTH(srcType);int cn CV_MAT_CN(srcType), sumType CV_64F;if( sdepth < …
git代理设置
2019独角兽企业重金招聘Python工程师标准>>> git config --global http.proxy http://127.0.0.1:1080 git config --global https.proxy https://127.0.0.1:1080 git config --global http.sslVerify false删除 git config --global --unset http.proxy git config …
获得PMP证书的这一年
很荣幸,通过2018年12月的PMP考试,这不仅是一张证书的收获,更体现了我的成长,明确了以后的道路。在考证的过程中,我收获了很多,不仅是工作技能方面,还包括思想的升华。 首先,重拾了…