Swift - 使用SwiftHTTP通过HTTPS进行网络请求,及证书的使用


1 2 3 4 5 | <key>NSAppTransportSecurity</key><dict> <key>NSAllowsArbitraryLoads</key> <true/></dict> |
3,使用两个证书进行双向验证,以及网络请求
1 2 3 4 5 6 7 8 9 10 11 12 13 14 15 16 17 18 19 20 21 22 23 24 25 26 27 28 29 30 31 32 33 34 35 36 37 38 39 40 41 42 43 44 45 46 47 48 49 50 51 52 53 54 55 56 57 58 59 60 61 62 63 64 65 66 67 68 69 70 71 72 73 74 75 76 77 78 79 80 81 82 83 84 85 86 87 88 89 90 91 92 93 94 95 96 97 98 99 100 101 102 103 104 105 106 107 108 109 110 111 112 113 114 115 | import UIKitimport SwiftHTTPclass ViewController: UIViewController{ overridefunc viewDidLoad() { super.viewDidLoad() do { letopt = try HTTP.GET("https://192.168.1.112:8443") opt.auth = { challengein //认证服务器证书 ifchallenge.protectionSpace.authenticationMethod ==NSURLAuthenticationMethodServerTrust { print("服务端证书认证!") letserverTrust:SecTrust= challenge.protectionSpace.serverTrust! letcertificate = SecTrustGetCertificateAtIndex(serverTrust, 0)! letremoteCertificateData =CFBridgingRetain(SecCertificateCopyData(certificate))! letcerPath = Bundle.main.path(forResource:"tomcat", ofType:"cer")! letcerUrl = URL(fileURLWithPath:cerPath) letlocalCertificateData = try! Data(contentsOf: cerUrl) if(remoteCertificateData.isEqual(localCertificateData) ==true) { letcredential = URLCredential(trust: serverTrust) challenge.sender?.use(credential,for: challenge) returnURLCredential(trust: challenge.protectionSpace.serverTrust!) }else { returnnil } } //认证客户端证书 elseif challenge.protectionSpace.authenticationMethod ==NSURLAuthenticationMethodClientCertificate { print("客户端证书认证!") //获取客户端证书相关信息 letidentityAndTrust:IdentityAndTrust= self.extractIdentity(); leturlCredential:URLCredential= URLCredential( identity: identityAndTrust.identityRef, certificates: identityAndTrust.certArrayas? [AnyObject], persistence:URLCredential.Persistence.forSession) returnurlCredential } // 其它情况(不接受认证) else{ print("其它情况(不接受认证)") returnnil } } opt.start { responsein print("访问成功,获取数据如下:") print(response.text) } } catchlet error { print("请求失败: \(error)") } } //获取客户端证书相关信息 funcextractIdentity() -> IdentityAndTrust{ varidentityAndTrust:IdentityAndTrust! varsecurityError:OSStatus= errSecSuccess letpath: String = Bundle.main.path(forResource:"mykey", ofType:"p12")! letPKCS12Data = NSData(contentsOfFile:path)! letkey : NSString= kSecImportExportPassphrase asNSString letoptions : NSDictionary= [key : "123456"]//客户端证书密码 //create variable for holding security information //var privateKeyRef: SecKeyRef? = nil varitems : CFArray? securityError =SecPKCS12Import(PKCS12Data, options, &items) ifsecurityError == errSecSuccess { letcertItems:CFArray= items as CFArray!; letcertItemsArray:Array= certItems asArray letdict:AnyObject? = certItemsArray.first; iflet certEntry:Dictionary= dict as?Dictionary<String,AnyObject> { // grab the identity letidentityPointer:AnyObject? = certEntry["identity"] letsecIdentityRef:SecIdentity= identityPointer as!SecIdentity! print("\(identityPointer) :::: \(secIdentityRef)") // grab the trust lettrustPointer:AnyObject? = certEntry["trust"] lettrustRef:SecTrust= trustPointer as!SecTrust print("\(trustPointer) :::: \(trustRef)") // grab the cert letchainPointer:AnyObject? = certEntry["chain"] identityAndTrust =IdentityAndTrust(identityRef: secIdentityRef, trust: trustRef, certArray: chainPointer!) } } returnidentityAndTrust; } overridefunc didReceiveMemoryWarning() { super.didReceiveMemoryWarning() }}//定义一个结构体,存储认证相关信息structIdentityAndTrust { varidentityRef:SecIdentity vartrust:SecTrust varcertArray:AnyObject} |

4,只使用一个客户端证书
由于我们使用的是自签名的证书,那么对服务器的认证全由客户端这边判断。也就是说其实使用一个客户端证书“mykey.p12”也是可以的(项目中也只需导入一个证书)。
当对服务器进行验证的时候,判断服务主机地址是否正确,是的话信任即可(代码高亮部分)
1 2 3 4 5 6 7 8 9 10 11 12 13 14 15 16 17 18 19 20 21 22 23 24 25 26 27 28 29 30 31 32 33 34 35 36 37 38 39 40 41 42 43 44 45 46 47 48 49 50 51 52 53 54 55 56 57 58 59 60 61 62 63 64 65 66 67 68 69 70 71 72 73 74 75 76 77 78 79 80 81 82 83 84 85 86 87 88 89 90 91 92 93 94 95 96 97 98 99 100 101 102 103 104 | import UIKitimport SwiftHTTPclass ViewController: UIViewController{ //自签名网站地址 letselfSignedHosts = ["192.168.1.112","www.hangge.com"] overridefunc viewDidLoad() { super.viewDidLoad() do { letopt = try HTTP.GET("https://192.168.1.112:8443") opt.auth = { challengein //认证服务器(这里不使用服务器证书认证,只需地址是我们定义的几个地址即可信任) ifchallenge.protectionSpace.authenticationMethod ==NSURLAuthenticationMethodServerTrust &&self.selfSignedHosts.contains(challenge.protectionSpace.host) { print("服务器认证!") letcredential = URLCredential(trust: challenge.protectionSpace.serverTrust!) returncredential } //认证客户端证书 elseif challenge.protectionSpace.authenticationMethod ==NSURLAuthenticationMethodClientCertificate { print("客户端证书认证!") //获取客户端证书相关信息 letidentityAndTrust:IdentityAndTrust= self.extractIdentity(); leturlCredential:URLCredential= URLCredential( identity: identityAndTrust.identityRef, certificates: identityAndTrust.certArrayas? [AnyObject], persistence:URLCredential.Persistence.forSession) returnurlCredential } // 其它情况(不接受认证) else{ print("其它情况(不接受认证)") returnnil } } opt.start { responsein print("访问成功,获取数据如下:") print(response.text) } } catchlet error { print("请求失败: \(error)") } } //获取客户端证书相关信息 funcextractIdentity() -> IdentityAndTrust{ varidentityAndTrust:IdentityAndTrust! varsecurityError:OSStatus= errSecSuccess letpath: String = Bundle.main.path(forResource:"mykey", ofType:"p12")! letPKCS12Data = NSData(contentsOfFile:path)! letkey : NSString= kSecImportExportPassphrase asNSString letoptions : NSDictionary= [key : "123456"]//客户端证书密码 //create variable for holding security information //var privateKeyRef: SecKeyRef? = nil varitems : CFArray? securityError =SecPKCS12Import(PKCS12Data, options, &items) ifsecurityError == errSecSuccess { letcertItems:CFArray= items as CFArray!; letcertItemsArray:Array= certItems asArray letdict:AnyObject? = certItemsArray.first; iflet certEntry:Dictionary= dict as?Dictionary<String,AnyObject> { // grab the identity letidentityPointer:AnyObject? = certEntry["identity"] letsecIdentityRef:SecIdentity= identityPointer as!SecIdentity! print("\(identityPointer) :::: \(secIdentityRef)") // grab the trust lettrustPointer:AnyObject? = certEntry["trust"] lettrustRef:SecTrust= trustPointer as!SecTrust print("\(trustPointer) :::: \(trustRef)") // grab the cert letchainPointer:AnyObject? = certEntry["chain"] identityAndTrust =IdentityAndTrust(identityRef: secIdentityRef, trust: trustRef, certArray: chainPointer!) } } returnidentityAndTrust; } overridefunc didReceiveMemoryWarning() { super.didReceiveMemoryWarning() }}//定义一个结构体,存储认证相关信息structIdentityAndTrust { varidentityRef:SecIdentity vartrust:SecTrust varcertArray:AnyObject} |
相关文章:
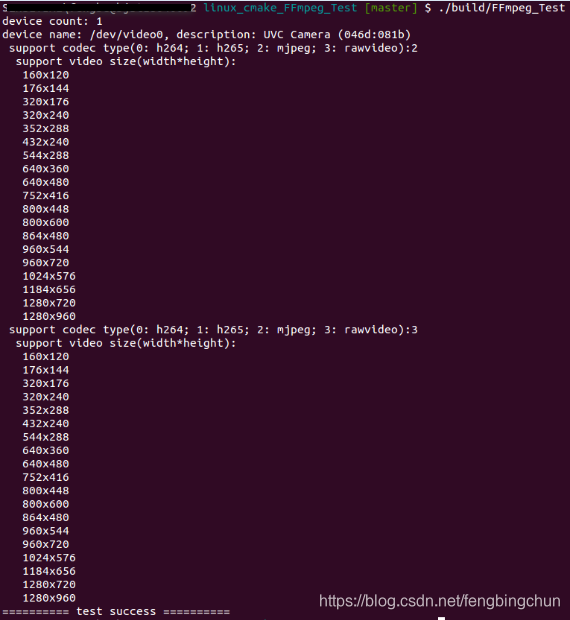
Linux下通过v4l2获取视频设备名、支持的编解码及视频size列表实现
早些时候给出了在Windows下通过dshow获取视频设备信息的实现,包括获取视频设备名、获取每种视频设备支持的编解码格式列表、每种编解码格式支持的video size列表,见:https://blog.csdn.net/fengbingchun/article/details/102806822 下面给出…
12种主流编程语言输出“ Hello World ”,把我给难住了!
作为一名程序员,在初步学习编程想必都绕不开一个最为基础的入门级示例“Hello World”,那么,你真的了解各个语言“Hello World”的正确写法吗?在我们刚开始打开编程世界的时候,往往写的第一个程序都是简单的文本输出&a…

军哥lnmp一键安装包nginx支持pathinfo配置
ssh里执行:cat > /usr/local/nginx/conf/pathinfo.conf << EOF set $real_script_name $fastcgi_script_name; if ($fastcgi_script_name ~ "(.?\.php)(/.*)") { set $real_script_name $1; set $path_info $2; } fastcgi_param SCRIPT_FILENAM…
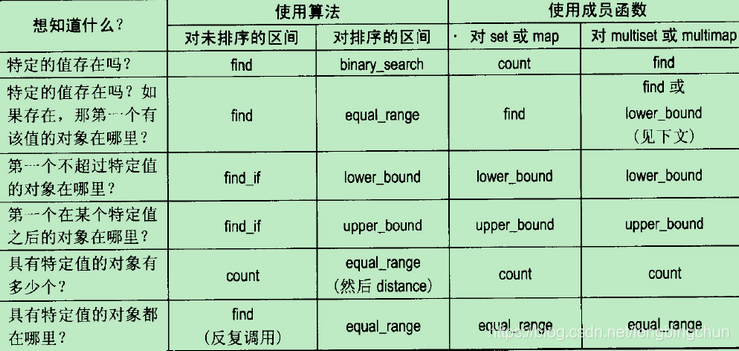
Effective STL 50条有效使用STL的经验笔记
Scott Meyers大师Effective三部曲:Effective C、More Effective C、Effective STL,这三本书出版已很多年,后来又出版了Effective Modern C。 Effective C的笔记见:https://blog.csdn.net/fengbingchun/article/details/102761542…
HTTPS网络加密双向验证-使用AFNetworking封装
1.首先使用OC封装请求头 #import <Foundation/Foundation.h> #import "AFNetworking.h" interface HttpsHandler : NSObject (AFHTTPSessionManager *)setHttpsMange; end 2.实现方法 (AFHTTPSessionManager *)setHttpsMange; { NSString *certFilePath […
30分钟搞定数据竞赛刷分夺冠神器LightGBM!
作者 | 梁云1991来源 | Python与算法之美(ID:Python_Ai_Road)【导读】LightGBM可以看成是XGBoost的升级加强版本,2017年经微软推出后,便成为各种数据竞赛中刷分夺冠的神兵利器。一,LightGBM和XGBoost对比正如其名字中的Light所蕴含…
js模块化例子
最近在看一本书,里面提到js的模块化,觉得很有必要,所以记录下来 Game.js /*** This is the main class that handles the game life cycle. It initializes* other components like Board and BoardModel, listens to the DOM events and* tr…
swift3.0提示框新用法
var alert: UIAlertController! alert UIAlertController(title: "提示", message: "添加照片", preferredStyle: UIAlertControllerStyle.actionSheet) let cleanAction UIAlertAction(title: "取消", style: UIAlertActionStyle.cancel,han…
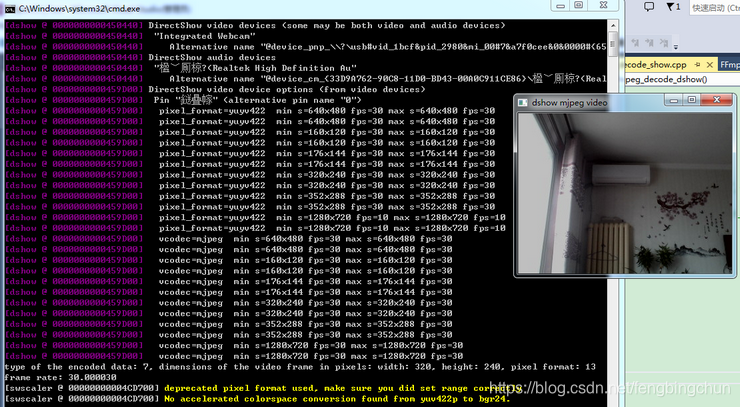
FFmpeg在Windows上通过dshow编解码方式设置为mjpeg并实时显示测试代码
Windows上默认的内置摄像头一般支持两种编解码格式:rawvideo和mjpeg。在调用FFmpeg接口时默认的采用rawvideo。这里通过DirectShow实现为mjpeg进行编解码。 通过命令行调用FFmpeg可执行文件: (1). 可获取Windows上连接的视频设备,命令如下&…
基于深度学习的低光照图像增强方法总结(2017-2019)| CSDN博文精选
扫码参与CSDN“原力计划”作者 | hyk_1996来源 | CSDN博客精选之前在做光照对于高层视觉任务的影响的相关工作,看了不少基于深度学习的低光照增强(low-light enhancement)的文章[3,4,5,7,8,9,10],于是决定简单梳理一下。光照估计&…
ios多线程和进程的区别(转载)
很想写点关于多进程和多线程的东西,我确实很爱他们。但是每每想动手写点关于他们的东西,却总是求全心理作祟,始终动不了手。 今天终于下了决心,写点东西,以后可以再修修补补也无妨。 一.为何需要多进程(或者…
OC封装的轮播图-只用调用即可
先来使用方法 1.//创建显示本地图片view UIView *imageScorll[WTImageScroll ShowLocationImageScrollWithFream:CGRectMake(0, 0, SCREENWIDTH, 200) andImageArray:array andBtnClick:^(NSInteger tagValue) { NSLog("点击的图片----%",(tagValue)); self.didSele…
多核时代,并行编程为何“臭名昭著”?
作者 | Yan Gu来源 | 转载自知乎用户Yan Gu【导读】随着计算机技术的发展,毫无疑问现代计算机的处理速度和计算能力也越来越强。然而细心的同学们可能早已注意到,从2005年起,单核的 CPU 性能就没有显著的提升了。究其原因,是人们发…
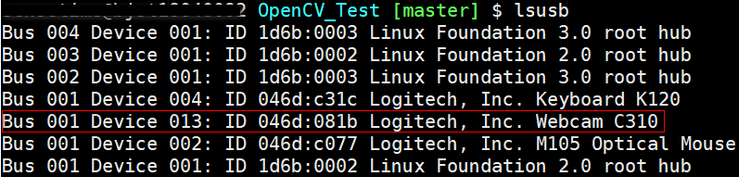
Linux下获取usb视频设备vendor id和product id的8种方法
在使用usb摄像头获取视频时,有时需要获取此摄像头供应商ID(vendor id, vid)和产品ID(product id, pid),这里在Linux下提供获取vid和pid的8种方法: 1. 通过v4l2中结构体v4l2_capability的成员变量card:此变量中会包含设备名、vid、…
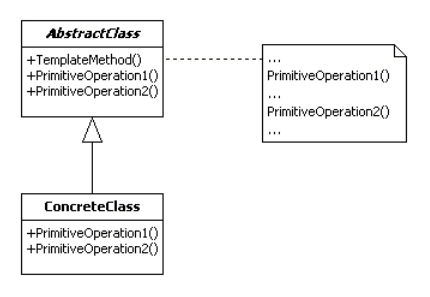
JAVA 设计模式 模板方法模式
定义 模板方法模式 (Template Method) 定义了一个操作中的算法的骨架,而将部分步骤的实现在子类中完成。模板方法模式使得子类可以不改变一个算法的结构即可重定义该算法的某些特定步骤。模板方法模式是所有模式中最为常见的几个模式之一,是基于继承的代…
这类程序员成华为宠儿,分分钟秒杀众应届毕业生
近日,华为20亿奖励员工的新闻频频刷屏。其中20亿奖金不是面向所有的华为员工,20亿奖金包涉及到的是研发体系、造AI芯片和建设生态的员工。从5G开始部署以来,华为获得了来自全球各地运营商的订单,签订了40多个5G商用合同。另外华为…
Swift 使用CoreLocation获取定位与位置信息
大多数情况下APP会在开启应用的时候获取当前的位置,所以我写在APPDelegate里第一步 import CoreLocationvar locationManager CLLocationManager() 第二步func application(application: UIApplication, didFinishLaunchingWithOptions launchOptions: [NSObject: …
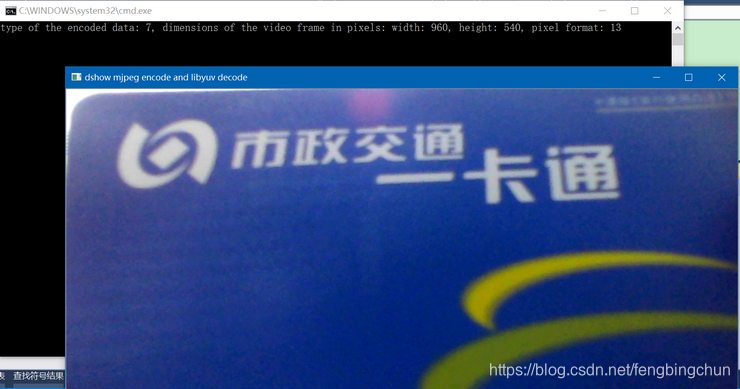
FFmpeg在Windows上设置dshow mjpeg编码+libyuv解码显示测试代码
之前在https://blog.csdn.net/fengbingchun/article/details/103444891中介绍过在Windows上通过ffmpeg dshow设置为mjpeg编解码方式进行实时显示的测试代码。这里测试仅调用ffmpeg的mjpeg编码接口,获取到packet后,通过libyuvlibjpeg-turbo对mjpeg进行解码…
转:浅谈Linux的内存管理机制
一 物理内存和虚拟内存 我们知道,直接从物理内存读写数据要比从硬盘读写数据要快的多,因此,我们希望所有数据的读取和写入都在内存完成,而内存是有限的,这样就引出了物理内存与虚拟内存的概念。 物理内存就是系统硬件提…
swift3.0阿里百川反馈
闲言少叙 直接上不熟 1.导入自己工程阿里百川demo中的Util文件,并引用其中的头文件 2.剩余就是swift3.0代码.在自己需要的地方书写 (前提是你已经申请了APPKey) 3.代码 //调用意见反馈 func actionOpenFeedback(){ //key self.appKey "此处填写自己申请的key" s…
通俗易懂:8大步骤图解注意力机制
作者 | Raimi Karim译者 | 夕颜出品 | AI科技大本营(ID:rgznai100)【导读】这是一份用图片和代码详解自注意力机制的指南,请收好。BERT、RoBERTa、ALBERT、SpanBERT、DistilBERT、SesameBERT、SemBERT、MobileBERT、TinyBERT和CamemBERT的共同…
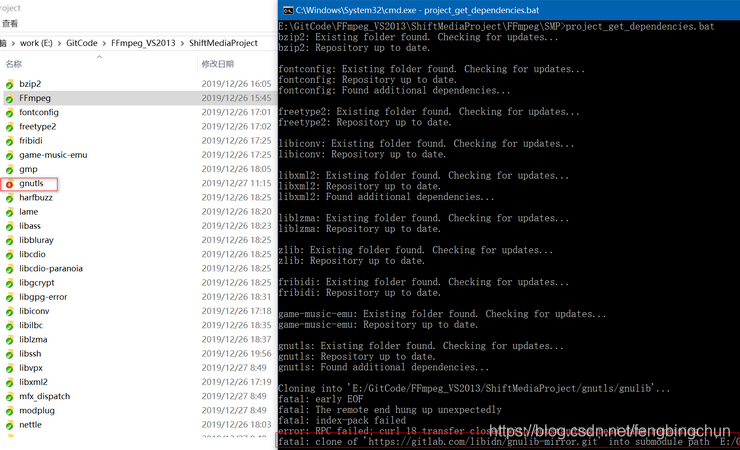
Windows上VS2017单步调试FFmpeg源码的方法
之前在https://blog.csdn.net/fengbingchun/article/details/90114411 介绍过如何在Windows7/10上通过MinGW方式编译FFmpeg 4.1.3源码生成库的步骤,那时只能生成最终的库,却不能产生vs工程,无法进行单步调试。GitHub上有个项目ShiftMediaProj…
ormlite 多表联合查询
ormlite 多表联合查询 QueryBuilder shopBrandQueryBuilder shopBrandDao.queryBuilder(); QueryBuilder shopQueryBuilder shopDao.queryBuilder();Where shopBrandWhere shopBrandQueryBuilder.where(); shopBrandWhere .eq(ShopBrand.SHOP_NO, shopNo);Where shopWhere …
C++中关键字volatile和mutable用法
C/C中的volatile关键字和const对应,用来修饰变量,用于告诉编译器该变量值是不稳定的,可能被更改。使用volatile注意事项: (1). 编译器会对带有volatile关键字的变量禁用优化(A volatile specifier is a hint to a compiler that …
基于生成对抗网络(GAN)的人脸变形(附链接) | CSDN博文精选
扫码参与CSDN“原力计划”翻译 | 张一豪校对 | 吴金笛来源 | 数据派THU*点击阅读原文,查看「CSDN原力计划」详细说明。本文详细介绍了生成对抗网络(GAN)的知识,并用其变换人脸,并探寻如何利用StyleGAN生成不同属性&…
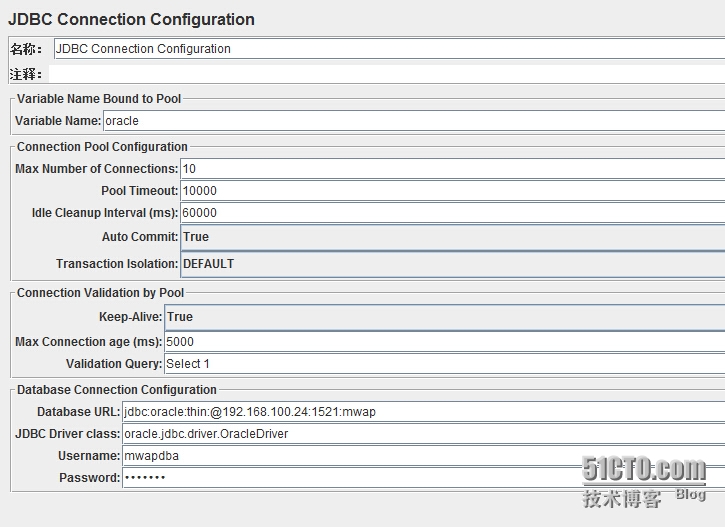
Jmeter连接Oracle数据库
一、Jmeter要连接oracle数据库,就必须复制JDBC驱动jar包文件ojdbc14.jar到Jmeter的lib目录下二、进入Jmeter的bin目录运行Jmeter.bat,启动Jmeter三、Jmeter软件配置如下:1、添加线程组右击线程组,选择“添加--配置元件--JDBC Conn…

swift3.0友盟分享
经过(一)的讲解,大家应该可以按照友盟提供的测试账号可以集成友盟分享了,友盟目前集合了18个APP共27种分享,可以授权的有10个App:微信、QQ、新浪微博、腾讯微博、人人网、豆瓣、Facebook、Twitter、Linkedi…
C++11中std::future的使用
C11中的std::future是一个模板类。std::future提供了一种用于访问异步操作结果的机制。std::future所引用的共享状态不能与任何其它异步返回的对象共享(与std::shared_future相反)( std::future references shared state that is not shared with any other asynchronous retur…
给算法工程师和研究员的「霸王餐」| 附招聘信息
现在的算法工程师真的是太难了!要让AI会看人眼都分辨不清的医疗影像!数据又不够,还得用前沿技术!好不容易学会看片,还要让AI会分析病理!然后模型搞出来了,还要把几十种模型,做N次计算…
swift3.0三种反向传值
一 :通知 1.通知传值所用方法 // MARK: - private methods(内部接口) let NotifMycation NSNotification.Name(rawValue:"MyNSNotification") func tempbuttonAction() { //这个方法可以传一个值 NotificationCenter.default.post(name: NotifMycation, object: &q…