ios snapkit m_如何使用自动布局和SnapKit在iOS上创建漂亮的拉伸布局
ios snapkit m
by Enabled Solutions
由Enabled Solutions
如何使用自动布局和SnapKit在iOS上创建漂亮的拉伸布局 (How to create beautiful Stretchy Layouts on iOS using Auto Layout and SnapKit)
Check the image below. This is a cool effect.
检查下面的图像。 这是一个很酷的效果。
And it’s really easy to build in iOS using Auto Layout. I wanted to write about this because the effect is so simple. And Auto Layout makes its implementation so elegant that I think you ought to know about it.
而且使用Auto Layout在iOS中构建起来真的很容易。 我想写这个因为效果很简单。 Auto Layout使它的实现如此优雅,以至于我认为您应该了解它。
If you want to follow along, you can clone the demo project at our starting point and implement the effect as you read along. You’ll need Xcode 9 as we’re going all-in on iOS 11 for this example.
如果您想继续学习,可以在我们的起点克隆演示项目 ,并在阅读时实现效果。 您将需要Xcode 9,因为在此示例中,我们将在iOS 11上全面使用Xcode 9。
git clone https://github.com/TwoLivesLeft/StretchyLayout.gitcd StretchyLayoutgit checkout Step-1Here’s how we’ll do it:
这是我们的处理方式:
- Start with the basic non-stretchy app从基本的非弹性应用开始
Modify the view hierarchy to add the necessary constraints to
修改视图层次结构以向其中添加必要的约束
make it stretchy
使它富有弹性
- Add polish to the app向应用程序添加波兰语
非弹性应用 (The non-stretchy app)
Here’s the view hierarchy for the basic version of the app. You can see it has three main views. There’s the header UIImageView, which is the container for the text, and the long UILabel containing our text content. The bright red lines represent our Auto Layout constraints. There’s also a UIScrollView and the root view of our view controller.
这是该应用程序基本版本的视图层次结构。 您可以看到它具有三个主要视图。 有标题UIImageView ,它是文本的容器,还有长的UILabel包含我们的文本内容。 鲜红色的线表示我们的“自动布局”约束。 还有一个UIScrollView和我们的视图控制器的根视图。
We’re going to build this using an Auto Layout framework called SnapKit. SnapKit is a simple iOS framework that makes Apple’s Auto Layout API…sane. It’s dead simple to use, and makes programming with Auto Layout genuinely pleasurable.
我们将使用称为SnapKit的自动布局框架来构建它。 SnapKit是一个简单的iOS框架,可让Apple的Auto Layout API变得理智。 它非常简单易用,并且使使用“自动布局”编程真正令人愉悦。
Most of the code will live in viewDidLoad of our StretchyViewController class. Below you can see how the initial constraints are set.
大多数代码将存在于我们的StretchyViewController类的viewDidLoad中。 在下面,您可以看到如何设置初始约束。
Our views are declared as private members:
我们的观点被宣布为私人成员:
private let scrollView = UIScrollView()private let infoText = UILabel()private let imageView = UIImageView()Our view controller’s view has a scroll view as its first subview, followed by the text and image views. It also has a backing view which provides us withthe red background behind the text.
我们的视图控制器视图将滚动视图作为其第一个子视图,然后是文本和图像视图。 它还具有支持视图,该视图为我们提供了文本后面的红色背景。
//Pin the edges of the scroll view to// our view controller’s viewscrollView.snp.makeConstraints { make inmake.edges.equalTo(view)}//Pin the top of our image view to the scroll view// pin the left and right to the view controller’s view// give it an aspect ratio constraint by constraining// its height to its width with a multiplierimageView.snp.makeConstraints { make inmake.top.equalTo(scrollView) make.left.right.equalTo(view) make.height.equalTo(imageView.snp.width).multipliedBy(0.7)}//Pin the backing view below the image view and to the// bottom of the scroll viewtextContainer.snp.makeConstraints { make inmake.top.equalTo(imageView.snp.bottom) make.left.right.equalTo(view) make.bottom.equalTo(scrollView)}//Pin the edges of the text to the text container view, this// will force the text container to grow to encompass the// text’s heightinfoText.snp.makeConstraints { make inmake.edges.equalTo(textContainer).inset(14)}Note: To get the code at this point, do git checkout Step-1
注意:要在此时获取代码,请执行git checkout Step-1
除了简短 (A brief aside)
We used SnapKit above. SnapKit is great — so here’s a primer on how it works.
我们在上面使用了SnapKit。 SnapKit非常棒-因此,这里是其工作原理的入门。
You access the snp member object on any UIView.
您可以在任何UIView上访问snp成员对象。
You call makeConstraints which accepts a closure, and the closure is given a ConstraintMaker object (called make here).
您调用makeConstraints接受一个闭包,并且为闭包提供一个ConstraintMaker对象( make此称为make )。
You then use the make object to pin edges or anchors of one view to any other view, layout guide, or constant.
然后,您可以使用make对象将一个视图的边缘或锚点固定到其他任何视图,布局指南或常量。
myView.snp.makeConstraints { make inmake.edges.equalTo(view)}This will pin the edges of myView to the edges of view.
这会将myView的边缘myView到view的边缘。
It’s readable and concise. Use this instead of the default Auto Layout API.
简洁明了。 使用它代替默认的自动布局API 。
使其具有弹性 (Making it stretchy)
So how do we go from this (not stretchy) to this (stretchy)?
那么,我们如何从这个(不是弹性的)变为这个(弹性的)呢?
It’s important for the stretch effect that Auto Layout will solve constraintsregardless of whether your views are siblings or elsewhere in the hierarchy.It only matters that they have a common ancestor.
无论您的视图是同级视图还是层次结构中的其他视图,自动布局都将解决约束对于拉伸效果非常重要,这只重要于它们具有共同的祖先。
But here’s a key element: views within scroll views can be constrained to views outside of scroll views. That’s how we will make this work.
但这是一个关键要素:滚动视图中的视图可以限制为滚动视图之外的视图。 这就是我们将如何进行这项工作的方式。
In the above diagram, the bright red lines represent our constraints. Note how the top of the image view is now pinned all the way back — outside the scrollview — to the top of the root view. But its bottom is pinned to the bottom of the image container view, which is inside the scroll view. This means thatwhen the scroll view scrolls, our image view will stretch to satisfy its constraints.
在上图中,鲜红色的线表示我们的约束。 请注意,现在如何将图像视图的顶部始终固定在根视图的顶部(滚动视图之外)。 但它的底部被固定在图像容器视图,其是滚动视图内的底部。 这意味着当滚动视图滚动时,我们的图像视图将拉伸以满足其约束。
So for our first step, we’ll replace our UIImageView with an empty container view.
因此,对于第一步,我们将UIImageView替换为空的容器视图。
let imageContainer = UIView()imageContainer.backgroundColor = .darkGrayscrollView.addSubview(imageContainer)imageContainer.snp.makeConstraints { make inmake.top.equalTo(scrollView) make.left.right.equalTo(view) make.height.equalTo(imageContainer.snp.width).multipliedBy(0.7)}Then we’ll add our image view as a subview of our scroll view. But we’re going to pin its top edge to our view’s top edge — not our scroll view’s top. The container we just added above is pinned to our scroll view’s top edge.
然后,我们将图像视图添加为滚动视图的子视图。 但是,我们要将其顶部边缘固定在视图的顶部边缘,而不是滚动视图的顶部。 我们刚才添加的容器固定在滚动视图的顶部边缘。
scrollView.addSubview(imageView)imageView.snp.makeConstraints { make inmake.left.right.equalTo(imageContainer)//** These are the key lines! ** make.top.equalTo(view) make.bottom.equalTo(imageContainer.snp.bottom)}Above you can see the lines that make this work. Our image container viewscrolls exactly how the original non-stretchy app scrolled. But we’ve added our actual image view above that container. And we’ve pinned its bottomto the container bottom, while its top is pinned to the view controller’s view.
在上方,您可以看到完成这项工作的线条。 我们的图像容器视图准确地滚动了原始的非伸缩式应用程序的滚动方式。 但是我们已经在该容器上方添加了实际的图像视图。 并且我们已将其底部固定到容器底部,而其顶部固定到视图控制器的视图。
This means that when you drag down in the scroll view, the top of the image“sticks” to the top of the screen and the whole image just gets bigger. Andbecause we’re using imageView.contentMode = .scaleAspectFill , we’re going to see the image content scale up within the image view as we over-scroll the scroll view.
这意味着当您在滚动视图中向下拖动时,图像的顶部“粘在”屏幕的顶部,并且整个图像会变大。 并且因为我们使用imageView.contentMode = .scaleAspectFill ,所以当我们滚动滚动视图时,我们将看到图像内容在图像视图中按比例放大。
Note: To get the code at this point do git checkout Step-2
注意 :要在此时获取代码,请执行git checkout Step-2
但是有一个错误 (But there’s a bug)
If you run this code, dragging down on the screen with your finger producesthe desired effect: the image scales up and bounces back. But if you scroll upto read the text …well, you’ll realize that you can’t.
如果运行此代码,则用手指在屏幕上向下拖动可产生所需的效果:图像放大并弹回。 但是,如果您向上滚动以阅读文本……那么,您会意识到自己做不到。
Why?
为什么?
Because when we scroll up, we are compressing the UIImageView into azero-height line. Its top must be equal to the view’s top, and its bottom must be equal to the text backing view’s top. So this means the scroll view will continue to “scroll,” but we won’t see the changes. This is because the backing view is jammed up against the image view, which is refusing to move above the top of the root view despite the scroll view scrolling.
因为当我们向上滚动时,我们正在将UIImageView压缩为高度为零的行。 它的顶部必须等于视图的顶部,其底部必须等于文本支持视图的顶部。 因此,这意味着滚动视图将继续“滚动”,但是我们看不到更改。 这是因为后视图卡在图像视图上,尽管滚动视图滚动,但该图像视图仍拒绝移至根视图上方。
Auto Layout is technically solving our constraints, but it’s not what we want.
自动版式在技术上正在解决我们的约束,但这不是我们想要的。
修正错误 (Fixing the bug)
We have to change how we constrain the image view. Here’s the change:
我们必须更改约束图像视图的方式。 这是更改:
imageView.snp.makeConstraints { make inmake.left.right.equalTo(imageContainer)//** Note the priorities make.top.equalTo(view).priority(.high)//** We add a height constraint too make.height.greaterThanOrEqualTo(imageContainer.snp.height).priority(.required)//** And keep the bottom constraint make.bottom.equalTo(imageContainer.snp.bottom)}Notice how we now have a top constraint, a bottom constraint, and a heightconstraint? This is one of the awesome things about Auto Layout: we can haveconflicting constraints and they will be broken in priority order. This is necessary to achieve the effect we want.
请注意,我们现在有一个顶部约束,一个底部约束和 身高限制? 这是关于“自动布局”的令人敬畏的事情之一:我们可能会有冲突的约束,并且它们会按优先级顺序被破坏。 这对于实现我们想要的效果是必要的。
First, we keep our original constraint. The top of our image view is pinned tothe top of our view. We give this a priority of .high.
首先,我们保持原始约束。 我们图像视图的顶部固定在我们视图的顶部。 我们将此优先级.high 。
We then add an additional constraint: the height of our image must be greaterthan or equal to the height of the image container behind it (recall that our image container has the aspect ratio constraint). This has a .required priority.
然后,我们添加一个附加约束:图像的高度必须大于或等于其后面图像容器的高度(请注意,我们的图像容器具有纵横比约束)。 具有.required优先级。
So what happens when we scroll up?
那么,当我们向上滚动时会发生什么?
Well, the image can’t get smaller. Our height constraint has a higher prioritythan the top constraint. So when we scroll up, Auto Layout will break thelowest priority constraint in order to solve the system. It will break the topconstraint, and our scrolling behaviour will revert to normal. This allows usto scroll up and read the text.
好吧,图像不会变小。 我们的高度约束比顶部约束具有更高的优先级。 因此,当我们向上滚动时,“自动布局”将打破最低优先级约束,以解决系统问题。 它将打破最大约束,并且我们的滚动行为将恢复为正常。 这使我们可以向上滚动并阅读文本。
Note that you can also remove the height constraint in this instance and simply set the top constraint priority to .high. This will allow iOS to break the top constraint and compress the image view to zero height. Given the .scaleAspectFill content mode, this creates a parallax-like effect. Try it out. You might prefer the way it looks.
请注意,在这种情况下,您也可以删除高度限制,只需将最高限制优先级设置为.high 。 这将允许iOS打破最高约束并将图像视图压缩到零高度。 给定.scaleAspectFill内容模式,这会产生类似视差的效果。 试试看。 您可能更喜欢它的外观。
Note: To get the code at this point do git checkout Step-3
注意 :要在此时获取代码,请执行git checkout Step-3
抛光细节 (Polishing the details)
There are three jarring problems we should fix while we’re here.
在此期间,我们应该解决三个棘手的问题。
1.文字过度滚动 (1. Text over-scrolling)
If we over-scroll past the bottom of the view, we get to see the uglygrey background of our view controller. We can use the exact same method tostretch our backing view out when we over-scroll past the bottom of the view.
如果我们过度滚动视图的底部,就会看到视图控制器的丑陋背景。 当我们过度滚动超过视图底部时,可以使用完全相同的方法来扩展支持视图。
I won’t go into the code, since it’s basically the same technique as the image view above. We add an additional text backing view behind our text container, and then pin its bottom edge to the root view’s bottom edge.
我不会讲代码,因为它基本上与上面的图像视图相同。 我们在文本容器后面添加了一个附加的文本支持视图,然后将其底部边缘固定到根视图的底部边缘。
Note: To get the code at this point do git checkout Step-4
注意 :要在此时获取代码,请执行git checkout Step-4
2.尊重安全区 (2. Respecting the safe area)
On iPhone X, our text overlaps the home indicator. We disabled the automatic content inset adjustment of our scroll view in order to let our image content go right to the top of the screen. So we’ll have to manually handle the bottom inset using the new safeAreaInsets property in iOS 11.
在iPhone X上,我们的文字与首页指示符重叠。 我们禁用了滚动视图的自动内容插入调整,以使图像内容直接显示在屏幕顶部。 因此,我们必须使用iOS 11中的新safeAreaInsets属性手动处理底部插图。
We also want to use safeAreaInsets to adjust our scroll view’s scrolling indicators. This way they won’t run into the curved edges of the screen on iPhone X.
我们还想使用safeAreaInsets来调整滚动视图的滚动指示器。 这样,它们就不会碰到iPhone X上屏幕的弯曲边缘。
To fix these two issues, we’ll override viewDidLayoutSubviews and manually set the bottom inset of the scroll view. iOS 11 would normally do this for us automatically, but we *don’t* want to inset the top. We want our header image flush behind the status bar.
为了解决这两个问题,我们将覆盖viewDidLayoutSubviews并手动设置滚动视图的底部插图。 iOS 11通常会自动为我们执行此操作,但我们*不想*插入顶部。 我们希望标题图像刷新到状态栏后面。
We have told iOS 11 not to touch our scroll view by setting itscontentInsetAdjustmentBehavior to .never.
我们已经告诉iOS的11不受其设置为触动我们的滚动视图contentInsetAdjustmentBehavior到.never 。
override func viewDidLayoutSubviews() { super.viewDidLayoutSubviews()//** We want the scroll indicators to use all safe area insets scrollView.scrollIndicatorInsets = view.safeAreaInsets//** But we want the actual content inset to just respect the bottom safe inset scrollView.contentInset = UIEdgeInsets(top: 0, left: 0, bottom: view.safeAreaInsets.bottom, right: 0)}This gives us the following appearance when scrolled all the way to the end.Note that the scroll indicator is no longer lost behind the curve, and we getmuch more space above the home indicator.
一直滚动到末尾时,这将为我们提供以下外观。请注意,滚动指示器不再丢失在曲线后面,并且我们在起始指示器上方获得了更多空间。
Note: To get the code at this point do git checkout Step-5
注意 :要在此时获取代码,请执行git checkout Step-5
3.必要时隐藏状态栏 (3. Hiding the status bar when needed)
Our text is overlapping the status bar when we scroll up. This looks gross.
向上滚动时,文本与状态栏重叠。 这看起来很糟糕。
Let’s hide the status bar with a cool animation when the user scrolls the text into the status bar area. It’s quite easy to detect this, and I think the effect looks great.
当用户将文本滚动到状态栏区域时,让我们用很酷的动画隐藏状态栏。 这很容易检测到,我认为效果看起来不错。
How do we do this?
我们如何做到这一点?
We convert the
textContainer’s rect to screen coordinates.我们将
textContainer的rect转换为屏幕坐标。- We check if the minimum Y of that frame is less than the view’s top safe area inset. This indicates that the text container is moving into the status bar area.我们检查该帧的最小Y是否小于视图的顶部安全区域插图。 这表明文本容器正在移入状态栏区域。
- If so, we hide the status bar. If not, we show the status bar.如果是这样,我们将隐藏状态栏。 如果没有,我们将显示状态栏。
We perform this check in the scrollViewDidScroll(_:) method of theUIScrollViewDelegate. So we make our StretchyViewController implement this delegate and set itself as the delegate for its scroll view.
我们在UIScrollViewDelegate的scrollViewDidScroll(_:)方法中执行此检查。 因此,我们使StretchyViewController实现此委托并将其自身设置为其滚动视图的委托。
Here’s the code for the status bar check:
这是状态栏检查的代码:
//MARK: — Scroll View Delegateprivate var previousStatusBarHidden = falsefunc scrollViewDidScroll(_ scrollView: UIScrollView) { //** We keep the previous status bar hidden state so that // we’re not triggering an implicit animation block for every frame // in which the scroll view scrolls if previousStatusBarHidden != shouldHideStatusBar {UIView.animate(withDuration: 0.2, animations: { self.setNeedsStatusBarAppearanceUpdate() })previousStatusBarHidden = shouldHideStatusBar }}//MARK: — Status Bar Appearanceoverride var preferredStatusBarUpdateAnimation: UIStatusBarAnimation { //** We use the slide animation because it works well with scrolling return .slide}override var prefersStatusBarHidden: Bool { return shouldHideStatusBar}private var shouldHideStatusBar: Bool { //** Here’s where we calculate if our text container // is going to hit the top safe area let frame = textContainer.convert(textContainer.bounds, to: nil) return frame.minY < view.safeAreaInsets.top}Note: To get the code at this point do git checkout Step-6
注意 :要在此时获取代码,请执行git checkout Step-6
我们涵盖的内容 (What we’ve covered)
You can pin pretty much anything to anything else, and your views will
您可以将几乎任何东西固定在其他任何东西上,您的视图将
stretch to satisfy your constraints.
拉伸以满足您的约束。
- This will work even if you’re scrolling.即使您正在滚动,这也将起作用。
Constraints are broken in priority order, so don’t be afraid to experiment
约束按优先级顺序破坏,所以不要害怕尝试
with conflicting constraints.
有冲突的约束。
- Use SnapKit!使用SnapKit!
Simeon Saëns leads Enabled’s mobile development activities with a strong focus on design and human-computer interaction. Simeon is also called to meet with clients to understand their needs and develop technical solutions. Follow Simeon on Twitter
SimeonSaëns领导Enabled的移动开发活动,重点是设计和人机交互。 Simeon还被要求与客户见面,以了解他们的需求并开发技术解决方案。 在Twitter上关注Simeon
还有其他问题吗? 发给我们@EnabledHQ (Got more questions? Tweet to us @EnabledHQ)
翻译自: https://www.freecodecamp.org/news/tutorial-creating-stretchy-layouts-on-ios-using-auto-layout-3fa974fa5e28/
ios snapkit m
相关文章:

谷歌 notification 测试 页面
1 <button onclick"notifyMe(master wei,http://cdn.sstatic.net/stackexchange/img/logos/so/so-icon.png,我在测试谷歌通知功能,http://www.mi.com/)">通知!</button>2 <script>3 var sum 0;4 document.addEventListener(DOMContentLoaded, fun…
[转]如果我有jQuery背景,我应该如何切换到AngularJS的思维模式?
导言 stackoverflow上有一个人问了一个问题:如果我有jQuery背景,我应该如何切换到AngularJS的思维模式? 有一个回复非常经典,获得了两千多票。 为了让国内开发者也能领略到其中的核心思想,现把这个问题和答案翻译出来供…

[微信小程序]实现一个自定义遮罩层组件(完整示例代码附效果图)
微信小程序开发交流qq群 173683895 承接微信小程序开发。扫码加微信。 正文: 先上效果图: 点击按钮Show显示遮罩层,再次点击屏幕任何地方隐藏遮罩层; <button bindtap"showview">Show</button> <view class"bg" bindtaphide…
网红快餐店_在一家快餐店工作解释了AJAX基础知识
网红快餐店by Kevin Kononenko凯文科诺年科(Kevin Kononenko) 在一家快餐店工作解释了AJAX基础知识 (AJAX Basics Explained By Working At A Fast Food Restaurant) AJAX (Asynchronous JavaScript And XML) can be pretty confusing if you do not have a firm understandin…
ThinkPHP 3.2 中获取所有函数方法名,以及注释,完整可运行
<?phpnamespace Home\Controller;use Common\Controller\BaseController;class AuthController extends BaseController{/*** cc index主页面*/public function index(){$modules array(Home); //模块名称$i 0;foreach ($modules as $module) {$all_controller $this-…

减少Building 'Xxx' Gradle project info等待时间
转载请注明出处:http://www.cnblogs.com/cnwutianhao/p/6640279.html 从Github上看到好的Demo想要Download下来学习。导入到Android Stduio的时候经常会碰到这样的事情。。。 等了半天没反应还是这个界面,老子要报警了!!…
js表单验证,如果不为空时自动改变提交按钮的背景色
<!DOCTYPE html><head><title>js验证表单,如果表单都不为空,则按钮颜色自变,某为空时恢复原本背景色</title><script language"javascript" type"text/javascript">var a ;var b ;function chadnge(e) {a e;if(a ! &…
ux可以去哪些公司_忽略UX会如何伤害您的API以及您可以如何做
ux可以去哪些公司by Ifeoluwa Arowosegbe通过Ifeoluwa Arowosegbe 忽略UX会如何伤害您的API以及您可以如何做 (How ignoring UX hurts your API and what you can do about it) Creating experiences that users love is crucial to the success of any product. Companies in…
初识java类的接口实现
初识java类的接口实现 如果两个类之间不存在继承关系,且两个类都想实现同一个接口,两个类都必须实现接口中全部方法,否则报语法错误如果两个类之间存在继承关系也想实现同一个接口,父类如果实现了某个接口的全部方法,从…

KMP的next[]数组
KMP是众多字符串问题的基础 理解next数组尤为重要 next又称前缀数组 是 它所处位置的前一个位置的元素 与 该链 链首开始 几个元素相匹配(即相同) 举个实例来说明: next对应的是该位置的前一个元素, 即next[i]对应a[i-1] 因为-1头指针的存在 next均对应…
[微信小程序]手指触摸动画效果(完整代码附效果图)
微信小程序开发交流qq群 173683895 本文共有两个示例,先上图 示例一: 示例二: 示例一代码(微信小程序): // pages/test/test.js Page({containerTap: function (res) {var that thisvar x res.touches[0].pageX;var y res.touches[0].pageY 85;this.setData({rippleS…
webpack 占位符_通过示例学习Webpack:占位符图像模糊
webpack 占位符by Kalalau Cantrell通过Kalalau Cantrell 通过示例了解Webpack:占位符图像模糊 (Learn Webpack by Example: Blurred placeholder images) The repo that goes along with this post uses webpack 3. If you are interested in learning webpack 4,…

UIImage 各种处理(分类)
1 interface UIImage (conversion)2 3 //压缩图片到宽度10244 (UIImage *)imageCompressSizeToMin1024Width:(UIImage *)image;5 6 7 //修改图片size8 (UIImage *)image:(UIImage *)image byScalingToSize:(CGSize)targetSize;9 10 //UIColor 转UIImage 11 (UIImage *)…
Matlab随笔之矩阵入门知识
直接输入法创建矩阵 – 矩阵的所有元素必须放在方括号“[ ]”内; – 矩阵列元素之间必须用逗号“,”或空格隔开,每行必须用“;”隔开 – 矩阵元素可以是任何不含未定义变量的表达式。可以是实数,或者是复数。 – 例a[1,2;3,4] 或 …
[微信小程序]提交表单返回成功后自动清空表单的值
微信小程序开发交流qq群 173683895 承接微信小程序开发。扫码加微信。 正文: 实现思路: 给每一个input绑定相同的value对象,提交成功后把这个对象赋值为空. 下面看代码: <form bindsubmitformsubmit><view><span>* </span>公司名称:&l…
xebium周末启动_我如何在周末建立和启动聊天机器人
xebium周末启动by Mike Williams由Mike Williams 我如何在周末建立和启动聊天机器人 (How I Built And Launched A Chatbot Over The Weekend) 在数小时内将您的想法带入功能性bot,获得真实的用户反馈,并在周末结束前启动! ? (Ta…

transition属性值
一、transition-property: transition-property是用来指定当元素其中一个属性改变时执行transition效果,其主要有以下几个值:none(没有属性改变);all(所有属性改变)这个也是其默认值;indent(元素…
[微信小程序]下拉菜单
微信小程序开发交流qq群 173683895 承接微信小程序开发。扫码加微信。 正文: 动画效果是使用CSS3 keyframes 规则(使 div 元素匀速向下移动) <view class page_row><view class"nav" wx:for{{nav_title}} wx:key"index"><vi…
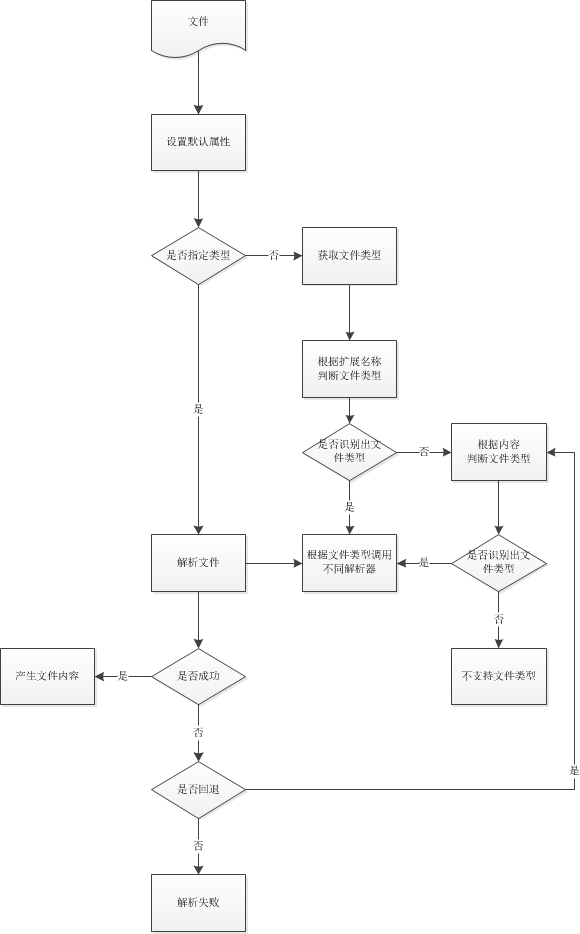
文件解析库doctotext源码分析
doctotext中没有make install选项,make后生成可执行文件在buile目录下面有.so动态库和头文件,需要的可以从这里面拷贝build/doctotext就是可执行程序。doctotext内置了两种检测文件类型方法:1、以后缀为依据检测文件类型2、以内容为依据检测文…
tmux系统剪切板_实践中的tmux:与系统剪贴板集成
tmux系统剪切板by Alexey Samoshkin通过阿列克谢萨莫什金(Alexey Samoshkin) 在实践中使用tmux:与系统剪贴板集成 (tmux in practice: integration with the system clipboard) 如何在tmux复制缓冲区和系统剪贴板之间建立桥梁,以及如何在OSX或Linux系统…
【Java面试题】54 去掉一个Vector集合中重复的元素
在Java中去掉一个 Vector 集合中重复的元素 1)通过Vector.contains()方法判断是否包含该元素,如果没有包含就添加到新的集合当中,适用于数据较小的情况下。 import java.util.Vector; public class DeleteVector {public static v…
tornado+nginx上传视频文件
[http://arloz.me/tornado/2014/06/27/uploadvideotornado.html] [NGINX REFRER: Nginx upload module] 由于tornado通过表达上传的数据最大限制在100M,所以如果需要上传视屏文件的情况在需要通过其他方式实现, 此处采用nginx的nginx-upload-module和jQu…
微信小程序swiper组件宽高自适应方法
微信小程序开发交流qq群 173683895 承接微信小程序开发。扫码加微信。 正文: 我把 swiper 的 width 设定成了屏幕的95%宽度, 如果想宽度也自适应的话请改成 width:{{width*2}}rpx <swiper classadvertising2 indicator-dots"true" styleheight:{{…
全面访问JavaScript的最佳资源
Looking for a new job is a daunting task. There are so many things to consider when trying to find the perfect role - location, company, job responsibilities, pay and compensation, training and much more.找一份新工作是艰巨的任务。 试图找到理想的职位时&…
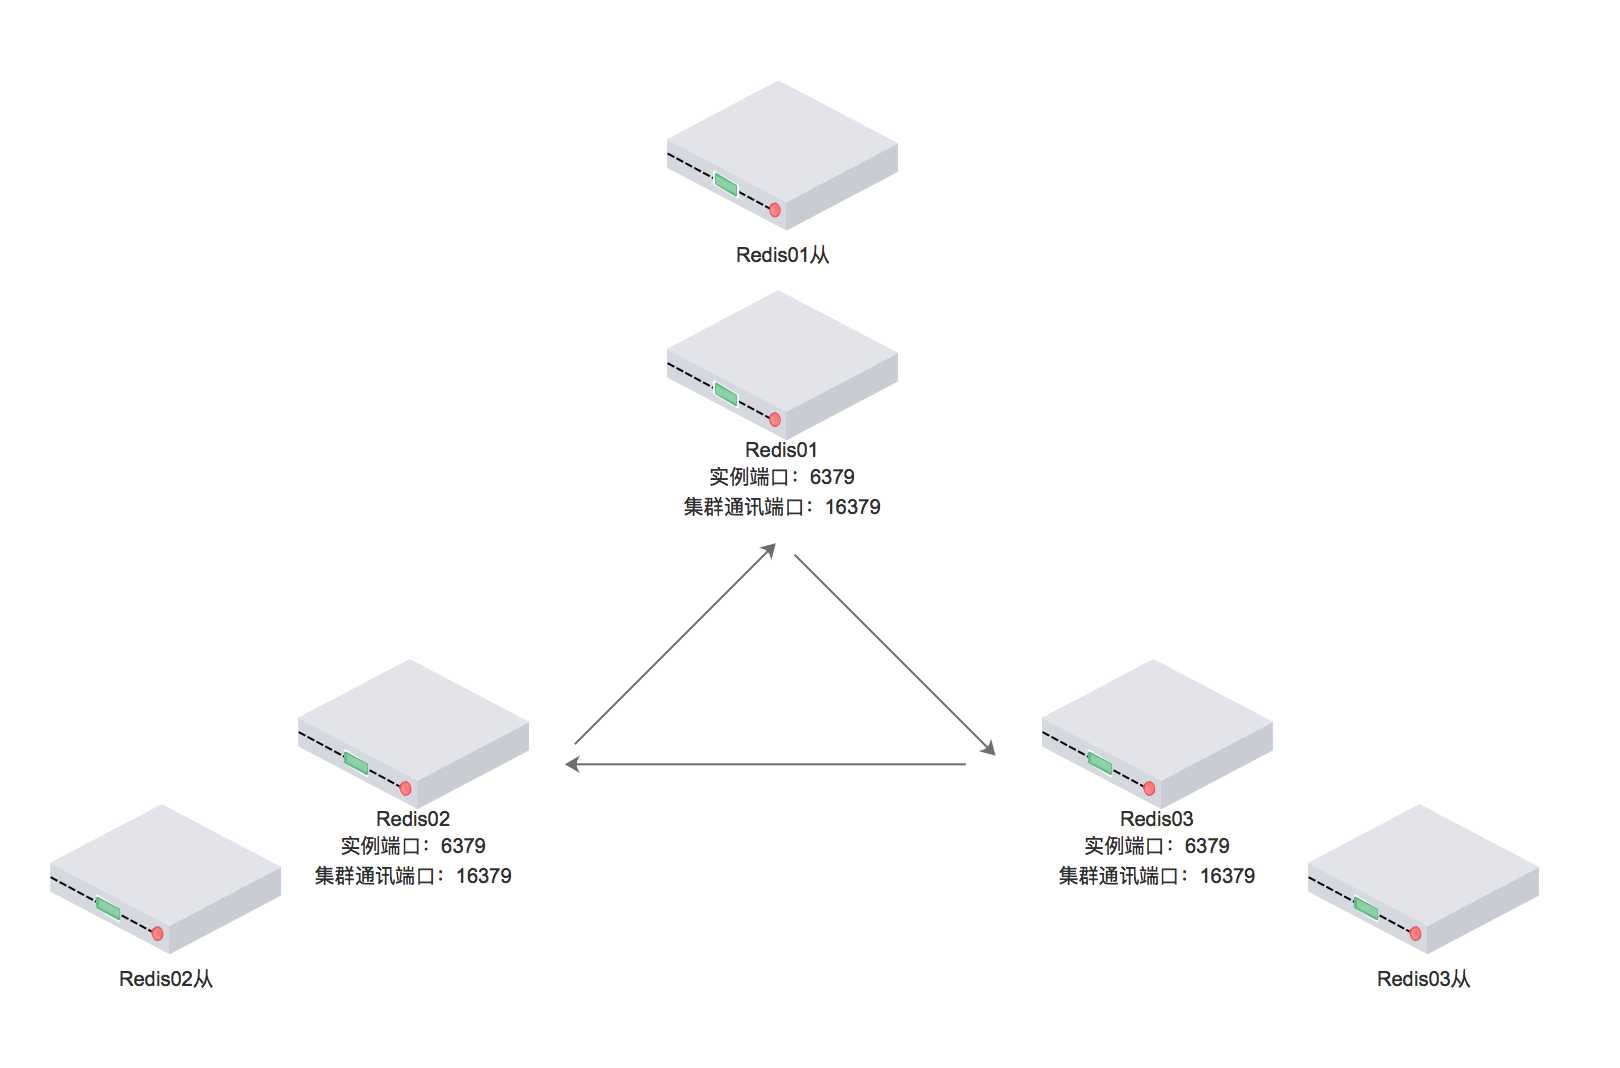
Redis集群官方推荐方案 Redis-Cluster
Redis-Cluster redis使用中遇到的瓶颈 我们日常在对于redis的使用中,经常会遇到一些问题 1、高可用问题,如何保证redis的持续高可用性。 2、容量问题,单实例redis内存无法无限扩充,达到32G后就进入了64位世界,性能下降…
[微信小程序]单选框以及多选框实例代码附讲解
微信小程序开发交流qq群 173683895 承接微信小程序开发。扫码加微信。 正文: 效果图 <radio-group class"radio-group" bindchange"radioChange"><label class"radio" wx:for"{{k7}}" wx:key"index&q…
IDL_GUI
菜单栏设计 PRO IDLGui;构建界面;显示;添加事件tlbWIDGET_BASE(xsize400,ysize400,/column,mbarmbar);实现基类fileWIDGET_BUTTON(mbar, $ ;新建button,value文件)openwidget_button(file,value打开,/menu)jpgwidget_button(open,valuejpg)existwidget_…
git隐藏修改_您可能不知道的有关Git隐藏的有用技巧
git隐藏修改I have launched a newsletter Git Better to help learn new tricks and advanced topics of Git. If you are interested in getting your game better in Git, you should definitely check that out.我已经发布了Git Better通讯,以帮助学习Git的新技…
css 层叠式样式表(2)
一,样式表分类 (1)内联样式。 --优先级最高,代码重复使用最差。 (当特殊的样式需要应用到单独某个元素时,可以使用。 直接在相关的标签中使用样式属性。样式属性可以包含任何 CSS 属性。) &…
Hadoop学习笔记之三 数据流向
http://hadoop.apache.org/docs/r1.2.1/api/index.html 最基本的: 1. 文本文件的解析 2. 序列文件的解析 toString会将Byte数组中的内存数据 按照字节间隔以字符的形式显示出来。 文本文件多事利用已有的字符处理类, 序列文件多事创建byte数组࿰…