webpack 占位符_通过示例学习Webpack:占位符图像模糊
webpack 占位符
by Kalalau Cantrell
通过Kalalau Cantrell
通过示例了解Webpack:占位符图像模糊 (Learn Webpack by Example: Blurred placeholder images)
The repo that goes along with this post uses webpack 3. If you are interested in learning webpack 4, you will find this post useful as the concepts as well as the config file format is the same. Webpack 4 did introduce optimizations, zero-config capabilities, as well as new out-of-the-box plugins that an advanced user would want to know about but is beyond the purpose of this post.
这篇文章随附的仓库使用webpack3。如果您对学习webpack 4感兴趣,您会发现这篇文章很有用,因为概念和配置文件格式都是相同的。 Webpack 4确实引入了优化,零配置功能以及高级用户想要了解的新的即用型插件,但这超出了本文的目的。
This is an episodic guide for learning webpack through various examples. Webpack newbies are welcome. I’m one myself and I’ll try to explain the webpack stuff in terms that make sense to someone just getting to know the tool.
这是通过各种示例学习Webpack的临时指南。 欢迎使用Webpack新手。 我自己一个人,我将尝试用对刚了解该工具的人有意义的术语来解释webpack的内容。
All the folks that maintain the packages used in this guide deserve recognition for making such awesome tools available to the community. Since it’s the subject of this guide, a special shout out goes to responsive-loader and Jeremy Stucki who maintains the project.
所有维护本指南中使用的软件包的人都应该因向社区提供如此出色的工具而受到认可。 由于是本指南的主题,因此特别感谢响应式加载器和维护项目的Jeremy Stucki 。
In episode I, we’ll look at a technique for loading images. This includes 1) inlines blurred placeholder versions of our images on initial page load. Then, 2) requests the full images from the server. Lastly, 3) when the full images finally load, they get faded in and the blurred placeholders get removed.
在第一集中,我们将介绍一种加载图像的技术。 这包括1)在初始页面加载时内联模糊图像的占位符版本。 然后,2)向服务器请求完整图像。 最后,3)当完整的图像最终加载时,它们会淡入并删除模糊的占位符。
This technique is great for devices on slow connections. It gives users some sense of what the page will look like during the several seconds (think slow 3G) it may take for the page’s images to fully load.
此技术非常适合连接速度较慢的设备。 它使用户大致了解页面在几秒钟内(看起来很慢的3G)将完全加载页面图像所需的外观。
入门 (Getting Started)
If you want to follow along in your code editor, you can either download this repo or git clone and checkout the blur-up branch of the repo if you prefer.
如果您想在代码编辑器中继续学习,可以根据需要下载此仓库或git clone并checkout的blur-up分支。
Below is the file structure you should find when you open up the project folder.
以下是打开项目文件夹时应找到的文件结构。
We’ll be using webpack and specifically responsive-loader. We will resize and generate blurred placeholders for the three images in src/imgs. These are, by the way, characters from the author’s favorite video game of all time.
我们将使用webpack以及专门的响应式加载器。 我们将为src/imgs.的三个图像调整大小并生成模糊的占位符src/imgs. 顺便说一下,这些都是作者一直以来最喜欢的视频游戏中的角色。
Let’s take a look at our source code now starting with index.html. As we go, we’ll see what webpack is doing for us and we’ll pause to talk about how. Boilerplate has been omitted and replaced with <-- ... -->for brevity.
现在让我们看一下以index.html开头的源代码。 在进行过程中,我们将看到webpack为我们做什么,我们将暂停讨论如何做。 为简便起见,省去了样板,并用<-- ... -...->代替。
You’ve probably noticed that there are three <;a> elements, one for each of our images. But what’s with the template literals? And what’s that requirefunction all about? These are how we’re asking webpack to do its thing.
您可能已经注意到,存在三个< ; a>元素,每个图像对应一个。 但是,模板文字是什么? 那什么that r功能呢? 这些就是我们要求webpack做到这一点的方式。
As webpack parses through our HTML, it encounters the template literals and knows it needs to put something there. The require function tells webpack what to put there – in our case we’re putting in image data (it may not be clear yet what data we’re putting there but hang with me, we’ll get there). So, how does webpack know to do this? Is it automatic?
当webpack解析我们的HTML ,它会遇到模板文字,并且知道需要在其中放置一些内容。 在require函数告诉的WebPack要放什么东西在那里-在我们的情况下,我们在图像数据(它可能不是很清楚但什么样的数据,我们正在将存在,但与我一起,我们会到达那里)推杆。 那么,webpack如何知道这样做呢? 它是自动的吗?
If you’ve never seen a webpack config file before, you could probably guess by just glancing at one that it’s very much not automatic. There are many options some of which are specific to webpack and others that are specific to a certain loader or plugin. So, what’s a loader anyway? What’s a plugin?
如果您以前从未看过Webpack配置文件,则可能只看一眼就可以猜到它不是很自动。 有很多选项,其中一些特定于webpack,而另一些特定于特定的加载程序或插件。 那么,什么是装载机 ? 什么是插件 ?
快速定义 (Quick definitions)
Before diving into the configuration, I’ll provide quick definitions of these webpack concepts. I will also provide links to the docs that explain them in more detail.
在深入研究配置之前,我将提供这些Webpack概念的快速定义。 我还将提供指向文档的链接,以更详细地说明它们。
Loader: Its job is to take your files, transform them a certain way, and give you the result of that transformation. The result you get depends on what type of file you’re working with and what the loader’s capabilities are. To use an example from our project today, you can use a loader to take an image file, transform it into image data, and then inline that data into your
HTML.加载程序 :它的工作是获取文件,以某种方式对其进行转换,然后为您提供转换结果。 您得到的结果取决于您正在使用的文件类型以及加载程序的功能。 要使用我们今天的项目中的示例,您可以使用加载程序来获取图像文件,将其转换为图像数据,然后将其内联到
HTML。Plugin: Its job is to accomplish more general tasks than loaders. Whereas loaders apply specific transformations to specific file types. Plugins, however, can perform tasks such as file compression, text minification, and so on. To use an example from our project today, you can use a plugin to compress image files.
插件 :它的工作是完成比装载机更多的常规任务。 加载程序将特定的转换应用于特定的文件类型。 但是,插件可以执行诸如文件压缩,文本缩小等任务。 要使用我们今天的项目中的示例,您可以使用插件来压缩图像文件。
HTML处理 (HTML Processing)
Let’s now look at how we use loaders and plugins to handle our HTMLspecifically. Below are the parts of our webpack.config.js that have to do with HTML. The other options that we’ll talk about eventually are omitted and replaced with // ....
现在让我们看看如何使用加载程序和插件专门处理HTML 。 以下是我们webpack.config.js中与HTML 。 最终我们将要讨论的其他选项被省略,并替换为// ...
First, we pull in the html-webpack-plugin and assign it to a variable named HtmlWebpackPlugin (creative, right?). This plugin’s job is to generate the HTML file that we’ll use in distribution. To initiate the plugin, we use the new operator on our variable in the plugins property of our config object. The config object I’m referring to is the one assigned to module.exports, and it is what “tells” webpack what to do.
首先,我们引入html-webpack-plugin并将其分配给名为HtmlWebpackPlugin的变量(creative,对吗?)。 该插件的工作是生成我们将在分发中使用的HTML文件。 要启动插件,我们在config对象的plugins属性中的变量上使用new运算符。 我指的是config对象,它是分配给module.exports ,它是“告诉” webpack要做的事情。
html-webpack-plugin would generate pretty generic boilerplate HTMLwithout any options passed in. But, notice that we’ve set its templateproperty equal to our source index.html file. As you might guess, this is us telling the plugin to use our index.html as a template when it generates an HTML file for us. Great, but why go through all this trouble you ask?
html-webpack-plugin会生成非常通用的样板HTML而无需传入任何选项。但是,请注意,我们已将其template属性设置为与源index.html文件相等。 您可能会猜到,这是告诉我们插件在为我们生成HTML文件时使用index.html作为模板。 很好,但是为什么要经历所有这些麻烦呢?
It’s because we want to use loaders to transform our source HTML. We want to transform this:
这是因为我们要使用加载程序来转换源HTML 。 我们要对此进行转换:
into this:
到这个:
Notice that the template literals and require functions have been replaced. Now the a.href attribute has an URL to a resized version of our image, 300pxwide. Also, the img.src attribute now has inline image data. I showed the transformation of our HTML for one <;a> element, but this is what we want all the <a> elements to look like.
请注意,模板文字和require函数已被替换。 现在, a.href属性具有指向300px宽的图像尺寸调整后的URL。 此外, img.src属性现在具有嵌入式图像数据。 我发现我们的转型HTML的一个< ;一>元素,但是这是我们想要人lt他<a>元的样子。
Let’s look at how we use loaders to accomplish this transformation. Let’s zoom in on the block of code from our webpack.config.js that starts off with the test: /\.html$/ key-value pair.
让我们看看如何使用加载程序完成此转换。 让我们放大webpack.config.js中以test: /\.html$/开始的代码块test: /\.html$/ . test: /\.html$/键值对。
{ test: /\.html$/, use: { loader: 'html-loader', options: { interpolate: true } }}This block says is, “Hey webpack, when you encounter HTMLfiles, please use html-loader and make sure it’s setup to allow interpolation”.
此代码块是,“嘿,Webpack,当您遇到HTML文件时,请使用html-loader并确保其设置允许插值”。
In other words, we testfor the “.html” extension. We use html-loader as the loader for that type of file, and then we specify in options that we’d like to use the interpolate feature from html-loader.
换句话说,我们test “ .html”扩展名。 我们use html-loader作为该类型文件的loader ,然后在options中指定要使用html-loader的interpolate功能。
If you look at the html-loader documentation, you’ll see that when interpolate is set to true, you can embed the result of some JavaScript(JS) right in our HTML. In our case, we take advantage of that by calling the require function to tell webpack to bring in image assets. But how does webpack know what to do with images?
如果查看html-loader 文档 ,您会看到将interpolate设置为true ,可以将一些JavaScript (JS)的结果直接嵌入HTML 。 在我们的例子中,我们通过调用require函数来告诉webpack引入图像资产来利用它。 但是,webpack如何知道如何处理图像?
图像处理 (Image Processing)
We need to tell it what loaders and plugins to use. Below is the part of our webpack.config.js file that instructs webpack what to do with images.
我们需要告诉它要使用哪些装载程序和插件。 以下是我们的webpack.config.js文件的一部分, webpack.config.js文件指示webpack如何处理图像。
The imagemin-webpack-plugin we’re using has a pretty simple job — it just compresses our images. You can read more about that here, but what’s of more interest is the loader we’re using to transform our images. Look at the block of code that starts with the test: /\.(png|jpg|gif)$/ key-value pair.
我们正在使用的imagemin-webpack-plugin有一个非常简单的工作-它只是压缩我们的图像。 您可以在此处阅读有关此内容的更多信息,但更有趣的是我们用来转换图像的加载器。 查看以test: /\.(png|jpg|gif)$/开头的代码块test: /\.(png|jpg|gif)$/ .( test: /\.(png|jpg|gif)$/键值对。
This block says, “Hey webpack, when you encounter image files use responsive-loader. Generate a resized version of the image at300pxwide. And while you’re at it create data for a placeholder image that is 50px wide”.
该块说:“嘿,Webpack,当您遇到图像文件时,请使用响应加载器。 生成300px宽的图像的调整大小版本。 当您使用它时,请为50px宽的占位符图像创建数据。”
In other words, we test for the “.png” or “.jpg” or “.gif” extensions. We useresponsive-loader as the loader for those types of file. Then we specify in options that we’d like to use the resize, placeholder, and name features of responsive-loader to transform our images.
换句话说,我们test “ .png”或“ .jpg”或“ .gif”扩展名。 我们use 响应加载器作为这些类型文件的loader 。 然后,在options中指定我们要使用响应加载程序的resize , placeholder和name功能来转换图像。
Let’s look in detail at what responsive-loader does for us with these options. When we say:
让我们详细看看使用这些选项的响应式加载程序为我们做什么。 当我们说:
require('./imgs/cloud-strife.jpg');Then responsive-loader gives us this back:
然后, 响应式加载器将其返回给我们:
It’s just a JS object. And that is why when can use .src and .placeholder to access what we need from our require statements so that when we do this:
这只是一个JS对象。 这就是为什么何时可以使用.src和.placeholder从require语句访问我们需要的内容,以便在执行此操作时:
<img src="${require('./imgs/cloud-strife.jpg').placeholder}" class="hero-preview" alt="cloud-strife">webpack gives us this:
webpack为我们提供了这一点:
<!--image data truncated for brevity-->;<img src="https://img-blog.csdnimg.cn/2022010618293853152.jpeg" class="hero-preview" alt="cloud strife">快速回顾 (Quick Recap)
Awesome, so we have a workflow for processing our HTML and our images. To recap:
太好了,因此我们有一个用于处理HTML和图像的工作流程。 回顾一下:
For HTML, we use the html-webpack-plugin to generate an HTML file using our source index.html as a template. We use html-loader to process our HTML and specifically allow interpolation. Interpolation lets us use require statements in our HTML so that we can ask webpack to load in images a certain way.
对于HTML ,我们使用html-webpack-plugin以我们的源index.html作为模板来生成HTML文件。 我们使用html-loader处理HTML并特别允许插值。 插值使我们可以在HTML使用require语句,以便我们可以要求webpack以某种方式加载图像。
For images, we use responsive-loader to generate resized versions of our images. It then generates image data for blurred placeholder versions of our images for us to use inline.
对于图像,我们使用响应加载程序生成图像的调整大小的版本。 然后,它会为图像的模糊占位符版本生成图像数据,以供我们内联使用。
Once our code is transformed with these loaders, the image paths and image data are embedded in our HTML. Nice!
一旦使用这些加载程序转换了代码,图像路径和图像数据就会嵌入到HTML 。 真好!
源级联样式表(CSS)和JavaScript(JS) (Source Cascading Style Sheets (CSS) and JavaScript(JS))
Let’s check out the rest of our source code. See the code comments for explanations on how we use JS and CSS to fade in the full image once it loads and then remove the placeholder image.
让我们检查其余的源代码。 请参阅代码注释,以获取有关如何在加载后使用JS和CSS淡入完整图像并删除占位符图像的说明。
CSS: (CSS:)
JS: (JS:)
加载CSS和JS (Loading CSS and JS)
Below is what our index.js looks like. This file is where we tell webpack to bring in all the modules we want to use and then use them. A module in the simplest terms is just a chunk of code from another file that we want to import and use.
下面是我们的index.js样子。 这个文件是我们告诉webpack引入所有要使用的模块然后使用它们的地方。 用最简单的术语来说, 模块只是我们要导入和使用的另一个文件中的一小段代码。
Inside of a JS file, we can use the ES2015 import syntax instead of requireto bring in modules. For instance, note that import loadFullImages from './loadImages' does the same thing as const loadFullImages = require('./loadImages).
在JS文件中,我们可以使用ES2015 import语法,而不require引入模块。 例如,请注意, import loadFullImages from './loadImages' const loadFullImages = require('./loadImages) 。
In our case, we just have two modules. Notice that modules in webpack are not restricted to JS – we can treat CSS files as modules, too, if we use the right loaders. This is powerful but can be confusing at first. Once I walk you through how webpack is loading our CSS file, however, you’ll see that all we’re doing is minifying our source CSS and generating a main.css file:
在我们的例子中,我们只有两个模块。 请注意,webpack中的模块不仅限于JS ,如果使用正确的加载器,我们也可以将CSS文件视为模块。 这功能强大,但起初可能会造成混淆。 但是,一旦我逐步介绍了webpack如何加载CSS文件,您将看到我们正在做的就是缩小源CSS并生成main.css文件:
In the above block of options, notice that we can specify multiple loaders in the use property by passing in an array of loader objects. The file then gets processed by each of the loaders starting with the last loader in the array and then ending with the first.
在上面的选项块中,请注意,我们可以通过传入加载程序对象数组来在use属性中指定多个加载程序。 然后,由每个加载器处理文件,从数组中的最后一个加载器开始,然后从第一个加载器结束。
This block basically says, “Hey webpack, when you encounterCSSfiles, please use css-loader to bring in the CSS and minify it. Then use extract-loader to separate it from being bundled in with our JS (more on that here). Then use file-loader to create a file for us with the name and extension of the original source file (in our case, it names it “main.css”).
该块基本上说:“嘿,Webpack,当您遇到CSS文件时,请使用css-loader引入CSS并将其最小化。 然后使用extract-loader将其与捆绑在我们的JS中分离开(更多有关此内容 )。 然后使用文件加载器为我们创建一个具有原始源文件名和扩展名的文件(在本例中,它的名称为“ main.css”)。
This is how we’re telling webpack to load our JS:
这就是我们告诉webpack加载JS的方式:
What this block basically says is, “Hey webpack, when you encounter JS files, please use babel-loader and its env preset to compile our JS. Babel takes our source JS written in ES2015+ syntax and compiles it down to browser-friendly ES5. The modules: false option tells Babel not to worry about transforming our import syntax. Webpack is already doing that.
该块的基本含义是:“嘿,Webpack,当您遇到JS文件时,请使用babel-loader及其env预设来编译我们的JS 。 Babel使用我们以ES2015 +语法编写的源JS ,并将其编译为对浏览器友好的ES5。 modules: false选项告诉Babel不要担心转换我们的import语法。 Webpack已经在这样做。
建造 (The Build)
If you want to see webpack generate the distribution files, go ahead and install Node.js which comes with npm if you don’t yet have these installed. Open up a command line console and cd into the project directory. If you’re on Windows and need a *NIX friendly shell, use Windows Powershell rather than the default Command Prompt.
如果您希望webpack生成分发文件,请继续安装npm附带的Node.js(如果尚未安装)。 打开命令行控制台和cd到项目目录。 如果您使用的是Windows,并且需要* NIX友好的shell,请使用Windows Powershell而不是默认的命令提示符。
Once you’re in the project directory, run the npm install command to install all the packages we’ve talked about in this guide. Then run the npm start command to execute the build. Below is the last bit of webpack configuration that we still need to go over. This is how webpack knows where to send the distribution files:
进入项目目录后,运行npm install命令安装我们在本指南中讨论的所有软件包。 然后运行npm start命令以执行构建。 下面是我们仍然需要遍历的webpack配置的最后一部分。 这是webpack知道将分发文件发送到哪里的方式:
path is a utility module. It allows us to easily construct file and directory paths that are platform friendly. These will work whether your platform’s file system uses ‘/’ or ‘\’ as path separators. Here we use the path.join function to tell webpack where to find and send our files.
path是一个实用程序模块。 它使我们能够轻松构建平台友好的文件和目录路径。 无论您平台的文件系统使用'/'还是'\'作为路径分隔符,它们都将起作用。 在这里,我们使用path.join函数来告诉webpack在哪里查找和发送文件。
entry tells webpack which module is the “main” module, the one in which we import all of the other modules that we depend on. app is the name we’ve given to the main bundle that webpack will create by stitching together all of our modules.
entry告诉webpack哪个模块是“主”模块,在该模块中,我们导入依赖的所有其他模块。 app是我们给webpack通过将所有模块拼接在一起而创建的主捆绑包的名称。
Finally, output.path tells webpack where to send all of the files it creates for us. The output.filename tells webpack what naming scheme to use for the bundles it creates. In our case, we’re just creating one bundle and it will come out named “app.bundle.js”.
最后, output.path告诉webpack将它创建的所有文件发送到哪里。 output.filename告诉webpack创建的包使用哪种命名方案。 在我们的例子中,我们只是创建一个包,它将被命名为“ app.bundle.js”。
结论 (Conclusion)
I hope you were able to learn a bit more about how webpack can help you build stuff through this example. I also hope you took away something from reading this. For instance, an image loading technique, a way to write modular JS, or even just practice reading someone else’s code. Finally, I hope you were able to fire up the resulting code in a browser and see it in action. Thanks for reading!
我希望您能够通过本示例进一步了解webpack如何帮助您构建内容。 我也希望您能从阅读本文中学到一些东西。 例如,图像加载技术,编写模块化JS ,甚至只是练习阅读别人的代码。 最后,我希望您能够在浏览器中启动生成的代码,并在实际中看到它。 谢谢阅读!
Clap if this helped you learn something, comment below with any questions, and say hi to me and thanks to Jeremy Stucki on Twitter.
鼓掌帮助您学习一些东西,在下面提出任何问题,并向我 问好 ,并感谢Twitter上的Jeremy Stucki 。
翻译自: https://www.freecodecamp.org/news/learn-webpack-by-example-blurred-placeholder-images-4ad8b1751709/
webpack 占位符
相关文章:

UIImage 各种处理(分类)
1 interface UIImage (conversion)2 3 //压缩图片到宽度10244 (UIImage *)imageCompressSizeToMin1024Width:(UIImage *)image;5 6 7 //修改图片size8 (UIImage *)image:(UIImage *)image byScalingToSize:(CGSize)targetSize;9 10 //UIColor 转UIImage 11 (UIImage *)…

Matlab随笔之矩阵入门知识
直接输入法创建矩阵 – 矩阵的所有元素必须放在方括号“[ ]”内; – 矩阵列元素之间必须用逗号“,”或空格隔开,每行必须用“;”隔开 – 矩阵元素可以是任何不含未定义变量的表达式。可以是实数,或者是复数。 – 例a[1,2;3,4] 或 …

[微信小程序]提交表单返回成功后自动清空表单的值
微信小程序开发交流qq群 173683895 承接微信小程序开发。扫码加微信。 正文: 实现思路: 给每一个input绑定相同的value对象,提交成功后把这个对象赋值为空. 下面看代码: <form bindsubmitformsubmit><view><span>* </span>公司名称:&l…
xebium周末启动_我如何在周末建立和启动聊天机器人
xebium周末启动by Mike Williams由Mike Williams 我如何在周末建立和启动聊天机器人 (How I Built And Launched A Chatbot Over The Weekend) 在数小时内将您的想法带入功能性bot,获得真实的用户反馈,并在周末结束前启动! ? (Ta…

transition属性值
一、transition-property: transition-property是用来指定当元素其中一个属性改变时执行transition效果,其主要有以下几个值:none(没有属性改变);all(所有属性改变)这个也是其默认值;indent(元素…
[微信小程序]下拉菜单
微信小程序开发交流qq群 173683895 承接微信小程序开发。扫码加微信。 正文: 动画效果是使用CSS3 keyframes 规则(使 div 元素匀速向下移动) <view class page_row><view class"nav" wx:for{{nav_title}} wx:key"index"><vi…
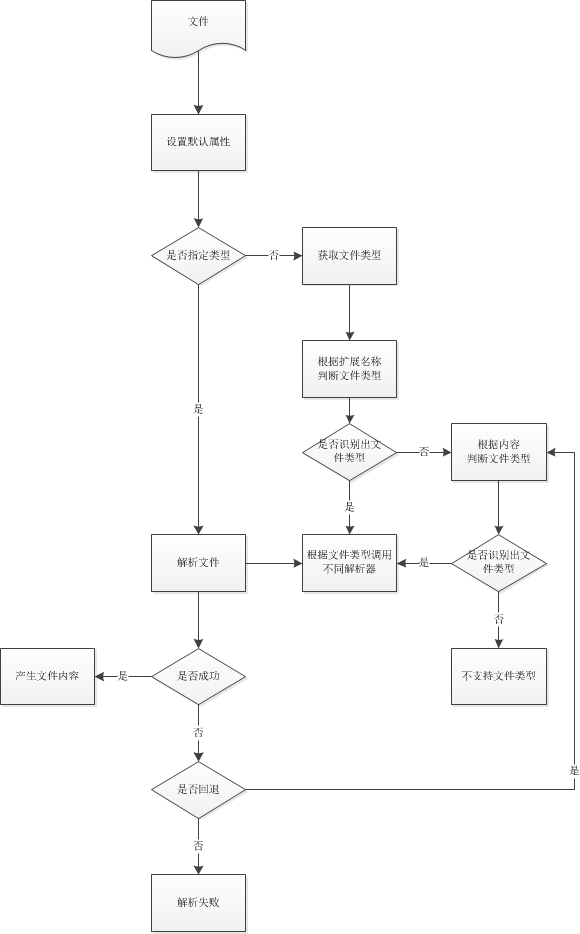
文件解析库doctotext源码分析
doctotext中没有make install选项,make后生成可执行文件在buile目录下面有.so动态库和头文件,需要的可以从这里面拷贝build/doctotext就是可执行程序。doctotext内置了两种检测文件类型方法:1、以后缀为依据检测文件类型2、以内容为依据检测文…
tmux系统剪切板_实践中的tmux:与系统剪贴板集成
tmux系统剪切板by Alexey Samoshkin通过阿列克谢萨莫什金(Alexey Samoshkin) 在实践中使用tmux:与系统剪贴板集成 (tmux in practice: integration with the system clipboard) 如何在tmux复制缓冲区和系统剪贴板之间建立桥梁,以及如何在OSX或Linux系统…
【Java面试题】54 去掉一个Vector集合中重复的元素
在Java中去掉一个 Vector 集合中重复的元素 1)通过Vector.contains()方法判断是否包含该元素,如果没有包含就添加到新的集合当中,适用于数据较小的情况下。 import java.util.Vector; public class DeleteVector {public static v…
tornado+nginx上传视频文件
[http://arloz.me/tornado/2014/06/27/uploadvideotornado.html] [NGINX REFRER: Nginx upload module] 由于tornado通过表达上传的数据最大限制在100M,所以如果需要上传视屏文件的情况在需要通过其他方式实现, 此处采用nginx的nginx-upload-module和jQu…
微信小程序swiper组件宽高自适应方法
微信小程序开发交流qq群 173683895 承接微信小程序开发。扫码加微信。 正文: 我把 swiper 的 width 设定成了屏幕的95%宽度, 如果想宽度也自适应的话请改成 width:{{width*2}}rpx <swiper classadvertising2 indicator-dots"true" styleheight:{{…
全面访问JavaScript的最佳资源
Looking for a new job is a daunting task. There are so many things to consider when trying to find the perfect role - location, company, job responsibilities, pay and compensation, training and much more.找一份新工作是艰巨的任务。 试图找到理想的职位时&…
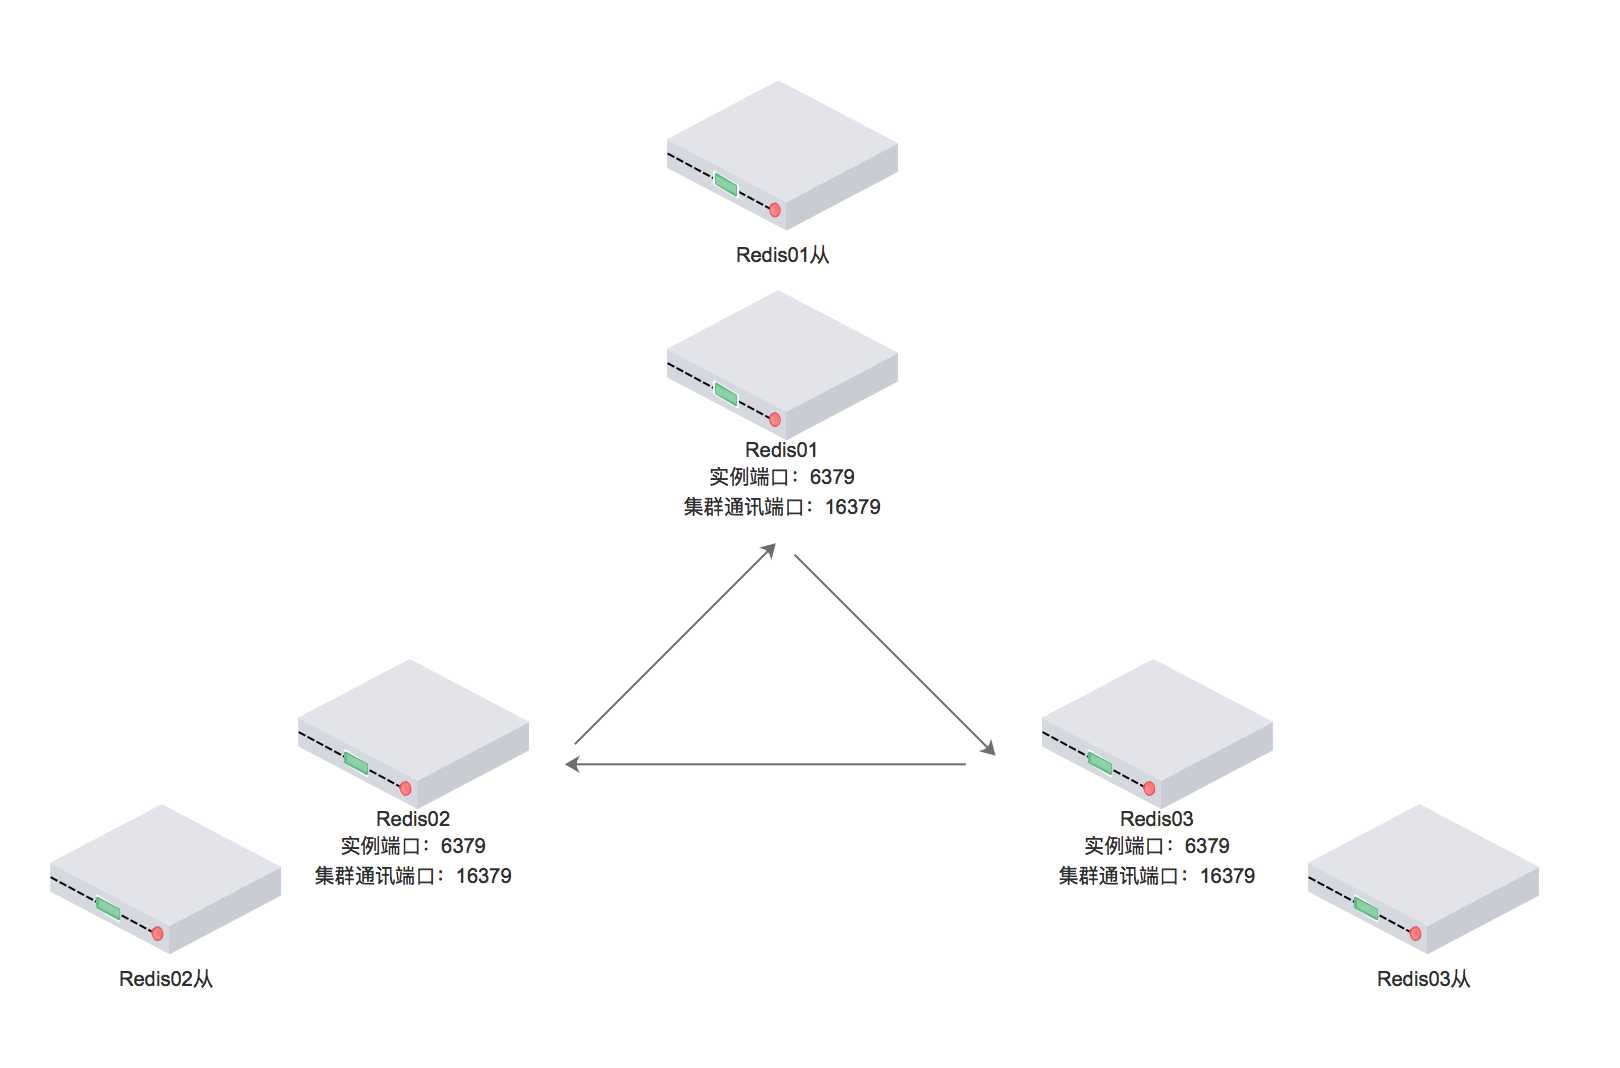
Redis集群官方推荐方案 Redis-Cluster
Redis-Cluster redis使用中遇到的瓶颈 我们日常在对于redis的使用中,经常会遇到一些问题 1、高可用问题,如何保证redis的持续高可用性。 2、容量问题,单实例redis内存无法无限扩充,达到32G后就进入了64位世界,性能下降…
[微信小程序]单选框以及多选框实例代码附讲解
微信小程序开发交流qq群 173683895 承接微信小程序开发。扫码加微信。 正文: 效果图 <radio-group class"radio-group" bindchange"radioChange"><label class"radio" wx:for"{{k7}}" wx:key"index&q…
IDL_GUI
菜单栏设计 PRO IDLGui;构建界面;显示;添加事件tlbWIDGET_BASE(xsize400,ysize400,/column,mbarmbar);实现基类fileWIDGET_BUTTON(mbar, $ ;新建button,value文件)openwidget_button(file,value打开,/menu)jpgwidget_button(open,valuejpg)existwidget_…
git隐藏修改_您可能不知道的有关Git隐藏的有用技巧
git隐藏修改I have launched a newsletter Git Better to help learn new tricks and advanced topics of Git. If you are interested in getting your game better in Git, you should definitely check that out.我已经发布了Git Better通讯,以帮助学习Git的新技…
css 层叠式样式表(2)
一,样式表分类 (1)内联样式。 --优先级最高,代码重复使用最差。 (当特殊的样式需要应用到单独某个元素时,可以使用。 直接在相关的标签中使用样式属性。样式属性可以包含任何 CSS 属性。) &…
Hadoop学习笔记之三 数据流向
http://hadoop.apache.org/docs/r1.2.1/api/index.html 最基本的: 1. 文本文件的解析 2. 序列文件的解析 toString会将Byte数组中的内存数据 按照字节间隔以字符的形式显示出来。 文本文件多事利用已有的字符处理类, 序列文件多事创建byte数组࿰…
[微信小程序]星级评分和展示(详细注释附效果图)
微信小程序开发交流qq群 173683895 承接微信小程序开发。扫码加微信。 正文: 星级评分分成两种情况: 一:展示后台给的评分数据 二:用户点击第几颗星星就显示为几星评分; <!--pages/test/test.wxml--> <view> <view>一:显示后台给的评分</…
uber_这就是我本可以免费骑Uber的方式
uberby AppSecure通过AppSecure 这就是我本可以免费骑Uber的方式 (Here’s how I could’ve ridden for free with Uber) 摘要 (Summary) This post is about a critical bug on Uber which could have been used by hackers to get unlimited free Uber rides anywhere in th…
磁盘I/O 监控 iostat
iostat -cdxm 2 5 dm-4 如果没有这个命令,需要安装sysstat 包。 Usage: iostat [ options ] [ <interval> [ <count> ] ]Options are:[ -c ] [ -d ] [ -N ] [ -n ] [ -h ] [ -k | -m ] [ -t ] [ -V ] [ -x ] [ -z ][ <device> [...] | ALL ] [ -p…
[微信小程序]物流信息样式加动画效果(源代码附效果图)
微信小程序开发交流qq群 173683895 承接微信小程序开发。扫码加微信。 正文: 效果图片:(信息仅为示例) <!--pages/order/order_wl.wxml--> <view classpage_row top><image classgoods src../../images/dsh.png></image><view cl…

在 Ubuntu 14.04 Chrome中安装Flash Player(转)
在 Ubuntu 14.04 中安装 Pepper Flash Player For Chromium 一个 Pepper Flash Player For Chromium 的安装器已经被 Ubuntu14.04 的官方源收录。Flash Player For Linux 自11.2 起已经停止更新,目前 Linux 平台下面的 Flash Player 只能依靠 Google Chrom 的 PPAPI…
数据结构显示树的所有结点_您需要了解的有关树数据结构的所有信息
数据结构显示树的所有结点When you first learn to code, it’s common to learn arrays as the “main data structure.”第一次学习编码时,通常将数组学习为“主要数据结构”。 Eventually, you will learn about hash tables too. If you are pursuing a Comput…

Unity应用架构设计(9)——构建统一的 Repository
谈到 『Repository』 仓储模式,第一映像就是封装了对数据的访问和持久化。Repository 模式的理念核心是定义了一个规范,即接口『Interface』,在这个规范里面定义了访问以及持久化数据的行为。开发者只要对接口进行特定的实现就可以满足对不同…
PHP连接数据库并创建一个表
微信小程序开发交流qq群 173683895 承接微信小程序开发。扫码加微信。 <html> <body><form action"test.class.php" method"post"> title: <input type"text" name"title"><br> centent: <input t…
MyBatis 入门
什么是 MyBatis ? MyBatis 是支持定制化 SQL、存储过程以及高级映射的优秀的持久层框架。MyBatis 避免了几乎所有的 JDBC 代码和手工设置参数以及抽取结果集。MyBatis 使用简单的 XML 或注解来配置和映射基本体,将接口和 Java 的 POJOs(Plain Old Java O…
cms基于nodejs_我如何使基于CMS的网站脱机工作
cms基于nodejsInterested in learning JavaScript? Get my ebook at jshandbook.com有兴趣学习JavaScript吗? 在jshandbook.com上获取我的电子书 This case study explains how I added the capability of working offline to the writesoftware.org website (whic…
how-to-cartoon-ify-an-image-programmatically
http://stackoverflow.com/questions/1357403/how-to-cartoon-ify-an-image-programmatically 转载于:https://www.cnblogs.com/guochen/p/6655333.html

Android Studio 快捷键
2015.02.05补充代码重构快捷键 Alt回车 导入包 自动修正CtrlN 查找类CtrlShiftN 查找文件CtrlAltL 格式化代码CtrlAltO 优化导入的类和包AltInsert 生成代码(如get,set方法,构造函数等)CtrlE或者AltShiftC 最近更改的代码CtrlR 替换文本CtrlF 查找文本CtrlShiftSpace 自动补全…