在Google Cloud Platform上持续部署Node.js
by Gautam Arora
由Gautam Arora
在Google Cloud Platform上持续部署Node.js (Continuous Deployment for Node.js on the Google Cloud Platform)
Google Cloud Platform (GCP) provides a host of options for Node developers to easily deploy our apps. Want a managed hosting solution like Heroku? App Engine, check! Want to host a containerized app? Kubernetes Engine, check! Want to deploy serverless app? Cloud Functions, check!
Google Cloud Platform(GCP)为Node开发人员提供了许多选项,可轻松部署我们的应用程序。 需要像Heroku这样的托管托管解决方案吗? App Engine ,请检查! 要托管一个容器化的应用程序吗? Kubernetes引擎 ,检查! 是否要部署无服务器应用程序? 云功能 ,请检查!
Recently at work, I’ve been enjoying using our in-house continuous deployment service that quickly builds, tests, and deploys new commits pushed to GitHub. So when I read about Google’s new Cloud Build service, I wanted to take it for a spin and see if I could recreate a similar seamless deployment experience for myself. Further, in a conversation with Fransizka from the Google Cloud team, she identified this as an area where a tutorial would be helpful. So here we go…
最近在工作中,我一直在使用我们的内部连续部署服务 ,该服务可以快速构建,测试和部署推送到GitHub的新提交。 因此,当我了解Google的新Cloud Build服务时,我想尝试一下它,看看是否可以为自己重新创建类似的无缝部署体验。 此外,在与Google Cloud团队的Fransizka进行的对话中,她指出这是教程会有所帮助的领域。 所以我们开始...
但是,等等,什么是Cloud Build? (But wait, what is Cloud Build?)
Cloud Build is a managed build service in GCP that can pull code from a variety of sources, run a series of build steps to create a build image for the application, and then deploy this image to a fleet of servers.
Cloud Build是GCP中的托管构建服务,可以从各种来源提取代码,运行一系列构建步骤来为应用程序创建构建映像,然后将该映像部署到服务器群中。
Cloud Build works well with Google’s own source code repository, Bit Bucket or GitHub. It can create a build image using a Docker configuration file (Dockerfile) or Cloud Build’s own configuration file (cloudconfig.yaml). It can deploy applications (and APIs) to App Engine, Kubernetes Engine, and Cloud Functions. A really cool feature is Build Triggers. These can be setup to watch for a new commit in the code repository and trigger a new build and deploy.
Cloud Build可与Google自己的源代码存储库,Bit Bucket或GitHub很好地配合使用。 它可以使用Docker配置文件( Dockerfile )或Cloud Build自己的配置文件( cloudconfig.yaml )创建构建映像。 它可以将应用程序(和API)部署到App Engine,Kubernetes Engine和Cloud Functions。 一个非常酷的功能是构建触发器。 可以设置它们以监视代码存储库中的新提交并触发新的构建和部署。
在我们深入探讨之前…… (Before we jump into the deep end…)
This post shares the detailed steps and code to setup the continuous deployment for Node apps on GCP. It assumes that you’re familiar with developing simple Node applications, working with the command line, and have some high level understanding of deploying apps to cloud services like Heroku, AWS, Azure or GCP.
这篇文章分享了详细的步骤和代码,以设置GCP上Node应用程序的连续部署。 假定您熟悉开发简单的Node应用程序,使用命令行并具有将应用程序部署到诸如Heroku,AWS,Azure或GCP之类的云服务的高级知识。
For each of the sections, a companion GitHub code repository is provided for you to follow along. Don’t sweat it though — feel free to skim over the article to learn about the high level ideas, and you can bookmark it and come to it later if you plan to set this up. The real fun of having a setup like this is that you get to deploy applications quickly.
对于每个部分,都提供了一个随附的GitHub代码存储库供您遵循。 不过,不要汗流—背-随意浏览本文以了解高级思想,如果打算进行设置,可以将其添加书签并在以后使用。 进行这样的设置的真正乐趣在于,您可以快速部署应用程序。
持续部署App Engine标准 (Continuous Deployment for App Engine Standard)
Deploying a Node app to App Engine is quite simple. Create a new project in Google Cloud Console, add an app.yaml configuration file in our code directory (which describes the node runtime we want to use — I’ve used Node 8), and run gcloud app deploy on our terminal — and done!
将Node应用程序部署到App Engine非常简单。 在Google Cloud Console中创建一个新项目,在我们的代码目录中添加一个app.yaml配置文件(该文件描述了我们要使用的节点运行时-我已经使用了Node 8),并在终端上运行gcloud app deploy完成了!
If you want to try this out for yourself, here are a couple of resources:
如果您想自己尝试一下,这里有一些资源:
Sample App for App Engine
App Engine的示例应用
Quickstart Guide for Node on App Engine
App Engine上的Node快速入门指南
So, what we’ve done so far by following the quickstart guide above:
因此,到目前为止,我们已经按照上面的快速入门指南进行了以下操作:
- Created a new project in Google Cloud Console在Google Cloud Console中创建了一个新项目
Deployed our Node app to App Engine using gcloud app deploy
使用gcloud app deploy将 Node应用程序部署到App Engine
….now how can we automate setup such that code changes get deployed automatically on push to GitHub?
…。现在如何实现设置自动化,以便在推送到GitHub时自动部署代码更改?
Here is what we need to do:
这是我们需要做的:
- Put our code on GitHub将我们的代码放在GitHub上
- Head over to GitHub to create a new repository前往GitHub创建一个新的存储库
- Then follow the instructions to push code from your machine to GitHub然后按照说明将代码从您的计算机推送到GitHub
2. Enable Cloud Build
2.启用云构建
Enable the Cloud Build API for our project
为我们的项目启用Cloud Build API
Enable the App Engine API for for our project.
为我们的项目启用App Engine API 。
Grant App Engine IAM to Cloud Build Service account by going to the IAM page, find this service account
<project-id>@cloudbuild.gserviceaccount.com, edit it and give it the App Engine Admin role.转到IAM页面 ,将App Engine IAM授予Cloud Build Service帐户,找到该服务帐户
<project-id>@cloudbuild.gserviceaccount.com,对其进行编辑并赋予其App Engine管理员角色。
3. Create a Cloud Build configuration file
3.创建一个Cloud Build配置文件
Create a new file
cloudbuild.yamlthat looks like this:创建一个新文件
cloudbuild.yaml,如下所示:
steps:- name: 'gcr.io/cloud-builders/npm' args: ['install']- name: 'gcr.io/cloud-builders/npm' args: ['test']- name: "gcr.io/cloud-builders/gcloud" args: ["app", "deploy"]timeout: "1600s"This configuration has three build steps (each line starting with a hyphen is a build step) that will run npm install, then npm test and if all looks good then deploy our code to App Engine.
此配置包含三个构建步骤(每个以连字符开头的行是一个构建步骤),它们将运行npm install ,然后npm test ,如果一切正常,则将我们的代码部署到App Engine。
Each build step is just like a command we run on our machine. But in this case, since this file is in yaml and each step is split over 2 lines of name and args, it can look like a bit of a mind-bender.
每个构建步骤就像我们在计算机上运行的命令一样。 但是在这种情况下,由于此文件位于yaml中,并且每个步骤都分为两行name和args,因此看起来有点麻烦。
Let’s try this: for the line starting with “name”, read its last word and then read the values in the “args” line. I hope this file makes more sense now!
让我们尝试一下:对于以“ name”开头的行,请读取其最后一个单词,然后读取“ args”行中的值。 我希望这个文件现在更有意义!
4. Run a Build manually (optional, just for verification)
4.手动运行构建(可选,仅用于验证)
- We can now deploy our application from our machine using Cloud Build现在,我们可以使用Cloud Build从我们的计算机上部署应用程序
Run the cloud build command on your terminal:
gcloud builds submit — config cloudbuild.yaml .This command starts a build on Cloud Build using the configuration file we created above.在终端上运行cloud build命令:
gcloud builds submit — config cloudbuild.yaml .此命令使用上面创建的配置文件在Cloud Build上启动构建。Head over to the Cloud Builds page to see the build being kicked off.
转到Cloud Builds页面 ,查看开始的构建。
- Wait for the build to end, and then test out your Node application using the App Engine URL for this app.等待构建结束,然后使用此应用程序的App Engine URL测试您的Node应用程序。
- You can make changes to your Node app and call this command again and to start more builds if you would like.您可以更改Node应用程序,然后再次调用此命令,并根据需要启动更多构建。
5. Create a Build Trigger
5.创建一个构建触发器
Head over to the Cloud Build Triggers page and select Create Trigger
转到“ 云构建触发器”页面,然后选择“创建触发器”
- On the Build Trigger setup page, choose GitHub as the Source Code Repository. This will require you to authorize GCP to access your GitHub repositories, which you will need to approve. Once done, select the GitHub repository for your Node app that you had pushed to GitHub earlier.在“构建触发器设置”页面上,选择GitHub作为源代码存储库。 这将需要您授权GCP访问您需要批准的GitHub存储库。 完成后,为您之前推送到GitHub的Node应用选择GitHub存储库。
Create a trigger named
continuous deployment, and for the trigger type choose Branch with regex for branch name asmaster. This will ensure that the builds, test, and deploy will only run for push to the master branch and not any branch.创建一个名为
continuous deployment的触发器,并为该触发器类型选择“ Branch with regex”作为分支名称为master。 这将确保生成,测试和部署仅在推送到master分支而不是任何分支时运行。For the build configuration file, select
cloudbuild.yaml对于构建配置文件,选择
cloudbuild.yaml- Now click the Build Trigger button现在单击“生成触发器”按钮
6. Run a Build automatically by pushing a commit to GitHub
6.通过将提交推送到GitHub,自动运行Build
- With our build trigger created, make a simple commit to your node application, like change “Hello, World!” to “Hello, GCP!” and commit and push this code to GitHub创建我们的构建触发器后,只需对您的节点应用程序进行简单提交,例如更改“ Hello,World!”。 向“你好,GCP!” 提交并将此代码推送到GitHub
Head back the the Cloud Builds page and you will notice that a build was automatically triggered (if it isn’t, give it a few more seconds or click the refresh button on the page)
返回“ Cloud Builds”页面 ,您会注意到一个构建是自动触发的(如果不是,请再等待几秒钟或单击页面上的刷新按钮)
- Once the build is complete and you see a green check, you can visit your application using its App Engine URL and see that your changes are now live!构建完成后,您会看到绿色的对勾,您可以使用其App Engine URL访问您的应用程序,并看到您的更改现已生效!
Here is a screenshot for builds being triggered through a GitHub push for our app:
这是通过GitHub推送为我们的应用触发的构建的屏幕截图:
Too good to be true?? Run this last step a few times times to test it out a few more times. Our first application now gets deployed to App Engine on every commit to master ?
难以置信?? 多次运行此最后一步,再进行几次测试。 现在,每一次提交到master上,我们的第一个应用程序都将部署到App Engine?
Kubernetes引擎的持续部署 (Continuous Deployment for Kubernetes Engine)
Great, so we’ve setup our application to deploy to App Engine on GitHub push, but what if we wanted the same setup for our containerized applications? Let’s give it a spin!
太好了,因此我们已经将应用程序设置为在GitHub push上部署到App Engine,但是如果我们希望对容器化应用程序进行相同的设置怎么办? 让我们旋转一下!
At a high level, deploying a Node app to Kubernetes engine has two main tasks. First, get our app ready: Containerize the application with Docker, build it, and push the Docker image to Google Container Registry. Then, setup things on the GCP end: create a Kubernetes Cluster, create a Deployment with your application image, and then create a Service to allow access to your running application.
在较高级别上,将Node应用程序部署到Kubernetes引擎有两个主要任务。 首先,准备好我们的应用程序:使用Docker对该应用程序进行容器化,进行构建,然后将Docker映像推送到Google Container Registry。 然后,在GCP端进行设置:创建一个Kubernetes集群,使用您的应用程序映像创建一个Deployment,然后创建一个服务以允许访问您正在运行的应用程序。
If you want to try this out for yourself, here are a few resources:
如果您想自己尝试一下,这里有一些资源:
Sample App for Kubernetes Engine
Kubernetes引擎的示例应用
Containerize a Node App with Docker
使用Docker容器化Node App
Deploy a Containerized Hello World App to Kubernetes Engine
将容器化的Hello World应用程序部署到Kubernetes Engine
So, what we’ve done so far by using the guides above:
因此,到目前为止,我们已经使用上述指南完成了以下操作:
- Created another new project in Google Cloud Console在Google Cloud Console中创建了另一个新项目
- Created a Kubernetes Cluster, Deployment, and Service创建一个Kubernetes集群,部署和服务
Deployed our Containerized Node app to Kubernetes Engine using kubectl
使用kubectl将我们的容器化节点应用程序部署到Kubernetes Engine
…but what we want is an continuous deployment setup such that a new commit kicks off a build and deployment.
…但是我们想要的是一个连续的部署设置,这样一个新的提交就可以启动构建和部署。
Here is what we need to do:
这是我们需要做的:
- Put our code on GitHub将我们的代码放在GitHub上
- We will follow the same steps as we did in the section earlier on App Engine. Create a new repository and push code from our machine to GitHub.我们将按照与前面有关App Engine的部分相同的步骤进行操作。 创建一个新的存储库,并将代码从我们的机器推送到GitHub。
2. Enable Cloud Build
2.启用云构建
Enable the Cloud Build API for our project
为我们的项目启用Cloud Build API
Enable the Kubernetes Engine API for our project
为我们的项目启用Kubernetes Engine API
Grant Kubernetes Engine IAM to Cloud Service account by going to the IAM page for this service account
<project-id>@cloudbuild.gserviceaccount.com, edit it, and give it the Kubernetes Engine Admin role通过转到该服务帐户
<project-id>@cloudbuild.gserviceaccount.com的IAM 页面 ,将Kubernetes Engine IAM授予Cloud Service帐户,对其进行编辑,然后将其授予Kubernetes Engine管理员角色
3. Create a Cloud Build Configuration file
3.创建一个云构建配置文件
Create a new file
cloudbuild.yamlthat looks like this:创建一个新文件
cloudbuild.yaml,如下所示:
steps:- name: 'gcr.io/cloud-builders/npm' args: ['install']- name: 'gcr.io/cloud-builders/npm' args: ['test']- name: 'gcr.io/cloud-builders/docker' args: ["build", "-t", "gcr.io/$PROJECT_ID/my-image:$REVISION_ID", "."]- name: 'gcr.io/cloud-builders/docker' args: ["push", "gcr.io/$PROJECT_ID/image:$REVISION_ID"]- name: 'gcr.io/cloud-builders/kubectl' args: - 'set' - 'image' - 'deployment/my-deployment' - 'my-container=gcr.io/$PROJECT_ID/image:$REVISION_ID' env: - 'CLOUDSDK_COMPUTE_ZONE=us-east1-b' - 'CLOUDSDK_CONTAINER_CLUSTER=my-cluster'This configuration has five build steps that will run npm install and then npm test to make sure our application works, then it will create a Docker image and push to GCR and then deploy our application to our Kubernetes cluster. The values my-cluster, my-deployment and my-container in this file refer to resources in the Kubernetes cluster we have created (as per the guide we followed above). $REVISION_ID is a variable value that Cloud Build injects into the configuration based on GitHub commit that triggers this build.
该配置有五个构建步骤,将运行npm install然后进行npm test以确保我们的应用程序正常运行,然后将创建一个Docker映像并推送到GCR,然后将我们的应用程序部署到我们的Kubernetes集群。 该文件中的值my-cluster, my-deployment and my-container指的是我们创建的Kubernetes集群中的资源(按照上面遵循的指南)。 $REVISION_ID是一个变量值,Cloud Build根据触发该构建的GitHub提交将其注入配置。
4. Run a Build manually (optional, for verification)
4.手动运行构建(可选,用于验证)
- We can now deploy our application from our machine using Cloud Build现在,我们可以使用Cloud Build从我们的计算机上部署应用程序
Run the cloud build command on your terminal:
gcloud builds submit — config cloudbuild.yaml --substitutions=REVISION_ID=1 .在您的终端上运行cloud build命令:
gcloud builds submit — config cloudbuild.yaml --substitutions=REVISION_ID=1 .
We’re also passing the revision id in this command, since we are manually running this build vs it being triggered by GitHub.
我们还将在此命令中传递修订版ID,因为我们正在手动运行此构建,而不是由GitHub触发。
Head over to the Cloud Builds page to see the build in action.
转至“ Cloud Builds”页面,以查看实际的构建。
- At the end of the build, you can test out your Node application using the Kubernetes Service URL在构建结束时,您可以使用Kubernetes服务URL测试您的Node应用程序。
- You can make changes to your Node app and call this command again to kickoff more builds if you would like您可以更改Node应用程序,然后再次调用此命令以启动更多构建。
5. Create a Build Trigger
5.创建一个构建触发器
The steps for setting this up are the same as that from the section above for App Engine. Go to Cloud Build Triggers page for this project, select the right GitHub repository, create a trigger called
continuous deploymentjust for themasterbranch and you’re done.设置步骤与上面针对App Engine的部分相同。 转到该项目的“ Cloud Build Triggers”页面 ,选择正确的GitHub存储库,为
master分支创建一个名为“continuous deployment的触发器,然后完成。- Run a Build automatically by pushing to GitHub通过推送到GitHub自动运行构建
This is also the same as the section above for App Engine — make a change, add, commit and push to GitHub which will kickoff a build that you can see on your Cloud Builds page. Once the builds completes, you will be able to see the updated app using the Kubernetes Service URL.
这与上面有关App Engine的部分相同-进行更改,添加,提交和推送到GitHub,这将启动您可以在“ 云构建”页面上看到的构建 。 构建完成后,您将可以使用Kubernetes服务URL查看更新的应用程序。
Here is a screenshot for a build being triggered through a GitHub push for our app:
这是通过GitHub推送为我们的应用触发的构建的屏幕截图:
The steps in this section were pretty much the same as the App Engine section. The main differences were that we had to containerize our application with Docker, spin up our Kubernetes cluster, and then have a Cloud Build configuration with just a few more steps.
本部分中的步骤与App Engine部分几乎相同。 主要区别在于,我们必须使用Docker将应用程序容器化,旋转我们的Kubernetes集群,然后仅需几个步骤即可完成Cloud Build配置。
But at its core, Cloud Build and its Build Triggers work pretty much the same and give us a seamless deployment experience. Our second application now gets deployed to Kubernetes Engine on every commit to master ??
但从本质上讲,Cloud Build及其构建触发器的工作原理几乎相同,并为我们提供了无缝的部署体验。 我们的第二个应用程序在每次提交给master时都已部署到Kubernetes Engine上。
持续部署云功能 (Continuous Deployment for Cloud Functions)
Sure, App Engine and Kubernetes Engine are great, but how about automated deployments for our Serverless app? I mean, having no servers to manage at all is really the best, right? Let’s do this!
当然,App Engine和Kubernetes Engine很棒,但是无服务器应用程序的自动化部署又如何呢? 我的意思是,根本没有要管理的服务器确实是最好的,对吗? 我们开工吧!
Deploying a Node app to Cloud functions will require us to create a new project. No configuration files are needed, and once GCloud functions deploy on our terminal, our functions are deployed!
将Node应用程序部署到Cloud功能将需要我们创建一个新项目。 不需要任何配置文件,并且一旦在我们的终端上部署了GCloud功能,就可以部署我们的功能!
If you want to try this out for yourself, here are the resources you will need:
如果您想自己尝试一下,这里是您需要的资源:
Sample App for Cloud Functions
云功能示例应用
Quickstart Guide for Node on Cloud Functions
云上节点功能快速入门指南
Locally Testing Cloud Functions using Node emulator
使用节点模拟器在本地测试云功能
If you’ve been following along, you can probably already picture what steps we need to do:
如果您一直在遵循,您可能已经了解了我们需要执行的步骤:
- Put our code on GitHub将我们的代码放在GitHub上
- We already know how to do this我们已经知道如何做到这一点
2. Enable Cloud Build
2.启用云构建
Enable the Cloud Build API for our project
为我们的项目启用Cloud Build API
Enable the Cloud Functions API for our project.
为我们的项目启用Cloud Functions API 。
Grant Cloud Functions IAM to Cloud Build Service account by going to the IAM page, find this service account
<project-id>@cloudbuild.gserviceaccount.com, edit it and give it the Project Editor role.通过转到IAM页面 ,将Cloud Functions IAM授予Cloud Build Service帐户,找到此服务帐户
<project-id>@cloudbuild.gserviceaccount.com,对其进行编辑并赋予其Project Editor角色。
3. Create a Cloud Build Configuration file
3.创建一个云构建配置文件
Create a new file
cloudbuild.yamlthat looks like this:创建一个新文件
cloudbuild.yaml,如下所示:
steps:- name: 'gcr.io/cloud-builders/npm' args: ['install']- name: 'gcr.io/cloud-builders/npm' args: ['test']- name: 'gcr.io/cloud-builders/gcloud' args: - beta - functions - deploy - helloWorld - -- source=. - -- runtime=nodejs8 - -- trigger-httpSimilar to the App Engine configuration, this configuration has 3 steps to install. Then test the build, and if all is good, then deploy it to Cloud Functions.
与App Engine配置类似,此配置有3个安装步骤。 然后测试构建,如果一切正常,则将其部署到Cloud Functions。
4. Run the Build manually (optional, for verification)
4.手动运行构建(可选,用于验证)
- We can now deploy our function from our machine using Cloud Build现在,我们可以使用Cloud Build从我们的机器上部署功能
Run this in your terminal:
gcloud builds submit — config cloudbuild.yaml .在您的终端中运行此命令:
gcloud builds submit — config cloudbuild.yaml .Head over to the Cloud Builds page to see the build in action.
转至“ Cloud Builds”页面,以查看实际的构建。
- At the end of the build, you can test out your serverless app using the Cloud Function URL在构建结束时,您可以使用Cloud Function URL来测试无服务器应用程序
5. Create a Build Trigger
5.创建一个构建触发器
The steps for setting this up are the same as that from the section above for App Engine and Kubernetes Engine. Go to Cloud Build Triggers page for this project, select the right GitHub repository, create a trigger called
continuous deploymentjust for themasterbranch, and you’re done.设置步骤与上面针对App Engine和Kubernetes Engine的部分中的步骤相同。 转到该项目的“ Cloud Build Triggers”页面 ,选择正确的GitHub存储库,为
master分支创建一个名为“continuous deployment的触发器,就完成了。
6. Run a Build automatically by pushing to GitHub
6.推送到GitHub,自动运行Build
This is also the same as the section above for App Engine & Kubernetes Engine: make a change, add, commit and push to GitHub, which will kickoff a build that you can see on your Cloud Builds page. Once the build completes, you will be able to see the updated app using the Cloud Functions URL
这与上面有关App Engine和Kubernetes Engine的部分相同:进行更改,添加,提交和推送到GitHub,这将启动您可以在Cloud Builds页面上看到的构建 。 构建完成后,您将可以使用Cloud Functions URL查看更新的应用程序
Here is a screenshot for build being triggered through a GitHub push for our sample app:
这是通过示例应用程序的GitHub推送触发构建的屏幕截图:
Cloud Functions were super easy to setup with automated builds and makes the “code → build → test → push → deploy” workflow really really fast! Our third application now gets deployed to Cloud functions on every commit to master ???
云功能非常易于通过自动构建进行设置,从而使“代码→构建→测试→推送→部署”工作流变得非常快! 现在,在每次提交给主服务器后,我们的第三个应用程序都将部署到云功能中?
结语 (Wrapping Up)
Phew! We covered a lot of ground in this post. If this was your first time trying out GCP for Node, hopefully you got to see how easy and straightforward it is to try out the various options. If you were most eager to understand how to setup continuous deployment for apps on GCP, I hope you weren’t disappointed either!
! 我们在这篇文章中介绍了很多内容。 如果这是您首次尝试使用GCP for Node,那么希望您能看到尝试各种选项的过程是多么容易和直接。 如果您最想了解如何为GCP上的应用设置持续部署,那么我希望您也不要失望!
Before you go, I just wanted to make sure that you didn’t miss the fact that all the sections had a sample app: Hello World for App Engine, Hello World for Kubernetes Engine and Hello World for Cloud Functions.
在开始之前,我只想确保您不会错过所有部分都包含示例应用程序的事实: App Engine的 Hello World,Kubernetes Engine的 Hello World和Cloud Functions的Hello World 。
That’s it for now! Let’s go ship some code! ?
现在就这样! 让我们一起发布一些代码! ?
Thanks for following along. If you have any questions or want to report any mistakes in this post, do leave a comment.
感谢您的关注。 如果您对此有任何疑问或想要报告任何错误,请发表评论。
If you found this article helpful, don’t be shy to ?
如果您觉得这篇文章对您有所帮助,请不要害羞?
And you can follow me on Twitter here.
您可以在Twitter上关注我。
翻译自: https://www.freecodecamp.org/news/continuous-deployment-for-node-js-on-google-cloud-platform-751a035a28d5/
相关文章:

hdu-1108 最小公倍数
题目链接: http://acm.hdu.edu.cn/showproblem.php?pid1108 题目类型: 数论 题意概括: 求两个数的最小公倍数 解题思路: 模拟 题目: 最小公倍数 Time Limit: 2000/1000 MS (Java/Others) Memory Limit: 65536/32768 K (Java/O…
sql-schema与catalog
schema: 指的是说当偶create database caiceclb时,caiceclb就是一个schema catalog: 指的是所有的database目录,就像上图显示的那样,将MySQL原来的(mysql,infomation_schema)及后来新建的的data…
这是如何更好地利用JavaScript数组的方法
by pacdiv由pacdiv 这是如何更好地利用JavaScript数组的方法 (Here’s how you can make better use of JavaScript arrays) Quick read, I promise. Over the last few months, I noticed that the exact same four mistakes kept coming back through the pull requests I c…
07、C语言——函数
函数 1、函数定义 函数返回值类型 函数名(形式参数列表) { 函数体; } 注意: 定义有参函数时,形参的定义可以采用传统方式或现代方式两种 1)传统方式: int …

This is probably not a problem with npm. There is likely additional logging output above
微信小程序开发交流qq群 173683895 承接微信小程序开发。扫码加微信。 E:\weii_objct\invoice-manage-web-view>npm start > ant-design-pro@2.1.0 start E:\weii_objct\invoice-manage-web-view > cross-env APP_TYPE=site umi dev cross-env 不是内部或外部命令…
parcel react_如何使用Parcel捆绑React.js应用程序
parcel reactby Michael Ozoemena迈克尔奥索埃梅纳(Michael Ozoemena) 如何使用Parcel捆绑React.js应用程序 (How to use Parcel to bundle your React.js application) 什么是包裹? (What’s Parcel?) Parcel is a web application bundler which offers a blazi…
SparkSQL 与 Spark Core的关系
不多说,直接上干货! SparkSQL 与 Spark Core的关系 Spark SQL构建在Spark Core之上,专门用来处理结构化数据(不仅仅是SQL)。 Spark SQL在Spark Core的基础上针对结构化数据处理进行很多优化和改进, 简单来讲: Spark SQ…
linux操作系统-设置静态ip
在使用linux虚拟机的时候因为经常有关机的需求,然后重新开机后可能面临这上一次获取的ip被改变,在这里我分享一下在linux 下设置静态ip的经验 1.查看路由状态 [rootlocalhost ~]# route -n Kernel IP routing table Destination Gateway Genmask Flags Met…
判断数组里面的下标是否等于一个字符串
微信小程序开发交流qq群 173683895 承接微信小程序开发。扫码加微信。 使用includes() 1、判断字符串里面是否包含一个字符串 示例: var a aaaaaaaavconsole.log(a.includes(v)); //truevar a aaaaaaaavconsole.log(a.includes(c)); //falsevar a aa…
如何获得更多的自由开发者客户
by Jad Joubran通过贾德乔布兰(Jad Joubran) 如何获得更多的自由开发者客户 (How to get more clients as a freelance developer) 我希望几年前知道的实用技巧 (Practical tips I wish I knew a few years ago) Whenever a conversation about freelancing kicks off with fe…

2017.6.4 入门组 NO.2——睡眠
其实这题就是将第二个时间-第一个时间,小于0的补全就A了代码如下: var x,y,k:string;l1,l2,x1,x2,x3,y1,y2,y3:longint; beginreadln(x);readln(y);l1:pos(:,x);l2:pos(:,y);k:copy(x,1,2); val(k,x1);k:copy(x,l11,2); val(k,y1);k:copy(y,1,2); val(k…
微信小程序获取用户收货地址 完整代码
微信小程序开发交流qq群 173683895 承接微信小程序开发。扫码加微信。 获取用户收货地址需要用户点击授权,所以有两种情况,确认授权、取消授权。 情况一,用户第一次访问用户地址授权,并且点击确定授权。 情况二,用…
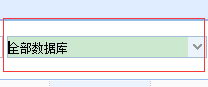
easyui的combobox下拉框初始化默认值以及保持该值一直显示的方法
easyui的combobox下拉框默认初始值是空,下面是实现从远程加载数据之后初始化默认值,以及让该值一直排在下拉框的最顶部的方式。 目前的需求是需要在初始化的时候添加"全部数据库"字段,并且在下拉的时候,"全部数据库"一直排在最顶部。 初始化效果…
关系数据库非关系数据库_如何与关系数据库最佳配合
关系数据库非关系数据库Relational databases handle data smoothly, whether working with small volumes or processing millions of rows. We will be looking at how we can use relational databases according to our needs, and get the most out of them.关系数据库无论…
看过的bootstrap书籍(附下载地址)
http://yun.baidu.com/share/link?shareid3820784617&uk1008683945 以下书籍下载地址。 《BootStrap入门教程》 就是网上的常规教程,过了一遍,不是很重要。 《Bootstrap实战_第一章》 没找到其余的章节,不过这本书不如直接看网上的boots…
Sql的连接表补充
连接条件可在FROM或WHERE子句中指定,建议在FROM子句中指定连接条件。WHERE和HAVING子句也可以包含搜索条件,以进一步筛选连接条件所选的行。 连接可分为以下几类: 内连接。(典型的连接运算,使用像 或 <…
js正则验证身份证号是否正确
微信小程序开发交流qq群 173683895 承接微信小程序开发。扫码加微信。 封装js公共方法 //验证身份证格式 const IdentityCodeValid sId > {const aCity { 11: "北京", 12: "天津", 13: "河北", 14: "山西", 15: "内蒙古…
jupyter笔记本_如何为Jupyter笔记本电脑设置PySpark
jupyter笔记本by Tirthajyoti Sarkar由Tirthajyoti Sarkar 如何为Jupyter笔记本电脑设置PySpark (How to set up PySpark for your Jupyter notebook) Apache Spark is one of the hottest frameworks in data science. It realizes the potential of bringing together both …
php 判断是否有相同的ID,如果有就修改数据库字段,没有就插入数据库字段
微信小程序开发交流qq群 173683895 承接微信小程序开发。扫码加微信。 php代码 <?phpheader("Content-Type:text/html;charsetutf8"); header("Access-Control-Allow-Origin: *"); //解决跨域header(Access-Control-Allow-Methods:POST);// 响应类…

MySql存储引擎特性对比
下表显示了各种存储引擎的特性: 其中最常见的两种存储引擎是MyISAM和InnoDB 刚接触MySQL的时候可能会有些惊讶,竟然有不支持事务的存储引擎,学过关系型数据库理论的人都知道,事务是关系型数据库的核心。但是在现实应用中ÿ…
如何使用React提前三天计划
by Mohit Jain由Mohit Jain 如何使用React提前三天计划 (How you can plan three days ahead with React) Today we’ll be making a ‘to-do’ website… with some different features.今天,我们将建立一个具有一些不同功能的“待办事项”网站。 You can check …

ajax 基础
ajax基础模式 url : "Handler.ashx", -- 提交到哪个服务端 data: { "uname": s }, -- 提交的数据,以键值对的方式传字符串,只能是字符串,可以传多个。 type: "post", …
wamp配置虚拟域名
1、打开apache下httpd.conf 我的目录是在F:\wamp\bin\apache\apache2.2.22\conf\httpd.conf 2、去掉这两行前面的#注释 LoadModule rewrite_module modules/mod_rewrite.so Include conf/extra/httpd-vhosts.conf 这两个注释 3、配置httpd-vhosts.conf <VirtualHost *:80>…
VUE 事件获取当前组件的属性
微信小程序开发交流qq群 173683895 承接微信小程序开发。扫码加微信。 for循环把当前的item传递给绑定事件: <block v-for"(item, index) in data_list"><div v-on:clickchangeType(item) class"ci "><div class"cib&q…
javascript计时器_JavaScript计时器:您需要了解的一切
javascript计时器by Samer Buna通过Samer Buna JavaScript计时器:您需要了解的一切 (JavaScript Timers: Everything you need to know) A few weeks ago, I tweeted this interview question:几周前,我在推特上发布了这个面试问题: *** An…

软考总结——虚存管理
存储管理是操作系统的重要职能之中的一个,主要任务是对内存空间进行分配与回收。因为计算机内存容量有限(如今一般都是32位或64位系统),而外存储设备的容量增长速度很快,比如移动硬盘已经到了…
微信小程序与H5相互跳转和传递数据
微信小程序开发交流qq群 173683895 承接微信小程序开发。扫码加微信。 这是小程序和web-vew的H5相互传参,H5使用小程序的微信支付的代码 H5部分 <!DOCTYPE html> <html><head><meta charset"utf-8" /><!--<meta name&…

【算法】弗洛伊德(Floyd)算法
这个算法主要要弄懂三个循环的顺序关系。 弗洛伊德(Floyd)算法过程:1、用D[v][w]记录每一对顶点的最短距离。2、依次扫描每一个点,并以其为基点再遍历所有每一对顶点D[][]的值,看看是否可用过该…
二次开发photoshop_Photoshop 101:Web开发人员简介
二次开发photoshop介绍 (Introduction) Often, when working as web developer, we need to integrate templates. They can be from Photoshop or other software. In this article, we will have a look at the basics of Photoshop for web developers.通常,在作…
html 提交表单,图片和文字一起提交,图片存入服务器,图片地址和表单信息存入数据库,带后端php代码
微信小程序开发交流qq群 173683895 承接微信小程序开发。扫码加微信。 html <!DOCTYPE html> <html><head><meta name"viewport" content"widthdevice-width, initial-scale1.0, user-scalableno, minimum-scale1.0, maximum-scale1.0…