二次开发photoshop_Photoshop 101:Web开发人员简介
二次开发photoshop
介绍 (Introduction)
Often, when working as web developer, we need to integrate templates. They can be from Photoshop or other software. In this article, we will have a look at the basics of Photoshop for web developers.
通常,在作为Web开发人员工作时,我们需要集成模板。 它们可以来自Photoshop或其他软件。 在本文中,我们将为Web开发人员介绍Photoshop的基础知识。
This content was initially written for a workshop for DAMDigital London.
此内容最初是为DAMDigital London的研讨会编写的。
Adobe Photoshop is a raster graphics editor software, meaning it is a program that allows users to create and edit images.
Adobe Photoshop是一个光栅图形编辑器软件,这意味着它是一个允许用户创建和编辑图像的程序。
It was released in 1988 and has grown to be the industry standard for graphics software.
它于1988年发布,现已发展成为图形软件的行业标准。
You can download a free trial version of Photoshop on the Adobe website.
您可以在Adobe网站上下载Photoshop的免费试用版。
工作空间 (Workspace)
Photoshop’s workspace is modular, so you can adapt it depending on the work you are doing. Some default workspaces are already set up in Photoshop. In this article, I’m using the Graphic and Web one. To change to this workspace, go into Window/workspace/Graphic and Web.
Photoshop的工作区是模块化的,因此您可以根据自己的工作进行调整。 在Photoshop中已经设置了一些默认工作区。 在本文中,我将使用“ Graphic and Web 。 要更改此工作空间,请进入Window/workspace/Graphic and Web 。
Let’s have a look at our workspace:
让我们看一下我们的工作空间:
A — Menu bar: This is where you’ll find most photoshop options.
A —菜单栏 :您可以在其中找到大多数photoshop选项。
B — Options bar: This bar will give you all the options for the currently selected tool.
B —选项栏 :此栏将为您提供当前所选工具的所有选项。
C — Toolbox: This panel contains all the available tools from photoshop. Related tools are grouped together, and you can long click on one of them to see all the tools.
C —工具箱 :此面板包含photoshop中所有可用的工具。 相关工具组合在一起,您可以长按其中之一以查看所有工具。
D — Panels: It is the area where you have your basic panels open, such as
Layers,History, and so on. To open a panel, just go intoWindow/(Panel that you want to open)D —面板 :这是您打开基本面板(例如
Layers,History等等)的区域。 要打开面板,只需进入“Window/(Panel that you want to open)要打开的面板Window/(Panel that you want to open)
创建一个新文件 (Create a new file)
When creating a new file in Photoshop, you first need to know for what medium the design is going to be used — meaning, is it going to be used for a screen (web, film, or video) or for print?
在Photoshop中创建新文件时,您首先需要知道设计将使用哪种媒体,即是将其用于屏幕(网页,电影或视频)还是用于印刷?
Depending on the answer to this question, you will need to change the PPI (Pixels Per Inch) value.
根据此问题的答案,您将需要更改PPI(每英寸像素)值。
Pixels per inch (PPI) is a measurement used to define the resolution of a computer display. This metric evaluates the picture/image quality that a particular computing or output display device is able to display. Pixels per inch is also known as pixel density. Techopedia
每英寸像素数(PPI)是用于定义计算机显示器分辨率的度量。 该度量评估特定的计算或输出显示设备能够显示的图片/图像质量。 每英寸像素数也称为像素密度。 技术百科
For print, you normally need 300PPI, but it actually depends on the printer and the size of the printed document. You should change your colour to CMYK as well, but again that depends on how you print your document. If you want to learn more about RGB and CMYK colours, check out this article.
对于打印,您通常需要300PPI,但这实际上取决于打印机和打印文档的大小。 您也应该将颜色更改为CMYK,但同样取决于您打印文档的方式。 如果您想了解有关RGB和CMYK颜色的更多信息,请查阅本文 。
For screens and web ?, you need 72PPI and RGB colour. Then you need to specify your screen size. I would recommend designing first for mobile, then tablet and desktop.
对于屏幕和Web?,您需要72PPI和RGB颜色。 然后,您需要指定屏幕尺寸。 我建议先设计移动设备,然后再设计平板电脑和台式机。
As a web developer, you might not need to create a new file. Chances are that you will need to work with a design provided by web designers.
作为Web开发人员,您可能不需要创建新文件。 您可能需要使用Web设计师提供的设计。
We are now going to look at an existing .psdtemplate and work with it to have a look around Photoshop.
现在,我们将查看现有的.psd模板,并使用它来浏览Photoshop。
You can download and open this PSD template from Luis Costa.
您可以从Luis Costa下载并打开此PSD模板 。
层数 (Layers)
One of the core features of Photoshop is layers. Layers are like a stack of sheets, and you can see through transparent areas or area with low opacity (partially transparent).
Photoshop的核心功能之一是图层 。 图层就像一叠纸,您可以看到透明区域或不透明性较低的区域(部分透明)。
You can open the layer panel in Window/Layers.
您可以在“ Window/Layers打开图层面板。
The top layer in this panel will be placed over all the other layers underneath. Layers can be organized as well in folders. It is important to correctly name layers and folders. That will help during integration.
此面板中的顶层将放置在其下的所有其他层之上。 也可以在文件夹中组织层。 正确命名图层和文件夹很重要。 这将有助于集成。
Next to each folder and layer, you have an eye icon. This allows you to toggle their visibility.
在每个文件夹和图层旁边,都有一个眼睛图标。 这使您可以切换其可见性。
Your PSD might have a lot of layers and documents. One way to quickly find a layer is to select the move tool (v). Right click on the canvas where you want to find your layer. You will get all the layers in the area where you have right clicked. By clicking on one, it will select this layer in your layer panel.
您的PSD可能包含很多图层和文档。 快速找到图层的一种方法是选择move tool (v) 。 右键单击要在其中找到图层的画布。 您将获得右键单击区域中的所有图层。 通过单击一个,它将在“图层”面板中选择该图层。
工具箱 (Toolbox)
Photoshop comes with a load of tools. I’m going to show you a few useful ones that will help you ?.
Photoshop带有大量工具。 我将向您展示一些有用的方法,这些方法可以帮助您?
First, if you just install Photoshop CC 2018, you will need to restore all tools. So go to Edit > Toolbar and click on the Restore Defaults button.
首先,如果仅安装Photoshop CC 2018,则需要还原所有工具。 因此,转到“ Edit > Tool栏”,然后单击“恢复默认值”按钮。
We are going to see some of the most useful tools you’d use to integrate a template:
我们将看到一些您用来集成模板的最有用的工具:
A —选择工具 (A — Selection tools)
Move: Allows the user to move a layer around the canvas. As we saw earlier, it can be used as well to find a layer if you right click on your canvas.
移动 :允许用户在画布上移动图层。 正如我们之前看到的,如果右键单击画布,它也可以用于查找图层。
Rectangular Marquee: This tool is used to select an area of the canvas to copy and paste, fill it in, and so on. It can be used as well to measure. When your selection is done, you can find the size of the selected area in
Window/Info. You might need to change the default unit in photoshopEdit/preferences/general/Unit & Rulersthen set your units to pixels.矩形选框 :此工具用于选择画布上要复制和粘贴,填充等的区域。 它也可以用来测量。 选择完毕后,您可以在
Window/Info找到所选区域的大小。 您可能需要在photoshop的“Edit/preferences/general/Unit & Rulers更改默认单位,然后将单位设置为像素。
B —裁剪和切片工具 (B — Crop and Slice tools)
Crop: This tool can… crop an image ?. In the tool settings (Options Bar), you can set an aspect ratio that you want to keep.
裁剪 :此工具可以…裁剪图像? 在工具设置(选项栏)中,可以设置要保留的纵横比。
C —测量工具 (C — Measuring tools)
Eyedropper: The eyedropper allows you to quickly get a color reference in your design. Just click where you want the color. Then at the bottom of your toolbox, the foreground color will change to the selected color. If you click on the foreground color, it will open the
color picker window. From there you can get the value of your color.吸管 :吸管可让您快速获得设计中的颜色参考。 只需单击您想要的颜色。 然后,在工具箱的底部,前景色将更改为所选颜色。 如果单击前景色,它将打开
color picker window。 从那里您可以获取颜色的价值。Color Sampler: When integrating your design, you might need to select multiple colors. We are going to use the info window again
Window/Info. This tool allows us to create a color sampler. Just click on the area of the image you want to get the colors from. You will get each color in the info panel. You can change the color type to web by clicking on the Eyedropper icon under the number.颜色采样器 :集成设计时,您可能需要选择多种颜色。 我们将再次使用信息窗口
Window/Info。 该工具使我们可以创建颜色采样器。 只需单击要从中获取颜色的图像区域。 您将在信息面板中获得每种颜色。 您可以通过单击数字下方的吸管图标将颜色类型更改为Web。
Ruler: helps you to measure your template. All the info will appear in your info window. Maintain
Shiftwhen measuring, so your ruler stays straight. You can get angles also.标尺 :帮助您测量模板。 所有信息将出现在您的信息窗口中。 测量时保持
Shift,使标尺保持笔直。 您也可以获取角度。
G —导航工具 (G — Navigation tool)
Hand: This tool helps you to get around the canvas. You can access this tool at any time by holding the spacebar and dragging it with your mouse.
手 :此工具可帮助您在画布上四处走动。 您可以随时按住空格键并用鼠标拖动它来访问此工具。
Zoom: Allows you to zoom in and out (you can you
Ctrl++, orCtrl+-too).缩放 :可以放大和缩小(也可以
Ctrl++或Ctrl+-)。
导游 (Guides)
As you might have noticed when opening our PSD file, we have some green lines on our template. They are guides. They are basically helpers that will help you build or measure things around your canvas.
正如您在打开PSD文件时可能已经注意到的那样,模板上有一些绿线。 他们是向导。 他们基本上是帮手,可以帮助您在画布上构建或度量事物。
You can move existing guides using the move tool(v).
您可以使用move tool (v)移动现有参考线。
To create new guides, you will need to open your ruler: View/Ruler or Ctrl + R. The ruler will appear in your workspace. Then from the ruler, you can drag a new guide into your canvas.
要创建新指南,您需要打开标尺: View/Ruler或Ctrl + R 标尺将出现在您的工作区中。 然后从标尺中将新的参考线拖到画布中。
To remove a guide, use the move tool(v) and put the guide back in the ruler.
要删除参考线,请使用move tool (v),然后将参考线放回标尺中。
To hide and show all your guides, you can just use Ctrl + H, or go to View/Extras.
要隐藏和显示所有指南,只需使用Ctrl + H或转到“ View/Extras 。
智能对象 (Smart objects)
What are smart objects?
什么是智能对象?
Smart Objects are layers that contain image data from raster or vector images, such as Photoshop or Illustrator files. Smart Objects preserve an image’s source content with all its original characteristics, enabling you to perform nondestructive editing to the layer. Adobe
智能对象是包含来自光栅或矢量图像的图像数据的图层,例如Photoshop或Illustrator文件。 智能对象会保留图像的原始内容及其所有原始特征,从而使您可以对图层执行非破坏性编辑。 土坯
Smart objects can be recognized in your layers when they have the following icon in their thumbnails:
当智能对象的缩略图中具有以下图标时,便可以在图层中识别它们:
Smart objects are really handy if you work with vector-type images (SVG, EPS, AI), but are also useful with other complex raster files.
如果使用矢量类型的图像(SVG,EPS,AI),则智能对象非常方便,但对于其他复杂的光栅文件也很有用。
Let’s try to import a smart object into our PSD. Download an SVG file from flaticon. To import our SVG in our canvas, just drag the file into the canvas. We can now edit our SVG in illustrator, or any other vector software, by double-clicking on the thumbnail or our smart object. Changes will appear in our PSD.
让我们尝试将一个智能对象导入到我们的PSD中。 从flaticon下载SVG文件。 要将SVG导入画布中,只需将文件拖动到画布中即可。 现在,我们可以通过双击缩略图或智能对象来在illustrator或任何其他矢量软件中编辑SVG。 更改将出现在我们的PSD中。
Smart objects can do way more than that, though. If you want to learn more about them, check out 10 Things You Need to Know About Smart Objects in Photoshop.
不过,智能对象的作用远不止于此。 如果要了解有关它们的更多信息,请在Photoshop中查看关于智能对象需要了解的10件事 。
出口资产 (Export assets)
First, just a reminder that photoshop is a raster software, not a vector software. This means we “can’t” export SVG files from photoshop. To do so, you will need to export these kinds of files from Illustrator or Inkscape, for example.
首先,提醒一下,Photoshop是光栅软件,而不是矢量软件。 这意味着我们“无法”从photoshop导出SVG文件。 为此,例如,您将需要从Illustrator或Inkscape导出此类文件。
On the web, we want to have light image files. For photography, we would use a compressed .jpg file. If you need to use transparency (Alpha channel) we would use .png file. For an animated image, we would use a .gif. If you need a vector image (icons, for example) the best is to export your file as .svg. If you want to have more information about all the files available in Photoshop, you can check out "file formats" in the Adobe's website.
在网络上,我们希望拥有浅色的图像文件。 对于摄影,我们将使用压缩的.jpg文件。 如果您需要使用透明度(Alpha通道),我们将使用.png文件。 对于动画图像,我们将使用.gif 。 如果需要矢量图像(例如,图标),最好是将文件导出为.svg 。 如果您想获得有关Photoshop中所有可用文件的更多信息,可以在Adobe网站上查看“文件格式” 。
导出我们的画布 (Export our canvas)
To export the canvas, just follow these steps:
要导出画布,只需按照以下步骤操作:
Go to
File/Export/Save for Web转到
File/Export/Save for Web- Pick file format选择文件格式
- Pick image size选择图像尺寸
- Pick quality挑选品质
- Save保存
仅从画布导出资产 (Export only an asset from the canvas)
You will probably need to export some assets of your template.
您可能需要导出模板的某些资产。
Let’s export the left arrow in the product carousel:
让我们导出产品轮播中的左箭头:
Using the move tool, we are going to find our layer. Right click on the arrow and select the layer Arrow Left. Now just right click on this layer in the layer panel. Select export as and select the type of file you need.
使用移动工具,我们将找到我们的图层。 右键单击箭头,然后选择图层Arrow Left 。 现在,只需在图层面板中右键单击该图层即可。 选择“ export as然后选择所需的文件类型。
We can also export folders.
我们还可以导出文件夹。
动作 (Actions)
What’s an action in Photoshop?
在Photoshop中有什么动作?
An action is a series of tasks that you playback on a single file or a batch of files — menu commands, panel options, tool actions, and so on. For example, you can create an action that changes the size of an image, applies an effect to the image, and then saves the file in the desired format. Adobe
操作是您在单个文件或一批文件上回放的一系列任务-菜单命令,面板选项,工具操作等。 例如,您可以创建一个动作来更改图像的大小,将效果应用于图像,然后以所需的格式保存文件。 土坯
This feature is really convenient if you want to resize a batch of images for the web!
如果您要为网络调整一批图像的大小,此功能非常方便!
Let’s create a new action to crop an image and export this one:
让我们创建一个新的动作来裁剪图像并将其导出:
Download a bunch of images from https://unsplash.com/
从https://unsplash.com/下载一堆图像
- Open one of those images打开其中一张图片
Open the
Actionspanel,Window/Actions,打开“
Actions面板,“Window/Actions,Create a new action by clicking on the icon Create a new action (The one on the left of the bin icon). Let’s name this action Export for web — client name.
通过单击图标创建新动作 (bin图标左侧的那个)来创建新动作 。 让我们将此操作命名为“ Web导出-客户名称”。
- We are now recording our action. The record button will be red, and you can stop recording by clicking on the stop icon (square icon on the left)/我们现在正在记录我们的行动。 录制按钮将变为红色,您可以通过单击停止图标(左侧的方形图标)/
- Select the crop icon and set the ratio to 1x1 and crop the image/选择裁剪图标并将比例设置为1x1并裁剪图像/
Now we want to export our image,
File/Export/Save for Web, selectJPG, quality 50% and width 500px.现在我们要导出图像,
File/Export/Save for Web,选择JPG,质量为50%,宽度为500px。- Click save and pick your destination folder.单击保存,然后选择目标文件夹。
- Close your image without saving it.关闭图像而不保存它。
- To stop recording click on the stop icon (square icon on the left).要停止录制,请单击停止图标(左侧的正方形图标)。
We now have our action, so we can open an image and just “play” our action by clicking on the play button.
现在我们有了动作,因此我们可以打开图像,然后单击“播放”按钮来“播放”动作。
If we want to apply our action to a batch of images, just follow these steps:
如果我们要将操作应用于一批图像,请按照下列步骤操作:
Go to
File/Automate/Batch转到
File/Automate/BatchSelect the
Sourcefolder.选择
Source文件夹。- Select our action选择我们的行动
Click on
Ok点击
Ok
And voilà! All your images are in the export folder.
和瞧! 您所有的图像都在导出文件夹中。
I hope you’ve enjoyed this small Photoshop 101 introduction for web developers ?. If you want to have a 102 version, let me know what you would like to know or to read more about ?.
我希望您喜欢Web开发人员的这个小型Photoshop 101简介。 如果您想使用102版本,请让我知道您想知道什么或想进一步了解?。
@vince_umo
@vince_umo
vincent-humeau.com
vincent-humeau.com
翻译自: https://www.freecodecamp.org/news/photoshop-101-introduction-for-web-developers-62d55232e62b/
二次开发photoshop
相关文章:

html 提交表单,图片和文字一起提交,图片存入服务器,图片地址和表单信息存入数据库,带后端php代码
微信小程序开发交流qq群 173683895 承接微信小程序开发。扫码加微信。 html <!DOCTYPE html> <html><head><meta name"viewport" content"widthdevice-width, initial-scale1.0, user-scalableno, minimum-scale1.0, maximum-scale1.0…

mysql-理想的索引
1.查询频繁 2.区分度高 例如:数据库表字段:sex 存储:男女,区分度就不高。 3.长度小 索引的长度直接影响索引文件的大小,影响增删改的速度,并间接影响查询速度。 4.尽可能覆盖常用字段 转载于:https://www.c…
使用java的Calendar对象获得当前日期的上几个度开始、结束时间
思路: 先获得当前季度的开始和结束日期,在当前日期的基础上往前推3个月即上个季度的开始和结束日期 /*** param flag true:开始日期;false:结束日期* return*/public static String getLastQuarterTime(boolean flag){…
快速 开发平台 架构_快速介绍清洁架构
快速 开发平台 架构by Daniel Deutsch由Daniel Deutsch 快速介绍清洁架构 (A quick introduction to clean architecture) In an open source project I started to contribute to, the concept of “clean architecture” was brought to me.在一个我开始参与的开源项目中 &a…
linux uart m200平台波特率500kbps乱码问题和输入不响应问题
[问题] linux uart m200平台波特率500kbps乱码问题 [解答] [问题] linux uart m200平台波特率500kbps输入不响应问题 [解答]转载于:https://www.cnblogs.com/harvis/p/6972196.html

VS2013中, 无法嵌入互操作类型“……”,请改用适用的接口的解决方法
使用VS2013,在引用COM组件的时候,出现了无法嵌入互操作类型“……”,请改用适用的接口的错误提示。 查阅资料,找到解决方案,记录如下: 选中项目中引入的dll,鼠标右键,选择属性&#…
JS根据两点的经纬度坐标得到驾车行驶距离
微信小程序开发交流qq群 173683895 承接微信小程序开发。扫码加微信。 html <!DOCTYPE html> <html><head><meta http-equiv"Content-Type" content"text/html; charsetutf-8"><meta name"viewport" content&quo…
three.ar.js_我们如何通过AR.js使产品吉祥物栩栩如生
three.ar.jsby Mateusz Tarnaski由Mateusz Tarnaski 我们如何通过AR.js使产品吉祥物栩栩如生 (How we brought our product mascot to life with AR.js) Short answer: using a browser-based Augmented Reality (AR) application. For the long answer, read below.简短答案&…
利用tuning-primer脚本优化MySQL数据库
脚本下载网址: http://www.day32.com/MySQL/tuning-primer.sh #!/bin/sh # vim: ts8########################################################################## ## MySQL performance tuning primer script ## Writen by: Matthew Montgomery ## Report bugs t…
自定义View步骤学习笔记
用途 : 一个View内部的子控件比较多的时候可以自定义一个View,把它内部的子控件屏蔽起来(就像苹果的导航栏上面的UIBarButton,你是通过BarButtonitem来修改显示的内容) 1.重写 initWithFrame 和 awakeFromNib(一般两个都要写),然后在写一个初始化的方法,在初始化方法中添加子控…
小程序给视频加默认图片封面,点击播放视频并停止播放上一个视频
微信小程序开发交流qq群 173683895 承接微信小程序开发。扫码加微信。 实现的功能: 微信小程序视频组件添加图片封面, 点击图片播放视频, 点击下一个视频的封面图自动停止播放当前视频并播放点击的视频。 效果GIF图: 实现代码: WXML …
一天 用户旅程_439天的旅程改变了我的生活
一天 用户旅程by Daniel Lemay丹尼尔勒梅(Daniel Lemay) 439天的旅程改变了我的生活 (The 439 day Journey that Changed my Life) It was Spring of 2017. I was beyond displeased with my current work situation. I dreaded going into work every day and being a punchi…

实现音乐播放器
音乐播放器 首先声明一下,本例是直接采用课本中范例122的方法。 效果图如下: 1、activity_main.xml布局 1 //四个按钮2 <LinearLayout3 android:layout_width"fill_parent"4 android:layout_height"wrap_content"5 …

学习ASP.NET MVC系列 - 还有比这更简炼的吗?把复杂的事情变简单了,贡献啊!...
转自学习ASP.NET MVC系列: 学习ASP.NET MVC(一)——我的第一个ASP.NET MVC应用程序 学习ASP.NET MVC(二)——我的第一个ASP.NET MVC 控制器 学习ASP.NET MVC(三)——我的第一个ASP.NET MVC 视图 学习ASP.NET MVC(四)——我的第一个ASP.NET MVC 实体对象 学习ASP.NET…
微信小程序开通腾讯云开发实践流程附详细图解
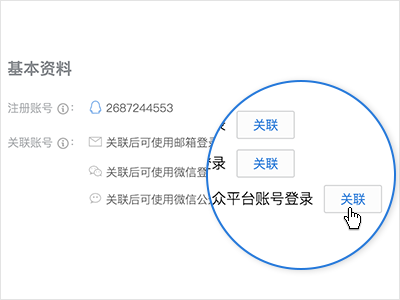
微信小程序开发交流qq群 173683895 云开发流程: 1.关联账户 关联腾讯云账号与微信公众号平台账号。前往关联账号时,请选择微信公众号。错误关联账号请在腾讯云账号中心重新绑定。 已关联账号 2.安装开发者工具 下载与安装客户端微信开发者工具并使…
github组织存储库使用_为什么我不使用您的GitHub存储库
github组织存储库使用by Sam Westreich, PhD由Sam Westreich博士 为什么我不使用您的GitHub存储库 (Why I’m not using your GitHub repository) As a bioinformatician, I reside in an interesting middle ground between developers and end users. My background trainin…
PHP导入excel到mysql数据库完整代码附效果图
微信小程序开发交流qq群 173683895 承接微信小程序开发。扫码加微信。 1.新建一个数据库 ImportXlsx 并在里面添加表名 IsXlsx. 2.下载 phpExcel 插件 点击下载 3.导入文件和xlsx 。 4.获取xlsx表的对象并存入数据库 效果图: PHP 实现 demo <?phph…
黑马程序员—易混淆的知识
------- android培训、java培训、期待与您交流! ---------- String和StringBuffer类区别1.String 是定长的例如:String s1"abc";s1"egf";StringBuffer类:是变成字符串,因为它具有(buffer)缓冲区&a…
简谈 Java 中的泛型通配符
很好的一篇文章https://zhuanlan.zhihu.com/p/26681625 转载于:https://www.cnblogs.com/hihtml5/p/6978651.html
播客#47:劳伦斯·布拉德福德
On todays episode, I interview Laurence Bradford. Shes the creator of the LearnToCodeWith.me blog and podcast, and the Newbie Coder Warehouse Facebook group.在今天的一集中,我采访了劳伦斯布拉德福德。 她是LearnToCodeWith.me博客和播客以及Newbie Cod…
如何使用 DBCC MEMORYSTATUS 命令来监视 SQL Server 2005 中的内存使用情况
https://technet.microsoft.com/en-us/solutionaccelerators/dd537566.aspx 注意:这篇文章是由无人工介入的微软自动的机器翻译软件翻译完成。微软很高兴能同时提供给您由人工翻译的和由机器翻译的文章, 以使您能使用您的语言访问所有的知识库文章。然而由机器翻译的…
{code:-1,error:`QcloudSecretId`不能为空,请确保 SDK 配置已正确初始化}解决方法
微信小程序开发交流qq群 173683895 承接微信小程序开发。扫码加微信。 微信小程序云开发登录报错:{"code":-1,"error":"QcloudSecretId不能为空,请确保 SDK 配置已正确初始化"} 遇到这个错误的原因是:腾讯不…

[转载] Tmux 速成教程:技巧和调整
原文: http://blog.jobbole.com/87584/ 决定从 screen 转向 tmux 了, 非常喜欢 tmux 的窗格功能. 简介 有些开发者经常要使用终端控制台工作,导致最终打开了过多的标签页。如果你也是他们当中的一员,或者你正在实践结对编程,那么我推荐你读一…
css在兼容模式下无法引用_如何在CSS中使用深色模式
css在兼容模式下无法引用by Frank Lmmer由FrankLmmer 如何在CSS中使用深色模式 (How to get dark mode working with CSS) I have been playing around with MacOS Mojave’s dark mode lately. It’s not 100% pleasing to my eyes, yet. But it’s especially useful when n…
COJ 0995 WZJ的数据结构(负五)区间操作
WZJ的数据结构(负五)难度级别:C; 运行时间限制:1000ms; 运行空间限制:262144KB; 代码长度限制:2000000B 试题描述请你设计一个数据结构,完成以下功能…
接入网易云信IM即时通讯的微信小程序聊天室
微信小程序开发交流qq群 173683895 承接微信小程序开发。扫码加微信。 接入流程: 初次接触网易云通信IM服务,您可以通过以下产品介绍文档了解我们的产品功能、相关概念、业务限制: 产品简介主要功能帐号集成与登录接口及业务限制 1. 创建…
vue颜色选择器_如何制作? Vue的颜色选择器!
vue颜色选择器by ZAYDEK由ZAYDEK 如何制作? Vue的颜色选择器! (How to make a ? color picker with Vue!) 注意:颜色看起来可能比实际颜色更可爱! (Caution: colors may appear cuter than they are!) Before I get to the arti…

centos7中使用yum安装tomcat以及它的启动、停止、重启
centos7中使用yum安装tomcat 介绍 Apache Tomcat是用于提供Java应用程序的Web服务器和servlet容器。 Tomcat是Apache Software Foundation发布的Java Servlet和JavaServer Pages技术的开源实现。 本教程介绍在CentOS 7服务器上使用yum进行Tomcat 7的基本安装和一些配置。请注意…
JS 数组A有数组B的数据就删除
微信小程序开发交流qq群 173683895 承接微信小程序开发。扫码加微信。 创建了两个数组,并且封装了一个函数以供调用。 var arr1 [a,b,c,d],arr2 [a,c,d,f]; this.arrayWeightRemoval(arr1,arr2); //返回结果 [b] ;// 数据去重this.arrayWeightRemoval functio…
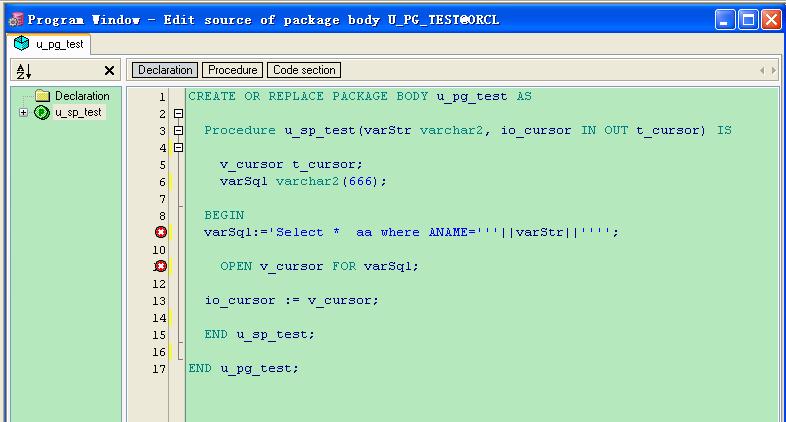
PL/SQL Developer的调试存储过程
学会使用PL/SQL Developer的调试功能,对于编写复杂的存储过程,包,funtion...非常有帮助,所以今晚学习了一下: (1)在sp里设置断点。 (2)点击TEST. (3) Debug-->Start. …