travis-ci自动部署_如何使用Travis CI部署(几乎)零恐惧的Cloud Foundry应用
travis-ci自动部署
by Robin Bobbitt
罗宾·波比(Robin Bobbitt)
如何使用Travis CI部署(几乎)零恐惧的Cloud Foundry应用 (How to deploy your Cloud Foundry app with (almost) zero fear using Travis CI)
Application deployments to the cloud should be painless. We should be able to deploy new code continuously, as often as we want, without fear. The blue-green deployment model enables us to do this.
将应用程序部署到云应该很轻松。 我们应该能够连续不断地部署新代码,而不必担心。 蓝绿色的部署模型使我们能够做到这一点。
I recently joined a new team at work that was deploying node.js Cloud Foundry applications to the IBM Cloud using Travis with the Bluemix CloudFoundry deployment provider. This works great for quickly and easily setting up your deployment with just a few parameters.
我最近加入了一个新的团队,该团队正在使用Travis和Bluemix CloudFoundry部署提供程序将node.js Cloud Foundry应用程序部署到IBM Cloud。 这对于仅需几个参数即可快速轻松地设置部署非常有用。
Unfortunately, every deployment means an outage of your application as the existing version stops and the new version starts up. Also, there is no verification that the new code is good before the old code is blown away.
不幸的是,由于现有版本停止并且新版本启动,因此每次部署都意味着您的应用程序中断。 另外,在旧代码被吹走之前,没有验证新代码是否正确。
With the blue-green deployment technique, your current application (Blue) continues to run and take network traffic. While your new application code (Green) is deployed on a temporary route. The new Green application can be validated on the temporary route. If there are any problems, the deployment stops. The Blue application continues to serve traffic uninterrupted. Once the Green application is vetted, the router is updated to point at the Green application. The Blue can be stopped.
使用蓝绿色部署技术,您当前的应用程序(蓝色)将继续运行并获取网络流量。 新的应用程序代码(绿色)部署在临时路径上时。 可以在临时路径上验证新的绿色应用程序。 如果有任何问题,则部署将停止。 Blue应用程序继续为流量提供不间断的服务。 审核Green应用程序后,路由器将更新为指向Green应用程序。 蓝色可以停止。
In this manner, there is always a version of the application available to take traffic. Any problems in the deployment or runtime of the new code will not impact the availability of your application.
以这种方式,始终有一个应用程序版本可用于获取流量。 新代码的部署或运行时中的任何问题都不会影响应用程序的可用性。
I immediately started looking around for a way to blue-green deploy our applications. In the interest of writing as little custom code as possible, I decided to leverage the cf-blue-green-deploy plugin for the Cloud Foundry command-line interface (CLI). I will share how I did this here.
我立即开始寻找一种蓝绿色部署我们的应用程序的方法。 为了编写尽可能少的自定义代码,我决定将cf-blue-green-deploy插件用于Cloud Foundry命令行界面(CLI)。 我将在这里分享我的操作方式。
I’m going to assume if you landed here you are probably past the point of simply “getting started” with Travis. I won’t be covering those details here.
我要假设,如果您降落在这里,您可能已经超出了Travis的“入门”范围 。 我不会在这里介绍这些细节。
If you’re not interested in following along and just want to get straight to the goods, you can clone my working sample from GitHub.
如果您对后续操作不感兴趣,而只想直接了解它们,可以从GitHub克隆我的工作示例。
安装CF CLI和蓝绿色插件 (Installing the CF CLI and blue-green plugin)
Since we’re not using the Cloud Foundry deployment provider, we have to install the Cloud Foundry CLI ourselves, as well as the blue-green deploy plugin. We can do this in the before_deploy phase of the Travis build lifecycle.
由于我们没有使用Cloud Foundry 部署提供程序 ,因此我们必须自己安装Cloud Foundry CLI和蓝绿色的部署插件。 我们可以在Travis构建生命周期的before_deploy阶段中执行此操作。
Note that the before_deploy phase runs before each deployment provider. If you are doing additional things in your deploy phase, you may want to move these steps into the after_success phase (which runs just once after a successful build) to avoid unnecessary extra installs. You could also move these steps into the deploy script itself, which we will be writing next.
请注意, before_deploy阶段在每个部署提供程序之前运行。 如果要在部署阶段执行其他操作,则可能需要将这些步骤移至after_success阶段(成功构建后仅运行一次),以避免不必要的额外安装。 您也可以将这些步骤移到部署脚本本身中,我们将在接下来编写。
Regardless of where you put it, here is the script:
无论放在何处,以下都是脚本:
- echo "Installing cf cli"- test x$TRAVIS_OS_NAME = "xlinux" && rel="linux64-binary" || rel="macosx64"; wget "https://cli.run.pivotal.io/stable?release=${rel}&source=github" -qO cf.tgz && tar -zxvf cf.tgz && rm cf.tgz- export PATH="$PATH:."- cf --version- echo "Installing cf blue-green deploy plugin"- cf add-plugin-repo CF-Community https://plugins.cloudfoundry.org- cf install-plugin blue-green-deploy -r CF-Community -fThe command to install the CLI comes directly from the CloudFoundry DPL source. The commands to install the blue-green deploy plugin come from the plugin’s README.
安装CLI的命令直接来自CloudFoundry DPL 源 。 安装蓝绿色deploy插件的命令来自该插件的README 。
调用蓝绿色部署 (Invoking the blue-green deploy)
To invoke the blue-green deploy, we will use the script deployment provider, which executes a provided command and checks for zero status as indication of success.
为了调用蓝绿色的部署,我们将使用脚本部署提供程序 ,该脚本执行提供程序执行提供的命令并检查零状态是否成功。
deploy:# on update to master branch we deploy to Cloud Foundry- provider: script skip_cleanup: true script: ./scripts/cf-blue-green-deploy.sh blue-green-cf-travis manifest.yml prod on: branch: masterNote that skip_cleanup is set to true. Without this, the cf CLI and blue-green deploy plugin you just installed would be removed prior to the deploy running.
请注意, skip_cleanup设置为true 。 否则,您刚安装的cf CLI和蓝绿色部署插件将在运行部署之前被删除。
The cf-blue-green-deploy.sh script logs in to the Cloud Foundry API and invokes the blue-green deploy plugin. In addition to specifying an application name and manifest file, you can also pass a smoke test script to the blue-green deploy plugin. The plugin will call the smoke test script after the new application code has been deployed, but before the application route is switched to the new application. This allows you to run any number of tests against the new code before any real traffic accesses it.
cf-blue-green-deploy.sh脚本登录到Cloud Foundry API并调用blue-green deploy插件。 除了指定应用程序名称和清单文件之外,您还可以将冒烟测试脚本传递给蓝绿色的deploy插件。 在部署了新的应用程序代码之后,但在将应用程序路由切换到新应用程序之前,该插件将调用冒烟测试脚本。 这使您可以在任何实际流量访问新代码之前对新代码运行任何数量的测试。
The smoke test script is passed a single argument. The argument is the temporary URL of the newly deployed application. If the smoke test script exits with success, the blue-green deploy will complete by switching the route to the new application. If the smoke test script exits with a failure, traffic continues to flow to the old version of the application. The new version remains available for troubleshooting.
烟雾测试脚本传递了一个参数。 参数是新部署的应用程序的临时URL。 如果烟雾测试脚本成功退出,则通过将路由切换到新应用程序来完成蓝绿色部署。 如果冒烟测试脚本因失败而退出,流量将继续流向该应用程序的旧版本。 新版本仍可用于故障排除。
In my example project, the smoke test script invokes a /version API and verifies that it returns with a 200 status code.
在我的示例项目中,冒烟测试脚本调用/ version API并验证它是否返回200状态代码。
In our real projects at work, we run a Postman collection against the newly deployed app. You want your smoke test suite to be sufficiently big enough that you feel confident in your new code, but not so big that it takes a long time to complete a deployment or flaky tests block you from completing a successful deploy.
在工作中的实际项目中,我们针对新部署的应用程序运行Postman集合。 您希望烟雾测试套件足够大,以使您对新代码充满信心,但又不要太大,以至于需要很长时间才能完成部署,或者测试不稳定会阻止您成功完成部署。
You could optionally run a more comprehensive suite of regression tests as an after_deploy step, after your new code is live.
新代码上线后,您可以选择作为after_deploy步骤来运行一套更全面的回归测试。
在IBM Cloud中进行蓝绿色部署的副作用 (Side effects of a blue-green deploy in IBM Cloud)
There are a few nuances of this approach to be aware of if you are deploying to IBM Cloud. Because you are creating a new CF application instance each time you blue-green deploy, your application guid will change. If you use the Availability Monitoring service, your configured tests will be lost when your guid changes.
如果要部署到IBM Cloud,需要注意一些这种方法的细微差别。 因为每次蓝绿色部署时都在创建一个新的CF应用程序实例,所以您的应用程序guid将会更改。 如果使用“可用性监视”服务,则当Guid更改时,配置的测试将丢失。
To work around this, stand up a permanent dummy application. Write your tests for your blue-green deployed app in this dummy application’s configuration. You can specify any URL when you write your Availability Monitoring tests.
要解决此问题,请建立一个永久的虚拟应用程序。 在此虚拟应用程序的配置中为蓝绿色部署的应用程序编写测试。 编写可用性监视测试时,可以指定任何URL。
Similarly, if you use the Log Analysis service, you’ll see that when you click the “View in Kibana” link on your application dashboard’s Logs tab, you will be launched into a Kibana search on the application guid string. Any application logs from before your most recent deployment will not show up. To work around this, you can simply filter on the application name rather than the application guid.
同样,如果使用Log Analysis服务,则将在单击应用程序仪表板的“日志”选项卡上的“在Kibana中查看”链接时看到,将在应用程序guid字符串上启动Kibana搜索。 最新部署之前的任何应用程序日志都不会显示。 要解决此问题,您可以仅过滤应用程序名称而不是应用程序guid。
Another service that has the same issue is Auto-Scaling. Each time a new application is stood up as part of the blue-green deploy, it needs its Auto-Scaling policy reconfigured. There is a command line interface available that you presumably could use to script this, but I have not yet had a need to try this.
具有相同问题的另一项服务是自动缩放。 每次将新应用程序作为蓝绿色部署的一部分进行安装时,都需要重新配置其自动扩展策略。 有一个命令行界面可用,您大概可以用它来编写脚本,但是我还没有必要尝试这个。
If any of these issues are non-starters for you, you always have the option of writing a custom blue-green deploy script that leverages two permanent CF applications, a blue, and a green. These two apps would take turns being live and being idle. You could configure both applications with an auto-scaling policy, for example.
如果您对这些问题都不满意,那么您始终可以选择编写自定义蓝绿色部署脚本,该脚本利用两个永久CF应用程序(一个蓝色和一个绿色)。 这两个应用程序将轮流运行并处于空闲状态。 例如,您可以使用自动缩放策略配置这两个应用程序。
Of course, this approach means you can’t take advantage of the blue-green deploy plugin described in this post, and you need to maintain your own custom script.
当然,这种方法意味着您不能利用本文中介绍的蓝绿色部署插件,而需要维护自己的自定义脚本。
结语 (Wrapping up)
In this post, we’ve examined how we can accomplish a low risk, zero-downtime deployment using Travis and the cf blue-green deploy plugin.
在本文中,我们研究了如何使用Travis和cf blue-green deploy插件完成低风险,零停机时间的部署。
In a real project, we would have even greater assurances, as we would have a suite of unit tests in place, and errors there would fail the Travis build before the deployment had a chance to run. We would also potentially have dev and staging branches configured to deploy to their own respective spaces in our Cloud Foundry organization, allowing us to validate and stabilize the application as necessary before promoting changes to production.
在真实的项目中,我们将拥有更大的保证,因为我们将拥有一套单元测试,并且在部署有机会运行之前,Travis构建中的错误将失败。 我们还可能会将dev和staging分支配置为部署到Cloud Foundry组织中各自的空间,从而使我们能够在促进生产变更之前根据需要验证和稳定应用程序。
Thanks for reading! This is my first Medium story, and I hope you found it useful.
谢谢阅读! 这是我的第一个中型故事,希望您发现它有用。
翻译自: https://www.freecodecamp.org/news/how-to-deploy-your-cloud-foundry-app-with-almost-zero-fear-using-travis-ci-926697fff8f6/
travis-ci自动部署
相关文章:
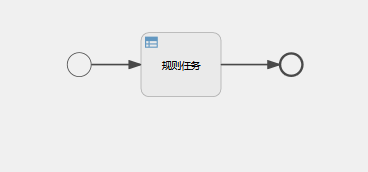
Activiti 规则任务(businessRuleTask)
Activiti 规则任务(businessRuleTask) 作者:邓家海 目前国内研究Activiti规则任务businessRuleTask)的文章在网上应该不超出3篇 小觑夜漫酒作伴,破晓黎明当笑言 前言: 最近一直在研究Activiti工作流的自动化…

10年工作经验老程序员推荐的7个开发类工具
做.NET软件工作已经10年了,从程序员做到高级程序员,再到技术主管,技术总监。见证了Visual Studio .NET 2003,Visul Studio 2005, Visual Studio Team System 2008, Visual Studio 2010 Ultimate,Visual Studio 2013一系列近5个版本的变化与亲…

PHP SSL certificate: unable to get local issuer certificate的解决办法
微信小程序开发交流qq群 173683895 承接微信小程序开发。扫码加微信。 当本地curl需要访问https时,出现SSL certificate: unable to get local issuer certificate错误信息 解决办法: 到http://curl.haxx.se/ca/cacert.pem下载pem文件,并…

辞职前为什么挣扎_当您感到自己像开发人员一样挣扎时,为什么学得最多
辞职前为什么挣扎by Walt Schlender由Walt Schlender 当您感到自己像开发人员一样挣扎时,为什么学得最多 (Why you learn the most when you feel like you’re struggling as a developer) The times when I have made the greatest leaps in my development skil…
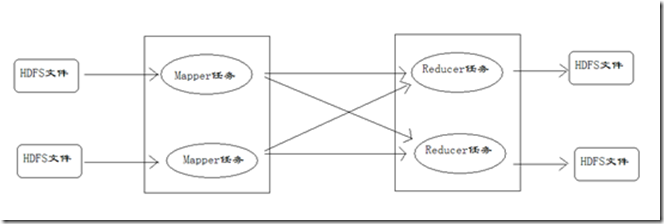
Hadoop学习之Mapreduce执行过程详解
一、MapReduce执行过程 MapReduce运行时,首先通过Map读取HDFS中的数据,然后经过拆分,将每个文件中的每行数据分拆成键值对,最后输出作为Reduce的输入,大体执行流程如下图所示: 整个流程图具体来说ÿ…

汇编试验十五:安装新的int 9中断例程
安装新的int 9中断例程(按A键后显示满屏幕的A) int 9 是外中断,同样,程序编写还是和其他中断例程类似,安装(复制),调用; 不同点是在于,他要从端口读取数据60h…
php判断前端传的多个字段与数据库匹配
微信小程序开发交流qq群 173683895 承接微信小程序开发。扫码加微信。 代码 <?phpheader("Content-Type:text/html;charsetutf8"); header("Access-Control-Allow-Origin: *"); //解决跨域header(Access-Control-Allow-Methods:POST);// 响应类型 …
javascript编写_用JavaScript深入探讨:为什么对编写好的代码至关重要。
javascript编写Using simple terminology and a real world example, this post explains what this is and why it is useful.这篇文章使用简单的术语和一个真实的例子,解释了this是什么以及为什么有用。 这是给你的吗 (Is this for you) I have noticed that man…
peak num
class Solution {public: int findPeakElement(vector<int>& nums) { int i0; int nnums.size(); while(i<n){ if(i0){ //处理第一位 if(nums[1] < nums[0]) return 0; else { …
用Eclipse的snippets功能实现代码重用
snippets功能实现代码重用 Snippets 代码片段是Eclipse的一个插件。 很多时候可以通过这个功能,重复使用常用的代码片段,加快开发效率。 创建一个代码段的步骤: 在Eclipse的editor中选中一块代码段,右键点击【Add to Snippets…
JS删除选中的数组
微信小程序开发交流qq群 173683895 承接微信小程序开发。扫码加微信。 js // 删除数组deleteArr: function (e) {let middlearr [{a:1},{b:2}];//全部数组let items [{a:1}];//选中的数组for (var i 0; i < items.length; i) {for (var j 0; j < middlearr.lengt…
Git合并和变基简介:它们是什么,以及如何使用它们
by Vali Shah通过瓦利沙阿 Git合并和Git变基简介:它们做什么以及何时使用它们 (An Introduction to Git Merge and Git Rebase: What They Do and When to Use Them) As a Developer, many of us have to choose between Merge and Rebase. With all the reference…

[转]单点登录原理与简单实现
一、单系统登录机制 1、http无状态协议 web应用采用browser/server架构,http作为通信协议。http是无状态协议,浏览器的每一次请求,服务器会独立处理,不与之前或之后的请求产生关联,这个过程用下图说明,三次…
[JAVA] DUMP
jmap -dump:live,formatb,fileD:\heap.bin 31563156是PID转载于:https://www.cnblogs.com/MasterMonkInTemple/p/4655547.html
ThinkPHP 5.0 入门教程 一:安装ThinkPHP并在Web浏览器访问
微信小程序开发交流qq群 173683895 承接微信小程序开发。扫码加微信。 严格来说,ThinkPHP无需安装过程,这里所说的安装其实就是把ThinkPHP框架放入WEB运行环境(前提是你的WEB运行环境已经OK) 下面我们开始安装ThinkPHP的运行环…
以太坊区块链同步_以太坊69:如何在10分钟内建立完全同步的区块链节点
以太坊区块链同步by Lukas Lukac卢卡斯卢卡奇(Lukas Lukac) Ethereu M 69:如何在10分钟内建立完全同步的区块链节点 (Ethereum 69: how to set up a fully synced blockchain node in 10 mins) Welcome in the first article of our new go-ethereum series!欢迎来…
微信小程序客服实现自动回复图文消息链接,点击去关注公众号
微信小程序开发交流qq群 173683895 承接微信小程序开发。扫码加微信。 用户打开客服消息,发送任意消息自动回复图文链接,达到关注公众号的目的。 先看效果: 打开芝麻小客服的后台,选择一键接入小程序智能客服 点击跳转 1.授权…
HtmlUnit、httpclient、jsoup爬取网页信息并解析
转载:http://tianxingzhe.blog.51cto.com/3390077/1755511转载于:https://www.cnblogs.com/puhongtao/p/7063563.html
《Maven 实战》笔记之setting.xml介绍
maven是什么?有什么用? Maven是一个跨平台的项目管理工具,主要服务于Java平台的项目构建,依赖管理和项目信息管理。项目构建包括创建项目框架、清理、编译、测试、到生成报告,再到打包和部署,项目信息包括项目描述,开发者列表,版本…
框架依赖注入和普通依赖注入_依赖注入快速入门:它是什么,以及何时使用它...
框架依赖注入和普通依赖注入by Bhavya Karia通过Bhavya Karia 介绍 (Introduction) In software engineering, dependency injection is a technique whereby one object (or static method) supplies the dependencies of another object. A dependency is an object that ca…
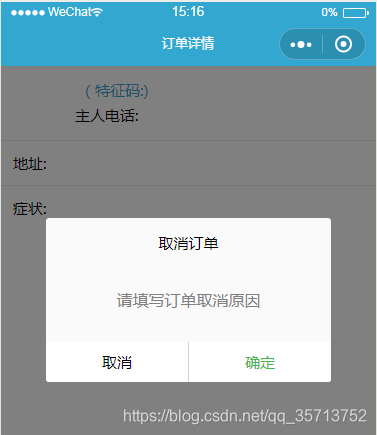
微信小程序自定义弹出框组件,模拟wx.showModal
微信小程序开发交流qq群 173683895 效果图: 代码 wxml <view wx:if{{showModal}}><view classmask_layer bindtapmodal_click_Hidden /><view classmodal_box><view class"title">取消订单</view><view classconte…
IOS tableView删除数据
NSMutableArray *_allshops; NSMutableArray *_deleteshops; -(IBAction)remove{ 1. //记录删除的行号 //创建动态数组存放行号的集合 NSMutableArray *deletepath [NSMutableArray array]; //遍历存放删除数据的数组,把行号放到deletepath中 for (Shop * s in _de…
vue.js 源代码学习笔记 ----- 工具方法 lang
/* flow */ // Object.freeze 使得这个对象不能增加属性, 修改属性, 这样就保证了这个对象在任何时候都是空的 export const emptyObject Object.freeze({}) /*** Check if a string starts with $ or _ ascii unicode 的区别 charcodeAt是一个字符的 unicode编码, 但是…
Tim Berners-Lee重新分散的新Web SOLID简介
by Arnav Bansal通过Arnav Bansal Tim Berners-Lee重新分散的新Web SOLID简介 (An introduction to SOLID, Tim Berners-Lee’s new, re-decentralized Web) Recently, Prof. Tim Berners-Lee lifted the veil off a project called Solid. I decided to check it out. In thi…

AngularJS2.0 教程系列(一)
Why Angular2 Angular1.x显然非常成功,那么,为什么要剧烈地转向Angular2? 性能的限制 AngularJS当初是提供给设计人员用来快速构建HTML表单的一个内部工具。随着时间的推移,各种特性 被加入进去以适应不同场景下的应用开发。然而由…
Vue组件绑定自定义事件
Vue组件使用v-on绑定自定义事件: 可以分为3步理解: 1.在组件模板中按照正常事件机制绑定事件: template: <button v-on:click"increment">{{ counter }}</button>, 如上ÿ…
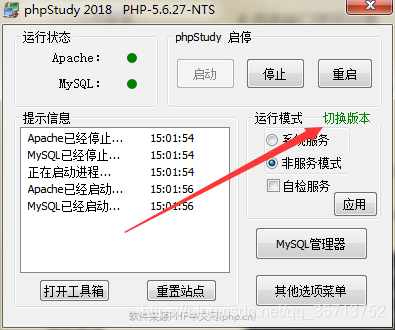
phpstudy本地调试运行TP5的后台源码
本地访问后台步骤: 1.打开 phpstudy 2.点击其它选项菜单 3.点击软件设置 4.点击端口常规设置 5.修改网站根目录为: C:\phpStudy\PHPTutorial\WWW\wxpet_2019\public phpstudy 切换php版本:5.6.27 public目录下的 .htacc…
如何使用TensorFlow Eager执行训练自己的FaceID ConvNet
by Thalles Silva由Thalles Silva Faces are everywhere — from photos and videos on social media websites, to consumer security applications like the iPhone Xs FaceID.人脸无处不在-从社交媒体网站上的照片和视频到iPhone Xs FaceID等消费者安全应用程序。 In this…
jquery判断一个元素是否为某元素的子元素
$(node).click(function(){if($(this).parents(.aa).length > 0){//是aa类下的子节点}else{//不是aa类下的子节点} });在判断点击body空白处隐藏弹出框时用到转载于:https://www.cnblogs.com/qdog/p/7067909.html

Sublime Text 3 (含:配置 C# 编译环境)
Sublime Text 3http://www.sublimetext.com/3http://www.sublimetext.com/3dev1. 关闭自动更新 菜单:Preferences->Settings User,打开User配置文档,在大括号内加入(或更改): "update_check&q…