docker使用mongo_如何使用Docker在AWS上部署Mongo:初学者的权威指南
docker使用mongo
为什么需要这个? (Why you need this?)
因为JS + Python + Mongo =完整的数据开发 (Because JS + Python + Mongo = full data development)
I am a Meteor developer. More precisely I use Vulcan.js, but that’s a whole other story. Meteor is a full-fledged Node.js framework, pretty nice for SaaS, real-time apps, prototyping, management softwares and a lot of other use cases.
我是流星开发人员。 更准确地说,我使用Vulcan.js, 但这是另一个故事 。 Meteor是一个成熟的Node.js框架,非常适合SaaS,实时应用程序,原型,管理软件以及许多其他用例。
As a default, it works with MongoDB. MongoDB is a NoSQL database management system (DBMS). It stores documents as JSON and its shell uses JavaScript, which are some reasons why it is so appreciated by Node.js developers.
默认情况下,它可用于MongoDB。 MongoDB是NoSQL数据库管理系统(DBMS)。 它以JSON格式存储文档,并且其外壳使用JavaScript,这是Node.js开发人员如此赞赏它的一些原因。
There is a neat tool called Meteor Up to automatically deploy Meteor apps and the associated Mongo databases on production servers. Neat is actually an understatement, it’s freakin’ awesome.
有一个名为Meteor Up的简洁工具可以在生产服务器上自动部署Meteor应用程序和关联的Mongo数据库。 整洁实际上是一种轻描淡写, 它令人惊讶。
And I am also a Python developer. Python is excellent for web scraping and data science. It’s both easy to use and suited for high performance.
我也是Python开发人员。 Python非常适合Web抓取和数据科学。 它既易于使用,又适合高性能。
Sometimes, I like to use both Python to extract and process data and Meteor to create the user interface. I call this “full data development”, as it goes from the raw data source to the end user interface.
有时,我喜欢同时使用Python提取和处理数据以及使用Meteor来创建用户界面。 我称其为“完整数据开发” ,因为它从原始数据源到最终用户界面。
But there is a problem: Meteor Up currently does not expose the Mongo database, only the local Meteor app can connect to it. So I cannot plug my Python servers to my Meteor managed databases out-of-the-box :(
但是有一个问题: Meteor Up当前不公开Mongo数据库,只有本地Meteor应用程序可以连接到它。 因此,我无法将Python服务器直接安装到我的Meteor托管数据库中:(
A paid service would do the job by providing an URL for the hosted database, such as this one:
付费服务可以通过为托管数据库提供URL来完成这项工作,例如:
mongo://username:password@somedomain.com:27017But why spend money when you can struggle for hours to set up your own Mongo database on AWS using Docker, and learn tons of useful tricks in the process? It’s even better if someone, say, me, does it first and writes a lengthy tutorial to make things easier for you!
但是,为什么要花很多时间在使用Docker的AWS上建立自己的Mongo数据库并在此过程中学到很多有用的技巧,却要花钱呢? 最好是有人先说给我听,然后写一篇冗长的教程,使您的工作更轻松!
Important note: it’s perfectly fine if it takes you multiple sessions to finish this looong tutorial. Don’t give up! The result is worth the hassle, as mastering Docker and AWS are two skills very appreciated by employers, and very useful in real life. Post your questions as comments if you have any, I’ll do my best to answer all of them.
重要说明:如果您需要花费多个时间来完成本教程,那将是非常好的。 不要放弃! 结果值得一试,因为掌握Docker和AWS是雇主非常赞赏的两种技能,并且在现实生活中非常有用。 将您的问题发表为评论(如果有的话),我会尽力回答所有问题。
1 —让我们发现Docker (1 — Let’s discover Docker)
我们的第一个容器 (Our first container)
I invite you to read Docker’s official installation doc here and install it, which takes only a few minutes. Then, let’s play a little. Run the following commands in your terminal and observe the results:
我邀请您在这里阅读Docker的官方安装文档并进行安装,仅需几分钟。 然后,让我们玩一点。 在终端中运行以下命令,并观察结果:
docker run --name my-lame-db -d mongo
docker ps
As simple as that, we just created an isolated container that runs Mongo!
如此简单,我们只是创建了一个运行Mongo的隔离容器!
You can access the official Mongo image Docker files somewhere in this folder hosted on GitHub to understand better what happens here. According to the last lines of the Dockerfile our db is available on port “27017” as a default:
您可以访问GitHub上此文件夹中某处的官方Mongo镜像Docker文件,以更好地了解此处发生的情况。 根据Dockerfile的最后几行,默认情况下,数据库在端口“ 27017”上可用:
EXPOSE 27017 CMD ["mongod"]But Mongo exposes itself on this port INSIDE the container. But the container is isolated, so only programs INSIDE the container can talk to Mongo. Our database is up and running but trapped alone in its container :/
但是Mongo在容器内部的此端口上暴露自己。 但是容器是隔离的,因此只有容器内部的程序才能与Mongo对话。 我们的数据库已启动并正在运行,但被单独困在其容器中:/
That’s lame! Let’s free it!
la脚! 让我们释放它!
打开容器,映射端口 (Open the container, map the ports)
If you want to access Mongo from OUTSIDE the container, you’ll have to map the exposed port and a port of the machine. The -p option is specifically meant for this:
如果要从容器的外部访问Mongo,则必须映射裸露的端口和计算机的端口。 -p选项专门用于此目的:
docker run -p 27017:27017 --name my-local-db -d mongoIf you had a Node server, you’d write docker run -p 80:3000 my-node-app for example. Your server running on port 3000 would thus be available through HTTP (port 80). First the container port, then the image port.
如果您有节点服务器,则可以编写docker run -p 80:3000 my-node-app 。 这样,在端口3000上运行的服务器将可以通过HTTP(端口80)使用。 首先是容器端口,然后是图像端口。
Let’s try to access our db in the browser, just for fun:
让我们尝试在浏览器中访问数据库,只是为了好玩:
As expected, you can’t connect to your db through the browser. But this rejection message comes from Mongo, which is a good sign. Let’s try again using the official CLI tool:
不出所料,您无法通过浏览器连接到数据库。 但是,此拒绝消息来自Mongo,这是一个好兆头。 让我们使用官方的CLI工具再试一次:
mongo localhost:27017 #or just "mongo", as this is the default uriYou can access your database shell, we are making progress!
您可以访问您的数据库外壳,我们正在取得进步!
But… I want my database to be on a distant server, not to run locally on my isolated machine.
但是……我希望我的数据库位于远程服务器上,而不要在隔离的计算机上本地运行。
2 —从您的终端访问AWS (2 — Access AWS from your terminal)
We picked AWS as our cloud provider because it is widely spread, but keep in mind this is just an example. AWS offers to new users free hosting for 12 months for one server instance, so you don’t need to pay to follow this tutorial. The steps are mostly similar if you pick another hosting service.
我们选择AWS作为我们的云提供商是因为它广泛分布,但是请记住,这只是一个例子。 AWS为新用户提供了一个服务器实例12个月的免费托管,因此您无需付费即可阅读本教程。 如果您选择其他托管服务,则步骤基本类似。
First step is to create a programmatic access to Amazon Web Services using the IAM service (Identity and Access Management). This key will be used by Docker Machine (see below) to do some operations, such as creating an AWS EC2 instance for you.
第一步是使用IAM服务(身份和访问管理)创建对Amazon Web Services的编程访问。 Docker Machine将使用此密钥(请参见下文)执行一些操作,例如为您创建一个AWS EC2实例。
Setting this up is outside the scope of our tutorial. Therefore, I invite you to read the first part of this article from Vishal Kumar. Follow the first 8 steps until you get AWS credentials. The rest of the article is interesting too but a bit advanced at this point and targeted to the MEAN stack. Let’s focus on Mongo only for the moment.
进行设置超出了我们教程的范围。 因此,我邀请您阅读Vishal Kumar的本文的第一部分 。 请遵循前8个步骤,直到获得AWS凭证。 本文的其余部分也很有趣,但是在这一点上有所改进,并针对MEAN堆栈。 让我们暂时仅关注Mongo。
At this point you should have your credentials.
此时,您应该具有您的凭据。
[default]
aws_access_key_id = [access key from the downloaded credential file]
aws_secret_access_key = [secret access key from the downloaded credential file]
Keep them safe! You will have to recreate a key pair if you lose them… and you certainly DON’T want anybody to discover them either!
确保他们安全! 如果丢失了密钥,则必须重新创建密钥对……并且您当然也不想让任何人发现它们!
3-使用Docker Machine将Docker置于云端 (3 —Put Docker in the cloud with Docker Machine)
不再需要AWS控制台 (Never need the AWS console again)
Docker Machine is an utility to manage the different machines hosting your containers (local machines, cloud servers). Hence the name, Docker… Machine. You can set it up for multiple cloud providers and it works very well with AWS.
Docker Machine是一个实用程序,用于管理托管您的容器的不同计算机(本地计算机,云服务器)。 因此,名称为Docker…Machine。 您可以为多个云提供商设置它,并且它可以与AWS很好地配合使用。
The official documentation gives all the information you need for AWS. I just jumped the VPC part, it’s a bit too advanced for the moment, but the rest is very useful.
官方文档提供了AWS所需的所有信息。 我刚刚跳了VPC部分,目前它有点太先进了,但是其余部分非常有用。
创建EC2实例 (Create the EC2 instance)
You will end up writing a command similar to the one below.
您最终将编写与以下命令类似的命令。
docker-machine create \
--driver amazonec2 \
--amazonec2-access-key ***** --amazonec2-secret-key **** \
--amazonec2-region ***** \
--amazonec2-open-port 27017 my-awesome-server
Let’s break it down.
让我们分解一下。
- I use the EC2 driver, since I am an AWS user.由于我是AWS用户,因此我使用EC2驱动程序。
- I pass the credentials inline as I have multiple accounts to manage我有多个帐户要管理,因此我以内联方式通过凭据
- I pass the region where I usually host my apps (“eu-west-3” for me),我经过了通常托管我的应用程序的区域(对我来说是“ eu-west-3”),
Don’t forget to open port 27017 (
--amazonec2-open-port 27017), otherwise AWS will block connections even if your container is correctly set.不要忘记打开端口27017(--
--amazonec2-open-port 27017),否则即使正确设置了容器,AWS也会阻止连接。
If you did not specify the region correctly, you may have trouble finding your instance on the AWS console. I still don’t get why you can’t have all zones displayed easily in this interface, but that’s how it works.
如果未正确指定区域,则可能无法在AWS控制台上找到实例。 我仍然不明白为什么不能在此界面中轻松显示所有区域,但这就是它的工作原理。
You should also be able to get rid of the access key and secret key somehow by setting your local machine AWS credentials, or store them as environment variables. I personally prefer to have them in the command line as I may replace them with environment variables.
通过设置本地计算机的AWS凭证,或将它们存储为环境变量,您还应该能够以某种方式摆脱访问密钥和秘密密钥。 我个人更喜欢在命令行中使用它们,因为我可以将它们替换为环境变量。
At this point, you can check the AWS console and see your instance set as expected!
此时,您可以检查AWS控制台并按预期查看实例集!
4-在您的实例上运行Mongo容器 (4 — Run a Mongo container on your instance)
激活正确的机器 (Activate the correct machine)
Now the tricky part, it took me a while to get it right. Docker Machine’s role is to manage your distant machines, launch instances and install Docker on it. That’s all. It’s NOT Docker.
现在是棘手的部分,我花了一些时间才把它弄对。 Docker Machine的作用是管理远程计算机,启动实例并在其上安装Docker。 就这样。 不是Docker。
So you still have to use Docker. But how does Docker know which machine to connect too?
因此,您仍然必须使用Docker。 但是Docker如何知道也要连接哪台机器?
Try this and look at the result:
试试看,看看结果:
docker-machine env my-awesome-serverIt will show a small shell script to setup environment variables.
它将显示一个小的Shell脚本来设置环境变量。
It also tells you to run this command:
它还告诉您运行以下命令:
eval $(docker-machine env my-awesome-server)This will simply run the displayed script in your shell. When those env variables are set, your machine becomes “active”.
这将仅在您的Shell中运行显示的脚本。 设置了这些env变量后,您的计算机将变为“活动”状态。
Type docker-machine active to check that the correct machine is listed.
键入docker-machine active以检查是否列出了正确的计算机。
Now type docker info , you should see that the Name matches your app. Magic! Docker is “connected” to the active machine, configured by Docker Machine.
现在输入docker info ,您应该看到Name与您的应用程序匹配。 魔法! Docker被“连接”到由Docker Machine配置的活动机器。
We can now run the same command as earlier:
现在,我们可以运行与之前相同的命令:
docker run -p 27017:27017 --name my-awesome-db -d mongo .It will create the database not on our local machine, but on the distant server. As simple as that!
它不会在本地计算机上,而是在远程服务器上创建数据库。 就如此容易!
Run this command to get your machine IP:
运行以下命令以获取您的计算机IP:
docker-machine ip my-awesome-serverAnd open the address http://<ip-given-by-docker-machine>:27017 : you should get a beautiful error message, telling you that you are trying to access MongoDB over HTTPS: it works!!!
并打开地址http://<ip-given-by-docker-machine> :27017:您应该收到一条漂亮的错误消息,告诉您您正在尝试通过HTTPS访问MongoDB:它有效!!!
Run mongo <ip-given-by-docker-machine>:27017 … and… you are in ! Congratulations, you just setup your Docker container on a production server.
运行mongo <ip-given-by-docker-machine> :27017… 并且…您在! 恭喜,您只是在生产服务器上设置了Docker容器 。
Ok now, we definitely DON’T want the whole world to access our db, so next step is setting up authentication.
好了,我们现在绝对不希望整个世界都访问我们的数据库,因此下一步是设置身份验证。
5-设置身份验证-2个容器解决方案 (5 — Setup authentication — 2 containers solution)
Sorry but you can already delete the container you’ve just created (exercise: I let you figure out the container stopping and removing commands). It was just an example. Sadly, you won’t be able to setup auth with it.
抱歉,您已经可以删除刚刚创建的容器(练习:我让您确定了容器停止和删除命令)。 这只是一个例子。 遗憾的是,您将无法对其进行身份验证。
Stay focused because the process is a bit trickier than you would expect:
保持专注,因为此过程比您预期的要棘手:
- We will create a first container, let’s name it “Container #1”, WITHOUT auth.我们将创建第一个容器,我们将其命名为“ Container#1”,不带身份验证。
- We will setup this container so data is saved on the server disk (that’s an important step), create and admin, and delete the container.我们将设置此容器,以便将数据保存在服务器磁盘上(这是重要的步骤),创建和管理以及删除容器。
- We will create a second container, “Container #2” WITH auth. The admin user credentials will still be valid, because they are saved on the disk.我们将使用身份验证创建第二个容器“ Container#2”。 管理员用户凭据将仍然有效,因为它们已保存在磁盘上。
There might be simpler solutions I am not yet aware of, for example by providing the admin user credentials during the container creation, so feel free to comment if you are a Docker/Mongo superhero! And a one container solution is also provided in the annexes at the end of the article.
我可能还没有发现更简单的解决方案,例如通过在容器创建过程中提供管理员用户凭据,因此如果您是Docker / Mongo超级英雄,请随时发表评论! 本文末尾的附件中还提供了一个容器解决方案。
在容器之间共享数据 (Share data between containers)
At this point you should think “well, containers are isolated, so how can Container #1 and Container #2 share the same admin user”? And you are right. The solution lies in storing files on the server.
在这一点上,您应该考虑“好吧,容器是隔离的,所以容器1和容器2如何共享同一管理员用户”? 你是对的。 解决方案在于将文件存储在服务器上。
Remember when we mapped ports, so that the container’s open port maps Mongo’s port? We will apply the same logic to the file system: we can map folders on the container and folders on the server.
还记得我们映射端口时,以便容器的开放端口映射Mongo的端口吗? 我们将对文件系统应用相同的逻辑:我们可以映射容器上的文件夹和服务器上的文件夹。
Let’s add an option to our command, and let’s call it the Final command for Container #1:
让我们在命令中添加一个选项,并将其称为容器#1的最终命令:
docker run \
-d \
-p 27017:27017 \
--name my-awesome-db \
-v ~/dataMongo:/data/db mongo \
mongod
Smart! Now when our Mongo containers will read/write their data in data/db they will also be available to the host server, in the ~/dataMongo folder (host folder first, then container folder).
聪明! 现在,当我们的Mongo容器将在data/db读取/写入它们的数据时,它们也将对主机服务器可用 ,位于~/dataMongo文件夹(首先是主机文件夹,然后是容器文件夹)中。
创建管理员用户 (Create the admin user)
It’s all in the title: you will now connect to your newly created Mongo instance and create the admin user.
一切都在标题中:现在,您将连接到新创建的Mongo实例并创建管理员用户。
docker-machine ip my-awesome-server
mongo <resulting-ip>
Now you should be connected to your database shell. You simply need to create a super admin user:
现在,您应该已连接到数据库外壳。 您只需要创建一个超级管理员用户:
db.createUser({user: "admin",pwd: "yourpassword",roles: [ { role: "userAdminAnyDatabase", db: "admin" } ],passwordDigestor : "server"}
)
You can look at the official doc, this article and this stack overflow thread for more information.
您可以查看官方文档 , 本文以及该堆栈溢出线程以获取更多信息。
Also, see this thread about the difference between the root role, which is an actual super admin, and userAdminAnyDatabase role, which is a kind of “user creator”.
另外, 请参见此线程,以了解root角色(它是实际的超级管理员)与userAdminAnyDatabase角色(这是一种“用户创建者”)之间的区别。
删除容器并激活身份验证 (Delete the container and activate auth)
We can remove Container #1, it’s role was only to let us access a Mongo shell on our server, but it lacked authentication.
我们可以删除容器#1,它的作用只是让我们访问服务器上的Mongo Shell,但它缺少身份验证。
docker stop my-awesome-db
docker rm my-awesome-db
We can then create our final container, with authentication activated. Since it will be connected to the server file system too, the data created using Container #1 are still available, including our admin user.
然后,我们可以创建激活身份验证的最终容器。 由于它也将连接到服务器文件系统,因此使用容器#1创建的数据仍然可用,包括我们的admin用户。
We simply add the --auth option to the initial command, it tells Mongo… well, to enable authentication. You guessed right.
我们只需在初始命令中添加--auth选项即可,它告诉Mongo…启用身份验证。 你猜对了。
Final command for Container #2:
#2容器的最终命令:
docker run \
-d \
-p 27017:27017 \
--name my-awesome-db \
-v ~/dataMongo:/data/db mongo \
--auth
mongod
Now connect again to your Mongo instance and run:
现在再次连接到您的Mongo实例并运行:
db.createCollection('IAMAHACKER')You’ll get a nice error message as expected!
您将得到一个不错的错误消息,如预期的那样!
And now try again while being authenticated:
现在,在通过身份验证时重试:
mongo $(docker-machine ip my-awesome-server):27017 -u admin -p yourpasswordIf it works, you are done! Congratulations ;)
如果可行,那么您就完成了! 恭喜;)
怎么办? (Now what?)
Your Mongo database is up and running in the cloud, safely isolated in its Docker container, and secured with username/password authentication.
您的Mongo数据库在云中启动并运行,安全地隔离在其Docker容器中,并通过用户名/密码身份验证进行保护。
The next steps will be plugging your applications to this database. Remember you can access your server IP using the command docker-machine ip my-awesome-server. You will certainly have to create additional users to administrate your databases.
下一步将把您的应用程序插入该数据库。 请记住,您可以使用命令docker-machine ip my-awesome-server来访问服务器IP。 当然,您将不得不创建其他用户来管理您的数据库。
Also, you probably won’t want anybody to connect to your database shell, even with authentication set. AWS will let you whitelist a few IPs, corresponding to your applications and your own computer, so that only trusted sources can connect to your database.
同样,即使设置了身份验证,您也可能不希望任何人连接到数据库外壳。 AWS将让您将一些IP列入白名单,这些IP与您的应用程序和您自己的计算机相对应,以便只有受信任的源才能连接到您的数据库。
Below this article, you’ll find a glossary, the final script, and a one-container solution to setup authentication, and a few additional tips.
在本文下面,您将找到词汇表,最终脚本以及用于设置身份验证的单一容器解决方案,以及一些其他提示。
I hope you found this tutorial helpful! If it’s the case, don’t forget to clap ;) And please check out the annexes below…
希望本教程对您有所帮助! 如果是这种情况,请别忘了鼓掌;)并请查看以下附件…
附件1-最终脚本 (Annex 1 — Final script)
# Launch an EC2 instance
docker-machine create \
--driver amazonec2 \
--amazonec2-access-key ***** --amazonec2-secret-key **** \
--amazonec2-region ***** \
--amazonec2-open-port 27017 my-awesome-server
# Activate the instance
eval $(docker-machine env my-awesome-server)
# Create container 1
docker run \
-d \
-p 27017:27017 \
--name my-awesome-db \
-v ~/dataMongo:/data/db mongo \
mongod
# Connect to your DB
mongo $(docker-machine ip my-awesome-server):27017
# IN THE MONGO SHELL create a super admin
db.createUser({user: "admin",pwd: "yourpassword",roles: [ { role: "userAdminAnyDatabase", db: "admin" } ],passwordDigestor : "server"}
)
# QUIT THE MONGO SHELL
# Delete the container and recreate one with auth
docker stop my-awesome-db
docker rm my-awesome-db
# Run the final container
docker run \
-d \
-p 27017:27017 \
--name my-awesome-db \
-v ~/dataMongo:/data/db mongo \
--auth \
mongod
# IF CA FAILS WITH PERMISSION DENIED ERROR
# see https://github.com/kubernetes/minikube/issues/3083
# sudo vim /var/lib/snapd/apparmor/profiles/snap.docker.docker
# Add following line inside file (e.g alongside with other "owner" lines):
# owner @{HOME}/.docker/machine/machines/** r,
# sudo apparmor_parser -r /var/lib/snapd/apparmor/profiles/snap.docker.docker
附件2-整洁的花样,我希望我不必自己学习 (Annex 2 — Neat tricks I wish I did not have to learn by myself)
If you are in devops, you will eventually get a muscle memory of Docker commands. Otherwise, if you setup projects for production only once a year, WRITE DOWN EVERYTHING. For example, you could write a Medium article.
如果您从事开发工作,最终将获得对Docker命令的强大记忆。 否则,如果您仅将项目设置为每年生产一次,请写下所有内容。 例如,您可以写一篇中型文章。
Seriously I’ve lost a few hours of work because I did not write down my progression. The next week I had forgotten everything. Docker is not trivial.
严重的是我因为没有写下自己的进度而失去了几个小时的工作。 第二周我忘记了一切。 Docker并不简单。
I ran into a permission issue with cert authentication when using Docker Machine, the solution is in the comments of this thread: https://github.com/kubernetes/minikube/issues/3083
使用Docker Machine时遇到了证书认证的权限问题,解决方案在此线程的注释中: https : //github.com/kubernetes/minikube/issues/3083
docker ps -awill print all containers, including inactive ones, whiledocker psonly prints active containers.docker ps -a将打印所有容器, 包括不活动的容器,而docker ps仅打印活动容器。An image is NOT a Dockerfile. A Dockerfile is a configuration file. Think of the blueprint of a boat. An image is a built Docker file. Think of a boat THAT IS NOT YET in the sea. A container is an image that you are running. Think of a boat ROAMING THE SEAS.
映像不是Dockerfile。 Dockerfile是一个配置文件 。 想想一艘船的蓝图。 映像是内置的Docker文件。 想一想在海中还没有的小船。 容器是您正在运行的映像。 想想一艘在海上漫游的船。
Differences between a Dockerfile, Docker Image and Docker ContainerQuick Jump: It All Starts With a Dockerfile | If You Build It, They Will Run (Usually) In casual conversation you may…nickjanetakis.com
Dockerfile,Docker映像和Docker容器 快速跳转 之间的差异 :一切都始于Dockerfile | 如果您构建它,它们将运行(通常)在非正式对话中,您可以… nickjanetakis.com
docker pull mongowill for example pull a Mongo Docker image, already built. But how to display the Dockerfile associated? You can’t. If you want to check it, you can look for the relevant GitHub repository (if it exists). That’s the exact same relation between an installed NPM package and its code.npm installdoes install a build (an “image”) but does not necessarily download the code (a “Dockerfile” here), which usually lives on GitHub but can also be private.例如,
docker pull mongo将拉取已构建的Mongo Docker映像。 但是如何显示关联的Dockerfile? 你不能 如果要检查它,可以查找相关的GitHub存储库(如果存在)。 这与已安装的NPM软件包及其代码之间的关系完全相同。npm install确实会安装一个构建(“映像”),但不一定下载代码(此处为“ Dockerfile”),该代码通常位于GitHub上,但也可以是私有的。
How can I view the Dockerfile in an image?Hi, Looking at some images in the repository (this one, for example: https://hub.docker.com/r/filippobosi/mfi/) I do…forums.docker.com
如何查看映像中的Dockerfile? 嗨,看一下存储库中的一些图像(例如,这个图像:https: //hub.docker.com/r/filippobosi/mfi/ )我正在…… forums.docker.com
On EC2, your instance IP can change over restarts! You’ll have to regenerate certs to keep connecting to the instance using
docker-machine regenerate-certs my-awesome-server在EC2上,您的实例IP可以在重启后更改! 您必须重新生成证书才能继续使用
docker-machine regenerate-certs my-awesome-server连接到实例
附件3 —设置身份验证—一种容器解决方案 (Annex 3— Setup authentication — one container solution)
There is also a “one container” solution. It’s less instructive, but faster and requires only one container.
还有一个“一个容器”的解决方案。 它的指导性较低,但速度更快,并且只需要一个容器。
Note : if you already setup auth using the 2 containers approach, you are already done. If you still want to try the 1 container approach, you’ll need to create a new instance on EC2 or remove the ~/dataMongo folder of the server.
注意:如果您已经使用2个容器方法设置了身份验证,那么您已经完成了。 如果仍然想尝试1容器方法,则需要在EC2上创建一个新实例或删除服务器的~/dataMongo文件夹。
You still need to share your folders with the host, otherwise your data are tied to the container, which should not happen! Containers should be easily deletable without any data loss, so documents have to be stored elsewhere.
您仍然需要与主机共享文件夹,否则您的数据将绑定到容器,这是不应该发生的! 容器应易于删除,且不会丢失任何数据,因此文档必须存储在其他位置。
The idea is to connect to your server and access Mongo from there, instead of accessing Mongo from your local machine. It’s a very subtle difference but that’s what saves us one step.
这个想法是连接到服务器并从那里访问Mongo,而不是从本地计算机访问Mongo。 这是一个非常微妙的差异,但这正是我们节省了一步。
If you connect to Mongo while being connected to your server, you will have more permission and will be able to setup an admin user even if auth is already set, as Mongo considers you as a “local” user. To rephrase it, since you were able to connect to the machine Mongo is running on, your AWS instance, Mongo already considers you as a “safe” user, as a hacker should not be there in the first place.
如果在连接到服务器的同时连接到Mongo,则即使您已经设置了身份验证,您也将拥有更多权限并能够设置管理员用户,因为Mongo认为您是“本地”用户。 换个说法,由于您能够连接到正在运行Mongo的机器,因此您的AWS实例Mongo已经将您视为“安全”用户,因为黑客首先就不应存在。
Run only the Final command for Container #2
仅对容器2运行最终命令
docker run \
-d \
-p 27017:27017 \
--name my-awesome-db \
-v ~/dataMongo:/data/db mongo \
--auth
mongod
You can always ssh your server using docker-machine ssh:
您始终可以使用docker-machine ssh服务器:
docker-machine ssh my-awesome-serverRunning mongo will open the Mongo shell. From there, you can add an admin user EVEN is auth is set, as we have done previously.
运行mongo将打开Mongo shell。 从那里,您可以添加管理员用户,即使已设置auth,也像我们之前所做的那样。
附件4——词汇表 (Annex 4— Glossary)
A bit of devops people mumbling.
一群虔诚的人在喃喃自语。
AWS: Amazon Web Services, a famous collection of cloud services with cheap offers.
AWS: Amazon Web Services,著名的云服务集合,提供廉价的服务。
AWS EC2: service for hosting server instances. That’s where you’d host your API or your whole website. Note that there might be services more suited for DB hosting but since EC2 is a must-know, it is my choice as a beginner.
AWS EC2:用于托管服务器实例的服务。 那就是您托管API或整个网站的地方。 请注意,可能会有一些更适合数据库托管的服务,但是由于EC2是必不可少的,因此我作为初学者选择它。
Docker: it’s a… well, a program? In a nutshell that’s a bunch of things that helps you to run programs in containers, isolated from the other programs running on the server, without costing as many resources as a virtual machine. Containers are also helpful to manage services (APIs, databases etc.) on a daily basis: kill/restart it, create new instance in one line…
Docker:这是一个……嗯,一个程序? 简而言之,它可以帮助您在容器中运行程序,与服务器上运行的其他程序隔离开来,而不会花费与虚拟机一样多的资源。 容器还有助于每天管理服务(API,数据库等):杀死/重新启动它,在一行中创建新实例…
Container: that will be my simplified definition, think of a virtual machine without an OS. It provides isolation while not consuming too many computing resources.
容器:这是我的简化定义,想想没有操作系统的虚拟机。 它提供了隔离,同时又不消耗太多的计算资源。
Dockerfile: that’s a config file for docker, which defines all the programs/files/commands/options you need to run your app.
Dockerfile:这是Docker的配置文件,它定义了运行应用程序所需的所有程序/文件/命令/选项。
Docker Machine: a CLI to push your Docker containers where you want, in the cloud or on your own servers.
Docker机器: CLI将您的Docker容器推送到您想要的位置,在云中或在您自己的服务器上。
I am the co-founder of the French company Lebrun Burel Knowledge Engineering (LBKE) — https://www.lbke.fr
我是法国Lebrun Burel知识工程(LBKE)公司的联合创始人— https://www.lbke.fr
Always happy to talk about code, machine learning, innovation and entrepreneurship!
总是很高兴谈论代码,机器学习,创新和企业家精神!
翻译自: https://www.freecodecamp.org/news/how-to-deploy-mongo-on-aws-using-docker-the-definitive-guide-for-first-timers-3738f3babd48/
docker使用mongo
相关文章:

git命令每次都要输入账号密码解决方法
QQ技术交流群 173683866 526474645 欢迎加入交流讨论,打广告的一律飞机票 1. 打开项目cmd , 打开方式 - 进入项目的文件目录,在目录中输入 cmd 2.在命令行输入命令 git config --global credential.helper store 3.在命令行输入命令 git pull 意思是创建一…
Linux C中strcpy , strncpy , strlcpy 的区别
strcpy ,strncpy ,strlcpy的用法 好多人已经知道利用strncpy替代strcpy来防止缓冲区越界。 但是如果还要考虑运行效率的话,也许strlcpy是一个更好的方式。 1. strcpy strcpy 是依据 /0 作为结束判断的,如果 to 的空间不够,则会引起 buffer ov…
入职后发现公司是外包全职_我如何通过全职工作,伴侣和3岁的双胞胎男孩打造产品...
入职后发现公司是外包全职by Courtney通过考特尼 我如何通过全职工作,伴侣和3岁的双胞胎男孩打造产品 (How I built my product with a full-time job, partner and 3 year old twin boys) If you’ve opened this article then I’ll assume that you’re either …

Java NIO中的Buffer
简介 Buffer缓冲区,首先要弄明白的是,缓冲区是怎样一个概念。它其实是缓存的一种,我们常说的缓存,包括保存在硬盘上的浏览器缓存,保存在内存中的缓存(比如Redis、memcached)。Buffer是把数据保存在内存中&a…
编写高质量代码改善C#程序的157个建议——建议86:Parallel中的异常处理
建议86:Parallel中的异常处理建议85阐述了如何处理Task中的异常。由于Task的Start方法是异步启动的,所以我们需要额外的技术来完成异常处理。Parallel相对来说就要简单很多,因为Parallel的调用者线程会等到所有的任务全部完成后,再…
VS Code – No source control providers 解决方法
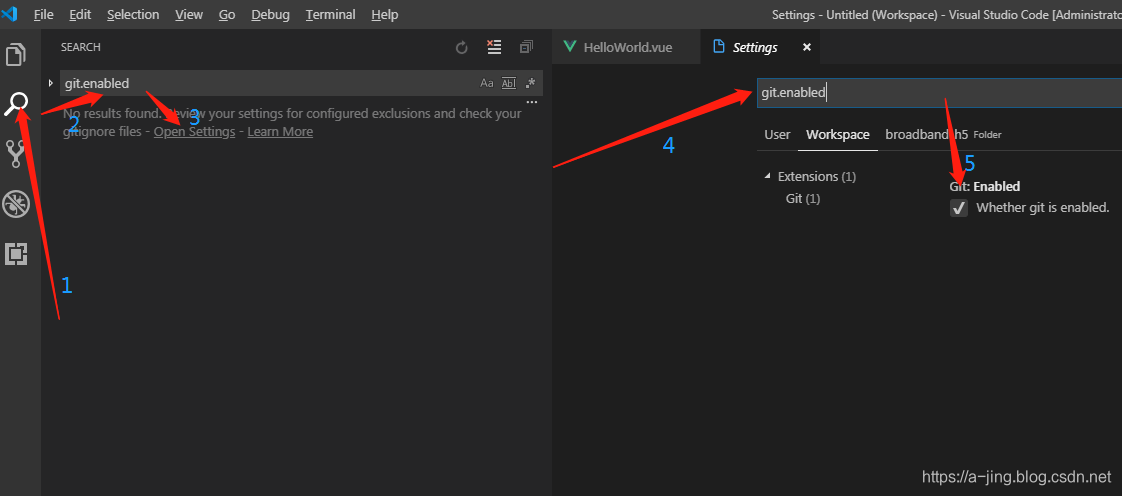
QQ技术交流群 173683866 526474645 欢迎加入交流讨论,打广告的一律飞机票 1.点击IDE左侧的搜索 2.在搜索中输入 git.enabled 3.点击Open Serrings 4.在Settings中的搜索框输入 git.enabled 5.把它下方的三个选项User Workpace broadband-h5(项目名称) 的Git en…
如何从JavaScript中的给定数字中形成最小的数字
by Prashant Yadav通过Prashant Yadav 如何从JavaScript中的给定数字中形成最小的数字 (How to form the smallest possible number from a given number in JavaScript) In this tutorial, we will implement an algorithm to form the smallest possible number with ES6.在…
微信小程序在web-view页面做分享,并且把分享的参数传递给小程序
QQ技术交流群 173683866 526474645 欢迎加入交流讨论,打广告的一律飞机票 本demo实现的功能,微信小程序给h5传参,h5给小程序传参 实现代码: <!--index.wxml --><web-view src"https://xxx.xxx.cn/test1.html?us…
洛谷—— P1118 [USACO06FEB]数字三角形Backward Digit Su…
https://www.luogu.org/problem/show?pid1118#sub 题目描述 FJ and his cows enjoy playing a mental game. They write down the numbers from 1 to N (1 < N < 10) in a certain order and then sum adjacent numbers to produce a new list with one fewer number. T…
Centos和Redhat的区别和联系
网上看到的,转载给大家 CentOS与RedHat的关系: RedHat在发行的时候,有两种方式:二进制的发行方式以及源代码的发行方式。无论是哪一种发行方式,你都可以免费获得(例如从网上下载),并…
矩阵专职_新的篇章开始了-我将以专职技术作家的身份加入RunCloud
矩阵专职If you used to submit (or read) articles on the freeCodeCamp Medium publication, there is a chance that your article may have been edited by me (or by another member of the team of volunteer editors).如果您以前曾经在freeCodeCamp Medium出版物上提交(…
转:【小作品】STM32无线WIFI视频小车制作剖析(下)
转载于:http://blog.csdn.net/u012819339/article/details/50654764 实体作品请参看优酷视频。 若以上链接点击无效请把该链接地址复制到浏览器地址栏 http://v.youku.com/v_show/id_XODYzODczNzQ4.html 说明: 该作品为arvik于2014年下半年在学校实验室做…
JS 缓存 设置临时缓存和长期缓存 sessionStorage localStorage
QQ技术交流群 173683866 526474645 欢迎加入交流讨论,打广告的一律飞机票 使用 Window sessionStorage 和 localStorage 属性 sessionStorage 用于临时保存同一窗口(或标签页)的数据,在关闭窗口或标签页之后将会删除这些数据 localStorage 缓存在浏览…
SQL中distinct的用法
在表中,可能会包含重复值。这并不成问题,不过,有时您也许希望仅仅列出不同(distinct)的值。关键词 distinct用于返回唯一不同的值。表A:示例1select distinct name from A 执行后结果如下:示例2…
brain.js 时间序列_免费的Brain JS课程学习JavaScript中的神经网络
brain.js 时间序列The last few years, machine learning has gone from a promising technology to something we’re surrounded with on a daily basis. And at the heart of many machine learning systems lies neural networks.在过去的几年中,机器学习已经从…

小白的Unity5之路(一)
Player移动: 1 public float speed 6f;2 Vector3 movement;3 Rigidbody playerRididbody;4 5 void FixedUpdate () {6 float h Input.GetAxisRaw("Horizontal");7 float v Input.GetAxisRaw("Vertical");8 Move(h, v); 9…

Splunk学习与实践
一、 Splunk公司与产品 美国Splunk公司,成立于2004年,2012年纳斯达克上市,第一家大数据上市公司,荣获众多奖项和殊荣。总部位于美国旧金山,伦敦为国际总部,香港设有亚太支持中心,上海设有海外第…
VUE v-if 和 v-for 的使用示例 VUE根据下标改变图片路径
QQ技术交流群 173683866 526474645 欢迎加入交流讨论,打广告的一律飞机票 v-if 和 v-else v-for <div class"" v-for"(item,index) in [1,1,1,1,1,1,1,1,1,1]"><img v-if"helpeds0" class"tou1" :style"{…
聊天软交互原理_来自不同城市的人们如何在freeCodeCamp聊天室中进行交互
聊天软交互原理by Dborah Mesquita由DborahMesquita 来自不同城市的人们如何在freeCodeCamp聊天室中进行交互 (How people from different cities interact in the freeCodeCamp chatrooms) 推理统计入门以及如何使用spaCy从文本中提取信息 (A primer on Inferential statisti…
使用微信的JS-SDK实现自定义分享到微信朋友圈
QQ技术交流群 173683866 526474645 欢迎加入交流讨论,打广告的一律飞机票 实现代码 <!DOCTYPE html> <html><head><meta name"viewport" content"widthdevice-width, initial-scale1.0, user-scalableno, minimum-scale1.0, …

[Unity3D]Unity3D连衣裙实现游戏开发系统
大家好,我是秦培。欢迎关注我的博客,我的博客地址blog.csdn.net/qinyuanpei。 不知从什么时候開始,国产RPG单机游戏開始出现换装,仙剑系列中第一部实现了换装的游戏是仙剑奇侠传四,后来原上海软星团队。眼下的烛龙科技…
python中nlp的库_单词袋简介以及如何在Python for NLP中对其进行编码
python中nlp的库by Praveen Dubey通过Praveen Dubey 单词词汇入门以及如何在Python中为NLP 编写代码的简介 (An introduction to Bag of Words and how to code it in Python for NLP) Bag of Words (BOW) is a method to extract features from text documents. These featur…
机器学习:计算学习理论
计算学习理论介绍 关键词: 鲁棒性 关键词: 【机器学习基础】理解为什么机器可以学习1——PAC学习模型--简书 关键词:存在必要性;从机器学习角度出发 PAC学习理论:机器学习那些事 关键词:不错的大道理 如果相…
HTML超出部分滚动效果 HTML滚动 HTML下拉 附效果图
QQ技术交流群 173683866 526474645 欢迎加入交流讨论,打广告的一律飞机票 H5 效果图 实现代码 <!DOCTYPE html> <html><head><meta charset"utf-8"><title>Bootstrap 实例 - 滚动监听(Scrollspy)…
编写高质量代码改善C#程序的157个建议——建议148:不重复代码
建议148:不重复代码 如果发现重复的代码,则意味着我们需要整顿一下,在继续前进。 重复的代码让我们的软件行为不一致。举例来说,如果存在两处相同的加密代码。结果在某一天,我们发现加密代码有个小Bug,然后…
求职者提问的问题面试官不会_如何通过三个简单的问题就不会陷入求职困境
求职者提问的问题面试官不会by DJ Chung由DJ Chung 如何通过三个简单的问题就不会陷入求职困境 (How to get un-stuck in your job search with three simple questions) 您甚至不知道为什么会被卡住? (Do you even know why you’re stuck?) Your job search can…
不能交换到解决jenkins用户的问题
su - jenkins始终有效,今centos无效,因为/etc/password在文档/bin/bash是yum当安装到/bin/false.之后可以改变。ubuntu安装包和yum安装包的行为不一致啊。版权声明:本文博主原创文章,博客,未经同意,不得转载…
HTML引用公共组件
QQ技术交流群 173683866 526474645 欢迎加入交流讨论,打广告的一律飞机票 在test.html引用footer.html 效果图 代码 test.html <!DOCTYPE html> <html><head><meta charset"utf-8"><title>引用demo</title><s…
Hadoop自学笔记(二)HDFS简单介绍
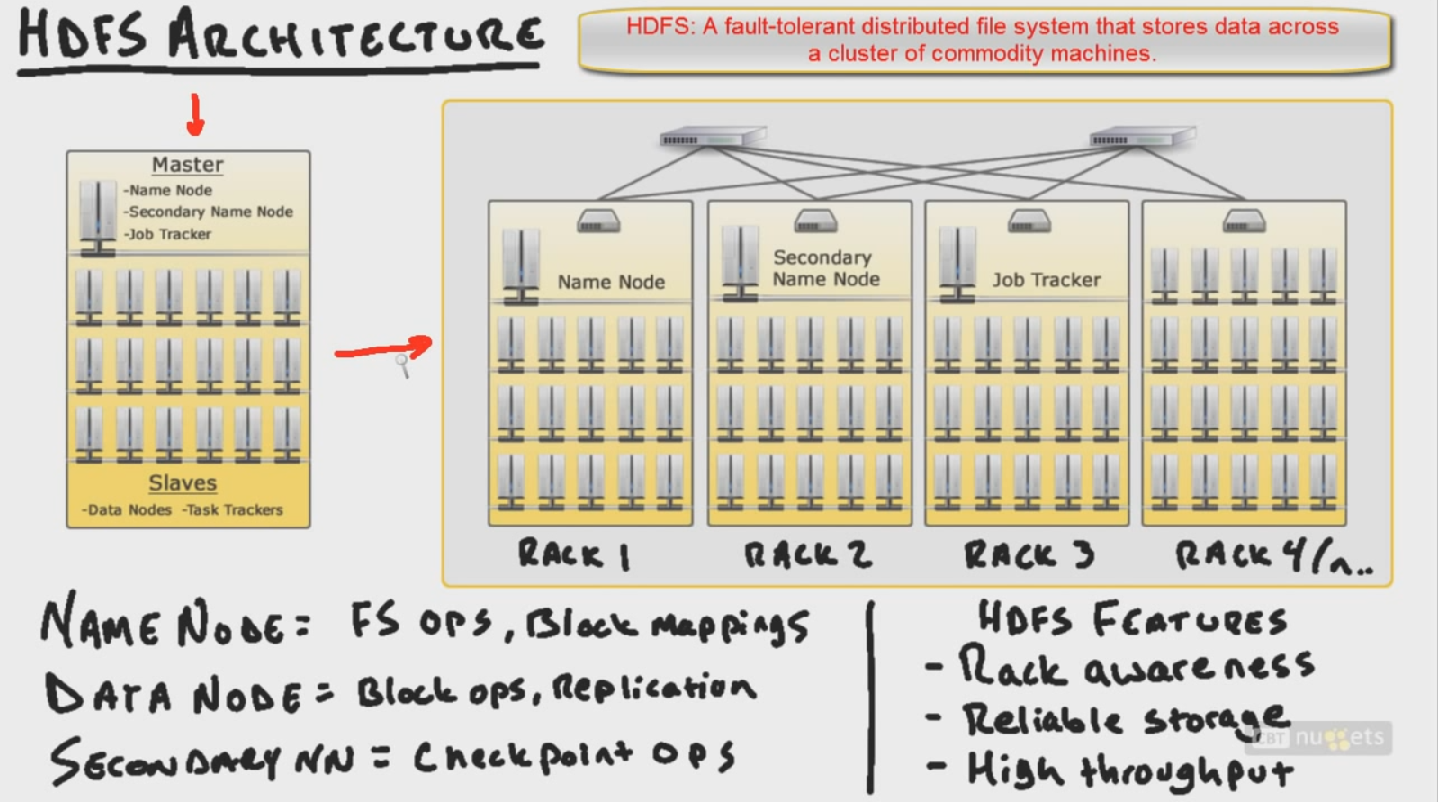
1. HDFS Architecture 一种Master-Slave结构。包括Name Node, Secondary Name Node,Data Node Job Tracker, Task Tracker。JobTrackers: 控制全部的Task Trackers 。这两个Tracker将会在MapReduce课程里面具体介绍。以下具体说明HDFS的结构及其功能。 Name Node:控制全部的Dat…
如何为Linux设置Docker和Windows子系统:爱情故事。 ?
Do you sometimes feel you’re a beautiful princess turned by an evil wizard into a frog? Like you don’t belong? I do. I’m a UNIX guy scared to leave the cozy command line. My terminal is my castle. But there are times when I’m forced to use Microsoft …