react入门代码_如何在React中构建温度控制应用程序-包括提示和入门代码
react入门代码
我们正在建立的 (What we're building)
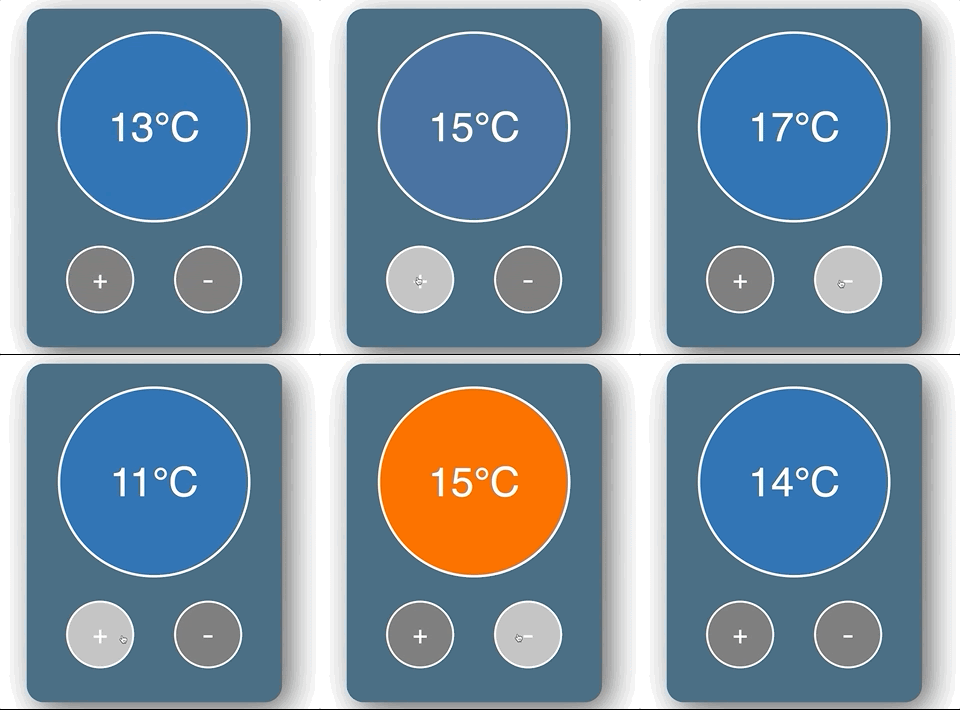
In this beginner React project, we're going to learn how to use state hooks, handle events, apply CSS based on state, and more! Check it out:
在这个初学者的React项目中,我们将学习如何使用状态挂钩,处理事件,基于状态应用CSS等等! 看看这个:

喜欢视频教程吗? (Prefer Video Tutorials?)
Check out the YouTube tutorial here.
在此处查看YouTube教程。
自己尝试 (Try it yourself)
If you want to have a go yourself first, here are the scenarios (you can also grab the CSS/starter code below):
如果您想先自己动手,请参考以下场景(您也可以在下面获取CSS /入门代码):
- When the user clicks the "increase button", the temperature should increase当用户单击“增加按钮”时,温度应增加
- The temperature cannot go above 30温度不能超过30
- When the user clicks the "decrease button", the temperature should decrease当用户单击“降低按钮”时,温度应降低
- The temperature cannot go below 0温度不能低于0
- When the temperature is 15 or above, the background color should change to red (HINT: I've included a style called "hot" you can use)当温度为15或更高时,背景色应变为红色(提示:我提供了一种可以使用的名为“热”的样式)
- When the temperature is below 15, the background color should be blue (HINT: I've included a style called "cold" you can use)当温度低于15时,背景色应为蓝色(提示:我提供了一种称为“冷”的样式,可以使用)
设置/入门代码 (Setup/Starter code)
NOTE: I'm assuming you have a React development environment setup. If not, check out this video to help you get started.
注意:我假设你有一个React开发环境设置。 如果没有, 请观看此视频以帮助您入门。
All we need to get started is to use create-react-app. Fire up a terminal and run:
我们需要开始的只是使用create-react-app 。 启动终端并运行:
npx create-react-app temperature-controlLet the terminal do its thing and open up the project in VS Code (or whatever you use).
让终端执行其操作,并以VS Code(或您使用的任何方式)打开项目。
Next, go into index.js, delete everything, and paste in the following:
接下来,进入index.js ,删除所有内容,然后粘贴以下内容:
import React from 'react';
import ReactDOM from 'react-dom';
import './index.css';
import App from './App';ReactDOM.render(<React.StrictMode><App /></React.StrictMode>,document.getElementById('root')
);
Go into index.css, delete everything, and paste in the following:
进入index.css ,删除所有内容,然后粘贴以下内容:
body {font-family: sans-serif;text-align: center;display: flex;flex-direction: column;justify-content: center;align-items: center;text-align: center;min-height: 100vh;
}.app-container {height: 400px;width: 300px;background: #2b5870;border-radius: 20px;box-shadow: 10px 10px 38px 0px rgba(0, 0, 0, 0.75);
}.temperature-display-container {display: flex;justify-content: center;align-items: center;height: 70%;
}.temperature-display {display: flex;border-radius: 50%;color: #ffffff;height: 220px;width: 220px;text-align: center;justify-content: center;align-items: center;font-size: 48px;border: 3px #ffffff solid;transition: background 0.5s;
}button {border-radius: 100px;height: 80px;width: 80px;font-size: 32px;color: #ffffff;background: rgb(105, 104, 104);border: 2px #ffffff solid;
}button:hover {background: rgb(184, 184, 184);cursor: pointer;
}button:focus {outline: 0;
}.button-container {display: flex;justify-content: space-evenly;align-items: center;
}.neutral {background: rgb(184, 184, 184);
}.cold {background: #035aa6;
}.hot {background: #ff5200;
}
Lastly, go into App.js, delete everything, and paste in the following:
最后,进入App.js ,删除所有内容,然后粘贴以下内容:
import React from 'react';const App = () => {return (<div className='app-container'><div className='temperature-display-container'><div className='temperature-display'>10°C</div></div><div className='button-container'><button>+</button><button>-</button></div></div>);
};export default App;
Now we can open a terminal in VS Code and run the following:
现在,我们可以在VS Code中打开一个终端并运行以下命令:
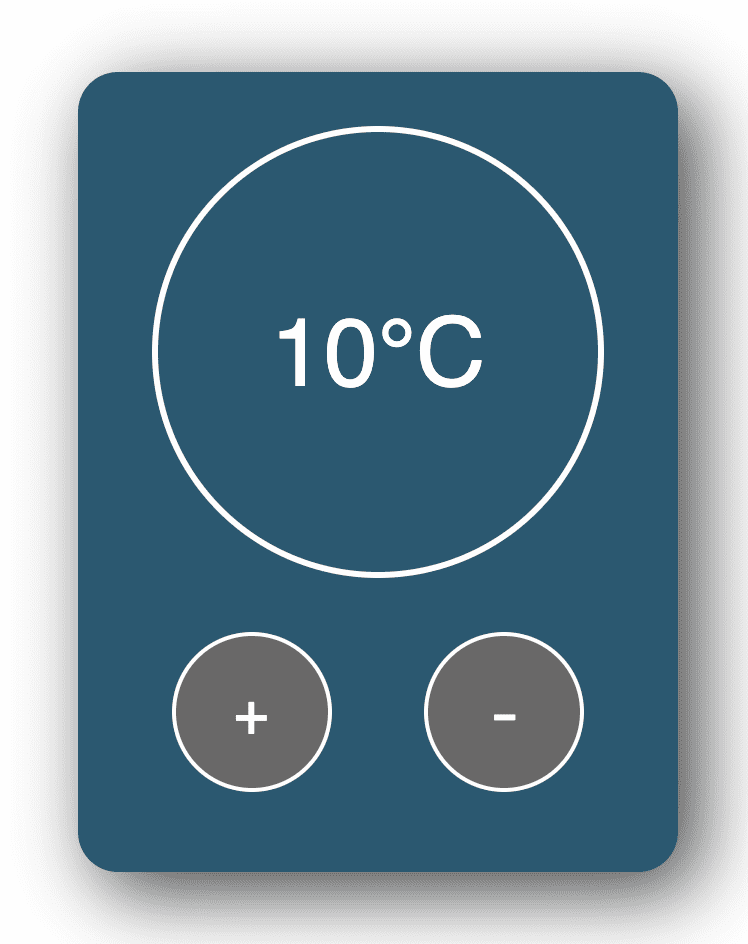
npm startIf all went as planned, you should see the following:
如果一切按计划进行,您应该看到以下内容:

Hurray! This gives us a nice template to play with, without having to worry about any CSS.
欢呼! 这为我们提供了一个不错的模板,而无需担心任何CSS。
使温度值动态化-使用状态 (Make the temperature value dynamic - using State)
The first thing we'll do is make the temperature value dynamic. To do this, we'll store the temperature value in state. This makes it easier for us to get at the value later, and perform logic using it.
我们要做的第一件事是使温度值动态变化。 为此,我们将温度值存储在state中 。 这使我们以后更容易获得该值并使用该值执行逻辑。
If something changes on your UI, it's a good idea to put it in state.
如果您的UI发生了变化,则最好将其置于状态。
In App.js import the useState hook at the top of the file like so:
在App.js中,将useState挂钩导入文件顶部,如下所示:
import React, { useState } from 'react';Then, add the following within the App function:
然后,在App函数中添加以下内容:
const [temperatureValue, setTemperatureValue] = useState(10);A quick refresher on useState - it allows us to hold data in component state. The useState hook gives us 2 things:
useState的快速更新-它使我们可以将数据保持在组件状态。 useState挂钩为我们提供了两件事:
- a variable that holds the current state value保持当前状态值的变量
- a function to change the state value.更改状态值的功能。
In this case, we've called our state variable temperatureValue and called our function setTemperatureValue. We've initialized our temperatureValue to have a value of 10, by passing the value 10 to the useState hook.
在这种情况下,我们称为状态变量temperatureValue,并称为函数setTemperatureValue 。 我们初始化我们temperatureValue有值10,由值10传递给useState钩。
Now that we have a state value, it's time to use it in our code. Remember, the stuff we get from useState can use used just like any old JavaScript variable and function (since that's what they are).
现在我们有了状态值,是时候在代码中使用它了。 请记住,我们从useState那里获得的东西可以像任何旧JavaScript变量和函数一样使用(因为它们就是它们)。
Within our JSX, we want to replace the hardcoded temperature value using our fancy new state variable. Change this line:
在我们的JSX中,我们想使用新的状态变量替换硬编码的温度值。 更改此行:
<div className='temperature-display'>10°C</div>So that it becomes this:
这样就变成了:
<div className='temperature-display'>{temperatureValue}°C</div>Notice how we've used {} to render our temperatureValue variable. Now, when our temperature value changes, the component will rerender and display the new temperature value.
注意我们如何使用{}来呈现我们的temperatureValue变量。 现在,当我们的温度值改变时,组件将重新渲染并显示新的温度值。
Our App.js file so far looks like this:
到目前为止,我们的App.js文件如下所示:
import React, { useState } from 'react';const App = () => {const [temperatureValue, setTemperatureValue] = useState(10);return (<div className='app-container'><div className='temperature-display-container'><div className='temperature-display'>{temperatureValue}°C</div></div><div className='button-container'><button>+</button><button>-</button></div></div>);
};export default App;
Now if you run the app, and look at the browser, you'll see that things look the same as before.
现在,如果您运行该应用程序,并查看浏览器,您将看到与以前相同的外观。
But if you change the initial value we pass to the useState hook from 10 to something else (e.g 15), you'll see that the app updates. This means our state hook is working!
但是,如果您将初始值从10 传递给useState挂钩 ,则将其更改为其他值(例如15),您将看到该应用程序进行了更新。 这意味着我们的状态挂钩正在工作!
单击按钮更改状态 (Changing state on button click)
Let's work on making the temperature value increase/decrease when the buttons are clicked.
单击按钮时,让我们进行温度值的增减。
As we know, the useState hook gives us a setTemperatureValue function that we can use to change the temperatureValue. So, it makes sense for us to wire this up to the button's onClick event.
众所周知,useState挂钩为我们提供了setTemperatureValue函数,可用于更改temperatureValue 。 因此,对于我们来说,将其连接到按钮的onClick事件是很有意义的。
We'll do the increase button first. Replace the increase button with the following:
我们将首先执行增加按钮。 将增加按钮替换为以下内容:
<button onClick={() => setTemperatureValue(temperatureValue + 1)}>+</button>Notice how this calls the setTemperatureValue function. We take the current temperatureValue, add 1 to it, and pass this as an argument.
注意这是如何调用setTemperatureValue函数的。 我们采用当前的temperatureValue ,将其加1并将其作为参数传递。
So since temperatureValue starts at 10, adding 1 will set the state value to be 11. When the button is clicked again, the state is set to 12, and so on.
因此,由于temperatureValue从10开始,所以加1会将状态值设置为11。再次单击该按钮时,状态将设置为12,依此类推。
Next, we'll do the same with the decrease button. Replace the current decrease button with the following:
接下来,我们将使用减少按钮进行相同操作。 将当前的减少按钮替换为以下内容:
<button onClick={() => setTemperatureValue(temperatureValue - 1)}>-</button>This is doing the same thing, except we're decreasing the temperatureValue this time.
这是在做相同的事情,除了这次我们要降低temperatureValue 。
Our code now looks like this:
现在,我们的代码如下所示:
import React, { useState } from 'react';const App = () => {const [temperatureValue, setTemperatureValue] = useState(10);return (<div className='app-container'><div className='temperature-display-container'><div className='temperature-display'>{temperatureValue}°C</div></div><div className='button-container'><button onClick={() => setTemperatureValue(temperatureValue + 1)}>+</button><button onClick={() => setTemperatureValue(temperatureValue - 1)}>-</button></div></div>);
};export default App;
Try running this in the browser and clicking the buttons. The values will increase/decrease.
尝试在浏览器中运行它,然后单击按钮。 值将增加/减少。
根据状态更改颜色 (Changing color based on state)
Now let's do some fancy stuff. We want the background color of the display to change depending on how high (or low) the temperature is.
现在,让我们做一些花哨的事情。 我们希望显示器的背景颜色根据温度的高低而变化。
If the temperature is 15 degrees or over, we want to change the background color to red. If it's under 15, we want to change the background color to blue.
如果温度为15度或以上,我们想将背景色更改为红色。 如果小于15,则要将背景颜色更改为蓝色。
If you have a look at the CSS, I've provided 2 classes:
如果您看一下CSS,我提供了2个类:
.coldwhich sets the background to blue.cold将背景设置为蓝色.hotwhich sets the background to red.hot将背景设置为红色
If we add either of these classes to the temperature display div, it changes the color. For example:
如果我们将这些类别之一添加到温度显示 div中,它将更改颜色。 例如:
<div className='temperature-display cold'>{temperatureValue}°C</div>will give the temperature display a blue background, while:
将使温度显示为蓝色背景,同时:
<div className='temperature-display hot'>{temperatureValue}°C</div>will give the temperature display a red background.
将使温度显示红色背景。
Ok, so that's nice and all, but how do we dynamically add these classes based on state?
好的,这很好,但是如何基于状态动态添加这些类?
Remember, it's generally a good idea to put the things that can change on your UI into state. So state is a perfect place to hold the current CSS class we want to use.
记住,将可更改的UI状态放入状态通常是一个好主意。 因此,state是存放我们要使用的当前CSS类的理想场所。
Let's go ahead and create another state hook to hold the temperatureColor like so:
让我们继续创建另一个状态挂钩,以保存temperatureColor,如下所示:
const [temperatureColor, setTemperatureColor] = useState('cold');Notice that we initialize our temperatureColor state object with a value of "cold" (since our temperature value is initially 10 degrees, we want the background color to be blue).
请注意,我们使用“ cold”值初始化了temperatureColor状态对象(由于我们的温度值最初为10度,因此我们希望背景颜色为蓝色)。
We can then use template literals to dynamically add the classes we want using this state variable. Go ahead and update the code with the following:
然后,我们可以使用模板文字来使用此状态变量动态添加所需的类。 继续并使用以下内容更新代码:
<div className={`temperature-display ${temperatureColor}`}>{temperatureValue}°C</div>This is a tricky syntax to understand, so don't worry if you don't understand straight away.
这是一个难以理解的语法,因此如果您不立即理解,请不要担心。
All this is doing is creating a string and dynamically applying the temperatureColor variable. Whenever the temperatureColor changes to "hot", the component will rerender and the CSS class "hot" will be added to the className string instead.
这一切都是创建一个字符串并动态应用temperatureColor变量。 每当temperatureColor更改为“ hot”时,该组件将重新呈现,并将CSS类“ hot”添加到className字符串中。
Our code so far looks like this:
到目前为止,我们的代码如下所示:
import React, { useState } from 'react';const App = () => {const [temperatureValue, setTemperatureValue] = useState(10);const [temperatureColor, setTemperatureColor] = useState('cold');return (<div className='app-container'><div className='temperature-display-container'><div className={`temperature-display ${temperatureColor}`}>{temperatureValue}°C</div></div><div className='button-container'><button onClick={() => setTemperatureValue(temperatureValue + 1)}>+</button><button onClick={() => setTemperatureValue(temperatureValue - 1)}>-</button></div></div>);
};export default App;
Change the initial temperatureColor state variable to "hot" / "cold" and the background of the temperature display should change.
将初始colorColor状态变量更改为“ hot” /“ cold”,并且温度显示的背景应更改。
Now that we know this is working, all we have to do is change the state variable. But where do we do this?
现在我们知道这是可行的,我们要做的就是更改状态变量。 但是我们在哪里做呢?
Well, we already have an onClick handler that changes the temperatureValue, so it makes sense to add our new logic to this handler.
好了,我们已经有了一个可以更改temperatureValue的onClick处理程序 ,因此将新逻辑添加到该处理程序是有意义的。
Up until now, we've been using an inline function for our click event handlers. And using inline functions is good when we have a one-line function.
到目前为止,我们一直在为点击事件处理程序使用内联函数 。 当我们具有单行函数时,使用内联函数会很好。
But when we have a multi-line function with a bunch of logic, it's best to move the function outside the JSX. This makes our code a bit cleaner.
但是,当我们具有包含逻辑的多行函数时,最好将函数移到JSX之外。 这使我们的代码更加简洁。
Go ahead and paste the following just below all the state stuff:
继续,将以下内容粘贴在所有州以下:
const increaseTemperature = () => {setTemperatureValue(temperatureValue + 1);
};const decreaseTemperature = () => {setTemperatureValue(temperatureValue - 1);
};
Here we're defining 2 functions - one that increases the temperature and another that decreases the temperature.
在这里,我们定义了2个功能-一个增加温度,另一个降低温度。
Next, we want to change our button's onClick properties to call these functions instead of the inline functions we had previously:
接下来,我们要更改按钮的onClick属性以调用这些函数,而不是以前的内联函数:
<button onClick={increaseTemperature}>+</button><button onClick={decreaseTemperature}>-</button>Now, instead of using an inline function, we are passing a reference to our increaseTemperature and decreaseTemperature functions. Our code so far looks like this:
现在,我们不再使用内联函数,而是将引用传递给我们的gainTemperature和reduceTemperature函数。 到目前为止,我们的代码如下所示:
import React, { useState } from 'react';const App = () => {const [temperatureValue, setTemperatureValue] = useState(10);const [temperatureColor, setTemperatureColor] = useState('cold');const increaseTemperature = () => {setTemperatureValue(temperatureValue + 1);};const decreaseTemperature = () => {setTemperatureValue(temperatureValue - 1);};return (<div className='app-container'><div className='temperature-display-container'><div className={`temperature-display ${temperatureColor}`}>{temperatureValue}°C</div></div><div className='button-container'><button onClick={increaseTemperature}>+</button><button onClick={decreaseTemperature}>-</button></div></div>);
};export default App;
Notice how nothing has changed just yet – we are just refactoring our code and getting ready for upcoming changes.
请注意,到目前为止还没有什么变化–我们只是重构代码 ,为即将发生的变化做好准备。
Now it is much easier to add code logic for either of the button click events - we just write our logic in the appropriate function and life is good.
现在,为两个按钮单击事件中的任何一个添加代码逻辑都变得更加容易-我们只需在适当的函数中编写逻辑即可,使用寿命长。
OK! With refactoring fun out of the way, let's get back to business. So we've said that When the temperature is 15 degrees or over, we want to change the temperatureColor state value.
好! 借助重构乐趣,让我们重新开始业务。 因此,我们说过, 当温度为15度或更高时,我们想更改temperatureColor状态值 。
We can add this logic to our increaseTemperature function like so:
我们可以像这样将逻辑添加到我们的gainTemperature函数中:
const increaseTemperature = () => {const newTemperature = temperatureValue + 1;setTemperatureValue(newTemperature);if (newTemperature >= 15) {setTemperatureColor('hot');}
};
What have we done?
我们做了什么?
We've created a variable to hold the newTemperature value (we did this since we'll be using this variable in a few places)
我们创建了一个变量来保存newTemperature值(我们这样做是因为我们将在几个地方使用此变量)
We set the temperatureValue, as we did before
我们像以前一样设置temperatureValue
We wrote an if statement to check if the newTemperature value is more than or equal to, 15
我们编写了一个if语句来检查newTemperature值是否大于或等于15
If yes, then we use the setTemperatureColor function to set to the temperatureColor state value to be "hot"
如果是的话,那么我们使用setTemperatureColor功能集于temperatureColor状态值是“热”
So whenever we click the button enough times that the temperatureValue is more than or equal to above 15, the temperatureColor variable changes, the component rerenders, and the "hot" class gets added to the temperature display like witchcraft.
因此,只要我们单击按钮足够多的时间,使temperatureValue大于或等于15, 温度 color变量就会更改,组件会重新渲染,并且“热”类会像巫术一样添加到温度显示中。
But wait! We haven't handled the decrease yet. Which is basically similar to the increase function:
可是等等! 我们尚未处理下降的情况。 基本上类似于增加功能:
const decreaseTemperature = () => {const newTemperature = temperatureValue - 1;setTemperatureValue(newTemperature);if (newTemperature < 15) {setTemperatureColor('cold');}
};
This time we subtract one and check if the new value is below 15 before changing the temperature color
这次我们减去一并在更改温度颜色之前检查新值是否低于15
Our final app code looks like this:
我们最终的应用程序代码如下所示:
import React, { useState } from 'react';const App = () => {const [temperatureValue, setTemperatureValue] = useState(10);const [temperatureColor, setTemperatureColor] = useState('cold');const increaseTemperature = () => {const newTemperature = temperatureValue + 1;setTemperatureValue(newTemperature);if (newTemperature >= 15) {setTemperatureColor('hot');}};const decreaseTemperature = () => {const newTemperature = temperatureValue - 1;setTemperatureValue(newTemperature);if (newTemperature < 15) {setTemperatureColor('cold');}};return (<div className='app-container'><div className='temperature-display-container'><div className={`temperature-display ${temperatureColor}`}>{temperatureValue}°C</div></div><div className='button-container'><button onClick={increaseTemperature}>+</button><button onClick={decreaseTemperature}>-</button></div></div>);
};export default App;
Run the app and everything should work - hurray!
运行该应用程序,一切正常-欢呼!
尝试的挑战 (A challenge to try)
You may have noticed that our temperature control isn't very safe - the user can increase the temperature until they reach 100°C, boiling themselves into oblivion, or decrease the temperature until they reach -100°C, turning themselves into a massive ice cube.
您可能已经注意到我们的温度控制不是很安全-用户可以升高温度直至达到100°C,使其沸腾,或者降低温度直至达到-100°C,从而使自身变成巨大的冰块立方体。
The challenge, should you choose to accept it, is to prevent the temperature value from going over 30°C, and prevent it from going under 30°C.
您应该选择接受的挑战是防止温度值超过30°C ,并防止温度低于30°C 。
HINT: The increaseTemperature and decreaseTemperature functions are perfect places to add this logic!
提示: 增加温度和减少温度功能是添加此逻辑的理想之地!
翻译自: https://www.freecodecamp.org/news/react-beginner-project-tutorial-temperature-control-app/
react入门代码
相关文章:

决策树(chap3)Machine Learning In Action学习笔记
优点:计算复杂度不高,输出结果易于理解,对中间值的缺失不敏感,可以处理不相关特征数据。缺点:可能会产生过度匹配问题。适用数据类型:数值型(必须离散化)和标称型。决策树创建分支的…

BigdCIMAL类型数据的使用选择
现在常用的数值类型有Integer , Double , Float , BigDecimal几种 , 常用的当然要数前两种 了 , Integer代表的是整数类型的数据 , double则是代表的是浮点型 , 双精度 ,double的计算精度相对于float来讲要 高 , BigDecimal的计算精度则是最高的 . 可是BigDecimal的一些计算方…

数字字符串转化为时间字符串
(NSString *)dateStringFromNumberTimer:(NSString *)timerStr {//转化为Doubledouble t [timerStr doubleValue];//计算出距离1970的NSDateNSDate *date [NSDate dateWithTimeIntervalSince1970:t];//转化为 时间格式化字符串NSDateFormatter *df [[NSDateFormatter alloc]…

git 覆盖本地修改_Git拉力–如何使用Git覆盖本地更改
git 覆盖本地修改When you learn to code, sooner or later youll also learn about Version Control Systems. And while there are many competing tools in this space, one of them is the de facto standard used by almost everyone in the industry. Its so popular tha…

云计算大会记录
一、要点及主要技术内容记录消费金融刘志军 马上消费大额 分散 小额 短期OpenStack OpenStack是一个由NASA(美国国家航空航天局)和Rackspace合作研发并发起的,以Apache许可证授权的自由软件和开放源代码项目。 OpenStack是一个开源的云计算管…

获取iOS版本号
(double)getCurrentIOS {return [[[UIDevice currentDevice] systemVersion] doubleValue];}

spring boot 服务 正确关闭方式
引言 Spring Boot,作为Spring框架对“约定优先于配置(Convention Over Configuration)”理念的最佳实践的产物,它能帮助我们很快捷的创建出独立运行、产品级别的基于Spring框架的应用,大部分Spring Boot应用只需要非常少的配置就可以快速运行…

如何在5美元的Raspberry Pi上构建个人开发服务器
In this article, youll learn how to build a personal dev server by installing Git, Node.js, Rust, and Docker on a Raspberry Pi. The cheapest option costs just $5. You can get a starter kit ($25) for free here.在本文中,您将学习如何通过在Raspberry…

Eclipse:xml文件中添加.xsd约束文件
今天在使用dubbo的时候,XML文件一直报错。找不到dubbo的xsd约束文件。 cvc-complex-type.2.4.c: The matching wildcard is strict, but no declaration can be found for element dubbo:reference 解决方法: 找到dubbo的jar包,然后在META-…

029 浏览器不能访问虚拟机的问题解决
1.在搭建分布式时 ssh一直不能进行scp,后来发现一个问题。 windows中的hosts配置了三台虚拟机的映射,但是在虚拟机中的hosts没有配置。 做法是在每台虚拟机上都配置三台虚拟机的映射。 2.端口访问与防火墙 最近帮别人解决问题时才注意的。 以前安装好虚拟…

获取 一个文件 在沙盒Library/Caches/ 目录下的路径
(NSString *)getFullPathWithFile:(NSString *)urlName {//先获取 沙盒中的Library/Caches/路径NSString *docPath [NSSearchPathForDirectoriesInDomains(NSCachesDirectory, NSUserDomainMask, YES) lastObject];NSString *myCacheDirectory [docPath stringByAppendingPat…

如何有效使用每一点脑力总结_如何更有效地节省脑力和编码
如何有效使用每一点脑力总结如果您知道这些工具的存在,那么您现在可能会使用它们。 (If you knew these tools existed, youd probably be using them by now.) This article isn’t going to tell you about saving your neck with a Roost stand, or your wrists …

C语言程序设计50例(一)(经典收藏)
【程序1】题目:有1、2、3、4个数字,能组成多少个互不相同且无重复数字的三位数?都是多少?1.程序分析:可填在百位、十位、个位的数字都是1、2、3、4。组成所有的排列后再去 掉不满足条件的排列。 1 #include…

python多线程执行类中的静态方法
在python 中如果通过多线程的方式执行某个方法很简单,只需要把同步函数的第一个参数为该函数对象即可。但是如果函数对象是某个类的静态方法,这时候如果直接使用类的该函数对象会报错。此时需要构造一个代理的方法来实现。 如:上一个博文中的…

检测缓存文件是否超时
(BOOL)isTimeOutWithFile:(NSString *)filePath timeOut:(double)timeOut {//获取文件的属性NSDictionary *fileDict [[NSFileManager defaultManager] attributesOfItemAtPath:filePath error:nil];//获取文件的上次的修改时间NSDate *lastModfyDate fileDict.fileModificat…

JavaScript创建对象–如何在JS中定义对象
Objects are the main unit of encapsulation in Object-Oriented Programming. In this article, I will describe several ways to build objects in JavaScript. They are:对象是面向对象编程中封装的主要单元。 在本文中,我将介绍几种使用JavaScript构建对象的方…

MyBatis中#{}和${}的区别
------------------------siwuxie095 MyBatis 中 #{} 和 ${} 的区别 1、在 MyBatis 的映射配置文件中,动态传递参数有两种方式: (1)#{} 占位符 (2)${} 拼接符 2、#{} 和 ${} 的区别 (1ÿ…

十进制字符串转十六进制字符串
NSString *colorStr[self.model.sclass_color substringFromIndex:1]; unsigned long cor strtoul([colorStr UTF8String],0,16);

gi克隆github文件_如何构建GitHub文件搜索功能的克隆
gi克隆github文件In this article, we will build a project that mimics the lesser known but awesome file search functionality provided by GitHub.在本文中,我们将构建一个项目,该项目模仿GitHub提供的鲜为人知但功能强大的文件搜索功能。 To se…

ipython --pandas
d定义: pandas是一个强大的Python数据分析的工具包。 pandas是基于NumPy构建的。 安装方法: pip install pandas import pandas as pd pandas的主要功能 具备对其功能的数据结构DataFrame、Series 集成时间序列功能 提供丰富的数学运算和操作 灵活处理缺失数据 Series 定义:Ser…

玩转Android之二维码生成与识别
二维码,我们也称作QRCode,QR表示quick response即快速响应,在很多App中我们都能见到二维码的身影,最常见的莫过于微信了。那么今天我们就来看看怎么样在我们自己的App中集成二维码的扫描与生成功能。OK,废话不多说&…

属性字符串(富文本)的使用
改变字符串中某些字符串字体的颜色 NSMutableAttributedString *attrStr[[NSMutableAttributedString alloc] initWithString:str]; [attrStr addAttribute:NSForegroundColorAttributeName value:kUIColorFromRGB(0xb2151c) range:[str rangeOfString:[NSString stringWith…

如何使用create-react-app在本地设置HTTPS
Running HTTPS in development is helpful when you need to consume an API that is also serving requests via HTTPS. 当您需要使用同时通过HTTPS服务请求的API时,在开发中运行HTTPS会很有帮助。 In this article, we will be setting up HTTPS in development …

Swift强制解析
IDE:Xcode Version7.3.1 Swift中"数据类型?"表示这是可选类型,即 某个常量或者变量可能是一个类型,也可能什么都没有,不确定它是否有值,也许会是nil。 比如: let num1 “123” let num2 Int(number1) pri…

rfc6455 WebSockets
https://tools.ietf.org/html/rfc6455 转载于:https://www.cnblogs.com/cheungxiongwei/p/8385719.html

2020-mb面试指南_2020年最佳代码面试准备平台
2020-mb面试指南Software developer interviews are rapidly evolving. Years ago, mastering data structures and common algorithms was enough to ace an interview and get a job. Today though, employers want candidates with real-world experience and skills. 软件开…

设计模式学习笔记(一)之工厂模式、单例模式
一、工厂模式 (1)简单工厂模式: 1 public interface IProduct { 2 3 public void saleProduct(); 4 5 } 创建一个产品接口,有一个卖产品的方法。 1 public class ProductA implements IProduct{ 2 3 public void saleProduct(){ 4 Sy…

iOS使用支付宝支付步骤
开发平台 (http://open.alipay.com/index.htm(这个里面找不到sdk) 需要进入下面的链接) 使用支付宝进行一个完整的支付功能,大致有以下步骤: 1>先与支付宝签约,获得商户ID(partner)和账号ID(…

heroku_了解如何使用Heroku部署全栈Web应用程序
herokuBuilding a full stack web app is no mean feat. Learning to deploy one to production so that you can share it with the world can add an additional layer of complexity.构建全栈式Web应用程序绝非易事。 学习将其部署到生产环境中,以便您可以与世界…

SpringMVC学习手册(三)------EL和JSTL(上)
1.含义 EL: Expression Language , 表达式语言JSTL: Java Server Pages Standard Tag Library, JSP标准标签库 2.测试项目构建 2.1 复制JSTL的标准实现 复制Tomcat中webapps\examples\WEB-INF\lib下的两个jar包到新建项目目录的WEB-INF\lib下2.2 在JSP文件中使用tagli…
