OpenCV提取轮廓(去掉面积小的轮廓)
转自:http://www.kaixuela.net/?p=23
#include <stdio.h>
#include "cv.h"
#include "cxcore.h"
#include "highgui.h"
#include <iostream>
using namespace std;
#pragma comment(lib,"cv.lib")
#pragma comment(lib,"cxcore.lib")
#pragma comment(lib,"highgui.lib")
struct Position
{
int x,y;
};
double per[256];// 保存灰度概率
IplImage *FindCountours(IplImage* src,IplImage *pContourImg);
int ImageStretchByHistogram(IplImage *src,IplImage *dst);
IplImage* Hist_Equalization(IplImage *srcimg);
void proBorder(IplImage *src); // 边界的处理
void GetBackImage(IplImage* src,IplImage* src_back);
void Threshold(IplImage *src);
int GetThreshold(double *const prob);
void Getprobability(IplImage *src);
double Eccentricity(IplImage *src);
void main()
{
//IplImage * src = cvLoadImage("C:\\image19\\A634.jpg",-1);//灰度图的方式载入
IplImage * src = cvLoadImage("C:\\image19\\A857.jpg",-1);
IplImage * dst = cvCreateImage(cvGetSize(src),IPL_DEPTH_8U,3);
IplImage *src_back = cvCreateImage(cvGetSize(src),IPL_DEPTH_8U,src->nChannels);
GetBackImage(src,src_back);
dst = FindCountours(src_back,dst);
cvNamedWindow("test",CV_WINDOW_AUTOSIZE);
cvShowImage("test",dst);
cvWaitKey(0);
cvReleaseImage(&src);
cvReleaseImage(&dst);
}
void GetBackImage(IplImage* src,IplImage* src_back)
{
//cvCvtColor(src,src,CV_RGB2GRAY);//灰度化
IplImage *tmp = cvCreateImage(cvGetSize(src),IPL_DEPTH_8U,3);
// 创建结构元素
IplConvKernel *element = cvCreateStructuringElementEx( 2, 2, 0, 0, CV_SHAPE_ELLIPSE,0);
//用该结构对源图象进行数学形态学的开操作后,估计背景亮度
cvErode(src,tmp,element,9);
//使用任意结构元素腐蚀图像
cvDilate(tmp,src_back, element,9);
//使用任意结构元素膨胀图像
}
IplImage *FindCountours(IplImage* src,IplImage *pContourImg)
{
CvMemStorage *storage = cvCreateMemStorage(0); //提取轮廓需要的储存容量为默认KB
CvSeq * pcontour = 0; //提取轮廓的序列指针
IplImage *temp = cvCreateImage(cvGetSize(src),src->depth,1);
//cvSmooth(src,temp,CV_GAUSSIAN,3,1,0);
cvSmooth(src,src,CV_GAUSSIAN,3,1,0);//平滑处理
cvCvtColor(src,temp,CV_RGB2GRAY);//灰度化
Getprobability(temp);
printf("最好的阈值:%d\n",GetThreshold(per));
//Threshold(temp);
proBorder(temp);
cvThreshold(temp,temp,GetThreshold(per),255,CV_THRESH_BINARY_INV);
int contoursNum = 0; // 轮廓数量
//int mode = CV_RETR_LIST;
int mode = CV_RETR_EXTERNAL;// 提取最外层轮廓
contoursNum = cvFindContours(temp,storage,&pcontour,sizeof(CvContour),mode,CV_CHAIN_APPROX_NONE);
// contoursNum = cvFindContours(temp,storage,&pcontour,sizeof(CvContour),CV_RETR_LIST,CV_CHAIN_APPROX_SIMPLE,cvPoint(0,0));
//二值图, 得到轮廓存储,轮廓指针序列,header_size,提取模式,逼近方法
CvScalar externalColor;// 保存颜色值
CvScalar holeColor;
//————–画轮廓—————-//
for (; pcontour != 0; pcontour=pcontour -> h_next)
{
//holeColor=CV_RGB(rand()&255,rand()&255,rand()&255);
//externalColor=CV_RGB(rand()&255,rand()&255,rand()&255);
CvRect r = ((CvContour *)pcontour)->rect;
if(r.height * r.width < 800)
{
holeColor=CV_RGB(0,0,0);
externalColor=CV_RGB(0,0,0);
cvDrawContours(pContourImg,pcontour,externalColor,holeColor,1,1,8);
}
else
{
//取得轮廓面积
double contArea = fabs(cvContourArea(pcontour,CV_WHOLE_SEQ));
//取得轮廓长度
double contLenth = cvArcLength(pcontour,CV_WHOLE_SEQ,-1);
// 圆形度
double contcircularity = contLenth * contLenth / contArea;
double pxl =Eccentricity(temp);
cout<<"面积为:"<<contArea<<endl;
cout<<"周长为:"<<contLenth<<endl;
cout<<"圆形度为:"<<contcircularity<<endl;
holeColor=CV_RGB(255,255,255);
externalColor=CV_RGB(255,255,255);
cvDrawContours(pContourImg,pcontour,externalColor,holeColor,1,1,8);
}
}
//IplConvKernel *element = cvCreateStructuringElementEx( 2, 2, 0, 0, CV_SHAPE_ELLIPSE,0);
//cvDilate(pContourImg,pContourImg, element,9);
return pContourImg;
}
double Eccentricity(IplImage *src)//偏心率
{
Position pos[4];
int width = src->width;
int height = src->height;
int i,j;
for(i = 0; i < height; i++)
{
for(j = 0; j < width; j++)
{
int pixel = (int)cvGet2D(src,i,j).val[0];
if(pixel != 0)
{
pos[0].x = j;
pos[0].y = i;//
goto s;
}
}
}
s:
for(i = height – 1; i >= 0; i–)
{
for(j = 0; j < width ; j++)
{
int pixel = (int)cvGet2D(src,i,j).val[0];
if(pixel != 0)
{
pos[1].x = j;
pos[1].y = i;//
goto w;
}
}
}
w:
for(i = 0 ; i < width ; i++)
{
for(j = 0;j < height; j++)
{
int pixel = (int)cvGet2D(src,j,i).val[0];
if(pixel != 0)
{
pos[2].x = j;//
pos[2].y = i;
goto e;
}
}
}
e:
for(i = width – 1; i >= 0; i–)
{
for(j = 0 ; j < height ; j++)
{
int pixel = (int)cvGet2D(src,j,i).val[0];
if(pixel != 0)
{
pos[3].x = j;//
pos[3].y = i;
goto f;
}
}
}
f:
int l_dis = abs(pos[0].y – pos[1].y);
int s_dis = abs(pos[2].x – pos[3].x);
int tmp_dis;
if(l_dis > s_dis)
{
printf("偏心率:%f\n",l_dis*1.0/s_dis);
}
else
{
tmp_dis = l_dis;
l_dis = s_dis;
s_dis = tmp_dis;
printf("偏心率:%f\n",l_dis*1.0/s_dis);
}
return 0;
}
void Getprobability(IplImage *src)
{
memset(per,0,sizeof(per));
int width = src->width;
int height = src->height;
for(int i = 0; i < height; i++) {
for(int j = 0; j < width; j++) {
per[(int)cvGet2D(src,i,j).val[0]]++;
}
}
int PixlNum = width * height;
for(i = 0; i < 256; i++)
per[i] = per[i] / PixlNum;
}
int GetThreshold(double *const prob)
{
int threshold = 0;
double maxf = 0;
for (int crrctThrshld = 1; crrctThrshld < 256 – 1; ++crrctThrshld) {
double W0 = 0, W1 = 0, U0 = 0, U1 = 0;
int i = 0;
for (i = 0; i <= crrctThrshld; ++i) {
U0 += i * prob[i];
W0 += prob[i];
}
for (; i < 256; ++i) {
U1 += i * prob[i];
W1 += prob[i];
}
if (W1 == 0 || W1 == 0)
continue;
U0 /= W0;
U1 /= W1;
double D0 = 0, D1= 0;
for (i = 0; i <= crrctThrshld; ++i)
D0 += pow((i – U0) * prob[i], 2.0);
for (; i < 256; ++i)
D1 += pow((i – U1) * prob[i], 2.0);
D0 /= W0;
D1 /= W1;
double Dw = pow(D0, 2.0) * W0 + pow(D1, 2.0) * W1;
double Db = W0 * W1 * pow((U1 – U0), 2.0);
double f = Db / (Db + Dw);
if (maxf < f) {
maxf = f;
threshold = crrctThrshld;
}
}
return threshold;
}
void proBorder(IplImage *src) // 边界的处理
{
int i,j;
int height = src->height;
int width = src->width;
int N = 100;
for(i = 0; i < N * width; i += width) // i表示向下走左上角
{
for(j = 0; j < N ; j++)
{
int index = i + j;
src->imageData[index] = (char)255;
}
}
int NN = 150;
int sw = width * (height – NN);// 左下角 三角形
int t = 1;
for(i = sw; i < sw + NN * width; i += width,t++)
{
for(j = 0; j < t; j++)
{
int index = i + j;
src->imageData[index] = (char)255;
}
}
int se = (height – NN – 1) * width; // 右下角
t = 0;
for(i = se; i < width * height ; i += width,t++)
{
for(j = 0; j < t; j++)
{
int index = i + j – t;
src->imageData[index] = (char)255;
}
}
int ne = width – NN; // 右上角 三角形剪切
t = 0;
for(i = ne; i < NN * width; i +=width,t++)
{
for(j = 0; j < NN – t; j++)
{
int index = i + j + t;
src->imageData[index] = (char)255;
}
}
}
void Threshold(IplImage *src)
{
int width = src->width;
int height = src->height;
float minpixel = cvGet2D(src,0,0).val[0];
float maxpixel = cvGet2D(src,0,0).val[0];
CvScalar s;
for(int i = 0; i < height; i++){
for(int j = 0; j < width; j++){
s = cvGet2D(src,i,j);
if(s.val[0] > maxpixel)
maxpixel = s.val[0];
if(s.val[0] < minpixel)
minpixel = s.val[0];
}
}
float firstgrey = (maxpixel + minpixel) / 2;
printf("%f\n",firstgrey);
float lastgrey;
float sum1 = 0,sum2 = 0;
int num1 = 0,num2 = 0;
int result = 0;
while(1)
{
result ++;
for(i = 0; i < height; i++){
for(int j = 0; j < width; j++){
s = cvGet2D(src,i,j);
if(s.val[0] < firstgrey)
{
sum1 += s.val[0];
num1++;
}
if(s.val[0] < firstgrey)
{
sum2 += s.val[0];
num2++;
}
}
}
lastgrey = (sum1/num1 + sum2/num2)/2;
if((int)lastgrey == (int)firstgrey)
break;
else
{
firstgrey = lastgrey;
sum1 = sum2 = 0;
num1 = num2 = 0;
}
}
lastgrey = (sum1/num1 + sum2/num2)/2;
printf("%f %d\n",firstgrey,result);
}
相关文章:
软工作业 5:词频统计——增强功能
一、基本信息 1.1 编译环境、项目名称、作者 1 #编译环境:python3.6 2 #项目名称:软工作业5-词频统计—增强功能 3 #作者:1613072055 潘博 4 # 1613072056 侯磊 1.2项目地址 本次作业地址: https://www.cnblogs.com/panboo/项目git地址: https://g…

Linux之文件权限管理
chmod ux转载于:https://www.cnblogs.com/chaoren399/archive/2013/03/11/2953727.html

如果三十年前有这些AI技术,可可西里的悲剧不会发生
作者 | 神经小姐姐来源 | HyperAI超神经(ID:HyperAI)而被盗猎者大量的非法捕杀。多种野生动物都处于濒临灭绝的局面,人工智能等技术,能够在帮助保护野生动物上,发挥比较大的作用,让我们能够生存…
Percona-Server-5.5.30安装
1、安装系统环境 yum install -y gcc gcc-c autoconf automake zlib* libxml* ncurses-devel libmcrypt* libtool-ltdl-devel* cmake bison 2、下载源码包 1 http://www.percona.com/downloads/ 2 3 wget -c http://www.percona.com/redir/downloads/Percona-Server-5.5/Perc…
OpenCV中SVM的使用
转自:http://download.csdn.net/download/gaogaogao124/3125857 略有改动: #include"stdafx.h" #include<opencv2/opencv.hpp> #include<cmath> #include<ctime> using namespace std; int _tmain(int argc,_TCHAR…
数据不够,用GAN来凑!
作者 | CV君来源 | 我爱计算机视觉(ID:aicvml)在计算机视觉领域,深度学习方法已全方位在各个方向获得突破,这从近几年CVPR 的论文即可看出。但这往往需要大量的标注数据,比如最著明的ImageNet数据集&#x…

MySQL的登陆错误:ERROR 1049 (42000): Unknown database 'root'
刚刚装上数据库的时候,直接按照这个格式就登陆上去了,突然莫名其妙登陆不上去了 但是现在突然死活登陆不上去了 于是拿着这个报错信息在网上找啊找,终于找了了错误的原因 -p和密码是连在一起的,赶紧一试,果然可以登陆&…

分布式缓存系统Memcached简介与实践
缘起: 在数据驱动的web开发中,经常要重复从数据库中取出相同的数据,这种重复极大的增加了数据库负载。缓存是解决这个问题的好办法。但是ASP.NET中的虽然已经可以实现对页面局部进行缓存,但还是不够灵活。此时Memcached或许是你想要的。Memca…
Windows7 libsvm库中grid.py的使用步骤
1、从http://www.csie.ntu.edu.tw/~cjlin/libsvm/下载最新的libsvm-3.12库(libsvm-3.12.tar.gz或libsvm-3.12.zip),将其放到F:\libsvm文件夹下解压缩,生成一个libsvm-3.12文件夹; 2、从http://www.gnuplot.info/下载最新的gnuplot即gp460-wi…
基于GEMM实现的CNN底层算法被改?Google提出全新间接卷积算法
作者 | Marat Dukhan from Google Research译者 | 凯隐责编 | Jane出品 | AI科技大本营(ID: rgznai100)【导读】本文介绍的内容主要聚焦Google 的一项最新工作:改变基于 GEMM 实现的 CNN底层算法提出的新方法。通用矩阵乘法(Gener…
共享内存跨进程通信
通过共享内存通信是最快的,不过既然是共享资源,那么就必须要有同步机制。 创建共享内存有两种方式shm和mmap的方式。 mmap是在磁盘上建立一个文件,每个进程地址空间中开辟出一块空间进行映射。而对于shm而言,shm每个进程最终会映射…

扶稳!四大步“上手”超参数调优教程,就等你出马了 | 附完整代码
作者 | Matthew Stewart译者 | Monanfei责编 | Jane出品 | AI科技大本营(ID: rgznai100)【导读】在本文中,我们将为大家介绍如何对神经网络的超参数进行优化调整,以便在 Beale 函数上获得更高性能,Beale 函数是评价优化…
读好书,写好程序
本人是做.NET开发的,以企业应用为主,以互联网为爱好,这里给大家推荐一些适合.NET程序员的书: 软件设计《企业应用架构模式》 Martin Fowler 的大作之一,总结了多种常见的企业应用架构模式,这些模式是脱离具…
SIFT特征点匹配中KD-tree与Ransac算法的使用
转自:http://blog.csdn.net/ijuliet/article/details/4471311 Step1:BBF算法,在KD-tree上找KNN。第一步做匹配咯~ 1.什么是KD-tree(fromwiki) K-Dimension tree,实际上是一棵平衡二叉树。 一般的KD-tree构造过程&a…

jQuery带缩略图的宽屏焦点图插件
在线演示 本地下载

追溯XLNet的前世今生:从Transformer到XLNet
作者丨李格映来源 | 转载自CSDN博客导读:2019 年 6 月,CMU 与谷歌大脑提出全新 XLNet,基于 BERT 的优缺点,XLNet 提出一种泛化自回归预训练方法,在 20 个任务上超过了 BERT 的表现,并在 18 个任务上取得了当…
微软MCITP系列课程
http://liushuo890.blog.51cto.com/5167996/d-1转载于:https://blog.51cto.com/showcart/1156172
在Ubuntu11.10中安装配置OpenCV2.3.1和CodeBlocks
1、 打开终端; 2、 执行指令,删除ffmpeg and x264旧版本:sudo apt-get removeffmpeg x264 libx264-dev 3、下载安装x264和ffmpeg所有的依赖:sudo apt-get update sudo apt-get installbuild-essential checkinstall git cmake…
深入浅出Rust Future - Part 1
本文译自Rust futures: an uneducated, short and hopefully not boring tutorial - Part 1,时间:2018-12-02,译者:motecshine, 简介:motecshine 欢迎向Rust中文社区投稿,投稿地址,好文将在以下地方直接展示 Rust中文社区首页Rust…
cmd 修改文件属性
现在的病毒基本都会采用一种方式,就是将病毒文件的属性设置为系统隐藏属性以逃避一般用户的眼睛,而且由于Windows系统的关系,这类文件在图形界面下是不能修改其属性的。但是好在Windows还算做点好事,留下了一个attrib命令可以让我…

Django 视图
Django之视图 目录 一个简单的视图CBV和FBV FBV版:CBV版:给视图加装饰器 使用装饰器装饰FBV使用装饰器装饰CBVrequest对象 请求相关的常用值属性方法Response对象 使用属性JsonResponse对象Django shortcut functions render()redirect()Django的View&am…

喜大普奔!GitHub官方文档推出中文版
原创整理 | Python开发者(ID:PythonCoder)最近程序员交友圈出了一个大新闻,GitHub 帮助文档正式推出中文版了,之前一直都是只有英文文档,看起来费劲不方便。这份中文文当非常详尽,可以说有了它 …
Linux中获取当前程序路径的方法
1、命令行实现:转自:http://www.linuxdiyf.com/viewarticle.php?id84177 #!/bin/sh cur_dir$(pwd) echo $cur_dir 注意:在cur_dir后没空格,后面也不能有空格,不然它会认为空格不是路径而报错 2、程序实现…
android 关于字符转化问题
今日在写android的客户端,发现字符转化是个大问题。 下面是Unicode转UTF-8的转化,便于以后使用 private static String decodeUnicode(String theString) { char aChar; int len theString.length(); StringBuffer outBuffer new Strin…
30分钟看懂XGBoost的基本原理
作者 | 梁云1991转载自Python与算法之美(ID: Python_Ai_Road)一、XGBoost和GBDTxgboost是一种集成学习算法,属于3类常用的集成方法(bagging,boosting,stacking)中的boosting算法类别。它是一个加法模型,基模型一般选择树模型&…
Linux下遍历文件夹的实现
转自:http://blog.csdn.net/wallwind/article/details/7528474 linux C 遍历目录及其子目录 #include <stdio.h> #include <string.h> #include <stdlib.h> #include <dirent.h> #include <sys/stat.h> #include <unistd.h&…
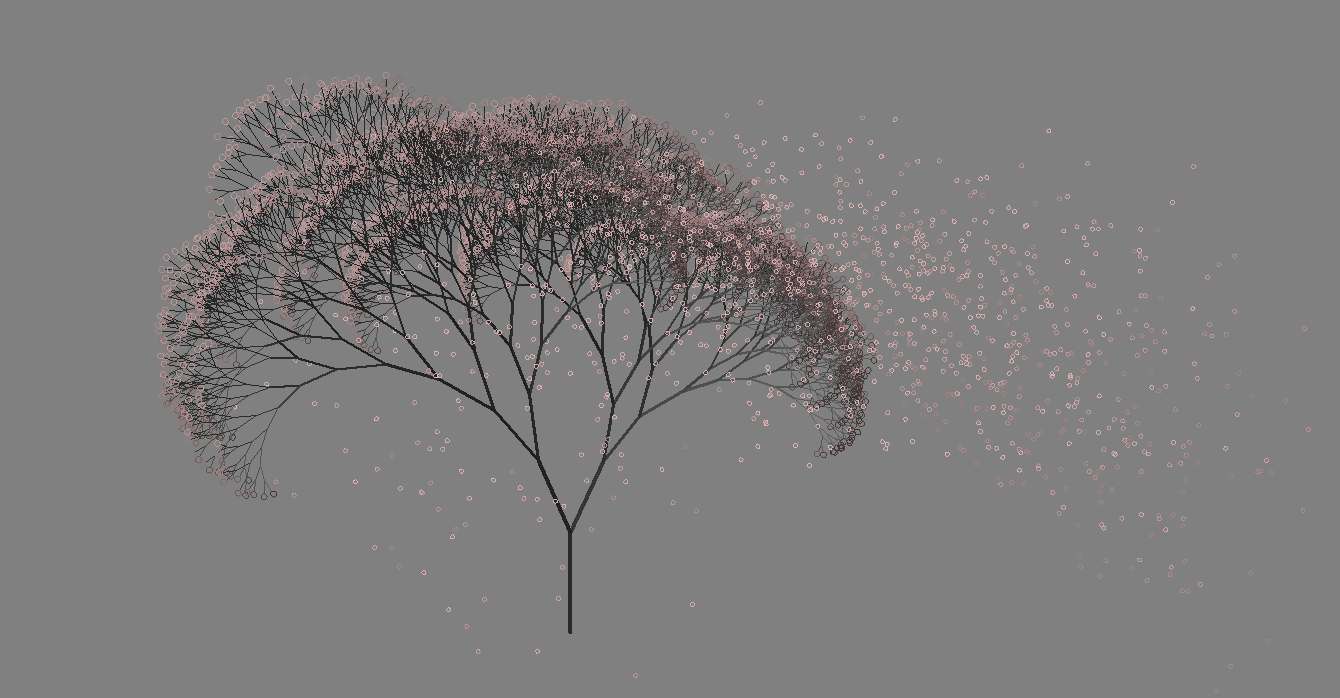
如何用Python画一棵漂亮的树
Tree海龟绘图turtle 在1966年,Seymour Papert和Wally Feurzig发明了一种专门给儿童学习编程的语言——LOGO语言,它的特色就是通过编程指挥一个小海龟(turtle)在屏幕上绘图。 海龟绘图(Turtle Graphics)后来…
windows7下,Java中利用JNI调用c++生成的动态库的使用步骤
1、从http://www.oracle.com/technetwork/java/javase/downloads/jdk-7u2-download-1377129.html下载jdk-7u2-windows-i586.exe,安装到D:\ProgramFiles\Java,并将D:\ProgramFiles\Java\jdk1.7.0_02\bin添加到环境变量中; 2、从http://www.ec…
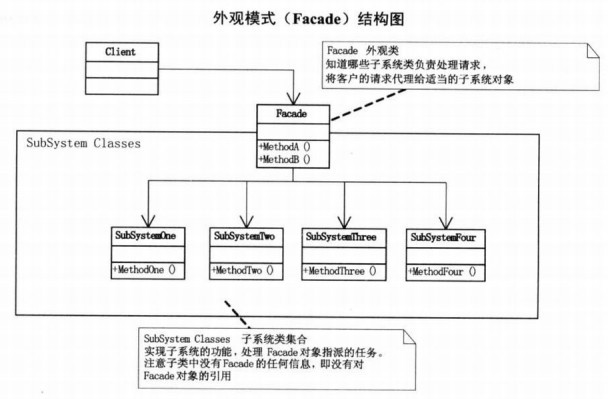
外观模式 - 设计模式学习
外观模式(Facade),为子系统中的一组接口提供一个一致的界面,此模式定义了一个高层接口,这个接口使得这一子系统更加容易使用。 怎么叫更加容易使用呢?多个方法变成一个方法,在外观看来,只需知道这个功能完成…
Google最新论文:大规模深度推荐模型的特征嵌入问题有解了!
转载自深度传送门(ID: gh_5faae7b50fc5)导读:本文主要介绍下Google在大规模深度推荐模型上关于特征嵌入的最新论文。 一、背景大部分的深度学习模型主要包含如下的两大模块:输入模块以及表示学习模块。自从NAS[1]的出现以来&#…