Caffe中对MNIST执行train操作执行流程解析
之前在 http://blog.csdn.net/fengbingchun/article/details/49849225 中简单介绍过使用Caffe train MNIST的文章,当时只是仿照caffe中的example实现了下,下面说一下执行流程,并精简代码到仅有10余行:
1. 先注册所有层,执行layer_factory.hpp中类LayerRegisterer的构造函数,类LayerRegistry的AddCreator和Registry静态函数;关于Caffe中Layer的注册可以参考 http://blog.csdn.net/fengbingchun/article/details/54310956
2. 指定执行mode是采用CPU还是GPU;
3. 构造SolverParameter类对象,存放Solver 参数信息;
4. 调用ReadProtoFromTextFile函数解析Solver文本文件(lenet_solver.prototxt),其文件内的各字段名需要在caffe.proto的message SolverParameter中存在,否则会解析不成功,其文件内容如下:
# The train/test net protocol buffer definition
# Proto filename for the train net, possibly combined with one or more test nets.
# train net 和 test net在同一个文件中
net: "E:/GitCode/Caffe_Test/test_data/model/mnist/lenet_train_test.prototxt"
# Solver type,采用哪种Solver优化方法
solver_type: SGD
# test_iter specifies how many forward passes the test should carry out.
# In the case of MNIST, we have test batch size 100 and 100 test iterations,
# covering the full 10,000 testing images.
# The number of iterations for each test net.
# batch size * test iter = test images,即 100 * 100 = 10000
test_iter: 100
# Carry out testing every 500 training iterations.
# The number of iterations between two testing phases.
#  指定执行多少次训练网络执行一次测试网络
test_interval: 500
# The base learning rate, momentum and the weight decay of the network.
# The base learning rate, 基础学习率
base_lr: 0.01
# The momentum value, 动量
momentum: 0.9
# The weight decay, 权值衰减
weight_decay: 0.0005
# The learning rate policy, 学习策略
lr_policy: "inv"
# The parameter to compute the learning rate,学习率计算参数
gamma: 0.0001
# The parameter to compute the learning rate,学习率计算参数
power: 0.75
# Display every 100 iterations
# the number of iterations between displaying info.
# If display = 0, no info will be displayed.
# 指定训练多少次显示一次结果信息,如loss值等
display: 100
# The maximum number of iterations,最多执行训练次数
max_iter: 10000
# snapshot intermediate results,执行多少次训练保存一次中间结果
snapshot: 5000
# The prefix for the snapshot, file save position,中间结果保存位置
snapshot_prefix: "E:/GitCode/Caffe_Test/test_data/model/mnist/lenet"
5. 将MNIST原始数据转换成LMDB数据库格式,在train和test时会使用;
6. 根据Solver type,New一个SGDSolver类对象并进行初始化操作:
(1)、调用GetSolver函数,new一个SGDSolver了对象;
(2)、调用Solver类的Init函数;
(3)、调用SolverParameter的DebugString函数打印解析后的lenet_solver.prototxt信息,输出结果如下:
test_iter: 100
test_interval: 500
base_lr: 0.01
display: 100
max_iter: 10000
lr_policy: "inv"
gamma: 0.0001
power: 0.75
momentum: 0.9
weight_decay: 0.0005
snapshot: 5000
snapshot_prefix: "E:/GitCode/Caffe_Test/test_data/model/mnist/lenet"
net: "E:/GitCode/Caffe_Test/test_data/model/mnist/lenet_train_test.prototxt"
solver_type: SGD
(4)、调用ReadNetParamsFromTextFileOrDie函数,解析lenet_train_test.prototxt文件(此文件中的各个layer段的位置不是固定的,每个layer内的各个段位置也不是固定的,它们的位置无关紧要,只是一般按照流程顺序从上到下排列),各个字段的说明如下:
name: "LeNet" # net名
layer { # memory required: (50175+64)*4=200960name: "mnist" # layer名字type: "Data" # layer类型,数据层,Data enters Caffe through data layers,read data from LEVELDB or LMDBtop: "data" # top名字, shape: 64 1 28 28 (50175)top: "label" # top名字, shape: 64 (64)include { # 指定何时将此layer mnist包含到网络中phase: TRAIN # 训练阶段会将此layer mnist包含到网络中}transform_param { # 图像预处理scale: 0.00390625 # 对图像像素值进行scale操作,范围[0, 1)}data_param { # data parametersource: "E:/GitCode/Caffe_Test/test_data/MNIST/train" # 数据存放路径batch_size: 64 # 指定一次处理图像的数量backend: LMDB # 数据存储方式}
}
layer { # memory required: (78400+100)*4=314000name: "mnist" # layer名字type: "Data" # layer类型,数据层,Data enters Caffe through data layers,read data from LEVELDB or LMDBtop: "data" # top名字, shape: 100 1 28 28 (78400)top: "label" # top名字, shape: 100 (100)include { # 指定何时将此layer mnist包含到网络中phase: TEST # 测试阶段会将此layer mnist包含到此网络中}transform_param { # 图像预处理scale: 0.00390625 # 对图像像素值进行scale操作,范围[0, 1)}data_param { # data parametersource: "E:/GitCode/Caffe_Test/test_data/MNIST/test" # 数据存放路径batch_size: 100 # 指定一次处理图像的数量backend: LMDB # 数据存储方式}
}
# test 阶段会创建一个layer: label_mnist_1_split,如下:
# layer_factory.hpp:75] Creating layer label_mnist_1_split
# net.cpp:110] Creating Layer label_mnist_1_split
# net.cpp:476] label_mnist_1_split <- label
# net.cpp:432] label_mnist_1_split -> label_mnist_1_split_0
# net.cpp:432] label_mnist_1_split -> label_mnist_1_split_1
# net.cpp:155] Setting up label_mnist_1_split
# net.cpp:163] Top shape: 100 (100)
# net.cpp:163] Top shape: 100 (100)
layer { # memory required: 737280*4=2949120/1152000*4=4608000name: "conv1" # layer名字type: "Convolution" # layer类型,卷积层bottom: "data" # bottom名字top: "conv1" # top名字, shape: 64 20 24 24 (737280)/100 20 24 24 (1152000)param { # 训练时用到的参数lr_mult: 1 # The multiplier on the global learning rate}param { # 训练时用到的参数lr_mult: 2 # The multiplier on the global learning rate}convolution_param { # convolution parameternum_output: 20 # 输出特征图(feature map)数量kernel_size: 5 # 卷积核大小(卷积核其实就是权值)stride: 1 # 滑动步长weight_filler { # The filler for the weighttype: "xavier" # 权值使用xavier滤波}bias_filler { # The filler for the biastype: "constant" # 偏置使用常量滤波}}
}
layer { # memory required: 184320*4=737280/288000*4=1152000name: "pool1" # layer名字type: "Pooling" # layer类型,Pooling层bottom: "conv1" # bottom名字top: "pool1" # top名字, shape: 64 20 12 12 (184320)/ 100 20 12 12 (288000)pooling_param { # pooling parameter,pooling层参数pool: MAX # pooling方法:最大值采样kernel_size: 2 # 滤波器大小stride: 2 # 滑动步长}
}
layer { # memory required: 204800*4=819200/320000*4=1280000name: "conv2" # layer名字type: "Convolution" # layer类型,卷积层bottom: "pool1" # bottom名字top: "conv2" # top名字, shape: 64 50 8 8 (204800)/ 100 50 8 8 (320000)param { # 训练时用到的参数lr_mult: 1 # The multiplier on the global learning rate}param { # 训练时用到的参数lr_mult: 2 # The multiplier on the global learning rate}convolution_param { # convolution parameter,卷基层参数num_output: 50 # 输出特征图(feature map)数量kernel_size: 5 # 卷积核大小(卷积核其实就是权值)stride: 1 # 滑动步长weight_filler { # The filler for the weighttype: "xavier" # 权值使用xavier滤波}bias_filler { # The filler for the biastype: "constant" # 偏置使用常量滤波}}
}
layer { # memory required: 51200*4=204800/80000*4=320000name: "pool2" # layer名字type: "Pooling" # layer类型,Pooling层bottom: "conv2" # bottom名字top: "pool2" # top名字, shape: 64 50 4 4 (51200)/ 100 50 4 4 (80000)pooling_param { # pooling parameter,卷积层参数pool: MAX # pooling方法:最大值采样kernel_size: 2 # 滤波器大小stride: 2 # 滑动步长}
}
layer { # memory required: 32000*4=128000/50000*4=200000name: "ip1" # layer名字type: "InnerProduct" # layer类型,全连接层bottom: "pool2" # bottom名字top: "ip1" # top名字, shape: 64 500 (32000)/ 100 500 (50000)param { # 训练时用到的参数lr_mult: 1 # The multiplier on the global learning rate}param { # 训练时用到的参数lr_mult: 2 # The multiplier on the global learning rate}inner_product_param { # 全连接层参数num_output: 500 # 输出特征图(feature map)数量weight_filler { # The filler for the weighttype: "xavier" # 权值使用xavier滤波}bias_filler { # The filler for the biastype: "constant" # 偏置使用常量滤波}}
}
# ReLU: Given an input value x, The ReLU layer computes the output as x if x > 0 and
# negative_slope * x if x <= 0. When the negative slope parameter is not set,
# it is equivalent to the standard ReLU function of taking max(x, 0).
# It also supports in-place computation, meaning that the bottom and
# the top blob could be the same to preserve memory consumption
layer { # memory required: 32000*4=128000/50000*4=200000name: "relu1" # layer名字type: "ReLU" # layer类型bottom: "ip1" # bottom名字top: "ip1" # top名字 (in-place), shape: 64 500 (32000)/ 100 500 (50000)
}
layer { # memory required: 640*4=2560/1000*4=4000name: "ip2" # layer名字type: "InnerProduct" # layer类型,全连接层bottom: "ip1" # bottom名字top: "ip2" # top名字, shape: 64 10 (640)/ 100 10 (1000)param { # 训练时用到的参数lr_mult: 1 # The multiplier on the global learning rate}param { # 训练时用到的参数lr_mult: 2 # The multiplier on the global learning rate}inner_product_param { # 全连接层参数num_output: 10 # 输出特征图(feature map)数量weight_filler { # The filler for the weighttype: "xavier" # 权值使用xavier滤波}bias_filler { # The filler for the biastype: "constant" # 偏置使用常量滤波}}
}
# test阶段会创建一个layer: ip2_ip2_0_split,如下:
# layer_factory.hpp:75] Creating layer ip2_ip2_0_split
# net.cpp:110] Creating Layer ip2_ip2_0_split
# net.cpp:476] ip2_ip2_0_split <- ip2
# net.cpp:432] ip2_ip2_0_split -> ip2_ip2_0_split_0
# net.cpp:432] ip2_ip2_0_split -> ip2_ip2_0_split_1
# net.cpp:155] Setting up ip2_ip2_0_split
# net.cpp:163] Top shape: 100 10 (1000)
# net.cpp:163] Top shape: 100 10 (1000)
layer { # memory required: 1*4=4name: "accuracy" # layer名字type: "Accuracy" # layer类型,计算输出准确率bottom: "ip2" # bottom名字bottom: "label" # bottom名字top: "accuracy" # top名字, shape: (1)include { # 指定何时将此layer accuracy包含到网络中phase: TEST # 测试阶段会将此layer accuracy包含到此网络中}
}
# SoftmaxWithLoss: Computes the multinomial logistic loss for a one-of-many
# classification task, passing real-valued predictions through a
# softmax to get a probability distribution over classes.
layer { # memory required: 1*4=4/1*4=4name: "loss" # layer名字type: "SoftmaxWithLoss" # layer类型bottom: "ip2" # bottom名字bottom: "label" # bottom名字top: "loss" # top名字, shape: (1)/ (1)
}# 在训练网络中,占用总内存大小为:200960+2949120+737280+819200+204800+128000+128000+2560+4=5169924
# 在测试网络中,占用总内存大小为:314000+(100+100)*4+4608000+1152000+1280000+320000+200000+200000+4000+(1000+1000)*4+4+4=8086808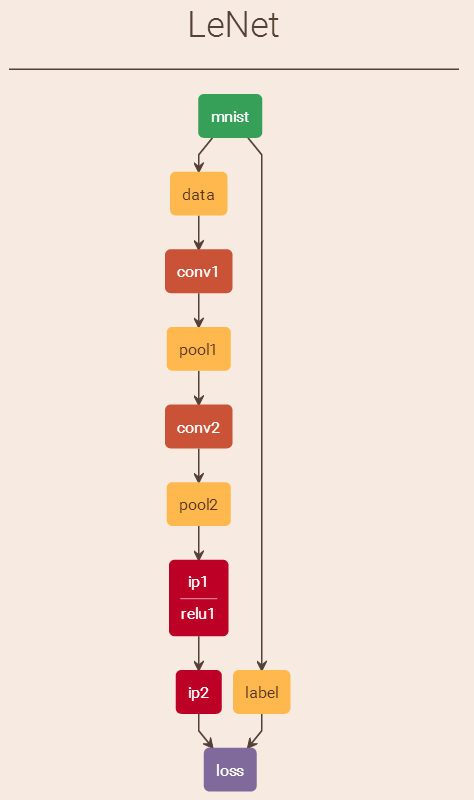
(5)、创建训练网络Net对象,并调用Net类的InitTrainNet函数构建训练网络,训练网络输出结果如下:
name: "LeNet"
state {phase: TRAIN
}
layer {name: "mnist"type: "Data"top: "data"top: "label"include {phase: TRAIN}transform_param {scale: 0.00390625}data_param {source: "E:/GitCode/Caffe_Test/test_data/MNIST/train"batch_size: 64backend: LMDB}
}
layer {name: "conv1"type: "Convolution"bottom: "data"top: "conv1"param {lr_mult: 1}param {lr_mult: 2}convolution_param {num_output: 20kernel_size: 5stride: 1weight_filler {type: "xavier"}bias_filler {type: "constant"}}
}
layer {name: "pool1"type: "Pooling"bottom: "conv1"top: "pool1"pooling_param {pool: MAXkernel_size: 2stride: 2}
}
layer {name: "conv2"type: "Convolution"bottom: "pool1"top: "conv2"param {lr_mult: 1}param {lr_mult: 2}convolution_param {num_output: 50kernel_size: 5stride: 1weight_filler {type: "xavier"}bias_filler {type: "constant"}}
}
layer {name: "pool2"type: "Pooling"bottom: "conv2"top: "pool2"pooling_param {pool: MAXkernel_size: 2stride: 2}
}
layer {name: "ip1"type: "InnerProduct"bottom: "pool2"top: "ip1"param {lr_mult: 1}param {lr_mult: 2}inner_product_param {num_output: 500weight_filler {type: "xavier"}bias_filler {type: "constant"}}
}
layer {name: "relu1"type: "ReLU"bottom: "ip1"top: "ip1"
}
layer {name: "ip2"type: "InnerProduct"bottom: "ip1"top: "ip2"param {lr_mult: 1}param {lr_mult: 2}inner_product_param {num_output: 10weight_filler {type: "xavier"}bias_filler {type: "constant"}}
}
layer {name: "loss"type: "SoftmaxWithLoss"bottom: "ip2"bottom: "label"top: "loss"
}name: "LeNet"
state {phase: TEST
}
layer {name: "mnist"type: "Data"top: "data"top: "label"include {phase: TEST}transform_param {scale: 0.00390625}data_param {source: "E:/GitCode/Caffe_Test/test_data/MNIST/test"batch_size: 100backend: LMDB}
}
layer {name: "conv1"type: "Convolution"bottom: "data"top: "conv1"param {lr_mult: 1}param {lr_mult: 2}convolution_param {num_output: 20kernel_size: 5stride: 1weight_filler {type: "xavier"}bias_filler {type: "constant"}}
}
layer {name: "pool1"type: "Pooling"bottom: "conv1"top: "pool1"pooling_param {pool: MAXkernel_size: 2stride: 2}
}
layer {name: "conv2"type: "Convolution"bottom: "pool1"top: "conv2"param {lr_mult: 1}param {lr_mult: 2}convolution_param {num_output: 50kernel_size: 5stride: 1weight_filler {type: "xavier"}bias_filler {type: "constant"}}
}
layer {name: "pool2"type: "Pooling"bottom: "conv2"top: "pool2"pooling_param {pool: MAXkernel_size: 2stride: 2}
}
layer {name: "ip1"type: "InnerProduct"bottom: "pool2"top: "ip1"param {lr_mult: 1}param {lr_mult: 2}inner_product_param {num_output: 500weight_filler {type: "xavier"}bias_filler {type: "constant"}}
}
layer {name: "relu1"type: "ReLU"bottom: "ip1"top: "ip1"
}
layer {name: "ip2"type: "InnerProduct"bottom: "ip1"top: "ip2"param {lr_mult: 1}param {lr_mult: 2}inner_product_param {num_output: 10weight_filler {type: "xavier"}bias_filler {type: "constant"}}
}
layer {name: "accuracy"type: "Accuracy"bottom: "ip2"bottom: "label"top: "accuracy"include {phase: TEST}
}
layer {name: "loss"type: "SoftmaxWithLoss"bottom: "ip2"bottom: "label"top: "loss"
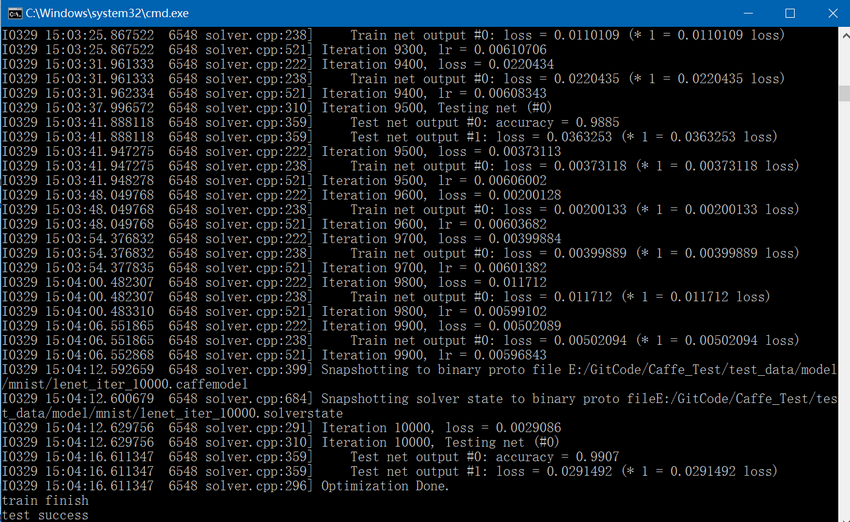
}7. 调用Solver类的Solve函数开始进行训练和测试:
(1)、当训练次数是500的倍数时(在lenet_solver.prototxt中设置test_interval为500),执行一次测试网络的Forward计算,循环100次(在lenet_solver.prototxt中设置test_iter为100,在lenet_train_test.prototxt文件中,测试阶段batch size为100,这样100*100=10000正好覆盖到所有的测试图像),测试网络最终会有两个结果输出,一个是accuracy,一个是loss;
(2)、执行一次训练网络的ForwardBackward计算,训练网络最终会有一个结果输出即loss;
(3)、更新训练网络的权值和偏置;
(4)、每训练5000次(在lenet_solver.prototxt中设置snapshot为5000)保存一次结果,包括.caffemodel和.caffestate;
(5)、按照以上(1)、(2)、(3)、(4)中的步骤,循环执行10000次(在lenet_solver.prototxt中设置max_iter为10000)。
精简后的mnist train代码如下:
#include "funset.hpp"
#include "common.hpp"int mnist_train()
{caffe::Caffe::set_mode(caffe::Caffe::CPU);const std::string filename{ "E:/GitCode/Caffe_Test/test_data/model/mnist/lenet_solver.prototxt" };caffe::SolverParameter solver_param;if (!caffe::ReadProtoFromTextFile(filename.c_str(), &solver_param)) {fprintf(stderr, "parse solver.prototxt fail\n");return -1;}mnist_convert(); // convert MNIST to LMDBboost::shared_ptr<caffe::Solver<float> > solver(caffe::GetSolver<float>(solver_param));solver->Solve();fprintf(stderr, "train finish\n");return 0;
}
GitHub:https://github.com/fengbingchun/Caffe_Test
相关文章:

华为云垃圾分类AI大赛三强出炉,ModelArts2.0让行业按下AI开发“加速键”
9月20日,华为云人工智能大赛垃圾分类挑战杯决赛在上海世博中心2019华为全联接大会会场顺利举办。经过近两个月赛程的层层筛选,入围决赛阵列的11支战队的高光时刻也如期而至。最终华为云垃圾分类挑战杯三强出炉。本次华为云人工智能大赛垃圾分类挑战杯聚焦…

王坚十年前的坚持,才有了今天世界顶级大数据计算平台MaxCompute...
如果说十年前,王坚创立阿里云让云计算在国内得到了普及,那么王坚带领团队自主研发的大数据计算平台MaxCompute则推动大数据技术向前跨越了一大步。数据是企业的核心资产,但十年前阿里巴巴的算力已经无法满足当时急剧增长数据量的需求。基于Ha…

tomcat简单配置
-----------------------------------------一、前言二、环境三、安装JDK四、安装tomcat五、安装mysql六、安装javacenter七、tomcat后台管理-----------------------------------------一、前言Tomcat是Apache 软件基金会(Apache Software Foundation)的…
使用Caffe进行手写数字识别执行流程解析
之前在 http://blog.csdn.net/fengbingchun/article/details/50987185 中仿照Caffe中的examples实现对手写数字进行识别,这里详细介绍下其执行流程并精简了实现代码,使用Caffe对MNIST数据集进行train的文章可以参考 http://blog.csdn.net/fengbingchun/…
前端也能玩转机器学习?Google Brain 工程师来支招
演讲嘉宾 | 俞玶编辑 | 伍杏玲来源 | CSDN(ID:CSDNnews)导语:9 月 7 日,在CSDN主办的「AI ProCon 2019」上,Google Brain 工程师,TensorFlow.js 项目负责人俞玶发表《TensorFlow.js 遇到小程序》的主题演讲,…

mongoDB设置用户名密码的一个要点
2019独角兽企业重金招聘Python工程师标准>>> 增加用户之前, 先选好库 use <库名> #选择admin库后可查看system.users里面的用户数据 db.system.users.find() db.createUser 这个函数填写用户名密码与权限就行了, 在这里设置库的名称没用. 一定要用用use选择好…

基于HTML5的电信网管3D机房监控应用
先上段视频,不是在玩游戏哦,是规规矩矩的电信网管企业应用,嗯,全键盘的漫游3D机房:随着PC端支持HTML5浏览器的普及,加上主流移动终端Android和iOS都已支持HTML5技术,新一代的电信网管应用几乎一致性的首选H…

从原理到实现,详解基于朴素ML思想的协同过滤推荐算法
作者丨gongyouliu编辑丨Zandy来源 | 大数据与人工智能(ID: ai-big-data)作者在《协同过滤推荐算法》、《矩阵分解推荐算法》这两篇文章中介绍了几种经典的协同过滤推荐算法。我们在本篇文章中会继续介绍三种思路非常简单朴素的协同过滤算法,这…

C++/C++11中引用的使用
引用(reference)是一种复合类型(compound type)。引用为对象起了另外一个名字,引用类型引用(refer to)另外一种类型。通过将声明符写成&d的形式来定义引用类型,其中d是声明的变量名。 一、一般引用:一般在初始化变量时,初始值…
node.js学习5--------------------- 返回html内容给浏览器
/*** http服务器的搭建,相当于php中的Apache或者java中的tomcat服务器*/ // 导包 const httprequire("http"); const fsrequire("fs"); //创建服务器 /*** 参数是一个回调函数,回调函数2个参数,1个是请求参数,一个是返回参数*/ let serverhttp.createServe…
内核分析阅读笔记
内核分析阅读笔记 include/Linux/stddef.h中macro offsetof define,list: #define offsetof(TYPE,MEMBER) ((size_t) &((TYPE *)0)->MEMBER) offsetof macro对于上述示例的展开剂分析:&((struct example_struct *)0)->list表示当结构example_struct正好在地址0上…

杨强教授力荐,快速部署落地深度学习应用的实践手册
香港科技大学计算机科学与工程学系讲座教授、国际人工智能联合会(IJCAI)理事会主席(2017—2019)、深圳前海微众银行首席AI 官 杨强为《深度学习模型及应用详解》一书撰序,他提到现在亟需一本介绍深度学习技术实践的图书…
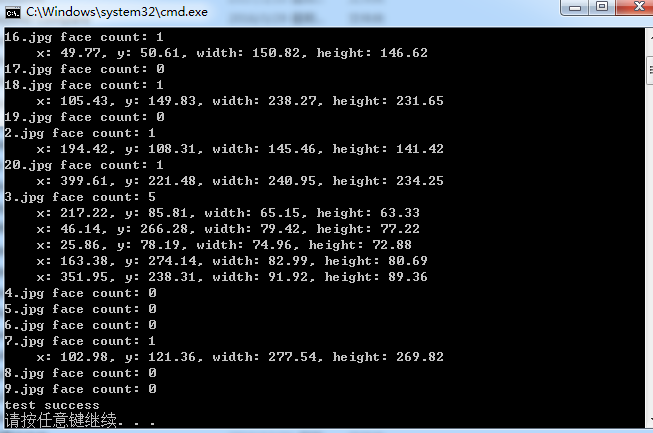
OpenFace库(Tadas Baltrusaitis)中基于HOG进行正脸人脸检测的测试代码
Tadas Baltrusaitis的OpenFace是一个开源的面部行为分析工具,它的源码可以从https://github.com/TadasBaltrusaitis/OpenFace下载。OpenFace主要包括面部关键点检测(facial landmard detection)、头部姿势估计(head pose estimation)、面部动作单元识别(facial acti…
nginx conf 文件配置
打印输出: location / { default_type text/plain; return 502 "$uri"; } $remode_addr 获取访问者的ID$request_method 判断提交方式 GET POST$http_user_agent 获取浏览器软件 if (条件) {} #if之后要有空格 条件3种写法: 1: 来判断相等,用于字符串比较 …
js中 字符串与Unicode 字符值序列的相互转换
一. 字符串转Unicode 字符值序列 var str "abcdef"; var codeArr []; for(var i0;i<str.length;i){codeArr.push(str.charCodeAt(i)); } console.log(codeArr);-->[97, 98, 99, 100, 101, 102] 二.Unicode 字符值序列转字符串 var str String.fromCharCode…
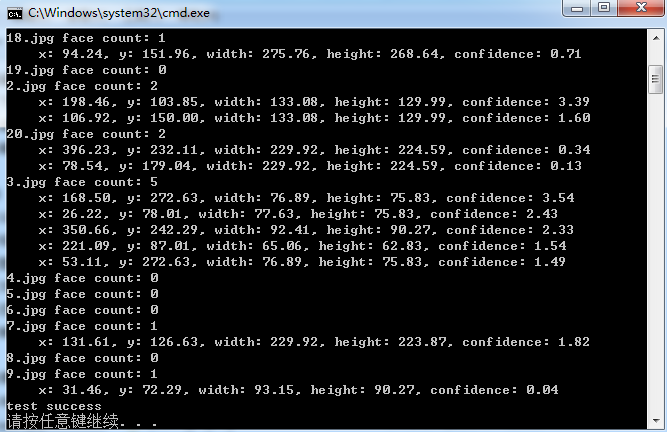
OpenFace库(Tadas Baltrusaitis)中基于Haar Cascade Classifiers进行人脸检测的测试代码
Tadas Baltrusaitis的OpenFace是一个开源的面部行为分析工具,它的源码可以从 https://github.com/TadasBaltrusaitis/OpenFace 下载。OpenFace主要包括面部关键点检测(facial landmard detection)、头部姿势估计(head pose estimation)、面部动作单元识别(facial a…

Uber提出损失变化分配方法LCA,揭秘神经网络“黑盒”
作者 | Janice Lan,Rosanne Liu等译者 | 清儿爸责编 | 夕颜出品 | AI科技大本营(ID: rgznai100)【导读】神经网络(Neural networks,NN)在过去十年来硕果累累,推动了整个行业的机器学习进程。然而࿰…
范登读书解读《亲密关系》(婚姻、爱情) 笔记
来源:邀请你看《樊登解读《亲密关系》(已婚人士必看)》,https://url.cn/5HJvLk5?sfuri 人们在童年的时候始终追寻着两种东西,第一种叫做归属感,第二叫做确认自己的重要性、价值感。 如果再童年的时候缺失这…
myeclipse莫名其妙的问题
2019独角兽企业重金招聘Python工程师标准>>> 怎么刷新,clean项目都不管用,结果删除相应工作空间下的那个项目就行。类似路径如D:\workspace\.metadata\.plugins\org.eclipse.core.resources\.projects 转载于:https://my.oschina.net/u/14488…

数据科学家需要知道的5种图算法
作者:Rahul Agarwal编译:ronghuaiyang来源 | AI公园(ID:AI_Paradise)【导读】因为图分析是数据科学家的未来。作为数据科学家,我们对pandas、SQL或任何其他关系数据库非常熟悉。我们习惯于将用户的属性以列的形式显示在…

在Windows7/10上快速搭建深度学习框架Caffe开发环境
之前在 http://blog.csdn.net/fengbingchun/article/details/50987353 中介绍过在Windows7上搭建Caffe开发环境的操作步骤,那时caffe的项目是和其它依赖项目分开的,每次换新的PC机时再次重新配置搭建还是很不方便,而且caffe的版本较老&#x…
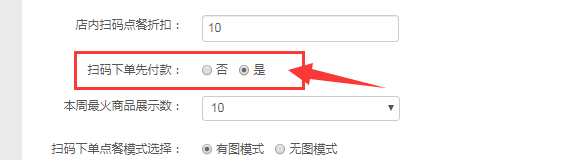
扫码下单支持同桌单人点餐FAQ
一、使用场景 满足较多商户希望同一桌台,各自点各自的菜品的业态场景(例如杭味面馆,黄焖鸡米饭店,面馆等大多数轻快餐店) 二、配置步骤及注意事项 管理员后台配置--配置管理--店铺配置--扫码点餐tab页 1、开启扫码下单…
使用photoshop 10.0制作符合社保要求的照片
2019独角兽企业重金招聘Python工程师标准>>> 北京市社保新参统人员照片修制方法 修改目标:照片规格:358像素(宽)×441像素(高),分辨率350dpi。 颜色模式:24位RGB真彩色。 储存格式&am…
C++11中std::addressof的使用
C11中的std::addressof获得一个对象的实际地址,即使 operator& 操作符已被重载。它常用于原本要使用 operator& 的地方,它接受一个参数,该参数为要获得地址的那个对象的引用。一般,若operator &()也被重载且不一致的话…

一份职位信息的精准推荐之旅,从AI底层架构说起
整理 | 夕颜出品 | AI科技大本营(ID:rgznai100)【导读】也许,每天早上你的邮箱中又多了一封职位推荐信息,点开一看,你可能发现这些推荐正合你意,于是按照这些信息,你顺利找到一份符合自己期待的…
Vue.js 生命周期
2019独角兽企业重金招聘Python工程师标准>>> 每个 Vue 实例在被创建之前都要经过一系列的初始化过程 vue在生命周期中有这些状态, beforeCreate,created,beforeMount,mounted,beforeUpdate,updated,beforeDestroy,destroyed。Vue在实例化的过程中&#x…
AX2009取销售订单的税额
直接用以下方法即可: Tax::calcTaxAmount(salesLine.TaxGroup, salesLine.TaxItemGroup, systemDateGet(), salesLine.CurrencyCode, salesParmLine.LineAmount, salesTable.taxModuleType()); salesParmLine.LineAmount:这个直接取的是装箱单或者发票…
Dubbo源码解析之服务路由策略
1. 简介 服务目录在刷新 Invoker 列表的过程中,会通过 Router 进行服务路由,筛选出符合路由规则的服务提供者。在详细分析服务路由的源码之前,先来介绍一下服务路由是什么。服务路由包含一条路由规则,路由规则决定了服务消费者的调…
C++中std::reverse和std::reverse_copy的使用
std::reverse:反转排序容器内指定范围中的元素。std::reverse_copy与std::reverse唯一的区别是:reverse_copy会将结果拷贝到另外一个容器中,而不影响原容器的内容。std::reverse: defined in header <algorithm>, reverses the order …

真相!30K拿到互联网大厂offer,网友:我服了!
最近笔者在知乎刷到一个帖子,其中,这条回答让人印象深刻:其实,最近几年人工智能大火,其中深度学习岗位的薪酬爆增,BAT大厂高薪招聘AI人才,收到的简历却寥寥无几?究竟是大厂岗位要求高…