Linux下getopt函数的使用
getopt为解析命令行参数函数,它是Linux C库函数。使用此函数需要包含系统头文件unistd.h。
getopt函数声明如下:
int getopt(int argc, char * const argv[], const char * optstring);其中函数的argc和argv参数通常直接从main的参数直接传递而来。optstring是一个包含合法选项字符的字符串。如果字符后跟一个冒号”:”,则该选项要求有参数。在argv中以“-“开头的都视作选项,“-“后的字符是选项字符。getopt会返回在argv中的选项字符,此字符会对应optstring中的字符。如果getopt被重复调用,它返回下一个选项字符。如果不再有可识别的选项字符,将返回-1。
如果getopt找到另一个选项字符,则返回该字符,更新外部变量optind和静态变量nextchar,以便下次调用getopt可以重复使用接下来的选项字符。如果成功找到选项,getopt返回该选项字符。如果所有命令行选项已被解析,getopt返回-1.如果getopt遇到一个选项字符不在optstring中,那么将返回"?".
如果getopt遇到一个缺少参数的选项,则返回值取决于optstring中的第一个字符,如果是":",则返回":",否则返回"?".
默认情况下,getopt会调换argv中的内容,将非选项放在最后。这样当getopts读取完所有的选项以后,optind会指向非选项的参数。
在处理选项列表时,getopt可以检测两种错误:(1).一个选项字符在optstring中并没有指定;(2).缺少选项参数。默认情况下,getopt在标准错误上输出错误信息,将错误的选项字符放在optopt中,并返回"?"作为函数结果。如果调用者将全局变量opterr设置为0,那么getopt不会输出错误信息(默认情况下,opterr是一个非零值)。如果optstring中的第一个字符是冒号":",那时getopt同样不会打印错误信息。另外,getopt将返回":"代替返回"?"以表示缺少选项参数。
getopt()所设置的全局变量包括:
(1). char *optarg:当前选项的参数。
(2). int optind: 是在argv中要处理的下一个元素的索引。系统初始化此值为1.调用者可以将其重置为1以重新开始扫描相同的argv,或扫描一个新的参数向量。每次调用getopt时,optind保存下个参数在argv中的索引(index)。如果找到一个选项,getopt会返回找到的选项字符,更新optind。如果选项有参数,将参数存到optarg,否则optarg为0。
(3). int opterr: 这个变量为非零时,getopt为”无效选项”或”缺少参数选项”输出错误信息。
(4). int optopt: 当发现无效选项字符时,getopt或返回'?'字符,或返回':'字符,并且optopt包含了所发现的无效选项字符。
getopt定义分为三种:
(1). 不带参数的选项。
(2). 必须带参数的选项:在选项后加一个冒号。
(3). 可选参数的选项:在选项后加两个冒号。
注意事项:
(1). 不带参数的选项可用连写。
(2). 选项不分先后顺序。
(3). 可选参数的选项与参数之间不能有空格。
下面是从其他文章中copy的测试代码,详细内容介绍可以参考对应的reference:
CMakeLists.txt文件内容如下:
PROJECT(samples_cplusplus)
CMAKE_MINIMUM_REQUIRED(VERSION 3.0)# 支持C++11
SET(CMAKE_C_FLAGS "${CMAKE_C_FLAGS} -g -Wall -O2 -std=c11")
SET(CMAKE_CXX_FLAGS "${CMAKE_CXX_FLAGS}  -g -Wall -O2 -std=c++11")INCLUDE_DIRECTORIES(${PROJECT_SOURCE_DIR})FILE(GLOB samples ${PROJECT_SOURCE_DIR}/*.cpp)FOREACH (sample ${samples})STRING(REGEX MATCH "[^/]+$" sample_file ${sample})STRING(REPLACE ".cpp" "" sample_basename ${sample_file})ADD_EXECUTABLE(test_${sample_basename} ${sample})TARGET_LINK_LIBRARIES(test_${sample_basename} pthread)
ENDFOREACH()
sample_getopt.cpp内容如下:
#include <iostream>
#include <unistd.h>namespace {void test1(int argc, char* argv[])
{// reference: http://man7.org/linux/man-pages/man3/getopt.3.htmlint flags = 0, opt = -1, nsecs = 0, tfnd = 0;while ((opt = getopt(argc, argv, "nt:")) != -1) {switch (opt) {case 'n':flags =1;break;case 't':nsecs = atoi(optarg);tfnd = 1;break;default:fprintf(stderr, "Usage: %s [-t nsecs] [-n] name\n", argv[0]);exit(EXIT_FAILURE);}}fprintf(stdout, "flags = %d; tfnd = %d; nsec = %d; optind = %d\n", flags, tfnd, nsecs, optind);if (optind >= argc) {fprintf(stderr, "Expected argument after options\n");exit(EXIT_FAILURE);}fprintf(stdout, "name argument = %s\n", argv[optind]);exit(EXIT_SUCCESS);
}int test2()
{// reference: https://stackoverflow.com/questions/10502516/how-to-call-correctly-getopt-functionconst char* argv[] = {"ProgramNameHere", "-f", "input.gmn", "-output.jpg"};int argc = sizeof(argv) / sizeof(argv[0]);std::cout<<"argc: "<<argc<<std::endl;for (int i = 0; i < argc; ++i) {//std::cout<<"argv: "<<argv[i]<<std::endl;}int c = -1;while ((c = getopt(argc, (char**)argv, "f:s:o:pw:h:z:t:d:a:b:?")) != -1) {std::cout<<"Option: "<<(char)c;if (optarg) {std::cout<<", argument: "<<optarg;}std::cout<<"\n";}return 0;
}int test3(int argc, char* argv[])
{// reference: https://www.gnu.org/software/libc/manual/html_node/Example-of-Getopt.html// Normally, getopt is called in a loop. When getopt returns -1, indicating no more options are present, the loop terminates.// A switch statement is used to dispatch on the return value from getopt. In typical use, each case just sets a variable that is used later in the program.// A second loop is used to process the remaining non-option arguments.int aflag = 0, bflag = 0, index = -1, c = -1;char* cvalue = nullptr;opterr = 0;while ((c = getopt(argc, argv, "abc:")) != -1) {switch (c) {case 'a':aflag = 1;break;case 'b':bflag = 1;break;case 'c':cvalue = optarg;break;case '?':if (optopt == 'c')fprintf(stderr, "Option -%c requires an argument.\n", optopt);else if (isprint(optopt))fprintf(stderr, "Unknown option '-%c'.\n", optopt);elsefprintf(stderr, "Unknown option character '\\x%x'.\n", optopt);return 1;default:abort();}}		fprintf(stdout, "aflag = %d, bflag = %d, cvalue = %s\n", aflag, bflag, cvalue);for (index = optind; index < argc; ++index) {fprintf(stdout, "index: %d, Non-option argument: %s\n", index, argv[index]);}return 0;
}} // namespaceint main(int argc, char* argv[])
{if (argc < 2) {fprintf(stderr, "the number of params must be greater than or equal to 2\n");return -1;}int flag = atoi(argv[1]);switch(flag) {case 1:fprintf(stdout, "start test 1:\n");test1(argc, argv);break;case 2:fprintf(stdout, "start test 2:\n");test2();break;case 3:fprintf(stdout, "start test 3:\n");test3(argc, argv);break;default:fprintf(stderr, "params error\n");break;}return 0;
}
build.sh内容如下:
#! /bin/bashreal_path=$(realpath $0)
dir_name=`dirname "${real_path}"`
echo "real_path: ${real_path}, dir_name: ${dir_name}"new_dir_name=${dir_name}/build
mkdir -p ${new_dir_name}
cd ${new_dir_name}
cmake ..
makecd -
run_getopt.sh内容如下:
#! /bin/bashreal_path=$(realpath $0)
dir_name=`dirname "${real_path}"`
echo "real_path: ${real_path}, dir_name: ${dir_name}"echo "test1:"
${dir_name}/build/test_sample_getopt 9 # params error
${dir_name}/build/test_sample_getopt 1 # flags = 0; tfnd = 0; nsec = 0; optind = 1
${dir_name}/build/test_sample_getopt 1 -b # invalid option -- 'b'
${dir_name}/build/test_sample_getopt 1 -x YYY # invalid option -- 'x'
${dir_name}/build/test_sample_getopt 1 -vZZZ # invalid option -- 'v'
${dir_name}/build/test_sample_getopt 1 -t 999 -n Jim # flags = 1; tfnd = 1; nsec = 999; optind = 4
${dir_name}/build/test_sample_getopt 1 -t888 -nSom # invalid option -- 'S'
${dir_name}/build/test_sample_getopt 1 -t6666 # flags = 0; tfnd = 1; nsec = 6666; optind = 2
${dir_name}/build/test_sample_getopt 1 -nant -t555 # invalid option -- 'a'
${dir_name}/build/test_sample_getopt 1 -n222 -t111 # invalid option -- '2'echo -e "\n\ntest2:"
${dir_name}/build/test_sample_getopt 2
# argc: 4
# Option: f, argument: input.gmn
# Option: o, argument: utput.jpgecho -e "\n\ntest3:"
${dir_name}/build/test_sample_getopt 3
# aflag = 0, bflag = 0, cvalue = (null)
# index: 1, Non-option argument: 3
${dir_name}/build/test_sample_getopt 3 -a -b
# aflag = 1, bflag = 1, cvalue = (null)
# index: 3, Non-option argument: 3
${dir_name}/build/test_sample_getopt 3 -ab
# aflag = 1, bflag = 1, cvalue = (null)
# iindex: 2, Non-option argument: 3
${dir_name}/build/test_sample_getopt 3 -c foo
# aflag = 0, bflag = 0, cvalue = foo
# index: 3, Non-option argument: 3
${dir_name}/build/test_sample_getopt 3 -cfoo
# aflag = 0, bflag = 0, cvalue = foo
# index: 2, Non-option argument: 3
${dir_name}/build/test_sample_getopt 3 arg1
# aflag = 0, bflag = 0, cvalue = (null)
# index: 1, Non-option argument: 3
# index: 2, Non-option argumnet: arg1
${dir_name}/build/test_sample_getopt 3 -a arg1
# aflag = 1, bflag = 0, cvalue = (null)
# index: 2, Non-option argument: 3
# index: 3, Non-option argument: arg1
${dir_name}/build/test_sample_getopt 3 -c foo arg1
# aflag = 0, bflag = 0, cvalue = foo
# index: 3, Non-option argument: 3
# index: 4, Non-option argument: arg1
${dir_name}/build/test_sample_getopt 3 -a -- -b
# aflag = 1, bflag = 0, cvalue = (null)
# index: 3, Non-option argument: 3
# index: 4, Non-option argument: -b
${dir_name}/build/test_sample_getopt 3 -a -
# aflag = 1, bflag = 0, cvalue = (null)
# index: 2, Non-option argument: 3
# index: 3, Non-option argument: -
执行过程:首先执行build.sh,然后再执行run_getopt.sh即可。
GitHub: https://github.com/fengbingchun/Linux_Code_Test
相关文章:

20行Python代码说清“量子霸权”
作者 | 马超 来源 | 程序人生(ID:coder_life)近日谷歌的有关量子霸权(Quantum Supremacy)的论文登上了Nature杂志150年刊的封面位置,而再次罢占各大媒体的头条位置,其实这篇文章之前曾经短暂上过NASA的网站…

Android组件系列----BroadcastReceiver广播接收器
【声明】 欢迎转载,但请保留文章原始出处→_→ 生命壹号:http://www.cnblogs.com/smyhvae/ 文章来源:http://www.cnblogs.com/smyhvae/p/3960623.html 【正文】 一、广播的功能和特征 广播的生命周期很短,经过调用对象-->…

Swift 代码调试-善用XCode工具(UI调试,五种断点,预览UIImage...)
原创Blog,转载请注明出处 http://blog.csdn.net/hello_hwc?viewmodelist 我的stackoverflow 工欲善其事,必先利其器,强烈建议新手同学好好研究下XCode这个工具。比如Build Settings,Build Info Rules,Build Parse…

Linux下getopt_long函数的使用
getopt_long为解析命令行参数函数,它是Linux C库函数。使用此函数需要包含系统头文件getopt.h。 getopt_long函数声明如下: int getopt_long(int argc, char * const argv[], const char *optstring, const struct option *longopts, int *longindex);…
Expect自动化控制简单介绍
telnet,ftp,Passwd,fsck,rlogin,tip,ssh等等。该工具利用Unix伪终端包装其子进程,允许任意程序通过终端接入进行自动化控制;也可利用Tk工具,将交互程序包装在X11的图形用…
C++中标准模板库std::vector的实现
以下实现了C标准模板库std::vector的部分实现,参考了 cplusplus. 关于C中标准模板库std::vector的介绍和用法可以参考 https://blog.csdn.net/fengbingchun/article/details/51510916 实现代码vector.hpp内容如下: #ifndef FBC_STL_VECTOR_HPP_ #defi…
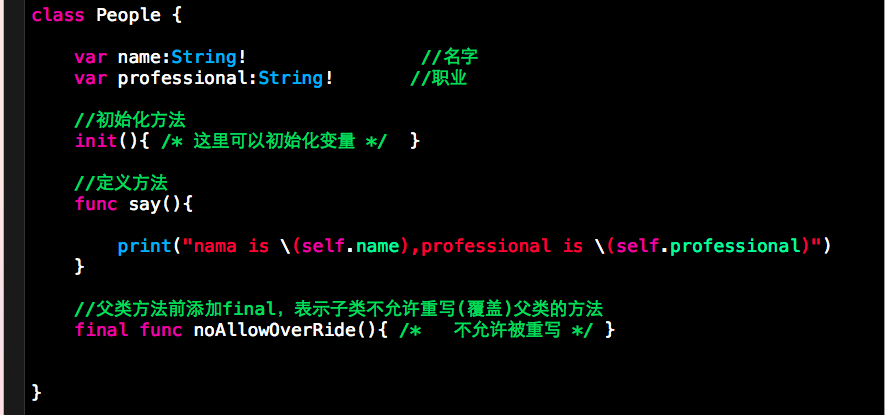
Swift学习 OOP三大特性:继承、多态、封装
先看个例子 从上面的例子可以总结那么一句话:”学生是人”。也就是Student类继承People类。简而言之,学生是人,这句话是说得通的,但是”人是学生”这句话是说不通的,不是学生就不是人了嘛? 从代码中,我们可以看出S…
5折票倒计时3天 | 超干货议程首度曝光!2019 中国大数据技术大会邀您共赴
(大会官网https://t.csdnimg.cn/U1wA)2019年,大数据与人工智能的热度已经蔓延到了各个领域,智能交通、AIoT、智慧城市,智慧物流、AI中台、工业制造等各种黑科技成为热搜名词。而在今年的乌镇互联网大会上,大…
mysql select * f
mysql> select * from tb;-------------| id | name |-------------| 1 | tbone || 3 | 2d2 || 5 | 55 || 6 | 66 |-------------4 rows in set (0.00 sec)转载于:https://www.cnblogs.com/bashala/p/3974088.html
C++/C++11中用于定义类型别名的两种方法:typedef和using
类型别名(type alias)是一个名字,它是某种类型的同义词。使用类型别名有很多好处,它让复杂的类型名字变得简单明了、易于理解和使用,还有助于程序员清楚地知道使用该类型的真实目的。在C中,任何有效类型都可以有别名。 有两种方法…
iOS学习笔记--01swift实现提示框第三方库:MBProgressHUD
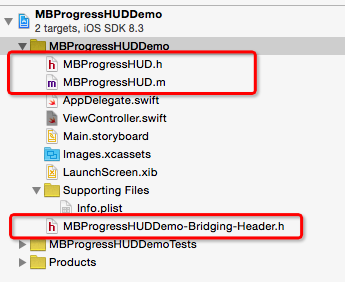
本文使用swift语言使用MBProgressHUD。 开源项目MBProgressHUD可以实现多种形式的提示框。使用简单,方便。GitHud的下载地址是:https://github.com/jdg/MBProgressHUD/ 下载完成后,将MBProgressHUD.h和MBProgressHUD.m拖入已经新建好的Swift项…

2019北京智源大会在京开幕, 中外学术大咖共话人工智能研究前沿
10月31日,由北京智源人工智能研究院主办的2019北京智源大会在国家会议中心开幕,会期两天。智源大会是北京创建全球人工智能学术和创新最优生态的标志性学术活动,定位于“内行的AI盛会”,以国际性、权威性、专业性和前瞻性为特色&a…
linux中登录类型及配置文件
linux中登录shell的类型1.交互式登录:直接通过终端输入用户信息登录1)login:2)在shell中 su - usernamesu -l username2.非交互式登录1)su username2)图形界面的终端3)执行脚本的过程用户配置文…
Swift项目引入第三方库的方法
分类:iOS(55) 目录(?)[] Swift项目引入第三方库的方法 转自 http://blog.shiqichan.com/How-To-Import-3rd-Lib-Into-Swift-Project/ 以下,将创建一个Swift项目,然后引入3个库: Snappy 简化autolayout代码…

最新NLP架构的直观解释:多任务学习– ERNIE 2.0(附链接)| CSDN博文精选
作者 | Michael Ye翻译 | 陈雨琳,校对 | 吴金笛来源 | 数据派THU(ID:DatapiTHU)百度于今年早些时候发布了其最新的NLP架构ERNIE 2.0,在GLUE基准测试中的所有任务上得分均远高于XLNet和BERT。NLP的这一重大突破利用了一…
C++中的内存对齐介绍
网上有很多介绍字节对齐或数据对齐或内存对齐的文章,虽然名字不一样,但是介绍的内容大致都是相同的。这里以内存对齐相称。注:以下内容主要来自网络。 内存对齐,通常也称为数据对齐,是计算机对数据类型合法地址做出了…
__cplusplus的用处
经常在/usr/include目录下看到这种字句: #ifdef __cplusplus extern "C" { #endif ... #ifdef __cplusplus } #endif 不太明白是怎么用的。今天阅读autobook,在第53页看到了作者的解释:C/C编译器对函数和变量名的命名方法不一样…
Linux下的内存对齐函数
在Linux下内存对齐的函数包括posix_memalign, aligned_alloc, memalign, valloc, pvalloc,其各个函数的声明如下: int posix_memalign(void **memptr, size_t alignment, size_t size); void *memalign(size_t alignment, size_t size); void *aligned_…
Swift2.0系列]Error Handling(项目应用篇)
1.FileManager中的应用 倘若你只是想看FileManager中的 Error Handling是如何实现的,请找到3.删除文件以及4.获取文件信息。我分别为你提供了do-catch以及try?的使用方法。 打开Xcode,选中Single View Application,输入项目名称例如FileManagerDemo,点击…
总点第一个视频产生选择偏差?Youtube用“浅塔”来纠正
作者 | Tim Elfrink译者 | Tianyu出品 | AI科技大本营(ID:rgznai100)【导读】本文来自于谷歌研究人员最近发表的一篇论文,介绍了视频平台 Youtube 的视频推荐方法,并在 RecSys 2019 大会上做了分享。本文总结归纳了一些论文中的重…

HTML样式offset[Direction] 和 style.[direction]的区别
为什么80%的码农都做不了架构师?>>> 以offsetLeft与style.left为例: offsetLeft使用的值是字符串,如“100px", style.left则使用数值,如 100 offsetLeft只可以读,因此用无法通过Js改变这个值实现样…

Ubuntu 14.04上安装pip3/numpy/matplotlib/scipy操作步骤
Ubuntu 14.04 64位上默认安装了两个版本的python,一个是python2.7.6,另外一个是python3.4.0,如下图所示: 安装完pip3的结果如下图所示: 升级完pip3的结果如下图所示: 安装完numpy的结果如下图所示: 通过sudo pip3 install matplot…
NSHelper.showAlertTitle的两种用法 swift
var model : CarCity CarCity() if (NSString.isNullOrEmpty(locationLabel.text)) { NSHelper.showAlertTitle(nil, message: "暂无法定位,请检查网络。", cancel: "确定") return } if (NSString.isNullOrEmpty(plateTextFild.text)) { NSHe…
通俗易懂:图卷积神经网络入门详解
作者 | 蝈蝈来源 | 转载自知乎用户蝈蝈【导读】GCN问世已经有几年了(2016年就诞生了),但是这两年尤为火爆。本人愚钝,一直没能搞懂这个GCN为何物,最开始是看清华写的一篇三四十页的综述,读了几页就没读了&a…
Java数据结构一 —— Java Collections API中的表
1.Collection接口 位于java.util包中,以下是重要的部分。 1 public interface Collection<AnyType> extends Iterable<AnyType> 2 { 3 int size(); 4 boolean isEmpty(); 5 void clear(); 6 boolean add(AnyType x); 7 …

Swift 中的内存管理详解
这篇文章是在阅读《The Swift Programming Language》Automatic Reference Counting(ARC,自动引用计数)一章时做的一些笔记,同时参考了其他的一些资料。 在早期的 iOS 开发中,内存管理是由开发者手动来完成的。因为传统…
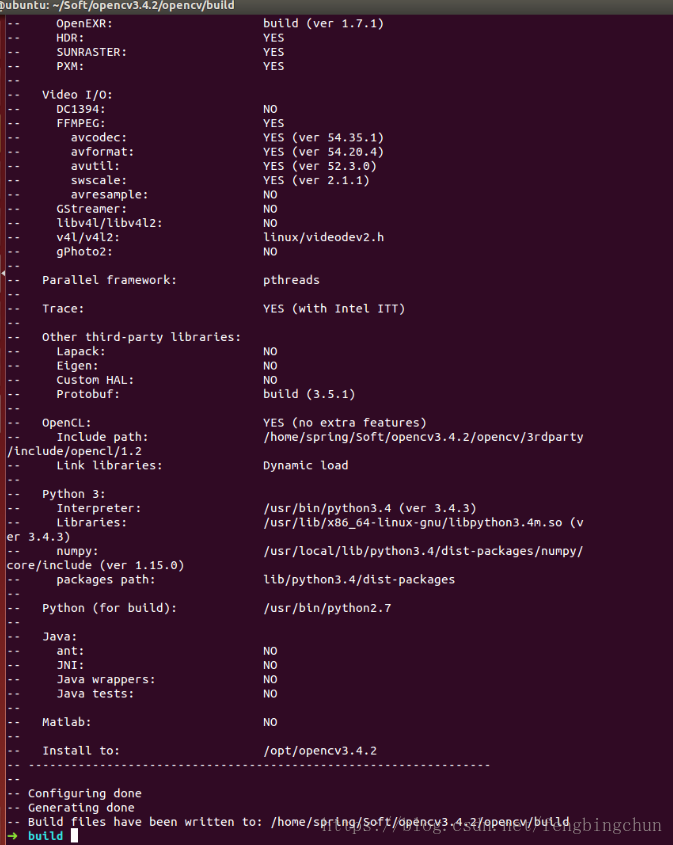
Ubuntu14.04 64位机上配置OpenCV3.4.2+OpenCV_Contrib3.4.2+Python3.4.3操作步骤
Ubuntu 14.04 64位上默认安装了两个版本的python,一个是python2.7.6,另外一个是python3.4.3。这里使用OpenCV最新的稳定版本3.4.2在Ubuntu上安装python3.4.3支持OpenCV的操作步骤如下: 1. 更新包,执行: sudo apt-get update sud…
“Python之父”从Dropbox退休
作者 | 若名出品 | AI科技大本营(ID:rgznai100)10 月 30 日,Python 之父 Guido Van Rossum 宣布将从工作六年的 Dropbox 公司退休,他在 Twitter 上转发了 Dropbox 团队写的《Thank you, Guido》公开信长文。Guido 表示,…
谭浩强《C++程序设计》书后习题 第十三章-第十四章
2019独角兽企业重金招聘Python工程师标准>>> 最近要复习一下C和C的基础知识,于是计划把之前学过的谭浩强的《C程序设计》和《C程序设计》习题重新做一遍。 编译环境为:操作系统32位Win7,编译工具VC6.0 第十三章:输入输…

图像处理库(fbc_cv):源自OpenCV代码提取
在实际项目中会经常用到一些基本的图像处理操作,而且经常拿OpenCV进行结果对比,因此这里从OpenCV中提取了一些代码组织成fbc_cv库。项目fbc_cv所有的代码已放到GitHub中,地址为 https://github.com/fengbingchun/OpenCV_Test ,它…