MySQL5.6.16二进制源码安装详解及一键安装实现
一、系统环境
1.1操作系统
[root@localhost ~]# cat /etc/redhat-release
CentOS Linux release 7.4.1708 (Core)
[root@localhost ~]# uname -rm
10.0-693.el7.x86_64 x86_64
[root@localhost ~]#
1.2 安装前环境监测
1.2.1.SELinux和系统防火墙关闭
检查selinux
[root@localhost ~]# sestatus -v
SELinux status:                 disabled
[root@localhost ~]#
或者使用使用getenforce检查
[root@localhost ~]# getenforce
Disabled
临时关闭selinux
[root@localhost ~]# setenforce 0
setenforce: SELinux is disabled
[root@localhost ~]#
永久关闭,需要修改SELinux的配置文件/etc/selinux/config
[root@localhost ~]# vim /etc/selinux/config
This file controls the state of SELinux on the system.
SELINUX= can take one of these three values:
enforcing - SELinux security policy is enforced.
permissive - SELinux prints warnings instead of enforcing.
disabled - No SELinux policy is loaded.
SELINUX=disabled
SELINUXTYPE= can take one of three two values:
targeted - Targeted processes are protected,
minimum - Modification of targeted policy. Only selected processes are protected.
mls - Multi Level Security protection.
SELINUXTYPE=targeted
防火墙设置
查看当前防火墙状态,已经关闭,而且开机不自启动
[root@localhost ~]# systemctl status firewalld.service
● firewalld.service - firewalld - dynamic firewall daemonLoaded: loaded (/usr/lib/systemd/system/firewalld.service; disabled; vendor preset: enabled)Active: inactive (dead)Docs: man:firewalld(1)临时关闭[root@localhost ~]# systemctl stop firewalld.service
永久关闭,开机不启动[root@localhost ~]# systemctl disable firewalld.service
1.2.2.swap分区 建议不配置或者分配4GB足够
[root@localhost soft]# free -m
total        used        free      shared  buff/cache   available
Mem:           1823         294        1163           9         366        1339
Swap:          2047           0        2047
1.2.3.文件系统的选择,推荐xfs(方便管理,支持动态扩容)
[root@localhost ~]# df -hT
Filesystem              Type      Size  Used Avail Use% Mounted on
/dev/mapper/centos-root xfs        17G  5.0G   13G  29% /
devtmpfs                devtmpfs  897M     0  897M   0% /dev
tmpfs                   tmpfs     912M     0  912M   0% /dev/shm
tmpfs                   tmpfs     912M  9.1M  903M   1% /run
tmpfs                   tmpfs     912M     0  912M   0% /sys/fs/cgroup
/dev/sda1               xfs      1014M  179M  836M  18% /boot
tmpfs                   tmpfs     183M   12K  183M   1% /run/user/42
tmpfs                   tmpfs     183M     0  183M   0% /run/user/0
1.2.4.操作系统限制(ulimit -a查看 主要参数open files max user processes )
[root@localhost ~]# ulimit -a
core file size          (blocks, -c) 0
data seg size           (kbytes, -d) unlimited
scheduling priority             (-e) 0
file size               (blocks, -f) unlimited
pending signals                 (-i) 7168
max locked memory       (kbytes, -l) 64
max memory size         (kbytes, -m) unlimited
open files                      (-n) 1024
pipe size            (512 bytes, -p) 8
POSIX message queues     (bytes, -q) 819200
real-time priority              (-r) 0
stack size              (kbytes, -s) 8192
cpu time               (seconds, -t) unlimited
max user processes              (-u) 7168
virtual memory          (kbytes, -v) unlimited
file locks                      (-x) unlimited
二、开始安装MySQL5.6版本
2.1安装准备
(1)软件版本:5.6.16
(2)安装方式:二进制方式 方便、灵活、管理数据和配置文件便捷
其他安装方式:rpm安装、yum安装
(3)硬件需求:虚拟机内存大小:最少2G
磁盘最少:40G
(4)系统环境:Centos6/7 Redhat 64位
安装包管理在/opt/目录下创建/opt/soft,在官网下载mysql安装包,通过secureCRT或者xshell并上传安装包到此目录。
[root@localhost ~]# ll /opt/soft/
total 297656
rw-r--r-- 1 root root      3222 Mar 22 16:59 my.cnf
rw-r--r-- 1 root root 304788904 Mar 13 20:30 mysql-5.6.16-linux-glibc2.5-x86_64.tar.gz
rw-r--r-- 1 root root      2032 May 11 23:35 mysql_install_binary5.6.16.sh
MySQL下载地址这里给出5.6.40,跟本次的5.6.16的大版本一致。
https://cdn.mysql.com//Downloads/MySQL-5.6/mysql-5.6.40-linux-glibc2.12-x86_64.tar.gz
如下是MySQL下载页面,可以选择需要的版本
https://dev.mysql.com/downloads/mysql/
2.2手动安装步骤如下
2.2.1三部曲
=>创建家目录:(basedir),并授权
/usr/local
解压mysql安装包到家目录 改名称(隐藏版本号)
[root@localhost soft]# tar -zxvf mysql-5.6.16-linux-glibc2.5-x86_64.tar.gz -C /usr/local/
[root@localhost soft]# ll -d /usr/local/mysql*
lrwxrwxrwx  1 root root  46 May 15 09:09 /usr/local/mysql -> /usr/local/mysql-5.6.16-linux-glibc2.5-x86_64/
drwxr-xr-x 13 root root 213 May 15 09:06 /usr/local/mysql-5.6.16-linux-glibc2.5-x86_64
[root@localhost soft]#
授权mysql家目录给mysql用户
[root@localhost soft]# id mysql
uid=27(mysql) gid=27(mysql) groups=27(mysql)
如果没有MySQL用户,可以创建mysql用户授权并查看
[root@localhost soft]# chown -R mysql:mysql /usr/local/mysql
[root@localhost soft]# ll -d /usr/local/mysql
lrwxrwxrwx 1 mysql mysql 46 May 15 09:09 /usr/local/mysql -> /usr/local/mysql-5.6.16-linux-glibc2.5-x86_64/
2曲=>创建数据目录(datadir),并授权
/data/mysql/
授权数据目录给mysql用户
[root@localhost soft]# mkdir -p /data/mysql
[root@localhost soft]# ll -ld /data/mysql/
drwxr-xr-x 2 root root 6 May 15 09:13 /data/mysql/
[root@localhost soft]# chown -R mysql:mysql /data/mysql/
[root@localhost soft]# ll -ld /data/mysql/
drwxr-xr-x 2 mysql mysql 6 May 15 09:13 /data/mysql/
3曲=>配置文件 /etc/my.cnf(安装阶段暂时不需要细看配置文件)
使用已经配置好的
问题:如果修改了/etc/my.cnf文件,只需要重启MySQL服务,然后会加载修改后的my.cnf配置文件。
my.cnf如下
[root@localhost soft]# vim /etc/my.cnf
[client]
port = 3306
socket = /tmp/mysql.sock
[mysql]
prompt="\u@db \R:\m:\s [\d]> "
no-auto-rehash
[mysqld]
user = mysql
port = 3306
basedir = /usr/local/mysql
datadir = /data/mysql/
socket = /tmp/mysql.sock
character-set-server = utf8mb4
skip_name_resolve = 1
open_files_limit    = 65535
back_log = 1024
max_connections = 512
max_connect_errors = 1000000
table_open_cache = 1024
table_definition_cache = 1024
table_open_cache_instances = 64
thread_stack = 512K
external-locking = FALSE
max_allowed_packet = 32M
sort_buffer_size = 4M
join_buffer_size = 4M
thread_cache_size = 768
"/etc/my.cnf" [dos] 115L, 3222C                                                                                                    1,1           Top
[client]
port = 3306
socket = /tmp/mysql.sock
[mysql]
prompt="\u@db \R:\m:\s [\d]> "
no-auto-rehash
[mysqld]
user = mysql
port = 3306
basedir = /usr/local/mysql
datadir = /data/mysql/
socket = /tmp/mysql.sock
character-set-server = utf8mb4
skip_name_resolve = 1
open_files_limit    = 65535
back_log = 1024
max_connections = 512
max_connect_errors = 1000000
table_open_cache = 1024
table_definition_cache = 1024
table_open_cache_instances = 64
thread_stack = 512K
external-locking = FALSE
max_allowed_packet = 32M
sort_buffer_size = 4M
join_buffer_size = 4M
thread_cache_size = 768
query_cache_size = 0
query_cache_type = 0
interactive_timeout = 600
wait_timeout = 600
tmp_table_size = 32M
max_heap_table_size = 32M
slow_query_log = 1
slow_query_log_file = /data/mysql/slow.log
log-error = /data/mysql/error.log
long_query_time = 0.5
server-id = 3306100
log-bin = /data/mysql/mysql-binlog
sync_binlog = 1
binlog_cache_size = 4M
max_binlog_cache_size = 128M
max_binlog_size = 128M
expire_logs_days = 7
master_info_repository = TABLE
relay_log_info_repository = TABLE
gtid_mode = on
enforce_gtid_consistency = 1
log_slave_updates
binlog_format = row
relay_log_recovery = 1
relay-log-purge = 1
key_buffer_size = 32M
read_buffer_size = 8M
read_rnd_buffer_size = 4M
bulk_insert_buffer_size = 64M
lock_wait_timeout = 3600
explicit_defaults_for_timestamp = 1
innodb_thread_concurrency = 0
innodb_sync_spin_loops = 100
innodb_spin_wait_delay = 30
transaction_isolation = REPEATABLE-READ
innodb_buffer_pool_size = 1024M
innodb_buffer_pool_instances = 8
innodb_buffer_pool_load_at_startup = 1
innodb_buffer_pool_dump_at_shutdown = 1
innodb_data_file_path = ibdata1:1G:autoextend
innodb_flush_log_at_trx_commit = 1
innodb_log_buffer_size = 32M
innodb_log_file_size = 2G
innodb_log_files_in_group = 2
innodb_io_capacity = 2000
innodb_io_capacity_max = 4000
innodb_flush_neighbors = 0
innodb_write_io_threads = 8
innodb_read_io_threads = 8
innodb_purge_threads = 4
innodb_page_cleaners = 4
innodb_open_files = 65535
innodb_max_dirty_pages_pct = 50
innodb_flush_method = O_DIRECT
innodb_lru_scan_depth = 4000
innodb_checksum_algorithm = crc32
innodb_lock_wait_timeout = 10
innodb_rollback_on_timeout = 1
innodb_print_all_deadlocks = 1
innodb_file_per_table = 1
innodb_online_alter_log_max_size = 4G
internal_tmp_disk_storage_engine = InnoDB
innodb_stats_on_metadata = 0
innodb_status_file = 1
innodb_status_output = 0
innodb_status_output_locks = 0
performance_schema
performance_schema = 1
performance_schema_instrument = '%=on'
innodb monitor
innodb_monitor_enable="module_innodb"
innodb_monitor_enable="module_server"
innodb_monitor_enable="module_dml"
innodb_monitor_enable="module_ddl"
innodb_monitor_enable="module_trx"
innodb_monitor_enable="module_os"
innodb_monitor_enable="module_purge"
innodb_monitor_enable="module_log"
innodb_monitor_enable="module_lock"
innodb_monitor_enable="module_buffer"
innodb_monitor_enable="module_index"
innodb_monitor_enable="module_ibuf_system"
innodb_monitor_enable="module_buffer_page"
innodb_monitor_enable="module_adaptive_hash"
[mysqldump]
quick
max_allowed_packet = 32M
2.2.2 一步走
(1)初始化MySQL(切换到mysql家目录scripts目录)
./mysql_install_db --basedir=/usr/local/mysql --datadir=/mysql/data --defaults-/etc/my.cnf --user=mysql
-user=mysql 这样初始化完成后,初始化生成的文件的权限都是mysql用户,所以一定加--user=mysql参数。否则初始化完成后还需要单独授权生成的文件。
初始化完成后,会有两个OK提示,就成功完成mysql的初始化。此时查看/data/mysql下的文件,同时查看所有文件的权限是mysql
[root@localhost mysql]# cd /usr/local/mysql/scripts/
[root@localhost scripts]# ./mysql_install_db   --basedir=/usr/local/mysql --datadir=/data/mysql --defaults-/etc/my.cnf --user=mysql
Installing MySQL system tables...
查看日志
[root@localhost ~]# less /data/mysql/error.log |grep ERROR
05-15 09:18:07 4131 [ERROR] /usr/local/mysql/bin/mysqld: unknown option '--defaults-/etc/my.cnf'
05-15 09:18:07 4131 [ERROR] Aborting
粗心大意,把配置文件那边写错了。修改后继续
[root@localhost scripts]# ./mysql_install_db   --basedir=/usr/local/mysql --datadir=/data/mysql --defaults-file=/etc/my.cnf --user=mysql
**Installing MySQL system tables...OK**Filling help tables...OK**To start mysqld at boot time you have to copy
support-files/mysql.server to the right place for your systemPLEASE REMEMBER TO SET A PASSWORD FOR THE MySQL root USER !
To do so, start the server, then issue the following commands:**/usr/local/mysql/bin/mysqladmin -u root password 'new-password'
/usr/local/mysql/bin/mysqladmin -u root -h localhost.localdomain password 'new-password'**Alternatively you can run:**/usr/local/mysql/bin/mysql_secure_installation**which will also give you the option of removing the test
databases and anonymous user created by default.  This is
strongly recommended for production servers.See the manual for more instructions.**You can start the MySQL daemon with:**
**
cd . ; /usr/local/mysql/bin/mysqld_safe &**You can test the MySQL daemon with mysql-test-run.plcd mysql-test ; perl mysql-test-run.plPlease report any problems at http://bugs.mysql.com/The latest information about MySQL is available on the web athttp://www.mysql.comSupport MySQL by buying support/licenses at http://shop.mysql.comWARNING: Found existing config file /usr/local/mysql/my.cnf on the system.
Because this file might be in use, it was not replaced,
but was used in bootstrap (unless you used --defaults-file)
and when you later start the server.
The new default config file was created as /usr/local/mysql/my-new.cnf,
please compare it with your file and take the changes you need.WARNING: Default config file /etc/my.cnf exists on the system
This file will be read by default by the MySQL server
If you do not want to use this, either remove it, or use the
-defaults-file argument to mysqld_safe when starting the server
2.2.3MySQL安装成功。

2.2.4启动MySQL
[root@localhost ~]#   /usr/local/mysql/bin/mysqld_safe  &
[1] 5771
[root@localhost ~]# 180515 09:28:48 mysqld_safe Logging to '/data/mysql/error.log'.
09:28:48 mysqld_safe Starting mysqld daemon with databases from /data/mysql/
09:28:50 mysqld_safe mysqld from pid file /data/mysql//localhost.localdomain.pid ended[1]+  Done                    /usr/local/mysql/bin/mysqld_safe
[root@localhost ~]# ps -ef|grep 3306
root       7094   3559  0 09:29 pts/2    00:00:00 grep --color=auto 3306
启动出错,查看日志
日志显示,3306端口正在使用,查看端口情况
[root@localhost ~]# netstat -nltp|grep mysql
tcp        0      0 0.0.0.0:3306            0.0.0.0:*               LISTEN      1373/mysqld
[root@localhost ~]# kill -9  1373
[root@localhost ~]#
此时查看mysql以及端口3306
[root@localhost ~]# netstat -nltp|grep mysql
[root@localhost ~]# netstat -nltp|grep 3306
再次启动MySQL服务器
[root@localhost ~]# /usr/local/mysql/bin/mysqld_safe &
[1] 10033
[root@localhost ~]#
[root@localhost ~]# 180515 09:38:52 mysqld_safe Logging to '/data/mysql/error.log'.
180515 09:38:52 mysqld_safe Starting mysqld daemon with databases from /data/mysql/
启动成功如下
[root@localhost ~]# ps -ef|grep mysql
root      10033   3559  0 09:38 pts/2    00:00:00 /bin/sh /usr/local/mysql/bin/mysqld_safe
mysql     11320  10033  3 09:38 pts/2    00:00:00 /usr/local/mysql/bin/mysqld --basedir=/usr/local/mysql --datadir=/data/mysql/ --plugin-dir=/usr/local/mysql/lib/plugin --user=mysql --log-error=/data/mysql/error.log --open-files-limit=65535 --pid-file=/data/mysql//localhost.localdomain.pid --socket=/tmp/mysql.sock --port=3306
root      11355   3559  0 09:39 pts/2    00:00:00 grep --color=auto mysql
[root@localhost ~]# ps -ef|grep 3306
mysql     11320  10033  3 09:38 pts/2    00:00:00 /usr/local/mysql/bin/mysqld --basedir=/usr/local/mysql --datadir=/data/mysql/ --plugin-dir=/usr/local/mysql/lib/plugin --user=mysql --log-error=/data/mysql/error.log --open-files-limit=65535 --pid-file=/data/mysql//localhost.localdomain.pid --socket=/tmp/mysql.sock --port=3306
root      11357   3559  0 09:39 pts/2    00:00:00 grep --color=auto 3306
[root@localhost ~]#
2.2.5 MySQL密码设置
登录MySQL服务器,默认没有密码
[root@localhost ~]# mysql
Welcome to the MariaDB monitor.  Commands end with ; or \g.
Your MySQL connection id is 1
Server version: 5.6.16-log MySQL Community Server (GPL)Copyright (c) 2000, 2017, Oracle, MariaDB Corporation Ab and others.Type 'help;' or '\h' for help. Type '\c' to clear the current input statement.root@db 09:39:  [(none)]>
2.2.6安装完成后的优化
(1)密码设置:目前root用户没有密码,那么设置root用户密码
 root@db 09:42:  [(none)]> use mysql;
Database changed
root@db 09:42:  [mysql]> update user set password=password('123456') where user='root';
Query OK, 4 rows affected (0.00 sec)
Rows matched: 4  Changed: 4  Warnings: 0
root@db 09:42:  [mysql]> flush privileges;
Query OK, 0 rows affected (0.00 sec)
测试修改后密码
//使用原来空密码登录,提示密码错误
[root@localhost ~]# mysql
ERROR 1045 (28000): Access denied for user 'root'@'localhost' (using password: NO)
//使用新密码登录,成功。
[root@localhost ~]# mysql -uroot -p123456
Welcome to the MariaDB monitor.  Commands end with ; or \g.
Your MySQL connection id is 4
Server version: 5.6.16-log MySQL Community Server (GPL)
Copyright (c) 2000, 2017, Oracle, MariaDB Corporation Ab and others.
Type 'help;' or '\h' for help. Type '\c' to clear the current input statement.
root@db 09:47:  [(none)]>
(2)mysql远程登录用户设置,安装完数据库后mysql数据库用户的管理。 只保留一个 localhost root
root@db 09:42:  [mysql]> use mysql
Database changed
root@db 09:43:  [mysql]> select host,user,password from user;
+-----------------------+------+-------------------------------------------+
| host                  | user | password                                  |
+-----------------------+------+-------------------------------------------+
| localhost             | root | *6BB4837EB74329105EE4568DDA7DC67ED2CA2AD9 |
| localhost.localdomain | root | *6BB4837EB74329105EE4568DDA7DC67ED2CA2AD9 |
| 127.0.0.1             | root | *6BB4837EB74329105EE4568DDA7DC67ED2CA2AD9 |
| ::1                   | root | *6BB4837EB74329105EE4568DDA7DC67ED2CA2AD9 |
null
| localhost             |      |                                           |
| localhost.localdomain |      |                                           |
+-----------------------+------+-------------------------------------------+
6 rows in set (0.00 sec)root@db 09:43:  [mysql]>  delete from user where host!='localhost' or user!='root';
Query OK, 5 rows affected (0.01 sec)root@db 09:44:  [mysql]> select host,user,password from user;
+-----------+------+-------------------------------------------+
| host      | user | password                                  |
+-----------+------+-------------------------------------------+
| localhost | root | *6BB4837EB74329105EE4568DDA7DC67ED2CA2AD9 |
+-----------+------+-------------------------------------------+
1 row in set (0.00 sec)root@db 09:44:  [mysql]>
【补充】
(1)我这里提前配置好了MySQL的环境变量
环境变量如下,环境变量修改
echo "export PATH=$PATH:/usr/local/mysql/bin" >> /etc/profile
source /etc/profile
(2)可以通过msyql自带的脚本,启动mysql
[root@localhost ~]# cp /usr/local/mysql/support-files/mysql.server /etc/init.d/mysqld
[root@localhost ~]# ll -ld /etc/init.d/mysqld
-rwxr-xr-x 1 root root 10880 May 15 09:34 /etc/init.d/mysqld
[root@localhost ~]# /etc/init.d/mysqld statusSUCCESS! MySQL running (11320)
我们刚刚启动了MySQL 因此现在看到的状态是正在运行。
(3)加入开机自启动
[root@localhost ~]# chkconfig --add mysqld
[root@localhost ~]# chkconfig --list mysqld
Note: This output shows SysV services only and does not include nativesystemd services. SysV configuration data might be overridden by nativesystemd configuration.
nullIf you want to list systemd services use 'systemctl list-unit-files'.To see services enabled on particular target use'systemctl list-dependencies [target]'.
mysqld          0:off   1:off   2:on    3:on    4:on    5:on    6:off
如上使用了centos6的命令添加开机自动开启服务的命令,可以使用7版本新的命令。
查看系统当前默认启动项目的方法[root@localhost ~]# systemctl list-unit-files
以上步骤,通过shell脚本实现,这里,把MySQL二进制包,MySQL安装shell,配置文件都放在/opt/soft目录下
[root@localhost ~]# ll /opt/soft/
total 297656
rw-r--r-- 1 root root      3222 Mar 22 16:59 my.cnf
rw-r--r-- 1 root root 304788904 Mar 13 20:30 mysql-5.6.16-linux-glibc2.5-x86_64.tar.gz
rw-r--r-- 1 root root      2032 May 11 23:35 mysql_install_binary5.6.16.sh
脚本如下
#!/bin/sh
#测试系统:Centos6.5 Centos7.4
#脚本使用前,提前准备好二进制安装包,创建/opt/soft放在/opt/soft下 配置文件放在/etc/my.cnf
#脚本不足:没有对预定好的mysql家目录 /usr/local/mysql和mysql数据目录/data/mysql以及/etc/my.cnf做判断,默认是这两个目录不存在或者目录是没有内容的,如果有内容可能会有警告
#对对应变量进行赋值
group=mysql
user=mysql
basedir=/usr/local/mysql/
datadir=/data/mysql/
mysql_package="mysql-5.6.16-linux-glibc2.5-x86_64"#准备开始
echo "Installing :" $mysql_package#--用户创建--
#匹配该文件中以$group变量值开头的内容
#创建组,如果组存在就直接执行如下命令
#--egrep在文件中查找指定模式
#--^表示匹配的字符必须在最前边 字符$与^类似,匹配最末的字符.egrep "^$group" /etc/group >& /dev/null
if [ $? -ne 0 ]
thengroupadd $group
fi#创建用户,如果用户存在就直接执行如下命令
egrep "^$user" /etc/passwd >& /dev/null
if [ $? -ne 0 ]
thenuseradd $user -g $group -p 123456 -s /sbin/nologin -M
fi
#第一曲:解压二进制安装包
tar -zxvf /opt/soft/$mysql_package.tar.gz -C /usr/local#重命名 隐藏版本号
cd /usr/local/
mv $mysql_package mysql#第二曲:创建数据目录
mkdir -p $datadir#授权--授权mysql家目录basedir和mysql数据目录datadir
cd /usr/local/mysql
chown -R $group:$user $basedir
mkdir -p $datadir
chown -R $group:$user $datadir
#第三曲:配置文件(提前准备好)
cp /opt/soft/my.cnf /etc/
#一步走:mysql初始化
cd $basedir/scripts/
./mysql_install_db --user=$user --basedir=$basedir --datadir=$datadir --defaults-file=/etc/my.cnf
#加入开机自启动
cp $basedir/support-files/mysql.server /etc/rc.d/init.d/mysqld
chkconfig --add mysqld
#环境变量修改
echo "export PATH=$PATH:$basedir/bin" >> /etc/profile
source /etc/profile#启动mysql服务
/etc/init.d/mysqld start
#启动结果
echo $mysql_package "install success."
#登陆mysql
mysql```脚本根据如上的安装步骤写的,这里,在另外一台服务器上通过该脚本一键部署安装MySQL
如下[root@localhost ~]# cd /opt/soft/
[root@localhost soft]# ll
total 297660
-rw-r--r--. 1 root root 3222 Apr 12 10:16 my.cnf
-rw-r--r--. 1 root root 304788904 Mar 13 20:30 mysql-5.6.16-linux-glibc2.5-x86_64.tar.gz
-rw-r--r--. 1 root root 1908 Apr 12 11:55 mysql_install_binary5.6.16.sh
-rw-r--r--. 1 root root 1904 Apr 12 11:57 mysql_install_binary5.6.33.sh
[root@localhost soft]#
[root@localhost soft]# sh mysql_install_binary5.6.16
Installing MySQL system tables...OK
Filling help tables...OK
安装成功,启动失败。WARNING: Default config file /etc/my.cnf exists on the system
This file will be read by default by the MySQL server
If you do not want to use this, either remove it, or use the
--defaults-file argument to mysqld_safe when starting the server
Starting MySQL.................. ERROR! The server quit without updating PID file (/data/mysql//localhost.localdomain.pid).
mysql-5.6.16-linux-glibc2.5-x86_64 install success.
ERROR 2002 (HY000): Can't connect to local MySQL server through socket '/tmp/mysql.sock' (2)
查看日志[root@localhost soft]# cat /data/mysql/error.log |grep ERROR
2018-05-15 11:28:23 8163 [ERROR] Can't start server: Bind on TCP/IP port: Address already in use
2018-05-15 11:28:23 8163 [ERROR] Do you already have another mysqld server running on port: 3306 ?
2018-05-15 11:28:23 8163 [ERROR] Aborting
`和上面手动安装错误一样,kill掉占用3306的线程`
[root@localhost soft]# netstat -nltp|grep 3306
tcp6 0 0 :::3306 :::* LISTEN 3066/mysqld
[root@localhost soft]# kill -9 3066
[root@localhost soft]# netstat -nltp|grep 3306
再次启动MySQL[root@localhost soft]# /etc/init.d/mysqld start
Starting MySQL.................. SUCCESS!
[root@localhost soft]# mysql
Welcome to the MySQL monitor. Commands end with ; or \g.
Your MySQL connection id is 1
Server version: 5.6.16-log MySQL Community Server (GPL)
Copyright (c) 2000, 2014, Oracle and/or its affiliates. All rights reserved.
Oracle is a registered trademark of Oracle Corporation and/or its
affiliates. Other names may be trademarks of their respective
owners.
Type 'help;' or '\h' for help. Type '\c' to clear the current input statement.
null
root@db 11:37: [(none)]>
启动成功,到此,MySQL二进制安装部署,一键安装完成。由于时间有限,难免有错误,请大家给与指正。希望对各位学习有帮助。转载于:https://blog.51cto.com/it3246/2116492
相关文章:

基于 OpenCV 的表格文本内容提取
作者 | 小白来源 | 小白学视觉小伙伴们可能会觉得从图像中提取文本是一件很麻烦的事情,尤其是需要提取大量文本时。PyTesseract是一种光学字符识别(OCR),该库提了供文本图像。PyTesseract确实有一定的效果,用PyTessera…

Redis以及Redis的php扩展安装无错版
安装Redis 下载最新的 官网:http://redis.io/ 或者 http://code.google.com/p/redis/downloads/list第一步:下载安装编译 #wget http://redis.googlecode.com/files/redis-2.4.4.tar.gz#tar zxvf redis-2.4.4.tar.gz#cd redis-2.4.4#make #make instal…

Android UI SurfaceView的使用-绘制组合图型,并使其移动
绘制容器类: //图形绘制容器 public class Contanier {private List<Contanier> list;private float x0,y0;public Contanier(){listnew ArrayList<Contanier>();}public void draw(Canvas canvas){canvas.save();canvas.translate(getX(), getY());chi…

新型混合共识机制及抗量子特性的 Hcash 主链测试链即将上线
由上海交通大学密码与计算机安全实验室(LoCCS)及上海观源信息科技有限公司负责研发的、具有新型混合共识机制及抗量子特性的 Hcash 主链代码已完成并在 2017 年 12 月18 日之前上传至github: https://github.com/HcashOrg/hcashd https://git…
CentOS 6虚拟机安装
这篇博客已经被合并到这里了: 虚拟机安装CentOS以及SecureCRT设置【完美无错版】 下面不用看了,看上面即可 1.下载虚拟机Oracle VM VirtualBox最新的下载地址: http://download.virtualbox.org/virtualbox/4.1.6/VirtualBox-4.1.6-74713-Win…

开发中新游戏《庞加莱》
三体题材的游戏,表现三体人在三体星上生活和冒险。收集水和物器,躲避火焰与巨日,探索遗迹并与巨型生物战斗。温度会因太阳位置不同而发生变化,进而对环境产生一定影响。 游戏开发中。 ---- 2017-4-27版视频: http://v.…

介绍一个打怪升级练习 Python 的网站,寓教于乐~
作者 | 周萝卜来源 | 萝卜大杂烩这是一个学习 Python 的趣味网站,通过关卡的形式来锻炼 Python 水平。一共有 33 关,每一关都需要利用 Python 知识解题找到答案,然后进入下一关。很考验对 Python 的综合掌握能力,比如有的闯关需要…
hive基本操作与应用
通过hadoop上的hive完成WordCount 启动hadoop ssh localhost cd /usr/local/hadoop ./sbin/start-dfs.sh cd /usr/local/hive/lib service mysql start start-all.sh Hdfs上创建文件夹 hdfs dfs -mkdir test1 hdfs dfs -ls /user/hadoop 上传文件至hdfs hdfs dfs -put ./try.tx…
PHP源代码分析-字符串搜索系列函数实现详解
今天和同事在讨论关键字过虑的算法实现,前几天刚看过布隆过滤算法,于是就想起我们公司内部的查找关键字程序,好奇是怎么实现的。于是查找了一下源代码,原来可以简单地用stripos函数查找, stripos原型如下: …

麻省理工研究:深度图像分类器,居然还会过度解读
作者 | 青苹果来源 | 数据实战派某些情况下,深度学习方法能识别出一些在人类看来毫无意义的图像,而这些图像恰恰也是医疗和自动驾驶决策的潜在隐患所在。换句话说,深度图像分类器可以使用图像的边界,而非对象本身,以超…
Oracle 查询转换之子查询展开
概念:子查询展开(Subquery Unnesting)是优化器处理带子查询的目标sql的一种优化手段,它是指优化器不再将目标sql中子查询当作一个独立的处理单元来单独执行,而是将该子查询转换为它自身和外部查询之间等价的表连接。这种等价连接转…
Xcode中通过删除原先版本的程序来复位App
可以在Xcode菜单中点击 Product->Clean Build Folder (按住Option键,在windows键盘中是Alt键.) 此时Xcode将会从设备中删除(卸载uninstall)任何该app之前部署的版本. 接下来重启Xcode,再试一下,有时这可以修复非常奇怪(really weird)的问题.
深入理解PHP之OpCode
OpCode是一种PHP脚本编译后的中间语言,就像Java的ByteCode,或者.NET的MSL。 此文主要基于《 Understanding OPcode》和 网络,根据个人的理解和修改,特记录下来 :PHP代码: <?phpecho "Hello World";$a 1…

关于 AIOps 的过去与未来,微软亚洲研究院给我们讲了这些故事
作者 | 贾凯强出品 | AI科技大本营(ID:rgznai100)在过去的15年里,云计算实现了飞速发展,而这种发展也为诸多的前沿技术奠定了基础,AIOps便在此环境中获得了良好的发展契机。在数字化转型的浪潮下,云计算已经…
JS 正则表达式 0.001 ~99.999
^(0|[1-9][0-9]?)(\.[0-9]{0,2}[1-9])?$转载于:https://www.cnblogs.com/wahaha603/p/9050130.html
深入浅出PHP(Exploring PHP)
一直以来,横观国内的PHP现状,很少有专门介绍PHP内部机制的书。呵呵,我会随时记录下研究的心得,有机会的时候,汇总成书。:) 今天这篇,我内心是想打算做为一个导论: PHP是一个被广泛应用的脚本语言…

懒人神器 !一个创意十足的 Python 命令行工具
作者 | 写代码的明哥来源 | Python编程时光当听到某些人说 xx 库非常好用的时候,我们总是忍不住想要去亲自试试。有一些库,之所以好用,是对一些库做了更高级的封闭,你装了这个库,就会附带装了 n 多依赖库,就…
Regular Expression Matching
正则匹配 Regular Expression Matching Implement regular expression matching with support for . and *. . Matches any single character. * Matches zero or more of the preceding element.The matching should cover the entire input string (not partial).The functio…

PI校正环节的程序实现推导过程
PI校正环节在经典控制论中非常有用,特别是对负反馈控制系统,基本上都有PI校正环节。1.下面分别说明比例环节和积分环节的作用,以阶跃信号为例。①比例环节单独作用以上分析说明,若只有比例环节的控制系统,阶跃响应也是…

几行 Python 代码实现邮件解析,超赞~
作者 | Yunlor来源 | CSDN博客前言如何通过python实现邮件解析?邮件的格式十分复杂,主要是mime协议,本文主要是从实现出发,具体原理可以自行研究。一、安装通过mailgun开源的Flanker库实现邮件解析。该库包含了邮件地址解析和邮件…
深入理解PHP原理之变量(Variables inside PHP)
或许你知道,或许你不知道,PHP是一个弱类型,动态的脚本语言。所谓弱类型,就是说PHP并不严格验证变量类型(严格来讲,PHP是一个中强类型语言,这部分内容会在以后的文章中叙述),在申明一个变量的时候࿰…

jQuery中的.height()、.innerHeight()和.outerHeight()
jQuery中的.height()、.innerHeight()和.outerHeight()和W3C的盒模型相关的几个获取元素尺寸的方法。对应的宽度获取方法分别为.width()、.innerWidth()和.outerWidth(),在此不详述。1. .height()获取匹配元素集合中的第一个元素的当前计算高度值 或 设置每一个匹配…

Python实战之logging模块使用详解
用Python写代码的时候,在想看的地方写个print xx 就能在控制台上显示打印信息,这样子就能知道它是什么了,但是当我需要看大量的地方或者在一个文件中查看的时候,这时候print就不大方便了,所以Python引入了logging模块来…
深入理解PHP原理之变量作用域
作者:laruence(http://www.laruence.com/)地址: http://www.laruence.com/2008/08/26/463.html PHP变量的内部表示是如何和用户脚本中的变量联系起来的呢?也就是说,如果我在脚本中写下:<?php $var"laruen…
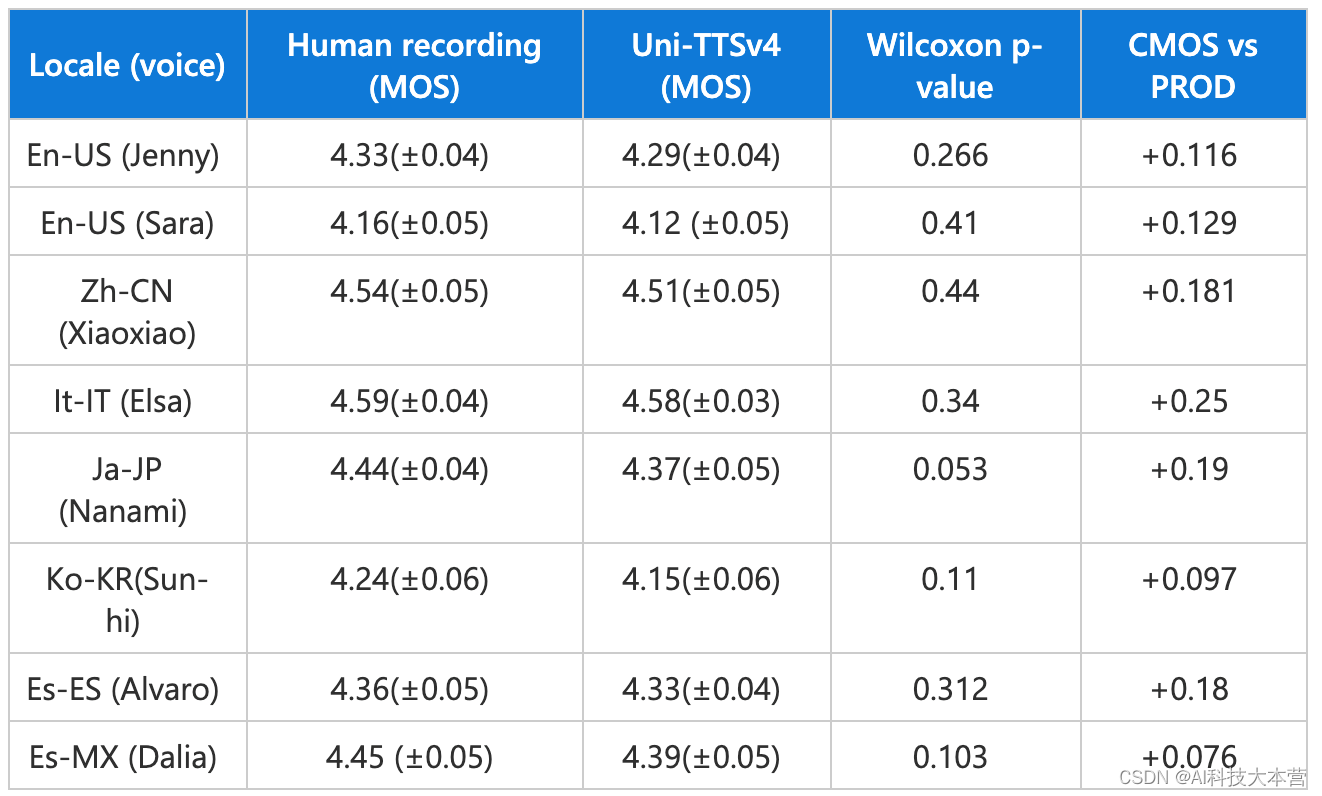
Azure AI的又一里程碑,Neural TTS新模型呈现真人般情感饱满的AI语音
在人与人之间的对话中,即使是同样的字句,也会因为所处情景和情感的不同而表现出丰富的抑扬顿挫,而这种动态性恰恰是各种AI合成语音的“软肋”。相比于人类讲话时丰富多变的语气,AI语音的“心平气和”往往给人带来明显的违和感。 …
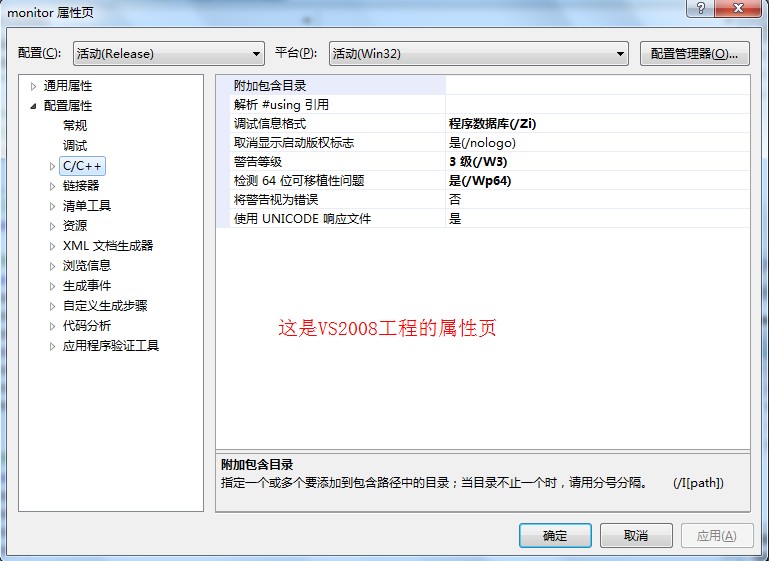
VS2010中“工具选项中的VC++目录编辑功能已被否决”解决方法
http://blog.csdn.net/chaijunkun/article/details/6658923 这是VS2010的改变,不能够在“工具-选项”中看到“VC目录”了。 但是呢,我们可以在另外一个地方找到它,请看下边的对比照片。 VS2008中: VS2010中: 打开方式非…
Bminer 7.0.0 ETH挖矿教程(Linux 64)
Bminer产品介绍Bminer是目前最快的挖矿程序,Bminer是基于NVIDIA GPU深度优化的挖矿软件。Bminer支持Equihash和Ethash两种算法的虚拟币,包括:ETH(以太坊),ETC,ZEC(零币),…
深入理解PHP原理之变量分离/引用(Variables Separation)
引自: http://www.laruence.com/ [风雪之隅 ]在前面的文章中我已经介绍了PHP的变量的内部表示(深入理解PHP原理之变量(Variables inside PHP)),以及PHP中作用域的实现机制(深入理解PHP原理之变量作用域(Scope inside PHP))。这节我们就接着前面的文章,继…
C# 属性、索引
属性(property): public string Name {get{return _name;}set{_name value;} } 简写为: public string Name { set; get;} 索引器(index): 索引器为C#程序语言中泪的一种成员,它是的对象可…

分享几段祖传的 Python 代码,拿来直接使用!
作者 | 周萝卜来源 | 萝卜大杂烩今天分享几段工作生活中常用的代码,都是最为基础的功能和操作,而且大多还都是出现频率比较高的,很多都是可以拿来直接使用或者简单修改就可以放到自己的项目当中日期生成很多时候我们需要批量生成日期…