python-opencv 定位识别读表
import cv2
import numpy as np
import math
import matplotlib.pyplot as plt
"""
函数的格式为:kmeans(data, K, bestLabels, criteria, attempts, flags)
(1)data: 分类数据,最好是np.float32的数据,每个特征放一列。之所以是np.float32原因是这种数据类型运算速度快,同样的数据下如果是uint型数据将会慢死你。
(2) K: 分类数,opencv2的kmeans分类是需要已知分类数的。
(3) bestLabels:预设的分类标签:没有的话 None
(4) criteria:迭代停止的模式选择,这是一个含有三个元素的元组型数。格式为(type,max_iter,epsilon)
其中,type又有两种选择:
—–cv2.TERM_CRITERIA_EPS :精确度(误差)满足epsilon停止。
—- cv2.TERM_CRITERIA_MAX_ITER:迭代次数超过max_iter停止。
—-cv2.TERM_CRITERIA_EPS+cv2.TERM_CRITERIA_MAX_ITER,两者合体,任意一个满足结束。
(5)attempts:重复试验kmeans算法次数,将会返回最好的一次结果
(6)flags:初始类中心选择,两种方法
cv2.KMEANS_PP_CENTERS ; cv2.KMEANS_RANDOM_CENTERS
"""
def panelAbstract(srcImage):imgHeight,imgWidth = srcImage.shape[:2]imgHeight = int(imgHeight);imgWidth = int(imgWidth)# 均值聚类提取前景:二维转一维imgVec = np.float32(srcImage.reshape((-1,3)))criteria = (cv2.TERM_CRITERIA_EPS + cv2.TERM_CRITERIA_MAX_ITER,10,1.0)flags = cv2.KMEANS_RANDOM_CENTERSret,label,clusCenter = cv2.kmeans(imgVec,2,None,criteria,10,flags)clusCenter = np.uint8(clusCenter)clusResult = clusCenter[label.flatten()]imgres = clusResult.reshape((srcImage.shape))imgres = cv2.cvtColor(imgres,cv2.COLOR_BGR2GRAY)bwThresh = int((np.max(imgres)+np.min(imgres))/2)_,thresh = cv2.threshold(imgres,bwThresh,255,cv2.THRESH_BINARY_INV)threshRotate = cv2.merge([thresh,thresh,thresh])# 确定前景外接矩形contours, hierarchy = cv2.findContours(thresh,cv2.RETR_EXTERNAL,cv2.CHAIN_APPROX_SIMPLE)minvalx = np.max([imgHeight,imgWidth]);maxvalx = 0minvaly = np.max([imgHeight,imgWidth]);maxvaly = 0maxconArea = 0;maxAreaPos = -1for i in range(len(contours)):if maxconArea < cv2.contourArea(contours[i]):maxconArea = cv2.contourArea(contours[i])maxAreaPos = iobjCont = contours[maxAreaPos]# 旋转校正前景rect = cv2.minAreaRect(objCont)for j in range(len(objCont)):minvaly = np.min([minvaly,objCont[j][0][0]])maxvaly = np.max([maxvaly,objCont[j][0][0]])minvalx = np.min([minvalx,objCont[j][0][1]])maxvalx = np.max([maxvalx,objCont[j][0][1]])if rect[2] <=-45:rotAgl = 90 +rect[2]else:rotAgl = rect[2]if rotAgl == 0:panelImg = srcImage[minvalx:maxvalx,minvaly:maxvaly,:]else:rotCtr = rect[0]rotCtr = (int(rotCtr[0]),int(rotCtr[1]))rotMdl = cv2.getRotationMatrix2D(rotCtr,rotAgl,1)imgHeight,imgWidth = srcImage.shape[:2]#图像的旋转dstHeight = math.sqrt(imgWidth *imgWidth + imgHeight*imgHeight)dstRotimg = cv2.warpAffine(threshRotate,rotMdl,(int(dstHeight),int(dstHeight)))dstImage = cv2.warpAffine(srcImage,rotMdl,(int(dstHeight),int(dstHeight)))dstRotimg = cv2.cvtColor(dstRotimg,cv2.COLOR_BGR2GRAY)_,dstRotBW = cv2.threshold(dstRotimg,127,255,0)contours, hierarchy = cv2.findContours(dstRotBW,cv2.RETR_EXTERNAL,cv2.CHAIN_APPROX_SIMPLE)maxcntArea = 0;maxAreaPos = -1for i in range(len(contours)):if maxcntArea < cv2.contourArea(contours[i]):maxcntArea = cv2.contourArea(contours[i])maxAreaPos = ix,y,w,h = cv2.boundingRect(contours[maxAreaPos])#提取前景:panelpanelImg = dstImage[int(y):int(y+h),int(x):int(x+w),:]panel_img = cv2.imwrite('image2/panel_img.png', panelImg)  # 将画上矩形的图形保存到当前目录# cv2.imshow("img", img)# cv2.imshow("mask", mask)# cv2.imshow("target", target)cv2.imshow("panel_img", panel_img)return panelImgdef getTaeget(targetImg):kernel_4 = cv2.getStructuringElement(cv2.MORPH_RECT, (2, 2))HSV = cv2.cvtColor(targetImg, cv2.COLOR_BGR2HSV)  # 把BGR图像转换为HSV格式Lower = np.array([0, 3, 5])  # 要识别颜色-红色的下限    ## 0 5 5 10 255 255Upper = np.array([10, 255, 255])  # 要识别的颜色-红色的上限# mask是把HSV图片中在颜色范围内的区域变成白色,其他区域变成黑色mask = cv2.inRange(HSV, Lower, Upper)erosion = cv2.erode(mask, kernel_4, iterations=1)erosion = cv2.erode(erosion, kernel_4, iterations=1)dilation = cv2.dilate(erosion, kernel_4, iterations=1)dilation = cv2.dilate(dilation, kernel_4, iterations=1)# target是把原图中的非目标颜色区域去掉剩下的图像target = cv2.bitwise_and(targetImg, targetImg, mask=dilation)# 将滤波后的图像变成二值图像放在binary中ret, binary = cv2.threshold(dilation, 127, 255, cv2.THRESH_BINARY)# 在binary中发现轮廓,轮廓按照面积从小到大排列contours, hierarchy = cv2.findContours(binary, cv2.RETR_EXTERNAL, cv2.CHAIN_APPROX_SIMPLE)w_ = []for i in contours:  # 遍历所有的轮廓x1, y1, w, h = cv2.boundingRect(i)  # 将轮廓分解为识别对象的左上角坐标和宽、高w_.append(w)i = w_.index(max(w_))x, y, w, h = cv2.boundingRect(contours[i])# cv2.rectangle(img, (x, y), (x + w, y + h), (0, 255,), 3)cropped = targetImg[y - 480:y + 380, x - 190:x + 280]  # 裁剪坐标为[y0:y1, x0:x1]# cv_cut_img_circle = cv2.imwrite("image/cv_cut_img_circle.png", cropped)# print(x, y, w, h)target_img = cv2.imwrite('image2/target_img.png', cropped)  # 将画上矩形的图形保存到当前目录# cv2.imshow("img", img)# cv2.imshow("mask", mask)# cv2.imshow("target", target)cv2.imshow("target_img", target_img)# cv2.waitKey(600)return croppeddef getGuage(cicleImg):gaus = cv2.GaussianBlur(cicleImg, (3, 3), 0)gray_img = cv2.cvtColor(gaus, cv2.COLOR_BGR2GRAY)gradx = cv2.Sobel(gray_img, cv2.CV_16SC1, 1, 0)grady = cv2.Sobel(gray_img, cv2.CV_16SC1, 0, 1)canny_img = cv2.Canny(gradx, grady, 50, 200)  # 黑白的边缘 高低阈值比值为2:1或3:1最佳(50:150 = 1:3)ret_2, binary_2 = cv2.threshold(canny_img, 127, 255, cv2.THRESH_BINARY)contours_2, hierarchy_2 = cv2.findContours(binary_2, cv2.RETR_TREE, cv2.CHAIN_APPROX_SIMPLE)h_2_ = []for j in contours_2:  # 遍历所有的轮廓x1_2, y1_2, w_2, h_2 = cv2.boundingRect(j)  # 将轮廓分解为识别对象的左上角坐标和宽、高h_2_.append(h_2)j = h_2_.index(max(h_2_))# print(max(h_))# h_2_ = (float(max(h_2_))) * 0.878# print(max(h_))# print("h_2_=", h_2_)x_2, y_2, w_2, h_2 = cv2.boundingRect(contours_2[j])print("x_2, y_2, w_2, h_2=",x_2, y_2, w_2, h_2)print("h_2 = ",h_2)cv2.rectangle(cicleImg, (x_2, y_2), (x_2 + w_2, y_2 + h_2), (0, 255,), 3)# cropped = cicleImg[(y_2 - 228):(y_2 + 118), (x_2 - 112):(x_2 - 80)]  # 裁剪坐标为[y0:y1, x0:x1]cropped = cicleImg[(y_2):(y_2 + h_2), (x_2):(x_2 + w_2)]cv_cut_guage = cv2.imwrite("image2/cv_cut_guage.png", cropped)cv2.imshow("cicleImg", cicleImg)# cv2.imshow("mask", mask)# cv2.imshow("target", target)cv2.imshow("canny_img", canny_img)cv2.imshow("cv_cut_guage", cv_cut_guage)return croppedif __name__=="__main__":srcImage = cv2.imread('image_guage/DSC_1394.JPG')#####040  400  145  235(error) 1394 1361(error) 035(error)# srcImage = cv2.imread('image2/1576638923.jpg')panelImg = panelAbstract(srcImage)targetImg = getTaeget(panelImg)cut_guage = getGuage(targetImg)gray_img = cv2.cvtColor(cut_guage, cv2.COLOR_BGR2GRAY)gaus = cv2.GaussianBlur(gray_img, (3, 3), 0)gradx = cv2.Sobel(gray_img, cv2.CV_16SC1, 1, 0)grady = cv2.Sobel(gray_img, cv2.CV_16SC1, 0, 1)canny_img = cv2.Canny(gradx, grady, 50, 300)  # 黑白的边缘 高低阈值比值为2:1或3:1最佳(50:150 = 1:3)ret_2, binary_2 = cv2.threshold(canny_img, 127, 255, cv2.THRESH_BINARY)contours_2, hierarchy_2 = cv2.findContours(binary_2, cv2.RETR_TREE, cv2.CHAIN_APPROX_SIMPLE)#h_2_ = []for j in contours_2:  # 遍历所有的轮廓x1_2, y1_2, w_2, h_2 = cv2.boundingRect(j)  # 将轮廓分解为识别对象的左上角坐标和宽、高h_2_.append(h_2)j = h_2_.index(max(h_2_))# print(max(h_))h_2_ = (float(max(h_2_))) * 0.878# print(max(h_2_))print("h_2_=", h_2_)# x_2, y_2, w_2, h_2 = cv2.boundingRect(contours_2[j])# print(x, y, w, h)# cropped = cut_guage[(y_2 - 228):(y_2 + 115), (x_2 - 108):(x_2 - 80)]  # 裁剪坐标为[y0:y1, x0:x1]# cv_cut_guage = cv2.imwrite("image/cv_cut_guage4.png", cropped)kernel_4 = cv2.getStructuringElement(cv2.MORPH_RECT, (1, 1))HSV = cv2.cvtColor(cut_guage, cv2.COLOR_BGR2HSV)  # 把BGR图像转换为HSV格式Lower = np.array([0, 10, 10])  # 要识别颜色-红色的下限    ## 0 5 5 10 255 255Upper = np.array([30, 255, 255])  # 要识别的颜色-红色的上限mask = cv2.inRange(HSV, Lower, Upper)# mask是把HSV图片中在颜色范围内的区域变成白色,其他区域变成黑色# erosion = cv2.erode(mask, kernel_4, iterations=1)# erosion = cv2.erode(erosion, kernel_4, iterations=1)dilation = cv2.dilate(mask, kernel_4, iterations=1)dilation = cv2.dilate(dilation, kernel_4, iterations=1)# target是把原图中的非目标颜色区域去掉剩下的图像# target = cv2.bitwise_and(img, img, mask=dilation)# 将滤波后的图像变成二值图像放在binary中ret_3, binary_3 = cv2.threshold(dilation, 127, 255, cv2.THRESH_BINARY)# 在binary中发现轮廓,轮廓按照面积从小到大排列contours_3, hierarchy_3 = cv2.findContours(binary_3, cv2.RETR_EXTERNAL, cv2.CHAIN_APPROX_SIMPLE)w_3_ = []for j in contours_3:  # 遍历所有的轮廓x1_3, y1_3, w_3, h_3 = cv2.boundingRect(j)  # 将轮廓分解为识别对象的左上角坐标和宽、高w_3_.append(w_3)j = w_3_.index(max(w_3_))x_3, y_3, w_3, h_3 = cv2.boundingRect(contours_3[j])# cv2.rectangle(cut_guage, (x_3, y_3), (x_3 + w_3/2, y_3 + h_3/2), (0, 255,), 3)cv2.rectangle(cut_guage, (x_3, y_3), (x_3+ w_3, y_3 + h_3), (255, 0,0), 3)# srcImage = cv2.imwrite("image2/srcImage.png", srcImage)youwei = y_3+h_3/2print("youwei=",youwei)result = (1-(youwei/h_2_))*100print("************************************* ")print("result = ",result)cv2.namedWindow('srcImage', cv2.WINDOW_NORMAL)  # 窗口大小可以改变cv2.imshow("srcImage", srcImage)cv2.imshow("cut_guage", cut_guage)cv2.waitKey(0)cv2.destroyAllWindows()


![]()
结果显示:
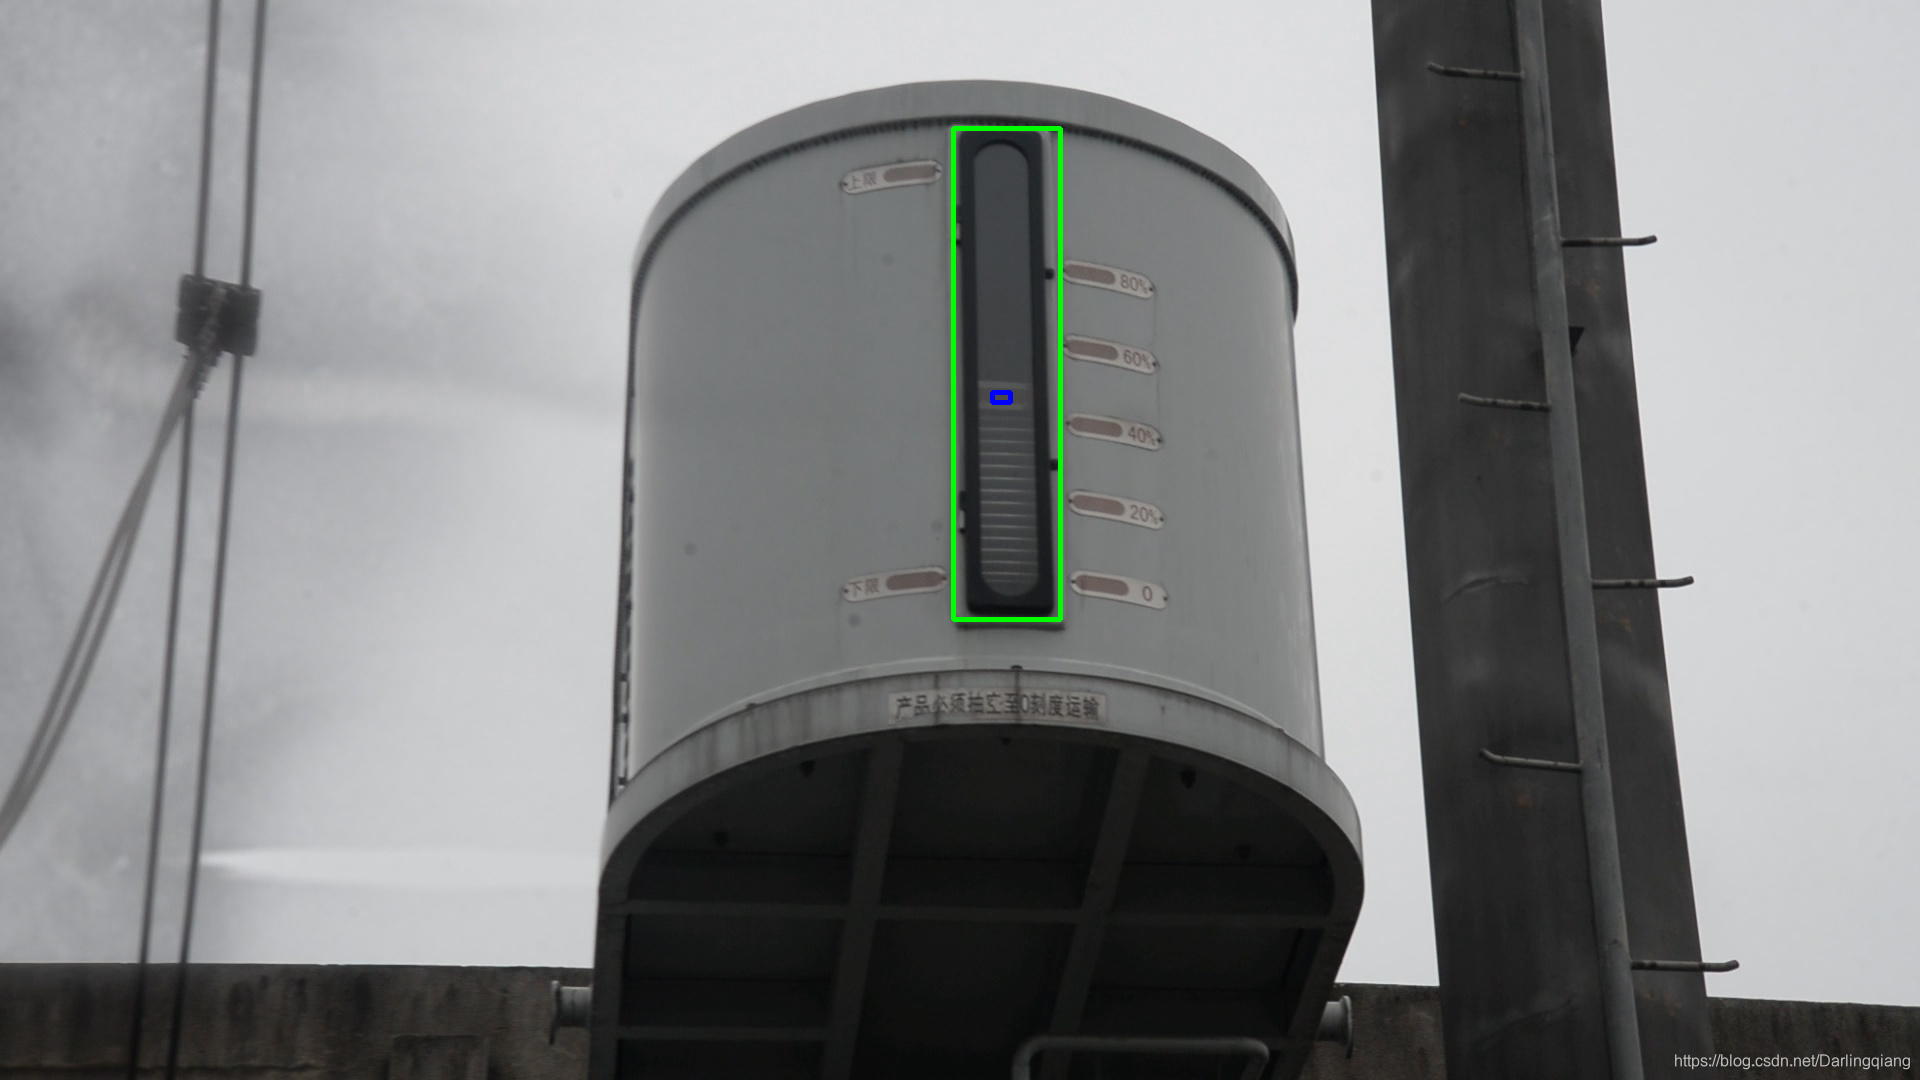
分步骤实现:test1file:/F:/code/python/wk_guage/image2/DSC_1394.JPG
前景背景分割:keanmes
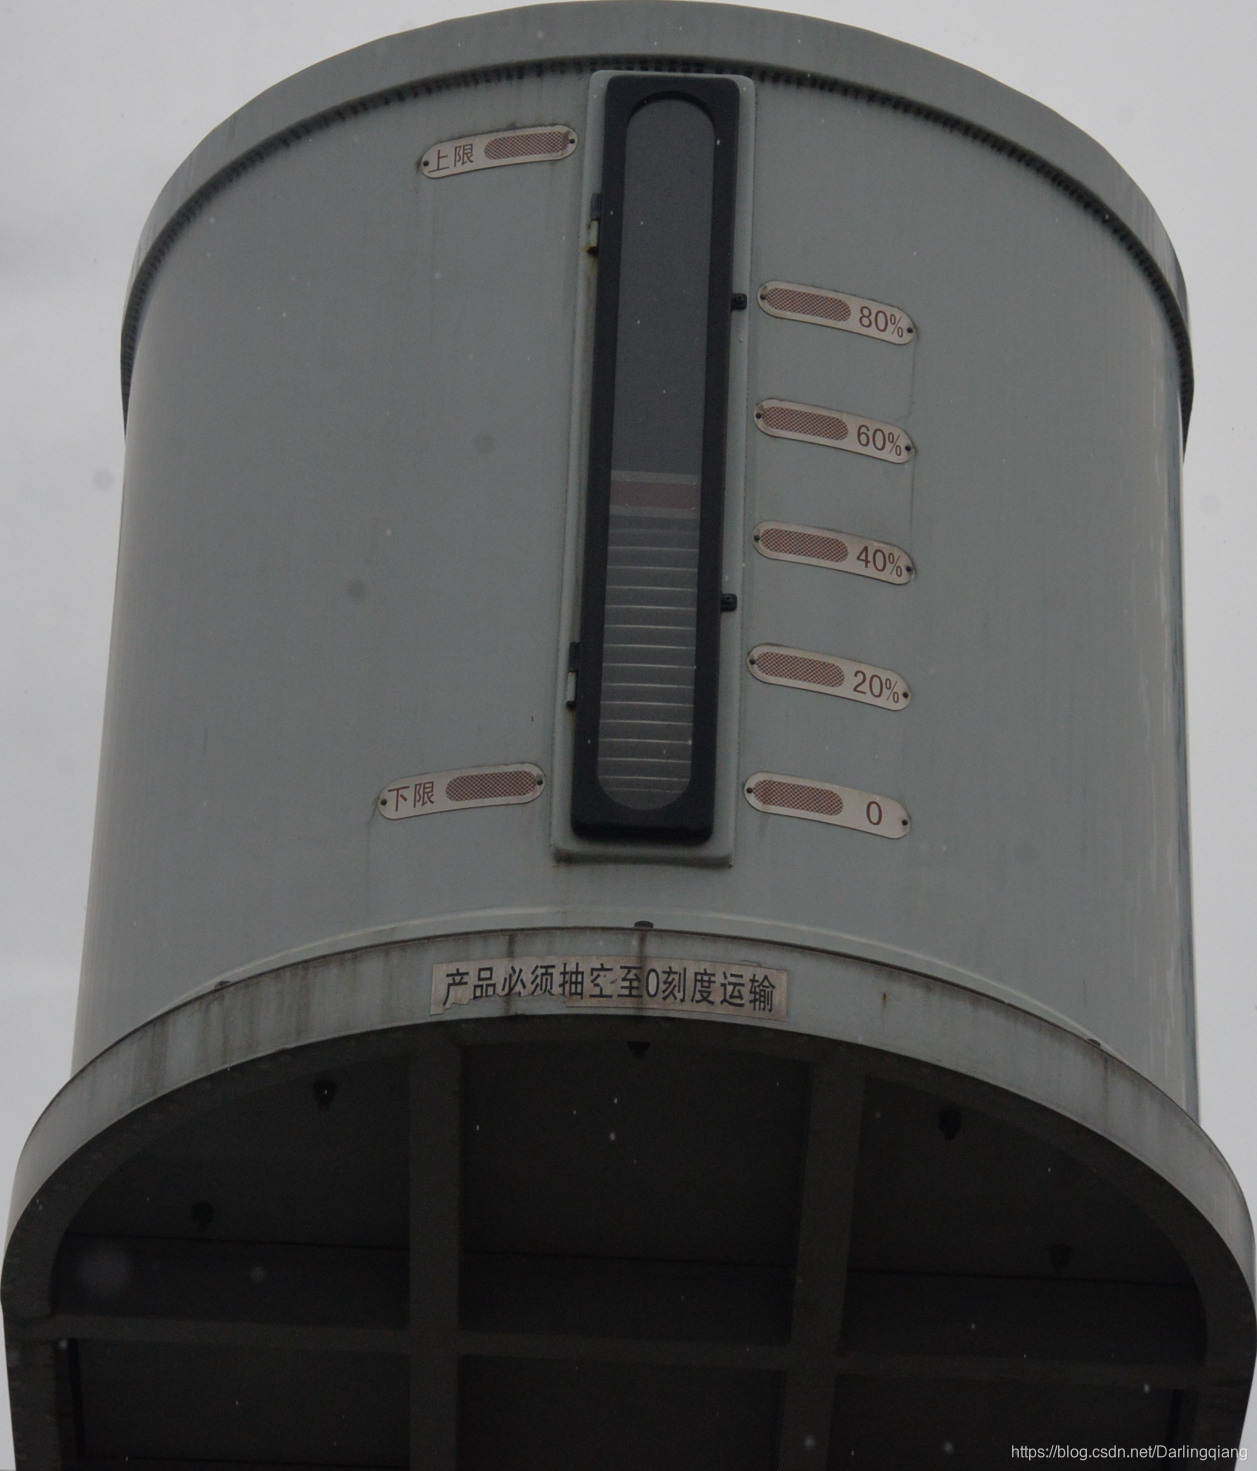
原图如下所示:

import cv2
import numpy as np
import math
import matplotlib.pyplot as pltsrcImage = cv2.imread('image2/image2/DSC_1400_0000040.JPG')
#srcImage = cv2.imread('image2/guage_1.jpg')imgHeight, imgWidth = srcImage.shape[:2]
imgHeight = int(imgHeight);
imgWidth = int(imgWidth)
# 均值聚类提取前景:二维转一维
imgVec = np.float32(srcImage.reshape((-1, 3)))
criteria = (cv2.TERM_CRITERIA_EPS + cv2.TERM_CRITERIA_MAX_ITER, 10, 1.0)
flags = cv2.KMEANS_RANDOM_CENTERS
ret, label, clusCenter = cv2.kmeans(imgVec, 2, None, criteria, 10, flags)
clusCenter = np.uint8(clusCenter)
clusResult = clusCenter[label.flatten()]
imgres = clusResult.reshape((srcImage.shape))
imgres = cv2.cvtColor(imgres, cv2.COLOR_BGR2GRAY)
bwThresh = int((np.max(imgres) + np.min(imgres)) / 2)
_, thresh = cv2.threshold(imgres, bwThresh, 255, cv2.THRESH_BINARY_INV)
threshRotate = cv2.merge([thresh, thresh, thresh])
# 确定前景外接矩形
contours, hierarchy = cv2.findContours(thresh, cv2.RETR_EXTERNAL, cv2.CHAIN_APPROX_SIMPLE)
minvalx = np.max([imgHeight, imgWidth]);
maxvalx = 0
minvaly = np.max([imgHeight, imgWidth]);
maxvaly = 0
maxconArea = 0;
maxAreaPos = -1
for i in range(len(contours)):if maxconArea < cv2.contourArea(contours[i]):maxconArea = cv2.contourArea(contours[i])maxAreaPos = i
objCont = contours[maxAreaPos]
# 旋转校正前景
rect = cv2.minAreaRect(objCont)
for j in range(len(objCont)):minvaly = np.min([minvaly, objCont[j][0][0]])maxvaly = np.max([maxvaly, objCont[j][0][0]])minvalx = np.min([minvalx, objCont[j][0][1]])maxvalx = np.max([maxvalx, objCont[j][0][1]])
if rect[2] <= -45:rotAgl = 90 + rect[2]
else:rotAgl = rect[2]
if rotAgl == 0:panelImg = srcImage[minvalx:maxvalx, minvaly:maxvaly, :]
else:rotCtr = rect[0]rotCtr = (int(rotCtr[0]), int(rotCtr[1]))rotMdl = cv2.getRotationMatrix2D(rotCtr, rotAgl, 1)imgHeight, imgWidth = srcImage.shape[:2]# 图像的旋转dstHeight = math.sqrt(imgWidth * imgWidth + imgHeight * imgHeight)dstRotimg = cv2.warpAffine(threshRotate, rotMdl, (int(dstHeight), int(dstHeight)))dstImage = cv2.warpAffine(srcImage, rotMdl, (int(dstHeight), int(dstHeight)))dstRotimg = cv2.cvtColor(dstRotimg, cv2.COLOR_BGR2GRAY)_, dstRotBW = cv2.threshold(dstRotimg, 127, 255, 0)contours, hierarchy = cv2.findContours(dstRotBW, cv2.RETR_EXTERNAL, cv2.CHAIN_APPROX_SIMPLE)maxcntArea = 0;maxAreaPos = -1for i in range(len(contours)):if maxcntArea < cv2.contourArea(contours[i]):maxcntArea = cv2.contourArea(contours[i])maxAreaPos = ix, y, w, h = cv2.boundingRect(contours[maxAreaPos])# 提取前景:panelpanelImg = dstImage[int(y):int(y + h), int(x):int(x + w)]# cropped = targetImg[y - 150:y + 50, x - 80:x + 80]  # 裁剪坐标为[y0:y1, x0:x1]panel_img = cv2.imwrite("image2/panelImg.png", panelImg)cv2.imshow("panelImg", panel_img)
test2:从分割所得图像中,根据颜色特识别最大的颜色矩形,(这个表里面一定是某个液位标志)。
panelImg如下图所示:
import cv2
import numpy as np
import math
import matplotlib.pyplot as plt# targetImg = cv2.imread('image/1.jpg')
targetImg = cv2.imread('image/1.jpg')
kernel_4 = cv2.getStructuringElement(cv2.MORPH_RECT, (2, 2))
HSV = cv2.cvtColor(targetImg, cv2.COLOR_BGR2HSV)  # 把BGR图像转换为HSV格式
Lower = np.array([0, 3, 5])  # 要识别颜色-红色的下限    ## 0 5 5 10 255 255
Upper = np.array([10, 255, 255])  # 要识别的颜色-红色的上限# mask是把HSV图片中在颜色范围内的区域变成白色,其他区域变成黑色
mask = cv2.inRange(HSV, Lower, Upper)
erosion = cv2.erode(mask, kernel_4, iterations=1)
erosion = cv2.erode(erosion, kernel_4, iterations=1)
dilation = cv2.dilate(erosion, kernel_4, iterations=1)
dilation = cv2.dilate(dilation, kernel_4, iterations=1)# target是把原图中的非目标颜色区域去掉剩下的图像
target = cv2.bitwise_and(targetImg, targetImg, mask=dilation)# 将滤波后的图像变成二值图像放在binary中
ret, binary = cv2.threshold(dilation, 127, 255, cv2.THRESH_BINARY)# 在binary中发现轮廓,轮廓按照面积从小到大排列
contours, hierarchy = cv2.findContours(binary, cv2.RETR_EXTERNAL, cv2.CHAIN_APPROX_SIMPLE)# w_ = []
#
# for i in contours:  # 遍历所有的轮廓
#         x1, y1, w, h = cv2.boundingRect(i)  # 将轮廓分解为识别对象的左上角坐标和宽、高
#         w_.append(w)
#         i = w_.index(max(w_))
# x, y, w, h = cv2.boundingRect(contours[i])# cv2.rectangle(img, (x, y), (x + w, y + h), (0, 255,), 3)# cropped = targetImg[y - 150:y + 50, x - 80:x + 80]  # 裁剪坐标为[y0:y1, x0:x1]
# cv_cut_img_circle = cv2.imwrite("image2/cv_cut_img_circle.png", cropped)# print(x, y, w, h)
# cv2.imwrite('image/cv_cut_img_circle.png', cv_cut_img)  # 将画上矩形的图形保存到当前目录
cv2.drawContours(targetImg, contours, -1, (0, 0, 255), 3)
cv2.imshow("img", targetImg)
cv2.imshow("mask", mask)
cv2.imshow("target", target)
cv2.imshow("erosion", erosion)
cv2.imshow("dilation", dilation)
cv2.waitKey()
# cv2.imshow("cv_cut_img_circle", cv_cut_img_circle)
# return cropped
test3:在框出的最大矩形中,(先验知识,出的最大矩形,一定是液位表的位置),识别其中为一个带有红色标记的矩形,浮标
进一步缩小面积:
import cv2
import numpy as np
import math
import matplotlib.pyplot as pltcicleImg = cv2.imread('image/cv_cut_img_circle1.png')
gaus = cv2.GaussianBlur(cicleImg, (3, 3), 0)
gray_img = cv2.cvtColor(gaus, cv2.COLOR_BGR2GRAY)gradx = cv2.Sobel(gray_img, cv2.CV_16SC1, 1, 0)
grady = cv2.Sobel(gray_img, cv2.CV_16SC1, 0, 1)
canny_img = cv2.Canny(gradx, grady, 100, 200) # 黑白的边缘 高低阈值比值为2:1或3:1最佳(50:150 = 1:3)ret_2, binary_2 = cv2.threshold(canny_img, 127, 255, cv2.THRESH_BINARY)
contours_2, hierarchy_2 = cv2.findContours(binary_2, cv2.RETR_TREE, cv2.CHAIN_APPROX_SIMPLE)h_2_ = []
for j in contours_2: # 遍历所有的轮廓x1_2, y1_2, w_2, h_2 = cv2.boundingRect(j) # 将轮廓分解为识别对象的左上角坐标和宽、高h_2_.append(h_2)j = h_2_.index(max(h_2_))# print(max(h_))# h_2_ = (float(max(h_2_))) * 0.878# print(max(h_))# print("h_2_=", h_2_)
x_2, y_2, w_2, h_2 = cv2.boundingRect(contours_2[j])
cv2.rectangle(cicleImg, (x_2, y_2), (x_2+w_2, y_2+h_2), (0, 255,), 3)
print(x_2, y_2, w_2, h_2)
print(h_2)
cropped = cicleImg[(y_2 - 228):(y_2 + 118), (x_2 - 112):(x_2 - 80)] # 裁剪坐标为[y0:y1, x0:x1]
cv_cut_guage = cv2.imwrite("image2/cv_cut_guage5.png", cropped)
cv2.imshow("cicleImg", cicleImg)
cv2.imshow("canny_demo", canny_img)
cv2.imshow("cv_cut_guage", cv_cut_guage)# return cropped
cv2.waitKey(0)
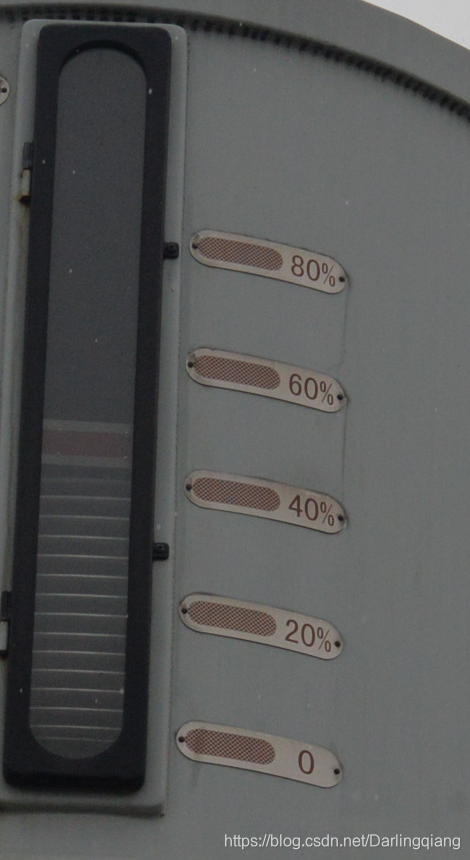
cv2.destroyAllWindows()test4:在框出的最大矩形中,(先验知识,出的最大矩形,一定是液位表的位置),识别其中为一个带有红色标记的矩形,浮标,如下图所示image/cv_cut_guage.png
![]()
import cv2
import numpy as np
import math
import matplotlib.pyplot as pltcut_guage = cv2.imread('image2/cv_cut_guage.png')
# srcImage = cv2.imread('image/guage_2.png')
gray_img = cv2.cvtColor(cut_guage, cv2.COLOR_BGR2GRAY)
gaus = cv2.GaussianBlur(gray_img, (3, 3), 0)
gradx = cv2.Sobel(gray_img, cv2.CV_16SC1, 1, 0)
grady = cv2.Sobel(gray_img, cv2.CV_16SC1, 0, 1)
canny_img = cv2.Canny(gradx, grady, 100, 300)  # 黑白的边缘 高低阈值比值为2:1或3:1最佳(50:150 = 1:3)ret_2, binary_2 = cv2.threshold(canny_img, 127, 255, cv2.THRESH_BINARY)
contours_2, hierarchy_2 = cv2.findContours(binary_2, cv2.RETR_TREE, cv2.CHAIN_APPROX_SIMPLE)h_2_ = []
for j in contours_2:  # 遍历所有的轮廓x1_2, y1_2, w_2, h_2 = cv2.boundingRect(j)  # 将轮廓分解为识别对象的左上角坐标和宽、高h_2_.append(h_2)j = h_2_.index(max(h_2_))# h_2_ = (float(max(h_2_))) * 0.878print("h_2_=", h_2_)kernel_4 = cv2.getStructuringElement(cv2.MORPH_RECT, (2, 2))
HSV = cv2.cvtColor(cut_guage, cv2.COLOR_BGR2HSV)
Lower = np.array([0, 5, 5])  # 要识别颜色-红色的下限    ## 0 5 5 10 255 255
Upper = np.array([20, 255, 255])  # 要识别的颜色-红色的上限mask = cv2.inRange(HSV, Lower, Upper)
dilation = cv2.dilate(mask, kernel_4, iterations=1)
dilation = cv2.dilate(dilation, kernel_4, iterations=1)
ret_3, binary_3 = cv2.threshold(dilation, 127, 255, cv2.THRESH_BINARY)
contours_3, hierarchy_3 = cv2.findContours(binary_3, cv2.RETR_EXTERNAL, cv2.CHAIN_APPROX_SIMPLE)w_3_ = []
for j in contours_3:  # 遍历所有的轮廓x1_3, y1_3, w_3, h_3 = cv2.boundingRect(j)  # 将轮廓分解为识别对象的左上角坐标和宽、高w_3_.append(w_3)
j = w_3_.index(max(w_3_))x_3, y_3, w_3, h_3 = cv2.boundingRect(contours_3[j])youwei = y_3 + h_3 / 2
print("youwei=", youwei)result = (1 - (youwei / h_2_)) * 100
print(result)# cv2.imshow("canny_img", canny_img)
cv2.waitKey(0)
# cv2.destroyAllWindows()相关文章:

使用 Vue 2.0 实现服务端渲染的 HackerNews
Vue 2.0 支持服务端渲染 (SSR),并且是流式的,可以做组件级的缓存,这使得极速渲染成为可能。同时, 和 2.0 也都能够配合 SSR 提供同构路由和客户端 state hydration。vue-hackernews-2.0 是 Vue 作者在GitHub上面放的 Vue 2.0 的一…

【HDU】Flipper 3328 (stack + 模拟 + 英语阅读)
http://acm.hdu.edu.cn/showproblem.php?pid3328 stack模拟,做完这一题最大的感想就是学好英语真的很重要,看题看了半天,还理解错了,这一题,出现L的话,就把最左边的牌翻转,然后放到它旁边的那…
最新阿里Java技术面试题,看这一文就够了!
金三银四跳槽季即将到来,作为 Java 开发者你开始刷面试题了吗?别急,小编整理了阿里技术面试题,看这一文就够了!阿里面试题目目录1:技术一面(基础面试题目)2:技术二面(技术深度、技术…

OpenCV 【七】————边缘提取算子(图像边缘提取)——canny算法的原理及实现
canny边缘检测实现(C、opencv) 1.作用: 图像边缘信息主要集中在高频段,通常说图像锐化或检测边缘,实质就是高频滤波。我们知道微分运算是求信号的变化率,具有加强高频分量的作用。在空域运算中来说&#x…

【Python】序列解包 and * 和 ** 的区别
可以使用序列解包功能对多个变量进行赋值。 序列解包也可以用于列表和字典,但对字典使用时,默认是对字典的“键”进行操作; 如果需要对“键:值”进行操作,需要使用字典items()方法; 如果需要对字典的“值…
JavaScript学习笔记—— 4. 变量、作用域和内存问题
ECMAScript变量可能包含两种不同数据类型的值:基本类型值和引用类型值,其中基本类型值是简单的数据段,而引用类型值指的是那些可能由多个值构成的对象;对于5种基本类型数据:undefined, null,boo…

ApacheCN 学习资源汇总 2019.3
【主页】 apachecn.org 【Github】ApacheCN 暂时下线: 社区 暂时下线: cwiki 知识库 自媒体平台 微博:ApacheCN知乎:ApacheCNCSDN简书OSChina博客园We are ApacheCN Open Source Organization, not ASF! We are fans of AI, and have no relationship w…

python数据结构与算法:二叉树及三种遍历方式(先序遍历/中序遍历/后序遍历)
树的实现采用queue的形式: 树的三种遍历方式(广度优先白能力法):先序遍历(根左右),中序遍历(左根右)以及后序遍历(左右根) ###################…
【HDU】3635 Dragon Balls (带权并查集 一)
题目链接:http://acm.hdu.edu.cn/showproblem.php?pid3635 【问题描述】 有标号为1到n的n个龙珠,分别放在对应标号为1到n的n个城市里。 下面有两种操作: T A B表示把A龙珠所在城市的所有龙珠都转移到B龙珠所在的城市中 Q A 表示查询A,需…
php源码安全加密之PHP混淆算法.
php源码安全加密的前世今生,本想发在教程区中.不知道怎么发,就写在这里面吧.PHP加密,解密是一直的话题,本人菜鸟,今天就简单向大家介绍一下并说说其中原理.提供一些加密的混淆算法.一\PHP的加密总体上来说分以下2种:1\扩展组件类加密,代表有:zend\ionCube\SG\php_screw\bcompil…

Element 2.6.0 发布,基于 Vue 2.0 的桌面端组件库
开发四年只会写业务代码,分布式高并发都不会还做程序员? Element 2.6.0 发布了,Element 是一套为开发者、设计师和产品经理准备的基于 Vue 2.0 的桌面端组件库,提供了配套设计资源,帮助你的网站快速成型。由饿了么公…
【Python】随机函数
import random 1、random.random() 2、random.uniform(a,b) 3、random.randint(a,b) 4、random.randrange([start],stop[, step]) 5、random.choice(sequence) 6、random.shuffle(x[, random]) 7、random.sample(sequence,k) import random 1、random.random() 返回随…
IOS/Android模拟器运行APP调试方法
真机不是那么好获取的,模拟器用起来更方便 ios 安装ios-sim 安装 ios-sim,获取 APP 完整的product的文件包。 $ npm i -g ios-sim 启动app # ios-sim launch *.app - -devicetypeid 本地模拟器支持机型类型 id $ ios-sim launch **/BaiduBoxApp.app --d…
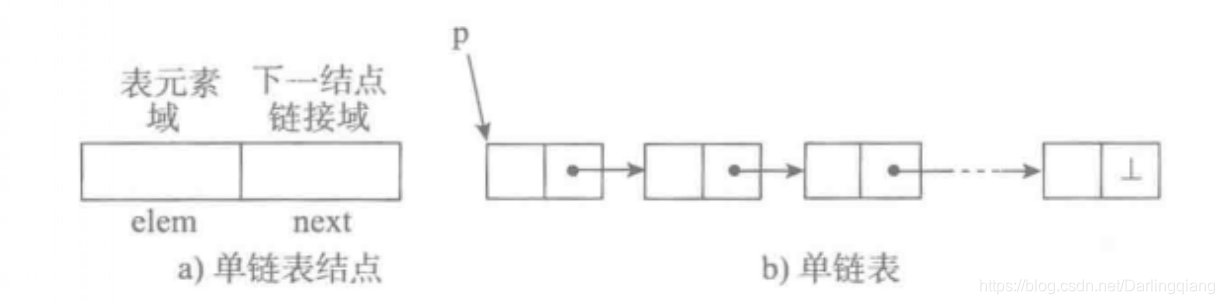
python数据结构与算法:单向链表
单链表:python实现及其对应的 增删查检 操作 ##################### P4.1-P4.8 单向链表 ########################### #coding:utf-8 class Node(object):def __init__(self,elem):self.elem elemself.next Noneclass SinglelinkList(object):""&quo…
Vue性能优化:如何实现延迟加载和代码拆分?
移动优先方法已经成为一种标准,但不确定的网络条件导致应用程序快速加载变得越来越困难。在本系列文章中,我将深入探讨我们在Storefront应用程序中所使用的Vue性能优化技术,你们也可以在自己的Vue应用程序中使用它们来实现快速加载。 Webpack…

GitHub怎样fork别人代码到自己仓库并进行贡献
在过程中可能遇到这个问题:https://www.cnblogs.com/q1104460935/p/8275833.html 这个博客应该可以解决 比如说现在有一个很牛逼的项目,我们进入项目地址, 想将这个项目复制到自己的github仓库,然后你还想将 仓库中的代码拉取到…
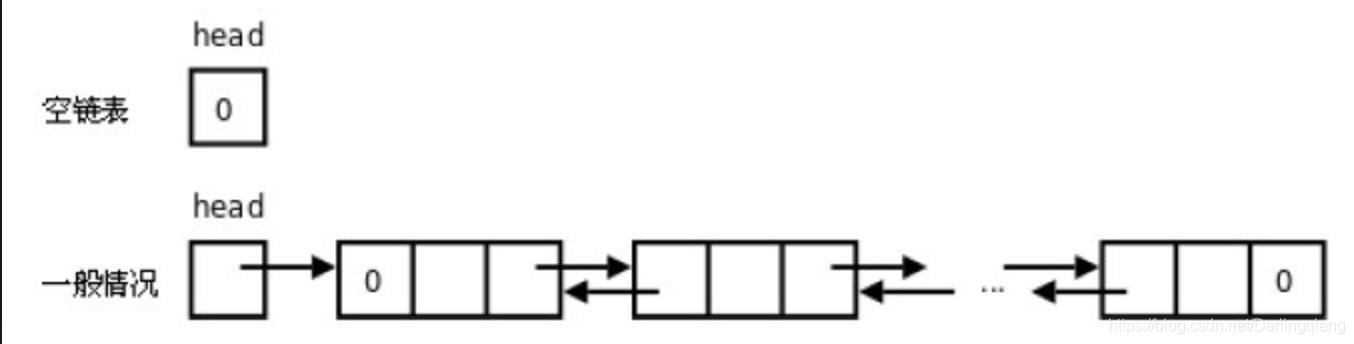
python数据结构与算法:单向循环列表
单向循环列表:python实现,及其对应的 增删查检 操作 ##################### P4.9-P4.12 循环链表 ########################### #coding:utf-8 class Node(object):def __init__(self,elem):self.elem elemself.next None class SinglecycleList(ob…
http权威指南-http连接管理
2019独角兽企业重金招聘Python工程师标准>>> HTTP连接管理 浏览器解析URL流程: 浏览器解析出域名;浏览器查询这个主机名的IP地址;浏览器获得端口号;浏览器发起到主机名IP地址端口的80连接;浏览器向服务器发…

在macos上基于python2.7安装PyQt5
在macos上基于python2.7安装PyQt5 在python3上面安装PyQt5是十分简单的,可是,在python2.7上安装这个东西,着实让人折腾了一把。要总结一下,年纪大了,记性不好。 首先要安装最新版的Qt和python2,命令如下&am…
python数据结构与算法:二分查找
二分查找:python 实现def binary_seaech(alist,item):"""二分查找 递归实现"""n len(alist)if n > 0:mid n // 2if alist[mid] item:return Trueelif item < alist[mid]:return binary_seaech(alist[:mid],item)else:retur…
使用maven镜像
综述 用maven做项目,最郁闷的莫过于某些依赖库下载不了。被墙了,你懂的。使用maven镜像仓库及其重要,特别是国内的镜像,可以有效缓解被墙疼痛。 常用的镜像 国外镜像 ibiblio.org <mirror> <id>ibiblio</id> &…
Jupyter Notebook 快捷键(基本)
Jupyter Notebook 快捷键 Jupyter Notebook 有两种键盘输入模式。编辑模式,允许你往单元中键入代码或文本;这时的单元框线是绿色的。命令模式,键盘输入运行程序命令;这时的单元框线是灰色。 命令模式 (按键 Esc 开启) Enter : …
关于二叉树的几个必须掌握的实现
The best way to end your fear is to face it yourself. 结束恐惧的最佳办法就是自己面对。本分分享了二叉搜索树的几种实现,由简入繁。说句题外话,马上又是金三银四的季节了,无论跳不跳槽,增加自己的知识储备总是没错的。从代码…
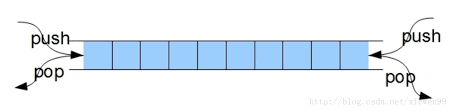
python数据结构与算法:队列与双端队列
双端队列: #################队列#################### #coding:utf-8 """ Deque() 创建一个空的双端队列 add_front(item) 从队头加入一个item元素 add_rear(item) 从队尾加入一个item元素 remove_front() 从队头删除一个item元素 remove_rear() 从…
view5.3登录桌面提示当前可用桌面资源不足
问题描述:用户反馈有个桌面经常提示当前可用桌面资源不足,开始的时候反复重启还可以使用,今天发现彻底无法登录了。解决方法:首先登录到view administrator管理平台查看该桌面发现状态是可用,说明桌面正常,…
【HDU】4706 Children's Day(模拟)
http://acm.hdu.edu.cn/showproblem.php?pid4706 该题没有输入,直接输出不同形状大小的N,在输出不同形状N的时候是要用到26个字母,并且是循环输出 #include <iostream>using namespace std;char map[60][60]; char a[] "abcdef…
详解原生AJAX请求demo(兼容IE5/6)
function createXHR(){ // 检测原生XHR对象是否存在if ( window.XMLHpptRequest ){// 如果存在就返回新实例return new XMLHpptRequest();} else { // 如果不存在就检测ActiveX对象// 兼容IE5/6return new ActiveXObject(Microsoft.XMLHttp);} }// 在所有的浏览器中创建XHR对象…
【POJ】3268 Silver Cow Party (将有向图的边反转)
问题链接:http://poj.org/problem?id3268 【问题描述】 One cow from each of N farms (1 ≤ N ≤ 1000) conveniently numbered 1…N is going to attend the big cow party to be held at farm #X (1 ≤ X ≤ N). A total of M (1 ≤ M ≤ 100,000) unidirectio…

项目管理深入理解08--成本管理
成本管理一章非常的重要,尤其是对于程序员来说,这方面非常的薄弱,但这部分知识无论是在项目管理中还是日常生活中都灰常重要,不然很难成为一个财务自由的程序员。此外,由于财务方面知识点比较多,特增加经济…
python数据结构与算法:双向链表
双向链表: ###################### P4.13-P4. 双向链表 ########################### # import singlelinkListclass Node(object):def __init__(self,item):self.elem itemself.next Noneself.prev None# class DoublelinkList(singlelinkList): #继承 class …