一、摘要:
Vuejs是一款前端MVVM框架,利用Vuejs、webpack以及周边一系列生态工具我们可以快速的构建起一个前端应用,网上对于Vue的分析大都是基于各个模块,理解起来不够顺畅,本文将从整个执行过程出发,讲一下Vuejs的核心原理。
二、版本说明:
Vuejs有两种版本,一种是runtime、一种是runtime-with-compiler,对应的渲染有两种写法:
1、render渲染函数:直接写render函数,渲染时将会调用render函数渲染DOM
<div id="demo"></div>//runtime写法var instance = new Vue({data: {hi: "monrning ",name: "Mr zhang"},render(h){ //h vm.$createElement = function (a, b, c, d) { return createElement(vm, a, b, c, d, true); };return h('div', this.hi + " " + this.name);}});instance.$mount(document.getElementById("demo"));
2、HTML模板语法:
<div id="demo">{{hi}} {{name}}</div>new Vue({el: "#demo"data: {hi: "monrning ",name: "Mr zhang"}});
runtime就是Vue运行时,很多框架的核心都是改自Vue的运行时,比如mpvue的运行部分,以后会讲。
runtime与runtime-with-compiler的区别:
顾名思义,前者没有compiler,后者有compiler。ompiler是Vue的编译模块,可以将HTML模板转换成对应的AST以及render渲染函数提供给Vue使用,所以本质上可以认为Vue的渲染就是在调用render渲染函数,compiler的作用就是在构造渲染函数。本文不讲compiler部分,只需要知道compiler会将模板构造成render函数即可,后面理解会用到。
三、模块分解:
为了便于理解,本人将Vue的核心分成以下几个部分:数据初始化、数据更新、异步队列、DOM渲染(虚拟DOM)
数据初始化:初始化调用Object.defineProperty对数据进行劫持,进而监听数据的变化,后续的更新、渲染都会依赖这一部分;
数据更新:数据监听实际在数据初始化阶段已经完成了,将这一部分独立出来的原因是数据初始化只做了对数据的set、get进行监听,逻辑的部分需要在数据更新以及渲染中来看;
异步队列:异步队列主要是为了解决在数据更新上触发多个Watcher如何进行更新的问题;
DOM渲染:这一部分包含虚拟DOM,单独作为一个部分,其中虚拟DOM高效的diff算法、patch的概念都很重要;
说明一下,这部分的分解是按照我个人的思路总结出来的几部分(非按顺序执行部分),如果有无法下手的情况可以有意识的按照这几部分来思考一下,仅供大家借鉴使用。
ps:注意上面的初始化和更新仅仅是“数据”的部分,不要跟下面的分析弄混淆。
四、核心原理:
接下来以实际的执行过程来讲一下Vue和核心原理,主要包括两个阶段:初始化阶段、数据更新阶段
以下面的代码为例:
<html lang="en">
<head><meta charset="UTF-8"><title></title><script src="../dist/vue.js"></script>
</head>
<body>
<div id="demo"><div >{{title}}{{title2}}</div><input type="button" @click="testClick" value="click"/>
</div>
</body>
<script>// 这种情况不需要var instance = new Vue({el:"#demo",data: {title: "input MVVM",title2: "input MVVM title2"
    },
    methods: {testClick(){this.title = Math.random();this.title2 = Math.random();}}});
</script>
</html>
首先讲一下初始化阶段
1、首先进行“数据的初始化”,代码如下:
function initData (vm) {var data = vm.$options.data;data = vm._data = typeof data === 'function'? getData(data, vm): data || {};if (!isPlainObject(data)) {data = {};warn('data functions should return an object:\n' +'https://vuejs.org/v2/guide/components.html#data-Must-Be-a-Function',vm);}// proxy data on instancevar keys = Object.keys(data);var props = vm.$options.props;var methods = vm.$options.methods;var i = keys.length;while (i--) {var key = keys[i];{if (methods && hasOwn(methods, key)) {warn(("Method \"" + key + "\" has already been defined as a data property."),vm);}}if (props && hasOwn(props, key)) {warn("The data property \"" + key + "\" is already declared as a prop. " +"Use prop default value instead.",vm);} else if (!isReserved(key)) {proxy(vm, "_data", key); //将data代理到Vue实例上}}// observe dataobserve(data, true /* asRootData */);}
可以看到数据初始化包括两个过程:
(1)、将 data 代理到Vue实例上,之后 data 中的数据可以直接通过Vue实例 this 来设置或者获取,代理过程如下:
 vm._data = typeof data === 'function'? getData(data, vm): data || {};//遍历data,设置代理
proxy(vm, "_data", key);    //proxy 过程function proxy (target, sourceKey, key) {sharedPropertyDefinition.get = function proxyGetter () {return this[sourceKey][key]};sharedPropertyDefinition.set = function proxySetter (val) {this[sourceKey][key] = val;};Object.defineProperty(target, key, sharedPropertyDefinition);}
ps: 这里先将数据挂在了vm._data 上,之后再代理到 vm 实例上,前者主要是为了暴漏 $data 使用,最终可以获取数据的地方有三个: vm (实例)、vm._data、vm.$data;
(2)、劫持数据,进行数据的初始化,底层使用大家了解最多Object.defineProperty(官方宣称3.0后这部分会使用Proxy来代替)
上面的 observe(data, true /* asRootData */) 最终会调用 defineReactive 进行初始化,直接看这部分:
//{title: 'MVVM'}
function defineReactive$$1 (obj,//{title: 'MVVM'}key,//titleval,customSetter,shallow) {var dep = new Dep();//依赖收集器 每个key一个 var property = Object.getOwnPropertyDescriptor(obj, key);if (property && property.configurable === false) {return}// cater for pre-defined getter/settersvar getter = property && property.get;var setter = property && property.set;if ((!getter || setter) && arguments.length === 2) {val = obj[key];}var childOb = !shallow && observe(val);Object.defineProperty(obj, key, { //进行劫持enumerable: true,configurable: true,get: function reactiveGetter () {var value = getter ? getter.call(obj) : val;if (Dep.target) { dep.depend();  //依赖收集器将当前watcher收集到依赖中if (childOb) {childOb.dep.depend();if (Array.isArray(value)) {dependArray(value);}}}return value},set: function reactiveSetter (newVal) {var value = getter ? getter.call(obj) : val;/* eslint-disable no-self-compare */if (newVal === value || (newVal !== newVal && value !== value)) {return}/* eslint-enable no-self-compare */if (customSetter) {customSetter();}// #7981: for accessor properties without setterif (getter && !setter) { return }if (setter) {setter.call(obj, newVal);} else {val = newVal;}childOb = !shallow && observe(newVal);dep.notify(); //通知订阅当前key的所有watcher}});}
这部分是最基本的部分,必须理解,直接上图:
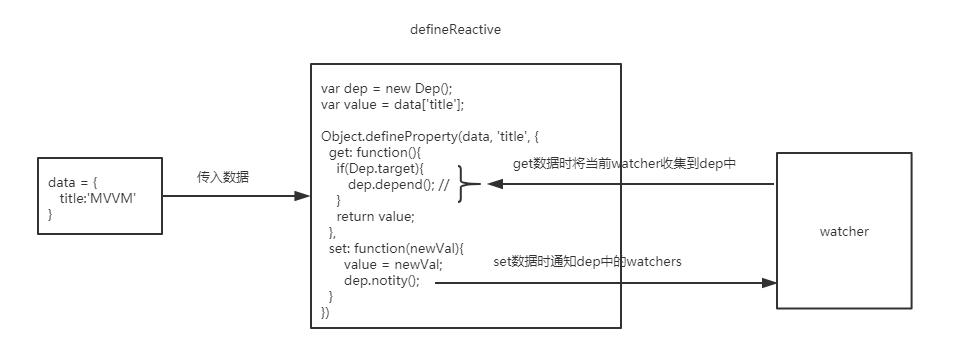
①、Observer会调用defineReactive对数据的每个key进行劫持;
②、defineReactive会为当前key定义get、set方法,以及创建一个Dep实例,Dep可以称为依赖收集器;
③、当(watcher)在获取数据时,如: let title = data.title,此时就会触发 'title' 对应的 get方法,如果Dep.target有对应的watcher,那么通过dep.depend() 将当前watcher加入到 'title' 对应的dep中,最后返回 title 的值。
这里有必要看下Dep的源码以及解释下Dep.target的含义
var uid = 0;/*** A dep is an observable that can have multiple* directives subscribing to it.*/var Dep = function Dep () {this.id = uid++;this.subs = [];};Dep.prototype.addSub = function addSub (sub) {this.subs.push(sub);};Dep.prototype.removeSub = function removeSub (sub) {remove(this.subs, sub);};Dep.prototype.depend = function depend () {if (Dep.target) {Dep.target.addDep(this);}};Dep.prototype.notify = function notify () {// stabilize the subscriber list firstvar subs = this.subs.slice();if (!config.async) {// subs aren't sorted in scheduler if not running async// we need to sort them now to make sure they fire in correct// ordersubs.sort(function (a, b) { return a.id - b.id; });}for (var i = 0, l = subs.length; i < l; i++) {subs[i].update();}};// The current target watcher being evaluated.// This is globally unique because only one watcher// can be evaluated at a time.Dep.target = null;var targetStack = [];function pushTarget (target) {targetStack.push(target);Dep.target = target;}function popTarget () {targetStack.pop();Dep.target = targetStack[targetStack.length - 1];}
这里Dep.target相当于一个上下文的作用(公共变量),用来存储当前正在执行的watcher实例。获取数据时判断如果Dep.target(当前watcher)存在,dep.depend() 就会将当前正在获取数据的watcher加入到依赖之中;
④、当数据发生变化时,如:data.title = 'xxxx',此时会触发 'title' 对应的set方法,通过dep.notity() 通知对应dep中的watcher,watcher再进行更新;
以上就是数据初始化的过程,总结来说就是对数据进行劫持,并为每个key建立一个依赖,获取数据时依赖收集对应的watcher,数据变化时通知对应的watcher进行更新。
2.之后进行数据的挂载,主要包括两个部分:模版解析、创建渲染watcher完成渲染
模版解析:compiler部分
调用compiler中的compiletoFunctions将模版解析为render渲染函数,(模板解析是运行时比较消耗性能的部分,如果已经编译过Vue会将结果缓存起来使用)

render函数将会传递给下面的渲染watcher渲染DOM使用(获取数据、创建对应的DOM、绑定事件),直观的看一下render的逻辑。
(function anonymous(
) {
with(this){return _c('div',{attrs:{"id":"demo"}},[_c('div',[_v("\n    "+_s(title)+"\n    "+_s(title2)+"\n    ")]),_v(" "),_c('input',{attrs:{"type":"button","value":"click"},on:{"click":testClick}})])}
})
创建渲染watcher,渲染DOM:渲染watcher划重点,Vue有很多个watcher,但只有一个watcher负责渲染,就是渲染watcher
首先讲一下Watcher,看下源码:
var uid$2 = 0;/*** A watcher parses an expression, collects dependencies,* and fires callback when the expression value changes.* This is used for both the $watch() api and directives.*/var Watcher = function Watcher (vm,expOrFn,cb,options,isRenderWatcher) {this.lazy = options.lazy;.....this.id = ++uid$2; // uid for batching .....this.expression = expOrFn.toString();// parse expression for getterif (typeof expOrFn === 'function') {this.getter = expOrFn;} else {this.getter = parsePath(expOrFn);.....}this.value = this.lazy? undefined: this.get();};/*** Evaluate the getter, and re-collect dependencies.*/Watcher.prototype.get = function get () {pushTarget(this);//将当前watcher 赋值到 Dep.targetvar value;var vm = this.vm;......value = this.getter.call(vm, vm);//调用watcher传入的回调函数......popTarget();this.cleanupDeps();return value};/*** Add a dependency to this directive.*/ Watcher.prototype.addDep = function addDep (dep) {var id = dep.id;if (!this.newDepIds.has(id)) {this.newDepIds.add(id);this.newDeps.push(dep);if (!this.depIds.has(id)) {dep.addSub(this);}}};Watcher.prototype.update = function update () {/* istanbul ignore else */if (this.lazy) {this.dirty = true;} else if (this.sync) {this.run();} else {queueWatcher(this);//将 watcher加入异步队列中}};/** * Scheduler job interface. * Will be called by the scheduler. */ Watcher.prototype.run = function run () {if (this.active) {var value = this.get();
......
}
......
}Watcher接受五个参数,现在只关注前两个即可,一个是vm实例,一个是执行函数expOrFn。
Watcher在构造函数初始化时会执行 this.get() 方法,this.get()会执行两个操作:pushTargt(this)、执行回调函数expOrFn
①、pushTargt(this):将当前的watcher实例赋值给Dep.target(见上面Object.defineProperty中的get方法),也即是此时 Dep.target = 'renderWatcher';
②、执行回调函数expOrFn:如果此时回调函数中如果有属获取数据的动作,将会先触发Object.defineProperty中的get方法,将Dep.target(当前watcher) 加入到依赖中,之后整个回调函数执行完毕。
过程如图:

这里的 pushTarget 以及 Dep.target 在看源码的时候是比较难懂的,主要是语义上没有写清(如果对应写成 pushWatcher 以及 globalWatcher 可能会更清楚一些,作者应该是想写的高内聚一些)。
接下来看一下渲染watcher,渲染watcher顾名思义就是负责渲染的watcher,说白了就是回调函数会执行上面的render渲染函数进行DOM渲染
updateComponent = function () {
vm._update(vm._render(), hydrating); //_render 会调用上面render进行DOM的绘制
};
new Watcher(vm, updateComponent, noop, {before: function before () {if (vm._isMounted && !vm._isDestroyed) {callHook(vm, 'beforeUpdate');}}}, true /* isRenderWatcher */);
那么根据上面Watcher逻辑,此处渲染watcher初始化时首先会将Dep.target切换到当前watcher上,之后执行回调updateComponent。updateComponent实际上就是执行render函数,render函数获取并订阅数据,之后创建DOM完成渲染。
由于已经订阅了数据,数据在发生变化时就会通知渲染watcher重新进行渲染,之后反映到DOM上。
下面是 updateComponent -> render 执行的逻辑,createElement 将会使用虚拟DOM来创建,最后映射到真实DOM,虚拟DOM的技术有机会单独来讲,不在此处展开。
with(this){return _c('div',{attrs:{"id":"demo"}},[_c('div',[_v("\n    "+_s(title)+"\n    "+_s(title2)+"\n    ")]),_v(" "),_c('input',{attrs:{"type":"button","value":"click"},on:{"click":testClick}})])}

vm._c = function (a, b, c, d) { return createElement(vm, a, b, c, d, false); };
总结一下:watcher说白了就是用了哪个数据就会订阅哪个数据,数据变化时就会收到对应通知,未使用到的数据变化就不会受到通知。如渲染watcher,模版中使用了title、title2,那么当title、title2变化时就会通知渲染watcher进行更新,其它各种watcher同理(lazy的有些特殊,后面再讲);
接下来讲一下数据更新阶段
当数据发生变化时,如例子中testClick触发数据变化,过程为:
testClick(){this.title = Math.random();this.title2 = Math.random();}
1.数据更新触发data中的set,依赖收集器会通知Watcher进行更新:
此处首先执行的是this.title = Math.random(),由于渲染watcher使用了title进行渲染,那么此处title的变化就会通知渲染watcher进行更新
//defineReactive中数据的set
dep.notify(); Dep.prototype.notify = function notify () {// stabilize the subscriber list firstvar subs = this.subs.slice();if (!config.async) {// subs aren't sorted in scheduler if not running async// we need to sort them now to make sure they fire in correct// ordersubs.sort(function (a, b) { return a.id - b.id; });}for (var i = 0, l = subs.length; i < l; i++) {subs[i].update();//watcher更新}
};
这里只有一个watcher使用了title,所以subs中就是一个渲染watcher,渲染watcher就会更新。
接下来看下watcher的更新逻辑:
Watcher.prototype.update = function update () {/* istanbul ignore else */if (this.lazy) {this.dirty = true;} else if (this.sync) {this.run();} else {queueWatcher(this);}};
这里可以看到watcher的update不会直接执行watcher的逻辑(例子中为渲染DOM),而是执行了一个queueWatcher方法(前面的逻辑判断先忽略),queueWatcher会将watcher放入一个队列queue中,之后通过nextTick来执行,这就是我前面讲到的异步队列
function queueWatcher (watcher) {var id = watcher.id;console.log('watcherId='+ id + 'exporession=' + watcher.expression);if (has[id] == null) {//console.log('watcherId='+ id + 'exporession=' + watcher.expression);has[id] = true;if (!flushing) {queue.push(watcher);} else { // if already flushing, splice the watcher based on its id// if already past its id, it will be run next immediately.var i = queue.length - 1;while (i > index && queue[i].id > watcher.id) {i--;}queue.splice(i + 1, 0, watcher);}// queue the flushif (!waiting) {waiting = true;if (!config.async) {flushSchedulerQueue();return}nextTick(flushSchedulerQueue);}}}
nextTick可以简单当成一个异步函数来看,比如setTimeout,主要目的就是把要执行的操作放到下一个执行周期中,比如例子中testClick整个执行周期完成后才会执行此处的逻辑,watcher中的逻辑才会真正执行,这样就避免了多次触发watcher以及触发了多个watcher更新造成的重复渲染问题。
var queue = [ watcher ];//nextTick flushSchedulerQueue
setTimetout(function(){for(var i = 0; i < queue.length; i++){queue[i].run(); //watcher.run()
  }
} , 0);
ps:这里的异步队列中涉及到了nextTick以及多个watcher执行顺序的问题,本文为了方便理解只讲了一种watcher--渲染watcher,后面讲其它watcher的时候一起来讲。
以上就是数据更新阶段的逻辑。
五、总结:
本文从Vue的初始化以及更新两个方面出发讲了下Vue的核心逻辑,主要目的是为了帮助大家了解整个流程,介绍过程屏蔽了不少内容,后面有机会再展开。另外,如果有没看过源码可以从我上面划分的几个部分来开,可能会事半功倍。