【React Native】react-navigation导航使用方法
目录
- 集成react-navigation
- 使用react-navigation
上一篇介绍了如何在已有iOS项目中集成React Native。这一篇我们把上一篇的demo做下拓展,添加点击电影跳转到详情页。页面跳转使用React Native推荐的第三方导航控件:react-navigation
集成react-navigation
- 根据官方指引,在终端cd到项目根目录,分别输入以下命令进行集成:
npm install --save react-native-navigation
npm install --save react-native-gesture-handler
react-native link react-native-gesture-handler
- 在iOS项目中,打开Podfile文件,添加RCTLinkingIOS:
pod 'React', :path => '../node_modules/react-native', :subspecs => [. . . // other subspecs'RCTLinkingIOS',. . .]然后执行以下命令安装
pod install
至此,react-navigation集成完毕。
使用react-navigation
- 参考官方使用文档,在根目录创建Navigator.js文件,编辑内容如下:
import React from "react";
import { createStackNavigator, createAppContainer } from 'react-navigation'
import HotMovie from './src/page/HotMovie';
import MovieDetail from './src/page/MovieDetail'const AppNavigator = createStackNavigator({Home: HotMovie,Details: MovieDetail},{initialRouteName: "Home"}
)const AppContainer = createAppContainer(AppNavigator);
export default class Navigator extends React.Component {render() {return <AppContainer />;}
}
其中HotMovie为上一篇中创建的电影列表,MovieDetail为新建的电影详情页,具体如下一步
- 创建MovieDetail.js文件,路径为./src/page/MovieDetail.js,编辑如下:
import React,{Component} from 'react';
import {StyleSheet,Image,Text,View} from 'react-native';export default class MovieDetail extends Component<Props>{constructor(props){super(props)const { navigation } = propsconst itemId = navigation.getParam('itemId', 'NO-ID')const cover = navigation.getParam('cover')this.state = {detail:null,cover:cover,itemId:itemId}this.fetchData = this.fetchData.bind(this)}componentDidMount(){const requrest_url = "https://movie.douban.com/j/subject_abstract?subject_id="+this.state.itemIdthis.fetchData(requrest_url)}fetchData(requrest_url){fetch(requrest_url).then((response) => response.json()).then((responseJson) => {this.setState({detail:responseJson.subject});})}render(){if (!this.state.detail) {return this.renderLoadingView();}const data =  this.state.detailconst state = this.statereturn(<View><Text style={{fontSize:32,fontWeight:"400",padding:10}}>{data.title}</Text><View style={styles.detailView}><Image style={styles.thumbnail} source={{url:state.cover}}></Image><View style={styles.rightDetai}><Text>导演: {data.directors.join('/')}</Text><Text>评分:{data.rate}</Text><Text>时长:{data.duration}</Text><Text>类型:{this.state.detail.types.join('/')}</Text><Text>主演:{this.getDetaiActor()}</Text></View></View></View>)}renderLoadingView(){return (<View style={styles.container}><Text>正在加载...</Text></View>)}getDetaiActor(){return this.state.detail.actors.slice(0,5).join('/')+' 等'}
}const styles = StyleSheet.create({container: {flex:1,flexDirection:'column',alignItems:'center',justifyContent: 'center',alignItems: 'center',height:300},detailView: {flexDirection:'row',justifyContent: 'flex-start',height:200,paddingLeft:20,paddingTop:10,paddingRight:10,},thumbnail:{width:79.5,height:121.5,},rightDetai:{flexDirection:'column',height:200,marginLeft:10}});- Index.js文件修改为:
import React from 'react';
import { AppRegistry } from 'react-native';
import HotMovie from './src/page/HotMovie';
import MovieDetail from './src/page/MovieDetail'
import Navigator from './Navigator';AppRegistry.registerComponent('Navigator', () => Navigator);
AppRegistry.registerComponent('HotMovie', () => HotMovie);
AppRegistry.registerComponent('MovieDetail', () => MovieDetail);- 在iOS项目中,跳转ViewController.m文件改为如下:
#import "ViewController.h"
#import <React/RCTRootView.h>@interface ViewController ()@end@implementation ViewController- (void)viewDidLoad {[super viewDidLoad];UIButton *button = [[UIButton alloc] initWithFrame:CGRectMake(0, 0, 200, 50)];button.center = self.view.center;[button setTitle:@"跳转RN" forState:0];[button setTitleColor:[UIColor greenColor] forState:0];[button addTarget:self action:@selector(clickButton:) forControlEvents:UIControlEventTouchUpInside];[self.view addSubview:button];
}- (void)clickButton:(UIButton*)button{NSURL *jsCodeLocation = [NSURL URLWithString:@"http://localhost:8081/index.bundle?platform=ios"];RCTRootView *rootView =[[RCTRootView alloc] initWithBundleURL: jsCodeLocationmoduleName: @"Navigator"initialProperties: nillaunchOptions: nil];UIViewController *vc = [[UIViewController alloc] init];vc.view = rootView;[self presentViewController:vc animated:YES completion:nil];
}
@end
- 在HotMovie.js中添加点击事件,HotMovie.js完整代码如下:
import React, { Component } from 'react';
import {StyleSheet, Image, Text, View, FlatList,TouchableOpacity} from 'react-native';
import { createStackNavigator, createAppContainer } from 'react-navigation'var REQUEST_URL = "https://movie.douban.com/j/search_subjects?type=movie&tag=%E7%83%AD%E9%97%A8&sort=recommend&page_limit=20&page_start=0"export default class HotMovie extends Component<Props> {_onItemClick(item) {this.props.navigation.navigate('Details',{itemId:item.id,cover:item.cover,title:item.title})}constructor(props){super(props);this.state = {movies:null,}this.renderMovie = this.renderMovie.bind(this)this.fetchData = this.fetchData.bind(this)}componentDidMount(){this.fetchData()}fetchData(){fetch(REQUEST_URL).then((response) => response.json()).then((responseJson) => {this.setState({movies:responseJson.subjects});})}render() {if (!this.state.movies) {return this.renderLoadingView();}return (<FlatListdata={this.state.movies}renderItem={this.renderMovie}style={styles.list}keyExtractor={item => item.id}/>);}renderLoadingView(){return (<View style={styles.container}><Text>正在加载...</Text></View>)}renderMovie({item}){return(<TouchableOpacity style={styles.item} onPress={() => this._onItemClick(item)}><Image source={{url:item.cover}} style={styles.thumbnail}/><View style={styles.itemRight}><Text>{item.title}</Text><Text>{item.rate}</Text></View></TouchableOpacity>)}
}const styles = StyleSheet.create({container: {flex:1,flexDirection:'row',alignItems:'center',justifyContent: 'center',alignItems: 'center',},item:{marginTop:1,flexDirection:'row',alignItems:'center',justifyContent: 'flex-start',height:100,backgroundColor:'lightgray',paddingLeft:10},thumbnail:{width:53,height:81,backgroundColor:'lightgray'},itemRight:{height:100,justifyContent: 'center',alignItems:'center',paddingLeft:10},list: {backgroundColor: "#F5FCFF"}
});
其中this.props.navigation.navigate('Details')即为react-navigation的导航跳转方法,但此方法不能跳转相同的页面(会没有效果),如果要多次push同样的页面,需要改为:
this.props.navigation.push('Details')
导航返回的话:
this.props.navigation.goBack()
- 设置导航标题
根据不同的需求,我们先看下官方的示例:
- 如果标题是固定的,定义一个名为navigationOptions的static的属性,返回一个包含配置的对象,如:
class HomeScreen extends React.Component {static navigationOptions = {title: 'Home',};/* render function, etc */
}
- 如果是需要从上层参数中获取,代码如:
class DetailsScreen extends React.Component {static navigationOptions = ({ navigation }) => {return {title: navigation.getParam('otherParam', 'A Nested Details Screen'),};};/* render function, etc */
}
- 如果要修改标题,代码如:
<Buttontitle="Update the title"onPress={() => this.props.navigation.setParams({otherParam: 'Updated!'})}/>
- 如果需要修改样式,代码如::
class HomeScreen extends React.Component {static navigationOptions = {title: 'Home',headerStyle: {backgroundColor: '#f4511e',},headerTintColor: '#fff',headerTitleStyle: {fontWeight: 'bold',},};/* render function, etc */
}
- 以上只是设置了首页的导航栏样式,我们希望全局设置,那直接回到最前面createStackNavigator代码处,修改:
const RootStack = createStackNavigator({Home: HomeScreen,Details: DetailsScreen,},{initialRouteName: 'Home',/* The header config from HomeScreen is now here */defaultNavigationOptions: {headerStyle: {backgroundColor: '#f4511e',},headerTintColor: '#fff',headerTitleStyle: {fontWeight: 'bold',},},}
);- 有时,我们想把标题改为自定义控件,例如显示图片或者按钮,我们可以这样:
class LogoTitle extends React.Component {render() {return (<Imagesource={require('./spiro.png')}style={{ width: 30, height: 30 }}/>);}
}class HomeScreen extends React.Component {static navigationOptions = {// headerTitle instead of titleheaderTitle: <LogoTitle />,};/* render function, etc */
}
回到我们的demo示例,我们希望整个App导航栏的背景颜色值是#f4511e,文字为白色,故在Navigator.js中统一配置,Navigator.js完整代码如下:
import React from "react";
import { createStackNavigator, createAppContainer } from 'react-navigation'
import HotMovie from './src/page/HotMovie';
import MovieDetail from './src/page/MovieDetail'const AppNavigator = createStackNavigator({Home: HotMovie,Details: MovieDetail},{defaultNavigationOptions: {headerTintColor: '#fff',headerStyle: {backgroundColor: '#f4511e',},headerTitleStyle: {fontWeight: 'bold',},},navigationOptions: {tabBarLabel: 'Home!',},}
)const AppContainer = createAppContainer(AppNavigator);
export default class Navigator extends React.Component {render() {return <AppContainer />;}
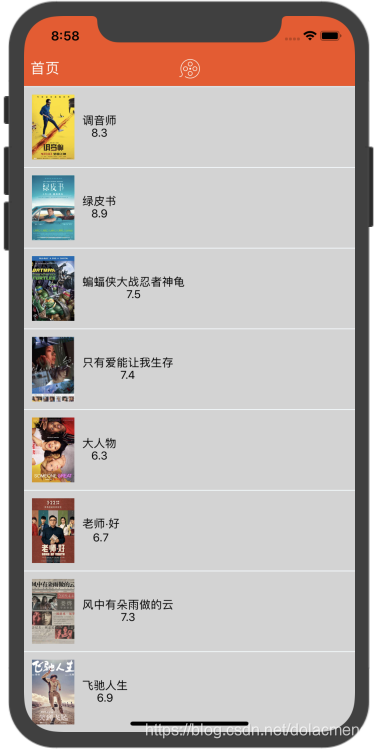
}首页(电影列表)的导航栏标题为指定图片movie.png (对应路径为:项目根目录/src/images/movie.png),故修改HotMovie.js为:
import React, { Component } from 'react';
import {StyleSheet, Image, Text, View, FlatList,TouchableOpacity} from 'react-native';
import { createStackNavigator, createAppContainer } from 'react-navigation'var REQUEST_URL = "https://movie.douban.com/j/search_subjects?type=movie&tag=%E7%83%AD%E9%97%A8&sort=recommend&page_limit=20&page_start=0"class LogoTitle extends React.Component {render() {return (<Imagesource={require('../image/movie.png')}style={{ width: 30, height: 30 }}/>);}
}export default class HotMovie extends Component<Props> {static navigationOptions = {headerTitle: <LogoTitle />,};//....省略代码
}const styles = StyleSheet.create({//...省略代码
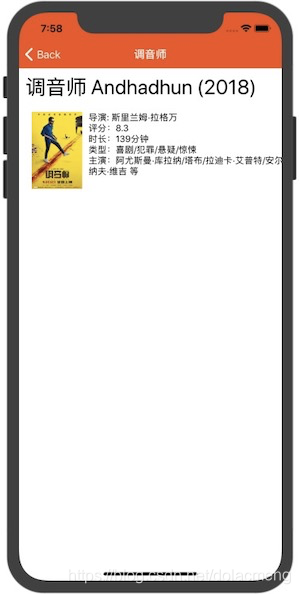
});在电影详情页,我们根据上一页面传递来的电影名称参数来设置标题,缺省值为电影详情:
import React,{Component} from 'react';
import {StyleSheet,Image,Text,View} from 'react-native';export default class MovieDetail extends Component<Props>{static navigationOptions = ({ navigation }) => {return {title:navigation.getParam('title','电影详情')}}//...省略代码
}const styles = StyleSheet.create({//...省略代码
});
完整源代码:https://github.com/dolacmeng/RNProject/tree/master
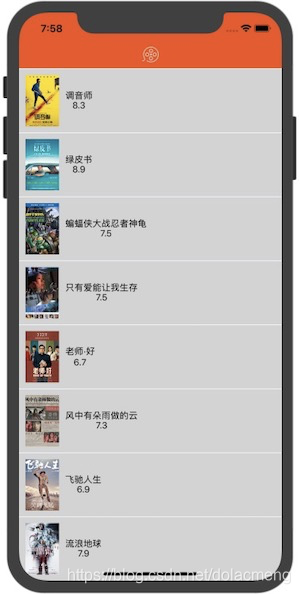
运行效果:
相关文章:

请说明在.net中常用的几种页面间传递参数的方法,并说出他们的优缺点。
QueryString 传递一个或多个安全性要求不高或是结构简单的数值。但是对于传递数组或对象的话,就不能用这个方法了 session(viewstate) 简单,但易丢失 作用于用户个人,过量的存储会导致服务器内存资源的耗尽。 application 对象的作用范围是整个全局&am…

邮Z速递物流,让用户密码在网络中遨游
“ 最近分析快递行业的APP上瘾了,求解救。”邮政作为快递行业一个傻大黑的存在,一直很奇怪,我一直在纳闷,邮政和EMS到底是不是一家,在很多网点,它们是一体的存在,但很多东西,又是各自…
servlet response 中文乱码
先,response返回有两种,一种是字节流outputstream,一种是字符流printwrite。 申明:这里为了方便起见,所有输出都统一用UTF-8编码。 先说字节流,要输出“中国",给输出流的必须是转换为utf-8…
【React Native】iOS原生导航跳转RN页面
上一篇介绍了React Native使用react-navigation进行导航跳转页面,现在我们介绍下原生iOS中怎么导航进一个新的React Native页面。 一、原生跳转React Native 创建HYReactNativeManager管理类. 在HYReactNativeManager.h中声明实现声明RCTBridgeDelegate协议&…
mac 常用指令
苹果公司生产的Mac搭载OS x 系统,OS x基于Unix,所以很多指令都和linux大同小异。 以下是一些常用指令,一点点自己记录下,方便自己和他人。这篇文应该是长期更新的。 1.ls [选项] [目录名] 第一个当然是list 指令 列出目录的文件列…

如何高效地爬取链家的房源信息(一)
“Python实现的链家网站的爬虫第一部分。”在之前的文章,以链家成都站为例,分析过链家网站数据的爬取,文章如下:干货!链家二手房数据抓取及内容解析要点但是,当时没有根据分析,将爬取实现。本系…

HDU5886 Tower Defence 【两遍树形dp】【最长链预处理】
题意:N个点的一棵带权树。切掉某条边的价值为切后两树直径中的最大值。求各个边切掉后的价值和(共N-1项)。 解法一: 强行两遍dp,思路繁琐,维护东西较多: dis表示以i为根的子树的直径,…
NPOI读取Excel数据应用
NPOI 是 POI 项目的 .NET 版本。使用 NPOI 你就可以在没有安装 Office 或者相应环境的机器上对 WORD/EXCEL 文档进行读写。NPOI是构建在POI 3.x版本之上的,它可以在没有安装Office的情况下对Word/Excel文档进行读写操作。 需求:根据excel表格提供的SVN相…
pod setup慢的解决方法
最近使用pod setup更新CocoaPods本地检索库,无奈只有10几k,还中途报错。最终通过以下步骤,完成更新。 1.手动下载Specs检索库 执行pod setup后,实质是从github上clone检索库(https://github.com/CocoaPods/Specs&…
如何高效地爬取链家的房源信息(二)
“Python实现的链家网站的爬虫第二部分。”本系列文将以链家南京站为例,使用Python实现链家二手房源信息的爬虫,将数据爬取,并存入数据库中,以便使用。本系列第一部分:如何高效地爬取链家的房源信息(一&…
C#实现HttpPost提交文件
先建立一个WebApplication Web.config <?xml version"1.0" encoding"utf-8"?><configuration><system.web><!--<globalization requestEncoding"gb2312" responseEncoding"gb2312" fileEncoding"gb231…
16年10月18号2th运算符与流程结构
---恢复内容开始--- 2th: 一:运算符 算数运算符 - * / %取余 9%30 自增 --自减 关系运算符 < < > > 全等于 !不等于 逻辑运算符 & | !非 ^异或 &&短路与 || 短路或 赋值…
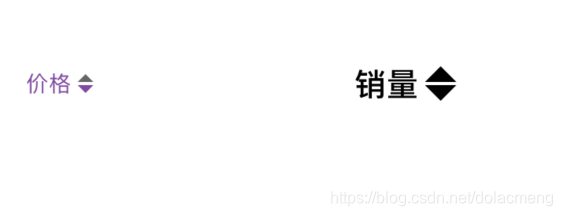
通用的排序按钮
排序按钮,使用Core Graphic绘制,可以指定颜色、大小、字体等: 使用场景如下: 1.使用方法 下载demo代码。将HYRankView.h和HYRankView.m代码拖入工程。 然后使用如下代码,即可快速添加一个名称为价格的排序按钮 HYR…
如何高效地爬取链家的房源信息(三)
“Python实现的链家网站的爬虫第三部分。”本系列文将以链家南京站为例,使用Python实现链家二手房源信息的爬虫,将数据爬取,并存入数据库中,以便使用。本系列第一部分为基础:如何高效地爬取链家的房源信息(…
Swift学习总结【持续更新】
1、 try、try?、try!的区别: try:需要用catch捕捉异常,如: do {let data try encoder.encode(item) try data.write(to: dataFilePath(), options: .atomic)} catch {print("Error encoding item array:\(error.localize…

svn清理失败且乱码 问题解决(转)
由于昨天在网络不好的状态下频繁尝试svn更新,导致今天svn更新时出现:清理失败且乱码的情况如下: 以下是解决方案:1.下载sqlite3.exe ,地址为:http://download.csdn.net/detail/whyzzj/63465292.在D盘建立文件夹 tools …
UI学习第二篇 (控件)
UIbutton 也是一个控件,它属于UIControl 用的最多的就是事件响应 1. //创建按钮对象 UIButton * _botton [UIButton buttonWithType:UIButtonTypeCustom]; //设置标题 [_botton setTitle:"按住说话" forstate:UIControlStateNormal]; [_botton setTitle:…
如何高效地爬取链家的房源信息(四)
“Python实现的链家网站的爬虫第四部分,最后一部分。”本系列文将以链家南京站为例,使用Python实现链家二手房源信息的爬虫,将数据爬取,并存入数据库中,以便使用。本系列第一部分为基础:如何高效地爬取链家…

Quartz2D在项目中的实际使用
还记得大学刚学iOS那会,从学校图书馆借了本iOS开发的书,有一章节介绍了Quartz2D,当时看得一头雾水,感觉这画画线,画画圆有什么用呢🤔️?工作一段时间后,遇到了一些需求,终…

区别:电感、磁珠和零欧电阻的作用
转载:http://www.cntronics.com/sensor-art/80022840 【导读】电感、磁珠和零欧电阻在电路中是常见的身影。对于这三者在电路中的作用及它们之间的区别,相信还有很多工程师不是很清楚。不过没关系,小编在此为大家奉上一篇关于电感、磁珠和零欧…

【转载】Linux下安装、配置、启动Apache
原文地址:http://www.cnblogs.com/zhuque/archive/2012/11/03/2763352.html 安装Apache前准备: 1、检查该环境中是否已经存在httpd服务的配置文件,默认存储路径:/etc/httpd/httpd.conf(这是centos预装的Apache的一个ent版本&#…
MIME格式解析
“ 本文介绍常见的MIME数据格式。”在协议还原中,不可避免地,经常会在各类协议内容中碰到MIME格式,例如标准邮件协议、HTTP协议。那么,什么是MIME呢?MIME是英文Multipurpose Internet Mail Extensions的缩写࿰…
AngularJs--过滤器(filter)
过滤器(filter)正如其名,作用就是接收一个输入,通过某个规则进行处理,然后返回处理后的结果。主要用在数据的格式化上,例如获取一个数组中的子集,对数组中的元素进行排序等。ng内置了一些过滤器…
【一步步学小程序】1.创建项目以及TabBar
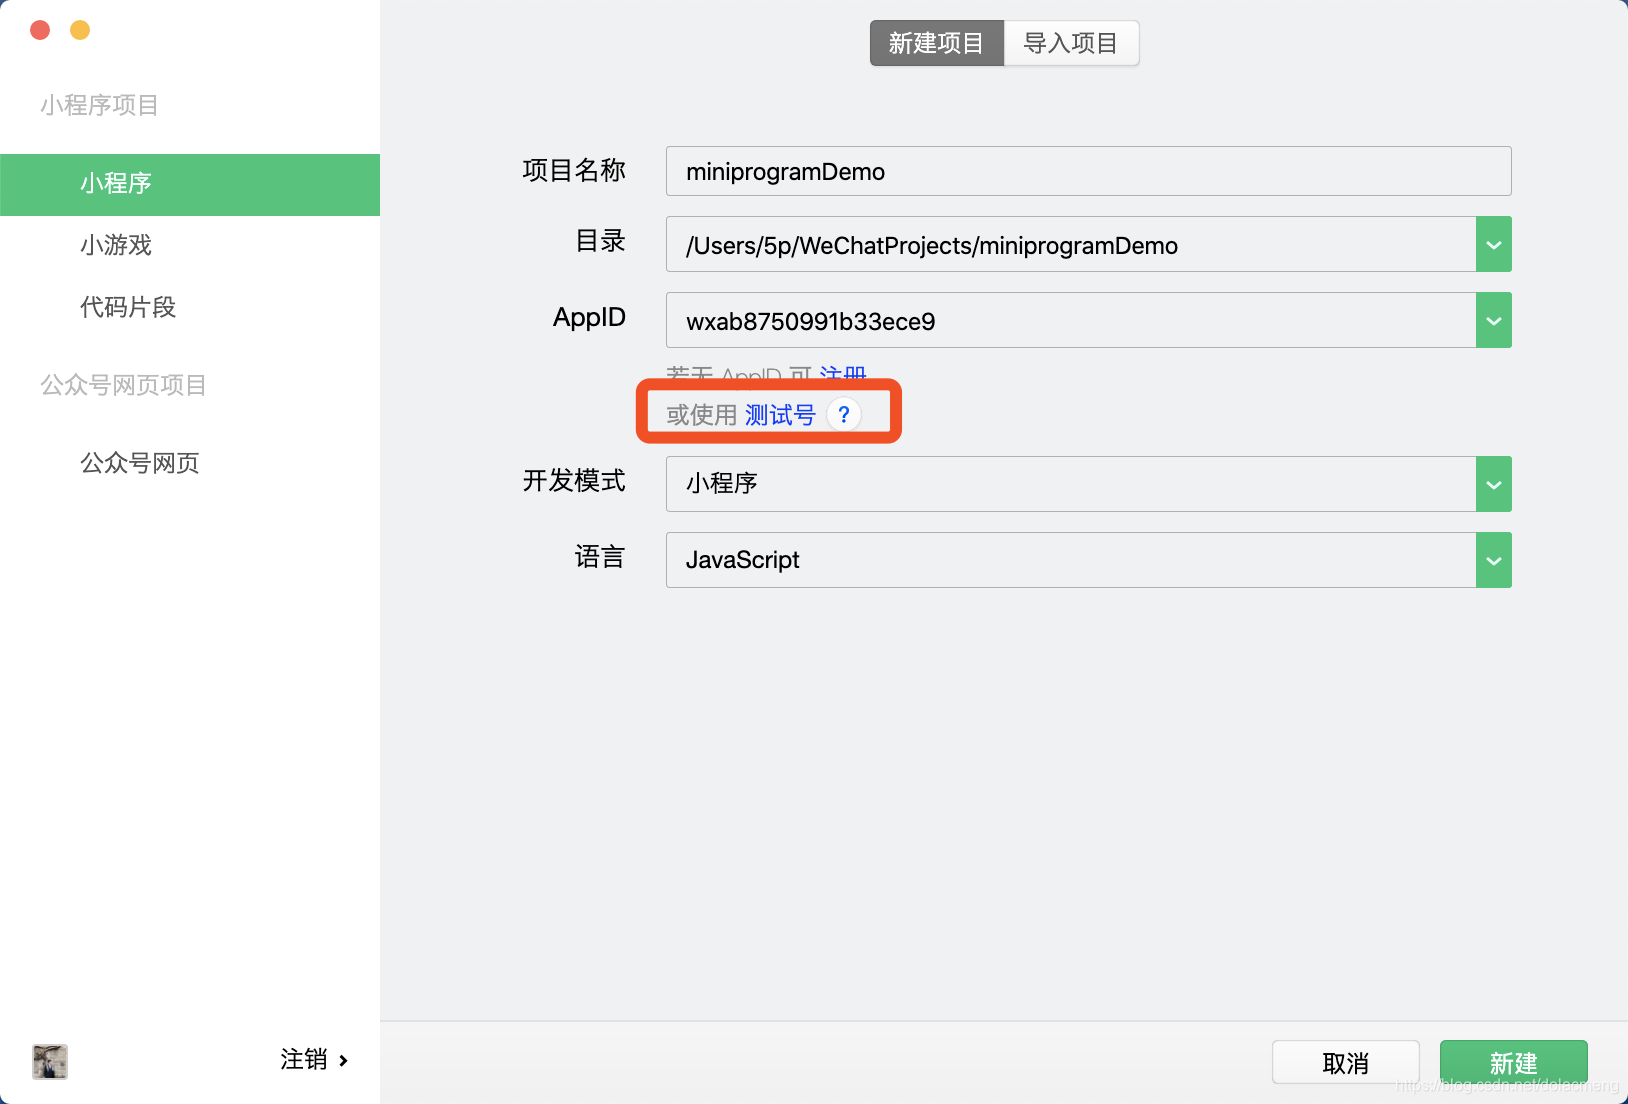
1.创建项目 如图,创建项目,输入项目名称、选择目录,AppID是唯一标识,我们可以先点如图红框内的测试号,自动生成一个AppID,然后点新建即创建完一个新项目。 2.创建3个页面 确保如图左上角的编译器按钮是…
Yii在window下的安装方法
首先,在http://www.yiichina.com/上下载yii 然后,配置系统环境变量,在win8下,按winx,找到系统->高级系统设置->环境变量->path 把php的运行环境,加入到环境变量中,以分号隔开。如&…
从新手到入门,如何进入协议分析的世界
“ 协议分析与还原自学及入门指南。”有部分朋友给我发消息,说对协议还原很感兴趣,但苦于没人指导,希望得到我的帮助,问我如何进行协议分析的学习。这篇文章从初学者的角度,编列了一个学习指南,希望能对协议…
C# 学习笔记01
想写一个app可以访问数据库,实现对数据库的查询,修改等,突然发现知识实在有限,故选择C#来实现此app。 使用简单的三层架构来作为此app的架构。表现层(UI)、业务逻辑层(BLL)、数据访问…

转载 iOS js oc相互调用(JavaScriptCore) --iOS调用js
iOS js oc相互调用(JavaScriptCore) 从iOS7开始 苹果公布了JavaScriptCore.framework 它使得JS与OC的交互更加方便了。 下面我们就简单了解一下这个框架 首先我导入framework 方法如下 点击Linked Frameworks and Libraries 的添加后 选择 JavaScriptCor…

【一步步学小程序】2.列表展示
我们上一节已经创建了一个可以点击切换的tabbar。这节我们开始正式敲代码,在首页上展示一个可以上下滚动的课程列表: 首先打开上一节的pages/home/homeMain/homeMain.wxml文件,布局相关代码都会在此文件中,小程序的布局方式类似H…
git分支的合并
原文: http://gitbook.liuhui998.com/3_3.html http://gitbook.liuhui998.com/5_3.html 一、如何分支的合并在git中,可以使用git merge 和git rebase两个命令来进行分支的合并。git merge 和git rebase在大体上都差不多,下文主要以git merg…