构建静态服务器_为静态网站构建无服务器联系表
构建静态服务器
介绍 (Introduction)
A few years ago AWS launched static hosting service S3, which was a paradigm shift for hosting static websites. The tech was crystal clear, all the static assets (HTML, CSS, and JS) would reside in an S3 bucket to host your impressive website. A pretty cool idea I personally liked it, really. Had it not been for that super important contact form hosting on S3 would have been cool but your contact form would be a joke unless you had another server in place to service AJAX requests from that form. The moment you had that service ready, the S3 solution wouldn’t appear so attractive at all.
几年前,AWS启动了静态托管服务S3,这是托管静态网站的一种模式转变。 该技术非常清晰,所有静态资产(HTML,CSS和JS)都将驻留在S3存储桶中,以托管您印象深刻的网站。 我个人真的很喜欢这个很棒的主意。 如果不是因为在S3上托管的超重要联系表单不是很酷,但是除非您有其他服务器来处理来自该表单的AJAX请求,否则您的联系表单会很开玩笑。 准备好该服务的那一刻,S3解决方案似乎就不会那么吸引人。
In the age of cutting edge technology, there’s always jaw-dropping innovations around the corner. One of the awesome tech innovation happens to be serverless. Not that there are no servers involved but you can care less about them now. Serverless can be a proper and viable solution to a lot of problems, it is the most perfect solution for your static hosted contact form. Keep reading by the end of this post you will be able to handle your website forms in the most inexpensive and simplest manner possible.
在尖端技术时代,总是有令人corner目结舌的创新指日可待。 令人敬畏的技术创新之一就是无服务器。 并不是说没有服务器,但您现在可以在乎它们。 无服务器可以是解决许多问题的合适且可行的解决方案,它是静态托管联系表单的最完美解决方案。 在本文结尾处继续阅读,您将能够以最便宜和最简单的方式处理您的网站表单。
无服务器框架 (The Serverless Framework)
Serverless is your toolkit for deploying and operating serverless architectures. Focus on your application, not your infrastructure.
无服务器是用于部署和操作无服务器体系结构的工具箱。 关注您的应用程序,而不是基础架构。
— Serverless.com
— Serverless.com
The Swiss army knife of Serverless technologies. Serverless Framework is a free and open-source web framework written in Node.js. Serverless was the first framework to be developed for building applications exclusively on AWS Lambda, the serverless computing platform provided by Amazon Web Services. Currently, applications developed with Serverless Framework can be deployed to other FaaS service providers. Here is the list of the Serverless cloud services supported by the Serverless Framework:
无服务器技术的瑞士军刀。 无服务器框架是使用Node.js编写的免费开源Web框架。 Serverless是第一个为专门在AWS Lambda(由Amazon Web Services提供的无服务器计算平台)上构建应用程序而开发的框架。 当前,使用无服务器框架开发的应用程序可以部署到其他FaaS服务提供商。 这是无服务器框架支持的无服务器云服务的列表:
AWS Lambda
AWS Lambda
Google Cloud Functions
Google Cloud功能
Azure Functions
Azure功能
IBM OpenWhisk
IBM OpenWhisk
Auth0 Webtask
Auth0 Web任务
Oracle Fn Project
Oracle Fn项目
Spotinst
Spotinst
Kubeless
无核
无服务器框架入门 (Getting started with Serverless Framework)
Obviously, you are pretty excited to get started with the Serverless Framework, let’s cut to the chase and start by installing Serverless.
显然,您很高兴开始使用无服务器框架,让我们开始追逐并开始安装无服务器框架。
Setting up Serverless is simple. You need to install it through npm and link it to your AWS account.
设置无服务器很简单。 您需要通过npm安装它并将其链接到您的AWS账户。
1.全局安装无服务器 (1. Installing Serverless Globally)
Time to get hands-on Serverless stuff.
是时候动手实践无服务器的东西了。
$ npm install serverless -gThis command installs Serverless globally on your local machine. The Serverless commands are now available to you from your terminal.
此命令在本地计算机上全局安装无服务器。 现在,您可以从终端上使用无服务器命令。
Note: Running Linux, you may want to run the above command as sudo.
注意:在 Linux上,您可能需要以sudo的身份运行上述命令。
2.在AWS控制台中创建一个IAM用户 (2. Create an IAM user in the AWS Console)
Go to your AWS Console, you will find the IAM service listed below the “Security, Identity & Compliance” group. Inside the IAM dashboard click on the Users tab and click “Add User” button.
转到您的AWS控制台 ,您将在“安全性,身份和合规性”组下面找到IAM服务 。 在IAM仪表板内,单击“用户”选项卡,然后单击“添加用户”按钮。
Create a new user and allow the user programmatic access by clicking on the Programmatic access checkbox. Next, in the permissions section, you need to add a set of permissions to the user. From the list of available options under the “Attach existing policies directly” check the AdministratorAccess.
创建一个新用户,并允许通过点击程序访问复选框用户编程访问 。 接下来,在权限部分,您需要向用户添加一组权限。 在“直接附加现有策略”下的可用选项列表中,检查AdministratorAccess 。
After the user is created, you will have access to the users Access Key ID andSecret Access Key. You will be required to use these keys in the next step.
创建用户之后,您将有权访问用户的访问密钥ID和秘密访问密钥 。 您将需要在下一步中使用这些键。
Word of Caution: These are the kind of credentials you don’t want to lose even by mistake, remember you have provided AdministratorAccess to this user. The user with AdministratorAccess can do pretty much everything with your AWS account.
警告词:这些是您甚至不希望丢失的凭据,记住您已经为该用户提供了AdministratorAccess 。 具有AdministratorAccess的用户几乎可以使用您的AWS账户执行所有操作。
3.配置无服务器以使用IAM凭据 (3. Configuring Serverless to use IAM Credentials)
Great! With the keys, you can set up Serverless Framework to access your AWS account. Switch to your terminal and use this command to configure Serverless:
大! 使用密钥,您可以设置Serverless Framework来访问您的AWS账户。 切换到您的终端并使用此命令配置无服务器:
$ sls config credentials --provider aws --key xxxxxxxxxxxxxx --secret xxxxxxxxxxxxxx --profile <username>Now your Serverless installation knows what account AWS to connect.
现在,您的无服务器安装知道了要连接哪个帐户AWS。
Note: sls is an alias for the serverless command. You can use both to the same effect. But sls is kinda cool.
注意: sls是serverless命令的别名。 您可以同时使用这两种效果。 但是sls有点酷。
4.创建服务 (4. Creating a service)
With the Serverless Framework hooked up with your AWS account, you can set up a Serverless project in a jiffy. Fire up the terminal and issue the following command:
通过将无服务器框架与您的AWS帐户挂钩,您可以轻松设置无服务器项目。 启动终端并发出以下命令:
$ sls create --template aws-python --path <your-folder-path>The --template flag is used to specify a preset template with the given settings. In the above command the template aws-python will set up the project configured to use AWS as the provider and Python as the runtime. The command will auto-generate serverless.yml , handler.py and .gitignorefile with preset values.
--template标志用于指定具有给定设置的预设模板。 在上面的命令中,模板aws-python将设置项目,该项目配置为使用AWS作为提供者,使用Python作为运行时。 该命令将使用预设值自动生成serverless.yml , handler.py和.gitignore文件。
The configuration is defined in the serverless.yml file. This file is the most important file in the Serverless Framework. It’s almost magical, given how it can spin up the infrastructure you have defined in it. The contents of the auto-generated serverless.yml file will look something like this:
该配置在serverless.yml文件中定义。 该文件是无服务器框架中最重要的文件。 考虑到它如何提升您在其中定义的基础架构,这几乎是神奇的。 自动生成的serverless.yml文件的内容如下所示:
service: <your-service-name>provider: name: aws runtime: python2.7functions: hello: handler: handler.helloThe provider section defines everything related to the service provider, there are a lot more properties to configure it further you can take a look at them here. In the auto-generated serverless.yml file, you need to add two important tags under the provider section, which are as follows:
provider部分定义了与服务提供者相关的所有内容,还有更多属性可以对其进行进一步配置,您可以在此处进行查看 。 在自动生成的serverless.yml文件中,您需要在provider部分下添加两个重要标记,如下所示:
region: <your-aws-region>
profile: <aws-username-with-programmatic-access>
The functions property is used to declare the serverless functions, you can declare multiple functions under this property. The above example declares a function called hello present in the handler.py file. Browse over to the handler.py file and you will find something like this:
functions属性用于声明无服务器功能,您可以在此属性下声明多个功能。 上面的示例在handler.py文件中声明了一个名为hello的函数。 浏览到handler.py文件,您会发现类似以下内容:
import json
def hello(event, context):    body = {"message": "Go Serverless v1.0! Your function executed      successfully!",        "input": event    }response = {"statusCode": 200,        "body": json.dumps(body)    }return response
无服务器应用 (The Serverless App)
Our Serverless solution makes use of AWS infrastructure, it consists of API Gateway, Lambda Functions, DynamoDB and Simple Email Service(SES). To achieve this end result we will use the previously introduced Serverless Framework.
我们的无服务器解决方案利用了AWS基础设施,由API网关,Lambda函数,DynamoDB和简单电子邮件服务(SES)组成。 为了达到这个最终结果,我们将使用以前引入的Serverless Framework。
Static Website — Amazon S3 provides a robust and simple web server. All of the static HTML, CSS and JS files for your application can be served from S3. The contact form on our static website is submitted using AJAX.
静态网站 -Amazon S3提供了功能强大且简单的Web服务器。 可以从S3提供应用程序的所有静态HTML,CSS和JS文件。 我们静态网站上的联系表是使用AJAX提交的。
API Gateway — The API Gateway is the event source for the application, it acts as a bridge between our contact form and serverless lambda function. It routes the request from the contact form to the lambda function. The API Gateway also performs tasks such as access control, monitoring, API version control and traffic management.
API网关 -API网关是应用程序的事件源,它充当联系表单和无服务器lambda函数之间的桥梁。 它将请求从联系表路由到lambda函数。 API网关还执行诸如访问控制,监视,API版本控制和流量管理之类的任务。
AWS Lambda — AWS Lambda is the place where the action takes place. Lambda functions run in stateless compute containers that are event-triggered, managed and ephemeral. In our example, we use a lambda function to send email using SES and store the request contents in DynamoDB NoSQL database.
AWS Lambda- AWS Lambda是执行操作的地方。 Lambda函数在无状态的计算容器中运行,这些容器是事件触发的,托管的和短暂的。 在我们的示例中,我们使用lambda函数通过SES发送电子邮件并将请求内容存储在DynamoDB NoSQL数据库中。
Simple Email Service (SES) — The cloud-based email sending service from Amazon. Scalable email service, you can send marketing and transactional emails using SES. In our example, we use SES to send emails using a verified email address.
简单电子邮件服务(SES)-来自Amazon的基于云的电子邮件发送服务。 可扩展的电子邮件服务,您可以使用SES发送市场营销和交易电子邮件。 在我们的示例中,我们使用SES通过已验证的电子邮件地址发送电子邮件。
DynamoDB — DynamoDB provides a scalable, consistent, fully managed and non-relational database from Amazon. In our example, we use DynamoDB to store and retrieve the messages received from the static contact form.
DynamoDB — DynamoDB从Amazon提供了一个可扩展的,一致的,完全托管的非关系数据库。 在我们的示例中,我们使用DynamoDB来存储和检索从静态联系人表单收到的消息。
You can find the source code for the demo application here. Go ahead and clone it!
您可以在此处找到演示应用程序的源代码。 继续克隆它!
faizanbashir/python-ses-dynamodb-contactformpython-ses-dynamodb-contactform - Serverless Framework SES and DynamoDB Contact Formgithub.com
faizanbashir / python-ses-dynamodb-contactform python-ses-dynamodb-contactform-无服务器框架SES和DynamoDB联系表 github.com
应用演练 (Application Walkthrough)
Let’s have a stroll through the demo application before we actually deploy it on AWS.
在实际将示例应用程序部署到AWS之前,让我们先来看看。
1.解密serverless.yml文件 (1. Demystifying the serverless.yml file)
The serverless.yml file defines the services the application needs to use and interact with. The resources and the actions the Serverless functions can perform are listed under the iamRoleStatements property. It lists the actions and resources.
serverless.yml文件定义应用程序需要使用并与之交互的服务。 无服务器功能可以执行的资源和操作列在iamRoleStatements 属性。 它列出了操作和资源。
iamRoleStatements:- Effect: "Allow"Action:- ses:SendEmail - ses:SendRawEmail Resource: "*" - Effect: "Allow" Action: - dynamodb:Scan - dynamodb:PutItem Resource: "arn:aws:dynamodb:${opt:region, self:provider.region}:*:table/${self:provider.environment.DYNAMODB_TABLE}"In the serverless.yml we are allowing the Serverless functions to use ses:SendEmail and dynamoDB:PutItem actions among many others defined above.
在serverless.yml我们允许无服务器功能使用ses:SendEmail和dynamoDB:PutItem操作以及上面定义的许多其他操作。
Since Lambda runs serverless functions in the cloud, we need to define the functions somewhere. Functions are defined using the functions property. In our example application we have defined events attached to them.
由于Lambda在云中运行无服务器功能,因此我们需要在某处定义功能。 函数是使用functions属性定义的。 在示例应用程序中,我们定义了附加到它们的事件。
functions: sendMail: handler: handler.sendMaildescription: Send Email using AWS SES Serviceevents:- http: path: sendMail method: post integration: lambda cors: true response: headers: "Access-Control-Allow_Origin": "'*'" list: handler: handler.list description: List all the contact form submissions events: - http: path: list method: get integration: lambda cors: true response: headers: "Access-Control-Allow_Origin": "'*'"Another great feature of Serverless Framework is that it will create an API in the AWS API Gateway and link it with relevant Lambda function. This is done using the http property defined in the events property.
无服务器框架的另一个重要功能是它将在AWS API Gateway中创建一个API,并将其与相关的Lambda函数链接。 这是使用events属性中定义的http属性完成的。
2.创建资源 (2. Creating Resources)
With Serverless Framework you create resources like a DynamoDB table as we have done here. This snippet of code is responsible for creating a DynamoDB table with the given configuration.
使用无服务器框架,您可以像在此处创建DynamoDB表之类的资源。 此代码段负责使用给定的配置创建DynamoDB表。
resources: Resources: ContactFormDynamoDbTable: Type: 'AWS::DynamoDB::Table' DeletionPolicy: Retain Properties: AttributeDefinitions: - AttributeName: id AttributeType: S KeySchema: - AttributeName: id KeyType: HASH ProvisionedThroughput: ReadCapacityUnits: 1 WriteCapacityUnits: 1 TableName: ${self:provider.environment.DYNAMODB_TABLE}3.浏览无服务器功能 (3. Peek into the Serverless functions)
The demo application is written in python, it uses boto3 AWS SDK to send emails using SES and for performing read/write operations on DynamoDB.
该演示应用程序是用python编写的,它使用boto3 AWS开发工具包通过SES发送电子邮件并在DynamoDB上执行读/写操作。
The sendMail function is triggered when a POST request is received from the contact form on the /sendMail path. The list function is triggered by a GET request to /list path defined in the serverless.yml file.
当从/sendMail路径上的联系表收到POST请求时,将触发sendMail函数。 list功能由对serverless.yml文件中定义的/list路径的GET请求触发。
构建应用程序 (Building the Application)
Now that you have set up and configured the Serverless Framework in your machine, it’s time to get things rolling.
现在,您已经在计算机中设置并配置了无服务器框架,是时候开始了。
1.克隆应用程序 (1. Clone the application)
Let’s start by cloning the application from Github.
让我们从克隆Github开始。
$ git clone https://github.com/faizanbashir/python-ses-dynamodb-contactform
$ cd python-ses-dynamodb-contactform
2.使用SES验证电子邮件地址 (2. Verify e-mail address with SES)
Fast-forward to verifying the email you intend to send email from SES. All you need to do is add an email address, AWS will send you a verification with a link to verify the email address.
快速验证您要从SES发送电子邮件的电子邮件。 您所需要做的就是添加一个电子邮件地址,AWS将向您发送带有链接的验证邮件,以验证该电子邮件地址。
After verifying the email address, the “Verification Status” for the email will show up as “verified”.
验证电子邮件地址后,电子邮件的“验证状态”将显示为“已验证”。
3.配置应用程序 (3. Configuring the application)
You need to configure the serverless.yml with your account specific details to make it work. Replace the region, profile and SENDER_EMAIL properties in serverless.yml as seen here:
您需要使用您的帐户特定详细信息配置serverless.yml ,以使其正常运行。 更换region , profile和SENDER_EMAIL在性能serverless.yml如下所示:
provider:  name: aws  runtime: python2.7  region: <aws-region>  profile: <aws-user>  ...
environment:  SENDER_EMAIL: <verified-email-address>
Awesome! with the configuration done you can turn your attention to deploying the application.
太棒了! 完成配置后,您可以将注意力转移到部署应用程序上。
4.部署到AWS (4. Deploying to AWS)
Everything in place now you can deploy application with a single command, ain’t that super cool.
现在,一切就绪,您就可以使用单个命令来部署应用程序,这不是超级酷。
$ sls deploy -vIt will take a minute or two to execute if you religiously followed this tutorial, at the end it will provide you a list of endpoints to use for calling our functions. It will look something like this:
如果您认真地遵循本教程,将需要一两分钟才能执行,最后,它将为您提供用于调用我们的函数的端点列表。 它看起来像这样:
endpoints:
POST - https://xxx.execute-api.xx.amazonaws.com/development/sendMail
GET - https://xxxx.execute-api.xx.amazonaws.com/development/list
5.测试端点 (5. Testing the endpoints)
Now that we have the endpoints let’s test application to see if it’s working or not. The /sendMail endpoint expects input in JSON format.
现在我们有了端点,让我们测试应用程序以查看其是否正常运行。 /sendMail端点期望以JSON格式输入。
$ curl --header "Content-Type: application/json" \--request POST \--data '{"firstname": "John", "lastname": "Doe", "email": "john@doe.com", "message": "Hi there"}'\https://xxx.execute-api.xx.amazonaws.com/development/sendMailIf the email is sent and the entry written to DynamoDB the request will exit with a response like this.
如果发送了电子邮件并将条目写入DynamoDB,则请求将以这样的响应退出。
> "Email Sent!"Now, let’s test the /list endpoint in the same manner with the GET endpoint you got after deploying the application.
现在,让我们以与部署应用程序后获得的GET端点相同的方式测试/list端点。
$ curl https://xxxx.execute-api.xx.amazonaws.com/development/listThe /list endpoint response will look something like this:
/list端点响应将如下所示:
> {"body": [{"firstname": "John", "lastname": "Doe", "email": "john@doe.com", "updatedAt": 1529425349731, "message": "Hi there", "id": "f651c404-73dc-11e8-bf3e-be54be0b5d22", "createdAt": 1529425349731}], "statusCode": 200}6.联系表 (6. The Contact Form)
With the Serverless functions working properly we can go ahead and integrate it into our static contact form. The static form code is in the public folder.
在无服务器功能正常运行的情况下,我们可以将其集成到我们的静态联系表中。 静态形式的代码是在public文件夹中。
Open the index.html file in your favourite IDE and update the URL variable with the /sendMail endpoint and you are good to go.
在您最喜欢的IDE中打开index.html文件,并使用/sendMail端点更新URL变量, /sendMail顺利。
//Insert your lambda function URL here
var URL = "https://xxx.execute-api.xx.amazonaws.com/development/sendMail";
Navigate to the page using the file:///<path>/<to>/<folder>/index.html in the browser or upload it to S3 bucket and enable static hosting.
使用浏览器中的file:///<path>/<to>/<folder>/index.html导航到该页面,或将其上传到S3存储桶并启用静态托管。
$ aws s3 sync public s3://your-bucket-nameTreat yourself with a Cappuccino, Latte or <insert-your-favorite-drink>. You just implemented a cool way to keep your website on static hosting with handling your forms, thanks to Serverless.
用卡布奇诺咖啡,拿铁咖啡或<插入您喜欢的饮料>对待自己。 多亏了Serverless,您刚刚实现了一种很酷的方法来处理表单,使网站保持在静态主机上。
事后思考 (Afterthoughts)
Serverless is definitely the way forward, not just for the worlds static contact forms. Serverless has opened a universe of opportunities for you, the contact form was just to get started with. How about using Serverless for your website analytics, a visitor counter or maybe click tracking?
无服务器无疑是前进的方向,而不仅仅是世界范围内的静态联系方式。 Serverless为您打开了无限的商机,联系表只是开始。 如何使用Serverless进行网站分析,访问者计数器或点击跟踪?
Endless opportunities are waiting for you. Get started for your next project in Serverless, it’ll be an awesome journey.
无尽的机会等着您。 开始您在Serverless中的下一个项目,这将是一段了不起的旅程。
Originally published at www.serverlessops.io.
最初发布在 www.serverlessops.io上 。
翻译自: https://www.freecodecamp.org/news/building-serverless-contact-form-for-static-websites/
构建静态服务器
相关文章:

Yii2之行为
Yii三大特性:属性、事件、行为。前面两篇文章已经分别讲解了属性和事件,本文接着讲讲yii的行为,分析yii行为的实现原理。 在yii中,一个对象绑定了行为之后,就拥有了所绑定行为拥有的所有事件,而且可以访问所…

ACM学习历程—HDU5586 Sum(动态规划)(BestCoder Round #64 (div.2) 1002)
题目链接:http://acm.hdu.edu.cn/showproblem.php?pid5586 题目大意就是把一段序列里面的数替换成f(x),然后让总和最大。 首先可以计算出初始的总和,以及每一个值换成f(x)的增益a[x]。 那么就是求一段子序列a[x]的最值了,经典的D…
ant models 内获取 url 的参数传递到组件
models代码: import { getCList} from "@/services/api"; import { MessageTip } from @/utils/tools.js import { router } from umi;const customerModel = {namespace: customerModel,state: {channelList: [], // 渠道列表},reducers: {getUrlQuery(state, { …
软件开发向大数据开发过渡_如果您是过渡到数据科学的开发人员,那么这里是您的最佳资源...
软件开发向大数据开发过渡by Cecelia Shao邵Ce It seems like everyone wants to be a data scientist these days — from PhD students to data analysts to your old college roommate who keeps Linkedin messaging you to ‘grab coffee’.如今,似乎每个人都想…
php随笔(1)
PHP标记的四种风格 1、XML风格 <?php echo <p>Hello world</p> ; ?> 2、简短风格 <? echo <p>Hello world</p> ; ?> 3、SCRIPT <script language php>echo <p>Hello wordl.</p>;</script> 4、ASP风格 <% …
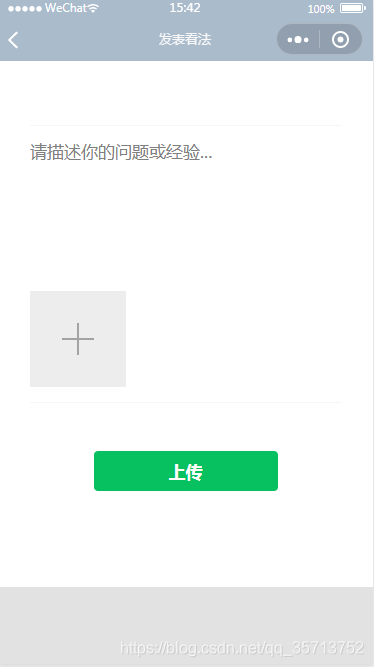
微信小程序云开发图片上传完整代码附效果图
在app.json里面加如下代码, 使用 WeUI组件库。点击跳转 "useExtendedLib": {"weui": true}, 先看效果图 wxml <!--pages/publish/publish.wxml--> <view class"page" data-weui-theme"{{theme}}"><view class"w…
图片lightbox2
1. 官网下载 http://lokeshdhakar.com/projects/lightbox2/ 2.引入 css jquery js 3. HTML格式 <a href"images/image-2.jpg" data-lightbox"roadtrip"> <img srcImage #1> </a> <a href"images/image-3.jpg" data-lig…
夏天和空调_您可以在今年夏天开始学习650项免费的在线编程和计算机科学课程...
夏天和空调Seven years ago, universities like MIT and Stanford first opened up free online courses to the public. Today, more than 900 schools around the world have created thousands of free online courses, popularly known as Massive Open Online Courses or …
bzoj1854: [Scoi2010]游戏
可以跑二分图 到第一个不能匹配的点就退出 嗯 还有并查集判环的做法? 1 #include<iostream>2 #include<algorithm>3 #include<cstdio>4 #include<cstdlib>5 #include<cstring>6 #include<string>7 8 using namespace std;9 10…
ant 获取当前url的参数
在util.js 中封装一个函数 公共函数: import { parse } from querystring; export const getPageQuery () > parse(window.location.href.split(?)[1]); 例如当前url 为:http://localhost:8000/manage/member_s_custome?corpIdww02c137b227b01c…
微软todo使用教程_Todo教程可能很有趣-但是,这是从头开始构建自己的项目的方法...
微软todo使用教程There are many great tutorials that walk you through creating apps, from simple todo lists to fully working web apps. But how do you start your own projects from scratch? Without the safety net of a tutorial, you might feel a bit lost on w…
python的with语句
from sqlalchemy import create_engine from sqlalchemy.orm import scoped_session, sessionmaker from setting import EREBUS_DB_CONNECT_STRING from contextlib import contextmanager# 创建数据库引擎,echo为True,会打印所有的sql语句 engine cre…
MSSQL 2012 拒绝了对对象 'extended_properties' (数据库 'mssqlsystemresource',架构 'sys')的 SELECT 权限...
查看数据库的表的时候报如下错误: MSSQL 2012 拒绝了对对象 extended_properties (数据库 mssqlsystemresource,架构 sys)的 SELECT 权限。 (Microsoft SQL Server,错误: 229) 解决方法: 在数据库里相应的用户权限中,把…
ant 接口返回文件流,前端自动下载实现
封装网络请求 : reqAxios.js import Axios from axios; import qs from qs; import { router } from umi; import { message } from antd;Axios.defaults.withCredentials = true// const httpUrl = https://xxx.cn/work_telecom_manage const httpUrl = window.location.o…
矩阵奇异值分解特征值分解_推荐系统中的奇异值分解与矩阵分解
矩阵奇异值分解特征值分解Recently, after watching the Recommender Systems class of Prof. Andrew Ng’s Machine Learning course, I found myself very discomforted not understanding how Matrix Factorization works.最近,在观看了Andrew Ng教授的机器学习课…
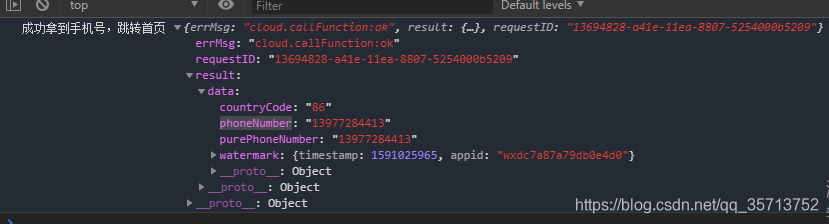
小程序云开发获取手机号完整代码 云函数中网络请求第三方接口
小程序云开发获取手机号完整代码 效果图: 小程序代码 <button open-type"getPhoneNumber" bindgetphonenumber"getPhoneNumber">登录</button> getPhoneNumber: function (e) {var that this;if (!e.detail.errMsg || e.detail.…

集合恒等式定律及文氏图
1、分配律 1.1 A∩(B∪C) (A∩B)∪(A∩C) 说明:从左至右,图1中三角形区域为 A,草绿色区域为 (B∪C),即有三角形又有草绿色底色的区域即为 A∩(B∪C) 图2中三角形区域为 (A∩B),草绿色区域为 (A∩C),三角形…

微信 小程序布局 水平菜单
<!-- 菜单列表部分 --><view class"wear-menu"><view classmenu-box wx:key"menu" wx:for"{{menuList}}" wx:for-index"index"><view class"menu-img" bindtap"selectMenu" data-index"…
keras神经网络回归预测_如何使用Keras建立您的第一个神经网络来预测房价
keras神经网络回归预测by Joseph Lee Wei En通过李维恩 一步一步的完整的初学者指南,可使用像Deep Learning专业版这样的几行代码来构建您的第一个神经网络! (A step-by-step complete beginner’s guide to building your first Neural Network in a c…
transform总结
1. 用jquery的css方法获取transform得到的是矩阵matrix,不利于获取translate的值, 优先使用dom.style.webKitTransform进行transform的读写 2. 从transform中读取translate的值方法 //jquery版本 function fGetTranslate($obj,type){var transformMatrix obj.css(&…
uni-app 音频控制
选择不同的音频,销毁上一个音频,播放最新的音频文件。 效果图: 音频组件代码: <template><view id"share_card" class"share_card"><view class"top"><img class"ms" :class…

推荐5款实用的jQuery时间轴插件
1、使用CSS3和jQuery制作的水平时间轴 这是一个可以在PC和移动端表现非常棒的水平时间轴,它由上部水平滑块和下部时间点对应的内容区块,点击时间轴上的时间点,下部内容会滑动到对应的内容区块。使用CSS3和jQuery技术使得时间轴滑块可以左右滑…
devkit_如何使用NodeMCU Devkit和Firebase数据库开始物联网
devkitby Jibin Thomas吉宾托马斯(Jibin Thomas) 如何使用NodeMCU Devkit和Firebase数据库开始物联网 (How to get started with IoT using NodeMCU Devkit and Firebase database) “The Internet will disappear. There will be so many IP addresses, so many devices, sen…
洛谷p1162填涂颜色(dfs写法)
这道题本是放在试炼场bfs里的,但是我觉得dfs好写些 所以就用dfs过了 题目如下 题目描述 由数字0 组成的方阵中,有一任意形状闭合圈,闭合圈由数字1构成,围圈时只走上下左右4个方向。现要求把闭合圈内的所有空间都填写成2.例如&…
Microsoft .NET Framework 4.6.1
适用于操作系统平台:Windows 7 SP1、Windows 8、Windows 8.1、Windows 10、Windows Server 2008 R2 SP1、Windows Server 2012 和 Windows Server 2012 R2 .NET Framework 4.6.1 官方更新介绍页面 http://msdn.microsoft.com/en-us/library/ms171868%28vvs.110%29.a…
VUE还没生效,页面闪屏的问题解决办法 v-cloak
当网络较慢,网页还在加载 Vue.js ,而导致 Vue 来不及渲染,这时页面就会显示出 Vue 源代码。我们可以使用 v-cloak 指令来解决这一问题。 html: <div id"app">{{context}} </div>js: <script…
如何使用Python创建,读取,更新和搜索Excel文件
This article will show in detail how to work with Excel files and how to modify specific data with Python.本文将详细显示如何使用Excel文件以及如何使用Python修改特定数据。 First we will learn how to work with CSV files by reading, writing and updating them.…

字符串基本操作
1.已知‘星期一星期二星期三星期四星期五星期六星期日 ’,输入数字(1-7),输出相应的‘星期几’ s"星期一星期二星期三星期四星期五星期六星期日" iint(eval(input("请输入1-7的数字:"))) print(s[3*(i-1):3*i…
IOS长按识别二维码失败
IOS长按不识别二维码,出现放大图片的问题解决。 CSS加入样式: touch-callout: none; -webkit-touch-callout: none; -ms-touch-callout: none; -moz-touch-callout: none; 代码: <!DOCTYPE html> <html><head><s…
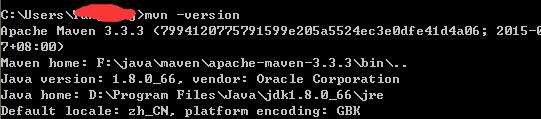
从svn下载的Mavn项目,到本地后不识别(MyEcplise)
从svn上面现在的mavn的项目到本地不识别的原因 1.首先要确认本机的mavn的环境是否正确。 2.查看本机的Myecplise的mavn的环境配置是否正确 3.在cmd当中执行命令 mvn -Dwtpversion1.0 eclipse:myeclipse ,可能svn上面的文件是eclipse建立的,需要进行转化。…