react中纯函数_如何在纯React中创建电子邮件芯片
react中纯函数
by Andreas Remdt
由Andreas Remdt
如何在纯React中创建电子邮件芯片 (How to create email chips in pure React)
Imagine that you, the good-looking developer (yes, I’m talking to you!), want to build an invitation form where users can add one or more email addresses to a list and send a message to all of them.
想象一下,您,一个好看的开发人员(是的,我正在和您聊天!),想要构建一个邀请表单,用户可以在其中将一个或多个电子邮件地址添加到列表中并向所有人发送消息。
Thinking about how this could be solved the best way possible, I looked at what Google does in their Gmail application. In the “New Message” overlay you can enter an email address and press “Return”, “Tab” or a comma to add it to the list of recipients. You can even paste a bunch of email addresses and the app will go ahead and parse and add them to your list. Pretty neat, isn’t it?
考虑如何最好地解决此问题,我研究了Google在其Gmail应用程序中的功能。 在“新邮件”叠加层中,您可以输入电子邮件地址,然后按“返回”,“制表符”或逗号将其添加到收件人列表中。 您甚至可以粘贴一堆电子邮件地址,该应用程序将继续解析并添加到您的列表中。 很整洁,不是吗?
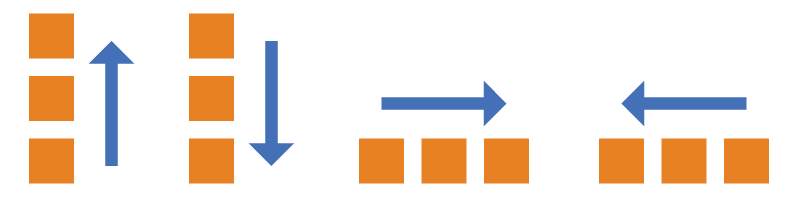
These visual components are commonly called Chips or Badges and can be found in frameworks like Materialize, Bootstrap or Material UI.
这些视觉组件通常称为“ 芯片”或“ 徽章” ,可以在诸如Materialize , Bootstrap或Material UI的框架中找到。
我们将要建设的 (What We Will be Building)
In this tutorial, I want to build such a feature in pure React, without the use of any other library or framework. We’ll create an input field which only accepts email addresses. The user can type them one by one or paste a bunch of them, which will create the chips as you can see and try in the example below:
在本教程中,我想在纯React中构建这样的功能,而无需使用任何其他库或框架。 我们将创建一个仅接受电子邮件地址的输入字段。 用户可以一一键入或粘贴一堆,这将创建芯片,如您所见并在以下示例中尝试:
Disclaimer: there are already various npm packages out there that do the same job, however, I like to implement such small features from scratch as I don’t enjoy depending on (sometimes huge) 3rd party scripts. Also, it’s a good exercise to practice your React skills.
免责声明:已经有各种各样的npm软件包可以完成相同的工作,但是,我喜欢从头开始实现一些小的功能,因为我不喜欢(有时是很大的)第3方脚本。 另外,练习React技能也是一个很好的练习。
脚手架项目 (Scaffolding the Project)
Since we don’t need anything special to get started, let’s just use create-react-app. In case you haven’t installed it on your computer already, open your terminal and enter npm install -g create-react-app.
由于我们不需要任何特殊的入门信息,因此我们只需要使用create-react-app即可 。 如果尚未将其安装在计算机上,请打开终端,然后输入npm install -g create-react-app 。
After the command has run, create-react-app should be installed (if you get an error during installation, you might need to run it with administrator privileges: sudo npm install -g create-react-app) and ready for use.
命令运行后,应安装create-react-app (如果在安装过程中遇到错误,则可能需要以管理员权限运行它: sudo npm install -g create-react-app )并可以使用。
Go into your workspace and type create-react-app chips. In my case, I’m going to name my folder chips, but you can choose whatever name you prefer.
进入您的工作区,然后输入create-react-app chips 。 就我而言,我将命名文件夹chips ,但您可以选择任何喜欢的名称。
create-react-app will go ahead and do its thing, installing all the dependencies that we need to get started. After this has been done, you can type cd chips to go into our newly created directory and npm start to boot up the development server. If everything went well, you should be greeted by the default React App screen.
create-react-app将继续执行它的工作,安装我们开始需要的所有依赖项。 完成此操作后,您可以键入cd chips进入我们新创建的目录,然后npm start启动开发服务器。 如果一切顺利,您应该会被默认的React App屏幕打招呼。
项目组织 (Project Organization)
In our chips directory we have a bunch of folders and files that were created for our convenience. We’ll be working in src/App.js for the most time, so open this file in your favorite code editor.
在我们的chips目录中,有很多文件夹和文件是为方便起见而创建的。 我们将大部分时间都在src/App.js工作,因此请在您喜欢的代码编辑器中打开此文件。
Delete all the code that you see inside of App.js. Next, let’s add a basic React class component:
删除您在App.js内部看到的所有代码。 接下来,让我们添加一个基本的React类组件:
import React from 'react';class App extends React.Component {render() {return <p>Hello World</p>;}
}
After saving App.js, you should see your browser refreshing automatically. The once dark page with the React logo is gone, instead, we have the simple text “Hello World” put onto the screen. Great start!
保存App.js ,您应该会看到浏览器自动刷新。 曾经带有React徽标的黑暗页面消失了,取而代之的是,我们在屏幕上放了简单的文本“ Hello World”。 伟大的开始!
输入字段和状态 (The Input Field and State)
As the next step, we’ll replace the not-so-useful “Hello World” text in our JSX with something more suited: an input element.
下一步,我们将JSX中不太有用的“ Hello World”文本替换为更合适的输入元素。
return (<inputplaceholder="Type or paste email addresses and press `Enter`"value={this.state.value}onChange={this.handleChange}/>
);
We now have an HTML input element with a placeholder attribute, which will show as long as the user hasn’t entered anything.
现在,我们有了一个带有placeholder属性HTML输入元素,只要用户未输入任何内容,该元素就会显示。
Below the placeholder attribute you’ll notice something that’s quite common in the React world, known as a Controlled Component. Normally, HTML form elements like input or textarea have their own state, which we can read and write with DOM methods like document.getElementById('input').value.
在placeholder属性下面,您会注意到React世界中很普遍的东西,称为Controlled Component 。 通常,诸如input或textarea类HTML表单元素都有其自己的状态,我们可以使用诸如document.getElementById('input').value类的DOM方法进行读写。
Using Controlled Components, the idea is that our React component’s state is the single source of through, meaning that the inputs value and our state are synced.
使用可控组件,我们的想法是我们的React组件的状态是穿透的唯一来源,这意味着输入值和我们的状态是同步的。
This allows us to manipulate the entered data on the fly and to add certain functionality that we’ll need later on.
这使我们能够即时处理输入的数据,并添加以后需要的某些功能。
If you would save and run this in your browser, you’d see the error message TypeError: Cannot read property 'value' of null. If you look at the code snippet it makes sense, because we are trying to access value from this.state, but we haven’t set up the state yet, nor do we have the handleChange method to control our state. Let’s add them.
如果您要在浏览器中保存并运行它,则会看到错误消息TypeError: Cannot read property 'value' of null 。 如果您看一下代码片段,这是有道理的,因为我们正在尝试从this.state访问value ,但是我们尚未设置状态,也没有handleChange方法来控制状态。 让我们添加它们。
class App extends React.Component {state = {value: ''}handleChange = (evt) => {this.setState({value: evt.target.value});};render() { ... }
}
First, we initialize a state object which contains an empty value property. Below that, we define the method handleChange which is going to be called each time the change event on the input element is fired. handleChange then runs and updates the state using setState.
首先,我们初始化一个包含空value属性的状态对象 。 在此之下,我们定义方法handleChange ,该方法将在每次触发输入元素上的change事件时调用。 然后, handleChange运行并使用setState更新状态。
evt.target.value is nothing React provides us with; it comes out of the box with JavaScript. evt.target is the input that we typed in, value is the entered value (how surprising).
evt.target.value不是React提供给我们的; 它随Java一起提供。 evt.target是我们输入的输入, value是输入的值(多么令人惊讶)。
Go ahead and try it out: in your browser you should be able to type something into the input. What you don’t see is that behind the scenes, your typed in data is synced with the state of your React component. Such magic!
继续尝试一下:在浏览器中,您应该可以在输入中输入内容。 您看不到的是,在后台,您键入的数据与React组件的状态同步。 太神奇了!
将电子邮件添加为筹码 (Adding Emails as Chips)
The next step is to enable the user to add emails to a list by pressing “Return”, “Tab” or the comma key on their keyboard. Before we can do such a thing, we need a list (or rather array) in our state to where we can add emails:
下一步是使用户能够通过按键盘上的“ Return”,“ Tab”或逗号键将电子邮件添加到列表中。 在做这样的事情之前,我们需要一个状态列表(或更确切地说是数组),可以在其中添加电子邮件:
state = {value: '',emails: []
}
Now that we have an array to work with, we need to react (pun intended) on users pressing these special keys. The best way to do so is the keydown event:
现在我们有了一个可以使用的数组,我们需要对按下这些特殊键的用户做出React(双关语)。 最好的方法是keydown事件 :
return (<inputplaceholder="Type or paste email addresses and press `Enter`"value={this.state.value}onChange={this.handleChange}onKeyDown={this.handleKeyDown}/>
);
Notice how I added the onKeyDown event listener, which refers to the following method:
请注意,我是如何添加onKeyDown事件侦听器的,该侦听器引用以下方法:
handleKeyDown = (evt) => {if (['Enter', 'Tab', ','].includes(evt.key)) {evt.preventDefault();var email = this.state.value.trim();if (email) {this.setState({emails: [...this.state.emails, email],value: ''});}}
};
Wow, there’s so much going on here, right? Don’t worry, let’s go through the changes step by step:
哇,这里有很多事,对吧? 不用担心,让我们逐步进行更改:
if (['Enter', 'Tab', ','].includes(evt.key))is where the magic begins: inside this condition, we check if the pressed key (evt.key) is one of our triggers. I have created an array with these three keys (you could easily add another key like “Space”). Using theincludesmethod we check if our pressed key part of the array. That said, if a user presses “Tab” thenevt.keywould beTabwhich exists inside the array, therefore the condition is true.if (['Enter', 'Tab', ','].includes(evt.key))是魔术开始的地方:在这种情况下,我们检查按下的键(evt.key)是否是我们的触发器之一。 我用这三个键创建了一个数组(您可以轻松添加另一个键,例如“ Space”)。 使用includes方法,我们检查数组的按键部分是否存在。 也就是说,如果用户按下“ Tab”,则evt.key将是存在于数组中的Tab,因此条件为true。If the condition is true, we’ll prevent the default from happening. Normally, by pressing the “Tab” key while being inside of an input element, you would focus on another element on the page or the browser (keyboard navigation), meaning that we’d leave our current input. But using
evt.preventDefault(), you can override the default browser behavior.如果条件为真,我们将防止发生默认情况。 通常,通过在输入元素内部按下“ Tab”键,您可以专注于页面或浏览器上的另一个元素( 键盘导航 ),这意味着我们将保留当前输入。 但是,使用
evt.preventDefault(),您可以覆盖默认的浏览器行为。Below, we save the input that we have got so far.
this.state.valuealways contains what the user has typed in, that’s what ourhandleChangemethod is for. Usingtrimjust allows us to remove whitespace before or after the input.在下面,我们保存到目前为止的输入。
this.state.value始终包含用户键入的内容,这就是我们的handleChange方法的作用。 使用trim仅允许我们在输入之前或之后删除空格。- Next, we check if the user has actually entered some data. If not, we don’t want to do anything.接下来,我们检查用户是否实际输入了一些数据。 如果没有,我们什么也不想做。
However, if
emailactually contains some data (which could really be anything as of right now), we append it into theemailsarray in our state.但是,如果
email实际上包含一些数据(截至目前可能确实是任何数据),我们将其附加到我们状态下的emails数组中。At last, we reset the
valueproperty in our state, which means that our input field will be cleared and the user can start typing a new email address (if he wants to). That’s the beauty of controlled components!最后,我们将
value属性重置为我们的状态,这意味着我们的输入字段将被清除,并且用户可以开始输入新的电子邮件地址(如果他愿意的话)。 那就是受控组件的美!
You might wonder what [...this.state.emails, email] does, right? Well, it’s a quite new JavaScript feature called spread syntax. The 3 dots mean that we extract all of the emails from this.state.emails. Now that we have them extracted, we can merge them together with our new email into a new array. Finally, we override our current emails property by assigning the newly created array to it. If you want to read more about this technique and why we can’t use array.push(), have a look at this Stack Overflow thread.
您可能想知道[...this.state.emails, email]是什么,对不对? 好吧,这是一个非常新JavaScript功能,称为s pread语法 。 3个点表示我们从this.state.emails提取了所有电子邮件。 现在我们已经提取了它们,我们可以将它们与我们的新email合并到一个新数组中。 最后,我们通过向其分配新创建的数组来覆盖当前的emails属性。 如果您想了解有关此技术的更多信息以及为什么我们不能使用array.push() ,请查看此Stack Overflow线程 。
Go ahead and try it out. Enter something into the input field and press any of our 3 triggers. Wait, nothing fancy happens you say? Well, that’s kind of expected, because although we add each input to our emails array we really don’t do anything with it, do we? Time to print them out:
继续尝试。 在输入字段中输入内容,然后按3个触发器中的任意一个。 等等,你说什么都没发生? 好吧,这是预料之中的,因为尽管我们将每个输入都添加到了电子邮件数组中,但实际上我们什么也没做,是吗? 是时候打印出来了:
return (<React.Fragment>{this.state.emails.map(email => <div key={email}>{email}</div>)}<inputplaceholder="Type or paste email addresses and press `Enter`"value={this.state.value}onChange={this.handleChange}onKeyDown={this.handleKeyDown}/></React.Fragment>
);
If you look at the JSX above you’ll see that I have wrapped our entire output with a React fragment and put an expression above the input field.
如果您看一下上面的JSX,您会看到我已经用React片段包装了整个输出,并在输入字段上方放置了一个表达式。
The fragment is so that I don’t have to render an unnecessary HTML element into the DOM.
该片段是为了使我不必在DOM中呈现不必要HTML元素。
The expression on line 3 is another typical React pattern that you will find in almost all applications: in here, we loop (or map, to be more concise) over the emails array from our state and output a div for every single item. The div has the email address as text content (and don’t forget the key prop, or else React will be mad at you).
第3行上的表达式是几乎在所有应用程序中都可以找到的另一种典型的React模式 :在这里,我们从状态循环遍历(或映射,以更简洁)在emails数组上,并为每个项目输出一个div 。 div的电子邮件地址为文本内容(不要忘记key道具,否则React会生您的气)。
Let’s see what we have achieved so far:
让我们看看到目前为止我们取得了什么成就:
从列表中删除电子邮件 (Removing Emails from the List)
That’s great and all, but what if you added someone that — let’s say you don’t really like? We need a feature to remove already added emails from the list!
那太好了,但是如果您添加一个这样的人怎么办?假设您真的不喜欢? 我们需要一项功能,以从列表中删除已经添加的电子邮件!
{this.state.emails.map(email => (<div key={email}>{email}<buttontype="button"onClick={() => this.handleDelete(email)}>×</button></div>
))}Look at the code above. Remember when we added the JSX to loop over all emails and print them out? This is the same code block, but now I have added a button inside our div that has a click event listener. This listener is going to call handleDelete as soon as a user presses the button.
看上面的代码。 还记得我们添加JSX来遍历所有电子邮件并打印出来吗? 这是相同的代码块,但是现在我在div内添加了一个带有click事件监听器的按钮。 用户按下按钮后,此侦听器将立即调用handleDelete 。
Notice how this function call is different, though. It’s actually an arrow function that gets called and in return calls the handleDelete method with a parameter, in this case, our email.
但是请注意,此函数调用有何不同。 实际上,它是一个箭头函数,它会被调用,然后返回带有参数的handleDelete方法,在这种情况下为我们的电子邮件。
This is a different approach from what you have seen so far, where we just did something like onChange={this.handleChange}. The reason is that this time, we need to pass the email that the user wants to get rid of into our method as a parameter, otherwise we wouldn’t be able to know which email to delete. If you want to know more details, this article has you covered.
这与您到目前为止所看到的方法不同,在该方法中,我们只做了类似onChange={this.handleChange} 。 原因是这一次,我们需要将用户希望摆脱的电子邮件作为参数传递到我们的方法中,否则我们将无法知道要删除的电子邮件。 如果您想了解更多详细信息,请阅读本文 。
Let’s implement the handleDelete method:
让我们实现handleDelete方法:
handleDelete = (toBeRemoved) => {this.setState({emails: this.state.emails.filter(email => email !== toBeRemoved)});
};
All we do in here is to set our state again, but this time we filter out the email address that was passed as a parameter. The filter method in JavaScript comes quite handy in cases like this.
我们在这里所做的只是再次设置状态,但是这次我们过滤掉作为参数传递的电子邮件地址。 在这种情况下,JavaScript中的filter方法非常方便。
We don’t have to use the weird spread syntax that you saw earlier ([...array1, newItem]), because filter returns a new array which doesn’t include the value that we just filtered out. We can then set this new array as our emails list.
我们不必使用您之前看到的怪异的扩展语法( [...array1, newItem] ),因为filter返回的新数组不包含我们刚刚过滤掉的值。 然后,我们可以将此新数组设置为我们的emails列表。
使它漂亮 (Making it pretty)
If you are like me, you might be cringing right now about the amount of unstyled content. Let’s make this bad boy pretty:
如果您像我一样,那么您现在可能会对未样式化内容的数量感到恐惧。 让这个坏男孩变得漂亮:
return (<main className="wrapper">{this.state.emails.map(email => (<div className="email-chip" key={email}>{email}<buttontype="button"className="button"onClick={() => this.handleDelete(email)}>×</button></div>))}<inputclassName="input"placeholder="Type or paste email addresses and press `Enter`"value={this.state.value}onChange={this.handleChange}onKeyDown={this.handleKeyDown}/></main>
);The first thing you’ll notice is that I have replaced the
React.Fragmentwith<main className="wrapper">. This is just for styling purposes, I want to center the wrapper on my page.您会注意到的第一件事是,我已用
<main className="wrapper”>替换了React.Fragment。 这只是出于样式目的,我想将包装器放在页面的中央。- I also have added some classes to the input, button and chips itself, which will receive a nice styling from our CSS file.我还为输入,按钮和筹码本身添加了一些类,它们将从CSS文件中获得漂亮的样式。
On top of the file, below
import React from 'react', I have added another import:import './app.css'. If you have used create-react-app, you’ll most likely find aApp.cssin yoursrcdirectory. I have just renamed mine to a lowercase app.css and imported it.在文件顶部,
import React from 'react',我添加了另一个导入:import './app.css'。 如果您使用过create-react-app ,则很可能会在src目录中找到一个App.css。 我刚刚将我的重命名为小写app.css并将其导入。
You can find the CSS here, I won’t show it in this place as it would add too much bloat to this already long article.
您可以在这里找到CSS ,我不会在这里展示它,因为它会给已经很长的文章增加太多的膨胀。
Let’s have a look at what our app looks like now:
让我们来看看我们的应用现在的样子:
验证方式 (Validation)
Our component is taking shape, but you might begin to wonder what will happen if a user enters some gibberish instead of an actual email address, right? RIGHT?
我们的组件正在逐步成形,但您可能会开始怀疑,如果用户输入一些乱码而不是实际的电子邮件地址,对吗? 对?
Currently, our component accepts all kinds of input, which we should fix as the next step. Let’s add an isValid method first:
当前,我们的组件接受各种输入,下一步应修复这些输入。 让我们首先添加一个isValid方法:
isValid(email) {var error = null;if (!this.isEmail(email)) {error = `${email} is not a valid email address.`;}if (this.isInList(email)) {error = `${email} has already been added.`;}if (error) {this.setState({ error });return false;}return true;
}
The isValid method receives a single parameter, which is the input (in the best case an email address) that we want to validate. It initializes an error variable with null, meaning that we don’t have any errors yet.
isValid方法接收一个参数,该参数是我们要验证的输入(最好是电子邮件地址)。 它使用null初始化一个error变量,这意味着我们还没有任何错误。
We then see 2 if-conditions. The first one is checking if the value is a valid email utilizing the isEmail method:
然后,我们看到2个if条件。 第一个方法是使用isEmail方法检查该值是否为有效电子邮件:
isEmail(email) {return /[\w\d\.-]+@[\w\d\.-]+\.[\w\d\.-]+/.test(email);
}
In here, we receive a single parameter which should, but might not be the email that we want to add. Using a regular expression and the test method, we check if it’s actually a valid email address.
在这里,我们收到一个参数,该参数应该是,但可能不是我们要添加的电子邮件。 使用正则表达式和test方法,我们检查它是否实际上是有效的电子邮件地址。
Disclaimer: I don’t guarantee that provided regular expression is the best one for validating emails. This is a difficult topic and there are many different variations out there, also things can get pretty complicated. But I’ll stick to this one, as it does the job.
免责声明:我不保证所提供的正则表达式是验证电子邮件的最佳方式。 这是一个困难的话题,并且有许多不同的变体,事情也会变得非常复杂 。 但是我会坚持这一点,因为它能完成任务。
The second method isInList also receives a single parameter (the email) and checks if it has already been added to our emails array in the state. Again, the awesome includes method is used:
第二种方法isInList也接收一个参数(电子邮件),并检查该参数是否已经添加到状态的我们的emails数组中。 再次,使用了很棒的includes方法:
isInList(email) {return this.state.items.includes(email);
}
All that our isValid method does is to use the other two methods to check if the given value is a valid email address and not yet part of our list. If neither of those conditions is true, we don’t set any error message and return true.
我们的isValid方法所做的全部工作就是使用其他两种方法来检查给定的值是否是有效的电子邮件地址,并且还不属于我们的列表。 如果这两个条件都不成立,则不设置任何错误消息,并返回true 。
Otherwise, if one of these conditions is actually truthy, meaning that the email is invalid or already in the list, we set an error message and return false. The error lives on our component state, so we need to add the property it:
否则,如果这些条件之一实际上是真实的,这意味着电子邮件无效或已在列表中,我们将设置一条错误消息并返回false 。 该错误存在于我们的组件状态中,因此我们需要为其添加属性:
class App extends React.Component {state = {value: '',emails: [],error: null}// ...
}
Notice that the error property is initialized with null, because when we initially load the app there’s no error, of course.
请注意,error属性使用null初始化,因为当我们最初加载应用程序时,当然没有错误。
Two things are still missing: in our handleKeyDown method we need to actually use the isValid method. And we should display the error to the user, otherwise having an error message in the first place would be rather pointless.
仍然缺少两件事:在我们的handleKeyDown方法中,我们实际上需要使用isValid方法。 并且我们应该向用户显示错误,否则首先显示错误消息将毫无意义。
handleKeyDown = (evt) => {if (['Enter', 'Tab', ','].includes(evt.key)) {evt.preventDefault();var email = this.state.value.trim();if (email && this.isValid(email)) {this.setState({emails: [...this.state.emails, email],value: ''});}}
};
Remember the handleKeyDown method? I sure hope you do, because you need to change it in order to get validation. On line 7, notice that I have added && this.isValid(email) inside the condition. This means that we are now using our validation, passing it the value that the user has typed in. Only if email has an actual value and it’s a valid email address we continue by setting the state.
还记得handleKeyDown方法吗? 我肯定希望您这样做,因为您需要更改它才能进行验证。 在第7行,请注意,我已经在条件中添加了&& this.isValid(email) 。 这意味着我们现在正在使用验证,并向其传递用户键入的值。仅当email具有实际值并且它是有效的电子邮件地址时,我们才继续设置状态。
The last part of the puzzle is to show the error message to the user.
难题的最后一部分是向用户显示错误消息。
return (<main className="wrapper">{this.state.emails.map(email => (// Hidden...))}<inputclassName={'input' + (this.state.error && ' has-error')}placeholder="Type or paste email addresses and press `Enter`"value={this.state.value}onChange={this.handleChange}onKeyDown={this.handleKeyDown}/>{this.state.error &&<p className="error">{this.state.error}</p>}</main>
);
Two things have changed:
发生了两件事:
Below the
input, we conditionally render a paragraph with our error message as text content.在
input下方,我们有条件地呈现一个段落,其中将错误消息作为文本内容。The
classNameof our input is no longer a simple string, but a JSX expression which appendshas-errorto the class name iferroris true. This is useful to give our input some custom styling if it’s invalid.输入的
className不再是简单的字符串,而是一个JSX表达式,如果error为true,则该表达式将has-error附加到类名。 如果输入无效,这可以为我们的输入提供一些自定义样式。
Go ahead and try the result in your browser. Try to enter an invalid email address or one that already is part of the list. You should see that the error message is displayed below the input.
继续并在浏览器中尝试结果。 尝试输入无效的电子邮件地址或列表中已经包含的电子邮件地址。 您应该看到错误消息显示在输入下方。
There’s one issue though: if you made the error message appear, it will stay forever, even if you add a valid email address afterward. We need to reset the error after the user starts typing again:
不过,有一个问题:即使您随后添加有效的电子邮件地址,如果出现错误消息,该错误消息也将永远存在。 用户再次开始输入后,我们需要重置错误:
handleChange = (evt) => {this.setState({value: evt.target.value,error: null});
};
Our handleChange method is the best place to do so! It gets called each time the user changes the input’s value, meaning that we can set the error to null again. If the user didn’t learn his lesson and tries to add an invalid email address again, then… well, the error message will re-appear.
我们的handleChange方法是最好的选择! 每次用户更改输入值时都会调用它,这意味着我们可以将错误再次设置为null 。 如果用户没有上课,并尝试再次添加无效的电子邮件地址,那么……错误消息将再次出现。
从剪贴板处理粘贴 (Handling Pasting from the Clipboard)
Our little component has grown quite a bit and became somewhat useful, but one important feature is still missing: pasting in email addresses from the clipboard.
我们的小组件已经增长了很多,并且变得有些有用,但是仍然缺少一个重要功能:从剪贴板粘贴电子邮件地址。
This one can be rather interesting because users might want to copy a bunch of email addresses from their mail app and paste them all at once. Different mail apps, however, have different formats. If you copy a bunch of emails from the Apple Mail app, for example, it looks like this:
这可能很有趣,因为用户可能希望从他们的邮件应用程序中复制一堆电子邮件地址,然后一次全部粘贴。 但是,不同的邮件应用程序具有不同的格式。 例如,如果您从Apple Mail应用程序复制了一堆电子邮件,则看起来像这样:
To: John Doe <john.doe@gmail.com> Cc: Jane Doe <jane.doe@gmail.com>Your app might handle it differently. So, how do we parse these strings to only get the part we want?
您的应用可能会以不同的方式处理它。 那么,我们如何解析这些字符串以仅得到我们想要的部分?
handlePaste = (evt) => {evt.preventDefault();var paste = evt.clipboardData.getData('text');var emails = paste.match(/[\w\d\.-]+@[\w\d\.-]+\.[\w\d\.-]+/g);if (emails) {var toBeAdded = emails.filter(email => !this.isInList(email));this.setState({emails: [...this.state.emails, ...toBeAdded]});}
};
The above method is a lot to digest, so let’s dive right in.
上面的方法有很多需要消化的地方,所以让我们开始吧。
- On line 2, we prevent the default, meaning that the text is not actually pasted into the input field. We’ll process it on our own.在第2行,我们阻止了默认设置,这意味着文本实际上并未粘贴到输入字段中。 我们将自行处理。
On line 4, we get the clipboard data that the user was about to paste using the Clipboard API.
pasteis a string.在第4行,我们使用Clipboard API获取用户将要粘贴的剪贴板数据 。
paste是一个字符串。Below, on line 5, we use the
matchmethod to apply a regex on our clipboard data. Thematchmethod will look through our entire string and get all parts that match with our regular expression (it’s the same one we used for the validation part). The result is an array of matches orundefinedif nothing matched.下面,在第5行,我们使用
match方法将正则表达式应用于剪贴板数据。match方法将遍历整个字符串,并获得与正则表达式匹配的所有部分(与用于验证部分的部分相同)。 结果是一个匹配数组,如果不匹配,则为undefined。On line 7, we check if there are any actual emails. If so, we will filter them on line 8 to exclude emails that are already in our list.
filteris our friend, once again. The variabletoBeAddedshould now be an array with emails that are not part of our list yet. Notice how we nicely reused ourisInListmethod.在第7行,我们检查是否有实际的电子邮件。 如果是这样,我们将在第8行对其进行过滤,以排除列表中已存在的电子邮件。
filter再次是我们的朋友。 现在,变量toBeAdded应该是包含我们列表以外的电子邮件的数组。 请注意,我们如何很好地重用了isInList方法。On line 10, we use the spread syntax again to merge our current
emailsarray with the newly createdtoBeAddedarray.在第10行,我们再次使用传播语法将当前的
emails数组与新创建的toBeAdded数组合并。
Notice how we didn’t validate the emails using isEmail. This step is implicitly done because we relied on the same regular expression to get all valid email addresses. If a user pasted an invalid email address, it would never make it.
注意我们如何不使用isEmail验证电子邮件。 因为我们依靠相同的正则表达式来获取所有有效的电子邮件地址,所以该步骤是隐式完成的。 如果用户粘贴了无效的电子邮件地址,则永远不会成功。
All that’s missing is the connection between our input and the handlePaste method:
所缺少的只是我们的输入和handlePaste方法之间的连接:
<inputclassName={'input' + (this.state.error && ' has-error'}placeholder="Type or paste email addresses and press `Enter`"value={this.state.value}onChange={this.handleChange}onKeyDown={this.handleKeyDown}onPaste={this.handlePaste}
/>
Thankfully, the paste event has you covered.
幸运的是, 粘贴事件已为您解决。
结论 (Conclusion)
There you have it, our finished component that accepts multiple email addresses and even lets you paste them in.
有了它,我们完成的组件可以接受多个电子邮件地址,甚至可以将其粘贴到其中。
Of course, if you could add more features and improvements, here are a few examples:
当然,如果您可以添加更多功能和改进,请参考以下示例:
If a user enters an email address but doesn’t press “Enter” or “Tab”, what should happen? You could attach a blur event to the input that tries to validate and add the content if the user clicks on something else on the page, like a submit button.
如果用户输入电子邮件地址但不按“ Enter”或“ Tab”,应该怎么办? 如果用户单击页面上的其他内容(例如,提交按钮),则可以将模糊事件附加到尝试验证并添加内容的输入中。
- You could make the chips clickable so that a user could select them to edit the email address.您可以使筹码可点击,以便用户可以选择它们来编辑电子邮件地址。
- Accessibility could surely be improved, making it easier for screen readers to understand.可访问性肯定会得到改善,从而使屏幕阅读器更容易理解。
I hope you enjoyed this tutorial, feel free to tell me your suggestions or feedback. Happy coding!
希望您喜欢本教程,随时告诉我您的建议或反馈。 编码愉快!
翻译自: https://www.freecodecamp.org/news/how-to-create-email-chips-in-pure-react-ad1cc3ecea16/
react中纯函数
相关文章:

servlet程序HTTP Status 500 - Error instantiating servlet class 解决
一、项目存放路径问题(最常见) 在安装Tomcat时,运行程序都正常,但却打不开http://localhost:8080/,在Tomcat目录webapps下也找不到自己做的项目,这时因为你做的项目没有部署到webapps目录下,倒霉的时候就会遇到报错HTT…
ASP.NET将原始图片按照指定尺寸等比例缩放显示图片
网站上可能会有很多图片,比如产品图片等,而且他们可能大小不一,宽度和高度也不一定一样,有的很大有的很小。如果放在一张网页上,可能会破坏版面,但是如果强制让他们按照指定的宽度和高度显示,因…

前端开发框架选择
Vue Vant 适用场景:开发移动端 (vue) 上手难度:1 Vant是一款很好用的移动端UI框架,非常轻便,适合小型项目 https://vant-contrib.gitee.io/vant/#/zh-CN/ 微信小程序 适用场景:微信小程序(小程序原生框架…
anki_Anki如何挽救我的工程生涯
ankiby Jeffrey Shek通过Jeffrey Shek Anki如何挽救我的工程生涯 (How Anki saved my Engineering Career) I was burned out and my software career was stalling just three years in. My memory sucked. Was my poor memory from stress, lack of sleep or was it always …
信息安全系统设计基础期末总结
【博客汇总】 一、每周读书笔记链接汇总 •[第二周读书笔记] http://www.cnblogs.com/20135302wei/p/4842480.html •[第三周读书笔记] http://www.cnblogs.com/20135302wei/p/4858760.html •[第四周读书笔记] http://www.cnblogs.com/20135302wei/p/4870113.html •[第五周读…
方法 retrun 异步的值,创建一个变量直接等于一个异步方法返回的值
需求:我想创建一个变量,他的值是一个openid, openid 从 getOpenid (封装的一个异步方法) 里面返回,通常调用 getOpenid ,会返回一个Promise 对象,.then 之后才能得到值,例如: //模拟一个异步方…
ps混合模式glsl代码
https://github.com/jamieowen/glsl-blend 转载于:https://www.cnblogs.com/guochen/p/7645227.html
应用程序启动器 标记为信任_为什么您今天不能信任应用程序-以及如何解决它...
应用程序启动器 标记为信任亲爱的每家高科技公司,请窃取这个想法 (Dear Every Single Tech Company, Please Steal This Idea) When you send a photo to someone, your messaging app actually first sends the photo to an app’s server, which then sends the p…

小程序客服自动回复图片,云开发的实现
小程序先开通云开发,创建一个文件夹,并配置为云函数的目录 小程序客服自动回复图片实现步骤: 1.云函数接收消息推送 第一步:开发者工具云开发控制台中增加配置 打开云开发控制台,到设置 tab 中选择全局设置 - 添加消…
ORA-12514: TNS: 监听程序当前无法识别连接描述符中请求的服务解决
方法1: a、通过oracle 工具 Net Configuration Assistant 重新配置监听,注意如果有双网卡请配置第一块网上IP。如何知道哪一块是一块网卡,可以通过ipconfig命令查看最上面的ip就是一块网卡的 b、通过Net Configuration Assistant 工具配置 “…
r语言 编辑 d3.js_d3.js的语言介绍
r语言 编辑 d3.jsby Matt Oxley由马特奥克斯利(Matt Oxley) d3.js的语言介绍 (A linguistic introduction to d3.js) 如何从一个试探者变成一个自信的用户 (How to go from a tentative to a confident user) d3.js is a fantastic library — but I can honestly tell you th…
【Luogu3041】视频游戏的连击(AC自动机,动态规划)
题面链接 题解 首先构建出AC自动机 然后在AC自动机上面跑DP 转移很显然从Trie树的节点跳到他的儿子节点 但是要注意一个问题, 在计算的时候,每一个节点加入后能够 造成的贡献 要加上他的子串的贡献 至于DP: 设f[i][j]表示已经使用了i个字母 当…

拥抱高效、拥抱 Bugtags 之来自用户的声音(三)
小编按:这是一篇 Bugtags 用户来稿,主要是介绍了使用 Bugtags 前后对测试及解决 Bug 所带来的变化,感谢山西农业大学 - 高正炎同学对 Bugtags 的信赖和支持。小编在这里诚邀各位热心用户向我们投稿,说出你使用 Bugtags 的故事。 0…
小程序打开文档标题乱码处理
先下载,自定义临时文件目录名称,然后再打开就可以了。 wx.downloadFile({url: https://xxx.cn/sfxy.docx, //仅为示例,并非真实的资源filePath: wx.env.USER_DATA_PATH /这是自定义标题.docx,success(res) {console.log(0, res)wx.openDocum…
我是“真正的”软件工程师吗?
by Sun-Li Beatteay通过孙丽贝蒂 我是“真正的”软件工程师吗? (Am I a “real” Software Engineer yet?) Am I a “real” Software Engineer yet?我是“真正的”软件工程师吗? This question has haunted me for years. And it seems I’m not al…
ntpdate[31915]: the NTP socket is in use, exiting
[rootmaster local]# ntpdate cn.pool.ntp.org 10 Oct 13:24:36 ntpdate[31915]: the NTP socket is in use, exitingcron 作业中运行 ntpdate,以便大约每隔一小时就设置一次本地时间。最近,我每次运行该命令时都会收到下列错误消息。 ntpdate[31915]: t…
小程序云开发更新数组的指定对象的值
云开发,在小程序实现 代码说明‘: 在这里,数据集合 groupList 中的 userList 是一个用户列表数组,我要更新数组中,openid 等于我的openid 的在线状态为 true。 先查询条件,集合里面的 _id 等于我传的id&a…

Unreal Engine 4 RenderTarget制作Live Camera效果
Unreal Engine 4 RenderTarget制作Live Camera效果 先上效果: Live Camera我不知道怎么翻译。反正意思就是将一个摄影机的Image渲染到一个2D平面上。 以下介绍下详细的实现方法: 1.创建一个Scene Capture 2D对象 将这个对象拖动到合适的地方。2.创建Re…
领导让我重构代码_领导不是由代码构成
领导让我重构代码The team leader is a key figure in a team of developers. It is a difficult role, involving both technical and social skills. This is the reason why not everyone is tailored for it.团队负责人是开发人员团队中的关键人物。 这是一项艰巨的任务&am…
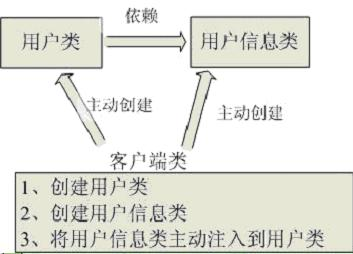
Spring学习-理解IOC和依赖注入
最近刚买了一本介绍ssm框架的书,里面主要对Mybatis、spring、springmvc和redis做了很多的讲解,个人觉得虽然有的内容我看不懂,但是整体上还是不错的。最近正在学习中,一边学习一边做一些总结,现在我对这些思想技术还没…

windows server2012怎样关机怎样重启-详细教程
|浏览:1991|更新:2014-12-15 17:33123456分步阅读百度经验:jingyan.baidu.com windows server2012和以往有些不同,关机/重启按钮不是在左边,甚至左边的“开始”都不见了,那怎样关机/重启呢?这里开始演示&am…
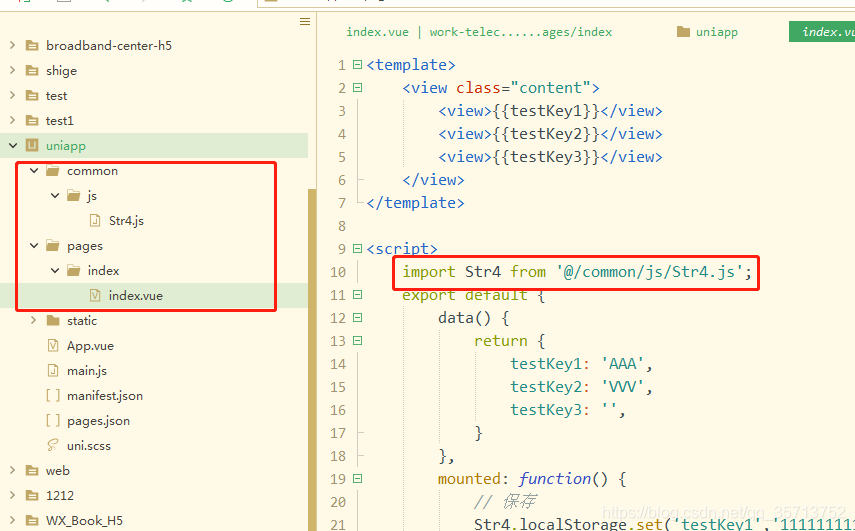
封装 localStorage 缓存,兼容网页,微信小程序,uni-app
封装的缓存功能,兼容网页,微信小程序,uni-app 使用,支持设置缓存,获取缓存,移除缓存,清空缓存,设置缓存时间,分组缓存设置。 把最下面的 Str4.js 代码拷贝到项目内可以直…
考csp所需算法_CSP vs RxJS:您所不知道的。
考csp所需算法by Kevin Ghadyani通过凯文加迪亚尼(Kevin Ghadyani) CSP vs RxJS:您所不知道的。 (CSP vs RxJS: what you don’t know.) CSP发生了什么? (What happened to CSP?) You probably clicked this article thinking “what is CSP?” It’s…
iOS蓝牙4.0开发例子
1建立中心角色 123#import <CoreBluetooth/CoreBluetooth.h> CBCentralManager *manager; manager [[CBCentralManager alloc] initWithDelegate:self queue:nil]; 2扫描外设(discover) [manager scanForPeripheralsWithServices:nil options:…
Spark Shuffle原理解析
Spark Shuffle原理解析 一:到底什么是Shuffle? Shuffle中文翻译为“洗牌”,需要Shuffle的关键性原因是某种具有共同特征的数据需要最终汇聚到一个计算节点上进行计算。 二:Shuffle可能面临的问题?运行Task的时候才会产…
云开发使用 got 的 get/post 传参请求示例代码
使用 got 进行网络请求的步骤: 1.创建云函数,并在终端执行云函数 2.执行 npm 安装 got ,命令:cnpm install --save got 3.在云函数中使用 示例代码: // 云函数入口文件 const cloud require(wx-server-sdk) cons…
JavaScript词法作用域的简单介绍
by Michael McMillan迈克尔麦克米兰(Michael McMillan) JavaScript词法作用域的简单介绍 (An easy intro to Lexical Scoping in JavaScript) Lexical scoping is a topic that frightens many programmers. One of the best explanations of lexical scoping can be found in…
Flex 布局详解 - 转自阮一峰老师
Flex 是 Flexible Box 的缩写,意为"弹性布局",用来为盒状模型提供最大的灵活性。任何的盒子都可以使用它。 下面我们来看一下使用 Flex 布局的容器的属性 flex-direction flex-wrap flex-flow justify-content align-items align-content 1.…
bzoj 1086: [SCOI2005]王室联邦
Description “余”人国的国王想重新编制他的国家。他想把他的国家划分成若干个省,每个省都由他们王室联邦的一个成员来管理。他的国家有n个城市,编号为1..n。一些城市之间有道路相连,任意两个不同的城市之间有且仅有一条直接或间接的道路。为…
在7分钟内深刻理解咖喱
Eric Elliott’s exceptional Composing Software series is initially what got me excited about functional programming. Its a must-read. 埃里克埃利奥特(Eric Elliott)杰出的合成软件系列最初使我对函数式编程感到兴奋。 这是必读的。 At one point in the series, he …