引自:http://blog.csdn.net/sinat_26917383/article/details/72861152
中文文档:http://keras-cn.readthedocs.io/en/latest/
官方文档:https://keras.io/
文档主要是以keras2.0。
训练、训练主要就”练“嘛,所以堆几个案例就知道怎么做了。
.
.
Keras系列:
1、keras系列︱Sequential与Model模型、keras基本结构功能(一)
2、keras系列︱Application中五款已训练模型、VGG16框架(Sequential式、Model式)解读(二)
3、keras系列︱图像多分类训练与利用bottleneck features进行微调(三)
4、keras系列︱人脸表情分类与识别:opencv人脸检测+Keras情绪分类(四)
5、keras系列︱迁移学习:利用InceptionV3进行fine-tuning及预测、完整案例(五)
.
一、CIFAR10 小图片分类示例(Sequential式)
要训练模型,首先得知道数据长啥样。先来看看经典的cifar10是如何进行训练的。
示例中CIFAR10采用的是Sequential式来编译网络结构。
from __future__ import print_function
import keras
from keras.datasets import cifar10
from keras.preprocessing.image import ImageDataGenerator
from keras.models import Sequential
from keras.layers import Dense, Dropout, Activation, Flatten from keras.layers import Conv2D, MaxPooling2D batch_size = 32 num_classes = 10 epochs = 200 data_augmentation = True # 数据载入 (x_train, y_train), (x_test, y_test) = cifar10.load_data() # 多分类标签生成 y_train = keras.utils.to_categorical(y_train, num_classes) y_test = keras.utils.to_categorical(y_test, num_classes) # 网络结构配置 model = Sequential() model.add(Conv2D(32, (3, 3), padding='same', input_shape=x_train.shape[1:])) model.add(Activation('relu')) model.add(Conv2D(32, (3, 3))) model.add(Activation('relu')) model.add(MaxPooling2D(pool_size=(2, 2))) model.add(Dropout(0.25)) model.add(Conv2D(64, (3, 3), padding='same')) model.add(Activation('relu')) model.add(Conv2D(64, (3, 3))) model.add(Activation('relu')) model.add(MaxPooling2D(pool_size=(2, 2))) model.add(Dropout(0.25)) model.add(Flatten()) model.add(Dense(512)) model.add(Activation('relu')) model.add(Dropout(0.5)) model.add(Dense(num_classes)) model.add(Activation('softmax')) # 训练参数设置 # initiate RMSprop optimizer opt = keras.optimizers.rmsprop(lr=0.0001, decay=1e-6) # Let's train the model using RMSprop model.compile(loss='categorical_crossentropy', optimizer=opt, metrics=['accuracy']) # 生成训练数据 x_train = x_train.astype('float32') x_test = x_test.astype('float32') x_train /= 255 x_test /= 255 if not data_augmentation: print('Not using data augmentation.') model.fit(x_train, y_train, batch_size=batch_size, epochs=epochs, validation_data=(x_test, y_test), shuffle=True) else: print('Using real-time data augmentation.') # This will do preprocessing and realtime data augmentation: datagen = ImageDataGenerator( featurewise_center=False, # set input mean to 0 over the dataset samplewise_center=False, # set each sample mean to 0 featurewise_std_normalization=False, # divide inputs by std of the dataset samplewise_std_normalization=False, # divide each input by its std zca_whitening=False, # apply ZCA whitening rotation_range=0, # randomly rotate images in the range (degrees, 0 to 180) width_shift_range=0.1, # randomly shift images horizontally (fraction of total width) height_shift_range=0.1, # randomly shift images vertically (fraction of total height) horizontal_flip=True, # randomly flip images vertical_flip=False) # randomly flip images # Compute quantities required for feature-wise normalization # (std, mean, and principal components if ZCA whitening is applied). datagen.fit(x_train) # fit训练 # Fit the model on the batches generated by datagen.flow(). model.fit_generator(datagen.flow(x_train, y_train, batch_size=batch_size), steps_per_epoch=x_train.shape[0] // batch_size, epochs=epochs, validation_data=(x_test, y_test))
就像caffe里面需要把数据编译成LMDB一样,keras也要数据服从其格式。来看看cifar10的数据格式:
.
1、载入数据
(x_train, y_train), (x_test, y_test) = cifar10.load_data()这句用来网络上载入数据,跟之前application之中,pre-model一样,有时间需要不断的网上下载,所以等你下载完了,可以自己改一样地址,让其读取本地文件。
x_train格式例如(100,100,100,3),100张格式为100*100*3的图像集;y_train格式为(100,)
.
2、多分类标签指定keras格式
keras对多分类的标签需要一种固定格式,所以需要按照以下的方式进行转换,num_classes为分类数量,假设此时有5类:
y_train = keras.utils.to_categorical(y_train, num_classes)最终输出的格式应该是(100,5)
.
3、图片预处理生成器ImageDataGenerator
datagen = ImageDataGenerator()
datagen.fit(x_train)
生成器初始化datagen ,然后datagen.fit,计算依赖于数据的变换所需要的统计信息
.
4、最终训练格式-batch
把数据按照每个batch进行划分,这样就可以送到模型进行训练了。比caffe中要LMDB快很多。
datagen.flow(x_train, y_train, batch_size=batch_size)接收numpy数组和标签为参数,生成经过数据提升或标准化后的batch数据,并在一个无限循环中不断的返回batch数据。
.
二、官方改编——多分类简易网络结构(Sequential式)
改编自官方文档的《面向小数据集构建图像分类模型》
.
1、数据来源与下载
官方文档是猫狗二分类,此时变成一个5分类,由于追求效率,从网上找来一个很小的数据集。来源于博客:
Caffe学习系列(12):训练和测试自己的图片
数据描述:
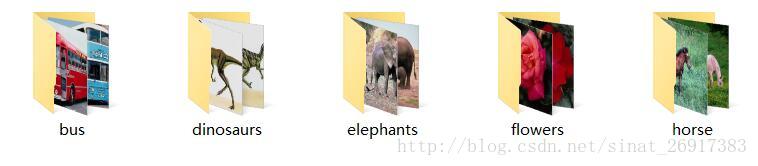
共有500张图片,分为大巴车、恐龙、大象、鲜花和马五个类,每个类100张。
下载地址:http://pan.baidu.com/s/1nuqlTnN
编号分别以3,4,5,6,7开头,各为一类。我从其中每类选出20张作为测试,其余80张作为训练。因此最终训练图片400张,测试图片100张,共5类。如下图:
.
2、 载入与模型网络构建
很坑的是Keras中文文档本节还没有及时更新,还需要看原版的网站。譬如keras中文文档是Convolution2D,但是现在是conv2D所以有点坑。
# 载入与模型网络构建
from keras.models import Sequential
from keras.layers import Conv2D, MaxPooling2D from keras.layers import Activation, Dropout, Flatten, Dense model = Sequential() model.add(Conv2D(32, (3, 3), input_shape=(150, 150,3))) # filter大小3*3,数量32个,原始图像大小3,150,150 model.add(Activation('relu')) model.add(MaxPooling2D(pool_size=(2, 2))) model.add(Conv2D(32, (3, 3))) model.add(Activation('relu')) model.add(MaxPooling2D(pool_size=(2, 2))) model.add(Conv2D(64, (3, 3))) model.add(Activation('relu')) model.add(MaxPooling2D(pool_size=(2, 2))) model.add(Flatten()) # this converts our 3D feature maps to 1D feature vectors model.add(Dense(64)) model.add(Activation('relu')) model.add(Dropout(0.5)) model.add(Dense(5)) # matt,几个分类就要有几个dense model.add(Activation('softmax'))# matt,多分类
二分类与多分类在前面的结构上都没有问题,就是需要改一下最后的全连接层,因为此时有5分类,所以需要Dense(5),同时激活函数是softmax,如果是二分类就是dense(2)+sigmoid(激活函数)。
同时出现了以下的报错:
报错1:model.add(Convolution2D(32, 3, 3, input_shape=(3, 150, 150))) ValueError: Negative dimension size caused by subtracting 3 from 1 for 'conv2d_6/convolution' (op: 'Conv2D') with input shapes: [?,1,148,32], [3,3,32,32]. 报错2:model.add(MaxPooling2D(pool_size=(2, 2))) ValueError: Negative dimension size caused by subtracting 2 from 1 for 'max_pooling2d_11/MaxPool' (op: 'MaxPool') with input shapes: [?,1,148,32].原因:
input_shape=(3,150, 150)是theano的写法,而tensorflow需要写出:(150,150,3);
需要修改Input_size。也就是”channels_last”和”channels_first”数据格式的问题。
.
3、设置训练参数
# 二分类
#model.compile(loss='binary_crossentropy',
#              optimizer='rmsprop',
#              metrics=['accuracy'])# 多分类 model.compile(loss='categorical_crossentropy', # matt,多分类,不是binary_crossentropy optimizer='rmsprop', metrics=['accuracy']) # 优化器rmsprop:除学习率可调整外,建议保持优化器的其他默认参数不变
二分类的参数与多分类的参数设置有些区别。
.
4、图像预处理
然后我们开始准备数据,使用.flow_from_directory()来从我们的jpgs图片中直接产生数据和标签。
其中值得留意的是:
- ImageDataGenerator:用以生成一个batch的图像数据,支持实时数据提升。训练时该函数会无限生成数据,直到达到规定的epoch次数为止。
- flow_from_directory(directory):
以文件夹路径为参数,生成经过数据提升/归一化后的数据,在一个无限循环中无限产生batch数据
train_datagen = ImageDataGenerator(rescale=1./255,shear_range=0.2,zoom_range=0.2,horizontal_flip=True) test_datagen = ImageDataGenerator(rescale=1./255) train_generator = train_datagen.flow_from_directory( '/.../train', target_size=(150, 150), # all images will be resized to 150x150 batch_size=32, class_mode='categorical') # matt,多分类 validation_generator = test_datagen.flow_from_directory( '/.../validation', target_size=(150, 150), batch_size=32, class_mode='categorical') # matt,多分类 # class_mode='binary'这一步骤是数据准备阶段,会比较慢,同时多分类,需要设置class_mode为“categorical”。flow_from_directory是计算数据的一些属性值,之后再训练阶段直接丢进去这些生成器。
.
5、训练阶段
model.fit_generator(train_generator,samples_per_epoch=2000,nb_epoch=50,validation_data=validation_generator,nb_val_samples=800)
# samples_per_epoch,相当于每个epoch数据量峰值,每个epoch以经过模型的样本数达到samples_per_epoch时,记一个epoch结束
model.save_weights('/.../first_try_animal5.h5')
最后的结果示范:
Epoch 48/50
62/62 [==============================] - 39s - loss: 0.0464 - acc: 0.9929 - val_loss: 0.3916 - val_acc: 0.9601 Epoch 49/50 62/62 [==============================] - 38s - loss: 0.0565 - acc: 0.9914 - val_loss: 0.6423 - val_acc: 0.9500 Epoch 50/50 62/62 [==============================] - 38s - loss: 0.0429 - acc: 0.9960 - val_loss: 0.4238 - val_acc: 0.9599 <keras.callbacks.History object at 0x7f049fc6f090>
.
6、出现的问题
问题一:loss为负数
原因:如果出现loss为负,是因为之前多分类的标签哪些设置不对,现在是5分类的,写成了2分类之后导致了Loss为负数,形如下面
Epoch 43/50
62/62 [==============================] - 39s - loss: -16.0148 - acc: 0.1921 - val_loss: -15.9440 - val_acc: 0.1998
Epoch 44/50
61/62 [============================>.] - ETA: 0s - loss: -15.8525 - acc: 0.2049Segmentation fault (core dumped)
.
三、fine-tuning方式一:使用预训练网络的bottleneck特征
本节主要来源于:面向小数据集构建图像分类模型
当然,keras中文版里面漏洞一大堆… 没有跟着版本更新,导致很多内容都是不对的,哎…
先看VGG-16的网络结构如下: 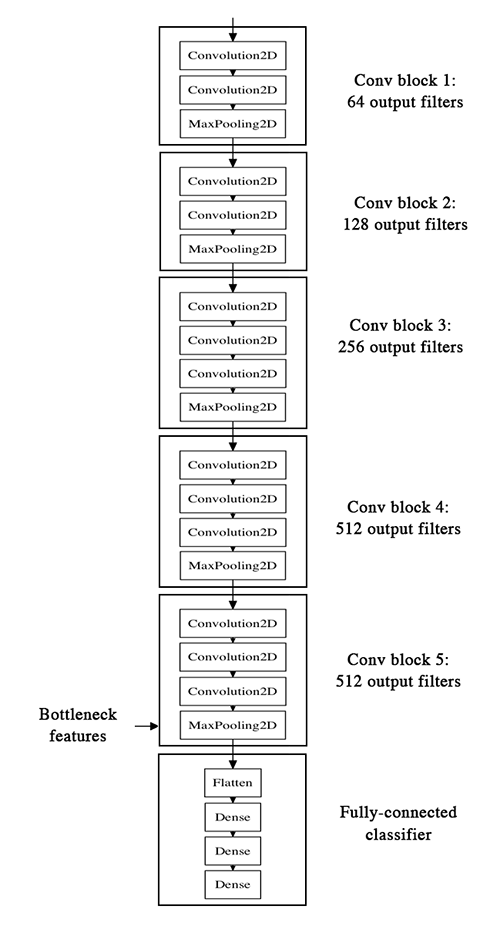
本节主要是通过已经训练好的模型,把bottleneck特征抽取出来,然后滚到下一个“小”模型里面,也就是全连接层。
实施步骤为:
- 1、把训练好的模型的权重拿来,model;
- 2、运行,提取bottleneck feature(网络在全连接之前的最后一层激活的feature
map,卷积-全连接层之间),单独拿出来,并保存 - 3、bottleneck层数据,之后 + dense全连接层,进行fine-tuning
.
1、导入预训练权重与网络框架
这里keras中文文档是错误的,要看现在的原作者的博客,
WEIGHTS_PATH = '/home/ubuntu/keras/animal5/vgg16_weights_tf_dim_ordering_tf_kernels.h5'
WEIGHTS_PATH_NO_TOP = '/home/ubuntu/keras/animal5/vgg16_weights_tf_dim_ordering_tf_kernels_notop.h5'from keras.applications.vgg16_matt import VGG16
model = VGG16(include_top=False, weights='imagenet')
其中WEIGHTS_PATH_NO_TOP 就是去掉了全连接层,可以用他直接提取bottleneck的特征,感谢原作者。
.
2、提取图片的bottleneck特征
需要步骤:
- 载入图片;
- 灌入pre-model的权重;
- 得到bottleneck feature
#如何提取bottleneck feature
from keras.models import Sequential
from keras.layers import Conv2D, MaxPooling2D from keras.layers import Activation, Dropout, Flatten, Dense # (1)载入图片 # 图像生成器初始化 from keras.preprocessing.image import ImageDataGenerator import numpy as np datagen = ImageDataGenerator(rescale=1./255) # 训练集图像生成器 generator = datagen.flow_from_directory( '/home/ubuntu/keras/animal5/train', target_size=(150, 150), batch_size=32, class_mode=None, shuffle=False) # 验证集图像生成器 generator = datagen.flow_from_directory( '/home/ubuntu/keras/animal5/validation', target_size=(150, 150), batch_size=32, class_mode=None, shuffle=False) #(2)灌入pre-model的权重 model.load_weights('/.../vgg16_weights_tf_dim_ordering_tf_kernels_notop.h5') #(3)得到bottleneck feature bottleneck_features_train = model.predict_generator(generator, 500) # 核心,steps是生成器要返回数据的轮数,每个epoch含有500张图片,与model.fit(samples_per_epoch)相对 np.save(open('bottleneck_features_train.npy', 'w'), bottleneck_features_train) bottleneck_features_validation = model.predict_generator(generator, 100) # 与model.fit(nb_val_samples)相对,一个epoch有800张图片,验证集 np.save(open('bottleneck_features_validation.npy', 'w'), bottleneck_features_validation)
注意
- class_mode,此时为预测场景,制作数据阶段,不用设置标签,因为此时是按照顺序产生;而在train_generator数据训练之前的数据准备,则需要设置标签
- shuffle,此时为预测场景,制作数据集,不用打乱;但是在model.fit过程中需要打乱,表示是否在训练过程中每个epoch前随机打乱输入样本的顺序。
.
3、 fine-tuning - “小”网络
主要步骤:
- (1)导入bottleneck_features数据;
- (2)设置标签,并规范成Keras默认格式;
- (3)写“小网络”的网络结构
- (4)设置参数并训练
# (1)导入bottleneck_features数据
train_data = np.load(open('bottleneck_features_train.npy'))
# the features were saved in order, so recreating the labels is easy
train_labels = np.array([0] * 100 + [1] * 100 + [2] * 100 + [3] * 100 + [4] * 96) # matt,打标签 validation_data = np.load(open('bottleneck_features_validation.npy')) validation_labels = np.array([0] * 20 + [1] * 20 + [2] * 20 + [3] * 20 + [4] * 16) # matt,打标签 # (2)设置标签,并规范成Keras默认格式 train_labels = keras.utils.to_categorical(train_labels, 5) validation_labels = keras.utils.to_categorical(validation_labels, 5) # (3)写“小网络”的网络结构 model = Sequential() #train_data.shape[1:] model.add(Flatten(input_shape=(4,4,512)))# 4*4*512 model.add(Dense(256, activation='relu')) model.add(Dropout(0.5)) #model.add(Dense(1, activation='sigmoid')) # 二分类 model.add(Dense(5, activation='softmax')) # matt,多分类 #model.add(Dense(1)) #model.add(Dense(5)) #model.add(Activation('softmax')) # (4)设置参数并训练 model.compile(loss='categorical_crossentropy', # matt,多分类,不是binary_crossentropy optimizer='rmsprop', metrics=['accuracy']) model.fit(train_data, train_labels, nb_epoch=50, batch_size=16, validation_data=(validation_data, validation_labels)) model.save_weights('bottleneck_fc_model.h5')
因为特征的size很小,模型在CPU上跑的也会很快,大概1s一个epoch。
#正确的结果:
Epoch 48/50
496/496 [==============================] - 0s - loss: 0.3071 - acc: 0.7762 - val_loss: 4.9337 - val_acc: 0.3229 Epoch 49/50 496/496 [==============================] - 0s - loss: 0.2881 - acc: 0.8004 - val_loss: 4.3143 - val_acc: 0.3750 Epoch 50/50 496/496 [==============================] - 0s - loss: 0.3119 - acc: 0.7984 - val_loss: 4.4788 - val_acc: 0.5625 <keras.callbacks.History object at 0x7f25d4456e10>
4、遇到的问题
(1)Flatten层——最难处理的层
其中在配置网络中,我发现Flatten是最容易出现问题的Layer了。非常多的问题,是因为输给这个层的格式不对。譬如报错:
语句:model.add(Flatten(input_shape=train_data.shape[1:]))
ValueError: Input 0 is incompatible with layer flatten_5: expected min_ndim=3, found ndim=2
于是要改成(4,4,512),这样写(512,4,4)也不对!
(2)标签格式问题
model.fit之后报错:
ValueError: Error when checking target: expected dense_2 to have shape (None, 5) but got array with shape (500, 1)标签格式没有设置,特别是多分类会遇见这样的问题。需要keras.utils.to_categorical()
train_labels = keras.utils.to_categorical(train_labels, 5).
四、fine-tuning方式二:要调整权重
Keras中文文档+原作者文档这个部分都没有写对!
先来看看整个结构。 ![![][)](http://keras-cn.readthedocs.io/en/latest/images/vgg16_modified.png)
fine-tune分三个步骤:
- 搭建vgg-16并载入权重,将之前定义的全连接网络加在模型的顶部,并载入权重
- 冻结vgg16网络的一部分参数
- 模型训练
注意:
- 1、fine-tune,所有的层都应该以训练好的权重为初始值,例如,你不能将随机初始的全连接放在预训练的卷积层之上,这是因为由随机权重产生的大梯度将会破坏卷积层预训练的权重。
- 2、选择只fine-tune最后的卷积块,而不是整个网络,这是为了防止过拟合。整个网络具有巨大的熵容量,因此具有很高的过拟合倾向。由底层卷积模块学习到的特征更加一般,更加不具有抽象性,因此我们要保持前两个卷积块(学习一般特征)不动,只fine-tune后面的卷积块(学习特别的特征)
- 3、fine-tune应该在很低的学习率下进行,通常使用SGD优化而不是其他自适应学习率的优化算法,如RMSProp。这是为了保证更新的幅度保持在较低的程度,以免毁坏预训练的特征。
.
1、步骤一:搭建vgg-16并载入权重
1.1 Keras文档结果
先看看Keras中文文档是这样的:
from keras import applications
from keras.preprocessing.image import ImageDataGenerator
from keras import optimizers from keras.models import Sequential from keras.layers import Dropout, Flatten, Dense # 网络结构 top_model = Sequential() #top_model.add(Flatten(input_shape=model.output_shape[1:])) top_model.add(Flatten(input_shape=(4,4,512))) top_model.add(Dense(256, activation='relu')) top_model.add(Dropout(0.5)) #top_model.add(Dense(1, activation='sigmoid')) top_model.add(Dense(5, activation='softmax')) # 加载权重 top_model.load_weights(top_model_weights_path) model.add(top_model)
中文文档是用Sequential式写的,但是没有找到对的权重:top_model_weights_path,如果不正确的权重文件会报错:
ValueError: You are trying to load a weight file containing 16 layers into a model with 2 layers.同时也没有交代model是什么。
1.2 原作者新改
当然看原作者代码知道了这里的model就是VGG16的。所以原作者改成:
# 载入Model权重 + 网络
from keras.applications.vgg16_matt import VGG16
model = VGG16(weights='imagenet', include_top=False) # “小网络”结构 top_model = Sequential() top_model.add(Flatten(input_shape=model.output_shape[1:])) # top_model.add(Flatten(input_shape=(4,4,512))) top_model.add(Dense(256, activation='relu')) top_model.add(Dropout(0.5)) top_model.add(Dense(5, activation='softmax')) # 加权重 top_model.load_weights(top_model_weights_path) # 两个网络整合 model.add(top_model)
这里又出现一个问题就是,原作者是用application中的VGG16来做的,那么VGG16原来的是Model式的,现在model.add的是Sequential,兼容不起来,报错:
# AttributeError: 'Model' object has no attribute 'add'于是参考了VGG16原来网络中的结构自己写了:
from keras import applications
from keras.preprocessing.image import ImageDataGenerator
from keras import optimizers from keras.models import Sequential from keras.layers import Dropout, Flatten, Dense # 载入Model权重 + 网络 from keras.applications.vgg16_matt import VGG16 model = VGG16(weights='imagenet', include_top=False) # 新加层 x = model.output # 最有问题的层:flatten层 x = Flatten(name='flatten')(x) # 尝试一:x = Flatten()(x) # 尝试二:x = GlobalAveragePooling2D()(x) # 尝试三:from keras.layers import Reshape #x = Reshape((4,4, 512))(x) # TypeError: long() argument must be a string or a number, not 'NoneType' x = Dense(256, activation='relu', name='fc1')(x) x = Dropout(0.5)(x) predictions = Dense(5, activation='softmax')(x) from keras.models import Model vgg_model = Model(input=model.input, output=predictions)
其中又是遇到了Flatten()层的问题,而且做了很多尝试,这一个层的意思是把VGG16网络结构+权重的model数据输出格式输入给Flatten()进行降维,但是!
model.output输出的格式是:(?,?,?,512)
那么肯定会报错:
ValueError: The shape of the input to "Flatten" is not fully defined (got (None, None, 512). Make sure to pass a complete "input_shape" or "batch_input_shape" argument to the first layer in your model.(1)其中原作者VGG16代码中是这么处理Flatten层的:
x = Flatten(name='flatten')(x)同样会报错。
(2)借鉴《Keras跨领域图像分类迁移学习与微调》的一部分:
x = Reshape((4,4, 512))(x)也没成功,应该是自己不太会如果写这个层。
(3)尝试直接加了个GlobalAveragePooling2D层之后:
x = GlobalAveragePooling2D()(x)
x = Dense(256, activation='relu', name='fc1')(x) x = Dropout(0.5)(x) predictions = Dense(5, activation='softmax')(x)
可以运行,但是,fit的结果是:
Epoch 1/50
31/31 [==============================] - 10s - loss: 0.5575 - acc: 0.7730 - val_loss: 0.5191 - val_acc: 0.8000 Epoch 2/50 31/31 [==============================] - 9s - loss: 0.5548 - acc: 0.7760 - val_loss: 0.5256 - val_acc: 0.8000 ... Epoch 49/50 31/31 [==============================] - 9s - loss: 0.5602 - acc: 0.7730 - val_loss: 0.5285 - val_acc: 0.8000 Epoch 50/50 31/31 [==============================] - 9s - loss: 0.5583 - acc: 0.7780 - val_loss: 0.5220 - val_acc: 0.8000 <keras.callbacks.History object at 0x7fb90410fb10>
内容结果总是一样的,所以还是不对,这块还没有解决。。
.
2、冻结vgg16网络的一部分参数
然后将最后一个卷积块前的卷积层参数冻结:
for layer in vgg_model.layers[:25]:layer.trainable = False# compile the model with a SGD/momentum optimizer vgg_model.compile(loss='binary_crossentropy', optimizer=optimizers.SGD(lr=1e-4, momentum=0.9), metrics=['accuracy']).
3、模型训练
然后以很低的学习率进行训练:
# 准备数据
train_data_dir = '/.../train'
validation_data_dir = '/.../validation'
img_width, img_height = 150, 150 nb_train_samples = 500 nb_validation_samples = 100 epochs = 50 batch_size = 16 # 图片预处理生成器 train_datagen = ImageDataGenerator( rescale=1./255, shear_range=0.2, zoom_range=0.2, horizontal_flip=True) test_datagen = ImageDataGenerator(rescale=1./255) # 图片generator train_generator = train_datagen.flow_from_directory( train_data_dir, target_size=(img_height, img_width), batch_size=32, class_mode='categorical') validation_generator = test_datagen.flow_from_directory( validation_data_dir, target_size=(img_height, img_width), batch_size=32, class_mode='categorical') # 训练 vgg_model.fit_generator( train_generator, steps_per_epoch=nb_train_samples // batch_size, epochs=epochs, validation_data=validation_generator, validation_steps=nb_validation_samples // batch_size)
如果在之前的网络结构可以正常载入的话,后面都是没有问题的,可以直接运行。