Docker的安装、镜像源更换与简单应用
Docker的安装、镜像源更换与简单应用【阅读时间:约20分钟】
- 一、概述
- 二、系统环境&项目介绍
- 1.系统环境
- 2.项目的任务要求
- 三、Docker的安装
- 四、Docker的简单应用
- 1. 运行第一个容器
- 2. Docker基本操作
- 3. MySQL与容器化
- 3.1 拉取MySQL镜像
- 3.2 构建docker镜像
- 3.3 MySQL容器使用
- 3.4 Docker compose与多容器应用自动化部署
- 4 docker网络
- 5. Docker仓库 (Registry)
- 五、References
一、概述
在以前的博客分享和上一次的前后端开发中,我们已经初步安装和使用了docker,本次博客还是按照课件,来简单演示Docker的安装与应用。
Docker 是一个开源的应用容器引擎,让开发者可以打包他们的应用以及依赖包到一个可移植的镜像中,然后发布到任何流行的 Linux或Windows 机器上,也可以实现虚拟化。容器是完全使用沙箱机制,相互之间不会有任何接口。
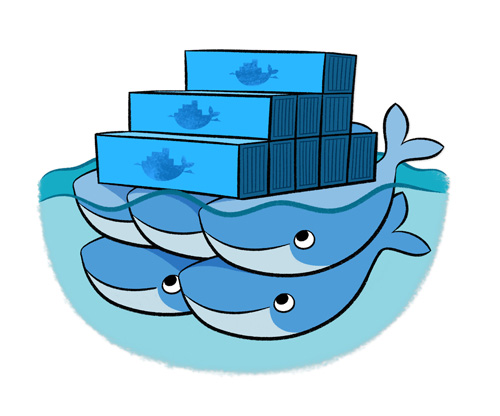
观察Docker图标,其实很形象的解释了什么是Docker。在没有使用集装箱的情况下,我们需要考虑不同形状、尺寸的货物怎么安放,货物与货物之间是否能堆叠,这无疑是很繁琐的事情。现在有了集装箱(容器),我们就能将不同的货物放入集装箱之内这样就能以同样的方式来存放货物,实现了标准化。
Docker采用了集装箱原理,我们将程序放入到容器中,实现“一次封装,到处运行”,只要开发环境能跑,在其他任何流行的机器上都能运行。并且将程序丢入到容器中,很好的实现了程序与程序之间的隔离,避免了类似Java开发的程序和.net开发的程序安装在一个服务器上需要很多调试,有时还会产生冲突的情况。
Docker的应用场景:
Web 应用的自动化打包和发布。
自动化测试和持续集成、发布。
在服务型环境中部署和调整数据库或其他的后台应用。
从头编译或者扩展现有的 OpenShift 或 Cloud Foundry 平台来搭建自己的 PaaS 环境。
二、系统环境&项目介绍
1.系统环境
- 操作系统:CentOS7
- 硬件信息:使用virtual box配置虚拟机(内存3G、磁盘30G)
- 编程语言:GO 1.15.2
2.项目的任务要求
- Docker的安装
- Docker的安装与简单应用简单应用
三、Docker的安装
在之前的博客(本人关于Docker的分享文章)中,我使用的是yum直接安装,但这导致了Docker版本的老旧,从而导致了编译运行速度极慢。
因此,我更加推荐使用清华源来高效配置Docker环境:
如果你之前安装过 docker,请先删掉
sudo yum remove docker docker-common docker-selinux docker-engine
安装一些依赖
sudo yum install -y yum-utils device-mapper-persistent-data lvm2
根据你的发行版下载repo文件:
wget -O /etc/yum.repos.d/docker-ce.repo https://download.docker.com/linux/centos/docker-ce.repo
把软件仓库地址替换为 TUNA:
sudo sed -i 's+download.docker.com+mirrors.tuna.tsinghua.edu.cn/docker-ce+' /etc/yum.repos.d/docker-ce.repo
最后安装:
sudo yum makecache fast
sudo yum install docker-ce
若输出Docker版本号出错如下:
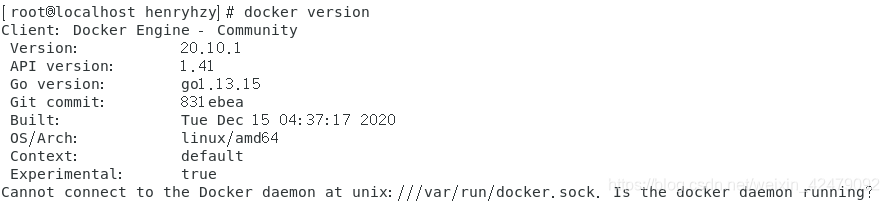
可以重新启动并输出Docker的状态和版本号:
[root@localhost henryhzy]# systemctl daemon-reload
[root@localhost henryhzy]# sudo service docker restart
Redirecting to /bin/systemctl restart docker.service
[root@localhost henryhzy]# sudo service docker status
Redirecting to /bin/systemctl status docker.service
● docker.service - Docker Application Container EngineLoaded: loaded (/usr/lib/systemd/system/docker.service; disabled; vendor preset: disabled)Active: active (running) since 一 2020-12-21 22:50:34 CST; 7s agoDocs: https://docs.docker.comMain PID: 3648 (dockerd)Tasks: 8Memory: 157.5MCGroup: /system.slice/docker.service└─3648 /usr/bin/dockerd -H fd:// --containerd=/run/containerd/cont...12月 21 22:50:32 localhost.localdomain dockerd[3648]: time="2020-12-21T22:50...
12月 21 22:50:32 localhost.localdomain dockerd[3648]: time="2020-12-21T22:50...
12月 21 22:50:32 localhost.localdomain dockerd[3648]: time="2020-12-21T22:50...
12月 21 22:50:33 localhost.localdomain dockerd[3648]: time="2020-12-21T22:50...
12月 21 22:50:33 localhost.localdomain dockerd[3648]: time="2020-12-21T22:50...
12月 21 22:50:33 localhost.localdomain dockerd[3648]: time="2020-12-21T22:50...
12月 21 22:50:33 localhost.localdomain dockerd[3648]: time="2020-12-21T22:50...
12月 21 22:50:33 localhost.localdomain dockerd[3648]: time="2020-12-21T22:50...
12月 21 22:50:34 localhost.localdomain systemd[1]: Started Docker Applicatio...
12月 21 22:50:34 localhost.localdomain dockerd[3648]: time="2020-12-21T22:50...
Hint: Some lines were ellipsized, use -l to show in full.
[root@localhost henryhzy]# docker version
Client: Docker Engine - CommunityVersion:           20.10.1API version:       1.41Go version:        go1.13.15Git commit:        831ebeaBuilt:             Tue Dec 15 04:37:17 2020OS/Arch:           linux/amd64Context:           defaultExperimental:      trueServer: Docker Engine - CommunityEngine:Version:          20.10.1API version:      1.41 (minimum version 1.12)Go version:       go1.13.15Git commit:       f001486Built:            Tue Dec 15 04:35:42 2020OS/Arch:          linux/amd64Experimental:     falsecontainerd:Version:          1.4.3GitCommit:        269548fa27e0089a8b8278fc4fc781d7f65a939brunc:Version:          1.0.0-rc92GitCommit:        ff819c7e9184c13b7c2607fe6c30ae19403a7affdocker-init:Version:          0.19.0GitCommit:        de40ad0
四、Docker的简单应用
1. 运行第一个容器
运行镜像hello-world
[root@localhost henryhzy]# docker run hello-world
Unable to find image 'hello-world:latest' locally
latest: Pulling from library/hello-world
Digest: sha256:1a523af650137b8accdaed439c17d684df61ee4d74feac151b5b337bd29e7eec
Status: Downloaded newer image for hello-world:latestHello from Docker!
This message shows that your installation appears to be working correctly.To generate this message, Docker took the following steps:1. The Docker client contacted the Docker daemon.2. The Docker daemon pulled the "hello-world" image from the Docker Hub.(amd64)3. The Docker daemon created a new container from that image which runs theexecutable that produces the output you are currently reading.4. The Docker daemon streamed that output to the Docker client, which sent itto your terminal.To try something more ambitious, you can run an Ubuntu container with:$ docker run -it ubuntu bashShare images, automate workflows, and more with a free Docker ID:https://hub.docker.com/For more examples and ideas, visit:https://docs.docker.com/get-started/
运行镜像ubuntu bash
要点:-it 参数,通过终端与进程(容器)交互,stdin,stdout,stderr定向到 TTY
docker run -it ubuntu bash
我在运行该指令时出现timeout error,因此自然而然地要更换Docker的国内镜像源,而Docker的国内镜像源的资源站比较丰富:
Docker中国区官方镜像:
https://registry.docker-cn.com
网易:
http://hub-mirror.c.163.com
ustc:
https://docker.mirrors.ustc.edu.cn
中国科技大学:
https://docker.mirrors.ustc.edu.cn
阿里云:
https://cr.console.aliyun.com/
[root@localhost henryhzy]# vim /etc/docker/daemon.json  # 创建或修改 /etc/docker/daemon.json 文件,修改为如下形式
{"registry-mirrors" : ["https://registry.docker-cn.com","https://docker.mirrors.ustc.edu.cn","http://hub-mirror.c.163.com","https://cr.console.aliyun.com/"]
}[root@localhost henryhzy]# systemctl daemon-reload
[root@localhost henryhzy]# systemctl restart docker
然后安装Docker Ubuntu镜像:

此时再次运行Docker Ubuntu镜像即可:

2. Docker基本操作
显示本地镜像库内容
[root@localhost henryhzy]# docker images
REPOSITORY    TAG       IMAGE ID       CREATED         SIZE
mysql         5.7       697daaecf703   10 days ago     448MB
ubuntu        latest    f643c72bc252   3 weeks ago     72.9MB
hello-world   latest    bf756fb1ae65   11 months ago   13.3kB
hello-world   latest    bf756fb1ae65   11 months ago   13.3kB
获得帮助
[root@localhost henryhzy]# docker --helpUsage: docker [OPTIONS] COMMANDA self-sufficient runtime for containersOptions:--config string Location of client config files (default"/root/.docker")-c, --context string Name of the context to use to connect to thedaemon (overrides DOCKER_HOST env var anddefault context set with "docker context use")-D, --debug Enable debug mode-H, --host list Daemon socket(s) to connect to-l, --log-level string Set the logging level("debug"|"info"|"warn"|"error"|"fatal")(default "info")--tls Use TLS; implied by --tlsverify--tlscacert string Trust certs signed only by this CA (default"/root/.docker/ca.pem")--tlscert string Path to TLS certificate file (default"/root/.docker/cert.pem")--tlskey string Path to TLS key file (default"/root/.docker/key.pem")--tlsverify Use TLS and verify the remote-v, --version Print version information and quitManagement Commands:app* Docker App (Docker Inc., v0.9.1-beta3)builder Manage buildsbuildx* Build with BuildKit (Docker Inc., v0.5.0-docker)config Manage Docker configscontainer Manage containerscontext Manage contextsimage Manage imagesmanifest Manage Docker image manifests and manifest listsnetwork Manage networksnode Manage Swarm nodesplugin Manage pluginssecret Manage Docker secretsservice Manage servicesstack Manage Docker stacksswarm Manage Swarmsystem Manage Dockertrust Manage trust on Docker imagesvolume Manage volumesCommands:attach Attach local standard input, output, and error streams to a running containerbuild Build an image from a Dockerfilecommit Create a new image from a container's changescp Copy files/folders between a container and the local filesystemcreate Create a new containerdiff Inspect changes to files or directories on a container's filesystemevents Get real time events from the serverexec Run a command in a running containerexport Export a container's filesystem as a tar archivehistory Show the history of an imageimages List imagesimport Import the contents from a tarball to create a filesystem imageinfo Display system-wide informationinspect Return low-level information on Docker objectskill Kill one or more running containersload Load an image from a tar archive or STDINlogin Log in to a Docker registrylogout Log out from a Docker registrylogs Fetch the logs of a containerpause Pause all processes within one or more containersport List port mappings or a specific mapping for the containerps List containerspull Pull an image or a repository from a registrypush Push an image or a repository to a registryrename Rename a containerrestart Restart one or more containersrm Remove one or more containersrmi Remove one or more imagesrun Run a command in a new containersave Save one or more images to a tar archive (streamed to STDOUT by default)search Search the Docker Hub for imagesstart Start one or more stopped containersstats Display a live stream of container(s) resource usage statisticsstop Stop one or more running containerstag Create a tag TARGET_IMAGE that refers to SOURCE_IMAGEtop Display the running processes of a containerunpause Unpause all processes within one or more containersupdate Update configuration of one or more containersversion Show the Docker version informationwait Block until one or more containers stop, then print their exit codesRun 'docker COMMAND --help' for more information on a command.To get more help with docker, check out our guides at https://docs.docker.com/go/guides/显示运行中容器
[root@localhost henryhzy]# docker ps
CONTAINER ID   IMAGE     COMMAND   CREATED   STATUS    PORTS     NAMES
显示所有容器(包含已中止)
[root@localhost henryhzy]# docker ps -aCONTAINER ID IMAGE COMMAND CREATED STATUS PORTS NAMESb6812c2d3cee ubuntu "bash" 4 minutes ago Exited (0) 3 minutes ago youthful_faraday99f729ea477b hello-world "/hello" 2 hours ago Exited (0) 2 hours ago xenodochial_noether2a1a3ae27a97 hello-world "/hello" 4 days ago Exited (0) 4 days ago eager_lalande继续运行原容器并进入
注意此处的NAMES要看情况而定,并且要重新运行Ubuntu bash时应当使用docker attach而非docker restart[root@localhost henryhzy]# docker restart exciting_wiles Error response from daemon: No such container: exciting_wiles [root@localhost henryhzy]# docker restart youthful_faraday youthful_faraday [root@localhost henryhzy]# docker attach youthful_faraday root@b6812c2d3cee:/# ls bin dev home lib32 libx32 mnt proc run srv tmp var boot etc lib lib64 media opt root sbin sys usr root@b6812c2d3cee:/# exit exit
3. MySQL与容器化
3.1 拉取MySQL镜像
拉取MySQL镜像
[root@localhost henryhzy]# docker pull mysql:5.7
5.7: Pulling from library/mysql
6ec7b7d162b2: Pulling fs layer
fedd960d3481: Pulling fs layer
7ab947313861: Pulling fs layer
64f92f19e638: Waiting
3e80b17bff96: Waiting
014e976799f9: Waiting
59ae84fee1b3: Waiting
7d1da2a18e2e: Waiting
301a28b700b9: Waiting
979b389fc71f: Waiting
403f729b1bad: Waiting
5.7: Pulling from library/mysql
6ec7b7d162b2: Pull complete
fedd960d3481: Pull complete
7ab947313861: Pull complete
64f92f19e638: Pull complete
3e80b17bff96: Pull complete
014e976799f9: Pull complete
59ae84fee1b3: Pull complete
7d1da2a18e2e: Pull complete
301a28b700b9: Pull complete
979b389fc71f: Pull complete
403f729b1bad: Pull complete
Digest: sha256:d4ca82cee68dce98aa72a1c48b5ef5ce9f1538265831132187871b78e768aed1
Status: Downloaded newer image for mysql:5.7
docker.io/library/mysql:5.7
3.2 构建docker镜像
编辑dockerfile
mkdir mydock && cd mydock
vim dockerfile
#在文件中输入以下内容
FROM ubuntu
ENTRYPOINT ["top", "-b"]
CMD ["-c"]
构建镜像
[root@localhost mydock]# docker build . -t hello
Sending build context to Docker daemon  2.048kB
Step 1/3 : FROM ubuntu---> f643c72bc252
Step 2/3 : ENTRYPOINT ["top", "-b"]---> Running in 63397948b616
Removing intermediate container 63397948b616---> 27c96fbe2e5e
Step 3/3 : CMD ["-c"]---> Running in 56d1c9c8c7ff
Removing intermediate container 56d1c9c8c7ff---> 22faa7e802b9
Successfully built 22faa7e802b9
Successfully tagged hello:latest
运行镜像
[root@localhost mydock]# docker run -it --rm hello -H
top - 17:07:13 up  2:46,  0 users,  load average: 0.27, 0.28, 0.16
Threads:   1 total,   1 running,   0 sleeping,   0 stopped,   0 zombie
%Cpu(s): 50.0 us, 50.0 sy,  0.0 ni,  0.0 id,  0.0 wa,  0.0 hi,  0.0 si,  0.0 st
MiB Mem :   2846.0 total,    157.5 free,   1062.3 used,   1626.2 buff/cache
MiB Swap:   3072.0 total,   3070.7 free,      1.3 used.   1563.3 avail Mem PID USER      PR  NI    VIRT    RES    SHR S  %CPU  %MEM     TIME+ COMMAND1 root      20   0    5960   1704   1276 R   0.0   0.1   0:00.05 toptop - 17:07:16 up  2:46,  0 users,  load average: 0.27, 0.28, 0.16
Threads:   1 total,   1 running,   0 sleeping,   0 stopped,   0 zombie
%Cpu(s): 18.3 us,  8.2 sy,  0.0 ni, 71.6 id,  1.2 wa,  0.0 hi,  0.8 si,  0.0 st
MiB Mem :   2846.0 total,    158.4 free,   1061.3 used,   1626.2 buff/cache
MiB Swap:   3072.0 total,   3070.7 free,      1.3 used.   1564.2 avail Mem PID USER      PR  NI    VIRT    RES    SHR S  %CPU  %MEM     TIME+ COMMAND1 root      20   0    5960   1704   1276 R   0.0   0.1   0:00.05 toptop - 17:07:19 up  2:46,  0 users,  load average: 0.25, 0.27, 0.16
Threads:   1 total,   1 running,   0 sleeping,   0 stopped,   0 zombie
%Cpu(s): 14.5 us,  5.9 sy,  0.0 ni, 79.6 id,  0.0 wa,  0.0 hi,  0.0 si,  0.0 st
MiB Mem :   2846.0 total,    158.4 free,   1061.3 used,   1626.2 buff/cache
MiB Swap:   3072.0 total,   3070.7 free,      1.3 used.   1564.2 avail Mem PID USER      PR  NI    VIRT    RES    SHR S  %CPU  %MEM     TIME+ COMMAND1 root      20   0    5960   1704   1276 R   0.3   0.1   0:00.06 top
...
...
【持续输出】
3.3 MySQL容器使用
启动服务器
[root@localhost mydock]# docker run -p 3306:3306 --name mysql2 -e MYSQL_ROOT_PASSWORD=root -d mysql:5.7
927714891d7cea9370930a8dd7e7fdfdaf97838063078e45c8aae4ab8e76069d[root@localhost mydock]# docker ps
CONTAINER ID   IMAGE       COMMAND                  CREATED          STATUS          PORTS                               NAMES
927714891d7c   mysql:5.7   "docker-entrypoint.s…"   48 seconds ago   Up 46 seconds   0.0.0.0:3306->3306/tcp, 33060/tcp   mysql2
启动MySQL客户端并退出
[root@localhost mydock]# docker run -it --net host mysql:5.7 "sh"
# mysql -h127.0.0.1 -P3306 -uroot -proot
mysql: [Warning] Using a password on the command line interface can be insecure.
Welcome to the MySQL monitor.  Commands end with ; or \g.
Your MySQL connection id is 2
Server version: 5.7.32 MySQL Community Server (GPL)Copyright (c) 2000, 2020, Oracle and/or its affiliates. All rights reserved.Oracle is a registered trademark of Oracle Corporation and/or its
affiliates. Other names may be trademarks of their respective
owners.Type 'help;' or '\h' for help. Type '\c' to clear the current input statement.mysql> exit
Bye
# exit
[root@localhost mydock]#
数据库文件位置:
[root@localhost mydock]# docker exec -it mysql2 bash
root@927714891d7c:/# ls /var/lib/mysql
auto.cnf    client-cert.pem  ib_logfile0  ibtmp1	      private_key.pem  server-key.pem
ca-key.pem  client-key.pem   ib_logfile1  mysql		      public_key.pem   sys
ca.pem	    ib_buffer_pool   ibdata1	  performance_schema  server-cert.pem
root@927714891d7c:/# exit
exit[root@localhost mydock]# docker container prune -f
Deleted Containers:
d8ee403b5c90c3900a1a6be55cfe87f7cd3318028ba5cc0a87888649f2ad4524
b6812c2d3cee25993252274c71ec2c0a38cf8b735ffff4de2f38670159d93050
99f729ea477bdee1babf99afbd811d23bec0337db8874f963270ab38b17a8286
2a1a3ae27a97e03fc773ef2c01d34a697d607c0b2639581cd7ae0546315d0f07Total reclaimed space: 34B[root@localhost mydock]# docker volume prune -f
Deleted Volumes:
5274edde97e9c2df7a46b7889626a3687d992eec31624b4b309d9b788400ba36Total reclaimed space: 0B[root@localhost mydock]# sudo docker volume ls
DRIVER    VOLUME NAME
local     daa3ec7dfd2e58d6dac5cf62ea5ef64183806a6cb386f6ff604310e4cd51c16c[root@localhost mydock]#
创建卷并挂载(挂载到
/var/lib/mysql)[root@localhost mydock]# docker rm $(sudo docker ps -a -q) -f -v 927714891d7c [root@localhost mydock]# docker volume create mydb mydb [root@localhost mydock]# docker run --name mysql2 -e MYSQL_ROOT_PASSWORD=root -v mydb:/var/lib/mysql -d mysql:5.7 3eaa6e51b7fcdefdeba9e609c80d0af2d44271a47dfcf3a02affc8bf623a5257 [root@localhost mydock]#启动客户端连接服务器,并退出
[root@localhost mydock]# docker run --name myclient --link mysql2:mysql -it mysql:5.7 bash
root@56a4e5c99806:/# env
MYSQL_PORT_33060_TCP_ADDR=172.17.0.2
MYSQL_PORT=tcp://172.17.0.2:3306
MYSQL_PORT_3306_TCP_ADDR=172.17.0.2
MYSQL_NAME=/myclient/mysql
MYSQL_ENV_MYSQL_ROOT_PASSWORD=root
MYSQL_MAJOR=5.7
MYSQL_PORT_3306_TCP_PORT=3306
HOSTNAME=56a4e5c99806
MYSQL_ENV_MYSQL_MAJOR=5.7
MYSQL_PORT_3306_TCP=tcp://172.17.0.2:3306
PWD=/
HOME=/root
MYSQL_ENV_GOSU_VERSION=1.12
MYSQL_PORT_33060_TCP_PROTO=tcp
MYSQL_VERSION=5.7.32-1debian10
GOSU_VERSION=1.12
TERM=xterm
MYSQL_PORT_33060_TCP_PORT=33060
MYSQL_PORT_3306_TCP_PROTO=tcp
SHLVL=1
MYSQL_PORT_33060_TCP=tcp://172.17.0.2:33060
PATH=/usr/local/sbin:/usr/local/bin:/usr/sbin:/usr/bin:/sbin:/bin
MYSQL_ENV_MYSQL_VERSION=5.7.32-1debian10
_=/usr/bin/env
root@56a4e5c99806:/# mysql -hmysql -P3306 -uroot -proot
mysql: [Warning] Using a password on the command line interface can be insecure.
Welcome to the MySQL monitor.  Commands end with ; or \g.
Your MySQL connection id is 2
Server version: 5.7.32 MySQL Community Server (GPL)Copyright (c) 2000, 2020, Oracle and/or its affiliates. All rights reserved.Oracle is a registered trademark of Oracle Corporation and/or its
affiliates. Other names may be trademarks of their respective
owners.Type 'help;' or '\h' for help. Type '\c' to clear the current input statement.mysql>
mysql> exit
Bye
root@56a4e5c99806:/# exit
exit[root@localhost mydock]#
说明:这里使用了
--link连接两个容器;客户端容器内可以使用mysql这个别名访问挂载现有数据库
- 官网案例:
docker run -v "$PWD/data":/var/lib/mysql --user 1000:1000 --name some-mysql -e MYSQL_ROOT_PASSWORD=my-secret-pw -d mysql:tag修改容器配置
- 官网案例
docker run --name some-mysql -v /my/custom:/etc/mysql/conf.d -e MYSQL_ROOT_PASSWORD=my-secret-pw -d mysql:tag
3.4 Docker compose与多容器应用自动化部署
下载docker-compose(容器编排的原型):
yum install docker-compose编写
stack.yml如下:version: '3.1' services:db:image: mysql:5.7command: --default-authentication-plugin=mysql_native_passwordrestart: alwaysenvironment:MYSQL_ROOT_PASSWORD: 19970805adminer:image: adminerrestart: alwaysports:- 8080:8080启动服务
docker-compose -f stack.yml up -d
4 docker网络
管理容器网络
[root@localhost henryhzy]# docker network ls
NETWORK ID     NAME      DRIVER    SCOPE
3a01e95dea2f   bridge    bridge    local
5fd9221111e1   host      host      local
05cfa60a0d11   none      null      local
自定义容器网络,备制支持
ifconfig和ping命令的ubuntu容器[root@localhost henryhzy]# docker run --name unet -it --rm ubuntu bashroot@0774b9ce2310:/# apt-get update Get:1 http://security.ubuntu.com/ubuntu focal-security InRelease [109 kB] Get:2 http://archive.ubuntu.com/ubuntu focal InRelease [265 kB] Get:3 http://security.ubuntu.com/ubuntu focal-security/main amd64 Packages [495 kB] Get:4 http://archive.ubuntu.com/ubuntu focal-updates InRelease [114 kB] Get:5 http://security.ubuntu.com/ubuntu focal-security/restricted amd64 Packages [103 kB] Get:6 http://archive.ubuntu.com/ubuntu focal-backports InRelease [101 kB] Get:7 http://security.ubuntu.com/ubuntu focal-security/universe amd64 Packages [645 kB] Get:8 http://archive.ubuntu.com/ubuntu focal/restricted amd64 Packages [33.4 kB] Get:9 http://archive.ubuntu.com/ubuntu focal/main amd64 Packages [1275 kB] Get:10 http://security.ubuntu.com/ubuntu focal-security/multiverse amd64 Packages [1167 B] Get:11 http://archive.ubuntu.com/ubuntu focal/multiverse amd64 Packages [177 kB] Get:12 http://archive.ubuntu.com/ubuntu focal/universe amd64 Packages [11.3 MB] Get:13 http://archive.ubuntu.com/ubuntu focal-updates/multiverse amd64 Packages [30.4 kB] Get:14 http://archive.ubuntu.com/ubuntu focal-updates/restricted amd64 Packages [136 kB] Get:15 http://archive.ubuntu.com/ubuntu focal-updates/universe amd64 Packages [885 kB] Get:16 http://archive.ubuntu.com/ubuntu focal-updates/main amd64 Packages [885 kB] Get:17 http://archive.ubuntu.com/ubuntu focal-backports/universe amd64 Packages [4250 B] Fetched 16.6 MB in 1min 29s (186 kB/s) Reading package lists... Doneroot@0774b9ce2310:/# apt-get install net-tools Reading package lists... Done Building dependency tree Reading state information... Done The following NEW packages will be installed:net-tools 0 upgraded, 1 newly installed, 0 to remove and 2 not upgraded. Need to get 196 kB of archives. After this operation, 864 kB of additional disk space will be used. Get:1 http://archive.ubuntu.com/ubuntu focal/main amd64 net-tools amd64 1.60+git20180626.aebd88e-1ubuntu1 [196 kB] Fetched 196 kB in 1s (348 kB/s) debconf: delaying package configuration, since apt-utils is not installed Selecting previously unselected package net-tools. (Reading database ... 4121 files and directories currently installed.) Preparing to unpack .../net-tools_1.60+git20180626.aebd88e-1ubuntu1_amd64.deb ... Unpacking net-tools (1.60+git20180626.aebd88e-1ubuntu1) ... Setting up net-tools (1.60+git20180626.aebd88e-1ubuntu1) ... root@0774b9ce2310:/# apt-get install net-tools Reading package lists... Done Building dependency tree Reading state information... Done net-tools is already the newest version (1.60+git20180626.aebd88e-1ubuntu1). 0 upgraded, 0 newly installed, 0 to remove and 2 not upgraded. root@0774b9ce2310:/# apt-get install iputils-ping -y Reading package lists... Done Building dependency tree Reading state information... Done The following additional packages will be installed:libcap2 libcap2-bin libpam-cap The following NEW packages will be installed:iputils-ping libcap2 libcap2-bin libpam-cap 0 upgraded, 4 newly installed, 0 to remove and 2 not upgraded. Need to get 90.5 kB of archives. After this operation, 333 kB of additional disk space will be used. Get:1 http://archive.ubuntu.com/ubuntu focal/main amd64 libcap2 amd64 1:2.32-1 [15.9 kB] Get:2 http://archive.ubuntu.com/ubuntu focal/main amd64 libcap2-bin amd64 1:2.32-1 [26.2 kB] Get:3 http://archive.ubuntu.com/ubuntu focal/main amd64 iputils-ping amd64 3:20190709-3 [40.1 kB] Get:4 http://archive.ubuntu.com/ubuntu focal/main amd64 libpam-cap amd64 1:2.32-1 [8352 B] Fetched 90.5 kB in 2s (51.6 kB/s) debconf: delaying package configuration, since apt-utils is not installed Selecting previously unselected package libcap2:amd64. (Reading database ... 4170 files and directories currently installed.) Preparing to unpack .../libcap2_1%3a2.32-1_amd64.deb ... Unpacking libcap2:amd64 (1:2.32-1) ... Selecting previously unselected package libcap2-bin. Preparing to unpack .../libcap2-bin_1%3a2.32-1_amd64.deb ... Unpacking libcap2-bin (1:2.32-1) ... Selecting previously unselected package iputils-ping. Preparing to unpack .../iputils-ping_3%3a20190709-3_amd64.deb ... Unpacking iputils-ping (3:20190709-3) ... Selecting previously unselected package libpam-cap:amd64. Preparing to unpack .../libpam-cap_1%3a2.32-1_amd64.deb ... Unpacking libpam-cap:amd64 (1:2.32-1) ... Setting up libcap2:amd64 (1:2.32-1) ... Setting up libcap2-bin (1:2.32-1) ... Setting up libpam-cap:amd64 (1:2.32-1) ... debconf: unable to initialize frontend: Dialog debconf: (No usable dialog-like program is installed, so the dialog based frontend cannot be used. at /usr/share/perl5/Debconf/FrontEnd/Dialog.pm line 76.) debconf: falling back to frontend: Readline debconf: unable to initialize frontend: Readline debconf: (Can't locate Term/ReadLine.pm in @INC (you may need to install the Term::ReadLine module) (@INC contains: /etc/perl /usr/local/lib/x86_64-linux-gnu/perl/5.30.0 /usr/local/share/perl/5.30.0 /usr/lib/x86_64-linux-gnu/perl5/5.30 /usr/share/perl5 /usr/lib/x86_64-linux-gnu/perl/5.30 /usr/share/perl/5.30 /usr/local/lib/site_perl /usr/lib/x86_64-linux-gnu/perl-base) at /usr/share/perl5/Debconf/FrontEnd/Readline.pm line 7.) debconf: falling back to frontend: Teletype Setting up iputils-ping (3:20190709-3) ... Processing triggers for libc-bin (2.31-0ubuntu9.1) ...root@0774b9ce2310:/# ifconfig eth0: flags=4163<UP,BROADCAST,RUNNING,MULTICAST> mtu 1500inet 172.17.0.3 netmask 255.255.0.0 broadcast 172.17.255.255ether 02:42:ac:11:00:03 txqueuelen 0 (Ethernet)RX packets 7235 bytes 17286356 (17.2 MB)RX errors 0 dropped 0 overruns 0 frame 0TX packets 7206 bytes 395732 (395.7 KB)TX errors 0 dropped 0 overruns 0 carrier 0 collisions 0lo: flags=73<UP,LOOPBACK,RUNNING> mtu 65536inet 127.0.0.1 netmask 255.0.0.0loop txqueuelen 1000 (Local Loopback)RX packets 0 bytes 0 (0.0 B)RX errors 0 dropped 0 overruns 0 frame 0TX packets 0 bytes 0 (0.0 B)TX errors 0 dropped 0 overruns 0 carrier 0 collisions 0root@0774b9ce2310:/# ping <your host ip> //可ping成功 隐藏ip信息打开另一个终端窗口,由容器制作镜像
[root@localhost henryhzy]# docker commit unet ubuntu:net
sha256:aa7870b2dcb8eee7357aac8533a3e7e78313358c0532ea5dea7cec4a2907ae1b
创建自定义网络
[root@localhost henryhzy]# docker network create mynet
4a4fa10b06e69fd3bcf4e1b3d53206768ed57601721bb2b78eb84177ea67da8b
在另外两个窗口分别创建u1,u2容器网络,并使用以下命令:
docker run --name u1 -it -p 8080:80 --net mynet --rm ubuntu:net bash
docker run --name u2 --net mynet -it --rm ubuntu:net bash
[root@localhost henryhzy]# docker inspect u1
[{"Id": "3615ba75666b105ffb19bf3975587b6e46e5146186f6678de2db52a77ad9fadf","Created": "2020-12-21T17:45:20.647669834Z","Path": "bash","Args": [],"State": {"Status": "running","Running": true,"Paused": false,"Restarting": false,"OOMKilled": false,"Dead": false,"Pid": 10571,"ExitCode": 0,"Error": "","StartedAt": "2020-12-21T17:45:22.69888905Z","FinishedAt": "0001-01-01T00:00:00Z"},"Image": "sha256:aa7870b2dcb8eee7357aac8533a3e7e78313358c0532ea5dea7cec4a2907ae1b","ResolvConfPath": "/var/lib/docker/containers/3615ba75666b105ffb19bf3975587b6e46e5146186f6678de2db52a77ad9fadf/resolv.conf","HostnamePath": "/var/lib/docker/containers/3615ba75666b105ffb19bf3975587b6e46e5146186f6678de2db52a77ad9fadf/hostname","HostsPath": "/var/lib/docker/containers/3615ba75666b105ffb19bf3975587b6e46e5146186f6678de2db52a77ad9fadf/hosts","LogPath": "/var/lib/docker/containers/3615ba75666b105ffb19bf3975587b6e46e5146186f6678de2db52a77ad9fadf/3615ba75666b105ffb19bf3975587b6e46e5146186f6678de2db52a77ad9fadf-json.log","Name": "/u1","RestartCount": 0,"Driver": "overlay2","Platform": "linux","MountLabel": "","ProcessLabel": "","AppArmorProfile": "","ExecIDs": null,"HostConfig": {"Binds": null,"ContainerIDFile": "","LogConfig": {"Type": "json-file","Config": {}},"NetworkMode": "mynet","PortBindings": {"80/tcp": [{"HostIp": "","HostPort": "8080"}]},"RestartPolicy": {"Name": "no","MaximumRetryCount": 0},"AutoRemove": true,"VolumeDriver": "","VolumesFrom": null,"CapAdd": null,"CapDrop": null,"CgroupnsMode": "host","Dns": [],"DnsOptions": [],"DnsSearch": [],"ExtraHosts": null,"GroupAdd": null,"IpcMode": "private","Cgroup": "","Links": null,"OomScoreAdj": 0,"PidMode": "","Privileged": false,"PublishAllPorts": false,"ReadonlyRootfs": false,"SecurityOpt": null,"UTSMode": "","UsernsMode": "","ShmSize": 67108864,"Runtime": "runc","ConsoleSize": [0,0],"Isolation": "","CpuShares": 0,"Memory": 0,"NanoCpus": 0,"CgroupParent": "","BlkioWeight": 0,"BlkioWeightDevice": [],"BlkioDeviceReadBps": null,"BlkioDeviceWriteBps": null,"BlkioDeviceReadIOps": null,"BlkioDeviceWriteIOps": null,"CpuPeriod": 0,"CpuQuota": 0,"CpuRealtimePeriod": 0,"CpuRealtimeRuntime": 0,"CpusetCpus": "","CpusetMems": "","Devices": [],"DeviceCgroupRules": null,"DeviceRequests": null,"KernelMemory": 0,"KernelMemoryTCP": 0,"MemoryReservation": 0,"MemorySwap": 0,"MemorySwappiness": null,"OomKillDisable": false,"PidsLimit": null,"Ulimits": null,"CpuCount": 0,"CpuPercent": 0,"IOMaximumIOps": 0,"IOMaximumBandwidth": 0,"MaskedPaths": ["/proc/asound","/proc/acpi","/proc/kcore","/proc/keys","/proc/latency_stats","/proc/timer_list","/proc/timer_stats","/proc/sched_debug","/proc/scsi","/sys/firmware"],"ReadonlyPaths": ["/proc/bus","/proc/fs","/proc/irq","/proc/sys","/proc/sysrq-trigger"]},"GraphDriver": {"Data": {"LowerDir": "/var/lib/docker/overlay2/a1a968eabfe8f593a62137c6b5abc4e772022c59006ba66f8f4a3a9fe697383f-init/diff:/var/lib/docker/overlay2/287cc08a344ff98b7a49739683bfdecee3f1f762f2ae57eb6ccb17bf6c7bee84/diff:/var/lib/docker/overlay2/d6be398a6c8c4c7a4c92e512744048789f990992ef6609dbe94306feb93ba6ad/diff:/var/lib/docker/overlay2/f866e66d90ab2c229a8af7960010e0530408422b5d7b65615acd5ba63da3baa2/diff:/var/lib/docker/overlay2/c1b551a6ca25d09a603c5a883e22e52ae31b33314afedae97a0b8079a02f9a2b/diff","MergedDir": "/var/lib/docker/overlay2/a1a968eabfe8f593a62137c6b5abc4e772022c59006ba66f8f4a3a9fe697383f/merged","UpperDir": "/var/lib/docker/overlay2/a1a968eabfe8f593a62137c6b5abc4e772022c59006ba66f8f4a3a9fe697383f/diff","WorkDir": "/var/lib/docker/overlay2/a1a968eabfe8f593a62137c6b5abc4e772022c59006ba66f8f4a3a9fe697383f/work"},"Name": "overlay2"},"Mounts": [],"Config": {"Hostname": "3615ba75666b","Domainname": "","User": "","AttachStdin": true,"AttachStdout": true,"AttachStderr": true,"ExposedPorts": {"80/tcp": {}},"Tty": true,"OpenStdin": true,"StdinOnce": true,"Env": ["PATH=/usr/local/sbin:/usr/local/bin:/usr/sbin:/usr/bin:/sbin:/bin"],"Cmd": ["bash"],"Image": "ubuntu:net","Volumes": null,"WorkingDir": "","Entrypoint": null,"OnBuild": null,"Labels": {}},"NetworkSettings": {"Bridge": "","SandboxID": "109f19b7b72e8ea0e4f213da5b50bb12b565b89a73b3cfc227604d1e977f83a7","HairpinMode": false,"LinkLocalIPv6Address": "","LinkLocalIPv6PrefixLen": 0,"Ports": {"80/tcp": [{"HostIp": "0.0.0.0","HostPort": "8080"}]},"SandboxKey": "/var/run/docker/netns/109f19b7b72e","SecondaryIPAddresses": null,"SecondaryIPv6Addresses": null,"EndpointID": "","Gateway": "","GlobalIPv6Address": "","GlobalIPv6PrefixLen": 0,"IPAddress": "","IPPrefixLen": 0,"IPv6Gateway": "","MacAddress": "","Networks": {"mynet": {"IPAMConfig": null,"Links": null,"Aliases": ["3615ba75666b"],"NetworkID": "4a4fa10b06e69fd3bcf4e1b3d53206768ed57601721bb2b78eb84177ea67da8b","EndpointID": "566e131813573a95ec5edc8905f80b61a1d3f4f1cde7a0e5030bcd37c0b377e2","Gateway": "172.18.0.1","IPAddress": "172.18.0.2","IPPrefixLen": 16,"IPv6Gateway": "","GlobalIPv6Address": "","GlobalIPv6PrefixLen": 0,"MacAddress": "02:42:ac:12:00:02","DriverOpts": null}}}}
]
[root@localhost henryhzy]# docker network connect bridge u1
[root@localhost henryhzy]# docker network disconnect mynet u1
5. Docker仓库 (Registry)
以阿里云容器镜像服务的教程如下:
阿里云容器镜像服务(免费)实践
– 访问 https://cr.console.aliyun.com
– 用淘宝或注册一个账号
– 选择“容器镜像服务”
– 常用仓库操作:如上传 hello-world 镜像
• 登陆 docker login --username= registry.cn-shenzhen.aliyuncs.com • 标签 docker tag hello-world registry.cn-shenzhen.aliyuncs.com/pmlpml/repo:helloworld • 上传 docker push registry.cn-shenzhen.aliyuncs.com/pmlpml/repo:hello-world • 下载 docker push registry.cn-shenzhen.aliyuncs.com/pmlpml/repo:hello-world • 标签 docker tag registry.cn-shenzhen.aliyuncs.com/pmlpml/repo:hello-world helloworld • 删除 docker rmi registry.cn-shenzhen.aliyuncs.com/pmlpml/repo:hello-world • 运行 docker run --rm hello-world • 退出 docker logout registry.cn-shenzhen.aliyuncs.com
• 检查docker的状态
~]# docker info … … ~]# docker info --format {{.ServerVersion}}
• 查看容器内进程
– Docker top – Docker stats
• 容器详细信息
~]# docker inspect … … ~]# docker inspect -f '{{.NetworkSettings.IPAddress}}' 084f46eddf33 172.17.0.2
• 容器的日志
– 容器应用的 stdout 与 stderr 输出
• 容器日志查看
~]# docker logs 084f46eddf33 root@084f46eddf33:/# ll total 12 drwxr-xr-x. 1 root root 43 Dec 13 13:46 ./ drwxr-xr-x. 1 root root 43 Dec 13 13:46 ../ -rwxr-xr-x. 1 root root 0 Dec 13 13:46 .dockerenv* drwxr-xr-x. 2 root root 4096 Dec 12 03:44 bin/ …~]# docker logs --tail 2 084f46eddf33 drwxr-xr-x. 10 root root 97 Dec 10 08:42 usr/ drwxr-xr-x. 11 root root 4096 Dec 10 08:42 var/
• 日志的重要性!
– 调试、分析
五、References
- 课件
- 本人关于Docker的分享文章
- 本人应用了Docker的前后端开发工程项目
- Docker清华源
相关文章:

vim学习笔记(三)
1.vim的配置文件在哪里?在normal模式下输入:echo $VIMVim的主配置文件为vimrc文件,它分为两个版本:global和personal,其中前者一般在/usr/share/vim/vimrc,后者一般在~/.vimrc,它是一个隐藏文件找到home目录的方法:ech…
python 学术_Python
前几天实验室一个师兄给我一个质谱结果,让帮忙做下go的功能富集,数据格式大概是这样的:由于之前做go和kegg时都是跑流程,像这种针对性的go富集还没做过,说到底,还是由于自己手上缺少数据,没有属…
Hive的Security配置
为了更好地使用好Hive,我将《Programming Hive》的Security章节取出来,翻译了一下。 Hive还是支持相当多的权限管理功能,满足一般数据仓库的使用。 Hive由一个默认的设置来配置新建文件的默认权限。 Xml代码 <property> <name>…
Docker安装Apache与运行简单的web服务——httpd helloworld
Docker运行简单的web服务——httpd helloworld目录【阅读时间:约5分钟】一、Docker简介二、Docker的安装与配置【CentOS环境】三、Docker运行简单的web服务——httpd helloworld四、References一、Docker简介 Docker 是一个开源的应用容器引擎,让开发者…
在CentOS 6.2上搭建vim开发环境
在CentOS 6.2上搭建vim开发环境最后更新日期:2013-07-051.首先使用Ubuntu(所在ip为192.168.16.230)翻墙登陆http://www.vim.org/,下载其上面的vim相关插件到Ubuntu的下载目录下:cd ~/下载/http://ctags.sourceforge.ne…

python基础(三元运算+深浅拷贝+函数参数)
三元运算 三元运算,又称三目运算,主要作用是减少代码量,是对简单的条件语句的缩写。 1 书写格式: 2 result 值1 if 条件 else 值2 3 即如果条件成立,则将值1赋给result变量,如果不成立,将值2赋…
pythonapi是什么_python接口自动化(一)--什么是接口、接口优势、类型(详解)...
简介经常听别人说接口测试,接口测试自动化,但是你对接口,有多少了解和认识,知道什么是接口吗?它是用来做什么的,测试时候要注意什么?坦白的说,笔者之前也不是很清楚。接下来先看一下…
【阶段小结】协同开发——这学期的Git使用小结
【阶段小结】协同开发——这学期的Git使用小结一、Git简介1. Git简单介绍2. Git工作流程以及各个区域3. Git文件状态变化二、Git安装&Git基本配置三、个人踩坑1. xcode project“抽风式”问题2. 如何拯救git仓库一、Git简介 1. Git简单介绍 Git是一个分布式版本控制软件&…
PHP函数printf()、sprintf()的用法
printf()函数优点在于可以格式化输出 格式: %[padding_character][-][width][.precision]type 所有的转换说明都是以%开始,如果想打印一个%符号,必须用%% ; 参数“padding_character”是可选,它将被用来填充变量直至所指定的宽度,该参数的作用…

20150411--Dede二次开发-01
20150411--Dede二次开发-01 目录 一、目前市场流行的电子商城系统 1 二、ecshop的介绍 1 三、安装 2 四、echsop 的目录结构 5 五、分析ecshop里面程序的架构 5 六、小试牛刀把面包屑导航改成两个大于号 6 1、根据php页面找出该页面对应的模板。 6 2、找到category.dwt模板文件…
修改cpu型号重启不变_猫头鹰展示D系列新款140毫米CPU散热器:更大散热片,能压400瓦...
猫头鹰一直以超强的CPU风冷散热器在电脑配件市场闻名遐迩,在台北电脑展期间,除了展出了概念性的无风扇CPU散热器,还宣布了发布D系列新款CPU散热器的计划。新的未命名的散热器相比与目前的NH-D15和NH-D15S型号要多一根热管,性能进一…
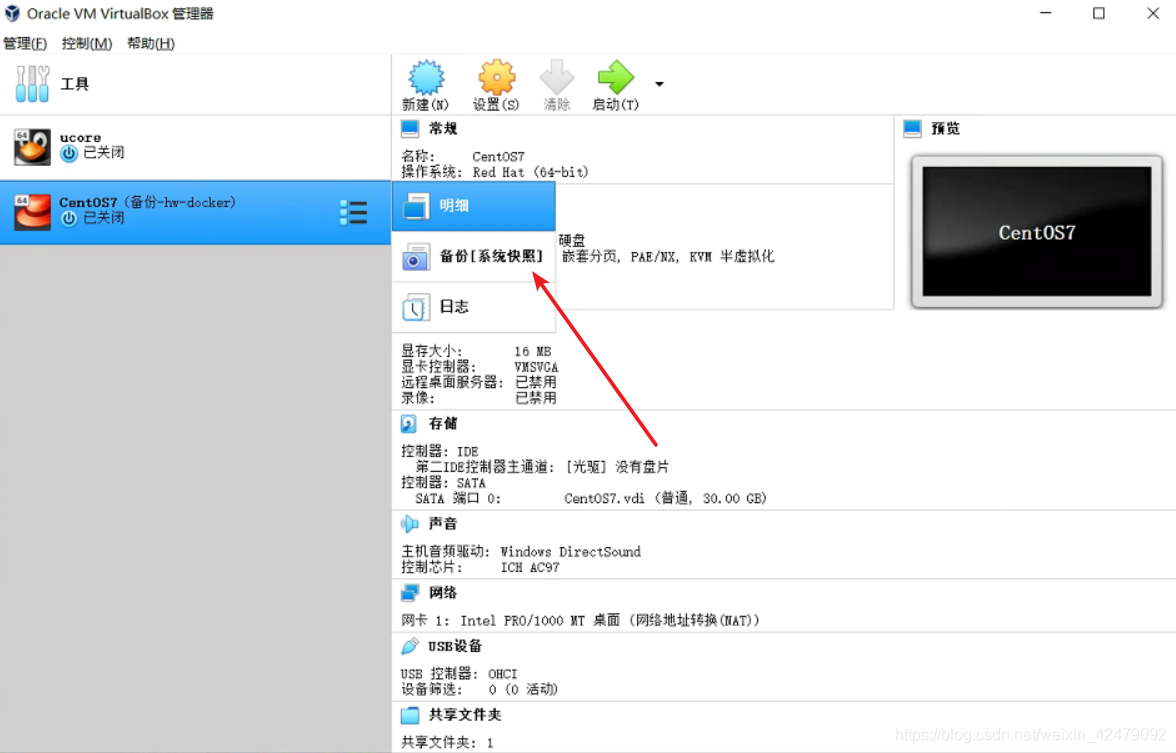
管理虚拟机的艺术——有备无患
随心前言:求求你们多多给虚拟机做一下备份~~ 超前预告:下一次分享一下linux/window to go的小玩意(把系统安装到U盘,即插即用) 接下来的博客尝试一下用随笔的形式,来写写自己感兴趣的一些玩意,比…
coreseek最大检索数只有1000的问题!
在 测试中发现,综艺视频只能看33页,每页10条,始终不得其解。经仔细分析,是csft.conf中的配置,下面修改说明如下:先将csft.conf中的searchd部分,将1000默认值改为10000max_matches 10000然后在调…

iframe怎么用_怎么样减少无效URL的爬行和索引
少年老成的云晨守望同学(题外话:少年老成是好事哈。我20多岁时人家说我像40岁,我40多岁时好多人说我像30多,男人20到50岁可以做到基本一个样子)在网络营销实战密码网站贴了个帖子:《透过京东商城看国内一线B2C网站SEO通病》。建议…

502 Server dropped connection
在本地电脑上开启了,全局VPN代理后,出现 502 报错。 502 Server dropped connection The following error occurred while trying to access http://localhost/invo/:502 Server dropped connection. 出现这种情况的原因是,vpn 链接挂了&…

【OpenCV】在Linux上使用OpenCvSharp
OpenCvSharp是一个OpenCV的 .Net wrapper,应用最新的OpenCV库开发,使用习惯比EmguCV更接近原始的OpenCV,该库采用LGPL发行,对商业应用友好。
DNS轮询解析是什么?
在其最简单的实现中,轮回DNS的工作方式是,不仅用一个潜在的IP地址来响应DNS请求,而且用一个潜在的IP地址列表来响应承载相同服务的几个服务器。传统的负载均衡技术通常需要专门的硬件或软件,但DNS轮询解析是一种负载分配、负载平衡或容错技术,通过管理域名系统(DNS)对来自客户计算机的地址请求的响应,按照适当的统计模型,提供多个冗余的互联网协议服务主机,将流量分散到多个服务器上。因此,虽然轮询DNS是一种简单有效的负载平衡方法,但它也存在一些限制和潜在的问题,需要根据实际情况进行选择和使用。
自建WIN10 FTP无法访问的解决方法
由于博主使用的是校园网,具体NAS方案比较复杂,主体上是用KodCloudWin10自带FTP,最近发现好像自带的FTP搭建不了。 废话不多说,说说解决方案: ①首先看看防火墙设置,用同一局域网下的主机ping一下测试是否能…
weiss数据结构和算法书的使用说明
《数据结构与算法分析 C语言描述》Mark Allen Weiss著,冯舜玺译,机械工业出版社。Weiss教授的经典教材三部曲之一,其中的C语言描述版本,也就是本书,被称为20世纪最重要的30本计算机教材之一。Mark Allen Weiss…

Bootstrap 栅格系统 理解与总结
Bootstrap 栅格系统 学习总结 Bootstrap框架是如今最流行的前端框架之一,Bootstrap功能强大,简单易学,很符合实际应用场景。 只是Bootstrap的内容较多,新手往往不能很快的熟练运用Bootstrap。 这里,我就对Bootstrap中非…

java抛出自定义异常_10 个深恶痛绝的 Java 异常。。
异常是 Java 程序中经常遇到的问题,我想每一个 Java 程序员都讨厌异常,一 个异常就是一个 BUG,就要花很多时间来定位异常问题。什么是异常及异常的分类请看这篇文章:一张图搞清楚 Java 异常机制。今天,栈长来列一下 Ja…
mac删除键很慢
关闭辅助功能-慢速键 重复延迟、等待调到最低

不相交集类以及应用迷宫生成
简单介绍: 考虑一个迷宫的生成,一个简单算法就是从各处的墙壁开始(除入口和出口之外)。此时,不断地随机选择一面墙,如果被该墙分割的单元彼此不联通,那么就把这面墙拆掉。重复这个过程直到开始单…
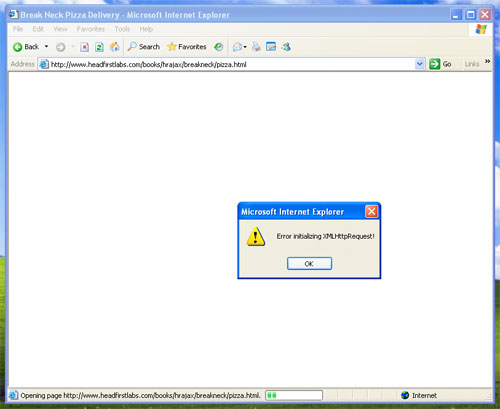
Ajax 完整教程
转载:http://www.cnblogs.com/Garden-blog/archive/2011/03/11/1981778.html Ajax 完整教程第 1 页 Ajax 简介Ajax 由 HTML、JavaScript™ 技术、DHTML 和 DOM 组成,这一杰出的方法可以将笨拙的 Web 界面转化成交互性的 Ajax 应用程序。本文的作者是一位…
python嵩天课后思考题_Python语言程序设计基础(第二版)嵩天等课后习题答案
第一次博文 Time:2018年04月28日 星期六 11:37二次补充 2018年05月02日第一章 程序设计基本方法 P29# 1.1字符串的拼接str1 input("请输入一个人的名字:")str2 input("请输入一个地点:")print("世界这么大&#x…

mac OneNote恢复历史记录
由于mac OneNote是个废物,因此还是得通过网页版OneNote或者win版OneNote来操作 网页端OneNote-对应笔记本页面 然后复制过去就可以恢复了
【C#公共帮助类】10年代码,最全的系统帮助类
这个帮助类主要包含:对象转换处理 、分割字符串、截取字符串、删除最后结尾的一个逗号、 删除最后结尾的指定字符后的字符、 生成指定长度的字符串、 生成日期随机码、 生成随机字母或数、字 截取字符长度、 对象<-->JSON 4.0使用、 对象<-->JSON 2.0使…
三十之惑–面霸的八月(第一部分)
三十之惑 –面霸的八月 题记: 三十几岁了,从sina大学肄业后,在外面漂泊,不好不坏。 从好的角度讲,这几年自己的技术没有减退,偶尔也还能够略有深入,同时能够更多的接触到产品、运营、甚至营销&a…
python小工具封装_python接口自动化(二)——封装需要用到的工具类
封装需要用的工具类:1、封装读取Excel的工具类,这里选用的是pandas:importpandas as pdpath ‘test.xlsx‘sheet_name ‘test_data‘classwith_excel:#构造函数,调用类时就运行def __init__(self, pathNone, sheet_nameNone):if p…
三十之惑–面霸的八月(第二部分)
书接上回,今天叙述小米的面试经历。 这里可能有一些技术理解和技术方案,欢迎讨论。另昨天共计收入7笔共95元,够我喝几杯咖啡了,谢谢所有捐钱的朋友。 如果你心疼我码字辛苦,有钱朋友钱场,没钱的请拉朋友来捧…