推荐并简要分析一个silverlight的相册DEMO--ImageSnipper(V2)
首先是缩放,旋转和透明处理:

然后是文字水印处理:


相信做为一个相册(图片浏览)的基本功能已经没什么问题了。
下面来看一下这个DEMO的类图,如下:

上图中的左半部用红框标识的区域是其控件设计类,因为本DEMO中所使用的控件如:按钮,滑动条,复选框等均未使用Silverlight中所提供的控件,而是自己绘制并定义事件。因此这是我对该DEMO感兴趣的另一个原因。而右侧则是一些工具类或图片处理类,如处理图片移动的MovableImage和TextBlock移动的
MovableTextBlock等。
xmlns:x="http://schemas.microsoft.com/winfx/2006/xaml" >
<Grid x:Name="Part_Root" MouseEnter="btnClearMouseEnter" MouseLeave="btnClearMouseLeave"
MouseLeftButtonDown="btnClearMouseDown" MouseLeftButtonUp="btnClearMouseUp">
<Grid.Resources>
<Storyboard x:Name="Part_MouseEnter"/>
<Storyboard x:Name="Part_MouseDown"/>
<Storyboard x:Name="Part_MouseUp"/>
<Storyboard x:Name="Part_MouseLeave"/>
</Grid.Resources>
<Rectangle x:Name="Part_BackgroundRect"/>
<TextBlock x:Name="Part_Caption"/>
<Rectangle x:Name="Part_ForegroundRect"/>
<Rectangle x:Name="Part_HighlightRect"/>
</Grid>
</ControlTemplate>
xmlns:x="http://schemas.microsoft.com/winfx/2006/xaml" >
<Grid x:Name="Part_Root" MouseEnter="btnClearMouseEnter" MouseLeave="btnClearMouseLeave"
MouseLeftButtonDown="btnClearMouseDown" MouseLeftButtonUp="btnClearMouseUp">
<Grid.Resources>
<Storyboard x:Name="Part_MouseEnter">
<ColorAnimation Duration="00:00:00.25" To="#3DFFFFFF" Storyboard.TargetName="Part_HighlightRect"
Storyboard.TargetProperty="(Shape.Fill).(SolidColorBrush.Color)" />
</Storyboard>
<Storyboard x:Name="Part_MouseDown">
<ColorAnimation Duration="00:00:00.2" To="#22000000" Storyboard.TargetName="Part_HighlightRect"
Storyboard.TargetProperty="(Shape.Fill).(SolidColorBrush.Color)" />
</Storyboard>
<Storyboard x:Name="Part_MouseUp">
<ColorAnimation Duration="00:00:00.2" To="#3DFFFFFF" Storyboard.TargetName="Part_HighlightRect"
Storyboard.TargetProperty="(Shape.Fill).(SolidColorBrush.Color)" />
</Storyboard>
<Storyboard x:Name="Part_MouseLeave">
<ColorAnimation Duration="00:00:00.25" To="#00FFFFFF" Storyboard.TargetName="Part_HighlightRect"
Storyboard.TargetProperty="(Shape.Fill).(SolidColorBrush.Color)" />
</Storyboard>
</Grid.Resources>
<Rectangle x:Name="Part_BackgroundRect" StrokeThickness="4" RadiusX="16" RadiusY="36" Stroke="#46000000">
<Rectangle.Fill>
<LinearGradientBrush EndPoint="0.5,-0.4" StartPoint="0.5,1.4">
<GradientStop Color="Gray" Offset="0.242"/>
<GradientStop Color="DarkBlue" Offset="0.333"/>
</LinearGradientBrush>
</Rectangle.Fill>
</Rectangle>
<TextBlock x:Name="Part_Caption" VerticalAlignment="Center" HorizontalAlignment="Center"
Foreground="Gold" Text="Button">
<TextBlock.RenderTransform>
<TranslateTransform X="0" Y="-2"/>
</TextBlock.RenderTransform>
</TextBlock>
<Rectangle x:Name="Part_ForegroundRect" VerticalAlignment="Top" StrokeThickness="4" RadiusX="16"
RadiusY="36" Width="124" Height="32">
<Rectangle.Fill>
<LinearGradientBrush EndPoint="0.5,-0.409" StartPoint="0.5,1.409">
<GradientStop Color="#00FFFFFF" Offset="0.13"/>
<GradientStop Color="#FFFFFFFF" Offset="1"/>
</LinearGradientBrush>
</Rectangle.Fill>
</Rectangle>
<Rectangle VerticalAlignment="Top" RadiusX="16" RadiusY="36" Fill="#00FFFFFF" x:Name="Part_HighlightRect"/>
</Grid>
</ControlTemplate>
下面简要浏览一下ButtonBase.xaml.cs的代码:
[TemplatePart(Name = "Part_Caption", Type = typeof(TextBlock))]
[TemplatePart(Name = "Part_ForegroundRect", Type = typeof(Rectangle))]
[TemplatePart(Name = "Part_BackgroundRect", Type = typeof(Rectangle))]
[TemplatePart(Name = "Part_HighlightRect", Type = typeof(Rectangle))]
[TemplatePart(Name = "Part_MouseEnter", Type = typeof(Storyboard))]
[TemplatePart(Name = "Part_MouseLeave", Type = typeof(Storyboard))]
[TemplatePart(Name = "Part_MouseDown", Type = typeof(Storyboard))]
[TemplatePart(Name = "Part_MouseUp", Type = typeof(Storyboard))]
public abstract partial class ButtonBase : Control
{
/// <summary>
/// 定义单击事件
/// </summary>
public event EventHandler Click;
/// <summary>
/// 执行单击事件的绑定方法
/// </summary>
protected void OnClick()
{
if (Click != null)
{
Click(this, new EventArgs());
}
}
/// <summary>
/// 标题属性
/// </summary>
public string Caption
{
get { return this.Part_Caption.Text; }
set { this.Part_Caption.Text = value; }
}
/// <summary>
/// 鼠标移入控件区域时启动Part_MouseEnter故事板,下面类似
/// </summary>
/// <param name="sender"></param>
/// <param name="e"></param>
protected virtual void Part_Root_MouseEnter(object sender, MouseEventArgs e)
{
Part_MouseEnter.Begin();
}
protected virtual void Part_Root_MouseLeave(object sender, MouseEventArgs e)
{
Part_MouseLeave.Begin();
}
protected virtual void Part_Root_MouseLeftButtonDown(object sender, MouseButtonEventArgs e)
{
Part_MouseDown.Begin();
}
protected virtual void Part_Root_MouseLeftButtonUp(object sender, MouseButtonEventArgs e)
{
Part_MouseUp.Begin();
//执行单击事件的绑定方法
OnClick();
}
protected Storyboard Part_MouseEnter, Part_MouseDown, Part_MouseLeave, Part_MouseUp;
protected Rectangle Part_ForegroundRect, Part_BackgroundRect, Part_HighlightRect;
protected Panel Part_Root;
protected TextBlock Part_Caption;
}
而故事板会让我们的按钮在鼠标触发事件时在UI上看起来更酷。当然下面还要看一下相应的Button中的内容,因
为这才是实际运行时使用的控件,其代码如下:
{
public Button()
{
//加载Button.xaml中的内容,为下面获取元素进行相应操作
string xaml = ResourceHelper.GetTemplate(this.GetType());
ControlTemplate template = (ControlTemplate)XamlReader.Load(xaml);
this.Template = template;
this.ApplyTemplate();
}
/// <summary>
/// 对当前模板(xaml)中的元素进行(主要是鼠标)事件绑定
/// </summary>
public override void OnApplyTemplate()
{
Part_Root = (Panel)GetTemplateChild("Part_Root");
Part_Caption = (TextBlock)GetTemplateChild("Part_Caption");
Part_ForegroundRect = (Rectangle)GetTemplateChild("Part_ForegroundRect");
Part_BackgroundRect = (Rectangle)GetTemplateChild("Part_BackgroundRect");
Part_HighlightRect = (Rectangle)GetTemplateChild("Part_HighlightRect");
Part_MouseEnter = (Storyboard)GetTemplateChild("Part_MouseEnter");
Part_MouseLeave = (Storyboard)GetTemplateChild("Part_MouseLeave");
Part_MouseDown = (Storyboard)GetTemplateChild("Part_MouseDown");
Part_MouseUp = (Storyboard)GetTemplateChild("Part_MouseUp");
Part_Root.SizeChanged += new SizeChangedEventHandler(Part_Root_SizeChanged);
Part_Root.MouseEnter += new MouseEventHandler(Part_Root_MouseEnter);
Part_Root.MouseLeave += new MouseEventHandler(Part_Root_MouseLeave);
Part_Root.MouseLeftButtonDown += new MouseButtonEventHandler(Part_Root_MouseLeftButtonDown);
Part_Root.MouseLeftButtonUp += new MouseButtonEventHandler(Part_Root_MouseLeftButtonUp);
}
/// <summary>
/// 按钮的实际高度或宽度发生变化时的处理事件
/// </summary>
/// <param name="sender"></param>
/// <param name="e"></param>
void Part_Root_SizeChanged(object sender, SizeChangedEventArgs e)
{
Part_ForegroundRect.Width = Part_Root.ActualWidth - 16d;
Part_ForegroundRect.Height = Part_Root.ActualHeight - 12d;
Part_HighlightRect.Width = Part_Root.ActualWidth - 10d;
Part_HighlightRect.Height = Part_Root.ActualHeight - 8d;
if (Part_Root.ActualWidth > Part_Root.ActualHeight)
{
Part_BackgroundRect.RadiusX = Part_ForegroundRect.RadiusX = Part_HighlightRect.RadiusX =
Part_Root.ActualHeight / 2d;
Part_BackgroundRect.RadiusY = Part_ForegroundRect.RadiusY = Part_HighlightRect.RadiusY =
Part_Root.ActualWidth / 4d;
}
else
{
Part_BackgroundRect.RadiusX = Part_ForegroundRect.RadiusX = Part_HighlightRect.RadiusX =
Part_Root.ActualHeight / 4d;
Part_BackgroundRect.RadiusY = Part_ForegroundRect.RadiusY = Part_HighlightRect.RadiusY =
Part_Root.ActualWidth / 2d;
}
}
}
到这里还有另一个按钮控件RepeatButton没有介绍,其实它的内容也上面的Button代码相似,所以就不多介绍了。
当然RepeatButton最终的用处是被放在了ImageSelector控件中做为子控制被加载,这其中与我们开发“复合型”控件
相似。

相关文章:

Ruby之Tempfile
今天又机会尝试了下Ruby的Tempfile库,相比于自己创建临时文件再删除的方法简便了很多。 require tempfiletmp Tempfile.new("tmp")tmp.path # > /tmp/tmp20110928-12389-8yyc6w 不唯一tmp.write("This is a tempfile") tmp.rewind tmp.read…

快车 FlashGet 3.1 修正版(1057)
快车 FlashGet 3.1 修正版(1057) SM发布于 2009-06-25 23:43:23| 2326 次阅读 字体:大 小 打印预览感谢VxuE的投递快车(FlashGet)是互联网上最流行,使用人数最多的一款下载软件.采用多服务器超线程技术、全面支持多种协议,具有优秀的文件管理功能.快车是绿色软件,无…

Python模拟微博登陆,亲测有效!
作者 l 上海小胖 来源 l Python专栏(ID:xpchuiit)转载请联系授权(微信ID:pythonzhuanlan)今天想做一个微博爬个人页面的工具,满足一些不可告人的秘密。那么首先就要做那件必做之事!…
Ruby调用shell命令
原来发在diandian的几篇旧闻,也一并转到iteye上来吧。 1. exec exec echo "hello $HOSTNAME" 用echo命令来取代当前进程,无法知道命令是否成功 2. system system(echo "hello $HOSTNAME") 运行一个子shell来避免覆盖当前进程&a…
mac os下valgrind的安装
valgrind是一款性能分析工具,功能强大。 在mac os下的安装略有不同,特写此文以记之。 现在最新的版本是3.8.1 tar jxvf valgrind-3.8.1.tar.bz2 cd valgrind-3.8.1 ./configure sudo xcode-select -switch /Applications/Xcode.app/Contents/Developer m…
Google Voice开始发送邀请函
今天收到了Google Voice的邀请函,标题为“Youve been invited to Google Voice”。最近关于Google Voice 的新闻不少,出于好奇登录http://www.google.com/voice 递交了申请,没有想到这么快得到了邀请函。邮件特别强调“ Please note that Goo…
Python开发(基础):字符串
字符串常用方法说明 #!/usr/bin/env python # -*- coding:utf-8 -*- # class str(basestring): # """ # str(object) -> string # # Return a nice string representation of the object. # If the argument is a string, the return value …
Linux与Windows文件共享命令 rz,sz
一般来说,linux服务器大多是通过ssh客户端来进行远程的登陆和管理的,使用ssh登陆linux主机以后,如何能够快速的和本地机器进行文件的交互呢,也就是上传和下载文件到服务器和本地; 与ssh有关的两个命令可以提供很方便的…

Python爬虫小偏方:如何用robots.txt快速抓取网站?
作者 | 王平,一个IT老码农,写Python十年有余,喜欢分享通过爬虫技术挣钱和Python开发经验。来源 | 猿人学Python在我抓取网站遇到瓶颈,想剑走偏锋去解决时,常常会先去看下该网站的robots.txt文件,有时会给你…

八百客与51CTO结了梁子?
转载于:https://blog.51cto.com/simon/171348
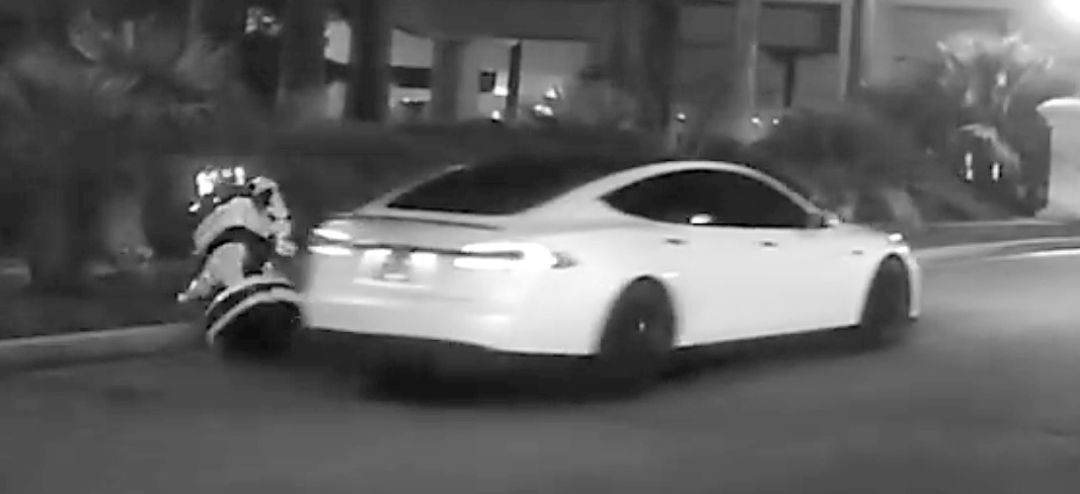
特斯拉“撞死”机器人,是炒作还是事故?
作者 | 若名出品 | AI科技大本营科幻片里机器人大战的剧情可能离人类还很遥远,但设想一下,现实中机器人不受控制的打起架来...1 月 6 日,一辆处于自动驾驶模式的特斯拉 Model S “撞死”了一辆掉队 Promobot 的机器人。本次撞击事件发生在当地…

网页解析:如何获得网页源码中嵌套的标签。
一:前言:网页源码中有很多嵌套的标签 例如div标签嵌套如:bUTP<DIV>finally<div>aurora</div>126.com</div><div class\"Cited1\">ggff</div> 我们的网页解析工作中有时候需要解嵌套。通俗的讲…

36.intellij idea 如何一键清除所有断点
转自:https://www.cnblogs.com/austinspark-jessylu/p/7799212.html 1.在idea左下方找到"View Breakpoints"按钮,点击打开. 2.点击"Java Line Breakpoints"前方的全选框,取消全选. 3.点击上方"-"即"Remove"按钮,即可取消所…
Ruby与vim
介绍一点vim下使用Ruby的技巧。 1. vim命令行模式下输入 !ruby % 可以直接运行Ruby程序,并返回到vim编辑 2. vim Ruby关键字及自定义变量补全 拷贝附录中的ruby-macros.vim至机器某处,然后修改~/.vimrc,添加一行: source ROOT(…

NLP技术落地为何这么难?里面有哪些坑?
AI 很火,但是 AI 的门槛也很高,普通的开发者想要搭上这波 AI 红利依然困难。近期,人工智能公司推出了新一代智能 Bot 开放平台,它整合了小i机器人 Chatting Bot、FAQ Bot、Discovery Bot 三大核心能力,为企业和开发者提…
开源工具之valgrind
首先对源文件进行编译:Preparing your programCompile your program with -g to include debugging information so that Memchecks error messages include exact line numbers.-O0 a good idea if you can tolerate the slowdown-O1 line number in error message…
存储过程定义语法
CREATE PROCEDURE addTicket(in vipsql VARCHAR(255),in ordersql VARCHAR(255),in detailkey varchar(255),in detailsql VARCHAR(255)) comment 挂单(售药窗口) BEGIN DECLARE CONTINUE HANDLER FOR SQLEXCEPTION ,NOT FOUND rollback; start transac…
.NET : 针对Oracle的LOB数据访问
参考资料:来自Oracle官方网站 在 .NET 中使用 Oracle 数据库事务作者:Jason Price http://www.oracle.com/technology/global/cn/pub/articles/price_dbtrans_dotnet.html 在 .NET 中使用大对象作者:Jason Price http://www.oracle.com/techn…
MySQL数据类型--------浮点类型实战
1. 背景 * MySQL支持的浮点类型中有单精度类型(float), 双精度类型(double),和高精度类型(decimal),在数字货币类型中推荐使用高精度类型(decimal)来进行应用. * MySQL浮点型和定点型可以用类型名称后加(M,D)来表示&am…
山寨上网本溃败的两点教训
不是马后炮。08年11月份,笔者写过一篇《上网本难以复制山寨机的辉煌》(以下简称《辉煌》),从消费取向和价格两个方面着手,分析认为山寨上网本市场有限,难以复制山寨手机的市场奇迹。现在看来,笔…
分享一个expect的脚本
分享一个expect的脚本,可以用于Linux机器之间远程执行命令: #!/usr/bin/expect -fset ipaddress [lindex $argv 0] set user [lindex $argv 1] set passwd [lindex $argv 2] set cmd [lindex $argv 3] set timeout [lindex $argv 4]spawn -noecho ssh $u…

今晚直播 | 深入浅出理解A3C强化学习
强化学习是一种比较传统的人工智能手段,在近年来随着深度学习的发展,强化学习和深度学习逐渐结合在了一起。这种结合使得很多原来无法想象的工作有了可能,最令我们瞩目的莫过于AlphaGo战胜李世石,以及OpenAI团队的机器人可以在团战…
正则表达式口诀及教程(推荐)
正则其实也势利,削尖头来把钱揣; (指开始符号^和结尾符号$)特殊符号认不了,弄个倒杠来引路; (指\. \*等特殊符号)倒杠后面跟小w, 数字字母来表示; ࿰…
ssh其他机器的Expect脚本
ssh登陆其他机器的Expect脚本 #!/usr/bin/expect -fset user [lindex $argv 0] set ipaddr [lindex $argv 1] set passwd [lindex $argv 2]spawn ssh -l $user $ipaddrexpect "password:" send "$passwd\r" interact或者: #!/usr/bin/expect -f…

今晚8点直播 | 深入浅出理解A3C强化学习
强化学习是一种比较传统的人工智能手段,在近年来随着深度学习的发展,强化学习和深度学习逐渐结合在了一起。这种结合使得很多原来无法想象的工作有了可能,最令我们瞩目的莫过于AlphaGo战胜李世石,以及OpenAI团队的机器人可以在团战…
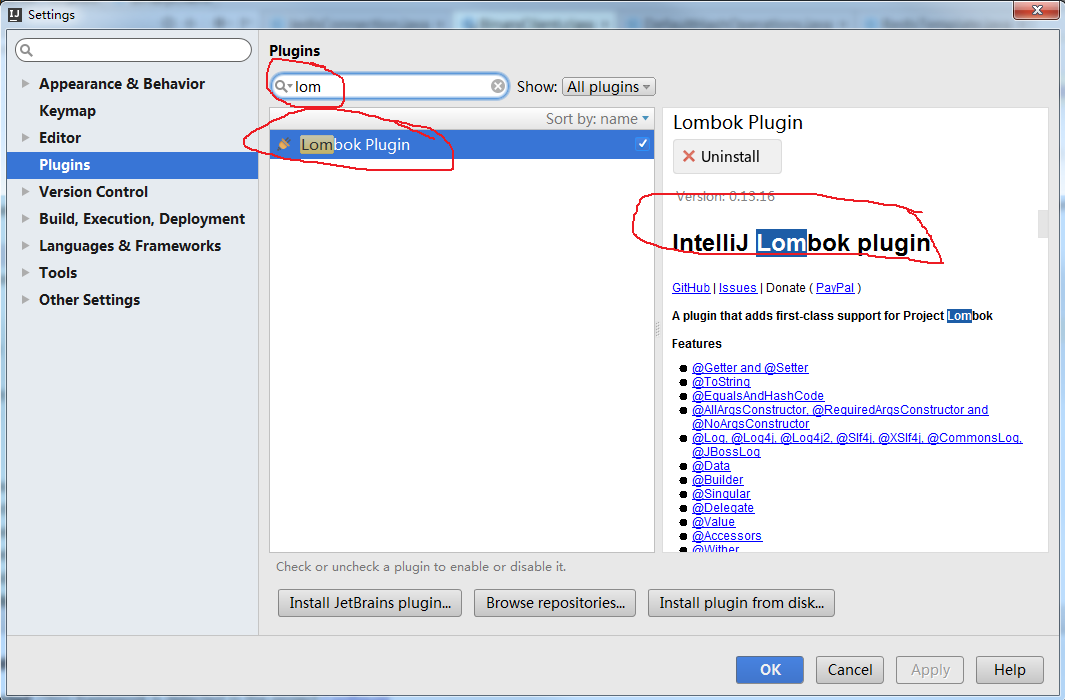
40.lombok在IntelliJ IDEA下的使用
转自:https://www.cnblogs.com/yjmyzz/p/lombok-with-intellij-idea.html lombok是一款可以精减java代码、提升开发人员生产效率的辅助工具,利用注解在编译期自动生成setter/getter/toString()/constructor之类的代码。代码越少,意味着出bug的…
C++之Boost使用
1. Get & Build & Install Boost download boost from http://www.boost.org/ 进入boost目录,使用命令: ./bootstrap.sh --prefixpath/to/installation ./b2 install 如此之后: leave Boost binaries in the lib/ subdirectory…

这就是芬兰:先让全国1%的人学起AI!
译者 | 大鱼责编 | 琥珀出品 | AI科技大本营【AI科技大本营导语】全球最大的手机制造商诺基亚、著名游戏《愤怒的小鸟》的开发商 Rovio,这两大曾名噪一时的科技公司都来自同一个国家——芬兰。很多人会问:在如此激烈的竞争环境下,为什么如此小…
Linux 裸设备基础知识(转)
1、裸设备定义:一块没有分区的硬盘,称为原始设备(RAW DEVICE)或者是一个分区,但是没有用EXT3,OCFS等文件系统格式化,称为原始分区(RAW PARTITION)以上两者都是裸设备 2、裸设备的绑定有文件系统的分区是采用mount的方式挂载到某一个挂载点的…

吴恩达与LG握手合作!
图片来自LG官网作者 | 琥珀出品 | AI科技大本营在近日举办的 CES 大会上,人工智能领域知名科学家、Landing.ai 创始人兼 CEO 吴恩达(Andrew Ng)与 LG(LG Electronics)总裁兼 CTO IP. Park 在拉斯维加斯签署了战略合作伙…