说起红眼算法,这个话题非常古老了。
百度百科上的描述:
“红眼”一般是指在人物摄影时,当闪光灯照射到人眼的时候,瞳孔放大而产生的视网膜泛红现象。
由于红眼现象的程度是根据拍摄对象色素的深浅决定的,如果拍摄对象的眼睛颜色较深,红眼现象便不会特别明显。
“红眼”也指传染性结膜炎。
近些年好像没有看到摄影会出现这样的情况,毕竟科技发展迅速。
记得最早看到红眼移除算法是在ACDSee 这个看图软件的编辑功能区。
当然,当时ACDSee 也没有能力做到自动去红眼,也需要进行手工操作。
红眼移除不难,其实就是把眼睛区域的颜色修正一下。
但是难就难在修复之后,不要显得太过突兀,或者破坏眼睛周围的颜色 。
这就有点难办了。
当然其实最简单的思路,就是转色域空间处理后再转回RGB。
记得在2015年的时候,
曾经一度想要寻找红眼移除过度自然的算法思路,
当时仅仅是好奇,想要学习之。
直到2016年,在一个Delphi 图像控件的源码里看到了一个红颜移除算法函数。
把代码转写成C之后验证了一下,效果不错,过度很自然。
貌似好像有点暴露年龄了,
俺也曾经是Delphi程序员来的,无比怀念Delphi7。
贴上红眼算法的Delphi源码:
procedure _IERemoveRedEyes(bitmap: TIEBitmap; fSelx1, fSely1, fSelx2, fSely2: integer; fOnProgress: TIEProgressEvent; Sender: TObject);
varrow, col: integer;nrv, bluf, redq, powr, powb, powg: double;per1: double;px: PRGB;
beginfSelX2 := imin(fSelX2, bitmap.Width);  dec(fSelX2);fSelY2 := imin(fSelY2, bitmap.Height); dec(fSelY2);per1 := 100 / (fSelY2 - fSelY1 + 0.5);for row := fSelY1 to fSelY2 dobeginpx := bitmap.Scanline[row];for col := fSelX1 to fSelX2 dobeginnrv := px^.g + px^.b;if nrv < 1 thennrv := 1;if px^.g > 1 thenbluf := px^.b / px^.gelsebluf := px^.b;bluf := dMax(0.5, dMin(1.5, Sqrt(bluf)));redq := (px^.r / nrv) * bluf;if redq > 0.7 thenbeginpowr := 1.775 - (redq * 0.75 + 0.25);if powr < 0 thenpowr := 0;powr := powr * powr;powb := 1 - (1 - powr) / 2;powg := 1 - (1 - powr) / 4;with px^ dobeginr := Round(powr * r);b := Round(powb * b);g := Round(powg * g);end;end;inc(px);end;if assigned(fOnProgress) thenfOnProgress(Sender, trunc(per1 * (row - fSelY1 + 1)));Application.ProcessMessages;end;
end;
非常非常简单的代码。
但是思路很巧妙。
不多说,各位看官自己品味一下。
先上个效果图:
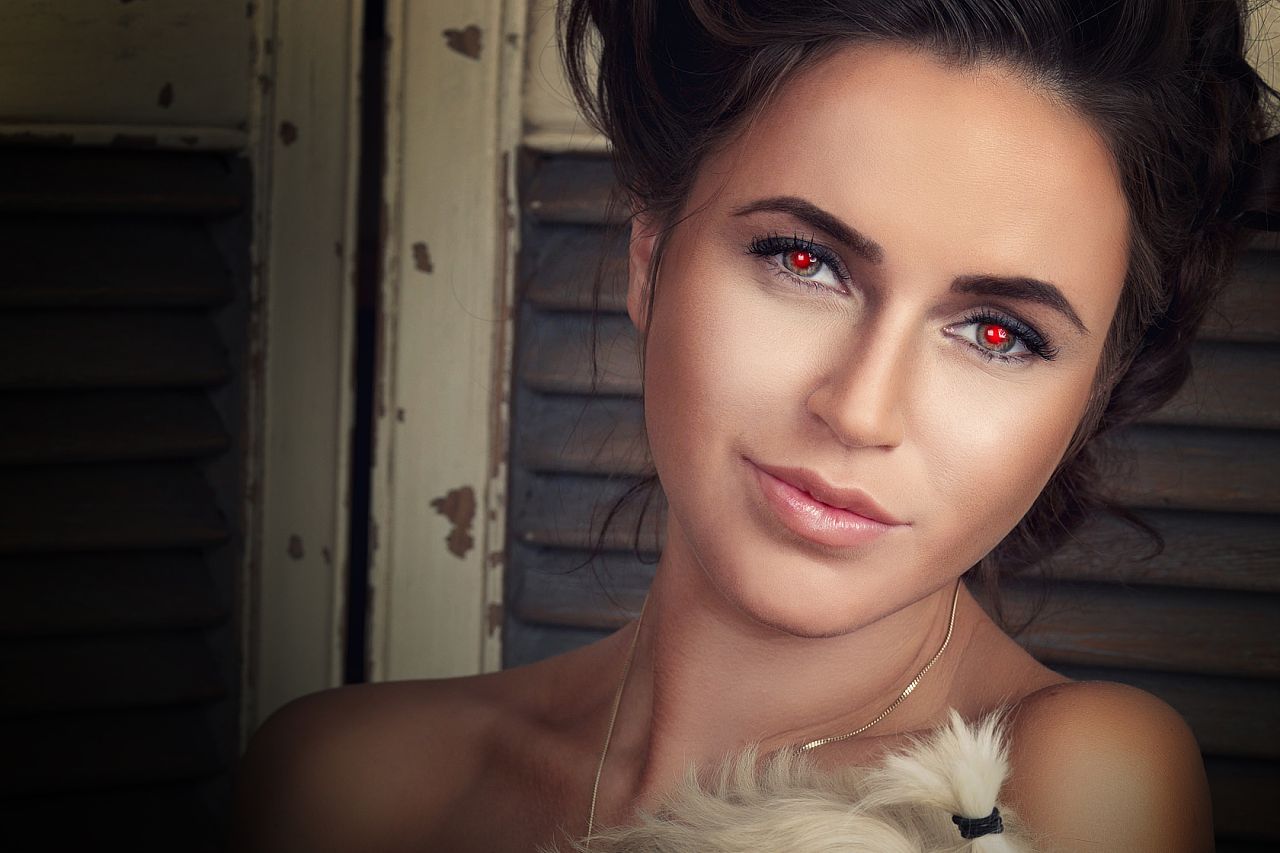

说明下本文背景前提:
人脸识别暂时采用MTCNN,示例不考虑判断是否存在红眼。
人脸检测部分,详情见博文《MTCNN人脸检测 附完整C++代码》
算法步骤:
检测人脸,对齐得到人脸五个特征点。
算出两眼球之间的距离,
估算眼球的大概大小,
(示例代码采用 两眼球之间的距离的九分之一)
计算相应的半径,
按圆形修复眼球颜色即可。
完整示例代码献上:
#include "mtcnn.h"
#include "browse.h"
#define USE_SHELL_OPEN
#ifndef  nullptr
#define nullptr 0
#endif
#if defined(_MSC_VER)
#define _CRT_SECURE_NO_WARNINGS
#include <windows.h>
#else
#include <unistd.h>
#endif
#define STB_IMAGE_STATIC
#define STB_IMAGE_IMPLEMENTATION#include "stb_image.h"
//ref:https://github.com/nothings/stb/blob/master/stb_image.h
#define TJE_IMPLEMENTATION#include "tiny_jpeg.h"
//ref:https://github.com/serge-rgb/TinyJPEG/blob/master/tiny_jpeg.h

#include <stdint.h>
#include "timing.h"char saveFile[1024];unsigned char *loadImage(const char *filename, int *Width, int *Height, int *Channels) {return stbi_load(filename, Width, Height, Channels, 0);
}void saveImage(const char *filename, int Width, int Height, int Channels, unsigned char *Output) {memcpy(saveFile + strlen(saveFile), filename, strlen(filename));*(saveFile + strlen(saveFile) + 1) = 0;//保存为jpgif (!tje_encode_to_file(saveFile, Width, Height, Channels, true, Output)) {fprintf(stderr, "save JPEG fail.\n");return;}#ifdef USE_SHELL_OPENbrowse(saveFile);
#endif
}void splitpath(const char *path, char *drv, char *dir, char *name, char *ext) {const char *end;const char *p;const char *s;if (path[0] && path[1] == ':') {if (drv) {*drv++ = *path++;*drv++ = *path++;*drv = '\0';}}else if (drv)*drv = '\0';for (end = path; *end && *end != ':';)end++;for (p = end; p > path && *--p != '\\' && *p != '/';)if (*p == '.') {end = p;break;}if (ext)for (s = end; (*ext = *s++);)ext++;for (p = end; p > path;)if (*--p == '\\' || *p == '/') {p++;break;}if (name) {for (s = p; s < end;)*name++ = *s++;*name = '\0';}if (dir) {for (s = path; s < p;)*dir++ = *s++;*dir = '\0';}
}void getCurrentFilePath(const char *filePath, char *saveFile) {char drive[_MAX_DRIVE];char dir[_MAX_DIR];char fname[_MAX_FNAME];char ext[_MAX_EXT];splitpath(filePath, drive, dir, fname, ext);size_t n = strlen(filePath);memcpy(saveFile, filePath, n);char *cur_saveFile = saveFile + (n - strlen(ext));cur_saveFile[0] = '_';cur_saveFile[1] = 0;
}void drawPoint(unsigned char *bits, int width, int depth, int x, int y, const uint8_t *color) {for (int i = 0; i < min(depth, 3); ++i) {bits[(y * width + x) * depth + i] = color[i];}
}void drawLine(unsigned char *bits, int width, int depth, int startX, int startY, int endX, int endY,const uint8_t *col) {if (endX == startX) {if (startY > endY) {int a = startY;startY = endY;endY = a;}for (int y = startY; y <= endY; y++) {drawPoint(bits, width, depth, startX, y, col);}}else {float m = 1.0f * (endY - startY) / (endX - startX);int y = 0;if (startX > endX) {int a = startX;startX = endX;endX = a;}for (int x = startX; x <= endX; x++) {y = (int)(m * (x - startX) + startY);drawPoint(bits, width, depth, x, y, col);}}
}void drawRectangle(unsigned char *bits, int width, int depth, int x1, int y1, int x2, int y2, const uint8_t *col) {drawLine(bits, width, depth, x1, y1, x2, y1, col);drawLine(bits, width, depth, x2, y1, x2, y2, col);drawLine(bits, width, depth, x2, y2, x1, y2, col);drawLine(bits, width, depth, x1, y2, x1, y1, col);
}#ifndef MAX
#define MAX(a, b) (((a) > (b)) ? (a): (b))
#endif
#ifndef MIN
#define MIN(a, b) (((a) > (b)) ? (b): (a))
#endifunsigned char ClampToByte(int Value) {return ((Value | ((signed int) (255 - Value) >> 31)) & ~((signed int) Value >> 31));
}int Clamp(int Value, int Min, int Max) {if (Value < Min)return Min;else if (Value > Max)return Max;elsereturn Value;
}void RemoveRedEyes(unsigned char *input, unsigned char *output, int width, int height, int depth, int CenterX, int CenterY,int Radius) {if (depth < 3) return;if ((input == nullptr) || (output == nullptr)) return;if ((width <= 0) || (height <= 0)) return;int Left = Clamp(CenterX - Radius, 0, width);int Top = Clamp(CenterY - Radius, 0, height);int Right = Clamp(CenterX + Radius, 0, width);int Bottom = Clamp(CenterY + Radius, 0, height);int PowRadius = Radius * Radius;for (int Y = Top; Y < Bottom; Y++) {unsigned char *in_scanline = input + Y * width * depth + Left * depth;unsigned char *out_scanline = output + Y * width * depth + Left * depth;int OffsetY = Y - CenterY;for (int X = Left; X < Right; X++) {int OffsetX = X - CenterX;int dis = OffsetX * OffsetX + OffsetY * OffsetY;if (dis <= PowRadius) {float bluf = 0;int Red = in_scanline[0];int Green = in_scanline[1];int Blue = in_scanline[2];int nrv = Blue + Green;if (nrv < 1) nrv = 1;if (Green > 1)bluf = (float) Blue / Green;elsebluf = (float) Blue;bluf = MAX(0.5f, MIN(1.5f, sqrt(bluf)));float redq = (float) Red / nrv * bluf;if (redq > 0.7f) {float powr = 1.775f - (redq * 0.75f +0.25f);if (powr < 0) powr = 0;powr = powr * powr;float powb = 0.5f + powr * 0.5f;float powg = 0.75f + powr * 0.25f;out_scanline[0] = ClampToByte(powr * Red + 0.5f);out_scanline[1] = ClampToByte(powg * Green + 0.5f);out_scanline[2] = ClampToByte(powb * Blue + 0.5f);}}in_scanline += depth;out_scanline += depth;}}
}int main(int argc, char **argv) {printf("mtcnn face detection\n");printf("blog:http://cpuimage.cnblogs.com/\n");if (argc < 2) {printf("usage: %s  model_path image_file \n ", argv[0]);printf("eg: %s  ../models ../sample.jpg \n ", argv[0]);printf("press any key to exit. \n");getchar();return 0;}const char *model_path = argv[1];char *szfile = argv[2];getCurrentFilePath(szfile, saveFile);int Width = 0;int Height = 0;int Channels = 0;unsigned char *inputImage = loadImage(szfile, &Width, &Height, &Channels);if (inputImage == nullptr || Channels != 3) return -1;ncnn::Mat ncnn_img = ncnn::Mat::from_pixels(inputImage, ncnn::Mat::PIXEL_RGB, Width, Height);std::vector<Bbox> finalBbox;MTCNN mtcnn(model_path);double startTime = now();mtcnn.detect(ncnn_img, finalBbox);double nDetectTime = calcElapsed(startTime, now());printf("time: %d ms.\n ", (int)(nDetectTime * 1000));int num_box = finalBbox.size();printf("face num: %u \n", num_box);bool draw_face_feat = false;for (int i = 0; i < num_box; i++) {if (draw_face_feat) {const uint8_t red[3] = {255, 0, 0};drawRectangle(inputImage, Width, Channels, finalBbox[i].x1, finalBbox[i].y1,finalBbox[i].x2,finalBbox[i].y2, red);const uint8_t blue[3] = {0, 0, 255};for (int num = 0; num < 5; num++) {drawPoint(inputImage, Width, Channels, (int) (finalBbox[i].ppoint[num] + 0.5f),(int) (finalBbox[i].ppoint[num + 5] + 0.5f), blue);}}int left_eye_x = (int) (finalBbox[i].ppoint[0] + 0.5f);int left_eye_y = (int) (finalBbox[i].ppoint[5] + 0.5f);int right_eye_x = (int) (finalBbox[i].ppoint[1] + 0.5f);int right_eye_y = (int) (finalBbox[i].ppoint[6] + 0.5f);int dis_eye = (int) sqrtf((right_eye_x - left_eye_x) * (right_eye_x - left_eye_x) +(right_eye_y - left_eye_y) * (right_eye_y - left_eye_y));int radius = MAX(1, dis_eye / 9);RemoveRedEyes(inputImage, inputImage, Width, Height, Channels, left_eye_x, left_eye_y, radius);RemoveRedEyes(inputImage, inputImage, Width, Height, Channels, right_eye_x, right_eye_y, radius);}saveImage("_done.jpg", Width, Height, Channels, inputImage);free(inputImage);printf("press any key to exit. \n");getchar();return 0;
}
算法见 RemoveRedEyes ,这个技巧可以用于类似的图片颜色处理。
要看人脸检测的结果,把draw_face_feat 改为 true 即可。
项目地址:
https://github.com/cpuimage/MTCNN
参数也很简单,
mtcnn 模型文件路径 图片路径
例如: mtcnn ../models ../sample.jpg
用cmake即可进行编译示例代码,详情见CMakeLists.txt。
若有其他相关问题或者需求也可以邮件联系俺探讨。
邮箱地址是:
gaozhihan@vip.qq.com