2019独角兽企业重金招聘Python工程师标准>>> 
本文将告诉你如何让你的应用程序支持各种不同屏幕大小,主要通过以下几种办法:
让你的布局能充分的自适应屏幕
根据屏幕的配置来加载合适的UI布局
确保正确的布局应用在正确的设备屏幕上
提供可以根据屏幕大小自动伸缩的图片
使用 "wrap_content" 和 "match_parent"
为了确保你的布局能够自适应各种不同屏幕大小,你应该在布局的视图中使用"wrap_content"和"match_parent"来确定它的宽和高。如果你使用了"wrap_content",相应视图的宽和高就会被设定成刚好能够包含视图中内容的最小值。而如果你使用了"match_parent"(在Android API 8之前叫作"fill_parent"),就会让视图的宽和高延伸至充满整个父布局。
通过使用"wrap_content"和"match_parent"来替代硬编码的方式定义视图大小,你的视图要么仅仅使用了需要的那边一点空间,要么就会充满所有可用的空间。例如:
<LinearLayout xmlns:android="http://schemas.android.com/apk/res/android"android:orientation="vertical"android:layout_width="match_parent"android:layout_height="match_parent"><LinearLayout android:layout_width="match_parent" android:id="@+id/linearLayout1" android:gravity="center"android:layout_height="50dp"><ImageView android:id="@+id/imageView1" android:layout_height="wrap_content"android:layout_width="wrap_content"android:src="@drawable/logo"android:paddingRight="30dp"android:layout_gravity="left"android:layout_weight="0" /><View android:layout_height="wrap_content" android:id="@+id/view1"android:layout_width="wrap_content"android:layout_weight="1" /><Button android:id="@+id/categorybutton"android:background="@drawable/button_bg"android:layout_height="match_parent"android:layout_weight="0"android:layout_width="120dp"style="@style/CategoryButtonStyle"/></LinearLayout><fragment android:id="@+id/headlines" android:layout_height="fill_parent"android:name="com.example.android.newsreader.HeadlinesFragment"android:layout_width="match_parent" />
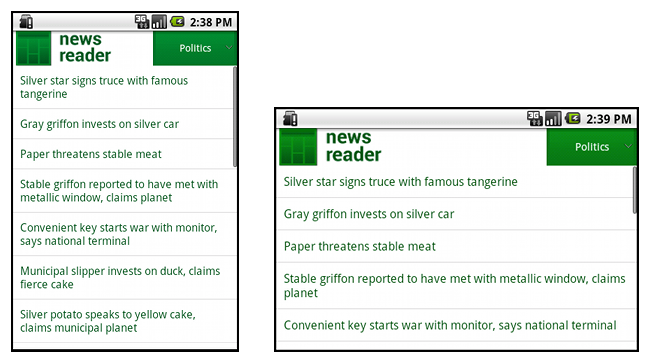
</LinearLayout>注意上面的例子中是如何使用 "wrap_content" 和 "match_parent" 来给控件定义宽高的,这让整个布局可以正确地适应不同屏幕的大小,甚至是横屏。
下图是这个布局分别在竖屏和横屏时显示的结果,注意控件的宽和高是根据屏幕自适应的。
使用RelativeLayout
通过多层嵌套LinearLayout和组合使用"wrap_content"和"match_parent"已经可以构建出足够复杂的布局。但是LinearLayout无法允许你准确地控制子视图之前的位置关系,所有LinearLayout中的子视图只能简单的一个挨着一个地排列。如果你需要让子视图能够有更多的排列方式,而不是简单地排成一行或一列,使用RelativeLayout将会是更好的解决方案。RelativeLayout允许布局的子控件之间使用相对定位的方式控制控件的位置,比如你可以让一个子视图居屏幕左侧对齐,让另一个子视图居屏幕右侧对齐。
例如:
<?xml version="1.0" encoding="utf-8"?>
<RelativeLayout xmlns:android="http://schemas.android.com/apk/res/android"android:layout_width="match_parent"android:layout_height="match_parent"><TextViewandroid:id="@+id/label"android:layout_width="match_parent"android:layout_height="wrap_content"android:text="Type here:"/><EditTextandroid:id="@+id/entry"android:layout_width="match_parent"android:layout_height="wrap_content"android:layout_below="@id/label"/><Buttonandroid:id="@+id/ok"android:layout_width="wrap_content"android:layout_height="wrap_content"android:layout_below="@id/entry"android:layout_alignParentRight="true"android:layout_marginLeft="10dp"android:text="OK" /><Buttonandroid:layout_width="wrap_content"android:layout_height="wrap_content"android:layout_toLeftOf="@id/ok"android:layout_alignTop="@id/ok"android:text="Cancel" />
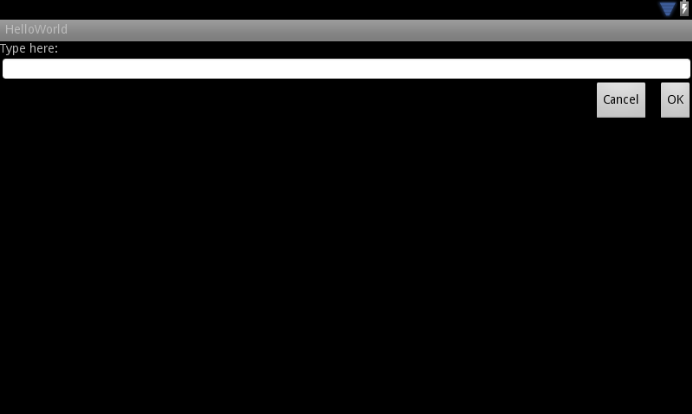
</RelativeLayout>下图展示了这个布局在QVGA屏幕上显示的结果。

下图展示了这个布局在一个更大的屏幕上显示的结果。
可以注意到,即使屏幕的大小改变,视图之前的相对位置都没有改变。
使用Size限定符
虽然使用以上几种方式可以解决屏幕适配性的问题,但是那些通过伸缩控件来适应各种不同屏幕大小的布局,未必就是提供了最好的用户体验。你的应用程序应该不仅仅实现了可自适应的布局,还应该提供一些方案根据屏幕的配置来加载不同的布局,可以通过配置限定符(configuration qualifiers)来实现。配置限定符允许程序在运行时根据当前设备的配置自动加载合适的资源(比如为不同尺寸屏幕设计不同的布局)。
现在有很多的应用程序为了支持大屏设备,都会实现“two pane”模式(程序会在左侧的面板上展示一个包含子项的List,在右侧面板上展示内容)。平板和电视设备的屏幕都很大,足够同时显示两个面板,而手机 屏幕一次只能显示一个面板,两个面板需要分开显示。所以,为了实现这种布局,你可能需要以下文件:
res/layout/main.xml,single-pane(默认)布局:
<LinearLayout xmlns:android="http://schemas.android.com/apk/res/android"  android:orientation="vertical"  android:layout_width="match_parent"  android:layout_height="match_parent">  <fragment android:id="@+id/headlines"  android:layout_height="fill_parent"  android:name="com.example.android.newsreader.HeadlinesFragment"  android:layout_width="match_parent" />
</LinearLayout>
res/layout-large/main.xml ,two-pane布局:
<LinearLayout xmlns:android="http://schemas.android.com/apk/res/android"  android:layout_width="fill_parent"  android:layout_height="fill_parent"  android:orientation="horizontal">  <fragment android:id="@+id/headlines"  android:layout_height="fill_parent"  android:name="com.example.android.newsreader.HeadlinesFragment"  android:layout_width="400dp"  android:layout_marginRight="10dp"/>  <fragment android:id="@+id/article"  android:layout_height="fill_parent"  android:name="com.example.android.newsreader.ArticleFragment"  android:layout_width="fill_parent" />
</LinearLayout>
请注意第二个布局的目录名中包含了large限定符,那些被定义为大屏的设备(比如7寸以上的平板)会自动加载此布局,而小屏设备会加载另一个默认的布局。
使用Smallest-width限定符
使用Size限定符有一个问题会让很多程序员感到头疼,large到底是指多大呢?很多应用程序都希望能够更自由地为不同屏幕设备加载不同的布局,不管它 们是不是被系统认定为"large"。这就是Android为什么在3.2以后引入了"Smallest-width"限定符。
Smallest-width限定符允许你设定一个具体的最小值(以dp为单位)来指定屏幕。例如,7寸的平板最小宽度是600dp,所以如果你想让你的UI在这种屏幕上显示two pane,在更小的屏幕上显示single pane,你可以使用sw600dp来表示你想在600dp以上宽度的屏幕上使用two pane模式。
res/layout/main.xml,single-pane(默认)布局:
<LinearLayout xmlns:android="http://schemas.android.com/apk/res/android"  android:orientation="vertical"  android:layout_width="match_parent"  android:layout_height="match_parent">  <fragment android:id="@+id/headlines"  android:layout_height="fill_parent"  android:name="com.example.android.newsreader.HeadlinesFragment"  android:layout_width="match_parent" />
</LinearLayout>
res/layout-sw600dp/main.xml ,two-pane布局:
<LinearLayout xmlns:android="http://schemas.android.com/apk/res/android"  android:layout_width="fill_parent"  android:layout_height="fill_parent"  android:orientation="horizontal">  <fragment android:id="@+id/headlines"  android:layout_height="fill_parent"  android:name="com.example.android.newsreader.HeadlinesFragment"  android:layout_width="400dp"  android:layout_marginRight="10dp"/>  <fragment android:id="@+id/article"  android:layout_height="fill_parent"  android:name="com.example.android.newsreader.ArticleFragment"  android:layout_width="fill_parent" />
</LinearLayout>
这意味着,那些最小屏幕宽度大于600dp的设备会选择 layout-sw600dp/main.xml (two-pane)布局,而更小屏幕的设备将会选择 layout/main.xml (single-pane)布局。
然而,使用早于Android 3.2系统的设备将无法识别sw600dp这个限定符,所以你还是同时需要使用large限定符。这样你就需要在res/layout-large和res/layout-sw600dp目录下都添加一个相同的main.xml。下节你将会看到如何避免重复定义这种布局的技巧。
使用布局别名
Smallest-width限定符仅在Android 3.2及之后的系统中有效。因而,你也需要同时使用Size限定符(small, normal, large和xlarge)来兼容更早的系统。例如,你想手机上显示single-pane界面,而在7寸平板和更大屏的设备上显示multi-pane 界面,你需要提供以下文件:
res/layout/main.xml: single-pane布局
res/layout-large: multi-pane布局
res/layout-sw600dp: multi-pane布局
最后的两个文件是完全相同的,为了要解决这种重复,你需要使用别名技巧。例如,你可以定义以下布局:
res/layout/main.xml, single-pane布局
res/layout/main_twopanes.xml, two-pane布局
加入以下两个文件:
res/values-large/layout.xml:
<resources>  <item name="main" type="layout">@layout/main_twopanes</item>
</resources>
res/values-sw600dp/layout.xml:
<resources>  <item name="main" type="layout">@layout/main_twopanes</item>
</resources>最后两个文件有着相同的内容,但是它们并没有真正去定义布局,它们仅仅只是给main定义了一个别名main_twopanes。这样两个layout.xml都只是引用了@layout/main_twopanes,就避免了重复定义布局文件的情况。
使用Orientation限定符
有些布局会在横屏和竖屏的情况下都显示的很好,但是多数情况下这些布局都可以再调整的。在News Reader示例程序中,布局在不同屏幕尺寸和不同屏幕方向中是这样显示的:
小屏幕, 竖屏: 单面板, 显示logo
小屏幕, 横屏: 单面板, 显示logo
7寸平板, 竖屏: 单面板, 显示action bar
7寸平板, 横屏: 双面板, 宽, 显示action bar
10寸平板, 竖屏: 双面板, 窄, 显示action bar
10寸平板, 横屏: 双面板, 宽, 显示action bar
电视, 横屏: 双面板, 宽, 显示action bar
所有这些布局都是定义在 res/layout/ 这个目录下,为了要让设备根据屏幕配置来加载正确的布局,程序需要使用布局别名来实现。
res/layout/onepane.xml:
<LinearLayout xmlns:android="http://schemas.android.com/apk/res/android"  android:orientation="vertical"  android:layout_width="match_parent"  android:layout_height="match_parent">  <fragment android:id="@+id/headlines"  android:layout_height="fill_parent"  android:name="com.example.android.newsreader.HeadlinesFragment"  android:layout_width="match_parent" />
</LinearLayout>
res/layout/onepane_with_bar.xml:
<LinearLayout xmlns:android="http://schemas.android.com/apk/res/android"  android:orientation="vertical"  android:layout_width="match_parent"  android:layout_height="match_parent">  <LinearLayout android:layout_width="match_parent"   android:id="@+id/linearLayout1"    android:gravity="center"  android:layout_height="50dp">  <ImageView android:id="@+id/imageView1"   android:layout_height="wrap_content"  android:layout_width="wrap_content"  android:src="@drawable/logo"  android:paddingRight="30dp"  android:layout_gravity="left"  android:layout_weight="0" />  <View android:layout_height="wrap_content"   android:id="@+id/view1"  android:layout_width="wrap_content"  android:layout_weight="1" />  <Button android:id="@+id/categorybutton"  android:background="@drawable/button_bg"  android:layout_height="match_parent"  android:layout_weight="0"  android:layout_width="120dp"  style="@style/CategoryButtonStyle"/>  </LinearLayout>  <fragment android:id="@+id/headlines"   android:layout_height="fill_parent"  android:name="com.example.android.newsreader.HeadlinesFragment"  android:layout_width="match_parent" />
</LinearLayout>
res/layout/twopanes.xml:
<LinearLayout xmlns:android="http://schemas.android.com/apk/res/android"  android:layout_width="fill_parent"  android:layout_height="fill_parent"  android:orientation="horizontal">  <fragment android:id="@+id/headlines"  android:layout_height="fill_parent"  android:name="com.example.android.newsreader.HeadlinesFragment"  android:layout_width="400dp"  android:layout_marginRight="10dp"/>  <fragment android:id="@+id/article"  android:layout_height="fill_parent"  android:name="com.example.android.newsreader.ArticleFragment"  android:layout_width="fill_parent" />
</LinearLayout>
res/layout/twopanes_narrow.xml:
<LinearLayout xmlns:android="http://schemas.android.com/apk/res/android"  android:layout_width="fill_parent"  android:layout_height="fill_parent"  android:orientation="horizontal">  <fragment android:id="@+id/headlines"  android:layout_height="fill_parent"  android:name="com.example.android.newsreader.HeadlinesFragment"  android:layout_width="200dp"  android:layout_marginRight="10dp"/>  <fragment android:id="@+id/article"  android:layout_height="fill_parent"  android:name="com.example.android.newsreader.ArticleFragment"  android:layout_width="fill_parent" />
</LinearLayout>
现在所有需要的布局都已经定义好了,剩下的只要使用限定符来让各个设备根据屏幕配置加载正确的布局了。你现在就可以使用布局别名技术:
res/values/layouts.xml:
<resources>  <item name="main_layout" type="layout">@layout/onepane_with_bar</item>  <bool name="has_two_panes">false</bool>
</resources>
res/values-sw600dp-land/layouts.xml:
<resources>  <item name="main_layout" type="layout">@layout/twopanes</item>  <bool name="has_two_panes">true</bool>
</resources>
res/values-sw600dp-port/layouts.xml:
<resources>  <item name="main_layout" type="layout">@layout/onepane</item>  <bool name="has_two_panes">false</bool>
</resources>
res/values-large-land/layouts.xml:
<resources>  <item name="main_layout" type="layout">@layout/twopanes</item>  <bool name="has_two_panes">true</bool>
</resources>
res/values-large-port/layouts.xml:
<resources>  <item name="main_layout" type="layout">@layout/twopanes_narrow</item>  <bool name="has_two_panes">true</bool>
</resources>
使用Nine-Patch图片
支持不同屏幕大小通常情况下也意味着,你的图片资源也需要有自适应的能力。例如,一个按钮的背景图片必须能够随着按钮大小的改变而改变。
如果你想使用普通的图片来实现上述功能,你很快就会发现结果是令人失望的,因为运行时会均匀地拉伸或压缩你的图片。解决方案是使用nine-patch图片,它是一种被特殊处理过的PNG图片,你可以指定哪些区域可以拉伸而哪些区域不可以。
因而,当你设计需要在不同大小的控件中使用的图片时,最好的方法就是用nine-patch图片。为了将图片转换成nine-patch图片,你可以从一张普通的图片开始:
然后通过SDK中带有的draw9patch工具打开这张图片(工具位置在SDK的tools目录下),你可以在图片的左边框和上边框绘制来标记哪些区域可以被拉伸。你也可以在图片的右边框和下边框绘制来标记内容需要放置在哪个区域。结果如下图所示:

注意图片边框上的黑色像素,在上边框和左边框的部分表示当图片需要拉伸时就拉伸黑点标记的位置。在下边框和右边框的部分表示内容将会被放置的区域。
同时需要注意,这张图片的后缀名是 .9.png。你必须要使用这个后缀名,因为系统就是根据这个来区别nine-patch图片和普通的PNG图片的。
当你需要在一个控件中使用nine-patch图片时(如android:background="@drawable/button"),系统就会根据控件的大小自动地拉伸你想要拉伸的部分,效果如下图所示: