深度神经网络中的Batch Normalization介绍及实现
之前在经典网络DenseNet介绍_fengbingchun的博客-CSDN博客_densenet中介绍DenseNet时,网络中会有BN层,即Batch Normalization,在每个Dense Block中都会有BN参与运算,下面对BN进行介绍并给出C++和PyTorch实现。
Batch Normalization即批量归一化由Sergey loffe等人于2015年提出,论文名为:《Batch Normalization: Accelerating Deep Network Training by Reducing Internal Covariate Shift》,论文见:https://arxiv.org/pdf/1502.03167.pdf 。
Batch Normalization是一种算法方法,它使深度神经网络的训练更快、更稳定。它可在激活函数前也可在激活函数后进行。它依赖于batch size,当batch size较小时,性能退化严重。在训练和测试阶段,它的计算方式不同。
对于CNN,使用BN更好;对于RNN,使用LN(Layer Normalization)更好。
在训练过程中,由于每层输入的分布随着前一层的参数发生变化而发生变化,因此训练深度神经网络很复杂。由于需要较低的学习率和仔细的参数初始化,这会减慢训练速度,并且使得训练具有饱和非线性的模型变得非常困难。我们将这种现象称为内部协变量偏移(internal covariate shift),并通过归一化层输入来解决该问题。
Batch Normalization用于训练小批量样本(mini-batch)。它允许我们使用更高的学习率,并且不必太小心初始化。它还充当正则化器,在某些情况下消除了Dropout的需要。
Batch Normalization实现算法如下,截图来自原始论文:
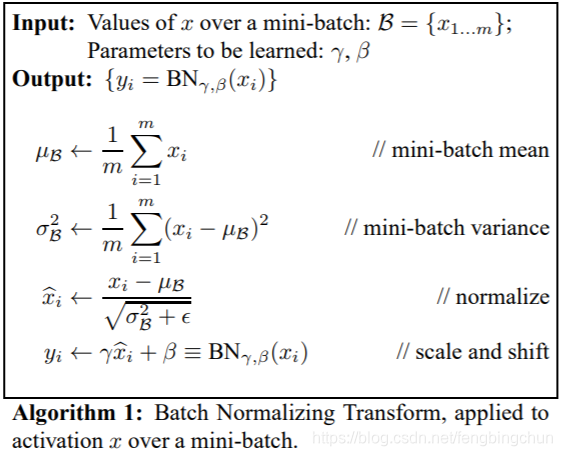
在一个mini-batch中,在每一个BN层中,对每个样本的同一通道,计算它们的均值和方差,再对数据进行归一化,归一化到平均值为0,标准差为1 的常态分布,最后使用两个可学习参数gamma和beta对归一化的数据进行缩放和移位。此外,在训练过程中还保存了每个mini-batch每一BN层的均值和方差,最后求所有mini-batch均值和方差的期望值,以此来作为推理过程中该BN层的均值和方差。
Batch Normalization优点:
(1).在不影响收敛性的情况下,可使用更大的学习率,使训练更快、更稳定;
(2).具有正则化效果,防止过拟合,可去除Dropout和局部响应归一化(Local Response Normalization, LRN);
(3).由于训练数据打乱顺序,使得每个epoch中mini-batch都不一样,对不同mini-batch做归一化可以起到数据增强的效果;
(4).缓减梯度爆炸和梯度消失。
以下是C++实现:
batch_normalization.hpp:
#ifndef FBC_SRC_NN_BATCH_NORM_HPP_
#define FBC_SRC_NN_BATCH_NORM_HPP_#include <vector>
#include <memory>
#include <algorithm>namespace ANN {class BatchNorm {
public:BatchNorm(int number, int channels, int height, int width) : number_(number), channels_(channels), height_(height), width_(width){mean_.resize(channels_);std::fill(mean_.begin(), mean_.end(), 0.);variance_.resize(channels_);std::fill(variance_.begin(), variance_.end(), 0.);}int LoadData(const float* data, int length);std::unique_ptr<float []> Run();void SetGamma(float gamma) { gamma_ = gamma; }float GetGamma() const { return gamma_; }void SetBeta(float beta) { beta_ = beta; }float GetBeta() const { return beta_; }void SetMean(std::vector<float> mean) { mean_ = mean; }std::vector<float> GetMean() const { return mean_; }void SetVariance(std::vector<float> variance) { variance_ = variance; }std::vector<float> GetVariance() const { return variance_; }void SetEpsilon(float epsilon) { epsilon_ = epsilon; }private:int number_; // mini-batchint channels_;int height_;int width_;std::vector<float> mean_;std::vector<float> variance_;float gamma_  = 1.; // 缩放 float beta_ = 0.; // 平移float epsilon_ = 1e-5; // small positive value to avoid zero-divisionstd::vector<float> data_;
};} // namespace ANN#endif // FBC_SRC_NN_BATCH_NORM_HPP_
batch_normalization.cpp:
#include "batch_normalization.hpp"
#include <string.h>
#include <vector>
#include <cmath>
#include "common.hpp"namespace ANN {int BatchNorm::LoadData(const float* data, int length)
{CHECK(number_ * channels_ * height_ * width_ == length);data_.resize(length);memcpy(data_.data(), data, length * sizeof(float));return 0;
}std::unique_ptr<float[]> BatchNorm::Run()
{int spatial_size = height_ * width_;for (int n = 0; n < number_; ++n) {int offset = n * (channels_ * spatial_size);for (int c = 0; c < channels_; ++c) {const float* p = data_.data() + offset + (c * spatial_size);for (int k = 0; k < spatial_size; ++k) {mean_[c] += *p++;}}}std::transform(mean_.begin(), mean_.end(), mean_.begin(), [=](float_t x) { return x / (number_ * spatial_size); });for (int n = 0; n < number_; ++n) {int offset = n * (channels_ * spatial_size);for (int c = 0; c < channels_; ++c) {const float* p = data_.data() + offset + (c * spatial_size);for (int k = 0; k < spatial_size; ++k) {variance_[c] += std::pow(*p++ - mean_[c], 2.);}}}std::transform(variance_.begin(), variance_.end(), variance_.begin(), [=](float_t x) { return x / (std::max(1., number_*spatial_size*1.)); });std::vector<float> stddev(channels_);for (int c = 0; c < channels_; ++c) {stddev[c] = std::sqrt(variance_[c] + epsilon_);}std::unique_ptr<float[]> output(new float[number_ * channels_ * spatial_size]);for (int n = 0; n < number_; ++n) {const float* p1 = data_.data() + n * (channels_ * spatial_size);float* p2 = output.get() + n * (channels_ * spatial_size);for (int c = 0; c < channels_; ++c) {for (int k = 0; k < spatial_size; ++k) {*p2++ = (*p1++ - mean_[c]) / stddev[c];}}}return output;
}} // namespace ANN
funset.cpp:
int test_batch_normalization()
{const std::vector<float> data = { 11.1, -2.2, 23.3, 54.4, 58.5, -16.6,-97.7, -28.8, 49.9, -61.3, 52.6, -33.9,-2.45, -15.7, 72.4, 9.1, 47.2, 21.7};const int number = 3, channels = 1, height = 1, width = 6;ANN::BatchNorm bn(number, channels, height, width);bn.LoadData(data.data(), data.size());std::unique_ptr<float[]> output = bn.Run();fprintf(stdout, "result:\n");for (int n = 0; n < number; ++n) {const float* p = output.get() + n * (channels * height * width);for (int c = 0; c < channels; ++c) {for (int h = 0; h < height; ++h) {for (int w = 0; w < width; ++w) {fprintf(stdout, "%f, ", p[c * (height * width) + h * width + w]);}fprintf(stdout, "\n");}}}return 0;
}
执行结果如下:

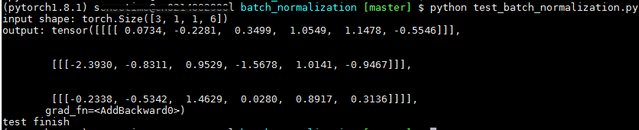
以下是调用PyTorch接口实现:源码来自于https://zh.d2l.ai/chapter_convolutional-modern/batch-norm.html
import torch
from torch import nn
import numpy as np# reference: https://zh.d2l.ai/chapter_convolutional-modern/batch-norm.html
# BatchNorm reimplementation
def batch_norm(X, gamma, beta, moving_mean, moving_var, eps, momentum):# 通过is_grad_enabled来判断当前模式是训练模式还是预测模式if not torch.is_grad_enabled():# 如果是在预测模式下,直接使用传入的移动平均所得的均值和方差X_hat = (X - moving_mean) / torch.sqrt(moving_var + eps)else:assert len(X.shape) in (2, 4)if len(X.shape) == 2:# 使用全连接层的情况,计算特征维上的均值和方差mean = X.mean(dim=0)var = ((X - mean) ** 2).mean(dim=0)else:# 使用二维卷积层的情况,计算通道维上(axis=1)的均值和方差。# 这里我们需要保持X的形状以便后面可以做广播运算mean = X.mean(dim=(0, 2, 3), keepdim=True)var = ((X - mean) ** 2).mean(dim=(0, 2, 3), keepdim=True)# 训练模式下,用当前的均值和方差做标准化X_hat = (X - mean) / torch.sqrt(var + eps)# 更新移动平均的均值和方差moving_mean = momentum * moving_mean + (1.0 - momentum) * meanmoving_var = momentum * moving_var + (1.0 - momentum) * varY = gamma * X_hat + beta  # 缩放和移位return Y, moving_mean.data, moving_var.dataclass BatchNorm(nn.Module):# num_features:完全连接层的输出数量或卷积层的输出通道数。# num_dims:2表示完全连接层,4表示卷积层def __init__(self, num_features, num_dims):super().__init__()if num_dims == 2:shape = (1, num_features)else:shape = (1, num_features, 1, 1)# 参与求梯度和迭代的拉伸和偏移参数,分别初始化成1和0self.gamma = nn.Parameter(torch.ones(shape))self.beta = nn.Parameter(torch.zeros(shape))# 非模型参数的变量初始化为0和1self.moving_mean = torch.zeros(shape)self.moving_var = torch.ones(shape)def forward(self, X):# 如果X不在内存上,将moving_mean和moving_var复制到X所在显存上if self.moving_mean.device != X.device:self.moving_mean = self.moving_mean.to(X.device)self.moving_var = self.moving_var.to(X.device)# 保存更新过的moving_mean和moving_varY, self.moving_mean, self.moving_var = batch_norm(X, self.gamma, self.beta, self.moving_mean,self.moving_var, eps=1e-5, momentum=0.9)return Y# N = 3, C = 1, H = 1, W = 6
data =  [[[[11.1, -2.2, 23.3, 54.4, 58.5, -16.6]]],[[[-97.7, -28.8, 49.9, -61.3, 52.6, -33.9]]],[[[-2.45, -15.7, 72.4, 9.1, 47.2, 21.7]]]]
input = torch.FloatTensor(data) # [N, C, H, W]
print("input shape:", input.shape)model = BatchNorm(1, 2)
output = model(input)
print("output:", output)print("test finish")
执行结果如下:可见,C++和PyTorch实现结果相同
以下是调用tiny-dnn接口的测试代码:
int test_dnn_batch_normalization()
{const std::vector<float> data = { 11.1, -2.2, 23.3, 54.4, 58.5, -16.6,-97.7, -28.8, 49.9, -61.3, 52.6, -33.9,-2.45, -15.7, 72.4, 9.1, 47.2, 21.7 };const int number = 3, channels = 1, height = 1, width = 6;const int spatial_size = height * width;tiny_dnn::tensor_t in_data(number), out_data(number);for (int n = 0; n < number; ++n) {in_data[n].resize(spatial_size * channels);out_data[n].resize(spatial_size * channels);int offset = n * (spatial_size * channels);memcpy(in_data[n].data(), data.data() + offset, sizeof(float)*spatial_size*channels);std::fill(out_data[n].begin(), out_data[n].end(), 0.);}std::vector<tiny_dnn::tensor_t*> in(1), out(1);in[0] = &in_data;out[0] = &out_data;tiny_dnn::batch_normalization_layer bn(spatial_size, channels);bn.forward_propagation(in, out);fprintf(stdout, "tiny_dnn result:\n");for (int n = 0; n < number; ++n) {for (int s = 0; s < spatial_size * channels; ++s)fprintf(stdout, "%f  ", out_data[n][s]);fprintf(stdout, "\n");}return 0;
}
执行结果如下:与上面的C++和PyTorch代码结果若有不同,原因是tiny-dnn源码中math_functions.h文件在求平均方差时除数为num_examples*spatial_dim-1.0f,而不是num_examples*spatial_dim

GitHub:
https://github.com/fengbingchun/NN_Test
https://github.com/fengbingchun/PyTorch_Test
相关文章:
韬光养晦的Sony AI,凭什么与Google和Facebook平起平坐?
作者 | 藏狐来源 | 脑极体(ID:unity007)伴随着感恩节气氛的日渐浓重,面对只剩下最后一个月份额的2019,奋进的、错失的,都已尘埃落定,是时候迎来盘点得失、清理思绪的冬藏时节了。整体来看&#…

Java迭代器模式
迭代器模式(Iterator Pattern)是 Java 和 .Net 编程环境中非常常用的设计模式。这种模式用于顺序访问集合对象的元素,不需要知道集合对象的底层表示。 迭代器模式属于行为型模式。 意图:提供一种方法顺序访问一个聚合对象中各个元…
Linux下搭建高效的SVN
第一种安装方式:svn下载:http://archive.apache.org/dist/subversion/需要的包yum install gcc gcc-cyum install expat-develyum install openssl-develhttp://labs.renren.com/apache-mirror//httpd/httpd-2.2.22.tar.gz //最好用2.2版本http://subver…
通过Windows10上的VS Code打开远端Ubuntu上的项目操作步骤
Ubuntu版本要求是16.04及以上版本。这里以16.04为例。 在Ubuntu上安装OpenSSH server,执行:$ sudo apt-get install openssh-server 在Windows 10 1803上安装Windows OpenSSH Client(注:Windows早期版本则需要安装Git for Windows)࿱…
Java中介者模式
中介者模式(Mediator Pattern)是用来降低多个对象和类之间的通信复杂性。这种模式提供了一个中介类,该类通常处理不同类之间的通信,并支持松耦合,使代码易于维护。中介者模式属于行为型模式。 意图:用一个中…
那些打着AI万金油旗号的产品欺骗大众,如何识别?
作者 | Arvind Narayanan译者 | 刘畅出品 | AI科技大本营(ID:rgznai100)如今,很多打着AI名号售出的产品都属于万金油系列,没什么实质性的功能。为什么会这样?我们应该如何识别这类AI?幻灯片上是评估性格和工…
分享一款jQuery全屏滚动页面特性案例
分享一款jQuery全屏滚动页面特性案例。我们在来往官网,或者小米官网都会看到全屏滚动页面的一些例子。可以说全屏滚动页面越来越受欢迎。它们就像是竖着的图片轮转一样。这样的页面有很多,如:iPhone 5C页面:http://www.dowebok.co…
后深度学习时代的一大研究热点?论因果关系及其构建思路
作者 | Bernhard Schlkopf译者 | Kolen编辑 | Jane出品 | AI科技大本营(ID:rgznai100)尽管机器学习在现阶段取得了很大成功,但是相比于动物所能完成的工作,机器学习在动物擅长的关键技术上表现不尽人意,比如…
Java观察者模式
当对象间存在一对多关系时,则使用观察者模式(Observer Pattern)。比如,当一个对象被修改时,则会自动通知它的依赖对象。观察者模式属于行为型模式。 意图:定义对象间的一种一对多的依赖关系,当一…
Python3中None用法
1.None是一个空值,空值是Python里的一个特殊值,用None表示。可以将None赋值给任何变量。 var None; print(var) # None if var is None:print("var has a value of None") # print else:print("var:", var) 2.None有自己的数据类型…

try finally 中的return
2019独角兽企业重金招聘Python工程师标准>>> public class Test { public static int test1() { int x 1; try { return x; } finally { x; } } public static int test2() { int x 1; try { return x; } finally { return x; } } public st…
我用Python破解了同事的加密压缩包
作者 | 朱小五来源 | 凹凸玩数据(ID: alltodata)又是一杯奶茶。事情的经过是这样的:又是奶茶,行吧行吧。快点开工,争取李大伟回来之前搞定。李大伟说是6位数字密码那么我们可以利用python生成全部的六位数字密码#生成从…

Ubuntu上通过android toolchain交叉编译Valgrind操作步骤
关于Valgrind的介绍可以参考:https://blog.csdn.net/fengbingchun/article/details/50196189. 这里介绍下在Ubuntu 16.04上通过android toolchain如android-ndk-r14b交叉编译Valgrind源码的操作步骤: 1. 从 https://valgrind.org/ 下载最新的版本3.17.0&…
Java状态模式
在状态模式(State Pattern)中,类的行为是基于它的状态改变的。这种类型的设计模式属于行为型模式。 在状态模式中,我们创建表示各种状态的对象和一个行为随着状态对象改变而改变的 context 对象。 意图:允许对象在内部…
Red Hat 5.8 CentOS 6.5 共用 输入法
pick up from http://jingyan.baidu.com/article/20b68a885a3607796cec622c.html
Python3中with用法
Python中的with语句用于用上下文管理器(context manager)定义的方法包装块的执行,它允许将常见的try…except…finally使用模式封装起来以方便重用。 在Python中,在处理非托管资源(unmanaged resources)(如文件流)时使用with关键字。它允许确保你在使用资…
作为计算机专业的你,这些点你命中了哪些?
是不是学计算机的在别人眼里就得会修电脑?是不是编代码的程序员在别人眼里就得喜欢穿格子衫?是不是从事互联网行业的人在别人眼里就喜欢背双肩包出行?1我学计算机就得会修电脑?前两天我在加班的时候,电话突然响起&…
Java空对象模式
在空对象模式(Null Object Pattern)中,一个空对象取代 NULL 对象实例的检查。Null 对象不是检查空值,而是反应一个不做任何动作的关系。这样的 Null 对象也可以在数据不可用的时候提供默认的行为。 在空对象模式中,我们…
JSON入门基础知识
2019独角兽企业重金招聘Python工程师标准>>> JSON入门基础 1、JSON定义 JSON:JavaScript 对象表示法(JavaScript Object Notation)。 JSON 是存储和交换文本信息的语法。类似 XML。 JSON 比 XML 更小、更快,更易…
Python3中raise用法
Python中raise语句支持强制触发指定的异常。 raise语法: raise [EXPRESSION [from EXPRESSION]] 如果raise后未跟表达式(expression),则raise重新引发当前作用域中活动的最后一个异常。如果当前范围内没有异常处于活动状态,则会引发RuntimeE…
精选实践 | 爱奇艺实用数据库选型树:不同场景如何快速选择数据库?
作者 | 郭磊涛 爱奇艺数据库和中间件负责人 TiDB User Group Ambassador来源 | 授权转载自AskTUG本文系 TUG 线下活动 “不同业务场景下的数据库技术选型思路” 分享实录。我是爱奇艺的数据库和中间件负责人郭磊涛,今天主要向大家分享数据库选型方面的思路ÿ…
iOS处理高并发量的数据请求和数据集合的对应关系
一、处理高并发请求的核心代码如下: // 创建信号量dispatch_semaphore_t semaphore dispatch_semaphore_create(0);// 创建全局并行dispatch_queue_t queue dispatch_get_global_queue(DISPATCH_QUEUE_PRIORITY_DEFAULT, 0);dispatch_group_t group dispatch_gro…
Top 10 Mistakes Java Developers Make(转)
文章列出了Java开发者最常犯的是个错误。 1.将数组转换为ArrayList 为了将数组转换为ArrayList,开发者经常会这样做: ?1List<String> list Arrays.asList(arr);Arrays.asList()会返回一个ArrayList,但这个ArrayList是Arrays的私有静态…
Python3中迭代器介绍
Python中一个可迭代对象(iterable object)是一个实现了__iter__方法的对象,它应该返回一个迭代器对象(iterator object)。迭代器是一个实现__next__方法的对象,它应该返回它的可迭代对象的下一个元素,并在没有可用元素时触发StopIteration异常…
30+博士、100+硕士整理的超全深度强化学习资源清单
作者 | Deep-RL来源 | 深度强化学习实验室(ID:Deep-RL)今天为大家推荐一个开源、开发的 Github 好项目《A Guide for Deep Reinforcement Learning》。这个项目联合了Deep Reinforcement Learning领域的30位博士,100位硕士共同完成…
Java访问者模式
在访问者模式(Visitor Pattern)中,我们使用了一个访问者类,它改变了元素类的执行算法。通过这种方式,元素的执行算法可以随着访问者改变而改变。这种类型的设计模式属于行为型模式。根据模式,元素对象已接受…
GNU/Linux平台上正则表达式的简单使用
友情提醒:本博文涉及的内容中涉及到的系统实践操作在Centos6.5上实现,GNU/Linux简称为linux,GNU/grep简称为grep,GNU/sed简称为sed,GNU/gawk简称为awk。-------------------------------------------------楔子------------------…

Linux下addr2line命令用法
Linux下addr2line命令用于将程序指令地址转换为所对应的函数名、以及函数所在的源文件名和行号。当含有调试信息(-g)的执行程序出现crash时(core dumped),可使用addr2line命令快速定位出错的位置。 如果无法确定文件名或函数名,addr2line将在它们的位置打…
JavaMVC 模式
MVC 模式代表 Model-View-Controller(模型-视图-控制器) 模式。这种模式用于应用程序的分层开发。 Model(模型) - 模型代表一个存取数据的对象或 JAVA POJO。它也可以带有逻辑,在数据变化时更新控制器。View࿰…
从概念到技术,打通「中台」的任督二脉,别再说不知道中台是什么
2019 年,「中台」这个词火了!随着阿里等头部互联网企业搭建和推动中台业务,让越来越多的企业关注中台,纷纷提出「中台战略」,帮助企业自身加速实现数字化转型。不少企业还在观望「中台」:1、我的企业里需要…