远程安装oracle 10.2.1 for redhat 5.0 2.6.18-53.el5xen
法一:直接开启一个 gnome-session
1. 点击桌面图标 Xmanager Enterprise
2. 右击Xmanager图标 --> Xstart
3. 在右边的空白处右击,newàXstart session
输入username 和 passwd
Execution Command:
/usr/bin/gnome-session --display $DISPLAY
法二:开启一个登录窗口,下面的方法是在远程机器上开启XDMCP,然后再用Xstart连接上去。
服务器:redhat as 5.0
终端:Xmanager enterprise 3.0
服务器配置:(Gnome)
------------------------
id:5:initdefault:
终端配置
------------------------
1、点击 Xmanager Enterprise 图标,打开 Xbrowser
这时 Xbrowser 窗口中会显示局域网中所有的可用服务器
(若没有显示,则表示服务器配置有问题)
直接双击你想使用的服务器即可开启一个登录窗口
终端配置(通过ssh登陆)
------------------------
如果只能通过 ssh 登录,则需要进行一些配置
首先配置 Xshell
1、打开 Xshell,右击你想要连接的 session,
如果没有的话,就创建一个新的 session
2、右击 session,选择“Properties”,
Connection 部分:
“Name”中输入session的名字(随便写)
“Method”为“SSH”,“Host”为服务器IP地址
“Port Number”为“22”
User Authentication 部分
“Method”为“Password”
“User Name”/“Password”为你的帐号和密码
3、点击 Connection 部分中“Method”后面的“Setup”
选择“Tunneling”,点击“TCP/IP Forwarding”中的“Add”,
出现对话框,进行下面的操作:
“Type”改为“Outgoing”,
“Listen Port”取“6020”
“Destination Host”改为“localhost”
“Destination Port”取“6020”
(注:Listen/Destination Port 可以是6020至6255中任意一个没有使用的值)
保存设置
Xshell 配置完成,下面开始配置 Xbrowser
------------------------
1、点击 Xmanager Enterprise 图标,打开 Xbrowser
选择 “Tools”--> “Option”
在“New Address”输入服务器的IP地址,然后点击“Add”,
保存设置。
2、回到 Xbrowser 窗口,这时能看到你增加的服务器图标。
右击服务器图标,选择“Save As”,创建一个新的 session,
然后右击这个 session,选择“Properties”。
在 “Proxy”部分打勾,Host为 “0.0.0.0”,
Port Number 为“6020”
(注:这个值应该与Xshell配置中第三步的“Listen Port”相同)
3、点击“X Server”,把
“Allocate display number automatically”前面的勾去掉,
在“Display Number box”中输入 “20”
(这个数字应等于上一步中的Port Number减去6000)
保存设置
4、双击该服务器图标即可开启一个登录窗口
转载于:https://blog.51cto.com/wqqzlm/114448
相关文章:
伯克利新无监督强化学习方法:减少混沌所产生的突现行为
作者 | Glen Berseth译者 | Arvin编辑 | 夕颜出品 | AI科技大本营(ID: rgznai100)【导读】所有生命有机体都在环境中占据一席之地,使它们在周围不断增加的熵中可以保持相对可预测性。例如,人类竭尽全力保护自己免受意外袭击--我们…

朴素、Select、Poll和Epoll网络编程模型实现和分析——Poll、Epoll模型处理长连接性能比较
在《朴素、Select、Poll和Epoll网络编程模型实现和分析——模型比较》一文中,我们分析了各种模型在处理短连接时的能力。本文我们将讨论处理长连接时各个模型的性能。(转载请指明出于breaksoftware的csdn博客) 我们可以想象下场景,…

Topcoder SRM 663 DIV 1
ABBADiv1 题意: 规定两种操作,一种是在字符串的末尾添加A,另一种是在末尾添加B然后反转字符串。现在给你一个起始串,一个终点串,然后问你是否能够通过以上两种操作,从起始串变为终点串。 题解: …

跨平台PHP调试器设计及使用方法——立项
作为一个闲不住且希望一直能挑战自己的人,我总是在琢磨能做点什么。自从今年初开始接触PHP,我也总想能在这个领域内产生点贡献。那能做点什么呢?我经常看到很多phper说自己设计了一个什么框架,或者说自己搭建了一个什么系统。虽然…
机器推理文本+视觉,跨模态预训练新进展
作者 | 李根、段楠、周明来源 | 微软研究院AI头条(ID:MSRAsia)【导读】机器推理要求利用已有的知识和推断技术对未见过的输入信息作出判断,在自然语言处理领域中非常重要。本文将介绍微软亚洲研究院在跨模态预训练领域的研究进展。近年来&…

[LeetCode]:94:Binary Tree Inorder Traversal
题目: Given a binary tree, return the inorder traversal of its nodes values. For example:Given binary tree {1,#,2,3}, 1\2/3return [1,3,2]. 代码: public class Solution {public static ArrayList<Integer> listResult new ArrayList&l…
腾讯 AI 2019这一年
所有参与投票的 CSDN 用户都参加抽奖活动群内公布奖项,还有更多福利赠送近日,腾讯AI实验室总结了 2019 年其取得重大进展的两大研究方向,推动实现的行业应用以及前沿研究探索方面的成果。一、两大难题攻坚:通用人工智能与数字人用…
跨平台PHP调试器设计及使用方法——探索和设计
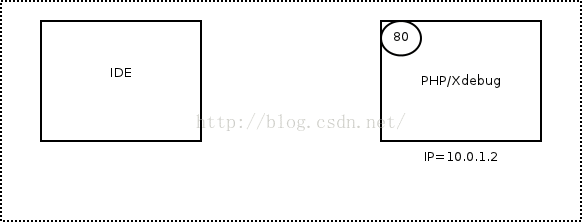
在《跨平台PHP调试器设计及使用方法——立项》一文中,我确定了使用xdebug作为调试器插件部分的基础组件。xdebug提供了一个远程调试的功能(相关资料可以详见https://xdebug.org/docs/remote),我们这个项目便是基于这个功能实现的。…
Ubuntu下允许Root用户直接登录图形界面
ubuntu root是默认禁用了,不允许用root登陆,所以先要设置root密码。 执行:sudo passwd root 接着输入密码和root密码,重复密码。再重新启动就可以用root登陆。 另外,默认情况下是不允许用root帐号直接登陆图形界面的。…
携程App for Apple Watch探索
在Apple Watch发布之后,很多App都针对它设计了相应的版本。旅行作为与Apple Watch时间管理特性契合度较高的场景,同时携程旅行作为国内领先的OTA行业App,也成为了首批适配Apple Watch并荣登Apple官网和App Store推荐的应用之一。InfoQ就App f…

跨平台PHP调试器设计及使用方法——通信
首先引用《跨平台PHP调试器设计及使用方法——探索和设计》中的结构图(转载请指明出于breaksoftware的csdn博客) 本文要介绍的是我们逻辑和pydbgp通信的实现(图中红框内内容)。 设计通信之前,我需要先设计一种通信协议…
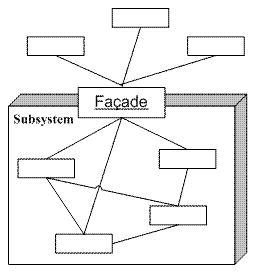
MVP模式的相关知识
MVP 是从经典的模式MVC演变而来,它们的基本思想有相通的地方:Controller/Presenter负责逻辑的处理,Model提供数据,View负责显示。作为一种新的模式,MVP与MVC有着一个重大的区别:在MVP中View并不直接使用Mod…
“数学不行,还能干点啥?”面试官+CTO:干啥都费劲!
关于数学与程序员的“暧昧”关系,先看看网友的看法:同时编程圈也流传着一个段子:一流程序员靠数学,二流程序员靠算法,末端程序员靠百度,低端看高端就是黑魔法。想一想,我们日常学习、求职、工作…
CentOS7 yum 源的配置与使用
YUM:Yellowdog Updater Modified Yum(全称为 Yellow dog Updater, Modified)是一个在Fedora和RedHat以及CentOS中的Shell前端软件包管理器。基于RPM包管理,能够从指定的服务器自动下载RPM包并且安装,可以自动处理依赖…
跨平台PHP调试器设计及使用方法——协议解析
在《跨平台PHP调试器设计及使用方法——探索和设计》一文中,我介绍了将使用pydbgp作为和Xdebug的通信库,并让pydbgp以(孙)子进程的方式存在。《跨平台PHP调试器设计及使用方法——通信》解决了和pydbgp通信的问题,本文…

测试客户端发图图
转载于:https://blog.51cto.com/ericsong/116942
搜狐、美团、小米都在用的Apache Doris有什么好? | BDTC 2019
【导读】12 月 5-7 日,由中国计算机学会主办,CCF 大数据专家委员会承办,CSDN、中科天玑协办的中国大数据技术大会(BDTC 2019)在北京长城饭店隆重举行。100 顶尖技术专家、1000 大数据从业者齐聚于此,以“大…

cacti邮件告警设置
功能说明对指定流量图形(指定接口)设置最高或最低流量阀值,当流量出现异常偏高或偏低触发阀值,系统自动将异常信息以邮件形式通知指定收件人。如果收件人邮箱是139邮箱,还可以增设短信通知功能。设置前准备设置该功能之…

跨平台PHP调试器设计及使用方法——高阶封装
在《跨平台PHP调试器设计及使用方法——协议解析》一文中介绍了如何将pydbgp返回的数据转换成我们需要的数据。我们使用该问中的接口已经可以构建一个简单的调试器。但是由于pydbgp存在的一些问题,以及调试器需要的一些高级功能,我们还需要对这些接口进行…
Oracle的口令文件(passwordfile)的讲解(摘录)
初学oracle,很多概念迷糊,今天看到这文章,让我有一个比较清晰的认识。转载[url]http://www.itpub.net/viewthread.php?tid906008&extra&page1[/url]1、os认证oracle安装之后默认情况下是启用了os认证的,这里提到的os认证…
如何优雅地使用pdpipe与Pandas构建管道?
作者 | Tirthajyoti Sarkar译者 | 清儿爸编辑 | 夕颜出品 | AI科技大本营(ID: rgznai100) 【导读】Pandas 是 Python 生态系统中的一个了不起的库,用于数据分析和机器学习。它在 Excel/CSV 文件和 SQL 表所在的数据世界与 Scikit-learn 或 Te…
第 十 天 : 添 加 硬 盘 和 分 区 挂 载 等
小Q:狼若回头,必有缘由,不是报恩,就是***; 事不三思必有败,人能百忍则无忧。今天的进度虽然慢了,但是学习状态还是一如往常,只不过今天遇到了不少新的知识点,需要好好想想…
从4个月到7天,Netflix开源Python框架Metaflow有何提升性能的魔法?
作者 | Rupert Thomas译者 | 凯隐编辑 | Jane出品 | AI科技大本营(ID:rgznai100)【导语】Metaflow 是由 Netflix 开发,用在数据科学领域的 Python框架,于 2019 年 12 月正式对外开源。据介绍,Metaflow 解决…
SOA标准发展混乱 国内业务缺少经验
近年来,SOA已经成为国际及我国信息技术领域的重大热点之一。从2005年至今,SOA逐渐成为影响中国IT系统构建的主导思想。从2006年开始,SOA的建设方法已在我国部分行业信息化项目中开始得以越来越广泛的应用。 但热潮背后, SOA概念在…

跨平台PHP调试器设计及使用方法——界面设计和实现
一个优秀的交互设计往往会影响一个产品的命运。在设计这款调试器时,我一直在构思这款调试器该长什么样子。简单、好用是我设计的原则,于是在《跨平台PHP调试器设计及使用方法——立项》一文中,我给出了一个Demo。之后实现的效果也与之变化并不…
AJAX安全-Session做Token
个人思路,请大神看到了指点 个人理解token是防止扫号机或者恶意注册、恶意发表灌水,有些JS写的token算法,也会被抓出来被利用,个人感觉还是用会过期的Session做token更好,服务器存储,加载到客户端页面&…
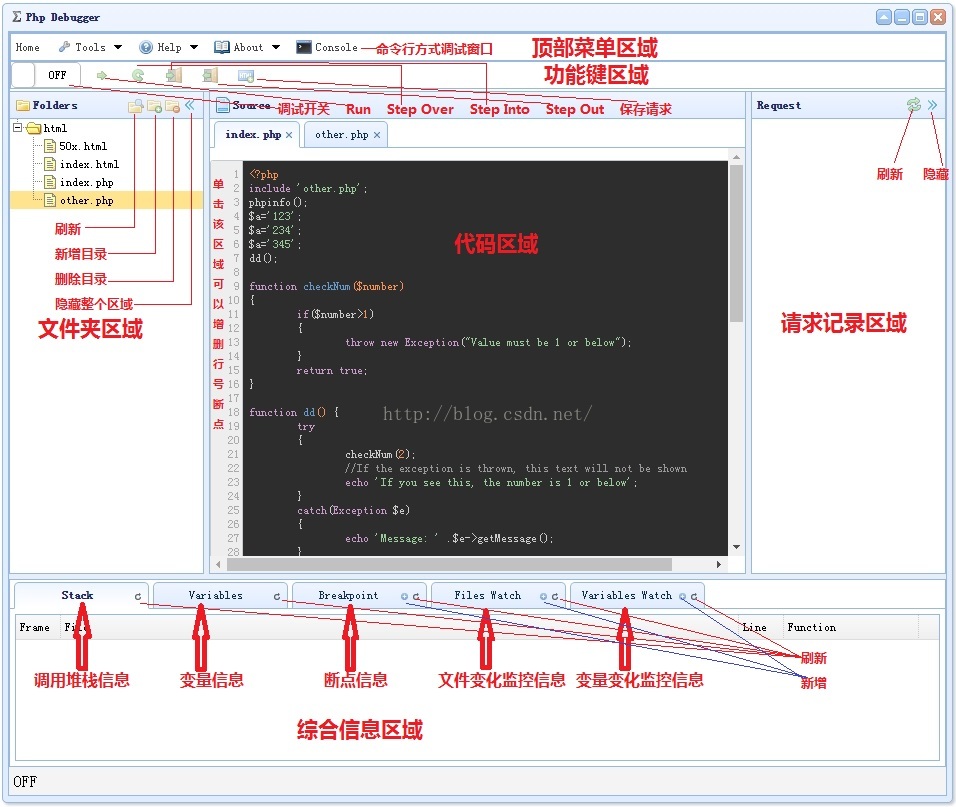
跨平台PHP调试器设计及使用方法——使用
经过之前六篇博文的分析和介绍,大家应该对这套调试器有个初步的认识。本文我将讲解它的使用方法。(转载请指明出于breaksoftware的csdn博客) 上图是该软件界面的布局,我们之后的讲解也将围绕着这些功能展开。 文件夹管理 在查看一…
管理7k+工作流,月运行超10000万次,Lyft开源的Flyte平台意味着什么?
作者 | Allyson Gale译者 | 刘畅编辑 | Jane出品 | AI科技大本营(ID:rgznai100)【导读】Flyte 平台可以更容易的创建并发,可伸缩和可维护的工作流,从而进行机器学习和数据处理。Flyte 已有三年多的训练模型和数据处理经…

Jmeter组件执行顺序与作用域
一、Jmeter重要组件: 1)配置元件---Config Element: 用于初始化默认值和变量,以便后续采样器使用。配置元件大其作用域的初始阶段处理,配置元件仅对其所在的测试树分支有效,如,在同一个作用域…

跨平台PHP调试器设计及使用方法——拾遗
之前七篇博文讲解了跨平台PHP调试器从立项到实现的整个过程,并讲解了其使用方法。但是它们并不能全部涵盖所有重要内容,所以新开一片博文,用来讲述其中一些杂项。(转载请指明出于breaksoftware的csdn博客) 触发调试的…