我用 YOLOv5 做情感识别!

作者 | 陈信达
来源 | Datawhale
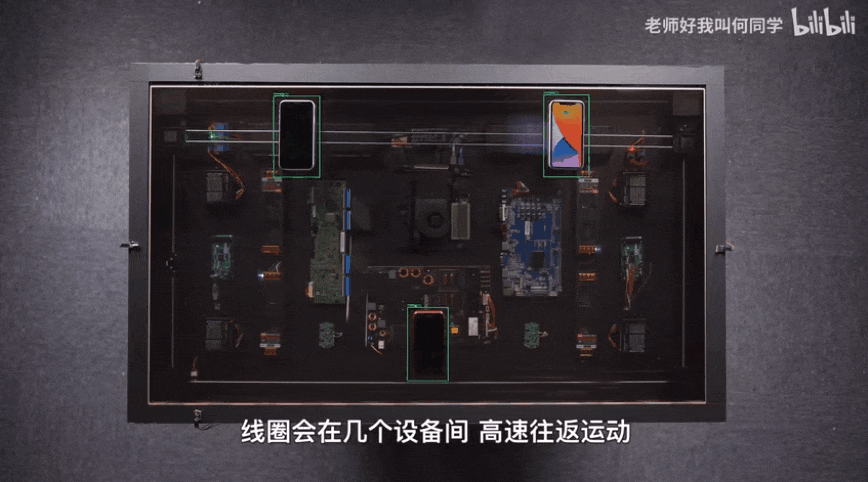
AI技术已经应用到了我们生活中的方方面面,而目标检测是其中应用最广泛的算法之一,疫情测温仪器、巡检机器人、甚至何同学的airdesk中都有目标检测算法的影子。下图就是airdesk,何同学通过目标检测算法定位手机位置,然后控制无线充电线圈移动到手机下方自动给手机充电。这看似简单的应用背后其实是复杂的理论和不断迭代的AI算法,今天笔者就教大家如何快速上手目标检测模型YOLOv5,并将其应用到情感识别中。
一、背景
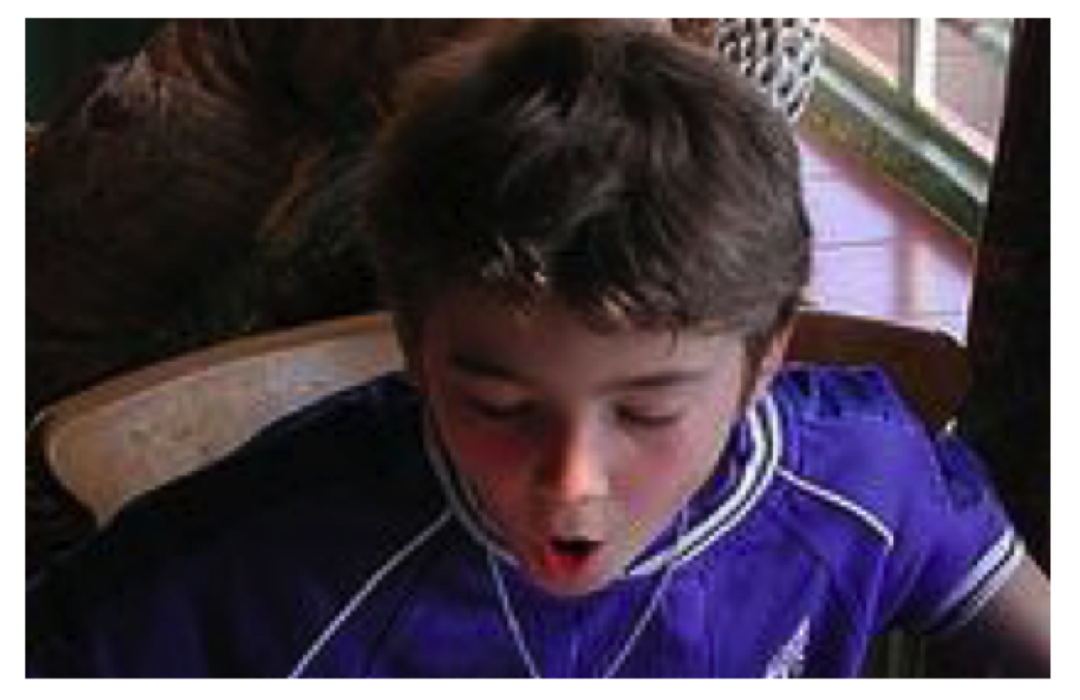
今天的内容来源于2019年发表在T-PAMI上的一篇文章[1],在这之前已经有大量研究者通过AI算法识别人类情感,不过本文的作者认为,人们的情感不仅与面部表情和身体动作等有关,还和当前身处的环境息息相关,比如下图的男孩应该是一个惊讶的表情:
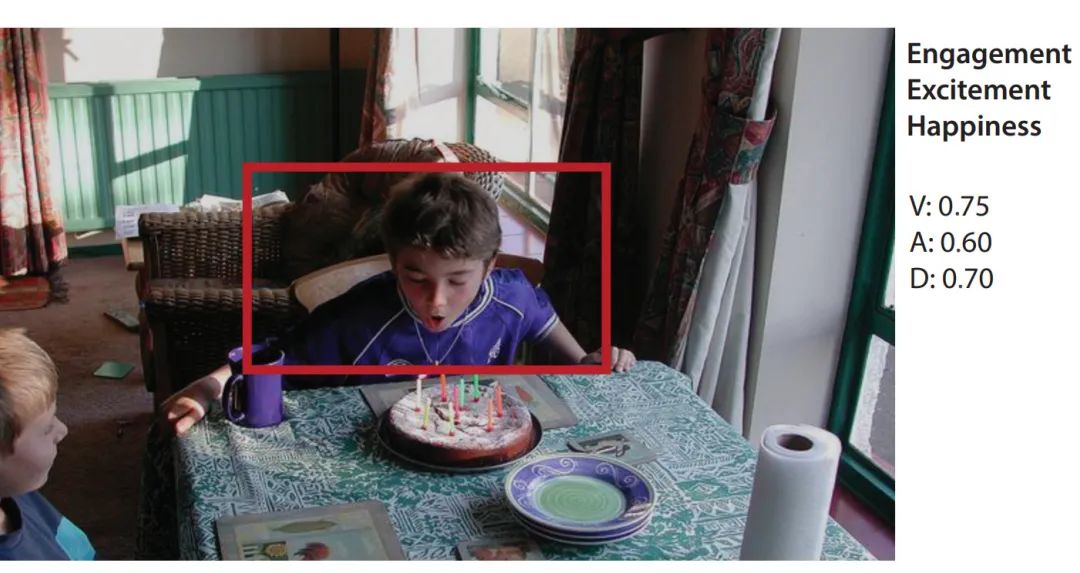
不过加上周围环境后,刚刚我们认为的情感就与真实情感不符:
本文的主要思想就是将背景图片和目标检测模型检测出的人物信息结合起来识别情感。
其中,作者将情感分为离散和连续两个维度。下面会解释以方便理解,已经清楚的同学可以快划跳过。
连续情感
解释
Valence (V) | measures how positive or pleasant an emotion is, ranging from negative to positive(高兴程度) |
Arousal (A) | measures the agitation level of the person, ranging from non-active / in calm to agitated / ready to act(激动程度) |
Dominance (D) | measures the level of control a person feels of the situation, ranging from submissive / non-control to dominant / in-control(气场大小) |
离散情感
解释
Affection | fond feelings; love; tenderness |
Anger | intense displeasure or rage; furious; resentful |
Annoyance | bothered by something or someone; irritated; impatient; frustrated |
Anticipation | state of looking forward; hoping on or getting prepared for possible future events |
Aversion | feeling disgust, dislike, repulsion; feeling hate |
Confidence | feeling of being certain; conviction that an outcome will be favorable; encouraged; proud |
Disapproval | feeling that something is wrong or reprehensible; contempt; hostile |
Disconnection | feeling not interested in the main event of the surrounding; indifferent; bored; distracted |
Disquietment | nervous; worried; upset; anxious; tense; pressured; alarmed |
Doubt/Confusion | difficulty to understand or decide; thinking about different options |
Embarrassment | feeling ashamed or guilty |
Engagement | paying attention to something; absorbed into something; curious; interested |
Esteem | feelings of favourable opinion or judgement; respect; admiration; gratefulness |
Excitement | feeling enthusiasm; stimulated; energetic |
Fatigue | weariness; tiredness; sleepy |
Fear | feeling suspicious or afraid of danger, threat, evil or pain; horror |
Happiness | feeling delighted; feeling enjoyment or amusement |
Pain | physical suffering |
Peace | well being and relaxed; no worry; having positive thoughts or sensations; satisfied |
Pleasure | feeling of delight in the senses |
Sadness | feeling unhappy, sorrow, disappointed, or discouraged |
Sensitivity | feeling of being physically or emotionally wounded; feeling delicate or vulnerable |
Suffering | psychological or emotional pain; distressed; anguished |
Surprise | sudden discovery of something unexpected |
Sympathy | state of sharing others emotions, goals or troubles; supportive; compassionate |
Yearning | strong desire to have something; jealous; envious; lust |
二、准备工作与模型推理
2.1 快速入门
只需完成下面五步即可识别情感!
通过克隆或者压缩包将项目下载到本地:git clone https://github.com/chenxindaaa/emotic.git
将解压后的模型文件放到emotic/debug_exp/models中。(模型文件下载地址:链接:https://gas.graviti.com/dataset/datawhale/Emotic/discussion)
新建虚拟环境(可选):
conda create -n emotic python=3.7
conda activate emotic
环境配置
python -m pip install -r requirement.txtcd到emotic文件夹下,输入并执行:
python detect.py运行完后结果会保存在emotic/runs/detect文件夹下。
2.2 基本原理
看到这里可能会有小伙伴问了:如果我想识别别的图片该怎么改?可以支持视频和摄像头吗?实际应用中应该怎么修改YOLOv5的代码呢?
对于前两个问题,YOLOv5已经帮我们解决,我们只需要修改detect.py中的第158行:
parser.add_argument('--source', type=str, default='./testImages', help='source') # file/folder, 0 for webcam将'./testImages'改为想要识别的图像和视频的路径,也可以是文件夹的路径。对于调用摄像头,只需要将'./testImages'改为'0',则会调用0号摄像头进行识别。
修改YOLOv5:
在detect.py中,最重要的代码就是下面几行:
for *xyxy, conf, cls in reversed(det):c = int(cls) # integer classif c != 0:continuepred_cat, pred_cont = inference_emotic(im0, (int(xyxy[0]), int(xyxy[1]), int(xyxy[2]), int(xyxy[3])))if save_img or opt.save_crop or view_img: # Add bbox to imagelabel = None if opt.hide_labels else (names[c] if opt.hide_conf else f'{names[c]} {conf:.2f}')plot_one_box(xyxy, im0, pred_cat=pred_cat, pred_cont=pred_cont, label=label, color=colors(c, True), line_thickness=opt.line_thickness)if opt.save_crop:save_one_box(xyxy, imc, file=save_dir / 'crops' / names[c] / f'{p.stem}.jpg', BGR=True)其中det是YOLOv5识别出来的结果,例如tensor([[121.00000, 7.00000, 480.00000, 305.00000, 0.67680, 0.00000], [278.00000, 166.00000, 318.00000, 305.00000, 0.66222, 27.00000]])就是识别出了两个物体。
xyxy是物体检测框的坐标,对于上面的例子的第一个物体,xyxy = [121.00000, 7.00000, 480.00000, 305.00000]对应坐标(121, 7)和(480, 305),两个点可以确定一个矩形也就是检测框。conf是该物体的置信度,第一个物体置信度为0.67680。cls则是该物体对应的类别,这里0对应的是“人”,因为我们只识别人的情感,所以cls不是0就可以跳过该过程。这里我用了YOLOv5官方给的推理模型,其中包含很多类别,大家也可以自己训练一个只有“人”这一类别的模型,详细过程可以参考:
在识别出物体坐标后输入emotic模型就可以得到对应的情感,即
pred_cat, pred_cont = inference_emotic(im0, (int(xyxy[0]), int(xyxy[1]), int(xyxy[2]), int(xyxy[3])))这里我将原来的图片可视化做了些改变,将emotic的结果打印到图片上:
def plot_one_box(x, im, pred_cat, pred_cont, color=(128, 128, 128), label=None, line_thickness=3):# Plots one bounding box on image 'im' using OpenCVassert im.data.contiguous, 'Image not contiguous. Apply np.ascontiguousarray(im) to plot_on_box() input image.'tl = line_thickness or round(0.002 * (im.shape[0] + im.shape[1]) / 2) + 1 # line/font thicknessc1, c2 = (int(x[0]), int(x[1])), (int(x[2]), int(x[3]))cv2.rectangle(im, c1, c2, color, thickness=tl, lineType=cv2.LINE_AA)if label:tf = max(tl - 1, 1) # font thicknesst_size = cv2.getTextSize(label, 0, fontScale=tl / 3, thickness=tf)[0]c2 = c1[0] + t_size[0], c1[1] - t_size[1] - 3cv2.rectangle(im, c1, c2, color, -1, cv2.LINE_AA) # filled#cv2.putText(im, label, (c1[0], c1[1] - 2), 0, tl / 3, [225, 255, 255], thickness=tf, lineType=cv2.LINE_AA)for id, text in enumerate(pred_cat):cv2.putText(im, text, (c1[0], c1[1] + id*20), 0, tl / 3, [225, 255, 255], thickness=tf, lineType=cv2.LINE_AA)运行结果:
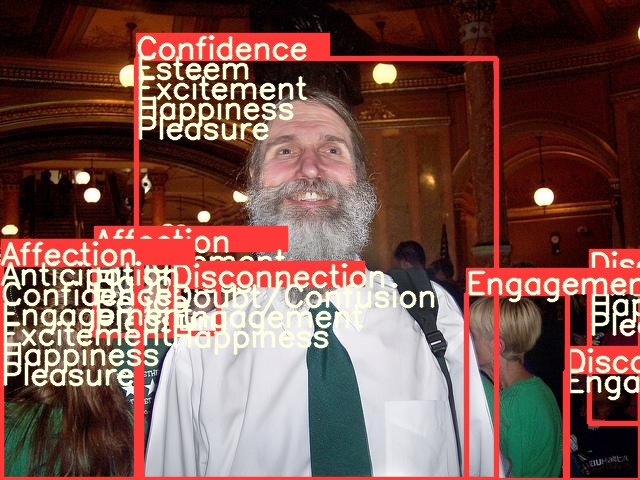
完成了上面的步骤,我们就可以开始整活了。众所周知,特朗普以其独特的演讲魅力征服了许多选民,下面我们就看看AI眼中的特朗普是怎么演讲的:
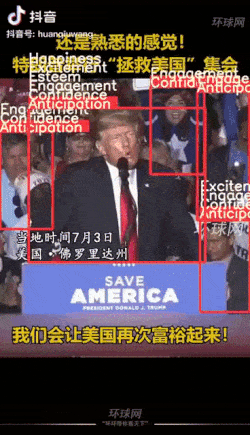
可以看出自信是让人信服的必备条件之一。
三、模型训练
3.1 数据预处理
首先通过格物钛进行数据预处理,在处理数据之前需要先找到自己的accessKey(开发者工具AccessKey新建AccessKey):

我们可以在不下载数据集的情况下,通过格物钛进行预处理,并将结果保存在本地(下面的代码不在项目中,需要自己创建一个py文件运行,记得填入AccessKey):
from tensorbay import GAS
from tensorbay.dataset import Dataset
import numpy as np
from PIL import Image
import cv2
from tqdm import tqdm
import osdef cat_to_one_hot(y_cat):cat2ind = {'Affection': 0, 'Anger': 1, 'Annoyance': 2, 'Anticipation': 3, 'Aversion': 4,'Confidence': 5, 'Disapproval': 6, 'Disconnection': 7, 'Disquietment': 8,'Doubt/Confusion': 9, 'Embarrassment': 10, 'Engagement': 11, 'Esteem': 12,'Excitement': 13, 'Fatigue': 14, 'Fear': 15, 'Happiness': 16, 'Pain': 17,'Peace': 18, 'Pleasure': 19, 'Sadness': 20, 'Sensitivity': 21, 'Suffering': 22,'Surprise': 23, 'Sympathy': 24, 'Yearning': 25}one_hot_cat = np.zeros(26)for em in y_cat:one_hot_cat[cat2ind[em]] = 1return one_hot_catgas = GAS('填入你的AccessKey')
dataset = Dataset("Emotic", gas)
segments = dataset.keys()
save_dir = './data/emotic_pre'
if not os.path.exists(save_dir):os.makedirs(save_dir)
for seg in ['test', 'val', 'train']:segment = dataset[seg]context_arr, body_arr, cat_arr, cont_arr = [], [], [], []for data in tqdm(segment):with data.open() as fp:context = np.asarray(Image.open(fp))if len(context.shape) == 2:context = cv2.cvtColor(context, cv2.COLOR_GRAY2RGB)context_cv = cv2.resize(context, (224, 224))for label_box2d in data.label.box2d:xmin = label_box2d.xminymin = label_box2d.yminxmax = label_box2d.xmaxymax = label_box2d.ymaxbody = context[ymin:ymax, xmin:xmax]body_cv = cv2.resize(body, (128, 128))context_arr.append(context_cv)body_arr.append(body_cv)cont_arr.append(np.array([int(label_box2d.attributes['valence']), int(label_box2d.attributes['arousal']), int(label_box2d.attributes['dominance'])]))cat_arr.append(np.array(cat_to_one_hot(label_box2d.attributes['categories'])))context_arr = np.array(context_arr)body_arr = np.array(body_arr)cat_arr = np.array(cat_arr)cont_arr = np.array(cont_arr)np.save(os.path.join(save_dir, '%s_context_arr.npy' % (seg)), context_arr)np.save(os.path.join(save_dir, '%s_body_arr.npy' % (seg)), body_arr)np.save(os.path.join(save_dir, '%s_cat_arr.npy' % (seg)), cat_arr)np.save(os.path.join(save_dir, '%s_cont_arr.npy' % (seg)), cont_arr)
等程序运行完成后可以看到多了一个文件夹emotic_pre,里面有一些npy文件则代表数据预处理成功。
3.2 模型训练
打开main.py文件,35行开始是模型的训练参数,运行该文件即可开始训练。
四、Emotic模型详解
4.1 模型结构

该模型的思想非常简单,流程图中的上下两个网络其实就是两个resnet18,上面的网络负责提取人体特征,输入为的彩色图片,输出是512个的特征图。下面的网络负责提取图像背景特征,预训练模型用的是场景分类模型places365,输入是的彩色图片,输出同样是是512个的特征图。然后将两个输出flatten后拼接成一个1024的向量,经过两层全连接层后输出一个26维的向量和一个3维的向量,26维向量处理26个离散感情的分类任务,3维向量则是3个连续情感的回归任务。
import torch
import torch.nn as nn class Emotic(nn.Module):''' Emotic Model'''def __init__(self, num_context_features, num_body_features):super(Emotic,self).__init__()self.num_context_features = num_context_featuresself.num_body_features = num_body_featuresself.fc1 = nn.Linear((self.num_context_features + num_body_features), 256)self.bn1 = nn.BatchNorm1d(256)self.d1 = nn.Dropout(p=0.5)self.fc_cat = nn.Linear(256, 26)self.fc_cont = nn.Linear(256, 3)self.relu = nn.ReLU()def forward(self, x_context, x_body):context_features = x_context.view(-1, self.num_context_features)body_features = x_body.view(-1, self.num_body_features)fuse_features = torch.cat((context_features, body_features), 1)fuse_out = self.fc1(fuse_features)fuse_out = self.bn1(fuse_out)fuse_out = self.relu(fuse_out)fuse_out = self.d1(fuse_out)    cat_out = self.fc_cat(fuse_out)cont_out = self.fc_cont(fuse_out)return cat_out, cont_out
离散感情是一个多分类任务,即一个人可能同时存在多种感情,作者的处理方法是手动设定26个阈值对应26种情感,输出值大于阈值就认为该人有对应情感,阈值如下,可以看到engagement对应阈值为0,也就是说每个人每次识别都会包含这种情感:
>>> import numpy as np
>>> np.load('./debug_exp/results/val_thresholds.npy')
array([0.0509765 , 0.02937193, 0.03467856, 0.16765128, 0.0307672 ,0.13506265, 0.03581731, 0.06581657, 0.03092133, 0.04115443,0.02678059, 0.        , 0.04085711, 0.14374524, 0.03058549,0.02580678, 0.23389584, 0.13780132, 0.07401864, 0.08617007,0.03372583, 0.03105414, 0.029326  , 0.03418647, 0.03770866,0.03943525], dtype=float32)
4.2 损失函数:
对于分类任务,作者提供了两种损失函数,一种是普通的均方误差损失函数(即self.weight_type == 'mean'),另一种是加权平方误差损失函数(即self.weight_type == 'static‘)。其中,加权平方误差损失函数如下,26个类别对应的权重分别为[0.1435, 0.1870, 0.1692, 0.1165, 0.1949, 0.1204, 0.1728, 0.1372, 0.1620, 0.1540, 0.1987, 0.1057, 0.1482, 0.1192, 0.1590, 0.1929, 0.1158, 0.1907, 0.1345, 0.1307, 0.1665, 0.1698, 0.1797, 0.1657, 0.1520, 0.1537]。
class DiscreteLoss(nn.Module):''' Class to measure loss between categorical emotion predictions and labels.'''def __init__(self, weight_type='mean', device=torch.device('cpu')):super(DiscreteLoss, self).__init__()self.weight_type = weight_typeself.device = deviceif self.weight_type == 'mean':self.weights = torch.ones((1,26))/26.0self.weights = self.weights.to(self.device)elif self.weight_type == 'static':self.weights = torch.FloatTensor([0.1435, 0.1870, 0.1692, 0.1165, 0.1949, 0.1204, 0.1728, 0.1372, 0.1620,0.1540, 0.1987, 0.1057, 0.1482, 0.1192, 0.1590, 0.1929, 0.1158, 0.1907,0.1345, 0.1307, 0.1665, 0.1698, 0.1797, 0.1657, 0.1520, 0.1537]).unsqueeze(0)self.weights = self.weights.to(self.device)def forward(self, pred, target):if self.weight_type == 'dynamic':self.weights = self.prepare_dynamic_weights(target)self.weights = self.weights.to(self.device)loss = (((pred - target)**2) * self.weights)return loss.sum() def prepare_dynamic_weights(self, target):target_stats = torch.sum(target, dim=0).float().unsqueeze(dim=0).cpu()weights = torch.zeros((1,26))weights[target_stats != 0 ] = 1.0/torch.log(target_stats[target_stats != 0].data + 1.2)weights[target_stats == 0] = 0.0001return weights对于回归任务,作者同样提供了两种损失函数,L2损失函数:
其中,当(默认是1)时,,否则。
L1损失函数:

其中,当(默认是1)时,,否则。
class ContinuousLoss_L2(nn.Module):''' Class to measure loss between continuous emotion dimension predictions and labels. Using l2 loss as base. '''def __init__(self, margin=1):super(ContinuousLoss_L2, self).__init__()self.margin = margindef forward(self, pred, target):labs = torch.abs(pred - target)loss = labs ** 2 loss[ (labs < self.margin) ] = 0.0return loss.sum()class ContinuousLoss_SL1(nn.Module):''' Class to measure loss between continuous emotion dimension predictions and labels. Using smooth l1 loss as base. '''def __init__(self, margin=1):super(ContinuousLoss_SL1, self).__init__()self.margin = margindef forward(self, pred, target):labs = torch.abs(pred - target)loss = 0.5 * (labs ** 2)loss[ (labs > self.margin) ] = labs[ (labs > self.margin) ] - 0.5return loss.sum()数据集链接:https://gas.graviti.com/dataset/datawhale/Emotic
[1]Kosti R, Alvarez J M, Recasens A, et al. Context based emotion recognition using emotic dataset[J]. IEEE transactions on pattern analysis and machine intelligence, 2019, 42(11): 2755-2766.
YOLOv5项目地址:https://github.com/ultralytics/yolov5
Emotic项目地址:https://github.com/Tandon-A/emotic

往
期
回
顾
技术
用技术实现时序羽毛球动作预测
资讯
AI在嘈杂环境中看唇语识别理解
技术
万粉博主推荐,调用AGanV2
资讯
GPT-3平替版语言模型,性能更优化

分享

点收藏

点点赞

点在看
相关文章:
Odoo 学习 【二】Environment 概览
Environment 参考链接: http://odoo-new-api-guide-line.readthedocs.io/en/latest/environment.html#environment 在新的API中,引入了环境的概念,它的主要目标是提供对游标、用户、模型、上下文、记录集、和缓存的封装。 有了这些,你没有必要…

php使用NuSoap产生webservice结合WSDL让asp.net调用
<?php require_once("nusoap-0.9.5/lib/nusoap.php"); //定义服务程序 function Add($a,$b){return $a$b;}//初始化服务对象 , 这个对象是类 soap_server 的一个实例 $soap new soap_server; //调用服务对象的 register 方法注册需要被客户端访问…

分享 10 个超实用的 Python 编程技巧
作者 | 欣一来源 | Python爱好者集中营今天小编来给大家分享几个Python的编程技巧,帮助你迅速完成地从小白到Python大神的蜕变。字典翻转首先我们来看字典的翻转,假设我们有下面类似的一个字典对象与数据car_dict { "brand":"Tesla"…
百度编辑器(1.4.3—net版)上传图片路径及其他配置
1:文件配置图: 2:文件夹配置图: 3:多余的功能删除(懒人不想使用百度编辑器官网的自定义,而选择全部功能的直接下载,对于没用的功能可以注释掉,以后有需要就可以再拿出来用…

windows下配置redis集群,启动节点报错:createing server TCP listening socket *:7000:listen:Unknown error...
windows下配置redis集群,启动节点报错:createing server TCP listening socket *:7000:listen:Unknown error 学习了:https://blog.csdn.net/u014652744/article/details/71774171 竟然真的是需要bind 127.0.0.1 不同的机器为啥就不一样呢&am…
apache日志分析简介
对apache的日志分析做下简单的介绍,主要参考apache官网的Log Files,手册参照 http://httpd.apache.org/docs/2.2/logs.html一.日志分析 如果apache的安装时采用默认的配置,那么在/logs目录下就会生成两个文件,分别是access_log和error_log1.access_log access_log为访问日志,记…
Kotlin语法(基础)
一、基础语法: 1. 定义包名: 包名应该在源文件的最开头,包名不必和文件夹路径一致:源文件可以放在任意位置。 package my.demo 2. 定义函数: fun sum(a: Int , b: Int) : Int{return a b } 表达式函数体自动推断型的返…

未来十年,人机交互将是重要的发展
编译 | 禾木木出品 | AI科技大本营(ID:rgznai100)机器人市场包括广泛且不断扩大的产品范围。经过多年的合作,可以预测机器人技术和机器人行业的未来发展。根据需求,专业服务应用将占据主要市场份额。客户行为的变化已成为行业发展…

20170507Linux七周二次课 io监控free ps 网络状态 抓包
七周二次课(5月7日)10.6 监控io性能10.7 free命令10.8 ps命令10.9 查看网络状态10.10 linux下抓包扩展tcp三次握手四次挥手 http://www.doc88.com/p-9913773324388.htmltshark几个用法:http://www.aminglinux.com/bbs/thread-995-1-1.html监控…
navicat for mysql导出表结构
show create table cm_events;

《新程序员003》正式上市!华为、阿里等 30+ 公司的云原生及数字化实战经验...
作者 | 唐小引出品 | 《新程序员》编辑部《新程序员 003:云原生和全面数字化实践》图书今日正式上市,纸书和电子书同步上架 CSDN 商城、New 程序员小程序、京东、当当等平台。这是由 50 余位技术专家共同创作,写给所有关注云原生和数字化的开…
sed及awk显示指定行内容
文件内容为[roottest1 test]# cat file.test 1 2 3 4 5 6 7 8 9 101. 显示第二行内容(指定行)1)sed[roottest1 test]# sed -n 2p file.test 22)awk[roottest1 test]# awk NR2 {print $0} file.test 2 [roottest1 test]# awk {if(NR2)print $0} file.t…

win10 spark+scala+eclipse+sbt 安装配置
转载请务必注明原创地址为:http://dongkelun.com/2018/03/... 1、首先安装配置jdk1.8以上,建议全部的安装路径不要有空格 2、安装spark 2.1 下载 下载地址:http://spark.apache.org/downloads.html,我下载的是 spark-2.2.1-bin-hadoop2.7.tgz…
jquery的live方法
live(type, [data], fn)手册API的介绍 jQuery 给所有匹配的元素附加一个事件处理函数,即使这个元素是以后再添加进来的也有效。 如下用 live给classclickme的元素绑定一个click事件: $(.clickme).live(click, function() { alert("Live handler ca…
碱基序列的儿子最长上涨
Font Size:Aa Aa AaDescription 给出一个由n个数组成的序列x[1..n],找出它的最长单调上升子序列的长度。即找出最大的长度m和a1, a2……,am,使得 a1 < a2 < … … < am 且 x[a1] < x[a2] < … … < x[am]。Input 先输入一个整数t&…

用 Python 写 3D 游戏,太赞了
作者 | 可可卷CSDN博客 | 可可卷vizard介绍Vizard是一款虚拟现实开发平台软件,从开发至今已走过十个年头。它基于C/C,运用新近OpenGL拓展模块开发出的高性能图形引擎。当运用Python语言执行开发时,Vizard同时自动将编写的程式转换为字节码抽象…
人人都能学会的python编程教程3:字符串和编码
字符串 在python3中已经全面支持中文。 由于Python源代码也是一个文本文件,所以,当你的源代码中包含中文的时候,在保存源代码时,就需要务必指定保存为UTF-8编码。当Python解释器读取源代码时,为了让它按UTF-8编码读取&…
基本MVC原理
参考《Pro PHP》 简单实现了一个mvc框架。 地址http://code.google.com/p/smallframework/自动加载的问题<?php function __autoload($class) { if(file_exists($class.".php")) { require_once($class.".php"); } } class autoload{ public static fu…

31个好用的 Python 字符串方法,建议收藏!
作者 | 小F来源 | 法纳斯特字符串是Python中基本的数据类型,几乎在每个Python程序中都会使用到它。今天,就带大家学习一下31个最重要的内置字符串方法。希望大家能从中找到对自己有帮助的技巧。▍1、Slicingslicing切片,按照一定条件从列表或…
《深入理解计算机系统》读书随笔-位操作
最近开始读《深入理解计算机系统》这本书。对于书中提到的从程序员的角度解读计算机系统这一说法非常感兴趣,所以决定好好读一读。从开始接触计算机编程就是站在一个高级语言的层次,虽然对编译原理,操作系统,汇编语言和计算机组成…

专访小邪:从十年技术之路看阿里技术体系的变革
2019独角兽企业重金招聘Python工程师标准>>> 摘要: 从2008年到2018年,从阿里巴巴中间件团队到飞天八部——小邪与阿里的十年。 编者按:从2008年到2018年,从阿里巴巴中间件团队到飞天八部——小邪与阿里的十年。 2008年…
PHP SPL笔记
PHP SPL笔记作者: 阮一峰日期: 2008年7月 8日这几天,我在学习PHP语言中的SPL。这个东西应该属于PHP中的高级内容,看上去很复杂,但是非常有用,所以我做了长篇笔记。不然记不住,以后要用的时候&am…

算力超越 iPhone,芯片堪比Mac,网友:“买来能干啥?”
整理 | 郑丽媛出品 | CSDN(ID:CSDNnews)自去年“元宇宙”概念突然爆火,作为其“入门钥匙”的 AR/VR 设备也顺势成为了话题焦点,尤其在多家外媒爆料苹果也在为此发力、甚至从 Meta 挖人以争取在 2022 年正式推出时&…
ios开发日记- 5 屏幕截图
-(void)fullScreenshots{UIWindow *screenWindow [[UIApplication sharedApplication] keyWindow]; UIGraphicsBeginImageContext(screenWindow.frame.size);//全屏截图,包括window [screenWindow.layer renderInContext:UIGraphicsGetCurrentContext()]; UIImage …

MaxCompute助力OSS支持EB级计算力
一、 MaxCompute是什么? 你的OSS数据是否作堆积在一旁沉睡已久,存储成本变为企业负担?你是否想唤醒沉睡的数据,驱动你的业务前行?MaxCompute可以帮助你高效且低成本的解决这些问题,通过对海量数据进行分析和…
php自动加载
很多开发者写面向对象的应用程序时对每个类的定义建立一个 PHP 源文件。一个很大的烦恼是不得不在每个脚本(每个类一个文件)开头写一个长长的包含文件列表。 在 PHP 5 中,不再需要这样了。可以定义一个 __autoload 函数,它会在试…

22个案例详解 Pandas 数据分析/预处理时的实用技巧,超简单
作者 | 俊欣来源 | 关于数据分析与可视化今天小编打算来讲一讲数据分析方面的内容,整理和总结一下Pandas在数据预处理和数据分析方面的硬核干货,我们大致会说Pandas计算交叉列表Pandas将字符串与数值转化成时间类型Pandas将字符串转化成数值类型Pandas当…
《mysql性能调优与架构设计》笔记: 一mysql 架构组成
2019独角兽企业重金招聘Python工程师标准>>> 2.1mysql物理文件组成 2.1.1日志文件: 1,查看mysql配置文件:mysql --verbose --help | grep -A 1 Default options; 1,错误日志:--log-error[file_name] 指定错…
发现一个可以搜索常用rpm包的地址(http://www.rpmfind.net/)
http://www.rpmfind.net/ 虽然资源不多,但也够用。 >如有问题,请联系我:easonjim#163.com,或者下方发表评论。<
PHP版UTF-8文件BOM自动检测移除程序
BOM信息是文件开头的一串隐藏的字符,用于让某些编辑器识别这是个UTF-8编码的文件。但PHP在读取文件时会把这些字符读出,从而形成了文件 开头含有一些无法识别的字符的问题。比如用UTF-8格式保存的生成图片的PHP文件,因为文件头隐藏的BOM信息也…