VS2010 CUDA 5.5 Win7 64位配置以及项目创建配置
一.安装CUDA5.5以及配置VS助手
1、安装之前必须确认自己电脑的GPU支持CUDA。在设备管理器中找到显示适配器(Display adapters),找到自己电脑的显卡型号,如果包含在http://www.nvidia.com/object/cuda_gpus.html的列表中,说明支持CUDA。
安装CUDA之前最好检查一下自己电脑的显卡驱动版本,版本过老的话,需要更新。有时候安装完毕CUDA之后,运行6中的deviceQuery程序时会出错,请优先考虑显卡驱动的问题。
2、下载NVIDIA CUDA Toolkit ( http://www.nvidia.com/content/cuda/cuda-downloads.html),本人下载的是desktop版本win64
CUDA5.0以上已经将ToolKit和SDK等整合在了一起,因此只需下载一个安装文件即可。
3、首先确认自己已经安装Visual Studio 2010 后再安装助手Visual Assist X。这里Visual Assist X 对于使用CUDA 不是必须的,但为了使程序编写更为方便,这里推荐安装。
4、CUDA的默认安装目录为:C:\Program Files\NVIDIA GPUComputing Toolkit\ 这里推荐使用默认的安装路径,不需更改。
5、安装完成后,在系统变量环境里面会发现新添加了两个环境变量
CUDA_PATH
C:\Program Files\NVIDIA GPU Computing Toolkit\CUDA\v5.5
CUDA_PATH_V5_5
C:\Program Files\NVIDIA GPU Computing Toolkit\CUDA\v5.5
且在系统变量的path也会自动添加
C:\Program Files\NVIDIA GPU ComputingToolkit\CUDA\v5.5\bin;C:\Program Files\NVIDIA GPU ComputingToolkit\CUDA\v5.5\libnvvp;C:\Program Files (x86)\NVIDIACorporation\PhysX\Common;
6、此时CUDA已经安装成功。可以在DOS命令下,测试运行显示GPU硬件配置和cuda属性例子程序deviceQuery。路径在如下位置:
C:\ProgramData\NVIDIA Corporation\CUDASamples\v5.5\Bin\win32\Release
Dos下的命令提示符
dir查看文件夹下的目录
dir/a:h 查看当前目录的隐藏文件,因为ProgramData是隐藏文件。
cd .. 返回上一级文件夹, cd file 进入file 文件夹
运行bandwidthTest示例程序,结果如下:
双击桌面上的图标,运行cuda自带的例子。
7、CUDA C/C++关键字及函数高亮显示
这个设置是让Visual Studio2010 在编辑.cu 文件时,把.cu 文件里的C/C++语法高亮。设置方法:在Visual Studio 2010 的菜单依次选“ Tools|Options|TextEditor|File Extension(工具|选项|文本编辑器|文件扩展名)”,在该窗口中将“Editor(编辑器)”下拉框选择“Microsoft Visual C++”,在“Extension(扩展名)”文本框中输入cu 点击“Add(添加)”按钮,重复工作把cuh 添加为Visual C++类型,添加完成后点击“OK(确定)”按钮,如下图所示:
为了让CUDA 的关键字,如__device__、dim3 等的文字高亮,需按如下步骤设置:
将C:\ProgramData\NVIDIA Corporation\CUDASamples\v5.5\doc\syntax_highlighting\visual_studio_8 目录下的usertype.dat 文件复制到C:\ProgramFiles\Microsoft Visual Studio10.0\Common7\IDE\ 目录下(对x64 位Win7 系统为X:\Program Files(X86)\Microsoft Visual Studio10.0\Common7\IDE\)。重启Visual Studio2010 后打开.cu 文件,CUDA 的关键字应该变成蓝色了。
8、CUDA 函数高亮,及CUDA 函数输入代码提示
实现这个功能需要使用Visual Assist X,如果没有安装支持Visual Studio 2010的Visual Assist X,这部分功能无法实现。这里只是为使编写代码更加方便,对CUDA 程序的开发无实质性障碍。
如果已经安装VisualAssist X,可以通过以下两步实现需要的功能。
(1)使Visual Assist X 支持CUDA 函数高亮和代码完成
在VisualStudio 2010 的菜单里依次选择:“ VAssistX|Visual assistX Options|Projects|C/C++Directories”,在该界面的“Platform”下拉框中选择Custom,在“Show Directories for”下拉框中选择Other include files,然后在下面的输入框里,新建、添加如下路径,如图:
C:\Program Files\NVIDIA GPU Computing Toolkit\CUDA\v5.5\include
C:\ProgramData\NVIDIA Corporation\CUDA Samples\v5.5\common\inc
(2)使Visual Assist X 实现.cu 文件高亮和代码完成功能,需要编辑注册表。在修改注册表时,为避免带来不必要的错误请先关闭Visual Studio 2010。使用Win+R组合键打开“运行”窗口,键入入regedit 命令(register edit 的缩写)打开注册表,找到如下位置:HKEY_CURRENT_USER\Software\WholeTomato\Visual Assist X\VANet10。在右边找到ExtSource 项目,鼠标右键选修改,在原有文字后添加如下文字:.cu;.cuh; 确定后关闭注册表。重新打开Visual Studio 2010,Visual Assist X 便开始支持.cu 及.cuh 文件的语法高亮及代码完成。此时.cu 文件的CUDA 函数是高亮的,使用函数名符号就会自动提示函数全称,参数类型等信息。
修改注册表时,请把vs关闭,否则修改不成功。
二.创建cu文件测试示例
在Visual Studio 2010 菜单选择“file|new|project(文件|新建|工程)”,在打开的新建项目窗口的“已安装的模板”一栏中选择“NVIDIA|CUDA”,类型选择为“CUDA 5.5Runtime”,见下图。
在“名称”中输入工程名后,点击确定。cuda自动提供的kernel.cu 并行加法示例进行编译运行。结果如下:
在此基础上可以方便的进行cuda的代码测试。
三.在已有的C++项目中添加cu文件
我们往往需要在已建成的vc项目中,加入gpu的并行算法,以提高算法的效率。在此介绍如何在已有的项目中添加cu文件和配置过程。在cudasample中也提供了具体的参考示例,路径如下:
C:\ProgramData\NVIDIACorporation\CUDA Samples\v5.5\0_Simple\cppIntegration
运行cppIntegration_vs2010.sln,查看其配置。
1) 新建一个Win32控制台项目cppcuda;
2) 然后在项目中添加空白cu文件:在源文件处点击右键,添加》新建项
选择的文件类型是CPP文件,在写名称的时候可以直接写为.cu文件,也可以写成.cpp文件之后再进行重命名。此处写为add_kernel.cu.
选择CUDA 5.5.(targets,.props)。
4) 在add_kernel.cu文件处点击右键,选择属性》配置属性》项类型下拉菜单中选择 CUDA C/C++
5)在项目》cppcuda属性页中,设置如下红色圆圈内的参数
更改配置属性》常规》字符集:
在 C/C++》常规》附加包含目录中添加绝对路径:
C:\ProgramData\NVIDIACorporation\CUDA Samples\v5.5\common\inc
C/C++》代码生成》运行库改为 多线程调试
链接器》常规》附加库目录中添加
$(CUDA_PATH_V5_5)\lib\$(Platform)
链接器》输入》附加依赖项 中输入
cudart_static.lib
6)以上配置完成之后,可以在空白的addcuda.cu开头添加如下两行代码
#include"cuda_runtime.h"
#include"device_launch_parameters.h"
7) 在cpp 与cu文件建立连接的函数定义必须用extern "C"形式开头,如
extern"C" double addnum(int *c, const int *a, constint *b, unsigned int size);
addnum这个函数具体在cu文件实现并行加法的功能,在cpp文件中调用。
8) 下面给出cppcuda具体的代码
如cppcuda.cpp:
#include"stdafx.h"
extern"C" double addnum(int *c, const int *a, const int *b, unsigned intsize);
int_tmain(int argc, _TCHAR* argv[])
{
const int arraySize = 5;
const int a[arraySize] = { 1, 2, 3, 4,5 };
const int b[arraySize] = { 10, 20, 30,40, 50 };
int c[arraySize] = { 0 };
addnum(c, a, b, arraySize);
return 0;
}
如add_kernel.cu:
#include"cuda_runtime.h"
#include"device_launch_parameters.h"
#include<stdio.h>
cudaError_taddWithCuda(int *c, const int *a, const int *b, unsigned int size);
__global__void addKernel(int *c, const int *a, const int *b)
{
int i = threadIdx.x;
c[i] = a[i] + b[i];
}
extern"C" double addnum(int *c, const int *a, const int *b, unsigned intsize)
{
cudaError_t cudaStatus = addWithCuda(c,a, b, size);
if (cudaStatus != cudaSuccess) {
fprintf(stderr,"addWithCuda failed!");
return 1;
}
}
cudaError_taddWithCuda(int *c, const int *a, const int *b, unsigned int size)
{
int *dev_a = 0;
int *dev_b = 0;
int *dev_c = 0;
cudaError_t cudaStatus;
// Choose which GPU to run on, changethis on a multi-GPU system.
cudaStatus = cudaSetDevice(0);
if (cudaStatus != cudaSuccess) {
fprintf(stderr,"cudaSetDevice failed! Do you havea CUDA-capable GPU installed?");
goto Error;
}
// Allocate GPU buffers for threevectors (two input, one output) .
cudaStatus =cudaMalloc((void**)&dev_c, size * sizeof(int));
if (cudaStatus != cudaSuccess) {
fprintf(stderr,"cudaMalloc failed!");
goto Error;
}
cudaStatus =cudaMalloc((void**)&dev_a, size * sizeof(int));
if (cudaStatus != cudaSuccess) {
fprintf(stderr,"cudaMalloc failed!");
goto Error;
}
cudaStatus =cudaMalloc((void**)&dev_b, size * sizeof(int));
if (cudaStatus != cudaSuccess) {
fprintf(stderr,"cudaMalloc failed!");
goto Error;
}
// Copy input vectors from host memoryto GPU buffers.
cudaStatus = cudaMemcpy(dev_a, a, size* sizeof(int), cudaMemcpyHostToDevice);
if (cudaStatus != cudaSuccess) {
fprintf(stderr,"cudaMemcpy failed!");
goto Error;
}
cudaStatus = cudaMemcpy(dev_b, b, size* sizeof(int), cudaMemcpyHostToDevice);
if (cudaStatus != cudaSuccess) {
fprintf(stderr,"cudaMemcpy failed!");
goto Error;
}
// Launch a kernel on the GPU with onethread for each element.
addKernel<<<1,size>>>(dev_c, dev_a, dev_b);
// Check for any errors launching thekernel
cudaStatus = cudaGetLastError();
if (cudaStatus != cudaSuccess) {
fprintf(stderr,"addKernel launch failed: %s\n", cudaGetErrorString(cudaStatus));
goto Error;
}
// cudaDeviceSynchronize waits for thekernel to finish, and returns
// any errors encountered during thelaunch.
cudaStatus = cudaDeviceSynchronize();
if (cudaStatus != cudaSuccess) {
fprintf(stderr,"cudaDeviceSynchronize returned error code %d after launchingaddKernel!\n", cudaStatus);
goto Error;
}
// Copy output vector from GPU bufferto host memory.
cudaStatus = cudaMemcpy(c, dev_c, size* sizeof(int), cudaMemcpyDeviceToHost);
if (cudaStatus != cudaSuccess) {
fprintf(stderr,"cudaMemcpy failed!");
goto Error;
}
Error:
cudaFree(dev_c);
cudaFree(dev_a);
cudaFree(dev_b);
return cudaStatus;
}
相关文章:

HTC VIVE SDK 中的例子 hellovr_opengl 程序流程分析
最近Vive的VR头盔设备很火,恰逢项目需求,所以对 SDK 中的例子 hellovr_opengl 做了比较细致的代码分析,先将流程图绘制如下,便于大家理解。 在ViVe头盔中实现立体效果的技术核心: 如果要外挂Vive的VR设备实现立体效果&…

Proximal Algorithms 4 Algorithms
目录 Proximal minimization解释\(f(x) g(x)\)解释1 最大最小算法不动点解释Forward-backward 迭代解释加速 proximal gradient method交替方向方法 ADMM解释1 自动控制解释2 Augmented Largranians解释3 Flow interpretation解释4 不动点特别的情况 \(f(x) g(Ax)\)Proximal …

C# TripleDES NoPadding 时对待加密内容进行补字节(8个字节为一个Block)
补一个空格(半角): private static byte[] FormatData(String str) {var yu str.Length % 8;if (yu 0) return Encoding.GetEncoding(Consts.Charset).GetBytes(str);var size 8 - yu;var arr new byte[str.Length size];var data Enco…
keras Regressor 回归
import numpy as np np.random.seed(1337) # for reproducibility from keras.models import Sequential from keras.layers import Dense import matplotlib.pyplot as plt # 可视化模块import tensorflow as tf import keras.backend.tensorflow_backend as KTF# create som…

13、JsonResponse响应介绍
转载于:https://blog.51cto.com/yht1990/2406566
keras Classifier 分类
import numpy as np np.random.seed(1337) # for reproducibility from keras.models import Sequential from keras.layers import Dense, Activation from keras.optimizers import RMSprop import matplotlib.pyplot as plt # 可视化模块import tensorflow as tf import ke…
如何管理好自己的性格?
往往因为我们太感性,而获得与男人不一样的灵动的感受。而当过分的感性不合时宜地在职业生涯中表现出来时,我们该怎么调整自己呢? 由于女人与生俱来的特点,我们善良、有耐心,所以我们更易得到别人的支持和帮助&#…

Axis2 webservice入门--Webservice的发布与调用
一、Webservice发布 参考 http://www.cnblogs.com/demingblog/p/3263576.html 二、webservice 调用 部分参考:http://www.cnblogs.com/demingblog/p/3264688.html 使用myeclipse中的axis2插件生成客户端代码 new -->others到如下界面: 点next 到如下界…

Java断点续传(基于socket与RandomAccessFile的实现)
这是一个简单的C/S架构,基本实现思路是将服务器注册至某个空闲端口用来监视并处理每个客户端的传输请求。 客户端先获得用户给予的需传输文件与目标路径,之后根据该文件实例化RandomAccessFile为只读,之后客户端向服务器发送需传输的文件名文…
EJB调用原理分析
EJB调用原理分析 作者:robbin (MSN:robbin_fan AT hotmail DOT com) 版权声明:本文严禁转载,如有转载请求,请和作者联系 一个远程对象至少要包括4个class文件:远程对象;远程对象的接口;实现远程…

Jfinal Generator 不需要生成带某个前缀的表名数组的方法
2019独角兽企业重金招聘Python工程师标准>>> package com.demo.common.model; import javax.sql.DataSource; import com.jfinal.kit.PathKit; import com.jfinal.kit.Prop; import com.jfinal.kit.PropKit; import com.jfinal.plugin.activerecord.generato…
tensorflow 2
import tensorflow as tf import numpy as npdef test1():#create datax_datanp.random.rand(100).astype(np.float32)y_datax_data*0.10.3#create tensorflow structureWeightstf.Variable(tf.random_uniform([1],-1.0,1.0)) #一维,范围[-1,1]biasestf.Variable(tf…
PCB多层线路板打样难点
PCB多层板无论从设计上还是制造上来说,都比单双层板要复杂,一不小心就会遇到一些问题,那在PCB多层线路板打样中我们要规避哪些难点呢? 1、层间对准的难点 由于多层电路板中层数众多,用户对PCB层的校准要求越来越…

GARFIELD@11-07-2004
Vanity Fair转载于:https://www.cnblogs.com/rexhost/archive/2004/11/07/61286.html
python文件读写1
# -*- coding: utf-8 -*-# read txt file def readTextFile(file):f open(file, r)# 尽可能多的读取文件的内容,一般会将整个文件内容都会读取context f.read() print(context)f.close()def readTextFileByLines(file):f open(file, "r")lines f.read…
jfinal框架下使用c3P0连接池连接sql server 2008
2019独角兽企业重金招聘Python工程师标准>>> 闲话少说 进入正题 首先是工程需要的jar包 然后是c3p0的配置文件。我是这样配置的 仅供参考 jdbcDriver com.microsoft.sqlserver.jdbc.SQLServerDriver jdbcUrl jdbc:sqlserver://localhost:7777;databaseNametest us…
mongodb插入文档时不传ObjectId
type BookExt struct {ID bson.ObjectId bson:"_id"Title string bson:"title"SubTitle string bson:"subTitle"Author string bson:"author" } 以上结构体,在通过此结构体对象作为参数传入Insert插入…

[问题]DotNet 项目如何实现在构建时 Build 号自动增加?
[问题]DotNet 项目如何实现在构建时 Build 号自动增加? 继续昨天的问题,今天在Google上找了一下,没有找到很好的方案。目前找到的解决方案有以下几种:1.使用一个地三方的 VS.Net 插件,实现在编译时 Build 号自动增加&a…

编写程序记录文件位置
当我们编写程序是会注意到,首先是配置一些函数的结构体。 所以我们就要找到下面的界面,然后打开FWLB中.c文件下面所对应的.h文件,这样就能查找到相应的结构体。下图为我所找到的中断的结构体、 然后就是查找相对应的中断向量。具体就是打开 还…
mnist数据集保存为图片
#coding: utf-8 from tensorflow.examples.tutorials.mnist import input_data import scipy.misc import os import numpy as np# 读取MNIST数据集。如果不存在会事先下载。 mnist input_data.read_data_sets("MNIST_data/", one_hotTrue)# 我们把原始图片保存在MN…
Python3数据分析与挖掘建模实战
<div>课程地址:http://icourse8.com/Python3_shujufenxi.html</div>复制代码第1章 课程介绍【赠送相关电子书随堂代码】 第2章 数据获取 第3章 单因子探索分析与数据可视化 第4章 多因子探索分析 第5章 预处理理论 第6章 挖掘建模 第7章 模型评估 第8章…
tensorflow生成对抗网络
import tensorflow as tf import numpy as np import os from tensorflow.examples.tutorials.mnist import input_data from matplotlib import pyplot as pltBATCH_SIZE 64 UNITS_SIZE 128 LEARNING_RATE 0.001 EPOCH 300 SMOOTH 0.1print("mnist手写体生成对抗网络…

博客园今天早上是不是出现什么问题了?
下面是我进我的blog后台管理和浏览博客园给出的提示。大约几分钟后恢复正常。转载于:https://www.cnblogs.com/freeyzh/archive/2004/12/01/71269.html
模态框获取id一直不变,都是同一个id值
2019独角兽企业重金招聘Python工程师标准>>> $(.refund-btn).click(function(){//此处必须是$(this),否则$(.refund-btn)重新获取,导致值一直不变var id $(this).attr(data-id);//var id $(.refund-btn).attr(data-id);错误,这样会导致一直…
标准功能模块组件 -- 内部联络单组件,内部邮件组件,提高多人异地协同办公效率...
为什么80%的码农都做不了架构师?>>> 未必什么功能都需要自己开发,我们不会自己开发一个数据库系统,也不会自己开发一个操作系统,同样我们每个功能模块都未必需要自己开发,自己开发最核心的模块,…

Microsoft patterns practices Enterprise Library released
一直关注这个东西,本来订阅了RSS,没想到GotDotNet上面的发布信息给清空了。 上周末发布的,今天才看到,刚刚下载了一个,下载还要求注册,真麻烦,现把地址共享,方便大家。 http://down…
图论之拓扑排序 poj 2367 Genealogical tree
题目链接 http://poj.org/problem?id2367 题意就是给定一系列关系,按这些关系拓扑排序。 #include<cstdio> #include<cstring> #include<queue> #include<vector> #include<algorithm> using namespace std; const int maxn200; int…
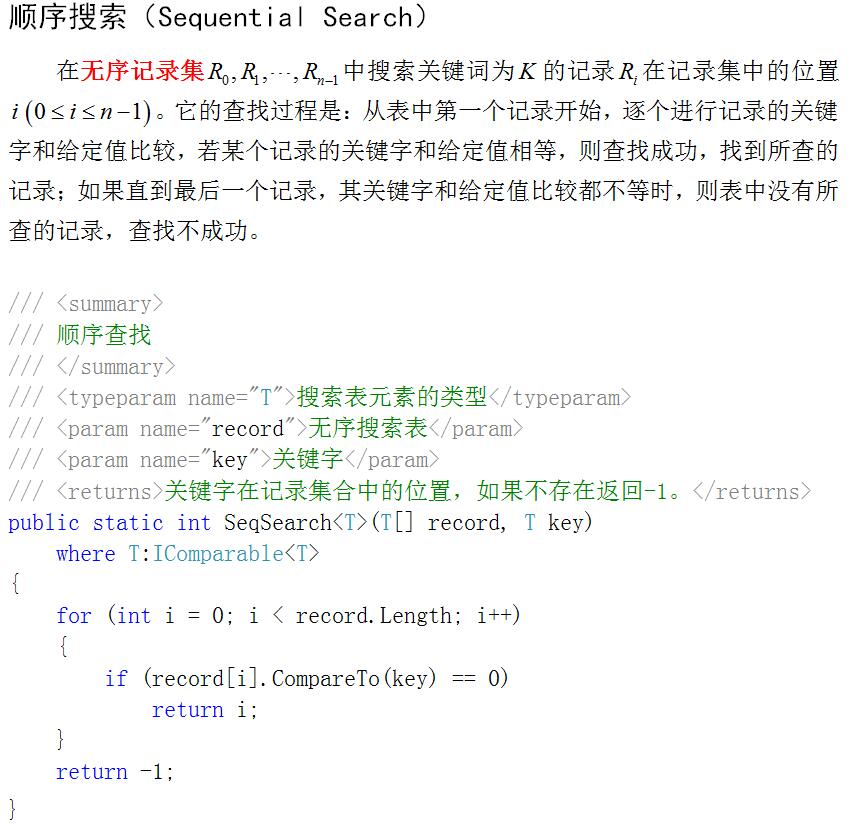
算法基础知识科普:8大搜索算法之顺序搜索
基本概念和术语 搜索表(Search Table):是由同一类型的数据元素(或记录)构成的集合。 关键字(Key):是数据元素中某个数据项的值,用它可以标识一个数据元素。若此关键字…
foj2024
为什么80%的码农都做不了架构师?>>> http://acm.fzu.edu.cn/problem.php?pid2024 View Code #include < stdio.h > #include < string .h > #define M 1010 int c[M][M]; int f[M][M]; int min( int a, int b, int c){ int z …
4701年新年快乐!
中华民族传统历法夏历(农历)采用的是干支纪年法,是世界上最古老的历法之一。干支即“六十甲子”,以60年为一循环。它的纪元开始相传可追溯到黄帝轩辕氏时代,按公元计算,第一个“甲子年”应是在公元前2697年…