iOS 多级下拉菜单
前言
App 常用控件 -- 多级下拉菜单, 如团购类, 房屋类, 对数据进行筛选. 有一级, 二级, 三级, 再多就不会以这种样式,呈现给用户了. 作者就简单聊一下 多级下拉菜单

一 目标
- 默认显示一个 TableView, 点击数据后, 添加第二个TableView, 并实现大小变化
- 第二次打开下拉菜单. 保存上次选中数据
二 菜单控件DropMenuView
.h文件
#import <UIKit/UIKit.h>@class DropMenuView;
@protocol DropMenuViewDelegate <NSObject>-(void)dropMenuView:(DropMenuView *)view didSelectName:(NSString *)str;@end@interface DropMenuView : UIView@property (nonatomic, weak) id<DropMenuViewDelegate> delegate;
/** 箭头变化 */
@property (nonatomic, strong) UIView *arrowView;/**控件设置@param view 提供控件 位置信息@param tableNum 显示TableView数量@param arr 使用数据*/
-(void)creatDropView:(UIView *)view withShowTableNum:(NSInteger)tableNum withData:(NSArray *)arr;/** 视图消失 */
- (void)dismiss;@end
.m文件
#import "DropMenuView.h"#define kWidth [UIScreen mainScreen].bounds.size.width
#define kHeight [UIScreen mainScreen].bounds.size.height@interface DropMenuView ()<UITableViewDelegate, UITableViewDataSource>
{
@private/** 保存 选择的数据(行数) */NSInteger selects[3];
}@property (nonatomic, assign) BOOL show;   // 按钮点击后 视图显示/隐藏
@property (nonatomic, assign) CGFloat rowHeightNum; // 设置 rom 高度/* 底层取消按钮 */
@property (nonatomic, strong) UIButton *cancelButton;
/** 表视图数组 */
@property (nonatomic, strong) NSArray *tableViewArr;
/** 表视图的 底部视图 */
@property (nonatomic, strong) UIView *tableViewUnderView;
/** 显示 TableView 数量 */
@property (nonatomic, assign) NSInteger tableCount;
/** 数据 */
@property (nonatomic, strong) NSArray *dataArr;@end@implementation DropMenuView- (instancetype)init
{self = [super init];if (self) {/** 数据初始化 */self.dataArr = [NSArray array];/** 保存 初始值为-1 */for (int i = 0; i < 3; i++) {selects[i] = -1;}/* 底层取消按钮 */self.cancelButton = [UIButton buttonWithType:UIButtonTypeCustom];self.cancelButton.backgroundColor = [UIColor colorWithWhite:0.0 alpha:0.3];[self.cancelButton addTarget:self action:@selector(clickCancelButton:) forControlEvents:UIControlEventTouchUpInside];[self addSubview:self.cancelButton];/** 表视图的 底部视图初始化 */self.tableViewUnderView = [[UIView alloc] init];self.tableViewUnderView.backgroundColor = [UIColor colorWithRed:0.74 green:0.73 blue:0.76 alpha:1.000];[self.cancelButton addSubview:self.tableViewUnderView];/** 默认设置为no, row高度为40 */self.show = NO;self.rowHeightNum = 40.0f;}return self;
}-(void)creatDropView:(UIView *)view withShowTableNum:(NSInteger)tableNum withData:(NSArray *)arr{if (!self.show) {self.show = !self.show;// 显示 TableView数量self.tableCount = tableNum;// 数据self.dataArr = arr;for (UITableView *tableView in self.tableViewArr) {[tableView reloadData];}// 初始位置 设置CGFloat x = 0.f;CGFloat y = view.frame.origin.y + view.frame.size.height;CGFloat w = kWidth;CGFloat h = kHeight - y;self.frame = CGRectMake(x, y, w, h);self.cancelButton.frame = CGRectMake(0, 0, self.frame.size.width, self.frame.size.height);self.tableViewUnderView.frame = CGRectMake(0, 0, self.frame.size.width, self.rowHeightNum * 7);if (!self.superview) {[[[UIApplication sharedApplication] keyWindow] addSubview:self];self.alpha = 0.0f;[UIView animateWithDuration:0.2f animations:^{self.alpha = 1.0f;}];[self loadSelects];[self adjustTableViews];}}else{/** 什么也不选择时候, 再次点击按钮 消失视图 */[self dismiss];}
}#pragma mark - 加载选中的TableView
-(void)loadSelects{[self.tableViewArr enumerateObjectsUsingBlock:^(UITableView *tableView, NSUInteger idx, BOOL * _Nonnull stop) {// 刷新TableView数据[tableView reloadData];// 选中TableView某一行[tableView selectRowAtIndexPath:[NSIndexPath indexPathForRow:selects[idx] inSection:0] animated:NO scrollPosition:UITableViewScrollPositionNone];//  加 !idx 是因为 循环第一次 idx == 0 方法不执行, 所以需要循环一次 加载一个TableView.if((selects[idx] != -1 && !tableView.superview) || !idx) {[self.tableViewUnderView addSubview:tableView];[UIView animateWithDuration:0.2 animations:^{if (self.arrowView) {self.arrowView.transform = CGAffineTransformMakeRotation(M_PI);}}];}}];}#pragma mark - 重置TableView的 位置
-(void)adjustTableViews{// 显示的 TableView 数量int addTableCount = 0;for (UITableView *tableView in self.tableViewArr) {if (tableView.superview) {addTableCount++;}}for (int i = 0; i < addTableCount; i++) {UITableView *tableView = self.tableViewArr[i];CGRect adjustFrame = tableView.frame;adjustFrame.size.width = kWidth / addTableCount ;adjustFrame.origin.x = adjustFrame.size.width * i + 0.5 * i;adjustFrame.size.height = self.tableViewUnderView.frame.size.height ;tableView.frame = adjustFrame;}}#pragma mark - TableView协议/** 行数 */
-(NSInteger)tableView:(UITableView *)tableView numberOfRowsInSection:(NSInteger)section{NSInteger __block count;[self.tableViewArr enumerateObjectsUsingBlock:^(id  _Nonnull obj, NSUInteger idx, BOOL * _Nonnull stop) {if (obj == tableView) {NSInteger firstSelectRow = ((UITableView *)self.tableViewArr[0]).indexPathForSelectedRow.row ;  NSInteger secondSelectRow = ((UITableView *)self.tableViewArr[1]).indexPathForSelectedRow.row ;count = [self countForChooseTable:idx firstTableSelectRow:firstSelectRow withSecondTableSelectRow:secondSelectRow];}}];return count;
}// 可以将 方法提出来, 如果有需要 可以设置为协议实现封装, 作者仅提取一个, 其他均在 TableView自身协议中写
-(NSInteger)countForChooseTable:(NSInteger)idx firstTableSelectRow:(NSInteger)firstSelectRow withSecondTableSelectRow:(NSInteger)secondSelectRow{if (idx == 0) {return self.dataArr.count;}else  if (idx == 1){if (firstSelectRow == -1) {return 0;}else{if (self.tableCount == 2) {return [self.dataArr[firstSelectRow][@"subcategories"] count];}else{return [self.dataArr[firstSelectRow][@"sub"] count];}}}else{if (secondSelectRow == -1) {return 0;}else{return [self.dataArr[firstSelectRow][@"sub"][secondSelectRow][@"sub"] count];}}
}/** 自定义cell */
-(UITableViewCell *)tableView:(UITableView *)tableView cellForRowAtIndexPath:(NSIndexPath *)indexPath{UITableViewCell *cell = [tableView dequeueReusableCellWithIdentifier:@"DropCell"];cell.textLabel.font = [UIFont systemFontOfSize:14];if (self.tableCount == 1) {cell.textLabel.text = self.dataArr[indexPath.row][@"label"];}else if (self.tableCount == 2){NSInteger firstSelectRow = ((UITableView *)self.tableViewArr[0]).indexPathForSelectedRow.row;if (tableView == self.tableViewArr[0]) {cell.textLabel.text = self.dataArr[indexPath.row][@"name"];}else if (tableView == self.tableViewArr[1]){cell.textLabel.text = self.dataArr[firstSelectRow][@"subcategories"][indexPath.row];}}else if (self.tableCount == 3){NSInteger firstSelectRow = ((UITableView *)self.tableViewArr[0]).indexPathForSelectedRow.row;NSInteger secondSelectRow = ((UITableView *)self.tableViewArr[1]).indexPathForSelectedRow.row;if (tableView == self.tableViewArr[0]) {cell.textLabel.text = self.dataArr[indexPath.row][@"name"];}else if (tableView == self.tableViewArr[1]){cell.textLabel.text = self.dataArr[firstSelectRow][@"sub"][indexPath.row][@"name"];}else if (tableView == self.tableViewArr[2]){cell.textLabel.text =  self.dataArr[firstSelectRow][@"sub"][secondSelectRow][@"sub"][indexPath.row];}}return cell;
}/** 点击 */
-(void)tableView:(UITableView *)tableView didSelectRowAtIndexPath:(NSIndexPath *)indexPath{UITableView *secondTableView = self.tableViewArr[1];UITableView *thirdTableView = self.tableViewArr[2];if (self.tableCount == 1) {[self saveSelects];[self dismiss];[_delegate dropMenuView:self didSelectName:self.dataArr[indexPath.row][@"label"]];}else if (self.tableCount == 2){if (tableView == self.tableViewArr[0]) {if (!secondTableView.superview) {[self.tableViewUnderView addSubview:secondTableView];}[secondTableView reloadData];[self adjustTableViews];}else if (tableView == self.tableViewArr[1]){[self saveSelects];[self dismiss];NSInteger firstSelectRow = ((UITableView *)self.tableViewArr[0]).indexPathForSelectedRow.row;[_delegate dropMenuView:self didSelectName:self.dataArr[firstSelectRow][@"subcategories"][indexPath.row]];}}else if (self.tableCount == 3){NSInteger firstSelectRow = ((UITableView *)self.tableViewArr[0]).indexPathForSelectedRow.row;NSInteger secondSelectRow = ((UITableView *)self.tableViewArr[1]).indexPathForSelectedRow.row;if (tableView == self.tableViewArr[0]) {if (!secondTableView.superview) {[self.tableViewUnderView addSubview:secondTableView];}[self adjustTableViews];[secondTableView reloadData];}else if (tableView == self.tableViewArr[1]){if (!thirdTableView.superview) {[self.tableViewUnderView addSubview:thirdTableView];}[self adjustTableViews];[thirdTableView reloadData];}else if (tableView == self.tableViewArr[2]){[self saveSelects];[self dismiss];[_delegate dropMenuView:self didSelectName:self.dataArr[firstSelectRow][@"sub"][secondSelectRow][@"sub"][indexPath.row]];}}}#pragma mark - 记录 选择状态
-(void)saveSelects{[self.tableViewArr enumerateObjectsUsingBlock:^(UITableView *tableView, NSUInteger idx, BOOL * _Nonnull stop) {selects[idx] = tableView.superview ? tableView.indexPathForSelectedRow.row : -1;}];
}#pragma mark - 视图消失
- (void)dismiss{if(self.superview) {self.show = !self.show;[self endEditing:YES];[UIView animateWithDuration:.25f animations:^{self.alpha = .0f;} completion:^(BOOL finished) {[self.tableViewUnderView.subviews enumerateObjectsUsingBlock:^(UIView *obj, NSUInteger idx, BOOL *stop) {[obj removeFromSuperview];}];[self removeFromSuperview];[UIView animateWithDuration:0.2 animations:^{if (self.arrowView) {self.arrowView.transform = CGAffineTransformMakeRotation(0);}}];}];}
}/** 底部按钮, 视图消失 */
-(void)clickCancelButton:(UIButton *)button{[self dismiss];
}/** 懒加载 */
-(NSArray *)tableViewArr{if (_tableViewArr == nil) {_tableViewArr = @[[[UITableView alloc] init], [[UITableView alloc] init], [[UITableView alloc] init]];for (UITableView *tableView in _tableViewArr) {[tableView registerClass:[UITableViewCell class] forCellReuseIdentifier:@"DropCell"];tableView.delegate = self;tableView.dataSource = self;tableView.frame = CGRectMake(0, 0, 0, 0);tableView.backgroundColor = [UIColor whiteColor];tableView.tableFooterView = [[UIView alloc] init];tableView.showsVerticalScrollIndicator = NO;tableView.rowHeight = self.rowHeightNum;}}return _tableViewArr;
}@end
三 调用控件MenuScreeningView
.h文件
#import <UIKit/UIKit.h>@interface MenuScreeningView : UIView#pragma mark - 筛选菜单消失
-(void)menuScreeningViewDismiss;@end
.m文件
#import "MenuScreeningView.h"
#import "DropMenuView.h"#define kWidth [UIScreen mainScreen].bounds.size.width
#define kHeight [UIScreen mainScreen].bounds.size.height@interface MenuScreeningView ()<DropMenuViewDelegate>@property (nonatomic, strong) UIButton *oneLinkageButton;
@property (nonatomic, strong) UIButton *twoLinkageButton;
@property (nonatomic, strong) UIButton *threeLinkageButton;@property (nonatomic, strong) DropMenuView *oneLinkageDropMenu;
@property (nonatomic, strong) DropMenuView *twoLinkageDropMenu;
@property (nonatomic, strong) DropMenuView *threeLinkageDropMenu;@property (nonatomic, strong) NSArray *addressArr;
@property (nonatomic, strong) NSArray *categoriesArr;
@property (nonatomic, strong) NSArray *sortsArr;@end@implementation MenuScreeningView- (instancetype)initWithFrame:(CGRect)frame
{self = [super initWithFrame:frame];if (self) {self.oneLinkageButton = [UIButton buttonWithType:UIButtonTypeCustom];self.oneLinkageButton.frame = CGRectMake(0, 0, kWidth/3, 36);[self setUpButton:self.oneLinkageButton withText:@"一级"];self.oneLinkageDropMenu = [[DropMenuView alloc] init];self.oneLinkageDropMenu.arrowView = self.oneLinkageButton.imageView;self.oneLinkageDropMenu.delegate = self;self.twoLinkageButton = [UIButton buttonWithType:UIButtonTypeCustom];self.twoLinkageButton.frame = CGRectMake(kWidth/3, 0, kWidth/3, 36);[self setUpButton:self.twoLinkageButton withText:@"二级"];self.twoLinkageDropMenu = [[DropMenuView alloc] init];self.twoLinkageDropMenu.arrowView = self.twoLinkageButton.imageView;self.twoLinkageDropMenu.delegate = self;self.threeLinkageButton = [UIButton buttonWithType:UIButtonTypeCustom];self.threeLinkageButton.frame = CGRectMake(2 * kWidth/3, 0,  kWidth/3, 36);[self setUpButton:self.threeLinkageButton withText:@"三级"];self.threeLinkageDropMenu = [[DropMenuView alloc] init];self.threeLinkageDropMenu.arrowView = self.threeLinkageButton.imageView;self.threeLinkageDropMenu.delegate = self;/** 最下面横线 */UIView *horizontalLine = [[UIView alloc] initWithFrame:CGRectMake(0, self.frame.size.height - 0.6, kWidth, 0.6)];horizontalLine.backgroundColor = [UIColor colorWithWhite:0.8 alpha:1.000];[self addSubview:horizontalLine];}return self;
}#pragma mark - 按钮点击推出菜单 (并且其他的菜单收起)
-(void)clickButton:(UIButton *)button{if (button == self.oneLinkageButton) {[self.twoLinkageDropMenu dismiss];[self.threeLinkageDropMenu dismiss];[self.oneLinkageDropMenu creatDropView:self withShowTableNum:1 withData:self.sortsArr];}else if (button == self.twoLinkageButton){[self.oneLinkageDropMenu dismiss];[self.threeLinkageDropMenu dismiss];[self.twoLinkageDropMenu creatDropView:self withShowTableNum:2 withData:self.categoriesArr];}else if (button == self.threeLinkageButton){[self.oneLinkageDropMenu dismiss];[self.twoLinkageDropMenu dismiss];[self.threeLinkageDropMenu creatDropView:self withShowTableNum:3 withData:self.addressArr];}
}#pragma mark - 筛选菜单消失
-(void)menuScreeningViewDismiss{[self.oneLinkageDropMenu dismiss];[self.twoLinkageDropMenu dismiss];[self.threeLinkageDropMenu dismiss];
}#pragma mark - 协议实现
-(void)dropMenuView:(DropMenuView *)view didSelectName:(NSString *)str{if (view == self.oneLinkageDropMenu) {[self.oneLinkageButton setTitle:str forState:UIControlStateNormal];[self buttonEdgeInsets:self.oneLinkageButton];}else if (view == self.twoLinkageDropMenu){[self.twoLinkageButton setTitle:str forState:UIControlStateNormal];[self buttonEdgeInsets:self.twoLinkageButton];}else if (view == self.threeLinkageDropMenu){[self.threeLinkageButton setTitle:str forState:UIControlStateNormal];[self buttonEdgeInsets:self.threeLinkageButton];}
}#pragma mark - 设置Button
-(void)setUpButton:(UIButton *)button withText:(NSString *)str{[button addTarget:self action:@selector(clickButton:) forControlEvents:UIControlEventTouchUpInside];[self addSubview:button];[button setTitle:str forState:UIControlStateNormal];button.titleLabel.font =  [UIFont systemFontOfSize:11];button.titleLabel.lineBreakMode = NSLineBreakByTruncatingTail;[button setTitleColor:[UIColor colorWithWhite:0.3 alpha:1.000] forState:UIControlStateNormal];[button setImage:[UIImage imageNamed:@"downarr"] forState:UIControlStateNormal];[self buttonEdgeInsets:button];UIView *verticalLine = [[UIView alloc]init];verticalLine.backgroundColor = [UIColor colorWithWhite:0.9 alpha:1.0];[button addSubview:verticalLine];verticalLine.frame = CGRectMake(button.frame.size.width - 0.5, 3, 0.5, 30);
}-(void)buttonEdgeInsets:(UIButton *)button{[button setTitleEdgeInsets:UIEdgeInsetsMake(0, -button.imageView.bounds.size.width + 2, 0, button.imageView.bounds.size.width + 10)];[button setImageEdgeInsets:UIEdgeInsetsMake(0, button.titleLabel.bounds.size.width + 10, 0, -button.titleLabel.bounds.size.width + 2)];}#pragma mark - 懒加载
-(NSArray *)addressArr{if (_addressArr == nil) {NSDictionary *dic = [NSDictionary dictionaryWithContentsOfFile:[[NSBundle mainBundle] pathForResource:@"address.plist" ofType:nil]];_addressArr = dic[@"address"];}return _addressArr;
}-(NSArray *)categoriesArr{if (_categoriesArr == nil) {_categoriesArr = [NSArray arrayWithContentsOfFile:[[NSBundle mainBundle] pathForResource:@"categories.plist" ofType:nil]];}return _categoriesArr;
}-(NSArray *)sortsArr{if (_sortsArr == nil) {_sortsArr =  [NSArray arrayWithContentsOfFile:[[NSBundle mainBundle] pathForResource:@"sorts.plist" ofType:nil]];}return _sortsArr;
}@end
四 调用
MenuScreeningView *menuScreening = [[MenuScreeningView alloc] initWithFrame:CGRectMake(0, 64, kWidth, 36)];[self.view addSubview:menuScreening];menuScreening.backgroundColor = [UIColor whiteColor];五 效果图

六 demo下载
因为数据源 无法上次上传[简书], 所以上传个demo, 细节方面, 可能有未注意地方,仅供参考.
传送门 : https://github.com/Lucifer0103/LinkageMenu.git
以 上 !
相关文章:

fork有啥用
#include <stdio.h>#include <sys/types.h>#include <unistd.h>int main(){ pid_t pid1; pid_t pid2; pid1 fork(); pid2 fork(); printf("pid1:%d, pid2:%d\n", pid1, pid2);}输出:pid1:3411, pid2:3412 //父进…
Html Agility Pack基础类介绍及运用
Html Agility Pack 源码中的类大概有28个左右,其实不算一个很复杂的类库,但它的功能确不弱,为解析DOM已经提供了足够强大的功能支持,可以跟jQuery操作DOM媲美:) 基础类和基础方法介绍 Html Agility Pack最常…
【Python自动化测试】setuptools
setuptools Python标准的打包分发工具使用简单的setup.py文件,将Python应用打包 最基础的setup.py文件 #!/usr/bin/env python3 # -*- coding: utf-8 -*- from setuptools import setup setup(nameMyDemo, # 应用名version1.0, # 版本号packages[myd…
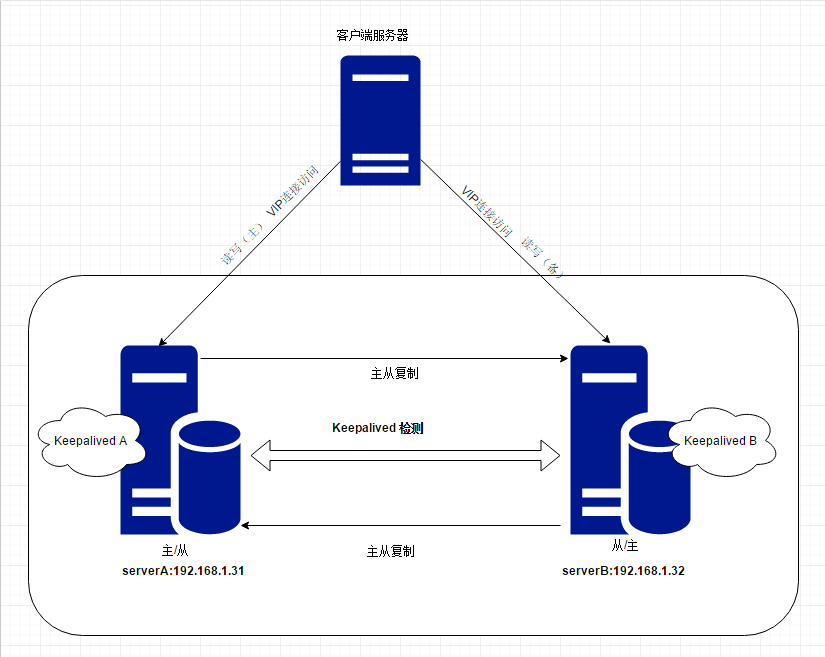
企业级-Mysql双主互备高可用负载均衡架构(基于GTID主从复制模式)(原创)
前言:原理与思想这里选用GTID主从复制模式Mysql主从复制模式,是为了更加确保主从复制的正确性、健康性与易配性。这里做的是两服务器A,B各有Mysql实例3310,两个实例间互为主从主从复制模式采用GTID主从复制模式,在服务器A,B上配置…

Objective-C自动生成文档工具:appledoc
作者 iOS_小松哥 关注 2016.12.13 15:47* 字数 919 阅读 727评论 10喜欢 35由于最近琐事比较多,所以好久没有写文章了。今天我们聊一聊Objective-C自动生成文档。 做项目的人多了,就需要文档了。手工写文档是一件苦差事,但是我们也有从源码中…
void main()是错的!
很多人甚至市面上的一些书籍,都使用了void main( ),其实这是错误的。C/C中从来没有定义过void main( )。C之父Bjarne Stroustrup在他的主页上的FAQ中明确地写着The definition void main( ) { /* ... */ } is not and never has been C, nor has it even…
Some tips
VScode自动换行 Code -> Perference -> Setting [ “editor.wordWrap”: “on” ]

iOS 自定义转场动画初探
最近项目刚迭代,正好闲下来捣鼓了一下iOS的自定义转场的效果。闲话不多说,直接开始上代码吧。(ps:请忽略实际的转场效果,关注技术本身呢哦。pps:主要是转场的动画做的比较low啦!) 1、首先定义一个转场动画的…
Delphi实现WebService带身份认证的数据传输
WebService使得不同开发工具开发出来的程序可以在网络连通的环境下相互通信,它最大的特点就是标准化(基于XML的一系列标准)带来的跨平台、跨开发工具的通用性,基于HTTP带来的畅通无阻的能力(跨越防火墙)。WebService给我们的软件开发带来了诸多好处,但是有一点还是必须要考虑到…

【Linux学习笔记】 - 什么是Linux?
Linux Linux内核 GNU工具 组成部分 Linux内核GUN工具图形化桌面环境应用软件 Linux内核 地位:Linux核心,控制计算机系统上的所有硬件和软件。必要时,分配硬件,并根据需要执行软件 主要功能: a. 系统内存存储 ——…

【转】 Android快速开发系列 10个常用工具类 -- 不错
原文网址:http://blog.csdn.net/lmj623565791/article/details/38965311 转载请标明出处:http://blog.csdn.net/lmj623565791/article/details/38965311,本文出自【张鸿洋的博客】 打开大家手上的项目,基本都会有一大批的辅助类&a…

CollectionView侧滑刷新
作者 SoDoIt 关注 2017.03.05 16:39 字数 33 阅读 31评论 0喜欢 2ABSideRefresh.gif效仿MJRefresh写的侧滑刷新,原理不讲了,需要的直接看代码 GitHub:https://github.com/wangjingyu0018/ABRefresh.git

函数功能MATLAB
近期一直在查找函数功能之类的题问,现在正好有机会和大家享共一下. 百科名片 录目 简介开展程历要主功能新特性版本分析特色优势开展简介开展程历要主功能新特性版本分析特色优势开展编辑本段 简介 matlab开辟任务面界 编辑本段 开展程历 编辑本段 要主功能 1.数值析分 2.数值和…
[HTTP协议]基础篇-待完结
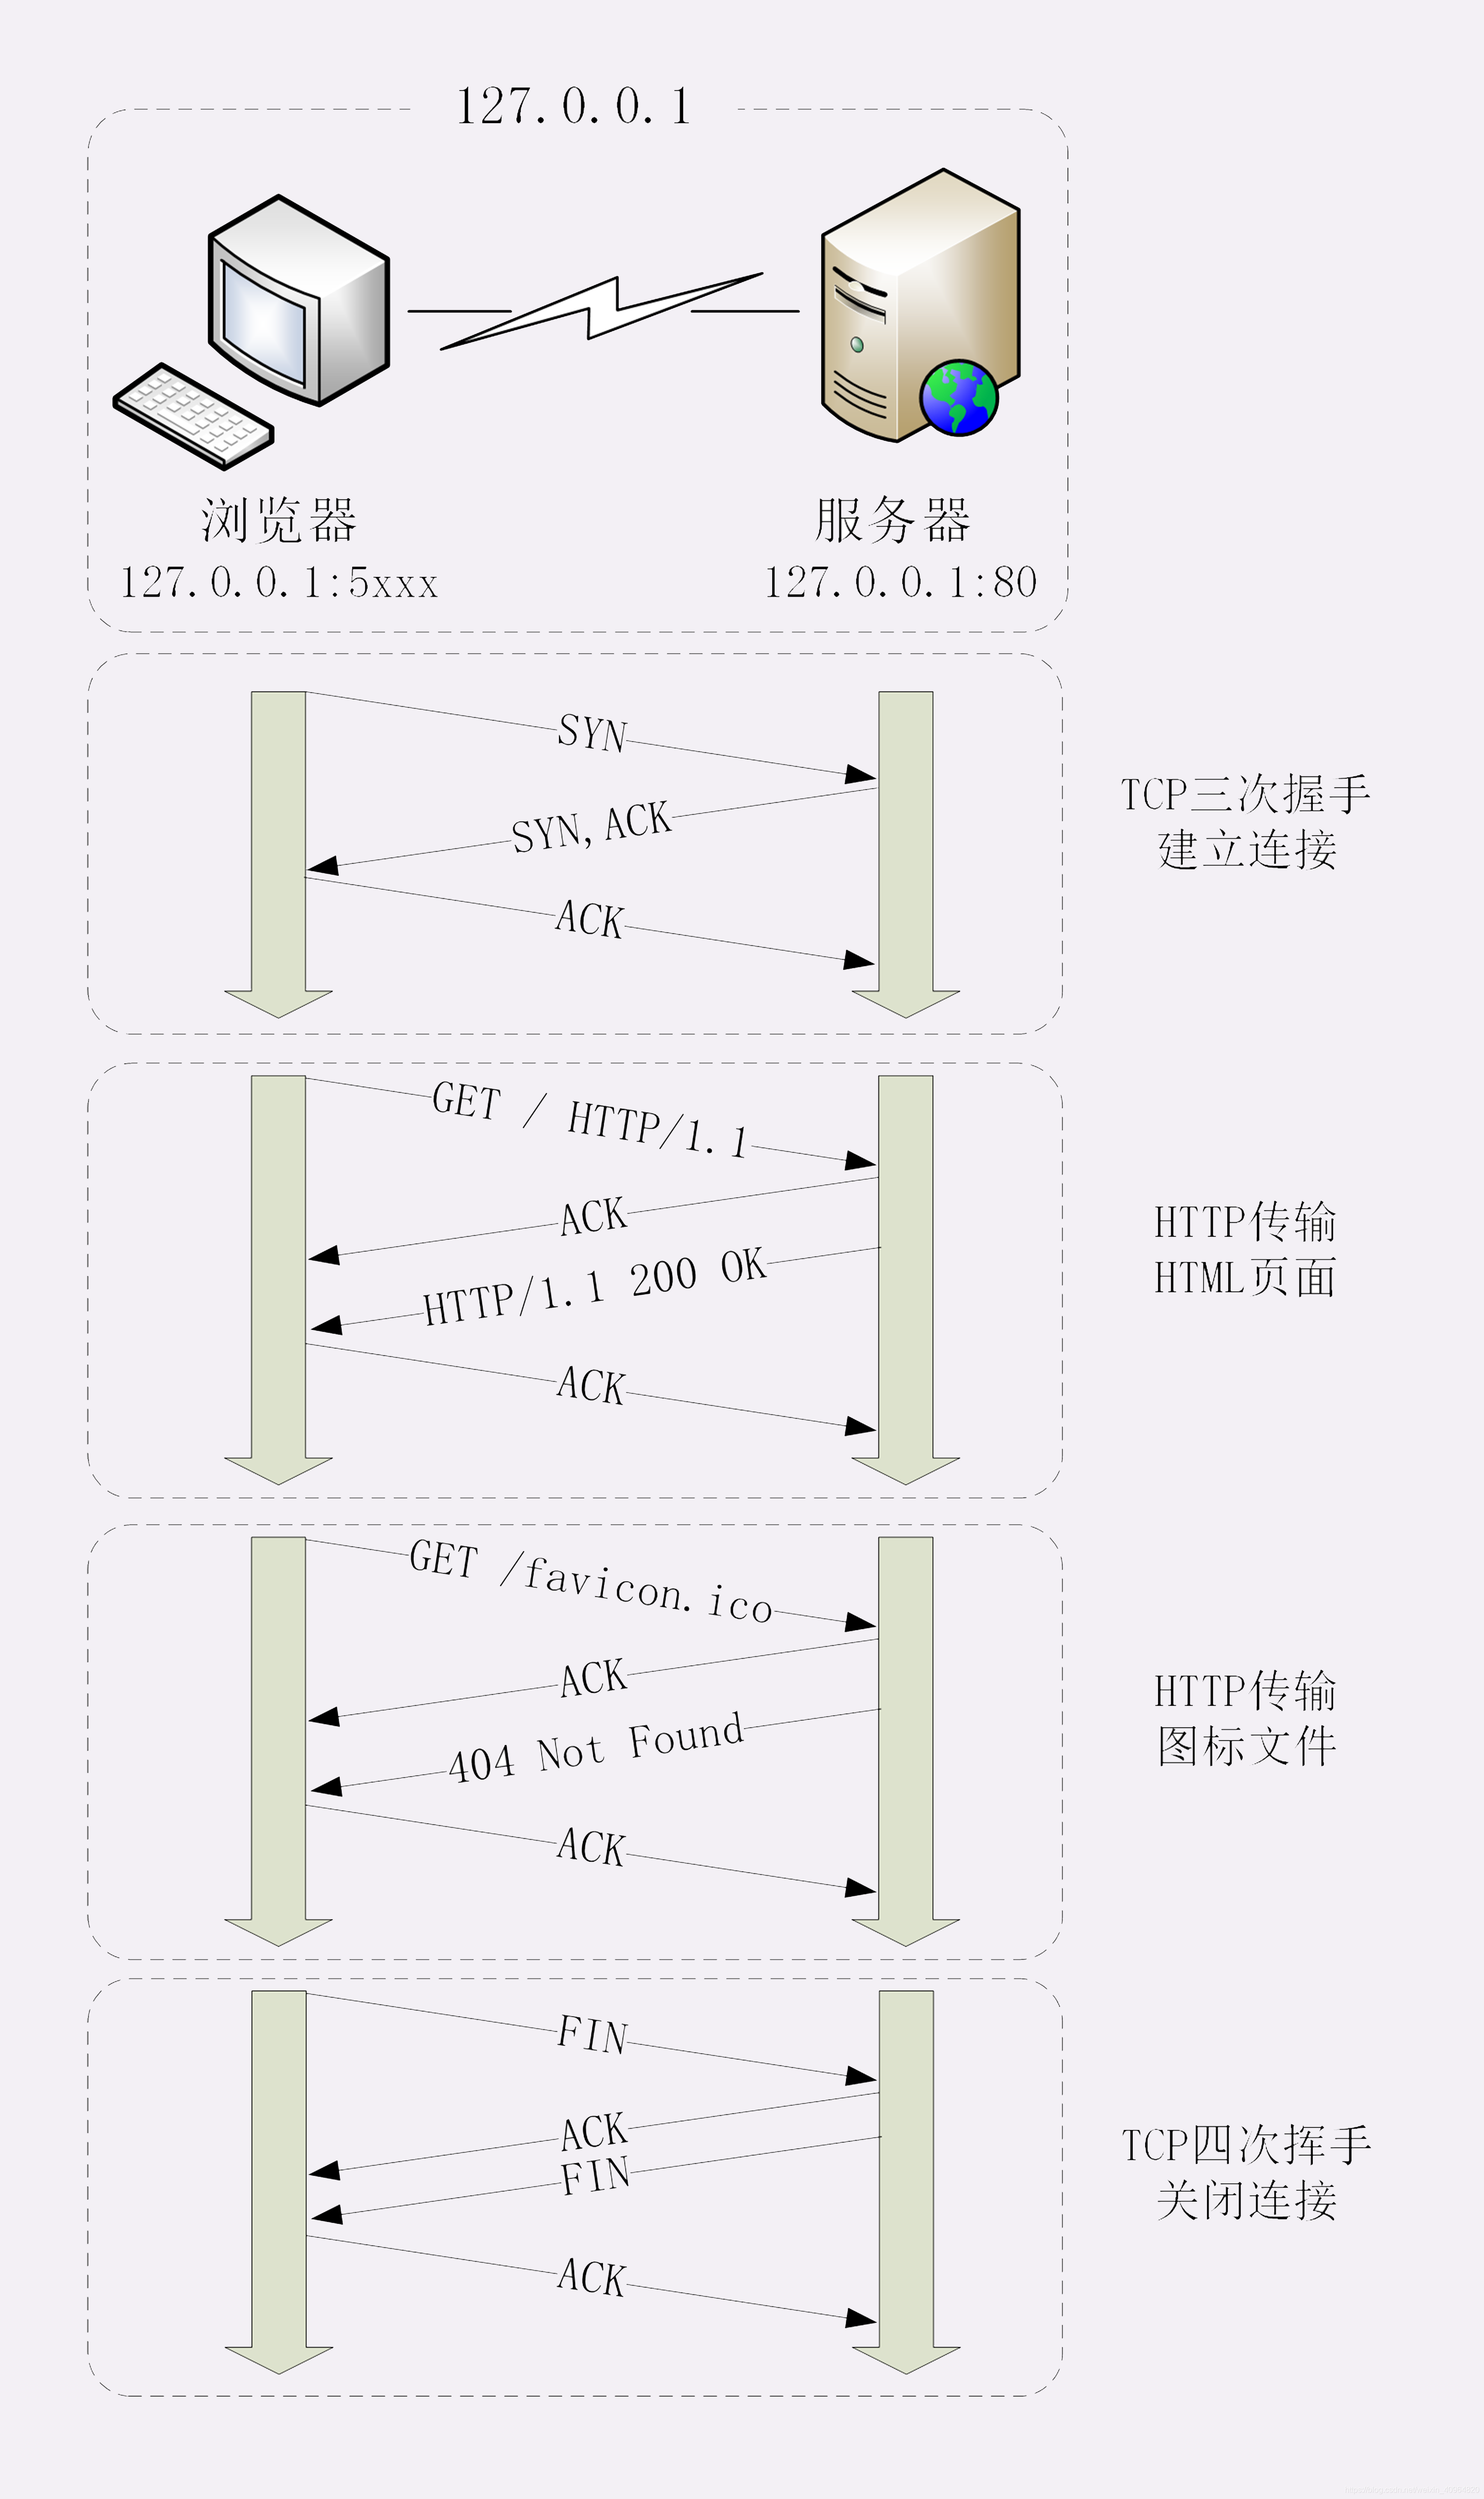
文章目录输入网址后回车输入网址后回车 简单的浏览器HTTP请求过程: 浏览器从地址栏输入中获取服务器IP地址和端口号浏览器用TCP的三次握手与服务器建立连接浏览器向服务器发送拼好的报文服务器收到报文后处理请求,同样拼好报文再发给浏览器浏览器解析报…
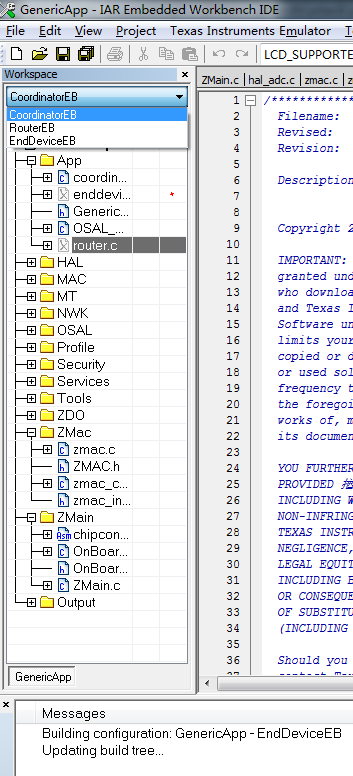
IAR之工程配置
参考 : IAR的Workspace顶部下拉菜单中Debug和Release http://blog.csdn.net/yanpingsz/article/details/5588525 最近买了zigbee模块的开发板回来研究, 其中一个实验程序里面有三个版本, 分别是路由/终端/协调器, 忙活了半天不知道同一个project是如何配置成3个不同的版本的. …
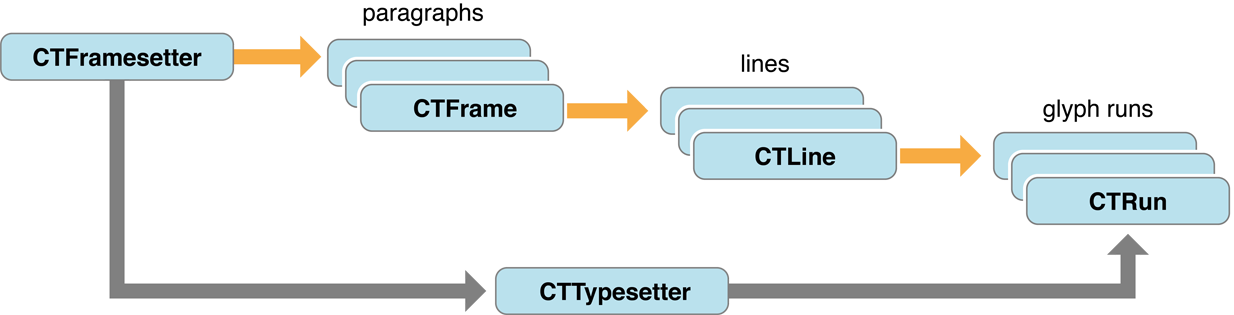
CoreText入坑一
CoreText是Mac OS和iOS系统中处理文本的low-level API, 不管是使用OC还是swift, 实际我们使用CoreText都还是间接或直接使用C语言在写代码。CoreText是iOS和Mac OS中文本处理的根基, TextKit和WebKit都是构建于其上。 一. 基础 1.在使用CoreText编写代码之前, 需要先了解一些基…
mysql连接hang住问题分析
【问题现象】: 1. Linuxc多线程连接mysql数据库,每次都是短连接,操作完后就释放连接,有时候会出现mysql_real_connect挂住的现象 2. 挂住超时mysql_real_connect返回后报错如下:Lostconnection to MySQL s…

【Linux学习笔记】 -- 基本Shell命令
常见的目录名均基于文件系统层级标准(filesystem hierarchy standard,FHS) Linux的四个部分: 1 Linux内核:控制所有硬软件,必要时分配硬件根据需要执行软件 系统内存管理:可用物理内存 创建、管理虚拟内存[交换空间…

【OpenCV】图像代数运算:平均值去噪,减去背景
代数运算,就是对两幅图像的点之间进行加、减、乘、除的运算。四种运算相应的公式为: 代数运算中比较常用的是图像相加和相减。图像相加常用来求平均值去除addtive噪声或者实现二次曝光(double-exposure)。图像相减用于减去背景或周…
简明 Vim 练级攻略(转)
vim的学习曲线相当的大(参看各种文本编辑器的学习曲线),所以,如果你一开始看到的是一大堆VIM的命令分类,你一定会对这个编辑器失去兴趣的。下面的文章翻译自《Learn Vim Progressively》,我觉得这是给新手最…
iOS 的离屏渲染
原文链接:http://www.imlifengfeng.com/blog/?p593OpenGL ES 是一套多功能开放标准的用于嵌入系统的 C-based 的图形库,用于 2D 和 3D 数据的可视化。OpenGL 被设计用来转换一组图形调用功能到底层图形硬件(GPU),由 G…
MySQL 常见操作指令
什么是SQL? SQL(Structured Query Language)用于访问和操作数据库的结构化查询语言。 数据库包含一个或多个表,每个表均有名称标识,包含数据的记录(行)。 典型的SQL语句 1. SELEC语句 SELE…
iOS 实现点击微信头像效果
来源:伯乐在线 - 小良 如有好文章投稿,请点击 → 这里了解详情 如需转载,发送「转载」二字查看说明 公司产品需要实现点击个人主页头像可以放大头像、缩放头像、保存头像效果(和点击微信个人头像类似),故找…
HDU 4292 Food(dinic +拆点)
题目链接 我做的伤心了,不知是模版效率低,还是错了,交上就是TLE,找了份别人的代码,改了好几下终于过了。。 1 #include <cstdio>2 #include <cstring>3 #include <queue>4 #include <map>5 #i…
jQuery中用ajax访问php接口文件
js代码 function ajax_request(){var result;var articleId new Object();articleIdgetArticleId();$.ajax({url: "/topicPage/getComment.php",//请求php文件的路径data:{id:articleId},//请求中要传送的参数,会自动拼接成一个路径,在php中用get方式获取…
Python 数据库操作 psycopg2
文章目录安装基本使用安装 psycopg 是 Python 语言中 PostpreSQL数据库接口 安装环境: Python:v2.7, v3.4~3.8PostGreSQL:7.4~12 pip install psycopg2基本使用 import psycopg2def connect_db(host: str,port: int,database: str,user:…
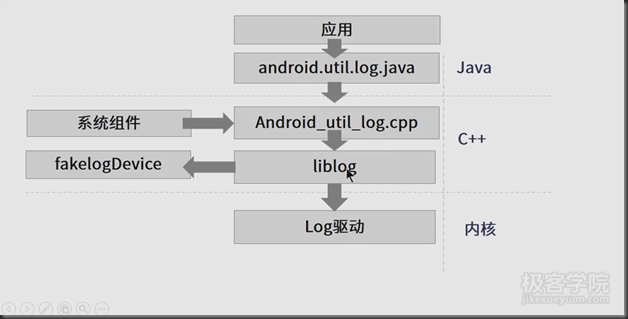
Android logcat命令详解
一、logcat命令介绍 1.android log系统 2.logcat介绍 logcat是android中的一个命令行工具,可以用于得到程序的log信息 log类是一个日志类,可以在代码中使用logcat打印出消息 常见的日志纪录方法包括:方法 描述 v(String,String) (vervbose)显…

[iOS]如何重新架构 JPVideoPlayer ?
注意:此文为配合 JPVideoPlayer version 2.0 版本发布而写,如果你想了解 2.0 版本的更新内容和所有实现细节,请点击前往 GitHub。 导言:我几个月前写了一个在 UITableView 中滑动 UITableViewCell 播放视频的框架,类似…

函数项目一个超感人的故事:关于swfupload在某些环境下面session丢失的完美解决方案(看完我哭了)...
查了好多资料,发现还是不全,干脆自己整理吧,至少保证在我的做法正确的,以免误导读者,也是给自己做个记录吧! 标题吸引到你了吗? 先说一下这个题问成形的原因。大家都晓得 session是靠cookie中的…
【学习笔记】git 使用文档
安装 git # mac 环境 brew install git检查是否安装成功 ➜ ~ git --version git version 2.20.1 (Apple Git-117)卸载 git ➜ ~ which -a git /usr/bin/git ➜ ~ cd /usr/bin ➜ bin sudo rm -rf git*git init 命令 对一个空文件,git 初始化。文件名称增加…