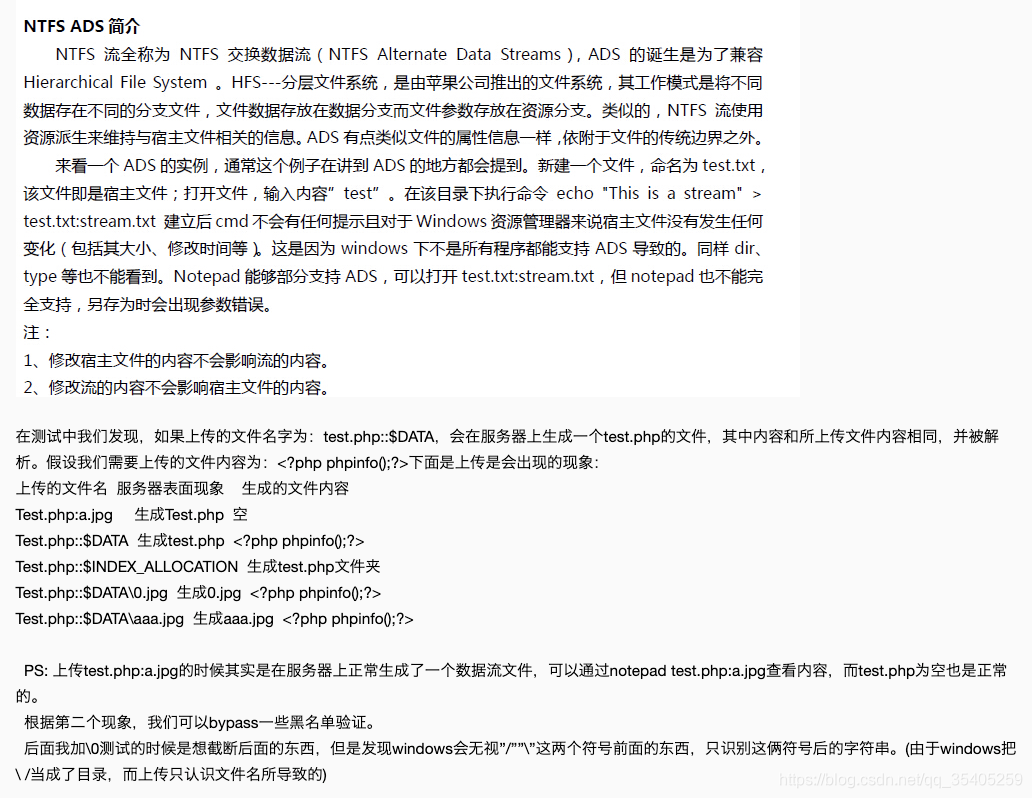
iOS 视频捕获系列之AVFoundation(一)
AVCaptureMovieFileOutput系列
在iOS开发过程中,或多或少的都涉及视频的操作。
尤其在去年直播行业的带动下,移动端对视频的处理也愈来愈发要求严格。
本文也是在 这篇 中参考而来。
Swift 版本哦!
- 本文 demo 均可在 GitHub 获得
- 本篇文章主要是让你学会以
AVCaptureMovieFileOutput式的输出 - 欢迎关注个人 博客
blog.aiyinyu.com
本篇不涉及 :
视频输出质量
帧率设置
具体的设备格式
像素格式
光学防抖
...等等
这些都会在下一篇中带你去认识。如果还不会用,就想了解这么多。就如同还不会走就要跑一样,是要跌大跟头滴!
正文:
在iOS当中对视频捕捉一般是 :
UIImagePickerController- 或者
AVFoundation
本文主要内容是: AVFoundation
AVFoundation与UIImagePickerController的区别在于 在于对视频流的处理,显然前者会更高级一点。- 而
AVFoundation中对视频的输出处理 又分为AVCaptureMovieFileOutput与AVAssetWriter。这里如果想要对视频的输出给出更多的操作那选择AVAssetWriter是个不错的选择。 - 所以这里重点介绍
AVFoundation更多的区别,还是在代码中体验比较好,说太多都没用。就是干
为了更好的查看其关系,下面的图比较直观一点:
 t
t首先我们新建一个工程
并在工程中的 plist 文件中添加访问 权限
Privacy - Camera Usage Description
Privacy - Microphone Usage Description
Privacy - Photo Library Usage Description
Privacy - Media Library Usage Description
先来研究
AVCaptureMovieFileOutput
关于 AVCaptureMovieFileOutput 看上图对号入座
首先新建一个 fileOutputViewController 控制器
控制器上放俩按钮: Close Record
你可以用 storyboard 拖拽也可以用代码实现其点击事件
由上图我们可以看到输出方式有两种 AVCaptureMovieFileOutput 与 AVAssetWriter ,在输出之前他们对视频的操作是一样的,所以我们可以把 它俩公共的部分抽象出来一个类,对使用不同的输出方式进行继承这个类就 OK 了
相同的部分抽象成 一个继承 NSObject 的 CaptureSessionCoordinator 公共类
该公共类不对采集后的视频不做输出处理,因为输出有两种不同的处理结果。
每一种处理正是其继承 CaptureSessionCoordinator 类的 子类完成其处理
公共类:CaptureSessionCoordinator
对 AVCaptureSession 类进行处理,相关属性如下:
AVCaptureSession
AVCaptureDevice
代理
视图
如下:
因为使用到线程,故对资源的加锁问题,在 Swift 中没法直接向 Oc 那样直接使用: synchronized 故在此利用闭包的特性达到相同的效果:
如何使用看文中代码
func synchronized(_ lock: AnyObject,dispose: ()->()) {objc_sync_enter(lock)dispose()objc_sync_exit(lock)
}由于对视频的处理都不是在主控制器fileOutputViewController里面执行的。故,对视频的输出都是需要代理来回调到控制器里面执行后续的相关操作。
所以这里需要一个代理:
protocol captureSessionCoordinatorDelegate: class {func coordinatorDidBeginRecording(coordinator: CaptureSessionCoordinator)func didFinishRecording(coordinator: CaptureSessionCoordinator)
}
上面的铺垫后,下面开始对 AVCaptureSession 进行相应的操作:
以我们的常识,该类中必须有这些方法:
- 开始运行
startRunning 结束运行
stopRunning开始记录
startRecording- 结束记录
stopRecording - 初始化初始化
AVCaptureVideoPreviewLayer
其他的方法可以在初始中进行,也可以进行模块化拆分
该类一个完整的代码如下:
class CaptureSessionCoordinator: NSObject {var captureSession: AVCaptureSession?var cameraDevice: AVCaptureDevice?var delegateCallQueue: DispatchQueue?weak var delegate: captureSessionCoordinatorDelegate?private var sessionQueue = DispatchQueue(label: "coordinator.Session")private var previewLayer: AVCaptureVideoPreviewLayer?override init() {super.init()captureSession = setupCaptureSession()}public func setDelegate(capDelegate: captureSessionCoordinatorDelegate,queue: DispatchQueue) {synchronized(self) {delegate = capDelegateif delegateCallQueue != queue {delegateCallQueue = queue}}}//MARK:            ________________Session Setup________________private func setupCaptureSession() -> AVCaptureSession {let session = AVCaptureSession()if !addDefaultCameraInputToCaptureSession(capSession: session) {printLogDebug("failed to add camera input to capture session")}if addDefaultMicInputToCaptureSession(capSession: session) {printLogDebug("failed to add mic input to capture session")}return session}private func addDefaultCameraInputToCaptureSession(capSession: AVCaptureSession) -> Bool {do {let cameraInput = try AVCaptureDeviceInput(device: AVCaptureDevice.defaultDevice(withMediaType: AVMediaTypeVideo))let success = addInput(input: cameraInput, capSession: capSession)cameraDevice = cameraInput.devicereturn success} catch let error as NSError {printLogDebug("error configuring camera input: \(error.localizedDescription)")return false}}private func addDefaultMicInputToCaptureSession(capSession: AVCaptureSession) -> Bool {do {let micInput = try AVCaptureDeviceInput(device: AVCaptureDevice.defaultDevice(withMediaType: AVMediaTypeAudio))let success = addInput(input: micInput, capSession: capSession)return success} catch let error as NSError {printLogDebug("error configuring mic input: \(error.localizedDescription)")return false}}//MARK:            ________________Public Api________________func addInput(input: AVCaptureDeviceInput,capSession: AVCaptureSession) -> Bool {if capSession.canAddInput(input) {capSession.addInput(input)return true}printLogDebug("input error")return false}func addOutput(output: AVCaptureOutput,capSession: AVCaptureSession) -> Bool {if capSession.canAddOutput(output) {capSession.addOutput(output)return true}printLogDebug("output error")return false}func startRunning() {sessionQueue.async {self.captureSession?.startRunning()}}func stopRunning() {sessionQueue.async {self.stopRunning()self.captureSession?.stopRunning()}}func startRecording() {// 子类继承后重写}func stopRecording() {// 子类继承后重写}
}
我们先来: AVCaptureMovieFileOutput
我们创建以 AVCaptureMovieFileOutput 方式输出并继承 CaptureSessionCoordinator 的类:fileOutputCoordinator
由最上面的大图可知,AVFoundation输出有两种:AVCaptureMovieFileOutput与AVAssetWriter。
而 AVCaptureMovieFileOutput 是对输出流没有做太多的处理,以AVCaptureMovieFileOutput方式进行视频输出处理的类,不需要太多的处理。
故继承 CaptureSessionCoordinator它的fileOutputCoordinator子类只需如下:
重点便是对输出的处理
class fileOutputCoordinator: CaptureSessionCoordinator,AVCaptureFileOutputRecordingDelegate {var movieFileOutput: AVCaptureMovieFileOutput?override init() {super.init()movieFileOutput = AVCaptureMovieFileOutput()_ = addOutput(output: movieFileOutput!, capSession: captureSession!)}override func startRecording() {let fm = YfileManager()let tempUrl = fm.tempFileUrl()movieFileOutput?.startRecording(toOutputFileURL: tempUrl, recordingDelegate: self)}override func stopRecording() {movieFileOutput?.stopRecording()}func capture(_ captureOutput: AVCaptureFileOutput!, didFinishRecordingToOutputFileAt outputFileURL: URL!, fromConnections connections: [Any]!, error: Error!) {delegate?.didFinishRecording(coordinator: self, url: outputFileURL)}func capture(_ captureOutput: AVCaptureFileOutput!, didStartRecordingToOutputFileAt fileURL: URL!, fromConnections connections: [Any]!) {delegate?.coordinatorDidBeginRecording(coordinator: self)}
}上面代码中有一个对文件处理的路径操作类:YfileManager
它主要就是对文件路径的操作,与临时文件存储到系统相册中的操作:以上代码中牵扯到的只有如下:
class YfileManager: NSObject {func tempFileUrl() -> URL {var path: String = ""let fm = FileManager.defaultvar i: Int = 0while path.isEmpty || fm.fileExists(atPath: path) {path = NSTemporaryDirectory() + "output\(i.description).mov"i += 1}return URL(fileURLWithPath: path)}
/// 对临时视频文件的存储操作,本方法在iOS9以后被遗弃了func copFileToCameraRoll(fileUrl: URL) {let library = ALAssetsLibrary()if !library.videoAtPathIs(compatibleWithSavedPhotosAlbum: fileUrl) {printLogDebug("video error")}library.writeVideoAtPath(toSavedPhotosAlbum: fileUrl) { (url, error) inif (error != nil) {printLogDebug("error: \(error?.localizedDescription)")} else if url == nil {printLogDebug("url is empty")}}}
}
到目前为止涉及非控制器(fileOutputViewController)的代码全部完成,接下来我们来到控制器执行相关的操作
实现fileOutputViewController控制器的方法
首当其冲的是相机视图与执行代理的方法:captureSessionCoordinatorDelegate
相关变量:
@IBOutlet weak var recordButton: UIBarButtonItem!var captureSessionCoordinator: fileOutputCoordinator?var recording: Bool = falsevar dismissing: Bool = false控制器具体代码:
class fileOutputViewController: UIViewController,captureSessionCoordinatorDelegate {@IBOutlet weak var recordButton: UIBarButtonItem!var captureSessionCoordinator: fileOutputCoordinator?var recording: Bool = falsevar dismissing: Bool = falseoverride func viewDidLoad() {super.viewDidLoad()captureSessionCoordinator = fileOutputCoordinator()captureSessionCoordinator?.setDelegate(capDelegate: self, queue: DispatchQueue(label: "fileOutputCoordinator"))confiureCamper()}override func didReceiveMemoryWarning() {super.didReceiveMemoryWarning()// Dispose of any resources that can be recreated.}/// 关闭当前视图@IBAction func closeCameral(_ sender: Any) {if recording {dismissing = true} else {stopPipelineAndDismiss()}}/// 开始记录 与停止记录@IBAction func recording(_ sender: Any) {if recording {captureSessionCoordinator?.stopRecording()} else {UIApplication.shared.isIdleTimerDisabled = true}recordButton.isEnabled = falserecordButton.title = "Stop"captureSessionCoordinator?.startRecording()recording = true}func confiureCamper() {let cameraViewlayer = captureSessionCoordinator?.previewLayerSetting()cameraViewlayer?.frame = view.boundsview.layer.insertSublayer(cameraViewlayer!, at: 0)captureSessionCoordinator?.startRunning()}func stopPipelineAndDismiss() {captureSessionCoordinator?.stopRunning()dismiss(animated: true, completion: nil)dismissing = false}func coordinatorDidBeginRecording(coordinator: CaptureSessionCoordinator) {recordButton.isEnabled = true}func didFinishRecording(coordinator: CaptureSessionCoordinator, url: URL) {UIApplication.shared.isIdleTimerDisabled = falserecordButton.title = "Record"recording = falselet fm = YfileManager()fm.copFileToCameraRoll(fileUrl: url)if dismissing {stopPipelineAndDismiss()}}}目前为止:到目前为止一个完整的
AVCaptureMovieFileOutput 类型的输出完成
如果你在真机设备调试过程中想查看临时的 tem文件,或者沙河的文件。那就接着如下看:
Xcode上面的导航栏 ->Window->Devices->点击你的设备->找到右下的installed Apps->点击你的要看的项目->点击+ -右边图标->Download下载到桌面即可 然后选择显示包内容就可以看到当前沙盒文件的状态啦!
如图:
 如图
如图