【iOS】Mapkit的使用:地图显示、定位、大头针、气泡等
以前做项目用高德地图SDK,需要注册账号和AppID,然后下载SDK集成到项目中,比较麻烦,这几天看了下苹果自带的MapKit框架,感觉挺好用,官方文档也介绍得很详细,所以按照官方文档写了个demo,实现地图的显示、显示用户当前位置、放置大头针、弹出气泡等基本功能。希望能帮到刚接触MapKit的朋友~
1.显示地图
(1)首先我们要像下图这样子打开地图功能:
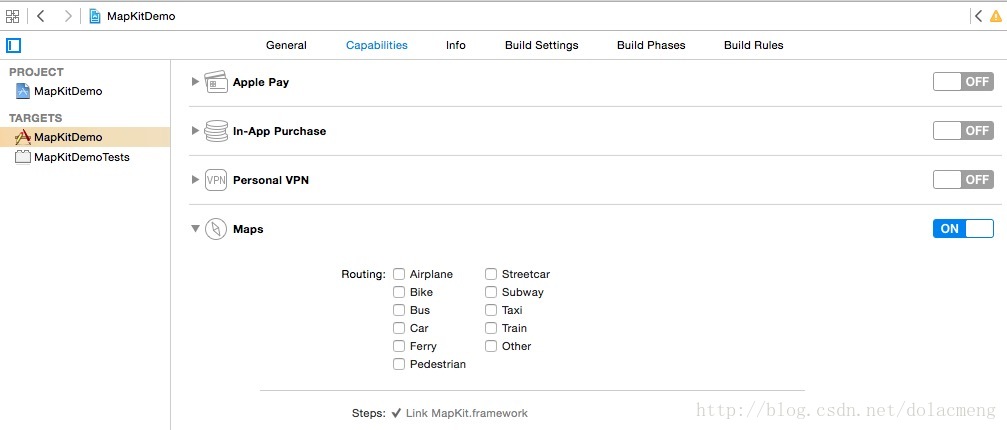
XCode会自动给我们的项目进行配置,例如会自动给我们添加MapKit.frameworks。
(2)在需要使用地图的类中
#import <MapKit/MapKit.h>
(3)显示地图有两种方法:
<1>使用Interface Builder, 拖一个Map view对象到View中
<2>使用纯代码,创建一个MKMapView的实例,使用initWithFrame:来进行初始化,最后将它作为subview添加到windows或者其它UIView上。
因为一个map view是一个UIView子类,所以可以像操作其它View那样操作map view,因此可以给map view添加任何subview,但是添加的subview并不会随着地图内容的移动而移动,如果需要跟随移动,必须使用annotations 或者 overlays。
新建的地图,默认只是显示地图数据以及响应用户手势。通过创建MKMapCamera实例,可以进行3D地图显示,通过设置mapType属性可以设置地图来显示卫星地图、卫星地图和地图数据的混合视图,通过改变属性rotateEnabled, pitchEnabled, zoomEnabled,scrollEnabled 等,可以限制用户的控制权限。通过实现代理MKMapViewDelegate ,可以响应用户的手势操作。
以下为使用第<2>种方法来显示地图:
mapView = [[MKMapView alloc] initWithFrame:self.view.bounds];[self.view addSubview:mapView];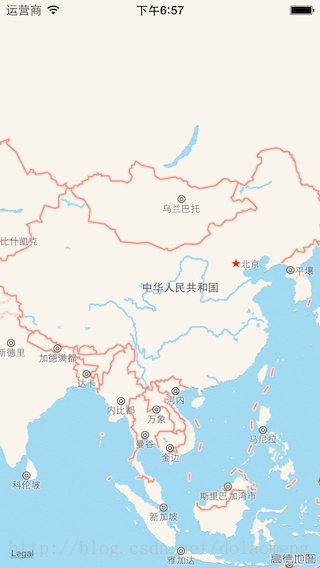
2.设置地图的默认显示区域
步骤1中添加的地图,默认会显示整个地球的视图,可以通过修改它的Region属性来设置地图初始化时默认的显示区域,这个属性是一个MKCoordinateRegion结构体,定义如下:
typedef struct {CLLocationCoordinate2D center;MKCoordinateSpan span;
} MKCoordinateRegion;其中span是使用度、分、秒为单位的,一度约等于111km,但是我们一般习惯使用的是长*宽的数据,因此可以使用MKCoordinateRegionMakeWithDistance 方法将常用的长和宽数据转化为需要的以度为单位的数据。下面就是将地图的显示范围设置为中心点为经纬度(29.454686,106.529259),南北方向和东西方向均为5km的区域
[mapView setRegion:MKCoordinateRegionMakeWithDistance(CLLocationCoordinate2DMake(29.454686, 106.529259), 5000, 5000) animated:YES];
3.显示3D地图
3D地图是从某个海拔高度点以一定角度俯瞰2D地图的视图,在iOS7和OSX10.9及以后版本,可以使用MKMapCamera类来调整3D地图。
一个MKMapCamera实例类camera,使用下面的属性来确定3D地图:
• 海拔高度(Altitude). camera的距离2D地图平面的高度,单位米
• 斜度(Pitch).camera相对于地面倾斜的角度(其中0度表示垂直往下看,所以效果是标准的2D地图)
• 方向(Heading). camera面对的方向
• 中心(Center). 显示在屏幕正中间的地图表面的点
或许举一个例子就秒懂了,下面的代码就是实现从经纬度(29.545686,106.628259),高度为100的空中俯瞰经纬度(29.454686,106.529259)的效果:
// Create a coordinate structure for the location.CLLocationCoordinate2D ground = CLLocationCoordinate2DMake(29.454686, 106.529259);// Create a coordinate structure for the point on the ground from which to view the location.CLLocationCoordinate2D eye = CLLocationCoordinate2DMake(29.545686, 106.628259);// Ask Map Kit for a camera that looks at the location from an altitude of 100 meters above the eye coordinates.MKMapCamera *myCamera = [MKMapCamera cameraLookingAtCenterCoordinate:ground fromEyeCoordinate:eye eyeAltitude:100];// Assign the camera to your map viewmapView.camera = myCamera;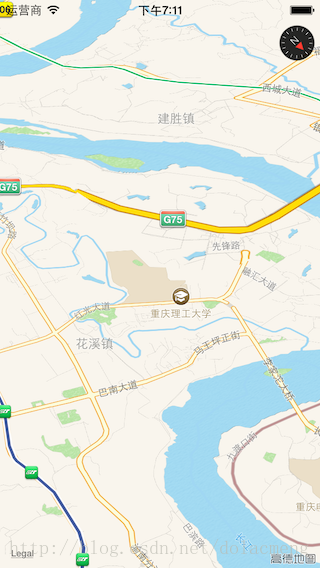
4.滑动和缩放地图内容
通过滑动和缩放可以随时改变地图的显示区域
• 通过滑动地图,改变map view或者camera的centerCoordinate 值,或者直接调用map view的setCenterCoordinate:animated: 或者setCamera:animated: 方法
• 改变放大级别,改变map view的region属性的值,或者调用setRegion:animated:方法,你也可以在3D地图中改变camera的海拔高度的值(设置海拔高度为双倍或者一半,大约等于放大或缩小一个级别)。
例如,下面的代码将地图往左移动当前地图宽度的一半的距离,并且带有移动的动画效果。
CLLocationCoordinate2D mapCenter = mapView.centerCoordinate;
mapCenter = [mapView convertPoint:CGPointMake(1, (mapView.frame.size.width/2.0))toCoordinateFromView:mapView];
[mapView setCenterCoordinate:mapCenter animated:YES];
通过修改地图的region属性的span的值进行地图缩放。如果要放大(拉近镜头),将span设置为一个更小的值,如果要缩小(拉远镜头),将span设置为一个更大的值。以下为缩小的示例代码:
MKCoordinateRegion theRegion = myMapView.region;// Zoom out
theRegion.span.longitudeDelta *= 2.0;
theRegion.span.latitudeDelta *= 2.0;
[myMapView setRegion:theRegion animated:YES];
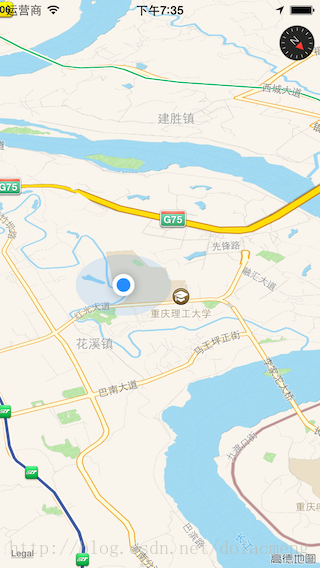
5.在地图上显示用户当前位置
要在地图上显示用户位置,先设置map view的showsUserLocation属性为Yes
mapView.showsUserLocation = YES;以上代码只是告诉mapView要显示用户位置,但mapView并不知道用户的位置,因此还需要通过CLLocationManager来使用定位服务:创建一个CLLocationManager 的实例,设置它的desiredAccuracy(期望的定位精度)和distanceFilter(距离过滤)属性。为了接收到位置更新的通知,设置代理CLLocationManagerDelegate,并调用startUpdatingLocation方法来注册接收定位更新(调用stopUpdatingLocation取消接收定位更新)。另外在iOS8中,需要向用户请求定位权限,示例代码如下:
- (void)startStandardUpdates{// Create the location manager if this object does not// already have one.if (nil == locationManager)locationManager = [[CLLocationManager alloc] init];locationManager.delegate = self;locationManager.desiredAccuracy = kCLLocationAccuracyBest;if([[[UIDevice currentDevice] systemVersion] floatValue] >= 8.0){[locationManager requestWhenInUseAuthorization];}if(![CLLocationManager locationServicesEnabled]){NSLog(@"请开启定位:设置 > 隐私 > 位置 > 定位服务");}if([locationManager respondsToSelector:@selector(requestAlwaysAuthorization)]) {[locationManager requestAlwaysAuthorization]; // 永久授权[locationManager requestWhenInUseAuthorization]; //使用中授权}[locationManager startUpdatingLocation];
}
关于iOS定位的详细讲解(后台持续定位),请看我的另一篇博文:http://blog.csdn.net/dolacmeng/article/details/45064939
6.创建一个地图快照
有时候,我们的需求并不需要一个功能完整的map view视图。例如,如果app只是想用户在一个地图图像的滚动列表中选择,那就不需要实现地图的交互功能。另一个创建一个静态地图图像的原因是为了实现绘图功能。在上面提到的需求中,我们可以使用MKMapSnapshotter对象来异步地创建一个静态的地图图像。
一般的,通过下面的步骤来创建一个地图快照
1.确保网络连接正常并且app正在前台运行
2.创建一个MKMapSnapshotOptions对象,并设置地图外观、输出大小等
3.创建一个MKMapSnapshotter对象并用上一步的实例对象初始化进行初始化。
4.调用startWithCompletionHandler:方法来开始异步的快照任务
5.当任务完成,从block中取回地图快照,并添加需要的覆盖物或者标注。
-(void)shot{MKMapSnapshotOptions *options = [[MKMapSnapshotOptions alloc] init];options.region = mapView.region;options.size = mapView.frame.size;options.scale = [[UIScreen mainScreen] scale];MKMapSnapshotter *snapshotter = [[MKMapSnapshotter alloc] initWithOptions:options];// Initialize the semaphore to 0 because there are no resources yet.dispatch_semaphore_t snapshotSem = dispatch_semaphore_create(0);// Get a global queue (it doesn't matter which one).dispatch_queue_t queue = dispatch_get_global_queue(DISPATCH_QUEUE_PRIORITY_DEFAULT, 0);// Create variables to hold return values. Use the __block modifier because these variables will be modified inside a block.__block MKMapSnapshot *mapSnapshot = nil;__block NSError *error = nil;// Start the asynchronous snapshot-creation task.[snapshotter startWithQueue:queuecompletionHandler:^(MKMapSnapshot *snapshot, NSError *e) {mapSnapshot = snapshot;error = e;// The dispatch_semaphore_signal function tells the semaphore that the async task is finished, which unblocks the main thread.dispatch_semaphore_signal(snapshotSem);}];// On the main thread, use dispatch_semaphore_wait to wait for the snapshot task to complete.dispatch_semaphore_wait(snapshotSem, DISPATCH_TIME_FOREVER);if (error) { // Handle error. }// Get the image from the newly created snapshot.//UIImage *image = mapSnapshot.image;// Optionally, draw annotations on the image before displaying it.}UIImage *image = mapSnapshot.image;UIImageView *imageView = [[UIImageView alloc] initWithFrame:CGRectMake(50, 50, 200, 200)];imageView.image = image;[self.view addSubview:imageView];
}
效果如下:

7.添加大头针(下文中统一称作标注)
(1)为了在地图上添加标注,app必须提供两个明确的对象
•一个annotation 对象, 遵从MKAnnotation代理,管理标注的数据(只是存储标注的数据,不涉及视图)
•一个annotation view, 用来在地图上画annotation的表现形式(用来显示标注数据的视图)
(2)明确了(1)中的要求后,得到添加标注的步骤:
<1>使用下面任何一个对象(annotation 对象)来确定一个合适的标注
•使用MKPointAnnotation类来实现一个标注,这种类型的标注包含显示在标注弹出气泡标题和副标题的属性。
•定义一个自定义的遵从MKAnnotation代理的对象,自定义的标注可以包含任何我们想存贮的数据类型。详细看Defining a Custom Annotation Object
<2>定义一个 annotation view来在屏幕上显示标注的数据。怎么定义annotation view 取决于我们的需求,可以是下面的任何一个:
•如果是要使用标准的大头针标注,创建一个MKPinAnnotationView类的实例。
•如果标注用自定义的静态图片来展示,创建一个MKAnnotationView类的实例,设置它的image属性为展示的图片。
•如果一张静态图片不足够来展现标注,新建一个MKAnnotationView的子类,实现自定义的绘制方法。
<3>实现mapView:viewForAnnotation:代理方法。
这个方法返回一个MKAnnotationView类型的视图,来显示标注的信息, 如果不实现这个代理方法或者return nil,就会用默认的 annotation view进行数据显示(也就是显示红色大头针、title、subtitle,效果请看下面的例子1)。
<4>使用addAnnotation: (或者 addAnnotations:)方法来添加标注到地图。
上面都是直接从官方文档翻译的,感觉有点晦涩难懂,还是上例子吧,比较比较容易理解~
(例子1)使用MKPointAnnotation类来作为标注,并使用默认的annotation view(不用实现mapView:viewForAnnotation:方法,或者return nil),代码及效果如下:
MKPointAnnotation *annotation0 = [[MKPointAnnotation alloc] init];[annotation0 setCoordinate:CLLocationCoordinate2DMake(29.454686, 106.529259)];[annotation0 setTitle:@"重庆理工大学"];[annotation0 setSubtitle:@"重庆市巴南区红光大道69号"];[mapView addAnnotation:annotation0];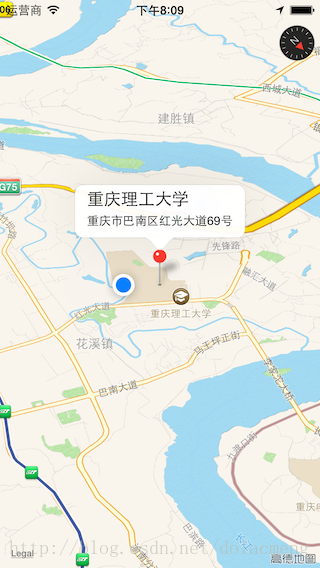
(例子2)使用MKPointAnnotation类来作为标注(还是用例子1中的代码),并使用默认的自定义MKPinAnnotationView,将大头针设置为紫色,设置气泡左边的图像,并在右边添加一个按钮(实现View:viewForAnnotation:方法,并返回一个MKPinAnnotationView实例),在例子1中增加代码及效果如下:
- (MKAnnotationView *)mapView:(MKMapView *)mapView viewForAnnotation:(id <MKAnnotation>)annotation{// If the annotation is the user location, just return nil.(如果是显示用户位置的Annotation,则使用默认的蓝色圆点)if ([annotation isKindOfClass:[MKUserLocation class]])return nil;if ([annotation isKindOfClass:[MKPointAnnotation class]]) {// Try to dequeue an existing pin view first.(这里跟UITableView的重用差不多)MKPinAnnotationView *customPinView = (MKPinAnnotationView*)[mapViewdequeueReusableAnnotationViewWithIdentifier:@"CustomPinAnnotationView"];if (!customPinView){// If an existing pin view was not available, create one.customPinView = [[MKPinAnnotationView alloc] initWithAnnotation:annotationreuseIdentifier:@"CustomPinAnnotationView"];}//iOS9中用pinTintColor代替了pinColorcustomPinView.pinColor = MKPinAnnotationColorPurple;customPinView.animatesDrop = YES;customPinView.canShowCallout = YES;UIButton *rightButton = [[UIButton alloc] initWithFrame:CGRectMake(0, 0, 80, 50)];rightButton.backgroundColor = [UIColor grayColor];[rightButton setTitle:@"查看详情" forState:UIControlStateNormal];customPinView.rightCalloutAccessoryView = rightButton;// Add a custom image to the left side of the callout.(设置弹出起泡的左面图片)UIImageView *myCustomImage = [[UIImageView alloc] initWithImage:[UIImage imageNamed:@"myimage"]];customPinView.leftCalloutAccessoryView = myCustomImage;return customPinView;}return nil;//返回nil代表使用默认样式
}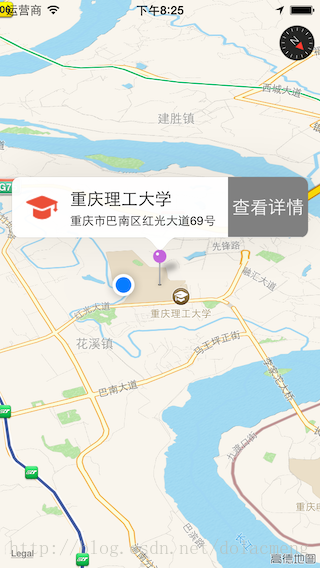
为了响应“查看详情”的点击事件,只要实现以下代理方法:
-(void)mapView:(MKMapView *)mapView annotationView:(MKAnnotationView *)view calloutAccessoryControlTapped:(UIControl *)control{NSLog(@"点击了查看详情");
}(例子3)使用MKPointAnnotation类来作为标注(还是用例子1中的代码),并使用默认的自定义MKAnnotationView
,将大头针设置为自定义图像,(实现View:viewForAnnotation:方法,并返回一个MKAnnotationView实例),例1中新增代码及效果如下:
- (MKAnnotationView *)mapView:(MKMapView *)mapView viewForAnnotation:(id <MKAnnotation>)annotation
{// If the annotation is the user location, just return nil.if ([annotation isKindOfClass:[MKUserLocation class]])return nil;if ([annotation isKindOfClass:[MKPointAnnotation class]]) {MKAnnotationView* aView = [[MKAnnotationView alloc] initWithAnnotation:annotation reuseIdentifier:@"MKPointAnnotation"];aView.image = [UIImage imageNamed:@"myimage"];aView.canShowCallout = YES;return aView;}return nil;
}

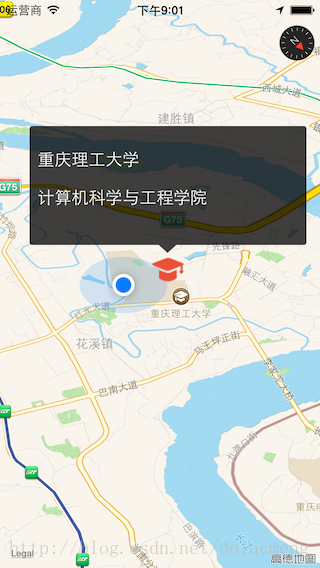
(例子4)这个例子较前面的例子要复杂些:
1. 使用实现MKAnnotation代理的自定义对象(MyCustomAnnotation)来作为标注(能存储任意的数据,例如存储一家餐厅的名字、地址、好评率、距离等属性,上面三个例子中的MKPointAnnotation只能存储title和subtitle,这里的例子定义了两个属性:maintitle和subtitle)。
2.使用继承自MKAnnotationView的类(MyCustomAnnotationView)来自定义气泡视图(实现View:viewForAnnotation:方法,并返回一个继承自MKAnnotationView的实例,其中,MKAnnotationView包含一个UIViewController的属性,这个view controller用来管理气泡的视图和响应事件,并且这个例子使用xib来设计界面)。
3.在MyCustomAnnotationView中要实现hitTest:和setSelected:animated:方法,来显示或隐藏气泡。
代码及效果如下:
MyCustomAnnotation.h文件
#import <Foundation/Foundation.h>
#import <MapKit/MapKit.h>@interface MyCustomAnnotation : NSObject <MKAnnotation> {CLLocationCoordinate2D coordinate;
}@property (nonatomic, readonly) CLLocationCoordinate2D coordinate;
@property (nonatomic, strong) NSString *maintitle;
@property (nonatomic, strong) NSString *secondtitle;- (id)initWithLocation:(CLLocationCoordinate2D)coord;@end
MyCustomAnnotation.m文件
#import "MyCustomAnnotation.h"@implementation MyCustomAnnotation
@synthesize coordinate;- (id)initWithLocation:(CLLocationCoordinate2D)coord {self = [super init];if (self) {coordinate = coord;}return self;
}
@end
MyCustomAnnotationView.h
#import <MapKit/MapKit.h>
#import "CustomCalloutViewController.h"
@class MyCustomAnnotation;
@interface MyCustomAnnotationView : MKPinAnnotationView
- (id)initWithAnnotation:(id <MKAnnotation>)annotation reuseIdentifier:(NSString *)reuseIdentifier;
@property(strong,nonatomic)CustomCalloutViewController *calloutViewController;
@property(strong,nonatomic)MyCustomAnnotation *myCustomAnnotation;
@end
MyCustomAnnotationView.m
#import "MyCustomAnnotationView.h"
#import "MyCustomAnnotation.h"
@implementation MyCustomAnnotationView- (id)initWithAnnotation:(id <MKAnnotation>)annotation reuseIdentifier:(NSString *)reuseIdentifier
{self = [super initWithAnnotation:annotation reuseIdentifier:reuseIdentifier];if (self){// Set the frame size to the appropriate values.CGRect  myFrame = self.frame;myFrame.size.width = 20;myFrame.size.height = 20;self.frame = myFrame;// The opaque property is YES by default. Setting it to// NO allows map content to show through any unrendered parts of your view.self.opaque = NO;self.canShowCallout = NO;self.calloutViewController = [[CustomCalloutViewController alloc] initWithNibName:@"CustomCalloutView" bundle:nil];self.myCustomAnnotation = (MyCustomAnnotation *)annotation;}return self;
}- (UIView *)hitTest:(CGPoint)point withEvent:(UIEvent *)event
{UIView *hitView = [super hitTest:point withEvent:event];if (hitView == nil && self.selected) {CGPoint pointInAnnotationView = [self.superview convertPoint:point toView:self];UIView *calloutView = self.calloutViewController.view;hitView = [calloutView hitTest:pointInAnnotationView withEvent:event];}return hitView;
}- (void)setSelected:(BOOL)selected animated:(BOOL)animated
{[super setSelected:selected animated:YES];// Get the custom callout view.UIView *calloutView = self.calloutViewController.view;if (selected) {self.calloutViewController.maintitle.text = self.myCustomAnnotation.maintitle;self.calloutViewController.secondtitle.text = self.myCustomAnnotation.secondtitle;CGRect annotationViewBounds = self.bounds;CGRect calloutViewFrame = calloutView.frame;if (calloutViewFrame.origin.x==annotationViewBounds.origin.x) {// Center the callout view above and to the right of the annotation view.calloutViewFrame.origin.x  -= (calloutViewFrame.size.width - annotationViewBounds.size.width) * 0.5;calloutViewFrame.origin.y -= (calloutViewFrame.size.height);calloutView.frame = calloutViewFrame;}[self addSubview:calloutView];} else {[calloutView removeFromSuperview];}
}
@end
CustomCalloutViewController.h文件
@interface CustomCalloutViewController : UIViewController{UILabel *labTitle;
}@property (weak, nonatomic) IBOutlet UILabel *maintitle;
@property (weak, nonatomic) IBOutlet UILabel *secondtitle;@end@implementation CustomCalloutViewController- (void)viewDidLoad {[super viewDidLoad];}- (void)didReceiveMemoryWarning {[super didReceiveMemoryWarning];
}@endView:viewForAnnotation:代理方法:
- (MKAnnotationView *)mapView:(MKMapView *)mapViewviewForAnnotation:(id <MKAnnotation>)annotation
{
<span style="white-space:pre">	</span>MyCustomAnnotationView *annotationView = (MyCustomAnnotationView *)[mapView dequeueReusableAnnotationViewWithIdentifier:@"MyCustomAnnotationView"];if (!annotationView) {annotationView = [[MyCustomAnnotationView alloc] initWithAnnotation:annotation reuseIdentifier:@"MyCustomAnnotationView"];annotationView.image = [UIImage imageNamed:@"myimage"];        }return annotationView;
}
另外,还能实现导航等功能,有时间再继续写。
2015-11-22修改:
很久没登录博客了,现在上传Demo代码:http://download.csdn.net/detail/dolacmeng/9290823
相关文章:

java.lang.NoSuchMethodError: org.springframework.core.io.ResourceEditor错误
一般是jar包冲突,或者某些jar包版本不同。 如上,spring其他包的版本均为4.2.5,而spring-webmvc的jar包为1.2.6版本,造成版本冲突。 把该包版本改为4.2.5,宣告成功! 转载于:https://www.cnblogs.com/toSeeMy…

SDUTOJ 1293 乘积最大的分解(数论)
乘积最大的分解思路: 让分解出来的因子有尽可能多的3,剩下的用2补全。 最开始思路错了,WA了好长时间 ! 函数中n 1的情况应该是不用,经测试数据中没有这组。 *注意用 long long 99的时候会超int的数据范围 1 #include …

列表及字典生成式
列表生成式: 列表生成式就是一个用来生成列表的特定语法形式的表达式。 语法格式: [exp for iter_var in iter] 迭代iter中的每个元素; 每次迭代都先把结果赋值给iter_var,然后通过exp得到一个新的计算值; 最后把…

[SQL基础教程] 1-5 表的删除和更新
[SQL基础教程] 1-5 表的删除和更新 表的删除 语法DROP TABLE <表名>; 法则 1-12 删除的表无法恢复 表定义的更新 语法ALTER TABLE<表名> ADD COLUMN<列的定义>; // 添加列 ALTER TABLE<表名> DROP COLUMN<列的定义>; // 删除列 ps: **Oracle、SQ…

【iOS】自定义控件入门:可拖动的环形进度
有时候UIKit的标准控件并不能满足我们的需求,因此我们可以通过自定义控件得到满足我们需求的控件,例如这篇文章将教你如何自定义一个圆形的进度条,并且用户可以通过拖动进度条上的手柄来改变进度值。主要参考了这篇文章:HOW TO BU…
在.NET2.0中解析Json和Xml
在.NET2.0中解析Json和Xml 在.NET解析json有很多方法,这里介绍最简单也用的最多的一种。 一、添加引用 解析Json,先下载开源控件 Newtonsoft.Json.dll 下载地址:http://files.cnblogs.com/gosky/Newtonsoft.Json%E9%9B%86%E5%90%88.zip 解压以…

虚拟机的基本操作
1、用户界面 [kioskfoundation156 Desktop]$ kiosk #打开shell的用户 #分隔符 foundation156 #主机名称 Desktop #工作目录名称 $ ##身份提示符,#表示超级用户,$表示普通用户 特别注意&a…
strong assign属性
strong:这要求运行时自动地保留对这个对象的引用。换而言之,ARC(Automatic Reference Counting)在运行时会一直把这个对象保留在内存里,直到它不再被任何其他对象引用。之后,其所占的内存会被自动释放。assign:表示这…

iOS7的界面上移问题
第一种方法:修改BaseSDK XCode5的默认BaseSDK是iOS7,所以要修改成工程文件创建时的BaseSDK。但是XCode5中默认只带有iOS7的SDK,所以要想能做到更改SDK,我们就要添加旧的SDK。 1.从苹果开发者中心下载旧版本XCode,https…
【Android】ActionBar的使用(1)
前(fei)言(hua):转行iOS开发半年,很久没接触Android了,前几天去上课,听着实在无聊,随手拿了同学的一本《Android UI设计》,发现有好多基础知识自己虽然用过&a…

装饰器及例题分析
知识点: 装饰器的定义: - 装饰器的实现是函数里面嵌套函数; - 装饰器的本质是一个函数, 它可以让其他函数在不需要做任何代码改动的前提下增加额外的功能; - 装饰器需要传递一个函数, 返回值也是一个函数对象. 1、map函数 def …

iOS开发系列--让你的应用“动”起来
概览 在iOS中随处都可以看到绚丽的动画效果,实现这些动画的过程并不复杂,今天将带大家一窥iOS动画全貌。在这里你可以看到iOS中如何使用图层精简非交互式绘图,如何通过核心动画创建基础动画、关键帧动画、动画组、转场动画,如何通…
ios app 砸壳
这里介绍使用dumpdecrypted砸壳。原理是用DYLD_INSERT_LIBRARIES这个环境变量加载脱壳的动态链接库dumpdecrypted.dylib 1.ssh连接上越狱的机器,输入密码alpine ssh root192.168.7.116 2.打开要砸的app,ps aux | grep var找到它的目录 yigewangde-iPhone…
基于visual Studio2013解决面试题之0804复杂链表
题目解决代码及点评/*复杂链表的拷贝,现在有一个复杂链表,完成一个clone函数拷贝一个链表复杂链表是指struct Node{struct Node* _next;struct Node* _sibling; // sibling指向链表中任意一个节点,或者…
python考试编程题
3. a: while True: s raw_input(变量名为:) if s exit: print 退出 break #判断是否由字母或下划线组成 if s[0].isalpha() or s[0] _: for i in s[1:]: if not (i.isalnum() or i _): print %s变量…
【分享】bootstrap学习笔记
一、基础知识 1.整体架构以响应式设计为理念,css组件、js插件jquery、基础布局组件和12栅格系统搭建。1.1响应式设计:结合media query查询,适应更多设备,自动适应用户的设备环境,不必为每个终端做一个特定的版本。2.cs…
大三下学期总结
本学期的最后一门考试已经考完了,就相当于本学期要结束了,本学期结束了,就相当于大学的学习生活接近尾声了。感觉大三下开学也只在不久之前,但是真的要结束了,我觉得这学期实在是过得太充实了,一直是在追着…
通过 cygwin64 自己编译对应的 Tera Term cyglaunch.exe
步骤如下: 将 cygterm.tar.gz解压到任意目录,当然要cygwin容易操作。(本例直接放到$HOME目录下,启动cygwin后的默认目录,如果之前没有更改的话)将 Makefile 中的 -mno-cygwin 选项删除。执行make࿰…

面向对象概念及三大特点
面向对象: 面向对象的基本概念 面向对象 oop : object oriented programming 我们之前学习的编程方式就是面向过程的 面向过程和面向对象,是两种不同的编程方式 对比面向过程的特点,可以更好的了解什么是面向对象 过程和函数(都是对一段…

【Android】ViewPager实现无限循环滚动
最近做的一个项目,客户要求在ViewPager实现的主页面中滑动到最后一页后继续滑动能返回到第一页,也就是实现无限循环滚动,效果如下: 看了下ViewPager没有滑到尽头的回调方法,因此想到的解决方案是,在原来的最…

LabVIEW 三维机器人展示
本程序是使用solidworks绘制模型图,通过LabVIEW 2013导入wrl文件完成. 程序效果如下: (工程文件) (3维机器人模型) (控制界面,未做美化....因为实际上这部分程序只是一小部分,主程序运行时,这部分面板是不显示的~\(≧▽≦)/~啦啦啦) 程序下载: 百度网盘: http://pan.baidu.com/…

SqlServer2008查询性能优化_第一章
转载于:https://www.cnblogs.com/MiaoXin/p/5813207.html

Python之类
1、类的结构 1.使用面向对象开发,第一步是设计类 2.使用 类名() 创建对象,创建对象的动作有两步 1.在内存中为对象分配空间 2.调用初始化方法__init___ 为对象初始化 3.对象创建后,内存中就有了一个对象的实实在在的存在--实例 因此…

祝大家圣诞节快乐!
在圣诞节来临之际,分享这份网页的代码,祝愿大家圣诞节快乐!点击这里查看效果 以下是源代码,可以保存到html文件打开看效果: 1 <!DOCTYPE html PUBLIC "-//W3C//DTD XHTML 1.0 Transitional//EN" "ht…
【iOS官方文档翻译】UICollectionView与UICollectionViewFlowLayout
(一)先来简单回顾一下UICollectionView *UICollectionView的简单使用可以看我以前写的这篇博文:UICollectionView的基本使用 UICollectionView与UITableView很相似,必须实现两个代理:UICollectionViewDataSource和UI…

python之文件
1、什么是文件指针? 文件指针 文件指针标记从哪个位置开始读取数据 第一次打开文件时,通常文件指针会指向文件的开始位置 当执行了read方法后,文件指针会移动到读取内容的末尾 创建一个当前目录下的文件pass 内容为: westos …

一个6年的菜鸟,在4年之前做的一些功能(二)
前戏:针对上一篇列出来的功能点,今天和大家分享下这个自定义的公式是怎么设计的,由于我的第一篇博客在首页被管理员移走了,大家可以点击这里来跳转,看下第一篇的目录结构。本人作为老菜鸟,和大家分享的也是…
Oracle11.2新特性之listagg函数 (行列转换)
SELECT regexp_substr(公司1,贵公司2, [^,], 1, LEVEL, i) FROM dualCONNECT BY LEVEL < length(公司1,贵公司2) - length(REPLACE(公司1,贵公司2, ,, )) 1 以上为字符串带分隔符的转换为列 Oracle11.2新增了LISTAGG函数,可以用于字符串聚集,测试如下…
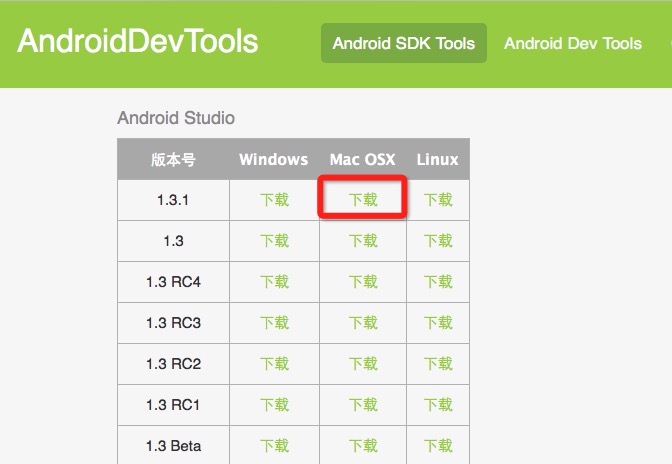
Mac 安装Android Studio
一、下载 可以通过以下这些网站下载Mac版的Android Studio http://www.androiddevtools.cn http://www.android-studio.org 二、安装 双击下载好的dmg文件,拖曳安装。 拷贝完成之后,在应用程序中打开Android Studio。这时候会引导进行环境安装和设置…

iscsi网络磁盘共享
iscsi(Internet SCSI)支持从客户端(发起端)通过IP向远程服务器上的ISCSI存储设备(目标)发送scsi命令。ISCSI限定名称用于确定发起端和目标,并采用iqn.yyy-mm.{reverse domain}:label的格式。 默认情况下,网…