memcache
nginx+php+memcache缓存
图解:

[root@test5 ~]# /etc/init.d/iptables stop
[root@test5 ~]# nginx
[root@test5 ~]# /etc/init.d/php-fpm start
Starting php-fpm done
[root@test5 ~]# tar zxf memcache-2.2.5.tgz
[root@test5 ~]# cd memcache-2.2.5
[root@test5 memcache-2.2.5]# ls

[root@test5 memcache-2.2.5]# cd ~
[root@test5 ~]# vim .bash_profile
[root@test5 ~]# source .bash_profile
[root@test5 ~]# cd memcache-2.2.5
[root@test5 memcache-2.2.5]# phpize


[root@test5 memcache-2.2.5]# ./configure //编译第一步
[root@test5 memcache-2.2.5]# make //编译第二步
[root@test5 memcache-2.2.5]# make install //编译第三步
memcache配置:
[root@test5 etc]# /etc/init.d/php-fpm reload
Reload service php-fpm done
[root@test5 etc]# php -m |grep memcache
[root@test5 etc]# cd
[root@test5 ~]# yum install -y memcached
[root@test5 html ]# cat /etc/sysconfig/memcached
[root@test5 ~]# /etc/init.d/memcached start
Starting memcached: [ OK ]
[root@test5 ~]# cd memcache-2.2.5
[root@test5 memcache-2.2.5]# cp memcache.php example.php /usr/local/lnmp/nginx/html/
[root@test5 memcache-2.2.5]# cd /usr/local/lnmp/nginx/html/
[root@test5 html]# ls
[root@test5 html ]# cat /etc/sysconfig/mecached

[root@test5 html ]# netstat -atunlp

[root@test5 html]# yum install telnet -y
[root@test5 html]# /usr/local/lnmp/nginx/html
[root@test5 html]# ls
50x.html bbs example.php index.php memcache.php readme utility
[root@test5 html]# vim memcache.php

[root@test5 ~]# /etc/init.d/memcached restart

浏览器上测试:


高并发压力测试:
[root@test5 ~]# ab -c 10 -n 1000 http://172.25.1.5/index.php

[root@test5 ~]# ab -c 10 -n 1000 http://172.25.1.5/example.php

说明:
example.php的页面缓存中不存在,所以直接访问了服务器,以至时间比较长;而index.php在memcache中有缓存,页面是缓存,以至时间比较短。
nginx加缓存
OpenResty:
是一个基于 Nginx 与 Lua 的高性能 Web 平台,其内部集成了大量精良的 Lua 库、第三方模块以及大多数的依赖项。用于方便地搭建能够处理超高并发、扩展性极高的动态 Web 应用、Web 服务和动态网关。OpenResty的目标是让你的Web服务直接跑在 Nginx 服务内部,充分利用 Nginx 的非阻塞 I/O 模型,不仅仅对 HTTP 客户端请求,甚至于对远程后端诸如 MySQL
PostgreSQL、Memcached 以及 Redis 等都进行一致的高性能响应。
[root@test5 ~]# tar zxf openresty-1.13.6.1.tar.gz
[root@test5 ~]# cd openresty-1.13.6.1
[root@test5 openresty-1.13.6.1]# ./configure --help //用来查看需要编译的内容

[root@test5 openresty-1.13.6.1]# ./configure --prefix=/opt/nginx --with-http_ssl_module --with-http_stub_status_module --with-threads --with-file-aio
[root@test5 openresty-1.13.6.1]# gmake && gmake install
[root@test5 openresty-1.13.6.1]# cd /opt/nginx/
[root@test5 nginx]# ls
bin COPYRIGHT luajit lualib nginx pod resty.index site
[root@test5 nginx]# cd nginx/
[root@test5 nginx]# cd conf/
[root@test5 conf]# ls
fastcgi.conf koi-win scgi_params
fastcgi.conf.default mime.types scgi_params.default
fastcgi_params mime.types.default uwsgi_params
fastcgi_params.default nginx.conf uwsgi_params.default
koi-utf nginx.conf.default win-utf
[root@test5 conf]# cp /usr/local/lnmp/nginx/conf/nginx.conf .
cp: overwrite `./nginx.conf'? y
[root@test5 conf]# /opt/nginx/nginx/sbin/nginx -t
[root@test5 conf]# /usr/local/lnmp/nginx/sbin/nginx
网页访问172.25.1.5:

[root@test5 conf]# cd ..
[root@test5 nginx]# cd html/
[root@test5 html]# ls
50x.html index.html
[root@test5 html]# cp /usr/local/lnmp/nginx/html/example.php .
[root@test5 html]# cp /usr/local/lnmp/nginx/html/index.php .
#user nobody;
worker_processes 1;
#error_log logs/error.log;
#error_log logs/error.log notice;
#error_log logs/error.log info;
#pid logs/nginx.pid;
events {
worker_connections 1024;
}
http {
upstream memcache {
server localhost:11211;
keepalive 512;
}
include mime.types;
default_type application/octet-stream;
#log_format main '$remote_addr - $remote_user [$time_local] "$request" '
# '$status $body_bytes_sent "$http_referer" '
# '"$http_user_agent" "$http_x_forwarded_for"';
#access_log logs/access.log main;
sendfile on;
#tcp_nopush on;
#keepalive_timeout 0;
keepalive_timeout 65;
#gzip on;
server {
listen 80;
server_name localhost;
#charset koi8-r;
#access_log logs/host.access.log main;
location / {
root html;
index index.php index.html index.htm;
}
location /memc {
internal;
memc_connect_timeout 100ms;
memc_send_timeout 100ms;
memc_read_timeout 100ms;
set $memc_key $query_string;
set $memc_exptime 300;
memc_pass memcache;
}
#error_page 404 /404.html;
# redirect server error pages to the static page /50x.html
#
error_page 500 502 503 504 /50x.html;
location = /50x.html {
root html;
}
#location ~ \.jsp$ {
# proxy_pass http://127.0.0.1;
#}
location ~ \.php$ {
set $key $uri$args;
srcache_fetch GET /memc $key;
srcache_store PUT /memc $key;
root html;
fastcgi_pass 127.0.0.1:9000;
fastcgi_index index.php;
# fastcgi_param SCRIPT_FILENAME /scripts$fastcgi_script_name;
include fastcgi.conf;
}
# deny access to .htaccess files, if Apache's document root
# concurs with nginx's one
#
#location ~ /\.ht {
# deny all;
#}
}
# another virtual host using mix of IP-, name-, and port-based configuration
#
#server {
# listen 8000;
# listen somename:8080;
# server_name somename alias another.alias;
# location / {
# root html;
# index index.html index.htm;
# }
#}
# HTTPS server
#
#server {
# listen 443 ssl;
# server_name localhost;
# ssl_certificate cert.pem;
# ssl_certificate_key cert.key;
# ssl_session_cache shared:SSL:1m;
# ssl_session_timeout 5m;
# ssl_ciphers HIGH:!aNULL:!MD5;
# ssl_prefer_server_ciphers on;
# location / {
# root html;
# index index.html index.htm;
# }
#}
//配置文件的内容

客户端测试:
[root@foundation1 dd]# ab -c 10 -n 1000 http://172.25.1.5/index.php

[root@foundation1 dd]# ab -c 10 -n 1000 http://172.25.1.5/example.php

nginx+tomcat+memcache缓存
图解:

环境:
nginx:test5(172.25.1.5) tomcat1:test5(172.25.1.5) tomcat2:test6(172.25.1.6)
memcache1:test5(172.25.1.5) memcache2:test6(172.25.1.6)
test5:搭建nginx、tomcat、memcache服务
test6:搭建tomcat、memcache服务
Tomcat简介:
Tomcat 服务器是一个免费的开放源代码的Web 应用服务器,属于轻量级应用服务器,在中小型系统和并发访问用户不是很多的场合下被普遍使用,是开发和调试JSP 程序的首选。可以这样认为,当在一台机器上配置好Apache 服务器,可利用它响应HTML页面的访问请求。实际上Tomcat是Apache 服务器的扩展,但运行时它是独立运行的,所以当你运行tomcat 时,它实际上作为一个与Apache 独立的进程单独运行的。当配置正确时,Apache 为HTML页面服务,而Tomcat 实际上运行JSP 页面和Servlet。另外,Tomcat 服务器具有处理HTML页面的功能,它还是一个Servlet和JSP容器,独立的Servlet容器是Tomcat的默认模式。不过,Tomcat处理静态HTML的能力不如Apache服务器。目前Tomcat最新版本为9.0。
jdk简介:
是 Java 语言的软件开发工具包,主要用于移动设备、嵌入式设备上的java应用程序。JDK是整个java开发的核心,它包含了JAVA的运行环境(JVM+Java系统类库)和JAVA工具。
工作原理:
server端向nginx请求java动态页面的时候,由于nginx只能处理静态页面,所以向后面传送给jdk来处理java请求,处理之后通过nginx返回请求并交给server端。
图形介绍:

[root@test5 ~]# tar zxf jdk-7u79-linux-x64.tar.gz -C /usr/local
[root@test5 local]# ln -s jdk1.7.0_79/ java
[root@test5 local]# ll -d /usr/local/java/
drwxr-xr-x 8 uucp 143 4096 Apr 11 2015 /usr/local/java/
[root@test5 local]# ls
apache-tomcat-7.0.37 games jdk lib64 sbin test.class
bin include jdk1.7.0_79 libexec share test.java
etc java lib lnmp src tomcat
[root@test5 local]# cd java/
[root@test5 java]# vim /etc/profile

[root@test5 java]# source /etc/profile
[root@test5 java]# cd
[root@test5 ~]# vim test.java //编写一个简单的java编程。

[root@test5 ~]# javac test.java

test5:
[root@test5 ~]# tar zxf apache-tomcat-7.0.37.tar.gz -C /usr/local/ //安装包由官网进行下载:tomcat.apache.org
[root@test5 ~]# cd /usr/local/
[root@test5 local]# ln -s apache-tomcat-7.0.37/ tomcat //做个软连接
[root@test5 local]# cd tomcat/
[root@test5 tomcat]# bin/startup.sh
[root@test5 tomcat]# ls

[root@test5 tomcat]# bin/startup.sh

[root@test5 tomcat]# netstat -antlp | grep :8080 //默认8080端口


[root@test5 tomcat]# cd /usr/local/lnmp/nginx/conf/
[root@test5 conf]# vim nginx.conf //修改配置文件使其访问默认的80端口

[root@test5 conf]# nginx -t
[root@test5 conf]# nginx -s reload


[root@test5 conf]# cd /usr/local/tomcat/
[root@test5 tomcat]# ls
apache-tomcat-7.0.37 conf LICENSE NOTICE RUNNING.txt webapps
bin lib logs RELEASE-NOTES temp work
[root@test5 tomcat]# cd webapps/
[root@test5 webapps]# ls
docs examples host-manager manager ROOT
[root@test5 webapps]# cd ROOT/
[root@test5 ROOT]# vim test.jsp

test6:(与test5进行相同操作,事先搭好memcache服务,这里就不重复了)
[root@test6 ~]# tar zxf jdk-7u79-linux-x64.tar.gz -C /usr/local/
[root@test6 ~]# tar zxf apache-tomcat-7.0.37.tar.gz -C /usr/local/
[root@test6 ~]# cd /usr/local/
[root@test6 local]# ls

[root@test6 local]# ln -s jdk1.7.0_79/ java
[root@test6 local]# ln -s apache-tomcat-7.0.37/ tomcat
[root@test6 local]# ll

[root@test6 local]# vim /etc/profile

[root@test6 local]# source /etc/profile
[root@test6 local]# cd tomcat/
[root@test6 tomcat]# bin/startup.sh


[root@test5 conf]# pwd
/usr/local/lnmp/nginx/conf
[root@test5 conf]# vim nginx.conf

[root@test5 conf]# nginx -t

nginx: the configuration file /usr/local/lnmp/nginx/conf/nginx.conf syntax is ok
nginx: configuration file /usr/local/lnmp/nginx/conf/nginx.conf test is successful
[root@test5 conf]# nginx -s reload
[root@test5 conf]# /usr/local/tomcat/webapps/ROOT
[root@test5 ROOT]# scp test.jsp test6:/usr/local/tomcat/webapps/ROOT/ //将test.jsp复制给test6
[root@test5 ROOT]# vim test.jsp
[root@test6 tomcat]# cd webapps/ROOT
[root@test6 ROOT]# vim test.jsp
主机进行静态测试:

动态测试:
[root@test5 tomcat]# cd webapps/ROOT/
[root@test5 ROOT]# pwd
/usr/local/tomcat/webapps/ROOT
[root@test5 ROOT]# vim test.jsp
<%@ page contentType="text/html; charset=GBK" %>
<%@ page import="java.util.*" %>
<html><head><title>Cluster App Test</title></head>
<body>
Server Info:
<%
out.println(request.getLocalAddr() + " : " + request.getLocalPort()+"<br>");%>
<%
out.println("<br> ID " + session.getId()+"<br>");
String dataName = request.getParameter("dataName");
if (dataName != null && dataName.length() > 0) {
String dataValue = request.getParameter("dataValue");
session.setAttribute(dataName, dataValue);
}
out.print("<b>Session list</b>");
Enumeration e = session.getAttributeNames();
while (e.hasMoreElements()) {
String name = (String)e.nextElement();
String value = session.getAttribute(name).toString();
out.println( name + " = " + value+"<br>");
System.out.println( name + " = " + value);
}
%>
<form action="test.jsp" method="POST">
name:<input type=text size=20 name="dataName">
<br>
key:<input type=text size=20 name="dataValue">
<br>
<input type=submit>
</form>
</body>
</html>
[root@test5 ROOT]# scp test.jsp test6:/usr/local/tomcat/webapps/ROOT/
[root@test5 ROOT]# cd -
/usr/local/tomcat
[root@test5 tomcat]# bin/shutdown.sh //将test5的tomcat给down掉

真机进行访问:

//关掉test5的tomcat,客户端刷新可访问到test6的session
[root@test5 tomcat]# /etc/init.d/memcached start
Starting memcached: [ OK ]
[root@test5 tomcat]# cd conf/
[root@test5 conf]# vim context.xml

[root@test5 conf]# /usr/local/tomcat/bin/startup.sh //开启tomcat服务

[root@test6 tomcat]# cd /usr/local/tomcat/conf
[root@test6 conf]# vim context.xml

[root@test6 conf]# /usr/local/tomcat/bin/startup.sh //开启tomcat服务

下载一个目录jar,包含以下内容

将目录分别发送给test5和test6


[root@test5 lib]# cd /usr/local/tomcat/lib
[root@test5 lib]# rm -rf memcached-session-manager-tc6-1.6.3.jar
[root@test6 lib]# cd /usr/local/tomcat/lib
[root@test6 lib]# rm -rf memcached-session-manager-tc6-1.6.3.jar
[root@test5 lib]# cd /usr/local/tomcat/
[root@test5 tomcat]# cat logs/catalina.out

[root@test6 lib]# cd /usr/local/tomcat/
[root@test6 tomcat]# cat logs/catalina.out

网页测试:


其中test6的ID为:7368AD2B39FEF2C84F252EEA44BA9D2A-n2
[root@test6 tomcat]# yum install -y telnet //用来查看一些内容
[root@test6 tomcat]# telnet localhost 11211

[root@test6 tomcat]# cat logs/catalina.out

[root@test6 tomcat]# bin/shutdown.sh //若将test6的tomcat给down掉

相关文章:

iOS中KVO模式的解析与应用
最近老翁在项目中多处用到了KVO,深感这种模式的好处。现总结如下: 一、概述 KVO,即:Key-Value Observing,它提供一种机制,当指定的对象的属性被修改后,则对象就会接受到通知。简单的说就是每次指定的被观察…

C 到C++的升级
C所有的变量都可以在需要使用时再定义。 C语言中的变量都必须在作用域开始的位置定义。 register 关键字请求编译器将局部变量存储于寄存器中 在C语言无法获取register 变量的地址 在C中可以取得 register 变量的地址 C编译器有自己的优化方式,所以几乎不用registe…

SET QUOTED_IDENTIFIER OFF语句的作用
先看下面几个sql语句 1SETQUOTED_IDENTIFIER ON2SELECT*FROM"USER" WHEREanetasp34SETQUOTED_IDENTIFIER ON5SELECT*FROM[USER]WHEREanetasp67SETQUOTED_IDENTIFIER OFF8SELECT*FROM[USER]WHEREa"netasp" 910SETQUOTED_IDENTIFIER OFF11SELECT*FROM[USE…

proxy实现 mysql 读写分离
实现 mysql 读写分离 图解: 环境: iptables 和 selinux 关闭 proxy:test2 172.25.1.2 Master: test3 172.25.1.3 Slave:test4 172.25.1.4 环境已经实现 test3(master) 和 test4(slave) 的主从复制 Server2: [roottest2 ~]# ls mysql-proxy-0.8.5-linux-el6-x86-64bit.tar.gz …
iOS开发中用到的一些第三方库
下面是我在开发中用到的一些优秀的iOS第三方开源库: 1.AFNetworking(网络请求,类似的还有ASIHTTPRequest) https://github.com/AFNetworking/AFNetworking/ 2.MBProgressHUD(提示框) https://github.…
小图标外链API
网页上有些分享的小图标,比如分享到facebook,weibo,qq空间等功能的时候,图标以前一般是自己做一个css sprite。当一个网站的图标变了的时候,比如facebook变成assbook的时候,你就要修改这个css sprite。费时…
转载JQuery 获取设置值,添加元素详解
转载原地址 http://www.cnblogs.com/0201zcr/p/4782476.html jQuery 获取内容和属性 jQuery DOM 操作 jQuery 中非常重要的部分,就是操作 DOM 的能力。 jQuery 提供一系列与 DOM 相关的方法,这使访问和操作元素和属性变得很容易。 提示:DOM …

mysql 主从复制 和基于gtid的mysql主从复制
主从复制 原理: mysql 无需借助第三方工具,而是其自带的同步复制功能,另外一点,mysql 的主从 复制并不是从硬盘给上文件直接同步,而是逻辑的 binlog 日志同步到本地的应用执行的过 程。 数据从一个 mysql 数据库(master)复制到另一个 mysql 数据库(slave),在 master 与 slave …
使用read write 读写socket
一旦,我们建立好了tcp连接之后,我们就可以把得到的fd当作文件描述符来使用。 由此网络程序里最基本的函数就是read和write函数了。 写函数: ssize_t write(int fd, const void*buf,size_t nbytes); write函数将buf中的nbytes字节内容写入文件…
iOS从通讯录中选择联系人
有时候APP需要用户输入一位联系人的姓名和电话,除了用户手动输入,一般也允许用户从通讯录中选择一位联系人(图1),下面的代码就是使用系统的<AddressBookUI/AddressBookUI.h>库实现这一需求。 图1 完整代码&…
document.readystate
http://www.cnblogs.com/lhb25/archive/2009/07/30/1535420.html http://www.cnblogs.com/haogj/archive/2013/01/15/2861950.html http://jincuodao.baijia.baidu.com/article/2896 电视转载于:https://www.cnblogs.com/daishuguang/p/3523783.html
Openstack安装部署
系统版本 rhel7.4 关闭 iptables 关闭 selinux foundation1: 172.25.254.1 server1: 172.25.254.11 server2: 172.25.254.12 可参考:https://docs.openstack.org/mitaka/zh_CN/install-guide-rdo/ //选择的mitaka 虚拟机上网 首先物理机必须可…

在Xcode中使用Git进行源码版本控制
本文翻译自Understanding Git Source Control in Xcode (译者myShire)欢迎您加入我们的翻译小组。 在应用程序开发过程中,很重要的一部分工作就是如何进行源码的版本控制。当代码出现问题时,我们就需要将代码恢复到原先正常的版本…
敏捷开发之道(二)极限编程XP
上次的博文敏捷开发之道(一)敏捷开发宣言中,我们介绍了一下敏捷开发宣言,在其中,我们了解到了关于敏捷开发的几个重要的价值观。今天我们来了解一个敏捷开发的方法——极限编程XP 1、介绍 极限编程(eXtreme…

spring 3.X与jdk 1.8不兼容
1、报错(部分) 2、解决 虽然Spring的jdk要求如下,但是spring 3与jdk1.8不兼容(使用的是spring 3.2) 在eclipse将jdk版本下调。这里将JDK调到1.7(在eclipse如下设置) 同时,需要设置服…
rhel-server-7.5-x86_64-dvd.iso镜像下载及rar压缩包的解压
主机名为server1 [rootserver1 ~]# ls rhel-server-7.5-x86_64-dvd.part1.rar rarlinux-5.6.1.tar.gz rhel-server-7.5-x86_64-dvd.part2.rar 1、如果没有rarlinux-5.6.1.tar.gz包可以去 https://www.rarlab.com/download.htm 这个网站下载RAR 5.61 for Linux 或者RAR 5.…
Expandable Table的Demo
在网上看到一个可点击cell展开的TableView的demo,原文是swift语言,我写了个oc版,有兴趣的朋友可以看下: 效果: oc源码(带中文注释):http://download.csdn.net/detail/dolacmeng/941…
Java对多线程的支持
Java运行时系统实现了一个用于调度线程执行的线程调度器,用于确定某一时刻由哪一个线程在CPU上运行。在Java技术中,线程通常是抢占式的而不需要时间片分配进程(分配给每个线程相等的CPU时间的进程)。抢占式调度模型就是许多线程处…

ESP8266-iot-2
1.SDK概述 复制相关的工程文件到HelloWorld里面 要在版本esp8266_nonos_sdk_v2.0.0_16_07_19上面开发,那么就要复制相应文件 然后打开IDE 导入HelloWorld到工程里面 创建3个文件,如下图 再从lib里面添加文件 复制到我的下面 复制app里面的内容 打算从IoT…
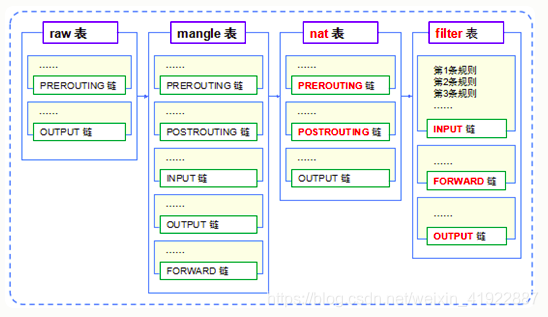
iptables防火墙策略
环境: foundation1 172.25.1.250 172.25.254.1 server1 172.25.1.1 server2 172.25.1.2 server3 172.25.1.3 四个主机都做解析 iptables简介: netfilter/iptables(简称为iptables…
ubuntu(16.04.01)学习-day1
1.修改root用户密码 sudo passwd root 按提示进行设置。 2.从Ubuntu 16.04开始,用户可以实现改变启动器的位置,可以将启动器移到屏幕底部,但是无法移到右边或顶部。打开终端,然后输入下面这个命令,即可将启动器移到屏幕…
HDU 1090 A+B for Input-Output Practice (II)
#include <cstdio> int main() {int n,a,b;scanf("%d",&n);for (int i1; i<n; i){ scanf("%d%d",&a,&b);printf("%d\n",ab);}return 0; } 转载于:https://www.cnblogs.com/forever97/p/3539605.html
监听UIWebView点击视频播放的事件
最近项目需要统计在跳转UIWebView后,用户点击网页上的视频进行播放的概率。找了很多监听进入视频播放的方法,最后在stackoverflow找到下面这个使用Notification的可行方法(如果是弹出): #pragma mark Notification - (void)addNotification {…
linux系统下redhat7之虚拟机控制
基础操作: [kioskfoundation0 Desktop]$ rht-vmctl start desktop ###开启desktop虚拟机 Error: desktop not started (is already running) ###报错,desktop已经运行 [kioskfoundation0 Desktop]$ rht-vmctl view desktop …

如何设计一个 iOS 控件?(iOS 控件完全解析)
前言 一个控件从外在特征来说,主要是封装这几点: 交互方式显示样式数据使用 对外在特征的封装,能让我们在多种环境下达到 PM 对产品的要求,并且提到代码复用率,使维护工作保持在一个相对较小的范围内;而一个…
Chapter12:动态内存
智能指针——shared_ptr为了更容易地使用动态内存,新的标准提供了智能指针来管理动态对象。智能指针的行为类似常规指针,重要的区别是它负责自动释放指向的对象。 智能指针的使用方式与普通指针类似。解引用一个智能指针返回它指向的对象。 1 if (p1 &am…
判断JS对象是否拥有某属性两种方式
方式,但稍有区别 1,in 运算符 1 2 3 var obj {name:jack}; alert(name in obj); // --> true alert(toString in obj); // --> true 可看到无论是name,还是原形链上的toString,都能检测到返回true。 2,hasOwnP…
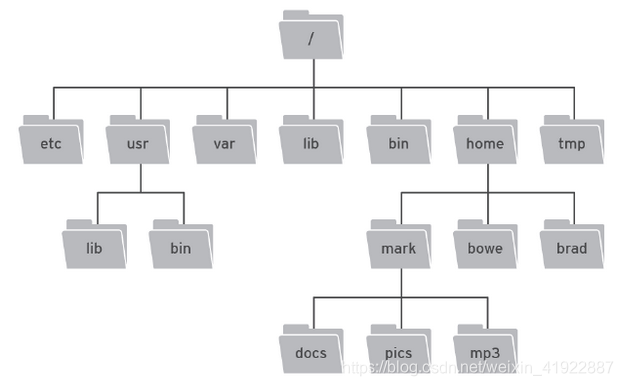
Linux之redhat7系统结构
一.linux系统结构 linux是一个倒树结构 linux中所有的东西都是文件 这些文件都在系统顶级目录“/” /就是根目录 /目录以下为二级目录这些目录都是系统装机时系统自动建立的 二级目录的作用 /bin ##二进制可执行文件也就是系统命令 /sbin ##系统管理命令存放位置 /boot …
ASP.NET优化
源地址:http://www.cnblogs.com/wangjingblogs/archive/2013/02/27/2934706.html http://jingyan.baidu.com/article/2d5afd69bfd0ff85a3e28e6d.html转载于:https://www.cnblogs.com/haizine/p/5841771.html
3D Touch介绍: 一个数字压力器App和Quick Actions
随着iPhone 6s and 6s Plus的发布,苹果介绍了全新的手机交互方式:重按手势。你应该知道,这个特性其实早已应用在苹果手表和MacBook产品中,名字叫Force Touch。它给用户交互添加了全新的维度! 或许你对Force Touch为什么…