node mongoose_如何使用Express,Mongoose和Socket.io在Node.js中构建实时聊天应用程序
node mongoose
by Arun Mathew Kurian
通过阿伦·马修·库里安(Arun Mathew Kurian)
如何使用Express,Mongoose和Socket.io在Node.js中构建实时聊天应用程序 (How to build a real time chat application in Node.js using Express, Mongoose and Socket.io)
In this tutorial, we will use the Node.js platform to build a real time chat application that sends and shows messages to a recipient instantly without any page refresh. We will use the JavaScript framework Express.js and the libraries Mongoose and Socket.io to achieve this.
在本教程中,我们将使用Node.js平台构建实时聊天应用程序 ,该应用程序可以立即发送和显示消息给收件人,而无需刷新页面。 我们将使用JavaScript框架Express.js以及库Mongoose和Socket.io实现此目的。
Before we start, lets have a quick look at the basics of Node.js
在开始之前,让我们快速看一下Node.js的基础知识
Node.js (Node.js)
Node.js is an open-source, cross-platform JavaScript run-time environment that executes JavaScript code outside the browser. The most important advantage of using Node is that we can use JavaScript as both a front-end and back-end language.
Node.js是一个开源,跨平台JavaScript运行时环境,可在浏览器外部执行JavaScript代码。 使用Node的最重要优势是我们可以将JavaScript既用作前端语言又用作后端语言。
As we know, JavaScript was used primarily for client-side scripting, in which scripts were embedded in a webpage’s HTML and run client-side by a JavaScript engine in the user’s web browser.
众所周知,JavaScript主要用于客户端脚本编写,其中脚本被嵌入到网页HTML中,并由用户Web浏览器中JavaScript引擎在客户端运行。
Node.js lets developers use JavaScript to write Command Line tools and for server-side scripting — running scripts server-side to produce dynamic web page content before the page is sent to the user’s web browser.
Node.js允许开发人员使用JavaScript编写命令行工具和服务器端脚本-在页面发送到用户的Web浏览器之前在服务器端运行脚本以生成动态网页内容。
To install node:
要安装节点:
https://nodejs.org/en/download/
https://nodejs.org/en/download /
Even though the node is single threaded it’s still faster to use asynchronous functions. For example, Node can process other things while a file is being read off disk, or while waiting for an HTTP request to complete. The asynchronous behaviour can be implemented using callbacks. Also the JavaScript works well with JSON and No-SQL databases.
即使节点是单线程的,使用异步函数仍然更快。 例如,在从磁盘上读取文件时或在等待HTTP请求完成时,Node可以处理其他事情。 可以使用回调实现异步行为。 JavaScript也可以与JSON和No-SQL数据库一起很好地工作。
NPM模块 (NPM Modules)
Nodejs allows the modules of libraries to be included in the application. These modules can be user-defined or third party modules.
Nodejs允许将库模块包含在应用程序中。 这些模块可以是用户定义的模块或第三方模块。
The third party modules can be installed using the following command:
可以使用以下命令来安装第三方模块:
npm install module_nameand the installed modules can be used using the require() function:
并且可以使用require()函数使用已安装的模块:
var module = require(‘module_name’)In Node apps we will be using a package.json file to maintain the module versions. This file can be created by this command:
在Node apps中,我们将使用package.json文件来维护模块版本。 可以通过以下命令创建此文件:
npm initand the packages must be installed as follows:
并且必须按照以下步骤安装软件包:
npm install -s module_nameThere are many frameworks that can be added as modules to our Node application. These will be explained further on as needed.
可以将许多框架作为模块添加到我们的Node应用程序中。 这些将根据需要进一步解释。
简单聊天应用 (Simple Chat Application)
The app must allow multiple users to chat together. The messages must be updated without refreshing the page. For simplicity we will be avoiding the authentication part.
该应用程序必须允许多个用户一起聊天。 消息必须更新而不刷新页面。 为简单起见,我们将避免身份验证部分。
We can start by creating a new project directory and moving into it. Then we can initiate our project by the following command:
我们可以先创建一个新的项目目录并移入其中。 然后我们可以通过以下命令启动我们的项目:
npm initThis will prompt us to enter details about our project.
这将提示我们输入有关我们项目的详细信息。
After this a package.json file will be created:
之后,将创建一个package.json文件:
{“name”: “test”,“version”: “1.0.0”,“description”: “”,“main”: “index.js”,“scripts”: {“test”: “echo \”Error: no test specified\” && exit 1"},“author”: “”,“license”: “ISC”
}
Our app directory is now set.
现在我们的应用程序目录已设置。
The first thing we need to create is a server. In order to create that, we will be making use of a framework named Express.
我们需要创建的第一件事是服务器。 为了创建它,我们将使用一个名为Express的框架。
Express.js (Express.js)
Express.js, or simply Express, is a web application framework for Node.js. Express provides a robust set of features for web and mobile applications. Express provides a thin layer of fundamental web application features, without obscuring Node.js features.
Express.js,或简称为Express,是Node.js的Web应用程序框架。 Express 为Web和移动应用程序提供了一组强大的功能 。 Express提供了基本的Web应用程序功能薄层,而不会模糊Node.js功能。
We will install Express.js using the following command:
我们将使用以下命令安装Express.js:
npm install -s expressInside the package.json file a new line will be added:
在package.json文件中,将添加新行:
dependencies”: {“express”: “⁴.16.3”}Next we will create a server.js file.
接下来,我们将创建一个server.js文件。
In this file we need to require Express and create a reference to a variable from an instance of Express. Static contents like HTML, CSS or JavaScript can be served using express.js:
在此文件中,我们需要Express并从Express实例创建对变量的引用。 可以使用express.js来提供HTML,CSS或JavaScript之类的静态内容:
var express = require(‘express’);var app = express();and we can start listening to a port using the code:
我们可以使用以下代码开始监听端口:
var server = app.listen(3000, () => {console.log(‘server is running on port’, server.address().port);
});
Now we need to create an HTML file index.html that displays our UI. I have added bootstrap and JQuery cdn.
现在,我们需要创建一个HTML文件index.html来显示我们的UI。 我添加了bootstrap和JQuery CDN。
//index.html<!DOCTYPE html>
<html>
<head><! — include bootstap and jquery cdn →
</head>
<body>
<div class=”container”><br><div class=”jumbotron”><h1 class=”display-4">Send Message</h1><br><input id = “name” class=”form-control” placeholder=”Name”><br><textarea id = “message” class=”form-control” placeholder=”Your Message Here”>
</textarea><br><button id=”send” class=”btn btn-success”>Send</button></div><div id=”messages”></div>
</div>
<script></script>
</body>
</html>
Please note that the empty <script> <;/script>tag will be the place where we will write the client side JavaScript code.
请注意,空的<script> < ; / script>标记将是我们编写客户端JavaScript代码的地方。
In-order to tell Express that, we will be using a static file. We will add a new line inside server.js:
为了告诉Express,我们将使用静态文件。 我们将在server.js中添加新行:
app.use(express.static(__dirname));We can run the server.js using the command
我们可以使用以下命令运行server.js
node ./server.jsor a package called nodemon, so that the changes made in the code will be automatically detected. We will download nodemon using the command
或称为nodemon的软件包,以便自动检测代码中所做的更改。 我们将使用以下命令下载nodemon
npm install -g nodemon-g — global, so that it is accessible in all projects.
-g-全局,以便在所有项目中都可以访问。
We will run the code using the command
我们将使用以下命令运行代码
nodemon ./server.jsIf you go to localhost:3000 we can see the index file:
如果您访问localhost:3000,我们可以看到索引文件:
Now that our server is up and running, we need to create our database. For this app we will having a No-SQL database and will be using Mongodb. I am setting up my mongodb in mlab.com. Our database will contain a single collection called messages with fields name and message.
现在我们的服务器已启动并正在运行,我们需要创建数据库。 对于此应用程序,我们将具有No-SQL数据库,并将使用Mongodb 。 我正在mlab.com中设置mongodb。 我们的数据库将包含一个名为messages的单个集合,其中包含name和message字段。
In-order to connect this database to the app, we will use another package called Mongoose.
为了将此数据库连接到应用程序,我们将使用另一个名为Mongoose的软件包。
猫鼬 (Mongoose)
Mongoose is a MongoDB object modeling tool designed to work in an asynchronous environment. Mongoose can be installed using the command
Mongoose是设计用于异步环境的MongoDB对象建模工具。 可以使用以下命令安装猫鼬
npm install -s mongooseInside server.js we will require mongoose:
在server.js内部,我们将需要猫鼬:
var mongoose = require(‘mongoose’);And we will assign a variable, the URL of our mlab database:
我们将分配一个变量,即mlab数据库的URL:
var dbUrl = ‘mongodb://username:pass@ds257981.mlab.com:57981/simple-chat’Mongoose will connect to the mlab database with the connect method:
猫鼬将使用connect方法连接到mlab数据库:
mongoose.connect(dbUrl , (err) => { console.log(‘mongodb connected’,err);
})
And we will be defining our message model as
我们将定义消息模型为
var Message = mongoose.model(‘Message’,{ name : String, message : String})We can implement the chat logic now. But before that there is one more package that needs to be added.
我们现在可以实现聊天逻辑。 但是在此之前,还需要添加一个软件包。
身体解析器 (Body-Parser)
Body-Parser extracts the entire body portion of an incoming request stream and exposes it on req.body. The middleware was a part of Express.js earlier, but now you have to install it separately.
Body-Parser提取传入请求流的整个主体部分,并将其公开在req.body上。 中间件是Express.js的一部分,但现在您必须单独安装。
Install it using the following command:
使用以下命令安装它:
npm install -s body-parserAdd the following codes to server.js:
将以下代码添加到server.js:
var bodyParser = require(‘body-parser’)
app.use(bodyParser.json());
app.use(bodyParser.urlencoded({extended: false}))
路由 (Routing)
Routing refers to how an application’s endpoints (URIs) respond to client requests. You define routing using methods of the Express app object that correspond to HTTP methods: app.get() to handle GET requests and app.post() to handle POST requests.
路由是指应用程序的端点(URI)如何响应客户端请求。 您可以使用Express应用程序对象的与HTTP方法相对应的方法来定义路由:app.get()处理GET请求和app.post()处理POST请求。
These routing methods specify a callback function (sometimes called “handler functions”) called when the application receives a request to the specified route (endpoint) and HTTP method. In other words, the application “listens” for requests that match the specified routes and methods, and when it detects a match, it calls the specified callback function.
这些路由方法指定在应用程序收到对指定路由(端点)和HTTP方法的请求时调用的回调函数 (有时称为“处理函数”)。 换句话说,应用程序“侦听”与指定的路由和方法匹配的请求,并且当它检测到匹配项时,它将调用指定的回调函数。
Now we need to create two routes to the messages for our chat to work.
现在,我们需要为消息创建两条路由,以便我们的聊天工作。
Inside server.js:
内部server.js:
get : will get all the message from database
get:将从数据库中获取所有消息
app.get('/messages', (req, res) => {Message.find({},(err, messages)=> {res.send(messages);})
})
post : will post new messages created by the user to the database
post:将用户创建的新消息发布到数据库中
app.post('/messages', (req, res) => {var message = new Message(req.body);message.save((err) =>{if(err)sendStatus(500);res.sendStatus(200);})
})
In order to connect these routes to the front end we need to add the following code in the client side script tag in the index.html:
为了将这些路由连接到前端,我们需要在index.html的客户端脚本标签中添加以下代码:
$(() => {$("#send").click(()=>{sendMessage({name: $("#name").val(), message:$("#message").val()});})getMessages()})function addMessages(message){$(“#messages”).append(`<h4> ${message.name} </h4><p> ${message.message} </p>`)}function getMessages(){$.get(‘http://localhost:3000/messages', (data) => {data.forEach(addMessages);})}function sendMessage(message){$.post(‘http://localhost:3000/messages', message)}Here the sendMessage is used to invoke the post route of the messages, and save a message sent by the user. The message is created when a user clicks the send button.
在这里, sendMessage用于调用消息的发布路由,并保存用户发送的消息。 当用户单击发送按钮时,将创建该消息。
Similarly the getMessage is used to invoke the get route of messages. This will get all the messages saved in the database and will be appended to the messages div.
类似地, getMessage用于调用消息的get路由。 这将获取所有保存在数据库中的消息,并将被添加到消息div中。
The only issue now is that there is no way for the client to know if the server is updated. So each time we post a message we need to refresh the page to see the new messages.
现在唯一的问题是客户端无法知道服务器是否已更新。 因此,每次发布消息时,我们都需要刷新页面以查看新消息。
To solve this we can add a push notification system that will send messages from server to client. In Node.js we use socket.io.
为了解决这个问题,我们可以添加一个推送通知系统,该系统将从服务器向客户端发送消息。 在Node.js中,我们使用socket.io。
套接字 (Socket.io)
Socket.IO is a JavaScript library for realtime web applications. It enables realtime, bi-directional communication between web clients and server. It has two parts: a client-side library that runs in the browser, and a server-side library for Node.js. Socket.io enables real-time bidirectional event-based communication.
Socket.IO是一个用于实时Web应用程序JavaScript库。 它支持Web客户端和服务器之间的实时双向通信 。 它包含两个部分:在浏览器中运行的客户端库和用于Node.js的服务器端库。 Socket.io支持基于事件的实时双向通信。
To install socket.io:
要安装socket.io:
npm install -s socket.iowe also need an HTTP package for Socket.io to work:
我们还需要一个HTTP包才能使Socket.io正常工作:
npm install -s httpAdd the following code to server.js:
将以下代码添加到server.js:
var http = require(‘http’).Server(app);
var io = require(‘socket.io’)(http);
And we can create a connection:
我们可以创建一个连接:
io.on(‘connection’, () =>{console.log(‘a user is connected’)
})
In the index.html add the following tag:
在index.html中添加以下标记:
<script src=”/socket.io/socket.io.js”></script>Now we need to create an emit action when a message is created in server.js. So the post route becomes this:
现在,当在server.js中创建消息时,我们需要创建一个发射动作。 因此发布路线变为:
app.post('/messages', (req, res) => {var message = new Message(req.body);message.save((err) =>{if(err)sendStatus(500);io.emit('message', req.body);res.sendStatus(200);})
})
And in the client side script tag in index.html, add the following code:
然后在index.html的客户端脚本标记中,添加以下代码:
var socket = io();socket.on(‘message’, addMessages)So each time a message is posted, the server will update the messages in the message div.
因此,每次发布消息时,服务器都会在消息div中更新消息。
Great!!
大!!
This is very basic application that we can create in Node.js. There is lot of scope for improvement. The finished code can be found in https://github.com/amkurian/simple-chat
这是我们可以在Node.js中创建的非常基本的应用程序。 有很多改进的余地。 可以在https://github.com/amkurian/simple-chat中找到完成的代码
server.js
server.js
var express = require('express');
var bodyParser = require('body-parser')
var app = express();
var http = require('http').Server(app);
var io = require('socket.io')(http);
var mongoose = require('mongoose');app.use(express.static(__dirname));
app.use(bodyParser.json());
app.use(bodyParser.urlencoded({extended: false}))var Message = mongoose.model('Message',{name : String,message : String
})var dbUrl = 'mongodb://username:password@ds257981.mlab.com:57981/simple-chat'app.get('/messages', (req, res) => {Message.find({},(err, messages)=> {res.send(messages);})
})app.get('/messages', (req, res) => {Message.find({},(err, messages)=> {res.send(messages);})
})app.post('/messages', (req, res) => {var message = new Message(req.body);message.save((err) =>{if(err)sendStatus(500);io.emit('message', req.body);res.sendStatus(200);})
})io.on('connection', () =>{console.log('a user is connected')
})mongoose.connect(dbUrl ,{useMongoClient : true} ,(err) => {console.log('mongodb connected',err);
})var server = http.listen(3001, () => {console.log('server is running on port', server.address().port);
});
Hope this was helpful in understanding some basic concepts.
希望这有助于理解一些基本概念。
Some useful links
一些有用的链接
Socket.IOSOCKET.IO 2.0 IS HERE FEATURING THE FASTEST AND MOST RELIABLE REAL-TIME ENGINE ~/Projects/tweets/index.js var io =…socket.ioExpress - Node.js web application frameworkExpress is a minimal and flexible Node.js web application framework that provides a robust set of features for web and…expressjs.com
Socket.IO SOCKET.IO 2.0拥有最快速,最可靠的实时引擎〜/ Projects / tweets / index.js var io =… socket.io Express-Node.js Web应用程序框架 Express是一个最小且灵活的节点.js Web应用程序框架,为Web和… Expressjs.com 提供了一组强大的功能
http://mongoosejs.com/
http://mongoosejs.com/
翻译自: https://www.freecodecamp.org/news/simple-chat-application-in-node-js-using-express-mongoose-and-socket-io-ee62d94f5804/
node mongoose
相关文章:

结对项目开发电梯调度 - 整体设计
一、系统介绍 1. 功能描述 本电梯系统用来控制一台运行于一个具有16层的大楼电梯,它具有上升、下降、开门、关门、载客的基本功能。 大楼的每一层都有: (1) 两个指示灯: 这两个指示灯分别用于指示当前所在的层数和电梯的当前状态ÿ…

3.分支结构与循环结构
1 程序结构 程序结构分为顺序结构、分支结构、循环结构。分支结构有:if结构,if....else结构,if...else if....else ,if...else结构,switch结构;循环结构有:while循环,do....while循环…

微信小程序 实现复制到剪贴版功能
微信小程序开发交流qq群 173683895 承接微信小程序开发。扫码加微信。 实现API: wx.setClipboardData(Object object) API说明:设置系统剪贴板的内容 属性类型默认值是否必填说明支持版本datastring 是剪贴板的内容 successfunction 否接口调用成功…
数据结构面试题编程题_您下次编程面试时应该了解的顶级数据结构
数据结构面试题编程题by Fahim ul Haq通过Fahim ul Haq Niklaus Wirth, a Swiss computer scientist, wrote a book in 1976 titled Algorithms Data Structures Programs.瑞士计算机科学家Niklaus Wirth在1976年写了一本书,名为《 算法数据结构程序》。 40 yea…

oracle使用小技巧
批量禁用触发器 SELECT ALTER TRIGGER || trigger_name || DISABLE; FROM all_triggers; 这样就生成了一个禁用语句列表,复制到sql脚本执行界面,批量执行即可,类似的,可以用all_tables来批量删除表。 转载于:https://www.cnblogs…
if for switch语句
顺序语句:一行行执行条件语句:选择分支if语句 1、 if(....)//括号内是判断条件 { //程序代码,运算等等 } 2、 if(....)//括号内是判断条件 { //程序代码,运算等等 } else//如果不满足条件则执…
Apache Unable to find the wrapper https - did you forget to enable it when you configured PHP?
微信小程序开发交流qq群 173683895 承接微信小程序开发。扫码加微信。 Apache Unable to find the wrapper "https" - did you forget to enable it when you configured PHP? 问题解决办法: 打开配置文件 php.ini , 如图: …
文件魔术数字_如何使用魔术脚手架自动创建文件并节省时间
文件魔术数字Before we begin: This article uses JavaScript / Node.js example code, but you can port these concepts to any language using the right tools.开始之前:本文使用JavaScript / Node.js示例代码,但是您可以使用正确的工具将这些概念移…

Sql Server统计报表案例
场景:查询人员指定年月工作量信息 USE [Test] GO SET ANSI_NULLS ON GO SET QUOTED_IDENTIFIER ON GO ALTER procedure [dbo].[GetWorkLoadMain] year int, month int, UserId varchar(50) as begindeclare day varchar(50)set dayCAST(year as varchar)-RIGHT((00…

运行报表时提示输入用户名和密码
在AX2012运行报表是总是提示用户输入用户名和密码: 尝试输入登陆名和密码,点击查看报表,出现如下错误: 因为AX2012的报表使用的针对AX2012客制化的SSRS,而要求输入登录名和密码是SSRS报表的数据源设置导致的。在SSRS管…
CSS 文字,边框实现从左至右颜色渐变
微信小程序开发交流qq群 173683895 承接微信小程序开发。扫码加微信。 1.文本从左至右颜色渐变 效果图: 2.边框从左至右颜色渐变 效果图: 实现代码: 1.文本从左至右颜色渐变实现代码: <!DOCTYPE html> <html>&l…
如何使用Create-React-App和自定义服务人员构建PWA
Note: This is not a primer on create-react-app or what a service worker is. This post assumes prior knowledge of both.注意:这不是create-react-app或服务工作者的入门。 这篇文章假定两者都有先验知识。 So, I recently had the opportunity to work on a…
inline-block空隙怎么解决
方法一:移除空格 元素间留白间距出现的原因就是标签段之间的空格,因此,去掉HTML中的空格,自然间距就木有了。考虑到代码可读性,显然连成一行的写法是不可取的,我们可以: <div class"spa…
php 网络请求 get请求和post请求
微信小程序开发交流qq群 173683895 承接微信小程序开发。扫码加微信。 代码记录 <?php header(content-type:application:json;charsetutf8); header(Access-Control-Allow-Origin:*); //header(Access-Control-Allow-Methods:POST); header(Access-Control-Allow-He…
docker查看现有容器_如何使用Docker将现有应用程序推送到容器中
docker查看现有容器by Daniel Newton丹尼尔牛顿 如何使用Docker将现有应用程序推送到容器中 (How to shove an existing application into containers with Docker) I have finally got round to learning how to use Docker past the level of knowing what it is and does w…
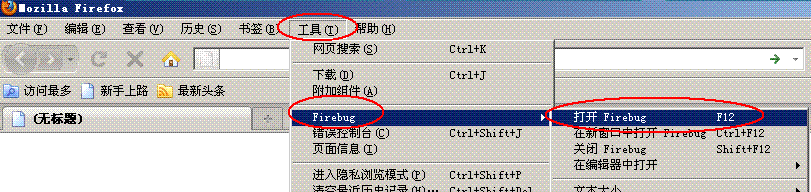
巧妙使用Firebug插件,快速监控网站打开缓慢的原因
巧妙使用Firebug插件,快速监控网站打开缓慢的原因 原文 巧妙使用Firebug插件,快速监控网站打开缓慢的原因 很多用户会问,我的网站首页才50KB,打开网页用了近60秒才打开?如何解释? 用户抱怨服务器运行缓…
第二阶段第三次站立会议
昨天做了什么:写了部分购物车的功能 今天要干什么:修改后台代码的错误 遇到的困难:没有困难转载于:https://www.cnblogs.com/jingxiaopu/p/7109774.html
微信小程序生成小程序二维码 php 直接可以用
微信小程序开发交流qq群 581478349 承接微信小程序开发。扫码加微信。 小程序需要先上线才能生成二维码 HTTP请求的效果图: 小程序展示的效果图: 小程序展示二维码源码: 请求二维码图片base64路径,点击预览图片 onLoad: func…
vue和react相同点_我在React和Vue中创建了相同的应用程序。 这是区别。
vue和react相同点by Sunil Sandhu由Sunil Sandhu 我在React和Vue中创建了相同的应用程序。 这是区别。 (I created the same app in React and Vue. Here are the differences.) Having used Vue at my current workplace, I had a fairly solid understanding of how it all …
Filter(过滤器)
一、Filter过滤器(重要) Javaweb中的过滤器可以拦截所有访问web资源的请求或响应操作。 1、Filter快速入门 1.1、步骤: 1. 创建一个类实现Filter接口 2. 重写接口中方法 doFilter方法是真正过滤的。 3. 在web.xml文件中配置 …
css3实现3D立体翻转效果
1、在IE下无法显示翻转效果,火狐和谷歌可以 1 /*样式css*/2 3 .nav-menu li {4 display: inline;5 }6 .nav-menu li a {7 color: #fff;8 display: block;9 text-decoration: none;10 overflow: visible;11 line-height: 40px;12 font-…
Ant Design 入门-参照官方文档使用组件
微信小程序开发交流qq群 173683895 承接微信小程序开发。扫码加微信。 先来一个按钮组件使用的对比,官方文档的(不能直接用)和实际能用的。 官网demo: import { Table, Divider, Tag } from antd;const columns = [{title: Name,dataIndex: name,key: name,render: text =…
如何用JavaScript的回调函数做出承诺
by Adham El Banhawy由Adham El Banhawy 如何用JavaScript的回调函数做出承诺 (How to make a Promise out of a Callback function in JavaScript) Back-end developers run into challenges all the time while building applications or testing code. As a developer who …
VMware里的linux系统里的命令行里会有bee的声音,要如何关掉
VMware里的linux系统里的命令行里会有bee的声音,要如何关掉 取消bell报警声的方法:登陆linux系统vi /etc/inputrc找到set bell-style none 将前面的#去掉,之后重启系统即可解决声音问题若不见效可以通过下面的方式解决下bell-styl…

React-Todos
最近学完React的最基本概念,闲下来的时候就自己写了一个Todo-List的小应用。这里做个简略的说明,给想好好学React的新手看。 React-Todo 学习前提 这里我用了webpackb做了babel和JSX预处理和模块打包。所以对React和一些ES2015(ES6࿰…
Ant Design 入门-引用自己命名的组件
微信小程序开发交流qq群 173683895 承接微信小程序开发。扫码加微信。 自己创建的组件:代码 import { Table, Divider, Tag } from antd; import React, { Component } from react; export default class My_Table extends Component {render() {const columns = [{title: …
迷宫出路代码_如何在软件开发的迷宫中找到自己的出路
迷宫出路代码by Tim Kleier蒂姆克莱尔(Tim Kleier) 如何在软件开发的迷宫中找到自己的出路 (How to find your way through the corn maze of software development) The corn maze is one of my favorite challenges to tackle. It’s an unnerving experience, especially w…
打包 React 项目并在服务器运行。
微信小程序开发交流qq群 173683895 承接微信小程序开发。扫码加微信。 1.找到项目根目录的package.json文件:如图: 2.打开cmd执行:npm run build 3.生成DIST文件夹。 4.把DIST文件放到服务器phpStudty根目录,访问index.html。…
一些有用的Python问题
1. 修改IDLE工作路径,在命令交互模式下输入如下指令: >>> import os >>> os.getcwd() #查看当前的工作路径 >>> os.chdir(E:\\Python\\Demo) #修改当前的工作路径 2.Python中 ImportError: cannot import name NUMPY_MKL 的…
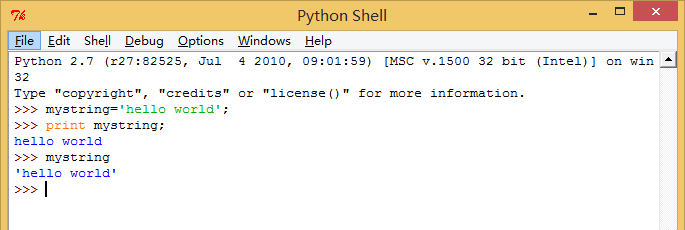
Python核心编程笔记---- print
在仅用变量名时,输出的字符串是用单引号括起来的。这个是为了让非字符串对象也可能以字符的形式显示在屏幕上。 而print 函数打印出来的是变量的值。 print 调用的是str()方法。而仅用变量名时调用的是repr()方法。 证明:------------------------------…