docker查看现有容器_如何使用Docker将现有应用程序推送到容器中
docker查看现有容器
by Daniel Newton
丹尼尔·牛顿
如何使用Docker将现有应用程序推送到容器中 (How to shove an existing application into containers with Docker)
I have finally got round to learning how to use Docker past the level of knowing what it is and does without ever using it. This is the first post that I have attempted to use Docker in and will probably be what I refer to whenever I start a new project (for Java or Kotlin anyway).
我终于回过头来学习如何在不使用Docker的情况下了解如何使用Docker。 这是我尝试使用Docker的第一篇文章,并且可能是我每次启动新项目(无论如何针对Java或Kotlin)时所指的内容。
This will be a short post that takes an existing project (from one of my other posts) and alters it so it can run inside of containers. The project is a Spring Boot application with a MongoDB database and ActiveMQ message queue. All these components are prime fodder for containerization.
这将是一篇简短的文章,它采用一个现有项目(来自我的其他文章之一)并对其进行更改,以便可以在容器内部运行。 该项目是一个带有MongoDB数据库和ActiveMQ消息队列的Spring Boot应用程序。 所有这些成分都是集装箱化的主要原料。
Completing the steps outlined in this post removes the need to have a local installation of MongoDB and ActiveMQ. Just install Docker and you’re good to go. That itself is already a victory in my books.
完成本文中概述的步骤,就无需在本地安装MongoDB和ActiveMQ。 只需安装Docker,您就可以顺利进行。 那本身已经是我书中的胜利。
Here are links to the code and the corresponding blog post. The post covers all the information about the code.
这里是代码链接和相应的博客文章 。 该帖子涵盖了有关代码的所有信息。
One last comment: for the content of this post, I am assuming that you have already installed Docker. If you haven’t, then Docker has already got you covered. Here’s where you can find the supported platforms which provide further links on how to install Docker for your specific machine. The orientation and setup page Docker provides might also be helpful.
最后的评论:对于本文的内容,我假设您已经安装了Docker。 如果您还没有,那么Docker已经为您服务。 在这里可以找到受支持的平台 ,这些平台提供了有关如何为特定计算机安装Docker的更多链接。 Docker提供的方向和设置页面也可能会有所帮助。
转换Spring App (Converting the Spring App)
First up, the Spring Boot application.
首先,是Spring Boot应用程序。
This is the only part of the project that contains our code. The rest are images downloaded from someone else’s repository. To start moving this application towards running in a container, we need to create a Dockerfile that specifies the content of an image:
这是包含我们的代码的项目的唯一部分。 其余的是从其他人的存储库下载的图像。 要开始将此应用程序移到在容器中运行,我们需要创建一个Dockerfile来指定图像的内容:
This takes the base image of openjdk:8-jdk-alpine. This is a good starting point for the application. It adds the Jar built from the application code (naming it app.jar) and exposes a port for communication between containers. The final line defines the command that executed when the image is run in a container. This is what starts the Spring application.
这将获取openjdk:8-jdk-alpine的基本图像。 这是应用程序的一个很好的起点。 它添加了从应用程序代码构建的Jar(将其命名为app.jar ),并公开了容器之间进行通信的端口。 最后一行定义了在容器中运行映像时执行的命令。 这就是启动Spring应用程序的原因。
To build an image from the Dockerfile run the command below (assuming you have already built the application code):
要从Dockerfile构建映像, Dockerfile运行以下命令(假定您已经构建了应用程序代码):
docker build -t spring-boot-jms-tutorial .There is now an image named spring-boot-jms-tutorial (-t lets us define the name). This can now be used to create a container that executes the code that is packed into the image’s Jar:
现在有一个名为spring-boot-jms-tutorial的映像( -t让我们定义名称)。 现在可以使用它来创建一个容器,该容器执行包装在图像Jar中的代码:
docker run --name application -p 4000:8080 spring-boot-jms-tutorialThis will create and run a container built from the spring-boot-jms-tutorial image. It names the container application and the -p property allows a port from a local machine to be mapped to a port inside the container. To access port 8080 of the container we simply need to use port 4000 on our own machine.
这将创建并运行一个由spring-boot-jms-tutorial镜像构建的容器。 它命名了容器application ,并且-p属性允许将本地计算机上的端口映射到容器内的端口。 要访问容器的端口8080 ,我们只需要在我们自己的计算机上使用端口4000 。
If we stopped this container and wanted to run it again, we should use the command:
如果我们停止了该容器并想再次运行它,则应使用以下命令:
docker start applicationWhere application is the name of the container we created before. If docker run was used again it would create another new container rather than reusing the existing one. Actually, because we provided a name to the container, running the same run command from earlier will lead to an error.
其中application是我们之前创建的容器的名称。 如果再次使用docker run ,它将创建另一个新容器,而不是重用现有容器。 实际上,由于我们为容器提供了名称,因此从较早版本运行相同的run命令将导致错误。
Now the Spring application is successfully running in a container, but the logs are not looking very good. Let’s have a quick look so we know what we need to do next.
现在,Spring应用程序已在容器中成功运行,但是日志看起来不太好。 让我们快速浏览一下,以便我们知道下一步需要做什么。
MongoDB connection failing:
MongoDB连接失败:
Exception in monitor thread while connecting to server mongocontainer:27017 com.mongodb.MongoSocketException: mongocontainer: Name does not resolve at com.mongodb.ServerAddress.getSocketAddress(ServerAddress.java:188) ~[mongodb-driver-core-3.6.4.jar!/:na] at com.mongodb.connection.SocketStreamHelper.initialize(SocketStreamHelper.java:59) ~[mongodb-driver-core-3.6.4.jar!/:na] at com.mongodb.connection.SocketStream.open(SocketStream.java:57) ~[mongodb-driver-core-3.6.4.jar!/:na] at com.mongodb.connection.InternalStreamConnection.open(InternalStreamConnection.java:126) ~[mongodb-driver-core-3.6.4.jar!/:na] at com.mongodb.connection.DefaultServerMonitor$ServerMonitorRunnable.run(DefaultServerMonitor.java:114) ~[mongodb-driver-core-3.6.4.jar!/:na] at java.lang.Thread.run(Thread.java:748) [na:1.8.0_171] Caused by: java.net.UnknownHostException: mongocontainer: Name does not resolve at java.net.Inet4AddressImpl.lookupAllHostAddr(Native Method) ~[na:1.8.0_171] at java.net.InetAddress$2.lookupAllHostAddr(InetAddress.java:928) ~[na:1.8.0_171] at java.net.InetAddress.getAddressesFromNameService(InetAddress.java:1323) ~[na:1.8.0_171] at java.net.InetAddress.getAllByName0(InetAddress.java:1276) ~[na:1.8.0_171] at java.net.InetAddress.getAllByName(InetAddress.java:1192) ~[na:1.8.0_171] at java.net.InetAddress.getAllByName(InetAddress.java:1126) ~[na:1.8.0_171] at java.net.InetAddress.getByName(InetAddress.java:1076) ~[na:1.8.0_171] at com.mongodb.ServerAddress.getSocketAddress(ServerAddress.java:186) ~[mongodb-driver-core-3.6.4.jar!/:na] ... 5 common frames omittedActiveMQ also isn’t there:
ActiveMQ也不存在:
Could not refresh JMS Connection for destination 'OrderTransactionQueue' - retrying using FixedBackOff{interval=5000, currentAttempts=1, maxAttempts=unlimited}. Cause: Could not connect to broker URL: tcp://activemqcontainer:61616. Reason: java.net.UnknownHostException: activemqcontainerWe will sort these out in the next sections so the application can work in its entirety.
我们将在下一部分中对它们进行整理,以便应用程序可以完整地工作。
One last thing before we move onto looking at Mongo and ActiveMQ.
在我们着眼于Mongo和ActiveMQ之前,还有最后一件事。
The dockerfile-maven-plugin could also be used to help with the above which builds the container as part of running mvn install. I chose not to use it since I couldn’t get it to work properly with docker-compose. Below is a quick example of using the plugin:
dockerfile-maven-plugin也可以用来帮助上述工作,该工作是在运行mvn install过程中构建容器的。 我选择不使用它,因为无法使其与docker-compose一起正常工作。 以下是使用插件的快速示例:
This then allows us to replace a few of the lines in the Dockerfile:
然后,这使我们可以替换Dockerfile的几行:
Here one line has been added and one existing line is changed. The JAR_FILE argument replaces the original name of the Jar which is injected in by the plugin from the pom.xml. Make these changes and run mvn install and bam, your container is built with all the required code.
此处已添加一行,而现有一行已更改。 JAR_FILE参数替换了插件从pom.xml注入的Jar的原始名称。 进行这些更改,然后运行mvn install和bam,您的容器将使用所有必需的代码构建。
使用MongoDB映像 (Using the MongoDB image)
There is a MongoDB image ready and waiting for us to use. It is ideally named mongo… What else did you expect? All we need to do is run the image and give it’s container a name:
MongoDB映像已准备就绪,正在等待我们使用。 它的理想名称是mongo …您还期望什么? 我们需要做的就是run映像,并为其命名一个容器:
docker run -d --name mongocontainer mongoAdding -d will run the container in the background. The name of the container is not just for convenience as the Spring application will need it later to connect to Mongo.
添加-d将在后台运行容器。 容器的名称不仅是为了方便起见,因为Spring应用程序以后将需要它来连接到Mongo。
到ActiveMQ映像上 (Onto the ActiveMQ image)
Setting up ActiveMQ is just as simple as Mongo. Run the command below:
设置ActiveMQ就像Mongo一样简单。 运行以下命令:
docker run -d --name activemqcontainer -p 8161:8161 rmohr/activemqHere the 8161 ports are mapped from the container to the machine it’s running on, allowing the admin console to be accessed from outside the container.
这里的8161端口是从容器映射到运行它的计算机,从而允许从容器外部访问管理控制台。
绑在一起 (Tying it all together)
If you have been running all these commands as you read through the post, you would have noticed that the application container hasn’t actually been able to see the mongocontainer and activemqcontainer. This is because they are not running within the same network. Getting them to communicate is not difficult and takes only a few extra steps.
如果您在阅读mongocontainer文章时一直在运行所有这些命令,则您会注意到application容器实际上还无法看到mongocontainer和activemqcontainer 。 这是因为它们不在同一网络中运行。 让他们进行交流并不困难,并且只需采取一些额外的步骤。
By default, Docker creates a Bridge network when setting one up without any extra configuration. Below is how to do so:
默认情况下,Docker在进行设置时无需任何额外配置即可创建网桥网络。 以下是操作方法:
docker network create networkNow that the network (named network) is created, the commands that were run previously need to be altered to create containers that will connect to the network instead. Below are the 3 commands used to create the containers in the previous sections, each altered to join the network.
现在已经创建了网络(名为network ),需要更改以前运行的命令以创建将连接到网络的容器。 以下是前几节中用于创建容器的3个命令,每个命令都进行了更改以加入网络。
docker run -d --name mongocontainer --network=network mongodocker run -d --name activemqcontainer -p 8161:8161 --network=network rmohr/activemqdocker run --name application -p 4000:8080 --network=network spring-boot-jms-tutorialOnce these are all run, the application as a whole will now work. Each container can see each other. Allowing the application container to connect to MongoDB and ActiveMQ in their respective containers.
一旦所有这些都运行,整个应用程序现在就可以运行了。 每个容器可以看到对方。 允许application容器在各自的容器中连接到MongoDB和ActiveMQ。
At this point, everything is working. It runs in the same way that I remember it working when I had everything set up on my own laptop. But, this time around, nothing is set up locally… Except for Docker!
至此,一切正常。 它的运行方式与我记得自己在笔记本电脑上完成所有设置后就可以运行一样。 但是,这一次,本地没有任何设置……除了Docker!
Docker组成 (Docker composing it up)
We could have stopped there, but this next section will make running everything even easier. Docker Compose allows us to effectively bring all the commands that we ran earlier together and start all the containers and their network all in a single command. There is some more setup, but in the end, I think the amount of typing actually goes down.
我们可能已经在这里停了下来,但是下一节将使一切运行变得更加容易。 Docker Compose使我们可以有效地将之前运行的所有命令集中在一起,并在一个命令中启动所有容器及其网络。 还有更多设置,但最后,我认为键入的数量实际上减少了。
To do this, we need to create a docker-compose.yml file:
为此,我们需要创建一个docker-compose.yml文件:
Use with this version of the Dockerfile:
与此版本的Dockerfile :
This is pretty much everything that needs to be done.
这几乎是需要做的所有事情。
appcontainer is the Spring application container built from the project’s code. The build property of the container tells Docker to build the image based on the projects Dockerfile found in the project’s root directory. It passes in the JAR_FILE argument to the Dockerfile moving some of the configurations into this file instead.
appcontainer是根据项目代码构建的Spring应用程序容器。 容器的build属性告诉Docker根据项目根目录中的项目Dockerfile构建映像。 它将JAR_FILE参数传递给Dockerfile将某些配置移入该文件。
The other two containers don’t require much setup. As with the previous commands, the images they are built from are specified and activemqcontainer adds configuration around it’s mapped ports.
其他两个容器不需要太多设置。 与前面的命令一样,它们的生成映像已指定, activemqcontainer在其映射端口周围添加了配置。
The last piece of configuration happens in the background. A network is created and all the containers are added to it. This removes the need to create a network manually.
最后的配置发生在后台。 创建一个网络并将所有容器添加到其中。 这样就无需手动创建网络。
All that is left to do is run the up command:
剩下要做的就是运行up命令:
docker-compose upThis will build and run all the containers. The application code image is built if necessary. Running this exact command will output all the containers logs to the console, to do this in the background add the -d flag:
这将构建并运行所有容器。 如有必要,将构建应用程序代码映像。 运行此确切命令会将所有容器日志输出到控制台,为此在后台添加-d标志:
docker-compose up -dAfter doing so, we can have a look at the created containers and network. Running:
这样做之后,我们可以查看创建的容器和网络。 运行:
docker ps -a --format "table {{.Image}}\t{{.Names}}"Shows us:
显示给我们:
IMAGE NAMESmongo spring-boot-jms_mongocontainer_1spring-boot-jms_appcontainer spring-boot-jms_appcontainer_1rmohr/activemq spring-boot-jms_activemqcontainer_1And the network:
和网络:
docker network lsProduces:
产生:
NETWORK ID NAME DRIVER SCOPE163edcfe5ada spring-boot-jms_default bridge localThe names of the containers and network are prepended with the name of the project.
容器和网络的名称在项目名称之前。
结论 (Conclusion)
That is all there is to it…for a simple setup anyway. I’m sure there is much more the Docker gods could do but I am not one of them… Yet.
这就是全部……一个简单的设置。 我敢肯定Docker之神还可以做更多的事情,但我不是其中之一...然而。
In conclusion, we took an existing application that I wrote to work locally on a machine and shoved everything into a few containers. This meant we went from a machine that needed to have everything set up (with both MongoDB and ActiveMQ installed) to a machine that could skip all this by using containers and only requiring an installation of Docker. Docker then manages all of the dependencies for us.
最后,我们采用了一个我编写的现有应用程序,以便在计算机上本地工作,并将所有内容都放入几个容器中。 这意味着我们从一台需要设置所有内容的机器(同时安装了MongoDB和ActiveMQ)到一台可以通过使用容器而只需要安装Docker即可跳过所有操作的机器。 Docker然后为我们管理所有依赖项。
We looked at how to move each part of the application into a container and then tied it all together with Docker Compose. Leaving us, at the end of all this, with a single command that can move us from absolutely nothing to everything needed to run the application.
我们研究了如何将应用程序的每个部分移动到一个容器中,然后将它们与Docker Compose捆绑在一起。 在所有这些操作的最后,让我们离开一个命令,该命令可以使我们从绝对没有移动到运行该应用程序所需的一切。
The code used in this post can be found on my GitHub.
这篇文章中使用的代码可以在我的GitHub上找到 。
If you found this post helpful, you can follow me on Twitter at @LankyDanDev to keep up with my new posts.
如果您发现此帖子有帮助,可以在Twitter上@LankyDanDev关注我,以跟上我的新帖子。
Opinions and views found in my posts are my own and do not represent Accenture’s views on any subject. View all posts by Dan Newton
在我的帖子中发现的观点和观点是我自己的,并不代表埃森哲在任何主题上的观点。 查看丹·牛顿的所有文章
Originally published at lankydanblog.com on September 2, 2018.
最初于2018年9月2日发布在lankydanblog.com上。
翻译自: https://www.freecodecamp.org/news/how-to-shove-an-existing-application-into-containers-with-docker-6dcbd6152fe4/
docker查看现有容器
相关文章:
巧妙使用Firebug插件,快速监控网站打开缓慢的原因
巧妙使用Firebug插件,快速监控网站打开缓慢的原因 原文 巧妙使用Firebug插件,快速监控网站打开缓慢的原因 很多用户会问,我的网站首页才50KB,打开网页用了近60秒才打开?如何解释? 用户抱怨服务器运行缓…

第二阶段第三次站立会议
昨天做了什么:写了部分购物车的功能 今天要干什么:修改后台代码的错误 遇到的困难:没有困难转载于:https://www.cnblogs.com/jingxiaopu/p/7109774.html

微信小程序生成小程序二维码 php 直接可以用
微信小程序开发交流qq群 581478349 承接微信小程序开发。扫码加微信。 小程序需要先上线才能生成二维码 HTTP请求的效果图: 小程序展示的效果图: 小程序展示二维码源码: 请求二维码图片base64路径,点击预览图片 onLoad: func…
vue和react相同点_我在React和Vue中创建了相同的应用程序。 这是区别。
vue和react相同点by Sunil Sandhu由Sunil Sandhu 我在React和Vue中创建了相同的应用程序。 这是区别。 (I created the same app in React and Vue. Here are the differences.) Having used Vue at my current workplace, I had a fairly solid understanding of how it all …
Filter(过滤器)
一、Filter过滤器(重要) Javaweb中的过滤器可以拦截所有访问web资源的请求或响应操作。 1、Filter快速入门 1.1、步骤: 1. 创建一个类实现Filter接口 2. 重写接口中方法 doFilter方法是真正过滤的。 3. 在web.xml文件中配置 …

css3实现3D立体翻转效果
1、在IE下无法显示翻转效果,火狐和谷歌可以 1 /*样式css*/2 3 .nav-menu li {4 display: inline;5 }6 .nav-menu li a {7 color: #fff;8 display: block;9 text-decoration: none;10 overflow: visible;11 line-height: 40px;12 font-…
Ant Design 入门-参照官方文档使用组件
微信小程序开发交流qq群 173683895 承接微信小程序开发。扫码加微信。 先来一个按钮组件使用的对比,官方文档的(不能直接用)和实际能用的。 官网demo: import { Table, Divider, Tag } from antd;const columns = [{title: Name,dataIndex: name,key: name,render: text =…
如何用JavaScript的回调函数做出承诺
by Adham El Banhawy由Adham El Banhawy 如何用JavaScript的回调函数做出承诺 (How to make a Promise out of a Callback function in JavaScript) Back-end developers run into challenges all the time while building applications or testing code. As a developer who …
VMware里的linux系统里的命令行里会有bee的声音,要如何关掉
VMware里的linux系统里的命令行里会有bee的声音,要如何关掉 取消bell报警声的方法:登陆linux系统vi /etc/inputrc找到set bell-style none 将前面的#去掉,之后重启系统即可解决声音问题若不见效可以通过下面的方式解决下bell-styl…

React-Todos
最近学完React的最基本概念,闲下来的时候就自己写了一个Todo-List的小应用。这里做个简略的说明,给想好好学React的新手看。 React-Todo 学习前提 这里我用了webpackb做了babel和JSX预处理和模块打包。所以对React和一些ES2015(ES6࿰…
Ant Design 入门-引用自己命名的组件
微信小程序开发交流qq群 173683895 承接微信小程序开发。扫码加微信。 自己创建的组件:代码 import { Table, Divider, Tag } from antd; import React, { Component } from react; export default class My_Table extends Component {render() {const columns = [{title: …
迷宫出路代码_如何在软件开发的迷宫中找到自己的出路
迷宫出路代码by Tim Kleier蒂姆克莱尔(Tim Kleier) 如何在软件开发的迷宫中找到自己的出路 (How to find your way through the corn maze of software development) The corn maze is one of my favorite challenges to tackle. It’s an unnerving experience, especially w…
打包 React 项目并在服务器运行。
微信小程序开发交流qq群 173683895 承接微信小程序开发。扫码加微信。 1.找到项目根目录的package.json文件:如图: 2.打开cmd执行:npm run build 3.生成DIST文件夹。 4.把DIST文件放到服务器phpStudty根目录,访问index.html。…
一些有用的Python问题
1. 修改IDLE工作路径,在命令交互模式下输入如下指令: >>> import os >>> os.getcwd() #查看当前的工作路径 >>> os.chdir(E:\\Python\\Demo) #修改当前的工作路径 2.Python中 ImportError: cannot import name NUMPY_MKL 的…
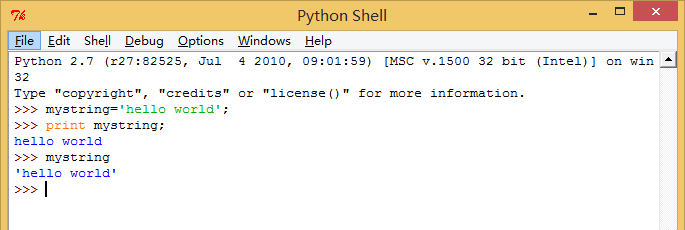
Python核心编程笔记---- print
在仅用变量名时,输出的字符串是用单引号括起来的。这个是为了让非字符串对象也可能以字符的形式显示在屏幕上。 而print 函数打印出来的是变量的值。 print 调用的是str()方法。而仅用变量名时调用的是repr()方法。 证明:------------------------------…
latex 插图解释_大O符号-只需插图和视频即可解释
latex 插图解释Big O notation is used to communicate how fast an algorithm is. This can be important when evaluating other people’s algorithms, and when evaluating your own! In this article, I’ll explain what Big O notation is and give you a list of the m…
[YTU]_2002(C语言实验——单词统计)
Description 从键盘输入一行字符,统计其中单词的个数,各单词以空格分隔,且空格数可以是多个。Input 输入只有一行句子。仅有空格和英文字母构成。 Output 单词的个数。 Sample Input stable marriage problem Consists of Matching memb…
资本中国人物-金融
一、二、三、店、五、土地、七、八、玖、拾起、白、千、一万、一亿、元(圆)、角、支、零、整个。这是上图中我们经常要填写。问:什么是它用数词?想必很多人都不是很清楚! 请看下面的两个相关的表数词: 1、数字化和大、小写数字对照…
Ant Design Pro 网络请求流程
微信小程序开发交流qq群 173683895 承接微信小程序开发。扫码加微信。 在 Ant Design Pro 中,一个完整的前端 UI 交互到服务端处理流程是这样的: UI 组件交互操作; 调用 model 的 effect; 调用统一管理的 service 请求函数&a…
在Google Cloud Platform上持续部署Node.js
by Gautam Arora由Gautam Arora 在Google Cloud Platform上持续部署Node.js (Continuous Deployment for Node.js on the Google Cloud Platform) Google Cloud Platform (GCP) provides a host of options for Node developers to easily deploy our apps. Want a managed ho…
hdu-1108 最小公倍数
题目链接: http://acm.hdu.edu.cn/showproblem.php?pid1108 题目类型: 数论 题意概括: 求两个数的最小公倍数 解题思路: 模拟 题目: 最小公倍数 Time Limit: 2000/1000 MS (Java/Others) Memory Limit: 65536/32768 K (Java/O…
sql-schema与catalog
schema: 指的是说当偶create database caiceclb时,caiceclb就是一个schema catalog: 指的是所有的database目录,就像上图显示的那样,将MySQL原来的(mysql,infomation_schema)及后来新建的的data…
这是如何更好地利用JavaScript数组的方法
by pacdiv由pacdiv 这是如何更好地利用JavaScript数组的方法 (Here’s how you can make better use of JavaScript arrays) Quick read, I promise. Over the last few months, I noticed that the exact same four mistakes kept coming back through the pull requests I c…
07、C语言——函数
函数 1、函数定义 函数返回值类型 函数名(形式参数列表) { 函数体; } 注意: 定义有参函数时,形参的定义可以采用传统方式或现代方式两种 1)传统方式: int …
This is probably not a problem with npm. There is likely additional logging output above
微信小程序开发交流qq群 173683895 承接微信小程序开发。扫码加微信。 E:\weii_objct\invoice-manage-web-view>npm start > ant-design-pro@2.1.0 start E:\weii_objct\invoice-manage-web-view > cross-env APP_TYPE=site umi dev cross-env 不是内部或外部命令…
parcel react_如何使用Parcel捆绑React.js应用程序
parcel reactby Michael Ozoemena迈克尔奥索埃梅纳(Michael Ozoemena) 如何使用Parcel捆绑React.js应用程序 (How to use Parcel to bundle your React.js application) 什么是包裹? (What’s Parcel?) Parcel is a web application bundler which offers a blazi…
SparkSQL 与 Spark Core的关系
不多说,直接上干货! SparkSQL 与 Spark Core的关系 Spark SQL构建在Spark Core之上,专门用来处理结构化数据(不仅仅是SQL)。 Spark SQL在Spark Core的基础上针对结构化数据处理进行很多优化和改进, 简单来讲: Spark SQ…
linux操作系统-设置静态ip
在使用linux虚拟机的时候因为经常有关机的需求,然后重新开机后可能面临这上一次获取的ip被改变,在这里我分享一下在linux 下设置静态ip的经验 1.查看路由状态 [rootlocalhost ~]# route -n Kernel IP routing table Destination Gateway Genmask Flags Met…
判断数组里面的下标是否等于一个字符串
微信小程序开发交流qq群 173683895 承接微信小程序开发。扫码加微信。 使用includes() 1、判断字符串里面是否包含一个字符串 示例: var a aaaaaaaavconsole.log(a.includes(v)); //truevar a aaaaaaaavconsole.log(a.includes(c)); //falsevar a aa…
如何获得更多的自由开发者客户
by Jad Joubran通过贾德乔布兰(Jad Joubran) 如何获得更多的自由开发者客户 (How to get more clients as a freelance developer) 我希望几年前知道的实用技巧 (Practical tips I wish I knew a few years ago) Whenever a conversation about freelancing kicks off with fe…