react.js做小程序_如何使用React.js构建现代的聊天应用程序
react.js做小程序
In this tutorial, I will guide you to build your own group chat application using React, React Router, and CometChat Pro. Yes, rather than roll out our own server, we will instead use CometChat Pro to handle the real-time sending and receiving of chat messages.
在本教程中,我将指导您使用React,React Router和CometChat Pro构建自己的群聊应用程序。 是的,我们不会使用自己的服务器,而是使用CometChat Pro来处理聊天消息的实时发送和接收。
When you’re done, you should have a functional chat application that looks something like this (of course, you’re welcome to tweak and experiment with things as you go along):
完成后,您应该拥有一个类似以下功能的聊天应用程序(当然,欢迎您在进行过程中进行调整和试验):
I have structured this tutorial as a series of steps to make it easy to follow along. If you’d just like to check out the code, click here.
我将本教程分为一系列步骤,以使其易于学习。 如果您只想查看代码, 请点击此处 。
设置项目 (Setting up the project)
Before we go too far, we must first set up our React project. To do this, we’ll use a lesser-known gem called Create React App.
在我们走得太远之前,我们必须首先设置我们的React项目。 为此,我们将使用一个鲜为人知的称为Create React App的gem。
The best thing? Because you have npm installed, you can use npx to install and run create-react-app in one step:
最好的东西? 由于已安装npm,因此可以使用npx一步安装并运行create-react-app:
npx create-react-app chatapp // note: npm v5.2+
npx create-react-app chatapp // note: npm v5.2+
After running this command, a new folder called “chatapp” will be created with the following structure:
运行此命令后,将使用以下结构创建一个名为“ chatapp”的新文件夹:
In addition, to React, we will also need to install React Router and CometChat Pro SDK. To do this, head to the chatapp directory and run:
此外,对于React,我们还需要安装React Router和CometChat Pro SDK。 为此,请转到chatapp目录并运行:
npm install react-router-dom @cometchat-pro/chat --save
npm install react-router-dom @cometchat-pro/chat --save
添加React路由器 (Add React Router)
In the end, our application will have two pages — one called Login where the user will log in, and another called Groupchat where we will render the chat room. We will use React Router to route users to the page they need.
最后,我们的应用程序将有两个页面-一个页面称为Login ,用户将在该页面Login ;另一个页面名为Groupchat ,在此Groupchat ,我们将提供聊天室。 我们将使用React Router将用户路由到他们需要的页面。
To setup React Router, we must first import the Router wrapper component in our index.js file. I call it a wrapper component because we wrap our App inside the Router component.
要设置React Router,我们必须首先在index.js文件中导入Router 包装器组件。 我将其称为包装器组件,因为我们将App封装在Router组件中。
Replace index.js with this snippet:
使用以下代码段替换index.js:
import React from 'react';
import { BrowserRouter as Router } from 'react-router-dom'; // added
import ReactDOM from 'react-dom';
import './index.css';
import App from './App';
ReactDOM.render(<Router><App /></Router>, document.getElementById('root'));
index.js is the entry point for our application. Its only real job is to render our React application. Most of our “real” logic happens in a file called App.js, which we will modify next.
index.js是我们应用程序的入口点。 唯一真正的工作就是渲染我们的React应用程序。 我们大多数的“真实”逻辑都发生在名为App.js的文件中,接下来我们将对其进行修改。
In App.js, we must import additional React Router dependencies which will enable us to render different components depending on what route the user has loaded. For example, if the user goes to the “/login” route, we should render the Login component. Likewise, if the user goes to the “/chat” route, we should render the Groupchat component:
在App.js中,我们必须导入其他React Router依赖关系,这将使我们能够根据用户加载的路线来呈现不同的组件。 例如,如果用户转到“ / login”路线,则应呈现“登录”组件。 同样,如果用户转到“ / chat”路线,则应呈现Groupchat组件:
import React, { Component } from "react";
import { Route, Redirect, Switch } from "react-router-dom";
import "./App.css";
// the below components will be created shortly
import Login from "./components/Login";
import Groupchat from "./components/Groupchat";
class App extends Component {constructor(props) {super(props);}
render() {return (<Switch><Redirect exact from="/" to="/login" /><Route path="/login" component={Login} /><Route path="/chat" component={Groupchat} /></Switch>);}
}
export default App;
If you try to run this code it will definitely throw some errors because we haven’t made the Login and Groupchat components. Let’s do that now.
如果您尝试运行此代码,则肯定会引发一些错误,因为我们尚未创建Login和Groupchat组件。 现在开始吧。
创建登录组件 (Create the Login component)
To keep our project nice and tidy, create a folder called components to hold our custom components.
为了使我们的项目保持整洁,请创建一个名为components的文件夹来保存我们的自定义组件。
Then, in that newly-created folder, create a file called Login.js with the following code:
然后,在该新创建的文件夹中,使用以下代码创建一个名为Login.js的文件:
import React from "react";
class Login extends React.Component {constructor(props) {super(props);this.state = {};}render() {return ( <div className="App"><h1>Login</h1></div>);}
}
export default Login;
All we’re doing here is exporting a component with the heading text, “Login”. We’ll flesh this component out soon but for right now, we are merely creating boilerplate.
我们在这里所做的就是导出带有标题文本“ Login”的组件。 我们将尽快充实此组件,但就目前而言,我们仅创建样板。
创建Groupchat组件 (Create the Groupchat component)
In the same components folder, create a new component called Groupchat.js:
在相同的components文件夹中,创建一个名为Groupchat.js的新组件:
import React from "react";
class Groupchat extends React.Component {constructor(props) {super(props);}render() {return <div className="chatWindow" />;}
}
export default Groupchat;
As we progress through the tutorial, we will develop this humble component into the core of our chat application.
在学习本教程的过程中,我们将把这个不起眼的组件开发成聊天应用程序的核心。
With the Groupchat and Login components in place, you should be able to run the application without an error. Open the app on localhost and navigate to localhost:3000/login and then localhost:3000/chat to see the components in action.
有了Groupchat和Login组件后,您应该能够运行该应用程序而不会出现错误。 在localhost上打开应用程序,然后导航到localhost:3000 / login,然后导航到localhost:3000 / chat以查看正在使用的组件。
创建CometChat APP ID和API密钥 (Create the CometChat APP ID and API key)
Like I mentioned at the beginning of the tutorial, we won’t be rolling out our own server in this tutorial. Instead, we’ll be using a hosted service of CometChat Pro.
就像我在本教程开始时提到的那样,我们不会在本教程中推出自己的服务器。 相反,我们将使用CometChat Pro的托管服务。
Before we can connect to CometChat, we must first create a CometChat application from the dashboard:
在连接到CometChat之前,我们必须首先从仪表板创建CometChat应用程序:
Once your application has been created, hit “Explore” then head to the “API Keys” tab:
创建应用程序后,点击“浏览”,然后转到“ API密钥”选项卡:
Click “Create API key” and fill in the form, choosing Auth Only scope. From the table, you can note your application ID and application key, we’ll need these shortly.
单击“创建API密钥”并填写表格,选择“仅验证”范围。 在表格中,您可以记下您的应用程序ID和应用程序密钥,我们很快将需要它们。
创建CometChat组ID (Create the CometChat group ID)
While we have the dashboard open, let’s also create a group. Normally you’d do this with code (for example, you might allow the user to create a custom chat group for their team or project through your app) but for learning and testing, the dashboard is fine.
打开仪表板后,我们还要创建一个group 。 通常,您可以使用代码来执行此操作(例如,您可以允许用户通过您的应用程序为其团队或项目创建自定义聊天组),但是对于学习和测试而言,仪表板很好。
Head to the “Groups” tab and create a new group called testgroup:
转到“组”选项卡并创建一个名为testgroup的新组:
Like last time, you’ll be taken back to a table where you can note the group ID:
与上次一样,您将被带回到一个表中,您可以在其中记录组ID:
Take note as we’ll need this in the next step.
请注意,因为下一步将需要它。
创建配置文件 (Create the configuration file)
To make it easy to reference our configuration, create a new file called config.js and paste your credentials:
为了便于参考我们的配置,请创建一个名为config.js的新文件并粘贴您的凭据:
export default {appId: "", //Enter your App IDapiKey: "", //Enter your API KEYGUID: "", // Enter your group UID
};
You can now close the dashboard. Once you setup CometChat, all interaction happens through code.
现在,您可以关闭仪表板。 设置CometChat后,所有交互都将通过代码进行。
创建一个CometChat Manager类 (Create a CometChat Manager class)
One of the beautiful things about React is that it lends itself to a separation of concerns. Our components can focus purely on presentation while we can create other modules to handle things like data fetching and state management.
React的美丽之处之一是它使关注点分离。 我们的组件可以完全专注于表示,而我们可以创建其他模块来处理诸如数据获取和状态管理之类的事情。
To really take advantage of this, let’s create a new folder called “lib” and in that new folder, a file called chat.js. This is where all of our interaction with CometChat will take place:
为了真正利用这一点,让我们创建一个名为“ lib”的新文件夹,并在该新文件夹中创建一个名为chat.js的文件。 这是我们与CometChat进行所有互动的地方:
import { CometChat } from "@cometchat-pro/chat";
import config from "../config";
export default class CCManager {static LISTENER_KEY_MESSAGE = "msglistener";static appId = config.appId;static apiKey = config.apiKey;static LISTENER_KEY_GROUP = "grouplistener";static init() {return CometChat.init(CCManager.appId);}static getTextMessage(uid, text, msgType) {if (msgType === "user") {return new CometChat.TextMessage(uid,text,CometChat.MESSAGE_TYPE.TEXT,CometChat.RECEIVER_TYPE.USER);} else {return new CometChat.TextMessage(uid,text,CometChat.MESSAGE_TYPE.TEXT,CometChat.RECEIVER_TYPE.GROUP);}}static getLoggedinUser() {return CometChat.getLoggedinUser();}static login(UID) {return CometChat.login(UID, this.apiKey);}static getGroupMessages(GUID, callback, limit = 30) {const messagesRequest = new CometChat.MessagesRequestBuilder().setGUID(GUID).setLimit(limit).build();callback();return messagesRequest.fetchPrevious();}static sendGroupMessage(UID, message) {const textMessage = this.getTextMessage(UID, message, "group");return CometChat.sendMessage(textMessage);}static joinGroup(GUID) {return CometChat.joinGroup(GUID, CometChat.GROUP_TYPE.PUBLIC, "");}static addMessageListener(callback) {CometChat.addMessageListener(this.LISTENER_KEY_MESSAGE,new CometChat.MessageListener({onTextMessageReceived: textMessage => {callback(textMessage);}}));}
}
Aside from allowing us to create a separation of concerns, presenting the code like this also makes it easier to digest.
除了允许我们创建关注点分离之外,像这样显示代码也使摘要更容易理解。
Let me explain some important parts of this module, starting from the top:
让我从顶部开始解释该模块的一些重要部分:
LISTENER_KEY_MESSAGE– This is required by the message listener.LISTENER_KEY_MESSAGE–这是消息侦听LISTENER_KEY_MESSAGE所必需的。init()– This is required to be called only once throughout the lifecycle of the application, it calls the CometChatinitmethod with the appID.init()–在应用程序的整个生命周期中仅需调用一次,它使用appID调用CometChatinit方法。getTextMessage(uid, text, msgType)– it creates the message object based onCometChat.TextMessagemethod, it accepts the UID (GUID in our case) and the text message to send.getTextMessage(uid, text, msgType)–它基于CometChat.TextMessage方法创建消息对象,它接受UID(在本例中为GUID)和要发送的文本消息。getLoggedInUser()– it’s used to get the currently logged in user.getLoggedInUser()–用于获取当前登录的用户。login()– it’s used to log in a user based on the CometChat.login method, it takes in the UID (GUID in our case) and the apiKey.login()–用于基于CometChat.login方法登录用户,它接受UID(在本例中为GUID)和apiKey。getGroupMessages(GUID, callback, limit = 30)– this is used to get the previous group messages from CometChat using theCometChat.MessagesRequestBuilder()method that takes in the GUID and limit as parameters.getGroupMessages(GUID, callback, limit = 30)–用于使用CometChat.MessagesRequestBuilder()方法从CometChat获取先前的组消息,该方法接受GUID和limit作为参数。sendGroupMessage(UID, message)– this is used to send messages using theCometChat.sendMessage()method and it accepts the GUID and message as parameters.sendGroupMessage(UID, message)–用于使用CometChat.sendMessage()方法发送消息,并且接受GUID和消息作为参数。joinGroup(GUID)– It’s used to join a chosen group using a GUID.joinGroup(GUID)–用于使用GUID加入选定的组。addMessageListener(callback)– Uses theCometChat.addMessageListener()to listen to messages (did I mention this is called in real-time?), it requires theLISTENER_KEY_MESSAGEas a parameter and also a callback that is called when a message is received.addMessageListener(callback)–使用CometChat.addMessageListener()侦听消息(我是否提到过实时调用此消息?),它需要LISTENER_KEY_MESSAGE作为参数,还需要在收到消息时调用的回调。
There’s nothing specific to this application here. You could well take this module, expand it if needed, and import it into another project. Generally, though, this is just a thin wrapper around the SDK.
这里没有特定于此应用程序的内容。 您可以采用此模块,如果需要将其扩展,然后将其导入另一个项目。 通常,这只是SDK的一个薄包装。
更新登录组件 (Update the login component)
With all our configuration and chat code in place, we can now rapidly build out the UI starting with the Login component.
有了我们所有的配置和聊天代码,我们现在可以从Login组件开始快速构建UI。
Just to remind you, this is what the Login component will look like:
提醒您,这是Login组件的外观:
As you can see, its main function is to ask the user for their name. Once a name is supplied, we render the Groupchat component.
如您所见,它的主要功能是询问用户的姓名。 提供名称后,我们将呈现Groupchat组件。
Replace Login.js with:
将Login.js替换为:
import React from "react";
import { Redirect } from "react-router-dom";
import chat from "../lib/chat";
import spinner from "../logo.svg";
class Login extends React.Component {constructor(props) {super(props);this.state = {username: "",isAuthenticated: false,user: null,isSubmitting: false,errorMessage: ""};}onSubmit = e => {if (this.state.username !== "") {e.preventDefault();this.login();}};login = () => {this.toggleIsSubmitting();chat.login(this.state.username).then(user => {this.setState({user,isAuthenticated: true});}).catch(error => {this.setState({errorMessage: "Please enter a valid username"});this.toggleIsSubmitting();console.log(error);});};toggleIsSubmitting = () => {this.setState(prevState => ({isSubmitting: !prevState.isSubmitting}));};handleInputChange = e => {this.setState({username: e.target.value});};render() {if (this.state.isAuthenticated) {return (<Redirectto={{pathname: "/chat",state: { user: this.state.user }}}/>);}return (<div className="App"><h1>COMETCHAT</h1><p>Create an account through your CometChat dashboard or login with one of our test users, superhero1, superhero2, etc.</p><form className="form" onSubmit={this.onSubmit}><input onChange={this.handleInputChange} type="text" /><span className="error">{this.state.errorMessage}</span>{this.state.isSubmitting ? (<img src={spinner} alt="Spinner component" className="App-logo" />) : (<inputtype="submit"disabled={this.state.username === ""}value="LOGIN"/>)}</form></div>);}
}
export default Login;
Aside from the presentational HTML, most code here is dedicated to handling a React form.
除了演示HTML之外,这里的大多数代码都专用于处理React表单 。
更新Groupchat组件 (Update the Groupchat component)
The Groupchat component has a lot more responsibility than the Login component. As a quick reminder, this is what it will look like:
Groupchat组件比Login组件承担更多的责任。 快速提醒一下,这是这样的:
For the most part, the Groupchat component’s job is to bridge the chat lib module and the UI we’ll present to the user. For example, when a user sends a message, we call chat.sendMessage and as new messages trickle in, a callback function is called:
在大多数情况下, Groupchat组件的工作是桥接chat lib模块和我们将提供给用户的UI。 例如,当用户发送消息时,我们称为chat.sendMessage ,随着新消息的滴入,回调函数将被调用:
import React from "react";
import { Redirect } from "react-router-dom";
import chat from "../lib/chat";
import config from "../config";
class Groupchat extends React.Component {constructor(props) {super(props);
this.state = {receiverID: "",messageText: null,groupMessage: [],user: {},isAuthenticated: true};
this.GUID = config.GUID;}
sendMessage = () => {chat.sendGroupMessage(this.GUID, this.state.messageText).then(message => {console.log("Message sent successfully:", message);this.setState({ messageText: null });},error => {if (error.code === "ERR_NOT_A_MEMBER") {chat.joinGroup(this.GUID).then(response => {this.sendMessage();});}});};
scrollToBottom = () => {const chat = document.getElementById("chatList");chat.scrollTop = chat.scrollHeight;};
handleSubmit = event => {event.preventDefault();this.sendMessage();event.target.reset();};
handleChange = event => {this.setState({ messageText: event.target.value });};
getUser = () => {chat.getLoggedinUser().then(user => {console.log("user details:", { user });this.setState({ user });}).catch(({ error }) => {if (error.code === "USER_NOT_LOGED_IN") {this.setState({isAuthenticated: false});}});};
messageListener = () => {chat.addMessageListener((data, error) => {if (error) return console.log(`error: ${error}`);this.setState(prevState => ({groupMessage: [...prevState.groupMessage, data]}),() => {this.scrollToBottom();});});};
componentDidMount() {this.getUser();this.messageListener();// chat.joinGroup(this.GUID)}
render() {const { isAuthenticated } = this.state;if (!isAuthenticated) {return <Redirect to="/" />;}return (<div className="chatWindow"><ul className="chat" id="chatList">{this.state.groupMessage.map(data => (<div key={data.id}>{this.state.user.uid === data.sender.uid ? (<li className="self"><div className="msg"><p>{data.sender.uid}</p><div className="message"> {data.data.text}</div></div></li>) : (<li className="other"><div className="msg"><p>{data.sender.uid}</p><div className="message"> {data.data.text} </div></div></li>)}</div>))}</ul><div className="chatInputWrapper"><form onSubmit={this.handleSubmit}><inputclassName="textarea input"type="text"placeholder="Enter your message..."onChange={this.handleChange}/></form></div></div>);}
}
export default Groupchat;<
There’s a lot to digest here, so let’s break the important parts down:
这里有很多要消化的东西,所以让我们分解重要的部分:
sendMessage()– This function handles sending a message to the group, passing the GUID and the text message that is stored is in the component’s state. If the user is not part of the group we then make a request to join the group and then call the sendMessage function again.sendMessage()–此函数处理将消息发送到组,传递GUID,并且所存储的文本消息处于组件状态。 如果该用户不属于该组,则我们将请求加入该组,然后再次调用sendMessage函数。scrollToBottom()– This function will be used as a callback function for the message listener, it just makes sure that the latest messages are shown in the chat list.scrollToBottom()–此函数将用作消息侦听器的回调函数,它只是确保最新消息显示在聊天列表中。handleSubmit()– This calls the sendMessage function.handleSubmit()–调用sendMessage函数。getUser()– This calls the chat.getLoggedInUser() method and stores the user object in the component’s state.getUser()–调用chat.getLoggedInUser()方法并将用户对象存储在组件的状态中。messageListener()– This calls the chat.addMessageListener() function and appends every new message received to thegroupMessagearray which is stored in the component’s state and rendered in the app.messageListener()–调用chat.addMessageListener()函数,并将接收到的groupMessage追加到groupMessage数组中,该数组存储在组件状态中并在应用程序中呈现。componentDidMount()– This calls the getUser and messageListener functions.componentDidMount()–这将调用getUser和messageListener函数。
Finally, we render a class depending on if the message is ours or someone else’s. This way, we can apply different styles which is the topic of the next section.
最后,我们根据消息是我们的消息还是其他人的消息来渲染类。 这样,我们可以应用不同的样式,这是下一部分的主题。
更新样式 (Update the styles)
If you were to run the application now, it would work but with no CSS to speak of thus far, it would look quite uh, odd.
如果您现在要运行该应用程序,它将可以运行,但是到目前为止还没有CSS可以说,它看起来很奇怪。
This isn’t a tutorial about CSS so I won’t explain it in any detail, but to help you follow along, you can paste the following into your App.css file (you will have one already because it was generated by create-react-app earlier):
这不是一本关于CSS的教程,因此我将不做任何详细解释,但是为了帮助您继续学习,您可以将以下内容粘贴到您的App.css文件中(您已经有了一个,因为它是由create-react-app之前):
.App {text-align: center;display: flex;width: 100%;flex-direction: column;align-items: center;justify-content: center;height: 50vh;
}
.App p{font-size: 12px;width: 50%;
}
.App-logo {animation: App-logo-spin infinite 0.5s linear;height: 10vmin;
}
.form {display: flex;flex-direction: column;
}
.form input[type="text"] {width: 300px;height: 30px;margin-bottom: 10px;
}
.form input[type="submit"] {padding: 5px;height: 30px;border: none;background-color: #187dbc;color: #fff;
}
.form input[type="submit"]:hover {border: #fff;cursor: pointer;background-color: #000;color: #fff;
}
.error{color: red;font-size: 10px;text-align: center;
}
@keyframes App-logo-spin {from {transform: rotate(0deg);}to {transform: rotate(360deg);}
}
.message {font-size: 15px !important;
}
body {background-color: #f5f5f5;font: 600 18px/1.5 -apple-system, BlinkMacSystemFont, "Segoe UI", Lato,Oxygen-Sans, Ubuntu, Cantarell, "Helvetica Neue", sans-serif;color: #4b4b4b;
}
.container {display: grid;grid-template-columns: repeat(4, 1fr);grid-template-rows: repeat(1, 50px);grid-gap: 3px;margin-top: 15px;
}
.group {background: #4eb5e5;grid-column-start: 1;grid-column-end: 2;grid-row-start: 1;grid-row-end: 190;border-radius: 5px;
}
.chatWindow {display: grid;grid-column-start: 2;grid-column-end: 9;grid-row-start: 1;grid-row-end: 190;background: rgb(233, 229, 229);border-radius: 5px;
}
.chatInputWrapper {display: grid;grid-row-start: 190;grid-row-end: 190;
}
::-webkit-scrollbar {display: none;
}
/* M E S S A G E S */
.chat {list-style: none;background: none;margin: 0;padding: 0 0 50px 0;margin-top: 60px;margin-bottom: 10px;max-height: 400px;overflow: scroll;scroll-behavior: smooth;
}
.chat li {padding: 0.5rem;overflow: hidden;display: flex;
}
.chat .avatar {position: relative;display: block;z-index: 2;
}
.chat .avatar img {background-color: rgba(255, 255, 255, 0.9);-webkit-touch-callout: none;-webkit-user-select: none;-moz-user-select: none;-ms-user-select: none;
}
.chat .uid img {background-color: rgba(255, 255, 255, 0.9);-webkit-touch-callout: none;-webkit-user-select: none;-moz-user-select: none;-ms-user-select: none;
}
.chat .day {position: relative;display: block;text-align: center;color: #c0c0c0;height: 20px;text-shadow: 7px 0px 0px #e5e5e5, 6px 0px 0px #e5e5e5, 5px 0px 0px #e5e5e5,4px 0px 0px #e5e5e5, 3px 0px 0px #e5e5e5, 2px 0px 0px #e5e5e5,1px 0px 0px #e5e5e5, 1px 0px 0px #e5e5e5, 0px 0px 0px #e5e5e5,-1px 0px 0px #e5e5e5, -2px 0px 0px #e5e5e5, -3px 0px 0px #e5e5e5,-4px 0px 0px #e5e5e5, -5px 0px 0px #e5e5e5, -6px 0px 0px #e5e5e5,-7px 0px 0px #e5e5e5;box-shadow: inset 20px 0px 0px #e5e5e5, inset -20px 0px 0px #e5e5e5,inset 0px -2px 0px #d7d7d7;line-height: 38px;margin-top: 5px;margin-bottom: 20px;cursor: default;-webkit-touch-callout: none;-webkit-user-select: none;-moz-user-select: none;-ms-user-select: none;
}
.other .msg {order: 1;border-top-left-radius: 0px;box-shadow: -1px 2px 0px #d4d4d4;
}
.other:before {content: "";position: relative;top: 0px;right: 0px;left: 40px;width: 0px;height: 0px;border: 5px solid #fff;border-left-color: transparent;border-bottom-color: transparent;
}
.self {justify-content: flex-end;align-items: flex-end;
}
.self .msg {order: 1;border-bottom-right-radius: 0px;box-shadow: 1px 2px 0px #d4d4d4;
}
.self .avatar {order: 2;
}
.self .avatar:after {content: "";position: relative;display: inline-block;bottom: 19px;right: 0px;width: 0px;height: 0px;border: 5px solid #fff;border-right-color: transparent;border-top-color: transparent;box-shadow: 0px 2px 0px #d4d4d4;
}
.msg {background: white;min-width: fit-content;padding: 10px;border-radius: 10px;box-shadow: 0px 2px 0px rgba(0, 0, 0, 0.07);
}
.msg p {font-size: 0.8rem;margin: 0 0 0.2rem 0;color: rgb(81, 84, 255);
}
.msg img {position: relative;display: block;width: 450px;border-radius: 5px;box-shadow: 0px 0px 3px #eee;transition: all 0.4s cubic-bezier(0.565, -0.26, 0.255, 1.41);cursor: default;-webkit-touch-callout: none;-webkit-user-select: none;-moz-user-select: none;-ms-user-select: none;
}
@media screen and (max-width: 800px) {.msg img {width: 300px;}
}
@media screen and (max-width: 550px) {.msg img {width: 200px;}
}
.msg time {font-size: 0.7rem;color: #ccc;margin-top: 3px;float: right;cursor: default;-webkit-touch-callout: none;-webkit-user-select: none;-moz-user-select: none;-ms-user-select: none;
}
.msg time:before {content: " ";color: #ddd;font-family: FontAwesome;display: inline-block;margin-right: 4px;
}
::-webkit-scrollbar {min-width: 12px;width: 12px;max-width: 12px;min-height: 12px;height: 12px;max-height: 12px;background: #e5e5e5;
}
::-webkit-scrollbar-thumb {background: rgb(48, 87, 158);border: none;border-radius: 100px;border: solid 3px #e5e5e5;box-shadow: inset 0px 0px 3px #999;
}
::-webkit-scrollbar-thumb:hover {background: #b0b0b0;box-shadow: inset 0px 0px 3px #888;
}
::-webkit-scrollbar-thumb:active {background: #aaa;box-shadow: inset 0px 0px 3px #7f7f7f;
}
::-webkit-scrollbar-button {display: block;height: 26px;
}
/* T Y P E */
input.textarea {width: 100%;height: 50px;background: #fafafa;border: none;outline: none;padding-left: 55px;padding-right: 55px;color: #666;font-weight: 400;
}
结论 (Conclusion)
Run the application with npm start and low and behold, your chat application is complete. At least, the basic functionality is in place. With CometChat, you could easily expand the app to include a “who’s online list”, direct messages, media messages, and a bunch of other features.
以npm start和低端运行应用程序, npm start到您的聊天应用程序已完成。 至少,基本功能已经到位。 有了CometChat,您可以轻松地扩展应用程序,使其包含“谁的在线列表”,直接消息,媒体消息以及许多其他功能。
This article was originally published on Cometchat’s blog.
本文最初发表在Cometchat的博客上 。
翻译自: https://www.freecodecamp.org/news/building-a-modern-chat-application-with-react-js-558896622194/
react.js做小程序
相关文章:

RAP Mock.js语法规范
Mock.js 的语法规范包括两部分: 数据模板定义规范(Data Template Definition,DTD)数据占位符定义规范(Data Placeholder Definition,DPD)1.数据模板定义规范 DTD 数据模板中的每个属性由 3 部分…
NSDictionary、NSMutableDictionary基本使用
郝萌主倾心贡献,尊重作者的劳动成果。请勿转载。假设文章对您有所帮助,欢迎给作者捐赠,支持郝萌主,捐赠数额任意,重在心意^_^ 我要捐赠: 点击捐赠Cocos2d-X源代码下载:点我传送游戏官方下载:htt…

h5轮播图及效果图
效果图: 代码: <!doctype html> <html><head><meta charset"utf-8"><title>jQuery响应式卡片轮播切换代码</title><link rel"stylesheet" type"text/css" href"css/style.c…
性能测试回归测试_自动网站性能回归测试
性能测试回归测试by Adam Henson亚当汉森(Adam Henson) 如何使用Foo自动执行网站性能回归测试 (How to automate website performance regression testing with Foo) 使用部署后步骤自动执行连续交付工作流程中的性能回归测试 (Using a post deploy step to automate performa…

【html】【13】特效篇--下拉导航
html代码: 1 <!DOCTYPE html>2 <html>3 <head>4 <meta http-equiv"Content-Type" content"text/html; charsetUTF-8">5 <title>Bootstrap导航条鼠标悬停下拉菜单</title>6 <li…
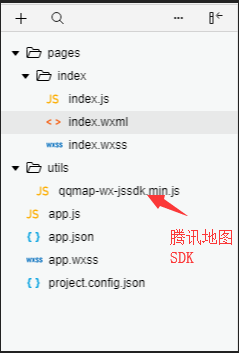
小程序获取用户所在城市完整代码
小程序目录结构 插入提示: 1. 申请开发者密钥(key): 申请密钥 2. 下载微信小程序JavaScriptSDK,下载地址 下载完成后放入utils文件夹下引用即可 3. 安全域名设置,在“设置” -> “开发设置”中设置req…
prolog_如何通过观看权力的游戏学习Prolog
prologby Rachel Wiles瑞秋威尔斯(Rachel Wiles) 如何通过观看权力的游戏学习Prolog (How to learn Prolog by watching Game of Thrones) 他们死了吗? 他们还活着吗? 她是他的姨妈吗? 不用把精力浪费在2011年,而可以使用Prolog节…
身份证号码对应地区-官方措辞:行政区划代码
身份证前6位代表着该身份证的籍贯在哪里,而官方的措辞则为:行政区划代码 如何找到最新的行政区划代码了? 通过:http://blog.sina.com.cn/s/blog_5a76dae20100tqv5.html 此人的博客得知,行政区划代码是国家统计局统计的…
Jquery_操作cookies
首先引入jquery.cookie.js jquery.cookie.js下地址:http://plugins.jquery.com/cookie/ 操作文档: https://github.com/carhartl/jquery-cookie#readme 创建cookies: $.cookie(name, value); 设置有效期: 设置七天过期 $.cookie(n…
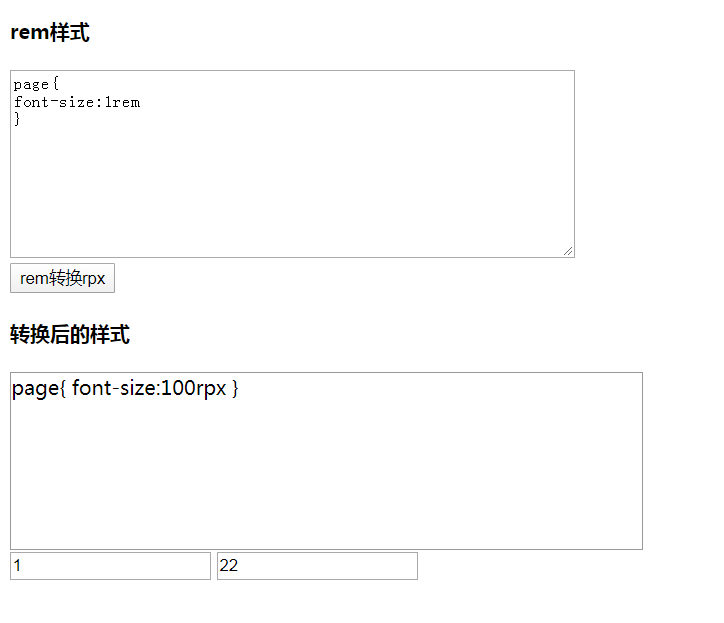
rem转rpx工具
对样式进行格式化,然后根据 “rem” 进行拆分,这样就会拆分成一个数组 [str1,str2,str3...,str6], 除了最后一个元素,前边的元素都会以 “rem” 样式的数值结尾, 然后在对数组中的元素字符串进行再次根据 “:” 进行…
colab中的变量怎么读取_Fizyr Retinanet在Colab中进行目标检测
colab中的变量怎么读取by RomRoc由RomRoc 带有Fizyr Retinanet的Google Colab中的对象检测 (Object Detection in Google Colab with Fizyr Retinanet) Let’s continue our journey to explore the best machine learning frameworks in computer vision.让我们继续我们的旅程…
c++重载(以运算符重载为主)
重载(OverLoading)是面向对象程序设计多态性的一种体现。所谓重载,是指“同一标识符”在同一作用域的不同场合具有不同的语义,这个标识符可以是函数名或运算符。也就是说,重载可以使多个函数使用同一个函数名ÿ…
记录-MySQL中的事件调度Event Scheduler
下面是自己的实例 /*查询event是否开启(查询结果Off为关闭 On为开启)*/show variables like %sche%; /*开启/关闭命令(1开启--0关闭)*/set global event_scheduler1; /*关闭事件任务: */alter event e_test_insert ON COMPLETION…
JS 实现下载Blod文件
实现代码: //下载Blod文件 const downLoadBlobFile (filename, res) > {if (!res) return;let a document.createElement(a);let blob new Blob([res], { type: application/vnd.openxmlformats-officedocument.spreadsheetml.sheet;charsetutf-8 });let blo…
盖尔-沙普利算法_盖尔定律-及其与初创企业的关系
盖尔-沙普利算法I realized something fascinating the other day: I realized that, as a startup entrepreneur and founder, I’m a builder of systems.前几天,我意识到了一件令人着迷的事情:我意识到,作为一名初创企业家和创始人&#x…
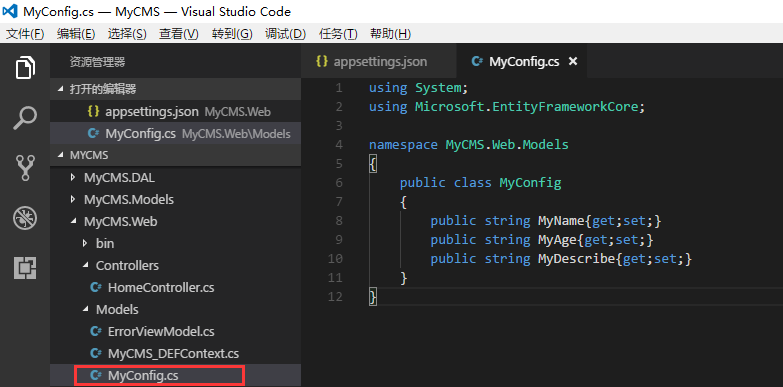
使用VS Code开发.Net Core 2.0 MVC Web应用程序教程之三(配置文件读取)
干了一天的活,还有点时间,给兄弟们写点东西吧。 大家有没有发现一个问题?那就是在.Net Core的MVC项目里面,没有.config文件了!!!同志们,没有config文件了啊,这样搞&#…
小程序云开发数据库在网站读取
使用TCB JS SDK Tencent Cloud Base(TCB) JavaScript SDK 介绍 TCB 提供开发应用所需服务和基础设施。TCB JS SDK 让你可以在网页端使用 JavaScript 代码服务访问 TCB 的的服务。你可以使用该 SDK 构建自己的公众号页面或者独立的网站等 Web 服务。 安装 TCB JS SDK 可以…
设计模式学习心得4
1.组合模式 定义一个父类,其中包括所有子类的方法接口,那么对于任何一个子类来说对外界都是封闭的,外界只调用父类的接口,而不知道子类是否有实现。 2.迭代器模式 这个很常见,在C中常常会用在标准模版类中,…
react创建组件_如何使用React创建时间轴组件
react创建组件These days I’ve been working on a new page for my website. I wanted to have a Timeline to showcase some of my professional accomplishments over the years.这些天来,我一直在为网站创建新页面。 我希望有一个时间表来展示我多年来的一些专业…
oracle根据一张表更新另外一张表
知道是两张表进行更新,之前作过mysql的,直接就写了: update a,b set a.code b.code wehre a.id b.id 然后就报错了,上网查了下知道oracle不能这样子写 之后找到如下的办法: UPDATE a set a.code (select b.code from b where…
应用内设置语言不重启方法
1、设置本应用方法网上有很多,大概如下 Resources resources getResources(); Configuration config resources.getConfiguration(); DisplayMetrics dm resources.getDisplayMetrics(); config.locale locale; //目标语言 resources.updateConfiguration(confi…
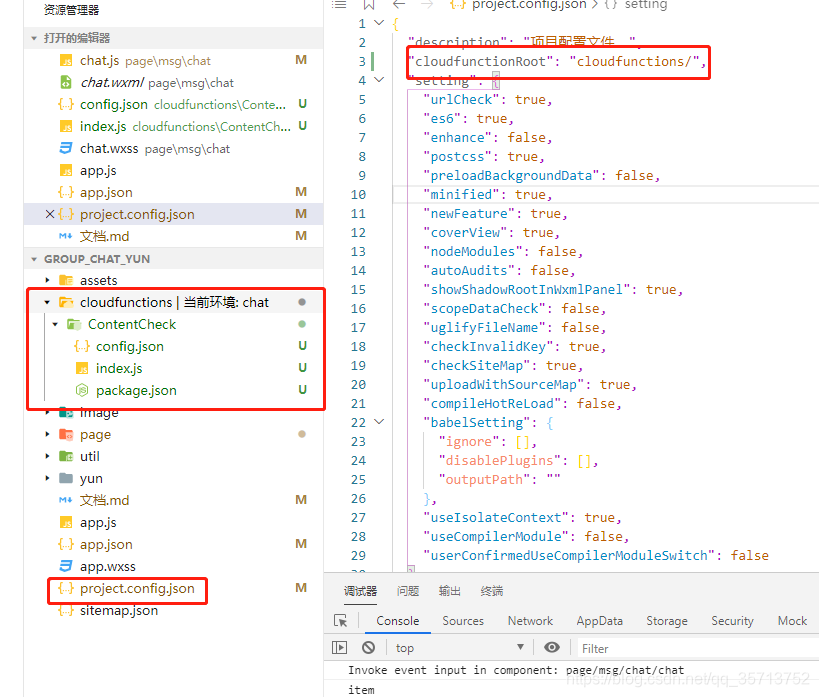
小程序内容审核违规过滤,在小程序使用security.msgSecCheck
使用微信提供的API security.msgSecCheck 查看文档 1.开通云开发,创建云环境。 2.在云函数的目录中,创建一个云函数(ContentCheck),如果小程序代码没有云函数的目录,可以在 project.config.json 目录中配置…
如何在JavaScript中切片和拼接数组
.slice() and .splice() are similar methods in JavaScript. They look similar, they sound similar, and they do similar things. For those reasons, it’s important to know the differences between them. Also, they’re used very often, so understanding their usa…
jQuery中getJSON跨域原理详解
详见:http://blog.yemou.net/article/query/info/tytfjhfascvhzxcytp28 jQuery中getJSON跨域原理详解 前几天我再开发一个叫 河蟹工具条 的时候,其中有个功能就是获取本页面的短网址。 这个想法是好的,可是在我付诸于行动的时候,发…
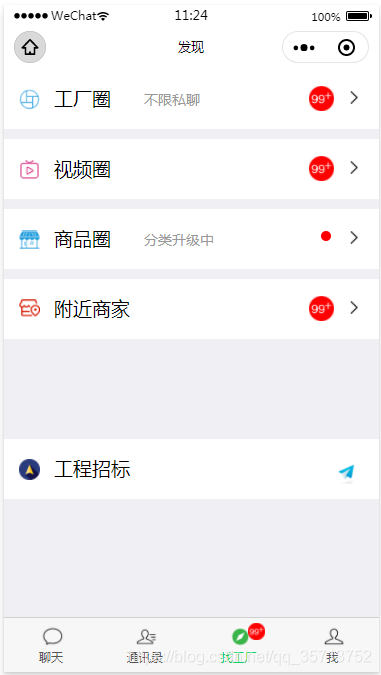
样式集(七)仿微信发现页样式
效果图: <!--pages/find/find.wxml--><include src"/components/common/common" /> <view class"item" catchtap"nav1"><image class"icon" mode"widthFix" src"/images/icon_5.png&q…
html向js传递id
html获取id方法: <div id"thediv1" style"display:block" onclick"ceshi(this.id)">技术A组</div> this.id ------>本身id转载于:https://www.cnblogs.com/wanlibingfeng/p/7613575.html
javascript功能_功能性JavaScript简介
javascript功能Hey everybody! I’ve written a book called Discover Functional JavaScript, and it’s now ready in both paperback and Kindle formats.大家好! 我已经写了一本书《 发现功能JavaScript》 ,现在已经可以使用平装本和Kindle格式。 A…
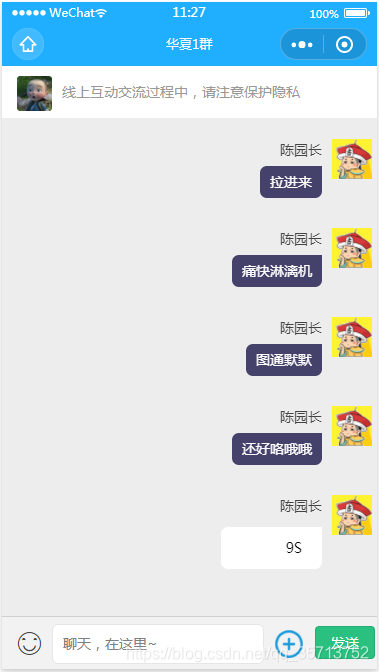
样式集,小程序群聊,聊天室样式,效果图
效果图 注:(码云 group_chat_yun ) 代码: <!-- <view class"top"><image class"page_editright" catchtap"navBack" mode"widthFix" src"/images/editright.png&quo…
GeoQuiz项目的开发与总结2
时间过得很快,第二阶段的学习结束了。 本周的主要工作是完成了Geoquiz项目的剩余部分。 首先是学到了些什么,最主要的是工作的流程,然后是界面的布局,菜单栏的设计到等。当然我觉得我学到的应该是工作制作的思维方式吧。 再来说说…
【12.16】VC++调用Word OLE进行自动化生成报表
! 12-16更新 初始化博客转载于:https://www.cnblogs.com/miki-52/p/5052689.html