react创建组件_如何使用React创建时间轴组件
react创建组件
These days I’ve been working on a new page for my website. I wanted to have a Timeline to showcase some of my professional accomplishments over the years.
这些天来,我一直在为网站创建新页面。 我希望有一个时间表来展示我多年来的一些专业成就。
I did it for a couple of reasons:
我这样做有两个原因:
- My future self will look back one day and say: “Wow… I remember the day when I did that! How happy I was to achieve that goal!” Our success is a journey, not a destination and I want to write down every goal that I achieve along the way我未来的自我有一天会回头说:“哇……我记得那天我做到了! 我为实现这个目标感到多么高兴!” 我们的成功是一段旅程,而不是终点,我想写下一路实现的每个目标
- It might attract more clients (we’ll see how this goes ?)它可能会吸引更多的客户(我们将看看情况如何?)
- In my opinion it is a different kind of portfolio. A unique portfolio, maybe? ?我认为这是另一种投资组合。 独特的投资组合,也许吗? ?
Nevertheless… Let’s build something now!
不过……让我们现在建立一些东西!
In the picture above you can see what we’re going to build today using React! Before we start let’s break down the steps we need to take:
在上图中,您可以看到我们今天将使用React构建什么! 在开始之前,让我们分解一下我们需要采取的步骤:
Create the
datathat we'll need创建我们需要的
dataCreate the
TimelineItemcomponent - each individual timeline entry创建
TimelineItem组件-每个单独的时间线条目Create a
Timelinecontainer - it will take thedataand pass it down to theTimelineItems创建一个
Timeline容器-将获取data并将其传递给TimelineItem- Style everything风格化一切
创建数据 (Create the data)
Before we move to actually create the React components we need to know exactly how the data is going to look so we can plan out the DOM structure.
在实际创建React组件之前,我们需要确切地知道数据的外观,以便我们可以规划DOM结构。
For this Timeline app we’re going to need an array of objects. We will call this array: timelineData.
对于此时间轴应用程序,我们将需要一个对象数组 。 我们将其称为数组: timelineData 。
Let’s see how it might look:
让我们看一下它的外观:
[{text: 'Wrote my first blog post ever on Medium',date: 'March 03 2017',category: {tag: 'medium',color: '#018f69'},link: {url:'https://medium.com/@popflorin1705/javascript-coding-challenge-1-6d9c712963d2',text: 'Read more'}},{// Another object with data}
];
The properties are pretty straightforward, right? I used similar data to what I have on my timeline page, so we can say that this is production ready! ?
属性非常简单,对吧? 我使用了与时间表页面上相似的数据,因此可以说这已经可以投入生产了! ?
Next, we’ll build the TimelineItem component. This will use the data from the object above:
接下来,我们将构建TimelineItem组件。 这将使用上面对象中的数据:
TimelineItem组件 (The TimelineItem component)
const TimelineItem = ({ data }) => (<div className="timeline-item"><div className="timeline-item-content"><span className="tag" style={{ background: data.category.color }}>{data.category.tag}</span><time>{data.date}</time><p>{data.text}</p>{data.link && (<ahref={data.link.url}target="_blank"rel="noopener noreferrer">{data.link.text}</a>)}<span className="circle" /></div></div>
);
We have the following tags:
我们有以下标签:
.timeline-itemdiv - used as a wrapper. This div will have half the width of its parent's width (50%) and every other.timeline-itemdiv will be placed to the right side using the:nth-child(odd)selector.timeline-item用作包装器。 这个div的宽度是其父级宽度的一半(50%),并且每个其他.timeline-itemdiv将使用:nth-child(odd)选择器放置在右侧.timeline-item-contentdiv - another wrapper (more on why we need this in the styling section).timeline-item-content另一个包装器(有关在样式部分中为什么需要此包装的更多信息).tagspan - this tag will have a custom background color depending on the category.tag此标签将具有自定义背景颜色,具体取决于类别the
time/dateand thetexttime/date和textlink- we will need to check this to see if alinkis provided because we might not always want to have onelink-我们将需要检查此link以查看是否提供了link,因为我们可能并不总是希望拥有一个链接.circlespan - this tag will be used to place a circle on the middle line/bar.circle此标签将用于在中线/条上放置一个圆
Note: Everything will make much more sense when we get to the CSS/styling part, but before that let’s create the Timeline component:
注意 :当我们进入CSS / styleling部分时,一切都会变得更加有意义,但是在此之前,让我们创建Timeline组件:
时间轴容器 (The Timeline container)
This component will basically map over the array and for each object it will create a TimelineItem component. We also add a small check to make sure that there is at least one element in the array:
该组件基本上将map到数组,并为每个对象创建一个TimelineItem组件。 我们还添加了一个小检查,以确保数组中至少有一个元素:
import timelineData from '_path_to_file_';const Timeline = () =>timelineData.length > 0 && (<div className="timeline-container">{timelineData.map((data, idx) => (<TimelineItem data={data} key={idx} />))}</div>);As mentioned above, the timelineData is the array of objects containing all the required information. In my case I stored this array in a file and I imported it here, but you can take this from your own database or from an API endpoint, it's up to you.
如上所述, timelineData是包含所有必需信息的对象数组。 就我而言,我将此数组存储在文件中,然后将其导入此处,但是您可以从自己的数据库或API端点获取它,这取决于您。
CSS (The CSS)
Note: most of the wrappers will be flexbox containers because we can play around easier with their positioning.
注意:大多数包装器都是flexbox容器,因为我们可以更轻松地定位它们。
Let's start with the .timeline-container CSS:
让我们从.timeline-container CSS开始:
.timeline-container {display: flex;flex-direction: column;position: relative;margin: 40px 0;
}.timeline-container::after {background-color: #e17b77;content: '';position: absolute;left: calc(50% - 2px);width: 4px;height: 100%;
}
We’re using the ::after selector to create that red line/bar in the middle of the .timeline-container. Using the calc() function we can position the line exactly in the middle by subtracting half of its size (2px) from 50%. We need to do this because by default the left property positions it according to the left edge of an element and not the middle.
我们使用::after选择器在.timeline-container的中间创建该红线/条。 使用calc()函数,我们可以通过从50%减去其大小的一半( 2px )来将其精确定位在中间。 我们需要这样做,因为默认情况下, left属性是根据元素的左边缘而不是中间位置来定位它的。
Now, let’s move to the .timeline-item wrapper.
现在,让我们转到.timeline-item包装器。
Below you can see an example of how these are positioned within their parent (the .timeline-container). For demonstration purposes I added a border to highlight these wrappers:
在下面,您可以看到一个示例如何将它们放置在其父对象( .timeline-container )中。 出于演示目的,我添加了边框以突出显示这些包装:
As you can see, every other wrapper goes to the right, and the inner wrapper (the .timeline-item-content) is taking less space — space given by the p tag which is inside it (mostly).
如您所见,其他所有包装器都向右移动 ,而内部包装器( .timeline-item-content )占用的空间更少-由内部的p标签提供的空间(主要是)。
Let's see the CSS for this:
让我们来看一下CSS:
.timeline-item {display: flex;justify-content: flex-end;padding-right: 30px;position: relative;margin: 10px 0;width: 50%;
}.timeline-item:nth-child(odd) {align-self: flex-end;justify-content: flex-start;padding-left: 30px;padding-right: 0;
}
The key to this is that we use the :nth-child(odd) selector and we set the align-self property to flex-end which means:“Go to the right as much as you can”!
关键在于我们使用:nth-child(odd)选择器,并将align-self属性设置为flex-end ,这意味着:“尽可能向右移动”!
Because these wrappers are 50% in width, you can see that two of them take up the whole width. From now on, every time we want to style differently something in the right side, we'll have to use this approach.
由于这些包装纸的宽度为50% ,因此您可以看到其中两个包装纸占据了整个宽度。 从现在开始,每次我们要在右侧样式不同时,都必须使用此方法。
Next, the .timeline-item-content wrapper:
接下来, .timeline-item-content包装器:
.timeline-item-content {box-shadow: 0 0 5px rgba(0, 0, 0, 0.3);border-radius: 5px;background-color: #fff;display: flex;flex-direction: column;align-items: flex-end;padding: 15px;position: relative;width: 400px;max-width: 70%;text-align: right;
}.timeline-item-content::after {content: ' ';background-color: #fff;box-shadow: 1px -1px 1px rgba(0, 0, 0, 0.2);position: absolute;right: -7.5px;top: calc(50% - 7.5px);transform: rotate(45deg);width: 15px;height: 15px;
}.timeline-item:nth-child(odd) .timeline-item-content {text-align: left;align-items: flex-start;
}.timeline-item:nth-child(odd) .timeline-item-content::after {right: auto;left: -7.5px;box-shadow: -1px 1px 1px rgba(0, 0, 0, 0.2);
}
We have a few things going on:
我们正在进行一些事情:
This wrapper has a fixed
widthand also amax-width. This is because we want it to have some boundaries, meaning that if there are only a few words, we want the box to be at least400pxwide, but if there is a lot of text, it shouldn't take up the full space (the50%from the.timeline-itemwrapper) but the text should move on to the next line -> this is the reason we used this second wrapper: .timeline-item-content该包装器具有固定的
width和max-width。 这是因为我们希望它具有一定的边界,这意味着如果只有几个单词,我们希望该框至少为400px宽,但是如果有很多文本,则不应占用全部空间(.timeline-item包装器中的50%),但文本应移至下一行->这就是我们使用第二个wrapper: .timeline-item-cont的原因r: .timeline-item-contentThe
text-alignandalign-itemsproperties are used to push the inner elements to the left or to the right, depending on the parenttext-align和align-items属性用于将内部元素向左或向右推,具体取决于父元素The small arrow that points to the middle line is given by the styles applied on the
::afterselector. Basically it is a box with abox-shadowapplied on it that is rotated45deg指向中间行的小箭头由
::after选择器上应用的样式给出。 基本上,这是一个有box-shadow的box-shadow,它旋转了45degAs mentioned above, we style the right side by selecting the parent with the
:nth-child(odd)selector如上所述,我们使用
:nth-child(odd)选择器选择父:nth-child(odd)来设置右边的样式
Next up, all the inner elements:
接下来,所有内部元素:
.timeline-item-content .tag {color: #fff;font-size: 12px;font-weight: bold;top: 5px;left: 5px;letter-spacing: 1px;padding: 5px;position: absolute;text-transform: uppercase;
}.timeline-item:nth-child(odd) .timeline-item-content .tag {left: auto;right: 5px;
}.timeline-item-content time {color: #777;font-size: 12px;font-weight: bold;
}.timeline-item-content p {font-size: 16px;line-height: 24px;margin: 15px 0;max-width: 250px;
}.timeline-item-content a {font-size: 14px;font-weight: bold;
}.timeline-item-content a::after {content: ' ►';font-size: 12px;
}.timeline-item-content .circle {background-color: #fff;border: 3px solid #e17b77;border-radius: 50%;position: absolute;top: calc(50% - 10px);right: -40px;width: 20px;height: 20px;z-index: 100;
}.timeline-item:nth-child(odd) .timeline-item-content .circle {right: auto;left: -40px;
}
Few things to note here:
这里要注意的几件事:
As you might have guessed, the
.tagis positionedabsolutebecause we want to keep it in the top left (or right) corner no matter what size is the box正如您可能已经猜到的那样,
.tag的位置是absolute因为无论框的大小如何,我们都希望将其保留在左上角(或右上角)We want to add a small caret after the
atag to highlight that it is a link我们希望后添加一个小尖号
a标签来强调,这是一个链接We create a
.circleand position it on top of the middle line/bar directly in front of the arrow我们创建一个
.circle并将其放置在箭头正前方的中间线/条的顶部
We’re almost done! ? The only thing that’s left to do is to add the CSS to make everything responsive across all screen sizes:
我们快完成了! ? 剩下要做的唯一一件事情就是添加CSS,以使所有内容在所有屏幕尺寸上都能响应:
@media only screen and (max-width: 1023px) {.timeline-item-content {max-width: 100%;}
}@media only screen and (max-width: 767px) {.timeline-item-content,.timeline-item:nth-child(odd) .timeline-item-content {padding: 15px 10px;text-align: center;align-items: center;}.timeline-item-content .tag {width: calc(100% - 10px);text-align: center;}.timeline-item-content time {margin-top: 20px;}.timeline-item-content a {text-decoration: underline;}.timeline-item-content a::after {display: none;}
}
We have two media queries:
我们有两个媒体查询:
On small laptop screen sizes — max-width: 1023px — we want to allow the .timeline-item-content to go across the entire width of its parent because the screen is smaller and otherwise it would look squeezed
在小型笔记本电脑屏幕上( max-width: 1023px ,我们希望允许.timeline-item-content遍及其父级的整个宽度,因为屏幕较小,否则看起来会受到挤压
On phones —
max-width: 767px在手机上-
max-width: 767px
set the
.tagto be fullwidth(and for that we don't need to forget to subtract10pxfrom the total of100%- this is because we have it positioned atleft: 5px, so we remove double of this amount)将
.tag设置为全width(为此,我们不必忘记从100%的总和中减去10px这是因为我们将其放置在left: 5px,因此我们删除了该数量的两倍)- center all the text and push it down from the top just a little bit将所有文本居中并从顶部向下一点一点
- remove the caret on the link and add an underline — looks better on mobile ?删除链接上的插入符号并添加下划线-在移动设备上看起来更好吗?
Aaaand… We’re done!
Aaaand…我们完成了!
结论 (Conclusion)
As I mentioned, this component is on my Timeline page. Check it out to see it in action! ?
如前所述,该组件位于“ 时间轴”页面上。 检查一下,看看它的作用! ?
If there is something that you didn’t understand from this article, make sure you contact me and I’ll be happy to answer your questions!
如果您对本文不了解,请确保与我联系,我们将很乐意回答您的问题!
Happy Coding! ?
编码愉快! ?
Originally published at www.florin-pop.com.
最初在www.florin-pop.com上发布。
翻译自: https://www.freecodecamp.org/news/how-to-create-a-timeline-component-with-react-1b216f23d3d4/
react创建组件
相关文章:

oracle根据一张表更新另外一张表
知道是两张表进行更新,之前作过mysql的,直接就写了: update a,b set a.code b.code wehre a.id b.id 然后就报错了,上网查了下知道oracle不能这样子写 之后找到如下的办法: UPDATE a set a.code (select b.code from b where…
应用内设置语言不重启方法
1、设置本应用方法网上有很多,大概如下 Resources resources getResources(); Configuration config resources.getConfiguration(); DisplayMetrics dm resources.getDisplayMetrics(); config.locale locale; //目标语言 resources.updateConfiguration(confi…
小程序内容审核违规过滤,在小程序使用security.msgSecCheck
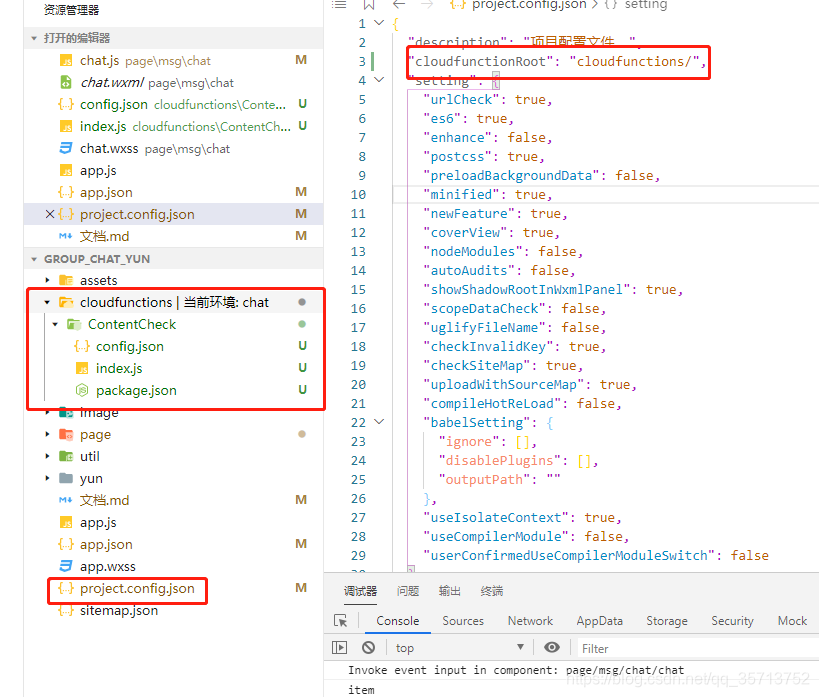
使用微信提供的API security.msgSecCheck 查看文档 1.开通云开发,创建云环境。 2.在云函数的目录中,创建一个云函数(ContentCheck),如果小程序代码没有云函数的目录,可以在 project.config.json 目录中配置…
如何在JavaScript中切片和拼接数组
.slice() and .splice() are similar methods in JavaScript. They look similar, they sound similar, and they do similar things. For those reasons, it’s important to know the differences between them. Also, they’re used very often, so understanding their usa…
jQuery中getJSON跨域原理详解
详见:http://blog.yemou.net/article/query/info/tytfjhfascvhzxcytp28 jQuery中getJSON跨域原理详解 前几天我再开发一个叫 河蟹工具条 的时候,其中有个功能就是获取本页面的短网址。 这个想法是好的,可是在我付诸于行动的时候,发…
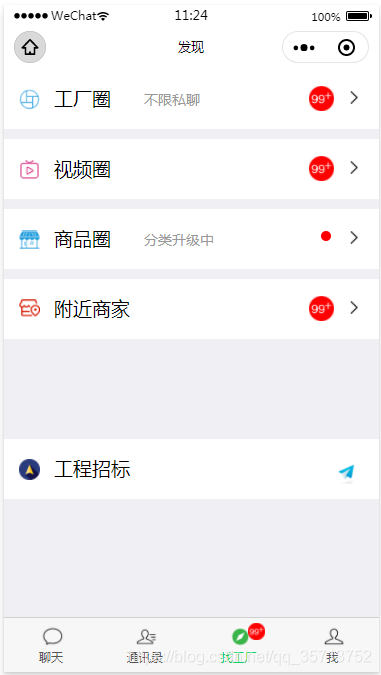
样式集(七)仿微信发现页样式
效果图: <!--pages/find/find.wxml--><include src"/components/common/common" /> <view class"item" catchtap"nav1"><image class"icon" mode"widthFix" src"/images/icon_5.png&q…
html向js传递id
html获取id方法: <div id"thediv1" style"display:block" onclick"ceshi(this.id)">技术A组</div> this.id ------>本身id转载于:https://www.cnblogs.com/wanlibingfeng/p/7613575.html
javascript功能_功能性JavaScript简介
javascript功能Hey everybody! I’ve written a book called Discover Functional JavaScript, and it’s now ready in both paperback and Kindle formats.大家好! 我已经写了一本书《 发现功能JavaScript》 ,现在已经可以使用平装本和Kindle格式。 A…
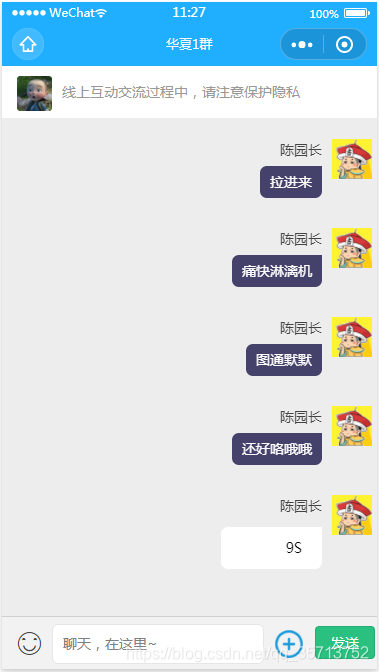
样式集,小程序群聊,聊天室样式,效果图
效果图 注:(码云 group_chat_yun ) 代码: <!-- <view class"top"><image class"page_editright" catchtap"navBack" mode"widthFix" src"/images/editright.png&quo…
GeoQuiz项目的开发与总结2
时间过得很快,第二阶段的学习结束了。 本周的主要工作是完成了Geoquiz项目的剩余部分。 首先是学到了些什么,最主要的是工作的流程,然后是界面的布局,菜单栏的设计到等。当然我觉得我学到的应该是工作制作的思维方式吧。 再来说说…
【12.16】VC++调用Word OLE进行自动化生成报表
! 12-16更新 初始化博客转载于:https://www.cnblogs.com/miki-52/p/5052689.html
python timber_如何使用Timber更有效地记录日志
python timberby Ayusch Jain通过Ayusch Jain 如何使用Timber更有效地记录日志 (How to log more efficiently with Timber) Logging is one of the most used utilities in the Android framework. It is really helpful in debugging your code when debugging by break-poi…
node 实现blog博客
https://cnodejs.org/topic/581b0c4ebb9452c9052e7acb转载于:https://www.cnblogs.com/zhangshuda/p/7640363.html

小程序输入框导致界面上移,在输入的时候固定住页面的解决代码
效果: 代码: <view class"comment" style"bottom:{{bottom}}px"><view class"emoji_block" wx:if{{emoji_block_show}}><view wx:for{{connectemoji}} catchtap"add_biaoqing" id"{{item}}…
react中纯函数_如何在纯React中创建电子邮件芯片
react中纯函数by Andreas Remdt由Andreas Remdt 如何在纯React中创建电子邮件芯片 (How to create email chips in pure React) Imagine that you, the good-looking developer (yes, I’m talking to you!), want to build an invitation form where users can add one or mo…

servlet程序HTTP Status 500 - Error instantiating servlet class 解决
一、项目存放路径问题(最常见) 在安装Tomcat时,运行程序都正常,但却打不开http://localhost:8080/,在Tomcat目录webapps下也找不到自己做的项目,这时因为你做的项目没有部署到webapps目录下,倒霉的时候就会遇到报错HTT…
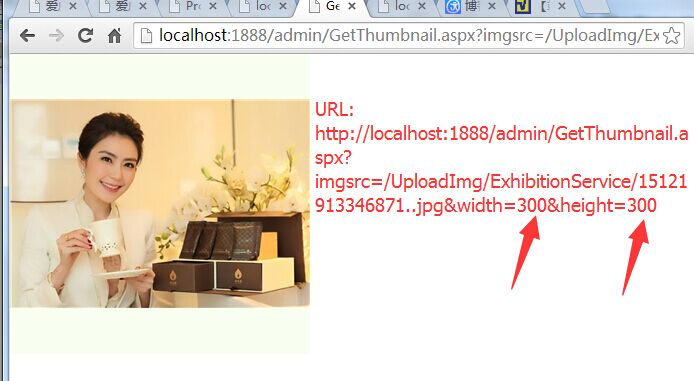
ASP.NET将原始图片按照指定尺寸等比例缩放显示图片
网站上可能会有很多图片,比如产品图片等,而且他们可能大小不一,宽度和高度也不一定一样,有的很大有的很小。如果放在一张网页上,可能会破坏版面,但是如果强制让他们按照指定的宽度和高度显示,因…
前端开发框架选择
Vue Vant 适用场景:开发移动端 (vue) 上手难度:1 Vant是一款很好用的移动端UI框架,非常轻便,适合小型项目 https://vant-contrib.gitee.io/vant/#/zh-CN/ 微信小程序 适用场景:微信小程序(小程序原生框架…
anki_Anki如何挽救我的工程生涯
ankiby Jeffrey Shek通过Jeffrey Shek Anki如何挽救我的工程生涯 (How Anki saved my Engineering Career) I was burned out and my software career was stalling just three years in. My memory sucked. Was my poor memory from stress, lack of sleep or was it always …
信息安全系统设计基础期末总结
【博客汇总】 一、每周读书笔记链接汇总 •[第二周读书笔记] http://www.cnblogs.com/20135302wei/p/4842480.html •[第三周读书笔记] http://www.cnblogs.com/20135302wei/p/4858760.html •[第四周读书笔记] http://www.cnblogs.com/20135302wei/p/4870113.html •[第五周读…
方法 retrun 异步的值,创建一个变量直接等于一个异步方法返回的值
需求:我想创建一个变量,他的值是一个openid, openid 从 getOpenid (封装的一个异步方法) 里面返回,通常调用 getOpenid ,会返回一个Promise 对象,.then 之后才能得到值,例如: //模拟一个异步方…
ps混合模式glsl代码
https://github.com/jamieowen/glsl-blend 转载于:https://www.cnblogs.com/guochen/p/7645227.html
应用程序启动器 标记为信任_为什么您今天不能信任应用程序-以及如何解决它...
应用程序启动器 标记为信任亲爱的每家高科技公司,请窃取这个想法 (Dear Every Single Tech Company, Please Steal This Idea) When you send a photo to someone, your messaging app actually first sends the photo to an app’s server, which then sends the p…

小程序客服自动回复图片,云开发的实现
小程序先开通云开发,创建一个文件夹,并配置为云函数的目录 小程序客服自动回复图片实现步骤: 1.云函数接收消息推送 第一步:开发者工具云开发控制台中增加配置 打开云开发控制台,到设置 tab 中选择全局设置 - 添加消…
ORA-12514: TNS: 监听程序当前无法识别连接描述符中请求的服务解决
方法1: a、通过oracle 工具 Net Configuration Assistant 重新配置监听,注意如果有双网卡请配置第一块网上IP。如何知道哪一块是一块网卡,可以通过ipconfig命令查看最上面的ip就是一块网卡的 b、通过Net Configuration Assistant 工具配置 “…
r语言 编辑 d3.js_d3.js的语言介绍
r语言 编辑 d3.jsby Matt Oxley由马特奥克斯利(Matt Oxley) d3.js的语言介绍 (A linguistic introduction to d3.js) 如何从一个试探者变成一个自信的用户 (How to go from a tentative to a confident user) d3.js is a fantastic library — but I can honestly tell you th…
【Luogu3041】视频游戏的连击(AC自动机,动态规划)
题面链接 题解 首先构建出AC自动机 然后在AC自动机上面跑DP 转移很显然从Trie树的节点跳到他的儿子节点 但是要注意一个问题, 在计算的时候,每一个节点加入后能够 造成的贡献 要加上他的子串的贡献 至于DP: 设f[i][j]表示已经使用了i个字母 当…

拥抱高效、拥抱 Bugtags 之来自用户的声音(三)
小编按:这是一篇 Bugtags 用户来稿,主要是介绍了使用 Bugtags 前后对测试及解决 Bug 所带来的变化,感谢山西农业大学 - 高正炎同学对 Bugtags 的信赖和支持。小编在这里诚邀各位热心用户向我们投稿,说出你使用 Bugtags 的故事。 0…
小程序打开文档标题乱码处理
先下载,自定义临时文件目录名称,然后再打开就可以了。 wx.downloadFile({url: https://xxx.cn/sfxy.docx, //仅为示例,并非真实的资源filePath: wx.env.USER_DATA_PATH /这是自定义标题.docx,success(res) {console.log(0, res)wx.openDocum…
我是“真正的”软件工程师吗?
by Sun-Li Beatteay通过孙丽贝蒂 我是“真正的”软件工程师吗? (Am I a “real” Software Engineer yet?) Am I a “real” Software Engineer yet?我是“真正的”软件工程师吗? This question has haunted me for years. And it seems I’m not al…