kafka streams_如何使用Kafka Streams实施更改数据捕获
kafka streams
Change Data Capture (CDC) involves observing the changes happening in a database and making them available in a form that can be exploited by other systems.
更改数据捕获 (CDC)涉及观察数据库中发生的更改,并将其以可被其他系统利用的形式提供。
One of the most interesting use-cases is to make them available as a stream of events. This means you can, for example, catch the events and update a search index as the data are written to the database.
最有趣的用例之一是使它们作为事件流可用。 这意味着,例如,您可以捕获事件并在将数据写入数据库时更新搜索索引。
Interesting right? Let's see how to implement a CDC system that can observe the changes made to a NoSQL database (MongoDB), stream them through a message broker (Kafka), process the messages of the stream (Kafka Streams), and update a search index (Elasticsearch)!🚀
有趣吧? 让我们看一下如何实现一个CDC系统,该系统可以观察对NoSQL数据库( MongoDB )所做的更改,通过消息代理( Kafka )进行流传输,处理流中的消息( Kafka Streams ),以及更新搜索索引( Elasticsearch)。 )!🚀
TL; DR (TL;DR)
The full code of the project is available on GitHub in this repository. If you want to skip all my jibber jabber and just run the example, go straight to the How to run the project section near the end of the article!😁
该项目的完整代码可在此存储库中的 GitHub上找到。 如果您想跳过我所有的短剑而只运行示例,请直接转到文章末尾的“ 如何运行项目”部分!😁
用例和基础架构 (Use case & infrastructure)
We run a web application that stores photos uploaded by users. People can share their shots, let others download them, create albums, and so on. Users can also provide a description of their photos, as well as Exif metadata and other useful information.
我们运行一个Web应用程序来存储用户上传的照片。 人们可以共享他们的镜头,让其他人下载它们,创建相册等等。 用户还可以提供其照片的描述,以及Exif元数据和其他有用信息。
We want to store such information and use it to improve our search engine. We will focus on this part of our system that is depicted in the following diagram.
我们想存储这些信息,并用它来改善我们的搜索引擎。 我们将专注于下图所示的系统的这一部分。
The information is provided in JSON format. Since I like to post my shots on Unsplash, and the website provides free access to its API, I used their model for the photo JSON document.
该信息以JSON格式提供。 由于我喜欢将照片发布在Unsplash上 ,并且该网站可以免费访问其API,因此我将其模型用于照片JSON文档。
Once the JSON is sent through a POST request to our server, we store the document inside a MongoDB database. We will also store it in Elasticsearch for indexing and quick search.
通过POST请求将JSON发送到我们的服务器后,我们将文档存储在MongoDB数据库中。 我们还将其存储在Elasticsearch中以进行索引和快速搜索。
However, we love long exposure shots, and we would like to store in a separate index a subset of information regarding this kind of photo. It can be the exposure time, as well as the location (latitude and longitude) where the photo has been taken. In this way, we can create a map of locations where photographers usually take long exposure photos.
但是,我们喜欢长时间曝光的照片 ,因此我们希望将有关此类照片的信息子集存储在单独的索引中。 它可以是曝光时间,也可以是拍摄照片的位置(经度和纬度)。 通过这种方式,我们可以创建摄影师通常拍摄长时间曝光照片的位置地图。
Here comes the interesting part: instead of explicitly calling Elasticsearch in our code once the photo info is stored in MongoDB, we can implement a CDC exploiting Kafka and Kafka Streams.
这里是有趣的部分:一旦照片信息存储在MongoDB中,我们无需在代码中显式调用Elasticsearch,而是可以利用Kafka和Kafka Streams来实现CDC 。
We listen to modifications to MongoDB oplog using the interface provided by MongoDB itself. When the photo is stored we send it to a photo Kafka topic. Using Kafka Connect, an Elasticsearch sink is configured to save everything sent to that topic to a specific index. In this way, we can index all photos stored in MongoDB automatically.
我们使用MongoDB本身提供的接口收听对MongoDB oplog的修改。 存储照片后,我们将其发送给photo Kafka主题。 使用Kafka Connect ,将Elasticsearch接收器配置为将发送到该主题的所有内容保存到特定索引。 这样,我们可以自动索引存储在MongoDB中的所有照片。
We need to take care of the long exposure photos too. It requires some processing of the information to extract what we need. For this reason, we use Kafka Streams to create a processing topology to:
我们也需要注意长时间曝光的照片。 它需要对信息进行一些处理以提取我们需要的东西。 因此,我们使用Kafka Streams创建处理拓扑以:
Read from the
phototopic阅读
photo主题- Extract Exif and location information提取Exif和位置信息
- Filter long exposure photos (exposure time > 1 sec.)过滤长时间曝光的照片(曝光时间> 1秒)。
Write to a
long-exposuretopic.写一个
long-exposure话题。
Then another Elasticsearch sink will read data from the long-exposure topic and write it to a specific index in Elasticsearch.
然后,另一个Elasticsearch接收器将从long-exposure主题中读取数据,并将其写入Elasticsearch中的特定索引。
It is quite simple, but it's enough to have fun with CDC and Kafka Streams! 😁
这很简单,但足以让CDC和Kafka Streams玩得开心! 😁
服务器实施 (Server implementation)
Let's have a look at what we need to implement: our server exposing the REST APIs!
让我们看看我们需要实现什么:我们的服务器公开了REST API !
模型和DAO (Models and DAO)
First things first, we need a model of our data and a Data Access Object (DAO) to talk to our MongoDB database.
首先,我们需要一个数据模型和一个数据访问对象 (DAO)以与我们的MongoDB数据库对话。
As I said, the model for the photo JSON information is the one used by Unsplash. Check out the free API documentation for an example of the JSON we will use.
如我所说,照片JSON信息的模型是Unsplash使用的模型。 查看免费的API 文档,获取我们将使用的JSON示例。
I created the mapping for the serializaion/deserialization of the photo JSON using spray-json. I'll skip the details about this, if you are curious just look at the repo!
我使用spray-json为照片JSON的序列化/反序列化创建了映射。 如果您感到好奇,我将跳过有关详细信息,请查看回购 !
Let's focus on the model for the long exposusure photo.
让我们关注长曝光照片的模型。
case class LongExposurePhoto(id: String, exposureTime: Float, createdAt: Date, location: Location)object LongExposurePhotoJsonProtocol extends DefaultJsonProtocol {implicit val longExposurePhotoFormat:RootJsonFormat[LongExposurePhoto] = jsonFormat(LongExposurePhoto, "id", "exposure_time", "created_at", "location")
}
This is quite simple: we keep from the photo JSON the information about the id, the exposure time (exposureTime), when the photo has been created (createdAt), and the location where it has been taken. The location comprehends the city, the country, and the position composed of latitude and longitude.
这是很简单:我们不断从照片JSON有关的信息id ,曝光时间( exposureTime ),当照片已创建( createdAt ),以及location的地方已采取。 该location领会的city ,在country和position组成的latitude和longitude 。
The DAO consists of just the PhotoDao.scala class.
DAO仅由PhotoDao.scala类组成。
class PhotoDao(database: MongoDatabase, photoCollection: String) {val collection: MongoCollection[Document] = database.getCollection(photoCollection)def createPhoto(photo: Photo): Future[String] = {val doc = Document(photo.toJson.toString())doc.put("_id", photo.id)collection.insertOne(doc).toFuture().map(_ => photo.id)}
}
Since I want to keep this example minimal and focused on the CDC implementation, the DAO has just one method to create a new photo document in MongoDB.
由于我想使该示例最少,并且只关注CDC实施,因此DAO只有一种在MongoDB中创建新照片文档的方法。
It is straightforward: create a document from the photo JSON, and insert it in mongo using id as the one of the photo itself. Then, we can return the id of the photo just inserted in a Future (the MongoDB API is async).
这很简单:根据照片JSON创建文档,然后使用id作为照片本身之一将其插入mongo中。 然后,我们可以返回刚插入Future中的照片的id (MongoDB API是异步的)。
卡夫卡制片人 (Kafka Producer)
Once the photo is stored inside MongoDB, we have to send it to the photo Kafka topic. This means we need a producer to write the message in its topic. The PhotoProducer.scala class looks like this.
将照片存储在MongoDB中后,我们必须将其发送到photo Kafka主题。 这意味着我们需要生产者在其主题中编写消息。 PhotoProducer.scala类看起来像这样。
case class PhotoProducer(props: Properties, topic: String) {createKafkaTopic(props, topic)val photoProducer = new KafkaProducer[String, String](props)def sendPhoto(photo: Photo): Future[RecordMetadata] = {val record = new ProducerRecord[String, String](topic, photo.id, photo.toJson.compactPrint)photoProducer.send(record)}def closePhotoProducer(): Unit = photoProducer.close()
}
I would say that this is pretty self-explanatory. The most interesting part is probably the createKafkaTopic method that is implemented in the utils package.
我会说这很不言自明。 最有趣的部分可能是在utils包中实现的createKafkaTopic方法。
def createKafkaTopic(props: Properties, topic: String): Unit = {val adminClient = AdminClient.create(props)val photoTopic = new NewTopic(topic, 1, 1)adminClient.createTopics(List(photoTopic).asJava)}This method creates the topic in Kafka setting 1 as a partition and replication factor (it is enough for this example). It is not required, but creating the topic in advance lets Kafka balance partitions, select leaders, and so on. This will be useful to get our stream topology ready to process as we start our server.
此方法在Kafka设置1中创建主题作为分区和复制因子(对于此示例来说就足够了)。 它不是必需的,但是预先创建主题可使Kafka平衡分区,选择领导者等。 这将有助于在启动服务器时准备好处理流拓扑。
事件监听器 (Event Listener)
We have the DAO that writes in MongoDB and the producer that sends the message in Kafka. We need to glue them together in some way so that when the document is stored in MongoDB the message is sent to the photo topic. This is the purpose of the PhotoListener.scala class.
我们有在MongoDB中编写的DAO和在Kafka中发送消息的生产者。 我们需要以某种方式将它们粘合在一起,以便将文档存储在MongoDB中时,消息会发送到photo主题。 这是PhotoListener.scala类的目的。
case class PhotoListener(collection: MongoCollection[Document], producer: PhotoProducer) {val cursor: ChangeStreamObservable[Document] = collection.watch()cursor.subscribe(new Observer[ChangeStreamDocument[Document]] {override def onNext(result: ChangeStreamDocument[Document]): Unit = {result.getOperationType match {case OperationType.INSERT => {val photo = result.getFullDocument.toJson().parseJson.convertTo[Photo]producer.sendPhoto(photo).get()println(s"Sent photo with Id ${photo.id}")}case _ => println(s"Operation ${result.getOperationType} not supported")}}override def onError(e: Throwable): Unit = println(s"onError: $e")override def onComplete(): Unit = println("onComplete")})
}
We exploit the Chage Streams interface provided by the MongoDB scala library.
我们利用MongoDB scala库提供的Chage Streams接口 。
Here is how it works: we watch() the collection where photos are stored. When there is a new event (onNext) we run our logic.
它是这样工作的:我们watch()存储照片的集合。 当有一个新事件( onNext )时,我们运行我们的逻辑。
For this example we are interested only in the creation of new documents, so we explicitly check that the operation is of type OperationType.INSERT. If the operation is the one we are interested in, we get the document and convert it to a Photo object to be sent by our producer.
对于此示例,我们仅对创建新文档感兴趣,因此,我们明确检查该操作的类型是否为OperationType.INSERT 。 如果该操作是我们感兴趣的操作,我们将获取文档并将其转换为由生产者发送的Photo对象。
That's it! With few lines of code we connected the creation of documents in MongoDB to a stream of events in Kafka.🎉
而已! 只需几行代码,我们就可以将MongoDB中的文档创建与Kafka中的事件流连接起来。
As a side note, be aware that to use the Change Streams interface we have to setup a MongoDB replica set. This means we need to run 3 instances of MongoDB and configure them to act as a replica set using the following command in mongo client:
另外,请注意,要使用Change Streams接口, 我们必须设置MongoDB副本集 。 这意味着我们需要运行3个MongoDB实例,并在mongo client中使用以下命令将它们配置为副本集:
rs.initiate({_id : "r0", members: [{ _id : 0, host : "mongo1:27017", priority : 1 },{ _id : 1, host :"mongo2:27017", priority : 0 },{ _id : 2, host : "mongo3:27017", priority : 0, arbiterOnly: true }]})Here our instances are the containers we will run in the docker-compose file, that is mongo1, mongo2, and mongo3.
这里的实例是我们将在mongo1 -compose文件中运行的容器,即mongo1 , mongo2和mongo3 。
处理拓扑 (Processing Topology)
Time to build our processing topology! It will be in charge of the creation of the long-exposure index in Elasticsearch. The topology is described by the following diagram:
是时候建立我们的处理拓扑了! 它将负责在Elasticsearch中创建long-exposure索引。 下图描述了拓扑:
and it is implemented in the LongExposureTopology.scala object class. Let's analyse every step of our processing topology.
它在LongExposureTopology.scala对象类中实现。 让我们分析处理拓扑的每个步骤。
val stringSerde = new StringSerdeval streamsBuilder = new StreamsBuilder()val photoSource: KStream[String, String] = streamsBuilder.stream(sourceTopic, Consumed.`with`(stringSerde, stringSerde))The first step is to read from a source topic. We start a stream from the sourceTopic (that is photo topic) using the StreamsBuilder() object. The stringSerde object is used to serialise and deserialise the content of the topic as a String.
第一步是阅读源主题。 我们使用StreamsBuilder()对象从sourceTopic (即photo主题)开始一个流。 stringSerde对象用于将主题的内容序列化和反序列化为String 。
Please notice that at each step of the processing we create a new stream of data with a KStream object. When creating the stream, we specify the key and the value produced by the stream. In our topology the key will always be a String. In this step the value produced is still a String.
请注意,在处理的每个步骤中,我们都会使用KStream对象创建一个新的数据流。 创建流时,我们指定流所生成的键和值。 在我们的拓扑中,键将始终是String 。 在此步骤中,生成的值仍然是String 。
val covertToPhotoObject: KStream[String, Photo] =photoSource.mapValues((_, jsonString) => {val photo = jsonString.parseJson.convertTo[Photo]println(s"Processing photo ${photo.id}")photo})The next step is to convert the value extracted from the photo topic into a proper Photo object.
下一步是将从photo主题中提取的值转换为适当的Photo对象。
So we start from the photoSource stream and work on the values using the mapValues function. We simply parse the value as a JSON and create the Photo object that will be sent in the convertToPhotoObject stream.
因此,我们从photoSource流开始,然后使用mapValues函数处理这些值。 我们只需将值解析为JSON并创建将在convertToPhotoObject流中发送的Photo对象。
val filterWithLocation: KStream[String, Photo] = covertToPhotoObject.filter((_, photo) => photo.location.exists(_.position.isDefined))There is no guarantee that the photo we are processing will have the info about the location, but we want it in our long exposure object. This step of the topology filters out from the covertToPhotoObject stream the photos that have no info about the location, and creates the filterWithLocation stream.
不能保证我们正在处理的照片会包含有关位置的信息,但是我们希望在我们的长时间曝光对象中使用它。 拓扑的此步骤从covertToPhotoObject流中筛选出没有位置信息的照片,并创建filterWithLocation流。
val filterWithExposureTime: KStream[String, Photo] = filterWithLocation.filter((_, photo) => photo.exif.exists(_.exposureTime.isDefined))Another important fact for our processing is the exposure time of the photo. For this reason, we filter out from the filterWithLocation stream the photos without exposure time info, creating the filterWithExposureTime.
我们处理的另一个重要事实是照片的曝光时间。 因此,我们从filterWithLocation流中筛选出没有曝光时间信息的照片,从而创建了filterWithExposureTime 。
val dataExtractor: KStream[String, LongExposurePhoto] =filterWithExposureTime.mapValues((_, photo) => LongExposurePhoto(photo.id, parseExposureTime(photo.exif.get.exposureTime.get), photo.createdAt, photo.location.get))We now have all we need to create a LongExposurePhoto object! That is the result of the dataExtractor: it takes the Photo coming from the filterWithExposureTime stream and produces a new stream containing LongExposurePhoto.
现在,我们拥有创建LongExposurePhoto对象所需的LongExposurePhoto ! 那是dataExtractor的结果:它获取来自filterWithExposureTime流的Photo并产生一个包含LongExposurePhoto的新流。
val longExposureFilter: KStream[String, String] =dataExtractor.filter((_, item) => item.exposureTime > 1.0).mapValues((_, longExposurePhoto) => {val jsonString = longExposurePhoto.toJson.compactPrintprintln(s"completed processing: $jsonString")jsonString})We are almost there. We now have to keep the photos with a long exposure time (that we decided is more then 1 sec.). So we create a new longExposureFilter stream without the photos that are not long exposure.
我们就快到了。 现在,我们必须将照片保持较长的曝光时间(我们决定将其设置为1秒以上)。 因此,我们创建了一个新的longExposureFilter流,其中没有长时间曝光的照片。
This time we also serialise the LongExposurePhotos into the corresponding JSON string, which will be written to Elasticsearch in the next step.
这次我们还将LongExposurePhotos序列化为相应的JSON字符串,该字符串将在下一步中写入到Elasticsearch中。
longExposureFilter.to(sinkTopic, Produced.`with`(stringSerde, stringSerde))streamsBuilder.build()This is the last step of our topology. We write to our sinkTopic (that is long-exposure topic) using the string serialiser/deserialiser what is inside the longExposureFilter stream. The last command simply builds the topology we just created.
这是我们拓扑的最后一步。 我们使用字符串serialiser / longExposureFilter流中的内容to sinkTopic (即long-exposure主题)。 最后一个命令只是build我们刚刚创建的拓扑。
Now that we have our topology, we can use it in our server. The PhotoStreamProcessor.scala class is what manages the processing.
现在我们有了拓扑,我们可以在服务器中使用它了。 PhotoStreamProcessor.scala类是用于管理处理的类。
class PhotoStreamProcessor(kafkaProps: Properties, streamProps: Properties, sourceTopic: String, sinkTopic: String) {createKafkaTopic(kafkaProps, sinkTopic)val topology: Topology = LongExposureTopology.build(sourceTopic, sinkTopic)val streams: KafkaStreams = new KafkaStreams(topology, streamProps)sys.ShutdownHookThread {streams.close(java.time.Duration.ofSeconds(10))}def start(): Unit = new Thread {override def run(): Unit = {streams.cleanUp()streams.start()println("Started long exposure processor")}}.start()
}
First we create the sinkTopic, using the same utility method we saw before. Then we build the stream topology and initialize a KafkaStreams object with that topology.
首先,我们使用之前看到的相同的实用程序方法来创建sinkTopic 。 然后,我们构建流拓扑并使用该拓扑初始化KafkaStreams对象。
To start the stream processing, we need to create a dedicated Thread that will run the streaming while the server is alive. According to the official documentation, it is always a good idea to cleanUp() the stream before starting it.
要开始流处理,我们需要创建一个专用Thread ,该Thread将在服务器处于活动状态时运行流。 根据官方文档,在启动流之前先cleanUp()它总是一个好主意。
Our PhotoStreamProcessor is ready to go!🎉
我们PhotoStreamProcessor是准备去!🎉
REST API (REST API)
The server exposes REST APIs to send it the photo information to store. We make use of Akka HTTP for the API implementation.
服务器公开REST API来向其发送照片信息以进行存储。 我们将Akka HTTP用于API实现。
trait AppRoutes extends SprayJsonSupport {implicit def system: ActorSystemimplicit def photoDao: PhotoDaoimplicit lazy val timeout = Timeout(5.seconds)lazy val healthRoute: Route = pathPrefix("health") {concat(pathEnd {concat(get {complete(StatusCodes.OK)})})}lazy val crudRoute: Route = pathPrefix("photo") {concat(pathEnd {concat(post {entity(as[Photo]) { photo =>val photoCreated: Future[String] =photoDao.createPhoto(photo)onSuccess(photoCreated) { id =>complete((StatusCodes.Created, id))}}})})}}To keep the example minimal, we have only two routes:
为了使示例最少,我们只有两条路线:
GET /health- to check if the server is up & runningGET /health检查服务器是否已启动并正在运行POST /photo- to send to the system theJSONof the photo information we want to store. This endpoint uses the DAO to store the document in MongoDB and returns a201with the id of the stored photo if the operation succeeded.POST /photoJSON将要存储的照片信息的JSON发送到系统。 该端点使用DAO将文档存储在MongoDB中,如果操作成功,则返回201和所存储照片的ID。
This is by no means a complete set of APIs, but it is enough to run our example.😉
这绝不是一套完整的API,但是足以运行我们的示例。
服务器主类 (Server main class)
OK, we implemented all the components of our server, so it's time to wrap everything up. This is our Server.scala object class.
好的,我们实现了服务器的所有组件,因此该打包所有内容了。 这是我们的Server.scala对象类。
implicit val system: ActorSystem = ActorSystem("kafka-stream-playground")
implicit val materializer: ActorMaterializer = ActorMaterializer()
First a couple of Akka utility values. Since we use Akka HTTP to run our server and REST API, these implicit values are required.
首先是几个Akka实用价值。 由于我们使用Akka HTTP来运行服务器和REST API,因此需要这些隐式值。
val config: Config = ConfigFactory.load()
val address = config.getString("http.ip")
val port = config.getInt("http.port")val mongoUri = config.getString("mongo.uri")
val mongoDb = config.getString("mongo.db")
val mongoUser = config.getString("mongo.user")
val mongoPwd = config.getString("mongo.pwd")
val photoCollection = config.getString("mongo.photo_collection")val kafkaHosts = config.getString("kafka.hosts").split(',').toList
val photoTopic = config.getString("kafka.photo_topic")
val longExposureTopic = config.getString("kafka.long_exposure_topic")
Then we read all the configuration properties. We will come back to the configuration file in a moment.
然后,我们阅读所有配置属性。 稍后我们将回到配置文件。
val kafkaProps = new Properties()
kafkaProps.put("bootstrap.servers", kafkaHosts.mkString(","))
kafkaProps.put("key.serializer", "org.apache.kafka.common.serialization.StringSerializer")
kafkaProps.put("value.serializer", "org.apache.kafka.common.serialization.StringSerializer")val streamProps = new Properties()
streamProps.put(StreamsConfig.APPLICATION_ID_CONFIG, "long-exp-proc-app")
streamProps.put(StreamsConfig.BOOTSTRAP_SERVERS_CONFIG, kafkaHosts.mkString(","))val photoProducer = PhotoProducer(kafkaProps, photoTopic)
val photoStreamProcessor = new PhotoStreamProcessor(kafkaProps, streamProps, photoTopic, "long-exposure")
photoStreamProcessor.start()
We have to configure both our Kafka producer and the stream processor. We also start the stream processor, so the server will be ready to process the documents sent to it.
我们必须同时配置我们的Kafka生产者和流处理器。 我们还启动了流处理器,因此服务器将准备好处理发送给它的文档。
val client = MongoClient(s"mongodb://$mongoUri/$mongoUser")
val db = client.getDatabase(mongoDb)
val photoDao: PhotoDao = new PhotoDao(db, photoCollection)
val photoListener = PhotoListener(photoDao.collection, photoProducer)
Also MongoDB needs to be configured. We setup the connection and initialize the DAO as well as the listener.
另外,还需要配置MongoDB。 我们建立连接,并初始化DAO和侦听器。
lazy val routes: Route = healthRoute ~ crudRouteHttp().bindAndHandle(routes, address, port)
Await.result(system.whenTerminated, Duration.Inf)
Everything has been initialized. We create the REST routes for the communication to the server, bind them to the handlers, and finally start the server!🚀
一切都已初始化。 我们创建用于与服务器通信的REST路由,将它们绑定到处理程序,最后启动服务器!🚀
服务器配置 (Server configuration)
This is the configuration file used to setup the server:
这是用于设置服务器的配置文件:
http {ip = "127.0.0.1"ip = ${?SERVER_IP}port = 8000port = ${?SERVER_PORT}
}
mongo {uri = "127.0.0.1:27017"uri = ${?MONGO_URI}db = "kafka-stream-playground"user = "admin"pwd = "admin"photo_collection = "photo"
}
kafka {hosts = "127.0.0.1:9092"hosts = ${?KAFKA_HOSTS}photo_topic = "photo"long_exposure_topic = "long-exposure"
}
I think that this one does not require much explanation, right?😉
我认为这不需要太多解释,对吗?😉
连接器配置 (Connectors configuration)
The server we implemented writes in two Kafka topics: photo and long-exposure. But how are messages written in Elasticsearch as documents? Using Kafka Connect!
我们实现的服务器写了两个Kafka主题: photo和long-exposure 。 但是,如何在Elasticsearch中将消息作为文档编写? 使用Kafka Connect !
We can setup two connectors, one per topic, and tell the connectors to write every message going through that topic in Elasticsearch.
我们可以设置两个连接器,每个主题一个,然后告诉连接器在Elasticsearch中编写通过该主题的每条消息。
First we need Kafka Connect. We can use the container provided by Confluence in the docker-compose file:
首先,我们需要Kafka Connect 。 我们可以在docker-compose文件中使用Confluence提供的容器:
connect:image: confluentinc/cp-kafka-connectports:- 8083:8083networks:- kakfa_stream_playgrounddepends_on:- zookeeper- kafkavolumes:- $PWD/connect-plugins:/connect-pluginsenvironment:CONNECT_BOOTSTRAP_SERVERS: kafka:9092CONNECT_REST_ADVERTISED_HOST_NAME: connectCONNECT_REST_PORT: 8083CONNECT_GROUP_ID: compose-connect-groupCONNECT_CONFIG_STORAGE_TOPIC: docker-connect-configsCONNECT_CONFIG_STORAGE_REPLICATION_FACTOR: 1CONNECT_OFFSET_FLUSH_INTERVAL_MS: 10000CONNECT_OFFSET_STORAGE_TOPIC: docker-connect-offsetsCONNECT_OFFSET_STORAGE_REPLICATION_FACTOR: 1CONNECT_STATUS_STORAGE_TOPIC: docker-connect-statusCONNECT_STATUS_STORAGE_REPLICATION_FACTOR: 1CONNECT_KEY_CONVERTER: "org.apache.kafka.connect.storage.StringConverter"CONNECT_VALUE_CONVERTER: "org.apache.kafka.connect.json.JsonConverter"CONNECT_VALUE_CONVERTER_SCHEMAS_ENABLE: "false"CONNECT_INTERNAL_KEY_CONVERTER: "org.apache.kafka.connect.json.JsonConverter"CONNECT_INTERNAL_VALUE_CONVERTER: "org.apache.kafka.connect.json.JsonConverter"CONNECT_ZOOKEEPER_CONNECT: zookeeper:2181CONNECT_PLUGIN_PATH: /connect-pluginsCONNECT_LOG4J_ROOT_LOGLEVEL: INFOI want to focus on some of the configuration values.
我想重点介绍一些配置值。
First of all, we need to expose the port 8083 - that will be our endpoint to configure the connectors (CONNECT_REST_PORT).
首先,我们需要公开端口8083这将是配置连接器( CONNECT_REST_PORT )的端点。
We also need to map a volume to the /connect-plugins path, where we will place the Elasticsearch Sink Connector to write to Elasticsearch. This is reflected also in the CONNECT_PLUGIN_PATH.
我们还需要将卷映射到/connect-plugins路径,在该路径中,我们将放置Elasticsearch Sink连接器以写入Elasticsearch。 这也反映在CONNECT_PLUGIN_PATH 。
The connect container should know how to find the Kafka servers, so we set CONNECT_BOOTSTRAP_SERVERS as kafka:9092.
connect容器应该知道如何查找Kafka服务器,因此我们将CONNECT_BOOTSTRAP_SERVERS设置为kafka:9092 。
Once Kafka Connect is ready, we can send the configurations of our connectors to the http://localhost:8083/connectors endpoint. We need 2 connectors, one for the photo topic and one for the long-exposure topic. We can send the configuration as a JSON with a POST request.
Kafka Connect准备就绪后,我们可以将连接器的配置发送到http://localhost:8083/connectors端点。 我们需要2个连接器,一个用于photo主题,一个用于long-exposure主题。 我们可以通过POST请求将配置作为JSON发送。
{"name": "photo-connector","config": {"connector.class": "io.confluent.connect.elasticsearch.ElasticsearchSinkConnector","tasks.max": "1","topics": "photo","key.converter": "org.apache.kafka.connect.storage.StringConverter","value.converter": "org.apache.kafka.connect.json.JsonConverter","value.converter.schemas.enable": "false","schema.ignore": "true","connection.url": "http://elastic:9200","type.name": "kafka-connect","behavior.on.malformed.documents": "warn","name": "photo-connector"}
}
We explicitly say we are gonna use the ElasticsearchSinkConnector as the connector.class , as well as the topics that we want to sink - in this case photo.
我们明确表示要使用ElasticsearchSinkConnector作为connector.class以及我们要介绍的topics (在本例中为photo 。
We don't want to use a schema for the value.converter, so we can disable it (value.converter.schemas.enable) and tell the connector to ignore the schema (schema.ignore).
我们不想将架构用于value.converter ,因此我们可以禁用它( value.converter.schemas.enable )并告诉连接器忽略该架构( schema.ignore )。
The connector for the long-exposure topic is exactly like this one. The only difference is the name and of course the topics.
long-exposure主题的连接器与此类似。 唯一的区别是name和topics 。
如何运行项目 (How to run the project)
We have all we need to test the CDC! How can we do it? It's quite easy: simply run the setup.sh script in the root folder of the repo!
我们拥有测试CDC所需的一切! 我们该怎么做? 这很容易:只需在setup.sh的根文件夹中运行setup.sh脚本!
What will the script do?
该脚本将做什么?
Run the
docker-composefile with all the services.使用所有服务运行
docker-compose文件。Configure MongoDB replica set. This is required to enable the Change Stream interface to capture data changes. More info about this here.
配置MongoDB副本集。 这是启用Change Stream界面捕获数据更改所必需的。 关于这方面更多的信息在这里 。
- Configure the Kafka connectors.配置Kafka连接器。
- Connect to the logs of the server.连接到服务器的日志。
The docker-compose will run the following services:
docker-compose将运行以下服务:
- Our Server我们的服务器
- 3 instances of MongoDB (required for the replica set)3个MongoDB实例(副本集必需)
- Mongoku, a MongoDB clientMongoku,一个MongoDB客户
- Kafka (single node)Kafka(单节点)
- Kafka connect卡夫卡连接
- Zookeeper (required by Kafka)Zookeeper(Kafka要求)
- Elasticsearch弹性搜索
- Kibana基巴纳
There are a lot of containers to run, so make sure you have enough resources to run everything properly. If you want, remove Mongoku and Kibana from the compose-file, since they are used just for a quick look inside the DBs.
有很多容器要运行,因此请确保您有足够的资源来正常运行所有容器。 如果需要,请从撰写文件中删除Mongoku和Kibana,因为它们仅用于快速查看数据库内部。
Once everything is up and running, you just have to send data to the server.
一旦一切就绪并运行,您只需要将数据发送到服务器。
I collected some JSON documents of photos from Unplash that you can use to test the system in the photos.txt file.
我从Unplash收集了一些照片的JSON文档,可用于在photos.txt文件中测试系统。
There are a total of 10 documents, with 5 of them containing info about long exposure photos. Send them to the server running the send-photos.sh script in the root of the repo. Check that everything is stored in MongoDB connecting to Mongoku at http://localhost:3100. Then connect to Kibana at http://localhost:5601 and you will find two indexes in Elasticsearch: photo, containing the JSON of all the photos stored in MongoDB, and long-exposure, containing just the info of the long exposure photos.
共有10个文档,其中5个包含有关长时间曝光照片的信息。 将它们发送到在存储send-photos.sh根目录中运行send-photos.sh脚本的服务器。 检查所有内容是否都存储在通过http://localhost:3100连接到Mongoku的MongoDB中。 然后在http://localhost:5601连接到Kibana,您将在Elasticsearch中找到两个索引: photo (包含MongoDB中存储的所有照片的JSON)和long-exposure (仅包含长时间曝光的照片的信息)。
Amazing, right? 😄
太好了吧? 😄
结论 (Conclusion)
We made it guys!😄
我们做到了!😄
Starting from the design of the use-case, we built our system that connected a MongoDB database to Elasticsearch using CDC.
从用例的设计开始,我们构建了使用CDC将MongoDB数据库连接到Elasticsearch的系统。
Kafka Streams is the enabler, allowing us to convert database events to a stream that we can process.
Kafka Streams是启动器,允许我们将数据库事件转换为可以处理的流。
Do you need to see the whole project? Just checkout the repository on GitHub!😉
您需要查看整个项目吗? 只需在GitHub上签出存储库即可 !😉
That's it, enjoy! 🚀
就是这样,享受! 🚀
翻译自: https://www.freecodecamp.org/news/how-to-implement-the-change-data-capture-pattern-using-kafka-streams/
kafka streams
相关文章:

iOS超全开源框架、项目和学习资料汇总(1)UI篇
上下拉刷新控件**1. ** MJRefresh --仅需一行代码就可以为UITableView或者CollectionView加上下拉刷新或者上拉刷新功能。可以自定义上下拉刷新的文字说明。(推荐)**2. ** SVPullToRefresh --下拉刷新控件4500star,值得信赖**3. ** CBStoreHo…

day16 递归函数
一、递归 函数 为什么要有函数,提高代码的可读性,避免重复的代码,提高代码的复用性 在函数中能用return的不要print 1、递归的最大深度997 def foo(n):print(n)n1foo(n) foo(1) 递归的最大深度2、修改递归的最大深度 由此我们可以看出&#x…
设计模式之笔记--抽象工厂模式(Abstract Factory)
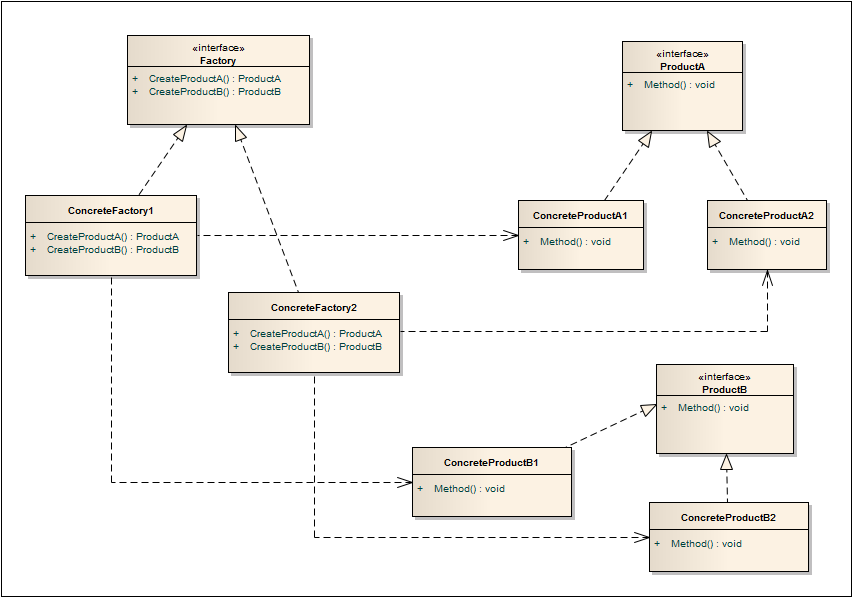
抽象工厂模式(Abstract Factory) 定义 抽象工厂模式(Abstract Factory),提供一个创建一系列相关或相互依赖对象的接口,而无需指定它们具体的类。 类图 描述 多个抽象产品类,每个抽象产品类可以派…
用户体验改善案例_如何检测用户的设备,以便改善他们的用户体验
用户体验改善案例A few months ago I watched a great talk from the Chrome Dev Summit about performance in slow devices.几个月前,我观看了Chrome开发者峰会上有关慢速设备性能的精彩演讲。 It blew my mind all the work done by Facebook in identifying de…

【如何快速的开发一个完整的iOS直播app】(采集篇)
前言在看这篇之前,如果您还不了解直播原理,请查看这篇文章如何快速的开发一个完整的iOS直播app(原理篇)开发一款直播app,首先需要采集主播的视频和音频,然后传入流媒体服务器,本篇主要讲解如何采集主播的视频和音频&am…

easyui 报表合并单元格
前段时间工作中碰到有需求,要求数据按下图所示格式来显示,当时在园子里看到了一篇文章(时间久了,想不起是哪一篇),研究了后做出了如下的DEMO,在此当作学习笔记,简单记录一下。 首先是…
HDU2594 KMP next数组的应用
这道题就是给你两个串s1, s2让你求出s1 s2的最长相同前缀和后缀, 我们直接将s1 s2连接到一起然后处理一下next数组即可, 注意答案应该是min(len(s1), len(s2) , next[len]), 代码如下: #include <cstdio> #include <cstring> #in…
c语言中浮点数和整数转换_C中的数据类型-整数,浮点数和空隙说明
c语言中浮点数和整数转换C中的数据类型 (Data Types in C) There are several different ways to store data in C, and they are all unique from each other. The types of data that information can be stored as are called data types. C is much less forgiving about d…

【如何快速的开发一个完整的iOS直播app】(美颜篇)
前言在看这篇之前,如果您还不了解直播原理,请查看这篇文章如何快速的开发一个完整的iOS直播app(原理篇)开发一款直播app,美颜功能是很重要的,如果没有美颜功能,可能分分钟钟掉粉千万,本篇主要讲解直播中美颜…

Linux内核分析——第五章 系统调用
第五章 系统调用 5.1 与内核通信 1、系统调用在用户空间进程和硬件设备之间添加了一个中间层,该层主要作用有三个: (1)为用户空间提供了一种硬件的抽象接口 (2)系统调用保证了系统的稳定和安全 (…
BZOJ 3110
http://www.lydsy.com/JudgeOnline/problem.php?id3110 整体二分区间修改树状数组维护 #include<cstdio> #define FOR(i,s,t) for(register int is;i<t;i) inline int max(int a,int b){return a>b?a:b;} inline int min(int a,int b){return a<b?a:b;} type…
css 选择器 伪元素_CSS伪元素-解释选择器之前和之后
css 选择器 伪元素选择器之前 (Before Selector) The CSS ::before selector can be used to insert content before the content of the selected element or elements. It is used by attaching ::before to the element it is to be used on.CSS ::before选择器可用于在选定…
各种面试题啊1
技术 基础 1.为什么说Objective-C是一门动态的语言? 什么叫动态静态 静态、动态是相对的,这里动态语言指的是不需要在编译时确定所有的东西,在运行时还可以动态的添加变量、方法和类 Objective-C 可以通过Runtime 这个运行时机制,…
PEP8 Python
写在前面 对于代码而言,相比于写,它更多是读的。 pep8 一、代码编排 缩进,4个空格的缩进,编辑器都可以完成此功能;每行最大长度79,换行可以使用反斜杠,换行点要在操作符的后边。类和top-level函…
粒子滤波 应用_如何使用NativeScript开发粒子物联网应用
粒子滤波 应用If youre developing any type of IoT product, inevitably youll need some type of mobile app. While there are easy ways, theyre not for production use.如果您要开发任何类型的物联网产品,则不可避免地需要某种类型的移动应用程序。 尽管有简单…

wkwebView基本使用方法
WKWebView有两个delegate,WKUIDelegate 和 WKNavigationDelegate。WKNavigationDelegate主要处理一些跳转、加载处理操作,WKUIDelegate主要处理JS脚本,确认框,警告框等。因此WKNavigationDelegate更加常用。 比较常用的方法: #p…
引用类型(一):Object类型
对象表示方式 1、第一种方式:使用new操作符后跟Object构造函数 var person new Object();<br/> person.name Nicholas;<br/> person.age 29; 2、对象字面量表示法 var person {name:Nicholas,age:29 } *:在age属性的值29的后面不能添加逗号…
(第四周)要开工了
忙碌的一周又过去了,这周的时间很紧,但是把时间分配的比较均匀,考研复习和各门功课都投入了一定的精力,所以不像前三周一样把大多数时间都花费在了软件工程上。也因为结对项目刚开始,我们刚刚进行任务分工以及查找资料…
统计数字,空白符,制表符_为什么您应该在HTML中使用制表符空间而不是多个非空白空间(nbsp)...
统计数字,空白符,制表符There are a number of ways to insert spaces in HTML. The easiest way is by simply adding spaces or multiple character entities before and after the target text. Of course, that isnt the DRYest method.有多种方法可以在HTML中插入空格。…
Python20-Day02
1、数据 数据为什么要分不同的类型 数据是用来表示状态的,不同的状态就应该用不同类型的数据表示; 数据类型 数字(整形,长整形,浮点型,复数),字符串,列表,元组…
Android网络框架-OkHttp3.0总结
一、概述 OkHttp是Square公司开发的一款服务于android的一个网络框架,主要包含: 一般的get请求一般的post请求基于Http的文件上传文件下载加载图片支持请求回调,直接返回对象、对象集合支持session的保持github地址:https://githu…
第一天写,希望能坚持下去。
该想的都想完了,不该想的似乎也已经尘埃落定了。有些事情,终究不是靠努力或者不努力获得的。顺其自然才是正理。 以前很多次想过要努力,学习一些东西,总是不能成,原因很多: 1.心中烦恼,不想学…
mac gource_如何使用Gource显示项目的时间表
mac gourceThe first time I heard about Gource was in 2013. At the time I watched this cool video showing Ruby on Rails source code evolution:我第一次听说Gource是在2013年 。 当时,我观看了这段很酷的视频,展示了Ruby on Rails源代码的演变&a…
insert语句让我学会的两个MySQL函数
我们要保存数据到数据库,插入数据是必须的,但是在业务中可能会出于某种业务要求,要在数据库中设计唯一索引;这时如果不小心插入一条业务上已经存在同样key的数据时,就会出现异常。 大部分的需求要求我们出现唯一键冲突…
对PInvoke函数函数调用导致堆栈不对称。原因可能是托管的 PInvoke 签名与非托管的目标签名不匹配。...
C#引入外部非托管类库时,有时候会出现“对PInvoke函数调用导致堆栈不对称。原因可能是托管的 PInvoke 签名与非托管的目标签名不匹配”的报错。 通常在DllImport标签内加入属性CallingConventionCallingConvention.Cdecl即可解决该问题。 如: [Dll…
Python字符串方法用示例解释
字符串查找方法 (String Find Method) There are two options for finding a substring within a string in Python, find() and rfind().在Python中的字符串中有两个选项可以找到子字符串: find()和rfind() 。 Each will return the position that the substring …
关于命名空间namespace
虽然任意合法的PHP代码都可以包含在命名空间中,但只有以下类型的代码受命名空间的影响,它们是:类(包括抽象类和traits)、接口、函数和常量。在声明命名空间之前唯一合法的代码是用于定义源文件编码方式的 declare 语句…
一 梳理 从 HDFS 到 MR。
MapReduce 不仅仅是一个工具,更是一个框架。我们必须拿问题解决方案去适配框架的 map 和 reduce 过程很多情况下,需要关注 MapReduce 作业所需要的系统资源,尤其是集群内部网络资源的使用情况。这是MapReduce 框架在设计上的取舍,…
huffman树和huffman编码
不知道为什么,我写的代码都是又臭又长。 直接上代码: #include <iostream> #include <cstdarg> using namespace std; class Node{ public:int weight;int parent, lChildren, rChildren;Node(int weight, int parent, int lChildren, int …