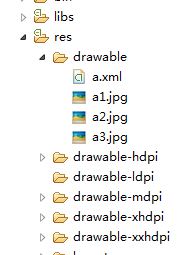
好多动画离不开帧动画的使用,下面就实现帧动画的制作方式之一,以后会推出其他方法。
上面是文件存放位置。
a.xml文件的代码如下:
<?xml version="1.0" encoding="utf-8"?>
<animation-list xmlns:android="http://schemas.android.com/apk/res/android"android:oneshot="false" ><itemandroid:drawable="@drawable/a1"android:duration="500"/><itemandroid:drawable="@drawable/a2"android:duration="500"/><itemandroid:drawable="@drawable/a3"android:duration="500"/></animation-list>
好了,进入main.xml(activity_main.xml)代码部分,其实很简单,就有一个ImageView和两个Button。
<ImageViewandroid:id="@+id/img2"android:layout_width="wrap_content"android:layout_height="wrap_content"android:layout_gravity="center" /><Buttonandroid:layout_width="wrap_content"android:layout_height="wrap_content"android:layout_gravity="center"android:onClick="start"android:text="开始帧动画" /><Buttonandroid:layout_width="wrap_content"android:layout_height="wrap_content"android:layout_gravity="center"android:onClick="stop"android:text="停止帧动画" />
然后进入java代码部分,onCreate()方法就省略不写了,直接写有关代码。
开始帧动画代码如下:
public void start(View v) {ImageView img2 = (ImageView) this.findViewById(R.id.img2);img2.setBackgroundResource(R.drawable.a);AnimationDrawable frame = (AnimationDrawable) img2.getBackground();frame.start();}
结束帧动画代码如下:
public void stop(View v) {ImageView img2 = (ImageView) this.findViewById(R.id.img2);AnimationDrawable frame = (AnimationDrawable) img2.getBackground();frame.stop();}
这里需要注意一点,像上面的
frame.start();如果写到onCreate()方法中则不会出现效果。我亲自测试,代码如下。protected void onCreate(Bundle savedInstanceState) {ImageView imgView;super.onCreate(savedInstanceState);setContentView(R.layout.activity_main);imgView = (ImageView) this.findViewById(R.id.img);imgView.setBackgroundResource(R.drawable.a);AnimationDrawable frame = (AnimationDrawable) imgView.getBackground();frame.start();}
这样只会出现第一张图片,不会有帧动画的效果。
好了,第一种帧动画实现方式就到这里,后续还会有其他方法推荐给大家。谢谢观赏,你的评论是我进步的动力。


