httpd.2.4虚拟主机配置测试
测试目标:
三个虚拟主机,要求如下
vhost1: phpMyAdmin, 同时提供https服务;
vhost2: wordpress
配置过程:
一、配置vhost1
1、首先配置vhost1,先搭建私有CA
在172.16.20.242上搭建私有CA:
(1) 创建私钥,公钥无需处理
[root@ca ~]# cd /etc/pki/CA/
[root@ca CA]# (umask 077;openssl genrsa -out private/cakey.pem 2048)
Generating RSA private key, 2048 bit long modulus
.....+++
.......+++
e is 65537 (0x10001)(2) 生成自签证书,填写相关证书信息
[root@ca CA]# (umask 077;openssl genrsa -out private/cakey.pem 2048)
Generating RSA private key, 2048 bit long modulus
.....+++
.......+++
e is 65537 (0x10001)
[root@ca CA]# openssl req -new -x509 -key private/cakey.pem -out cacert.pem -days 3655
You are about to be asked to enter information that will be incorporated
into your certificate request.
What you are about to enter is what is called a Distinguished Name or a DN.
There are quite a few fields but you can leave some blank
For some fields there will be a default value,
If you enter '.', the field will be left blank.
-----
Country Name (2 letter code) [XX]:CN
State or Province Name (full name) []:Hubei
Locality Name (eg, city) [Default City]:Hubei
Organization Name (eg, company) [Default Company Ltd]:Gump Ltd
Organizational Unit Name (eg, section) []:Ops
Common Name (eg, your name or your server's hostname) []:ca.gump.com
Email Address []:caadmin@gump.com
[root@ca CA]#
// 需要注意的是,证书格式必须为pem格式(3)创建签署证书环境
[root@ca CA]# touch /etc/pki/CA/index.txt
[root@ca CA]# touch /etc/pki/CA/serial
[root@ca CA]# echo 01 > /etc/pki/CA/serial
2、在web主机上生成证书请求,并发送证书请求到CA主机
在172.16.20.244生成证书请求:
(1)生成密钥,并保存到应用此证书的服务的配置文件目录下
[root@web ~]#  mkdir /etc/httpd/ssl
[root@web ~]#  cd /etc/httpd/ssl
[root@web ssl]# (umask 077;openssl genrsa -out httpd.key 2048)
Generating RSA private key, 2048 bit long modulus
..........+++
....................................................................+++
e is 65537 (0x10001)
[root@web ssl]# ls
httpd.key(2) 生成证书签署请求,填写相关信息需要注意的是,除了主机地址和邮箱地址,其它需要保持一致
[root@web ssl]# openssl req -new -key httpd.key -out httpd.csr
You are about to be asked to enter information that will be incorporated
into your certificate request.
What you are about to enter is what is called a Distinguished Name or a DN.
There are quite a few fields but you can leave some blank
For some fields there will be a default value,
If you enter '.', the field will be left blank.
-----
Country Name (2 letter code) [XX]:CN
State or Province Name (full name) []:Hubei
Locality Name (eg, city) [Default City]:Hubei
Organization Name (eg, company) [Default Company Ltd]:Gump Ltd
Organizational Unit Name (eg, section) []:Ops
Common Name (eg, your name or your server's hostname) []:web.gump.com
Email Address []:webadmin@gump.comPlease enter the following 'extra' attributes
to be sent with your certificate request
A challenge password []:
An optional company name []:
[root@web ssl]# ls
httpd.csr  httpd.key
[root@web ssl]# scp httpd.csr root@172.16.20.242:/tmp/
root@172.16.20.242's password:
httpd.csr                                                          100% 1050     1.0KB/s   00:00
[root@web ssl]#
3、签署证书请求,将证书请求发送回web主机
(1)签署证书请求
[root@ca CA]# openssl ca -in /tmp/httpd.csr -out /tmp/web.gump.com.crt -days 365
Using configuration from /etc/pki/tls/openssl.cnf
Check that the request matches the signature
Signature ok
Certificate Details:Serial Number: 1 (0x1)ValidityNot Before: Aug 23 10:55:56 2017 GMTNot After : Aug 23 10:55:56 2018 GMTSubject:countryName               = CNstateOrProvinceName       = HubeiorganizationName          = Gump LtdorganizationalUnitName    = OpscommonName                = web.gump.comemailAddress              = webadmin@gump.comX509v3 extensions:X509v3 Basic Constraints: CA:FALSENetscape Comment: OpenSSL Generated CertificateX509v3 Subject Key Identifier: 7A:D2:B5:60:3D:13:27:33:C4:F5:02:DC:AC:44:BB:0F:F9:32:00:71X509v3 Authority Key Identifier: keyid:5A:9A:54:2F:9C:91:3E:D6:BE:CC:22:68:50:C6:83:EB:23:AD:AC:AFCertificate is to be certified until Aug 23 10:55:56 2018 GMT (365 days)
Sign the certificate? [y/n]:y1 out of 1 certificate requests certified, commit? [y/n]y
Write out database with 1 new entries
Data Base Updated
[root@ca CA]#
(2)将证书传回请求者
[root@ca CA]# scp /tmp/web.gump.com.crt root@172.16.20.244:/etc/httpd/ssl
The authenticity of host '172.16.20.244 (172.16.20.244)' can't be established.
RSA key fingerprint is 5a:10:33:a2:bf:5b:06:82:25:01:fb:c2:74:93:34:95.
Are you sure you want to continue connecting (yes/no)? yes
Warning: Permanently added '172.16.20.244' (RSA) to the list of known hosts.
root@172.16.20.244's password:
web.gump.com.crt                                                   100% 4595     4.5KB/s   00:00
[root@ca CA]#
4、配置httpd支持使用ssl
(1)查看当前web主机是否已安装mod_ssl模块,如果没有安装,则必须先安装mod_ssl模块
(2)配置ssl配置文件
[root@web ssl]# vim /etc/httpd/conf.d/ssl.conf
修改如下选项:
<VirtuaHost 172.16.20.244:443>
// 因为ssl会话是基于IP地址建立的,若有多个IP地址,则需指定地址,若只有一个地址,则无需修
改,保持"*"即可;
DocumentRoot "/www/htdocs"
// 此目录为虚拟主机vhost1的中心目录,即网页文件存放位置
ServerName web.gump.com:443
// 当前主机名
ErrorLog /logs/pma_error_log
// 错误日志存放位置
Transferlog logs/pma_access_log
// 访问日志存放目录
SSLCertificateFile /etc/httpd/ssl/web.gump.com.crt
// 服务器证书存放目录
SSlCertificateKeyFile /etc/httpd/ssl/httpd.key
// 证书私钥存放目录
(3)配置phpMyadmin网页文件
[root@localhost  ~]#    mkdir -pv /www/htdocs/vhosts{1,2,3}
[root@localhost ~]#  unzip phpMyAdmin-4.0.10.20-all-languages.zip
[root@localhost ~]#  cp phpMyAdmin-4.0.10.20-all-languages /www/htdocs/vhosts1/
[root@localhost  ~]#    ln -sv phpMyAdmin-4.0.10.20-all-languages pma
(4)配置httpd.conf
[root@localhost conf]# vim httpd.conf
ServerName Localhost:80
DocumentRoot "/www/htdocs"
<Directory "/www/htdocs">
// Directory 指定的目录要和DocumentRoot一致
(5)配置虚拟主机配置文件
[root@localhost ~]#  vim /etc/httpd/conf.d/httpd-vhost1.conf
<VirtualHost 172.16.20.244:80>ServerAdmin web.gump.comDocumentRoot "/www/htdocs"<Directory "/www/htdocs/vhosts1/pma">Options NoneAllowOverride NoneRequire all granted</Directory>
</VirtualHost>
[root@localhost ~]#   systemctl reload httpd.service
查看配置效果

二、配置虚拟主机2
1、配置虚拟主机2的配置文件
[root@localhost ~]#   vim /etc/httpd/conf.d/httpd-vhost2.conf
<VirtualHost 172.16.20.245:80>ServerAdmin web2.gump.comDocumentRoot "/www/htdocs"<Directory "/www/htdocs/vhosts2">Options NoneAllowOverride NoneRequire all granted</Directory>
</VirtualHost>
2、为虚拟主机2配置IP地址
由于是虚拟机,没有多张网卡使用ip命令添加地址达到多IP效果
[root@localhost ~]#   ip addr add 172.16.20.245/24 dev ens33
[root@localhost ~]#   ip addr show dev ens33
[root@localhost ~]# ip add show dev ens33
2: ens33: <BROADCAST,MULTICAST,UP,LOWER_UP> mtu 1500 qdisc pfifo_fast state UP qlen 1000link/ether 00:0c:29:44:e2:e3 brd ff:ff:ff:ff:ff:ffinet 172.16.20.244/24 brd 172.16.20.255 scope global ens33valid_lft forever preferred_lft foreverinet 172.16.20.245/24 scope global secondary ens33valid_lft forever preferred_lft foreverinet6 fe80::d846:2237:6188:97fe/64 scope link tentative dadfailed valid_lft forever preferred_lft foreverinet6 fe80::a0de:8503:69c8:5595/64 scope link tentative dadfailed valid_lft forever preferred_lft foreverinet6 fe80::9a1a:88f0:c9cf:41bd/64 scope link tentative dadfailed valid_lft forever preferred_lft forever
3、配置虚拟主机2的网页文件
[root@localhost ~]#  unzip wordpress-4.7.4-zh_CH.zip
[root@localhost ~]#  cp wordpress /www/htdocs/vhosts2/
4、配置虚拟主机2的wordpress的配置文件
[root@localhost ~]# mysql
MariaDB [(none)]> CREATE DATABASE mydb1;
MariaDB [(none)]> exit
// 连接wordpress必须要配置正确的数据库及用户名密码,所以需要实现创建好数据库
[root@localhost ~]#   cd /www/htdocs/vhost2/wordpress
[root@localhost ~]#   cp wp-config-sample.php wp-config.php
[root@localhost ~]#   vim wp-config.php
define('DB_NAME','mydb1');  // 数据库为事先创建好的mydb1
define('DB_USER','root');   // 用户名为root
define('DB_PASSWORD','');   // root密码默认为空
5、查看配置效果

写的比较潦草,如有遗漏错误和争议之处,欢迎大家的批评指正和讨论,谢谢。
转载于:https://blog.51cto.com/11367661/2047992
相关文章:

视频批量转换为FLV的软件开发总结(1)——思想总结篇
视频批量转换为FLV的工作中,完全是因为项目中用到流媒体服务器管理发布视频。原始的数据可能是.mpg、.avi等格式的,这就需要大量的转换工作量,批量转换工具的需求很明显了。 原始准备使用外面的专门的视频转换软件Total Video Converter&…
https简单配置
SSL会话过程(1)客户端发送可供选择的加密方式,并向服务器请求证书(2)服务器端发送证书以及选定的加密方式给客户端(3)客户端取得证书并进行证书验证;如果新人给其发证书的CA…
突破电信3G宽带对网页浏览的上网限制
从上周开始用我189的手机卡插入到我的无线上网卡中就不能正常打开网页了,其它的IM(如QQ、旺旺等)都正常。ping www.sina.com.cn这些网址也是很正常的。foxmail收邮件也很正常。本来还想可能是网络比较忙或者其它的什么原因,但跟踪…

ClassLoader知识收集
阅读提示:全文认真阅读大约需要1个半小时时间,如果你需要在IDE中验证并理解,大约需要3个小时,如果你想自己写个类似的类加载器并调试,估计还需要3个小时。该知识点的掌握检测与否,你可以尝试其回答Java每日…
Linux下PS1设置
在测试机上每次执行命令总要用sudo -u ads开头,比较麻烦。索性用: sudo su ads 就可以直接用ads用户名进行操作了。 但是用这种方式之后,命令的前缀就变成了"bash-3.2$ ",相当不习惯,经过网上搜索࿰…

Android API 中文 (51) —— ZoomButtonsController
一、结构 public class ZoomButtonsController extends View implements View.OnTouchListener java.lang.Object android.widget.ZoomButtonsController 二、概述 ZoomButtonsController处理缩放控件的显示和隐藏并且定位其在相关父视图的位置。他也可以做为缩放控件的…

火爆GitHub的《机器学习100天》,有人把它翻译成了中文版
作者 | 红色石头转载自AI有道(ID:redstonewill)今天给大家介绍一个在 GitHub 上非常火的机器学习实战项目,叫做 100-Days-Of-ML-Code,中文名为《机器学习 100 天》。目前该项目已经收获了 1.7w stars 了。下面是项目地址ÿ…

新浪程序员加班改bug,竟错失77万年会大奖
作者 | 伍杏玲转载自CSDN(CSDNnews)好消息!还有不到二十天就放大假!大伙盼着过年盼着年会盼着抽中大奖!昨天有一位新浪码农真的抽中头等奖了——2000 股新浪股票,价值 77 万人民币啊!然并卵&…
Linux简单的颜色设置
通过alias,在~/.bashrc里配置: alias l.ls -d .* --colortty alias llls -l --colortty alias lsls --colortty alias vivim alias whichalias | /usr/bin/which --tty-only --read-alias --show-dot --show-tilde
第106天:Ajax中同步请求和异步请求
同步请求和异步请求的区别 1、同步是指:发送方发出数据后,等接收方发回响应以后才发下一个数据包的通讯方式。 用户填写所有信息后,提交给服务器,等待服务器的回应(检验数据),是一次性的。信息错…
排除一例电脑启动故障
晚上一上班,版式组小连来电话,说是排版过程中,电脑突然死机,重启,提示Disk I/O error:status00008036 NTDETECT失败断电,拆机,放电(开机键反复按下松开按下松开几次&…

登陆成功率 99%,云知声携手平安好医生推声纹登录系统
近日,云知声宣布与医疗健康生态平台平安好医生(01833.HK)共同研发的“声纹登录系统”(又称声纹锁)经过多次模型优化和升级迭代后,登录成功率接近 99%,达行业一流水准。 声纹识别(Voiceprint Rec…
知方可补不足~开发人员可以自己定义VS文件模版
团队开发,最重要的是什么? 统一的规范,对于一个团队,在开发项目之前,必须要先告诉大家项目的规范是什么,而开发人员在实际当中再去执行这个规范,对于规范事实上是个很宏观的概念,它可…
sql server日志占用空间过大的问题
一、关于日志的基本知识:在 SQL Server 2000 和 SQL Server 2005 中,每个数据库都至少包含一个数据文件和一个事务日志文件。SQL Server 在该数据文件中以物理方式存储数据。事务日志文件存储您对 SQL Server 数据库执行的所有修改的详细信息,…
svn 回归某一个特定版本
svn回归某一个特定版本: 先用svn log查看回归版本的版本号 version 然后用命令 svn up -r version

NA-NP-IE系列实验7:CDP
实验7:CDP<?xml:namespace prefix o ns "urn:schemas-microsoft-com:office:office" />1. 实验目的通过本实验,读者可以掌握如下技能:(1) 查找CDP 邻居(2) 熟悉CDP 的配置2. 实验拓扑图…

吴恩达“官宣”荣升准爸爸~
整理 | 琥珀 出品 | AI 科技大本营 “我们的最新‘成果’ Baby Ng 即将诞生!2019 年 2 月见面!” 1 月 17 日(北京时间 1 月 18 日凌晨),人生赢家吴恩达冷不丁在推特上晒出了妻子孕期中的照片(如仙子一般漂…
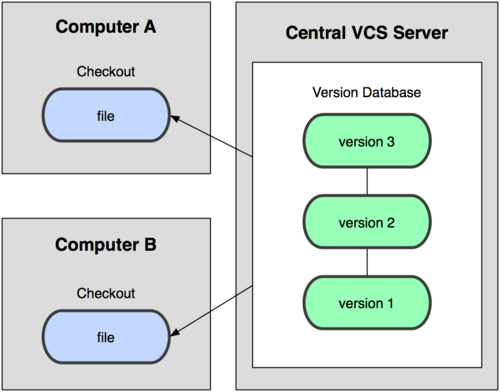
分布式版本控制系统 Git 教程
简介 Git 是什么? Git 是一个开源的分布式版本控制系统。 什么是版本控制? 版本控制是一种记录一个或若干文件内容变化,以便将来查阅特定版本修订情况的系统。 什么是分布式版本控制系统? 介绍分布式版本控制系统前,有…
Chrome插件HostAdmin
进入Chrome webstore:https://chrome.google.com/webstore/category/home 搜索 hostadmin,可以搜索到Pidgin的HostAdmin插件,直接安装即可。
设计模式——6适配器模式(Adapter)
6、适配器模式(Adapter)适配器模式将某个类的接口转换成客户端期望的另一个接口表示,目的是消除由于接口不匹配所造成的类的兼容性问题。主要分为三类:类的适配器模式、对象的适配器模式、接口的适配器模式。 核心思想就是&#x…

中国人口将迎来负增长,这是旷视们的机会
作者 | 阿司匹林 出品 | AI科技大本营 1 月 16 日,人工智能创业公司旷视科技在北京举办机器人战略发布会,发布了旷视机器人战略的核心产品——“河图(Hetu)”,用智能网络协同系统来改造传统的物流仓储行业。同时旷视还…
就看你怎么去运作
从前,有一个地方叫美国。有一个老头有三个儿子,其中大儿子、二儿子都在城里工作,他和小儿子相依为命在乡下生活。这一天,来了一个人,对他说:“我能不能把您的小儿子带到城里去工作?”老头说&…
安装EBS前期检查工具 - RDA - Health Check / Validation Engine Guide
参考文档 RDA - Health Check / Validation Engine Guide (文档 ID 250262.1) 先下载 RDA 补丁包。 Download HCVE/RDA安装RDA : Example:tar xvf rda.tarorgunzip rda.tar.gztar xvf rda.tarorunzip rda.zipNote:Each rda package (.zip, .tar, and .tar.gz) will cre…

啥是佩奇?Python告诉你
作者 | 丁彦君来源 | 恋习Python昨天,被《啥是佩奇》这支广告片刷屏了。佩奇明明是个喜剧角色,却看哭了所有人。▼《啥是佩奇》???快过年了在农村爷爷给城里的小孙子打电话小孙子说想要“佩奇”为了满足小孙子的愿望爷…
Linux中bashrc河bash_profile
/etc/profile:此文件为系统的每个用户设置环境信息,当用户第一次登录时,该文件被执行. 并从/etc/profile.d目录的配置文件中搜集shell的设置. /etc/bashrc:为每一个运行bash shell的用户执行此文件.当bash shell被打开时,该文件被读取. ~/.bash_profile 调用 ~/.bashrc 每个用户…
arcgis server 开发
不知道有多少人采用 adf 做开发,不知为什么,感觉在web 上用他老不爽 javascript api http://resources.esri.com/help/9.3/arcgisserver/apis/javascript/arcgis/help/jssamples_start.htm silverlight api http://resources.esri.com/help/9.3/arcgis…

详解谷歌最强NLP模型BERT(理论+实战)
作者:李理,环信人工智能研发中心vp,十多年自然语言处理和人工智能研发经验。主持研发过多款智能硬件的问答和对话系统,负责环信中文语义分析开放平台和环信智能机器人的设计与研发。 本文是作者正在编写的《深度学习理论与实战》的…
rz 和 sz
想从windows上传文件到linux中,还是rz / sz 可以用yum安装: yum install lrzsz -y 不能直接yum install rz 或者 yum install sz,只能用lrzsz来安装,-y表示之后的判断一律选择yes 使用rz从windows上传文件到linux,刚…

SMS系列之六:利用SMS实现操作系统的补丁分发
利用SMS实现操作系统的补丁分发杜 飞微软的每个操作系统都会不断的推出新的补丁,如Win2000的补丁达到SP4,XP的补丁达到SP3,Win2003也达到了SP2。那么做为一个IT管理员对员工的操作系统及时进行补丁升级也是一个日常工作。今天咱们就来看一下如…
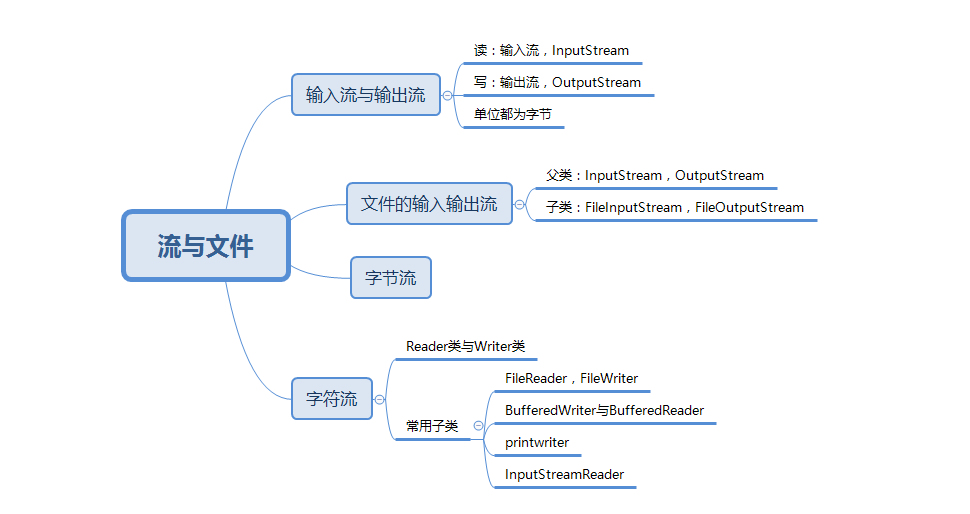
201621123075作业12-流与文件
1. 本周学习总结 1.1 以你喜欢的方式(思维导图或其他)归纳总结多流与文件相关内容。 2. 面向系统综合设计-图书馆管理系统或购物车 使用流与文件改造你的图书馆管理系统或购物车。 2.1 简述如何使用流与文件改造你的系统。文件中数据的格式如何ÿ…