如何用TF Object Detection API训练交通信号灯检测神经网络?

参加 2019 Python开发者日,请扫码咨询 ↑↑↑
作者简介:申泽邦(Adam Shan),谷歌认证机器学习专家(Google Developer Expert),兰州大学智能驾驶团队技术负责人,硕士在读。
文本转载自 CSDN 博客:https://blog.csdn.net/AdamShan/article/details/88627733
本文将解决如何使用 TensorFlow Object Detection API 训练交通信号灯检测网络,使用 Lisa 数据集,通过简单脚本将数据集整理为 tf record 格式,我们将分别在本地的 GPU 和 Google Cloud 提供的 TPU 上进行训练,最后导出网络的 protocbuf 权重,在 jupyter notebook 中进行模型验证。
首先感谢谷歌 TensorFlow Research Cloud 团队提供的免费 Cloud TPU,在本文中我使用的是 Cloud TPU v2 版本,拥有 8 个核心共计 64GB 的内存(类比于 GPU 的显存),能够提供最大 180 TFlops 的算力。
环境准备
本地 GPU 环境准备
首先介绍在本地使用 GPU 进行训练的环境准备,首先确保你的电脑中包含算力比较充足的 GPU(俗称显卡,推荐 GTX1060 及以上级别),使用 Ubuntu 或者其他 Linux 发行版本的系统,安装好 CUDA 和 CUDNN,安装 tensorflow-gpu 和其他环境:
pip install tensorflow-gpusudo apt-get install protobuf-compiler python-pil python-lxml python-tkpip install --user Cythonpip install --user contextlib2pip install --user jupyterpip install --user matplotlib
安装 COCO API:
git clone https://github.com/cocodataset/cocoapi.gitcd cocoapi/PythonAPImakecp -r pycocotools <path_to_tensorflow>/models/research/
克隆 models 项目:
git clone https://github.com/tensorflow/models.gitcd 到 models/research / 目录下,运行:
git clone https://github.com/tensorflow/models.git添加当前路径(research)到 python 路径:
export PYTHONPATH=$PYTHONPATH:`pwd`:`pwd`/slim以上均为官方安装教程,见:
https://github.com/tensorflow/models/blob/master/research/object_detection/g3doc/installation.md
至此,本地运行环境准备完成,后文中我们将在 Google Cloud 上如准备以上环境。
交通信号灯检测数据集准备
我们首先下载交通信号灯数据集,本文我们采用 Lisa 信号灯数据集,下载链接:
http://cvrr.ucsd.edu/vivachallenge/index.php/traffic-light/traffic-light-detection/
使用 Day Train Set (12.4 GB)和 Night Train Set (0.8 GB)两个数据集进行训练,下载完成后解压,得到原始图片 (保存与 frame 文件夹下) 和标注的 CSV 文件(文件名为:frameAnnotationsBOX.csv)
编写脚本 create_lisa_tf_record.py 将 Lisa 数据集以 tf record 格式保存,代码如下:
#!/usr/bin/env pythonimport osimport csvimport ioimport itertoolsimport hashlibimport randomimport PIL.Imageimport tensorflow as tffrom object_detection.utils import label_map_utilfrom object_detection.utils import dataset_utilimport contextlib2from object_detection.dataset_tools import tf_record_creation_utilANNOTATION = 'frameAnnotationsBOX.csv'FRAMES = 'frames'MAP = {'go': 'green','goLeft': 'green','stop': 'red','stopLeft': 'red','warning': 'yellow','warningLeft': 'yellow'}flags = tf.app.flagsflags.DEFINE_string('data_dir', '', 'Root directory to LISA dataset.')flags.DEFINE_string('output_path', '', 'Path to output TFRecord')flags.DEFINE_string('label_map_path', 'data/lisa_label_map.pbtxt','Path to label map proto')FLAGS = flags.FLAGSwidth = Noneheight = Nonedef process_frame(label_map_dict, frame):global widthglobal heightfilename, xmin, ymin, xmax, ymax, classes = frameif not os.path.exists(filename):tf.logging.error("File %s not found", filename)returnwith tf.gfile.GFile(filename, 'rb') as img:encoded_png = img.read()png = PIL.Image.open(io.BytesIO(encoded_png))if png.format != 'PNG':tf.logging.error("File %s has unexpeted image format '%s'", filename, png.format)returnif width is None and height is None:width = png.widthheight = png.heighttf.logging.info('Expected image size: %dx%d', width, height)if width != png.width or height != png.height:tf.logging.error('File %s has unexpected size', filename)returnprint filenameprint classeskey = hashlib.sha256(encoded_png).hexdigest()labels = [ label_map_dict[c] for c in classes ]xmin = [ float(x)/width for x in xmin ]xmax = [ float(x)/width for x in xmax ]ymin = [ float(y)/height for y in ymin ]ymax = [ float(y)/height for y in ymax ]classes = [ c.encode('utf8') for c in classes ]example = tf.train.Example(features=tf.train.Features(feature={'image/height': dataset_util.int64_feature(height),'image/width': dataset_util.int64_feature(width),'image/filename': dataset_util.bytes_feature(filename.encode('utf8')),'image/source_id': dataset_util.bytes_feature(filename.encode('utf8')),'image/key/sha256': dataset_util.bytes_feature(key.encode('utf8')),'image/encoded': dataset_util.bytes_feature(encoded_png),'image/format': dataset_util.bytes_feature('png'.encode('utf8')),'image/object/bbox/xmin': dataset_util.float_list_feature(xmin),'image/object/bbox/xmax': dataset_util.float_list_feature(xmax),'image/object/bbox/ymin': dataset_util.float_list_feature(ymin),'image/object/bbox/ymax': dataset_util.float_list_feature(ymax),'image/object/class/text': dataset_util.bytes_list_feature(classes),'image/object/class/label': dataset_util.int64_list_feature(labels)}))return exampledef create_frame(root, frame, records):filename = os.path.join(root, FRAMES, os.path.basename(frame))if not os.path.exists(filename):tf.logging.error("File %s not found", filename)returnxmin = []ymin = []xmax = []ymax = []classes = []for r in records:if r['Annotation tag'] not in MAP:continueclasses.append(MAP[r['Annotation tag']])xmin.append(r['Upper left corner X'])xmax.append(r['Lower right corner X'])ymin.append(r['Upper left corner Y'])ymax.append(r['Lower right corner Y'])yield (filename, xmin, ymin, xmax, ymax, classes)def process_annotation(root):tf.logging.info('Processing %s', os.path.join(root, ANNOTATION))with tf.gfile.GFile(os.path.join(root, ANNOTATION)) as a:annotation = a.read().decode('utf-8')with io.StringIO(annotation) as a:data = csv.DictReader(a, delimiter=';')for key, group in itertools.groupby(data, lambda r: r['Filename']):for e in create_frame(root, key, group):yield edef main(_):label_map_dict = label_map_util.get_label_map_dict(FLAGS.label_map_path)frames = []for r, d, f in tf.gfile.Walk(FLAGS.data_dir, in_order=True):if ANNOTATION in f:del d[:]for e in process_annotation(r):frames.append(e)# random.shuffle(frames)num_shards=30with contextlib2.ExitStack() as tf_record_close_stack:output_tfrecords = tf_record_creation_util.open_sharded_output_tfrecords(tf_record_close_stack, FLAGS.output_path, num_shards)for index, f in enumerate(frames):tf_example = process_frame(label_map_dict, f)output_shard_index = index % num_shardsoutput_tfrecords[output_shard_index].write(tf_example.SerializeToString())if __name__ == '__main__':tf.logging.set_verbosity(tf.logging.INFO)tf.app.run()
将此脚本复制到 models/research 目录下,运行此脚本如下:
python create_lisa_tf_record.py \--data_dir={lisa数据集的路径} \--output_path={你保存record文件的路径,包含record文件名} \--label_map_path={lisa_label_map.pbtxt的路径}
其中 label_map_path 用于指定标签数字到类别名的映射关系,我们只研究红绿黄灯的检测识别,所以只有三个类,lisa_label_map.pbtxt 内容如下:
item {id: 1name: 'green'}item {id: 2name: 'red'}item {id: 3name: 'yellow'}
需要留意的是,Lisa 数据集的标签一共有六类:go,goLeft,stop,stopLeft,warning,warningLeft,我们在上面的脚本中将这六类分别映射成 green, red, yellow 三类。
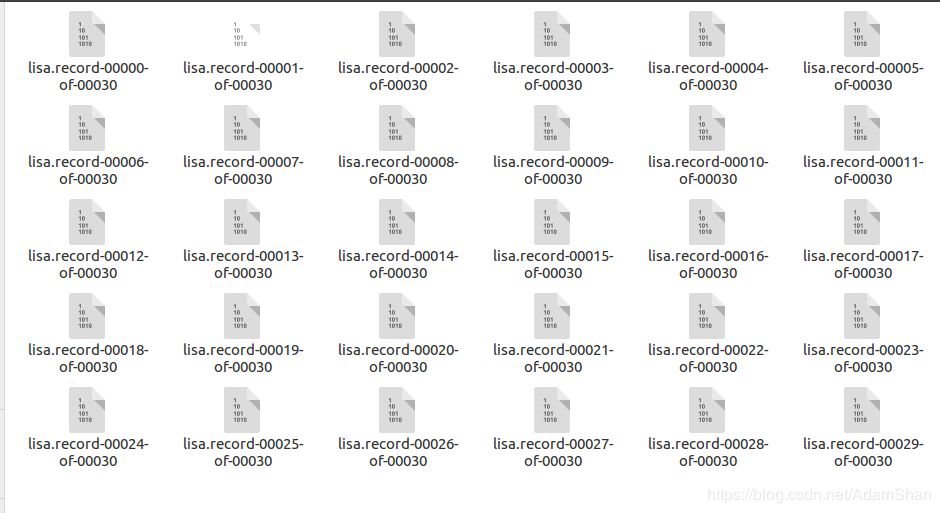
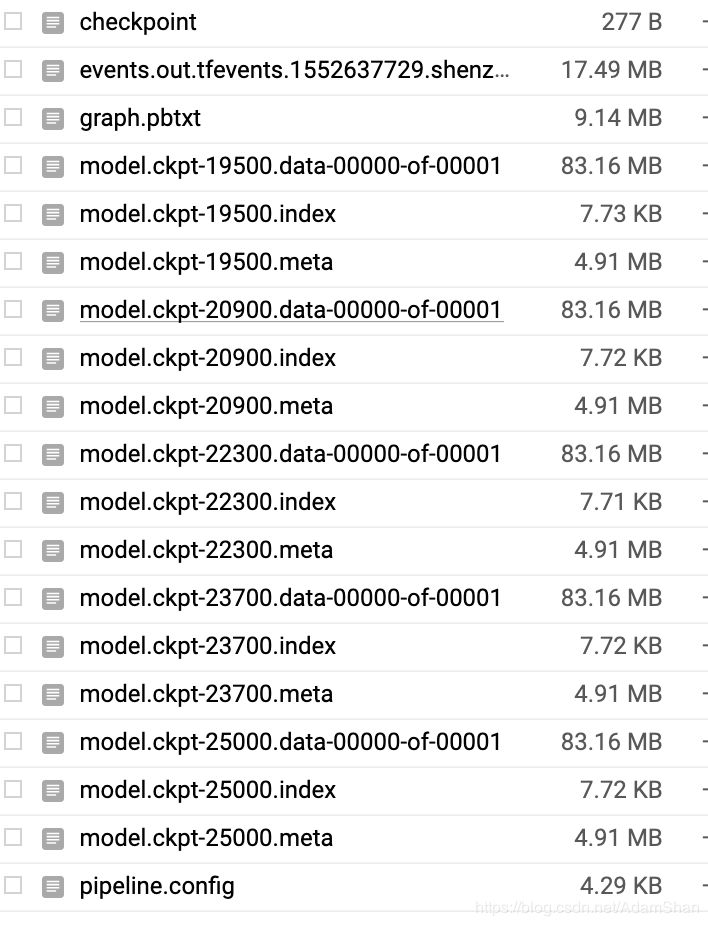
由于数据集数量较大,所以我们没有将所有的数据保存成一个 tf record 文件,我们使用如下代码,将 record 文件拆分成了 30 个子文件:
num_shards=30with contextlib2.ExitStack() as tf_record_close_stack:output_tfrecords = tf_record_creation_util.open_sharded_output_tfrecords(FLAGS.output_path, num_shards)for index, f in enumerate(frames):tf_example = process_frame(label_map_dict, f)output_shard_index = index % num_shardsoutput_tfrecords[output_shard_index].write(tf_example.SerializeToString())
得到的 tf record 文件如下图所示,至此,数据集的准备完成:
模型训练文件配置
准备好 tf record 后,需要调整模型的配置文件,我们首先在 Object detection 的 Model Zoo 中选取一个想要训练的模型,如下图所示,点击下载模型的预训练权重,现代深度学习模型往往包含百兆甚至数百兆的参数,从头训练需要耗费巨大的算力,所以我们选择在某些数据集上(如 COCO、PASCAL)已经预训练好的模型,在此模型权重的基础上进行 微调(Fine tune) ,即可快速训练得到适用于新任务的模型,具体理论细节,大家可以搜索关键词 迁移学习 了解。
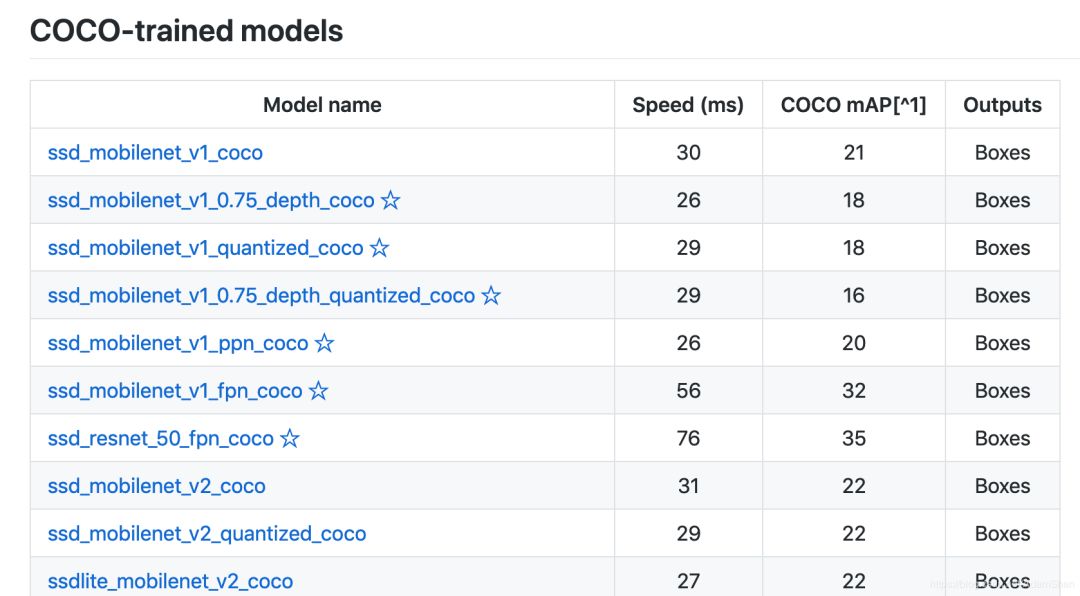
如上图,我们分别选择 ssd_resnet_50_fpn_coco 和 ssd_mobilenet_v1_fpn_coco 在本地 GPU 和 Cloud TPU 上进行训练,注意带星号即表示该模型支持 TPU 训练。下载好权重之后,从 models/research/object_detection/samples/configs 下拷贝出对应的 config 文件,以 ssd_resnet_50_fpn_coco 为例,修改类别数为 3:
num_classes: 3因为 Lisa 数据集的图像尺寸均为 1280*960,修改输入的 resize 层参数如下:
image_resizer {fixed_shape_resizer {height: 960width: 1280}}
将 config 中所有的 PATH_TO_BE_CONFIGURED 替换为对应文件的路径,如下所示:
fine_tune_checkpoint: "{下载的预训练模型路径}/model.ckpt"train_input_reader: {tf_record_input_reader {input_path: "{训练集record}/lisa.record-?????-of-00029"}label_map_path: "lisa_label_map.pbtxt"}eval_input_reader: {tf_record_input_reader {input_path: "eval/lisa.record-00029-of-00030"}label_map_path: "lisa_label_map.pbtxt"shuffle: falsenum_readers: 1}
上文中我们将数据集分割成了 30 个 tf record 文件,我们将最后一个文件 lisa.record-00029-of-00030 作为验证集,前 29 个 record 文件作为训练集,使用 linux 下的 rename 命令将 lisa.record-000{0-28}-of-00030 改为 lisa.record-000{0-28}-of-00029,命令如下:
rename "s/30/29/" * config 文件中还可以配置网络训练大量参数,如 batch_size 以及学习率等等,在 GPU 中,由于显存有限,batch_size 建议配置为 2 或者 4,TPU 属性和 GPU 有很大区别,所以参数会有所不同,配置好 config 文件后,cd 到 models/research / 目录,使用如下指令开始训练:
python object_detection/model_main.py \--pipeline_config_path={config 文件路径} \--model_dir={训练输出的路径(文件夹)} \--num_train_steps=50000 (训练的迭代次数) \--sample_1_of_n_eval_examples=1 \--alsologtostderr
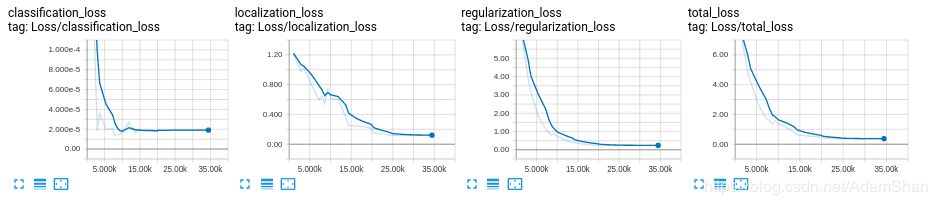
使用 tensorboard 可视化训练过程,效果如下:
导出并验证模型
当训练结束以后,模型会以 checkpoint 文件的形式保存,为了导出用于应用的计算图,需要将该模型的图结构和权重固化到一起,这一步操作被称为 freeze,使用如下命令 freeze 导出的模型:
# 在tensorflow/models/research/目录下INPUT_TYPE=image_tensorPIPELINE_CONFIG_PATH={config文件路径}TRAINED_CKPT_PREFIX={model.ckpt-50000的路径}EXPORT_DIR={导出计算图的路径}python object_detection/export_inference_graph.py \--input_type=${INPUT_TYPE} \--pipeline_config_path=${PIPELINE_CONFIG_PATH} \--trained_checkpoint_prefix=${TRAINED_CKPT_PREFIX} \--output_directory=${EXPORT_DIR}
得到权重固化的模型计算图后,验证该模型,修改 models/research/object_detection / 目录下的 object_detection_tutorial.ipynb 文件,在 jupyter notebook 下对模型进行验证,首先导入库:
import numpy as npimport osimport six.moves.urllib as urllibimport sysimport tarfileimport tensorflow as tfimport zipfilefrom distutils.version import StrictVersionfrom collections import defaultdictfrom io import StringIOfrom matplotlib import pyplot as pltfrom PIL import Image# This is needed since the notebook is stored in the object_detection folder.sys.path.append("..")from object_detection.utils import ops as utils_opsif StrictVersion(tf.__version__) < StrictVersion('1.9.0'):raise ImportError('Please upgrade your TensorFlow installation to v1.9.* or later!')# This is needed to display the images.%matplotlib inlinefrom utils import label_map_utilfrom utils import visualization_utils as vis_util
加载模型权重:
# 冻结的检测模型(protocbuf格式)的路径,这是用于信号灯检测的实际模型。PATH_TO_FROZEN_GRAPH = '/home/adam/data/tl_detector/new-export/frozen_inference_graph.pb'# label map的路径PATH_TO_LABELS = '/home/adam/data/tl_detector/lisa_label_map.pbtxt'# 交通信号灯检测为3NUM_CLASSES = 3detection_graph = tf.Graph()with detection_graph.as_default():od_graph_def = tf.GraphDef()with tf.gfile.GFile(PATH_TO_FROZEN_GRAPH, 'rb') as fid:serialized_graph = fid.read()od_graph_def.ParseFromString(serialized_graph)tf.import_graph_def(od_graph_def, name='')
加载 label map:
category_index = label_map_util.create_category_index_from_labelmap(PATH_TO_LABELS, use_display_name=True)print(category_index)def load_image_into_numpy_array(image):(im_width, im_height) = image.sizereturn np.array(image.getdata()).reshape((im_height, im_width, 3)).astype(np.uint8)
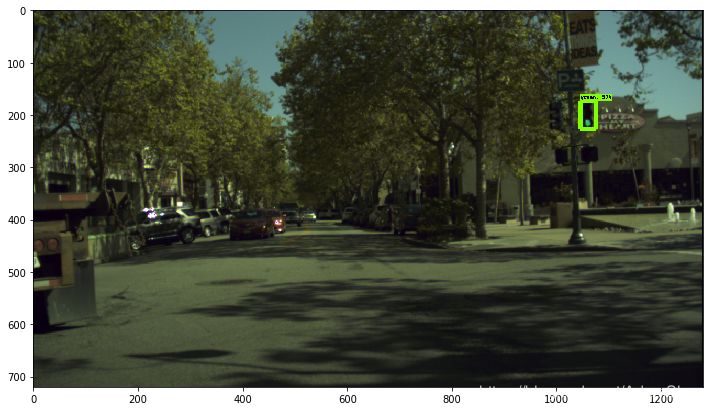
使用模型对测试图片进行交通信号灯检测:
import osPATH_TO_TEST_IMAGES_DIR = '/home/adam/data/tl_detector/test-example/'image_list = os.listdir(PATH_TO_TEST_IMAGES_DIR)TEST_IMAGE_PATHS = [ os.path.join(PATH_TO_TEST_IMAGES_DIR, i) for i in image_list ]print(TEST_IMAGE_PATHS)# Size, in inches, of the output images.IMAGE_SIZE = (12, 8)def run_inference_for_single_image(image, graph):with graph.as_default():with tf.Session() as sess:# Get handles to input and output tensorsops = tf.get_default_graph().get_operations()all_tensor_names = {output.name for op in ops for output in op.outputs}tensor_dict = {}for key in ['num_detections', 'detection_boxes', 'detection_scores','detection_classes', 'detection_masks']:tensor_name = key + ':0'if tensor_name in all_tensor_names:tensor_dict[key] = tf.get_default_graph().get_tensor_by_name(tensor_name)if 'detection_masks' in tensor_dict:# The following processing is only for single imagedetection_boxes = tf.squeeze(tensor_dict['detection_boxes'], [0])detection_masks = tf.squeeze(tensor_dict['detection_masks'], [0])# Reframe is required to translate mask from box coordinates to image coordinates and fit the image size.real_num_detection = tf.cast(tensor_dict['num_detections'][0], tf.int32)detection_boxes = tf.slice(detection_boxes, [0, 0], [real_num_detection, -1])detection_masks = tf.slice(detection_masks, [0, 0, 0], [real_num_detection, -1, -1])detection_masks_reframed = utils_ops.reframe_box_masks_to_image_masks(detection_masks, detection_boxes, image.shape[0], image.shape[1])detection_masks_reframed = tf.cast(tf.greater(detection_masks_reframed, 0.5), tf.uint8)# Follow the convention by adding back the batch dimensiontensor_dict['detection_masks'] = tf.expand_dims(detection_masks_reframed, 0)image_tensor = tf.get_default_graph().get_tensor_by_name('image_tensor:0')# Run inferenceoutput_dict = sess.run(tensor_dict,feed_dict={image_tensor: np.expand_dims(image, 0)})# all outputs are float32 numpy arrays, so convert types as appropriateoutput_dict['num_detections'] = int(output_dict['num_detections'][0])output_dict['detection_classes'] = output_dict['detection_classes'][0].astype(np.uint8)output_dict['detection_boxes'] = output_dict['detection_boxes'][0]output_dict['detection_scores'] = output_dict['detection_scores'][0]if 'detection_masks' in output_dict:output_dict['detection_masks'] = output_dict['detection_masks'][0]return output_dictfor image_path in TEST_IMAGE_PATHS:image = Image.open(image_path)# the array based representation of the image will be used later in order to prepare the# result image with boxes and labels on it.image_np = load_image_into_numpy_array(image)# Expand dimensions since the model expects images to have shape: [1, None, None, 3]image_np_expanded = np.expand_dims(image_np, axis=0)# Actual detection.output_dict = run_inference_for_single_image(image_np, detection_graph)# Visualization of the results of a detection.vis_util.visualize_boxes_and_labels_on_image_array(image_np,output_dict['detection_boxes'],output_dict['detection_classes'],output_dict['detection_scores'],category_index,instance_masks=output_dict.get('detection_masks'),use_normalized_coordinates=True,line_thickness=8`)plt.figure(figsize=IMAGE_SIZE)plt.imshow(image_np)
检测结果:

Google Cloud TPU 环境配置以及模型训练
Cloud TPU 环境配置
要使用 Google 的 TPU 计算资源首先需要掌握“科学上网”(让你的电脑能够访问 Google),然后进入 https://cloud.google.com 注册并创建 Project,所有新注册的用户均需要激活,激活完成以后才能使用 Cloud 的所有功能,激化实际上就是要绑定一张信用卡,激活完成后能免费领取 300 美元的额度,同学们可以使用此额度来完成本文的实验。
在 Cloud 的控制台,我们新建一个云存储示例(英文名 Bucket),TPU 节点在运算时读取存储于 Bucket 上的数据集(tf record 格式),同时将训练的结果图(checkout)文件和用于 tensorboard 可视化的 event 等文件写到 Bucket 中。Cloud 官方给出了如何创建一个 Bucket 教程:
https://cloud.google.com/tpu/docs/quickstart (其中的 Create a Cloud Storage bucket 小节)
下载 ctpu 工具并安装,下载和安装说明见官方仓库:
https://github.com/tensorflow/tpu/tree/master/tools/ctpu
注意是 Local Machine 安装而不是 Cloud Shell,安装完成以后使用如下命令新建虚拟机和 TPU:
ctpu up在此过程中会弹出网页让你登陆 Google 账号,登陆即可。配置完成后会弹出如下信息:
ctpu will use the following configuration:Name: [your TPU's name]Zone: [your project's zone]GCP Project: [your project's name]TensorFlow Version: 1.13VM:Machine Type: [your machine type]Disk Size: [your disk size]Preemptible: [true or false]Cloud TPU:Size: [your TPU size]Preemptible: [true or false]OK to create your Cloud TPU resources with the above configuration? [Yn]:
确认即可,其中 VM 是你的一个云上的虚拟机,TPU 是你的 TPU 节点,在完成配置后,下载安装 gcloud 工具:https://cloud.google.com/sdk/gcloud/ ,gcloud 工具为 Google Cloud Platform 提供了主要的命令行界面。借助此工具,可以通过命令行或在脚本和其他自动化功能中执行许多常见平台任务。安装 gcloud 以后,使用 gcloud init 初始化环境,使用如下指令设置当前 project 和 zone(保持和虚拟机以及 TPU 在同一个 zone):
gcloud config set project [YOUR-CLOUD-PROJECT]gcloud config set compute/zone [YOUR-ZONE]
使用 gcloud 登陆虚拟机,指令如下:
gcloud compute ssh使用 ctpu up 指令新建的虚拟机和 TPU 节点通常同名。登陆到你的远程虚拟机之后,使用和本地 GPU 环境一样的安装方式(见上文)安装 object detection API,注意虚拟机已经安装好了支持 TPU 的 Tensorflow,所以无需再安装,其余安装和环境配置流程和本地训练一致。
TPU 不能直接使用存储于虚拟机上的数据,TPU 的数据读入和训练结果的输出均面向 google 的云存储 Bucket,前文中我们已经新建了一个 Bucket 实例,下面我们要配置 Bucket 使得我们的 TPU 有权限读写该 Bucket,首先我们在虚拟机上查看我们的 TPU 服务账号,配置虚拟机的环境变量,配置虚拟机的 project:
gcloud config set project YOUR_PROJECT_NAME在 .bashrc 添加 project id 和 Bucket:
export PROJECT="YOUR_PROJECT_ID"export YOUR_GCS_BUCKET="YOUR_UNIQUE_BUCKET_NAME"
使用如下指令得到当前 TPU 的服务账号:
curl -H "Authorization: Bearer $(gcloud auth print-access-token)" https://ml.googleapis.com/v1/projects/${PROJECT}:getConfig得到当前 TPU 的服务账号,类似于 your-service-account-12345@cloud-tpu.iam.gserviceaccount.com 拷贝此账号,在 .bashrc 中添加如下环境变量:
export TPU_ACCOUNT=your-service-account在 Google Cloud 控制台的找到 Bucket-Browser, 选择 Bucket 点击 Edit bucket permissions 如下:
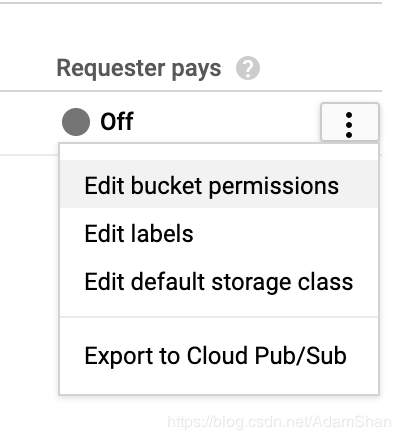
复制 TPU 服务账号,选择添加 Bucket 读写权限和 Object 读写权限,修改完成以后,使用 gcloud 登录虚拟机,使用上文相同的方法制作 record 文件,lisa 数据集可以使用 wget 下载。制作完成 record 文件后,使用 gsutil 将数据集从虚拟机拷贝至 Bucket:
gsutil cp -r record/ gs://${YOUR_GCS_BUCKET}/同样的,将从 Model Zoo 中下载的预训练权重和 label map 使用 gsutil 拷贝至 Bucket:
gsutil cp -r ssd_mobilenet_fpn/ gs://${YOUR_GCS_BUCKET}/gsutil cp lisa_label_map.pbtxt gs://${YOUR_GCS_BUCKET}/
修改 config 文件,我们使用的 TPU v2 是 Google 推出的第二代 Cloud TPU,其包含 8 个核心,每个核心具备 8G 的内存,所以使用 TPU 训练模型,可是设置较大的 batch size,较大的 batch size 意味着我们可以设置相对小的训练步数,本文中设置 batch size 为 32,训练步数为 25000 步。同时,config 文件中所有文件路径也要修改为云存储的路径,例如:
train_input_reader: {tf_record_input_reader {input_path: "gs://adamshan/record/lisa.record-?????-of-00029"}label_map_path: "gs://adamshan/lisa_label_map.pbtxt"}
其中 adamshan 是我的 Bucket 名称。同样的,使用 gsutil 将 config 文件拷贝至 Bucket,cd 到虚拟机的 models/research/ 目录下,执行如下命令开始训练:
python object_detection/model_tpu_main.py \--gcp_project={你的cloud project} \--tpu_zone={你的TPU所在的zone,例如:us-central1-f} \--tpu_name={你的TPU名称,可以使用gcloud查看,也可在cloud的控制台查看} \--model=train \--num_train_steps=25000 \--model_dir={你要输出模型和tensorboard event文件的路径,注意是bucket路径,例如gs://adamshan/saved/} \--pipeline_config_path={你保存于bucket中的config文件路径,例如:gs://adamshan/ssd_mobilenet_fpn.config}
TPU 将非常高效地开始训练,通常一个模型的 fine tune 在 Cloud TPU v2 上大约只需要 1-2 小时,最后的训练结果将被保存至 Bucket 的指定目录,如下:
模型的固化和应用同上文中本地训练的模型一致。
完整代码:https://github.com/AbangLZU/tl_detector
(本文为 AI科技大本营转载文章,转载请微信联系 1092722531)
推荐阅读:
Google首页玩起小游戏,AI作曲让你变身巴赫
特斯拉起诉小鹏汽车员工窃取商业机密,何小鹏回应
提升效率,这十个Pandas技巧必不可少!
超常用的Python代码片段 | 备忘单
小米“祭出” AIoT 神器!| 技术头条
工作量不断增加的微软Azure,正缩小与亚马逊AWS的差距
硬核接亲!程序员被新娘要求现场写代码,结果万万没想到……
理工男的网红生意, 6000万月活50万条日更的背后, 内容链还能这样操作?
曝光!月薪 5 万的程序员面试题:73% 人都做错,你敢试吗?

❤点击“阅读原文”,查看历史精彩文章。
相关文章:

iOS progressive Web App (PWA) 技术
随着 iOS 11.3 的发布,iOS PWA 的时代终于来了!本文对 iOS 中 PWA 的能力进行了分析,并将其与 iOS 上的 Native App、Android 上的 PWA 进行了深度对比,是值得收藏的一篇好文。 随着 iOS 11.3 的发布,苹果悄悄的支持了…

VS新建类自动添加版本注释
我们开发的时候习惯在代码顶部加上自己的版权说明。 每次拷贝挺麻烦的,上网查了一下,2003的介绍但不少。但08的模板生成方式好像改变了 后来2005的一篇介绍给了我一点提示。原来模板文件放在common7目录下。 主要分为ProjectTemplates和ItemTemplates&am…
【linux】shell中整数运算的加、减、乘、除
1、使用双括号“(( ))” shell中变量实现加法的方法 d $(($d 2)) 例子如下 #!/bin/bash d0 echo "d$d"for((i1;i<10;i)); do d$(($d 2)) echo "d$d" done unset d((i$j$k)) 等价于 iexpr $j $k ((i$j-$k)) 等价于 iexpr $j -$k ((i$…

简单使用PDO
2019独角兽企业重金招聘Python工程师标准>>> 首先基本配置: 连接MYSQL <?php $dsn mysql:hostlocalhost;dbnameworld;; $user user; $password secret; try { $dbh new PDO($dsn, $user, $password); } catch (PDOException $e) { echo Connecti…
一文看懂模糊搜索1.0到3.0的算法迭代历程
参加 2019 Python开发者日,请扫码咨询 ↑↑↑作者 | 宋广泽责编 | 郭芮来源 | CSDN(ID:CSDNnews)前一段时间在Linux上用C语言做了一个信息管理系统,初始版本的搜索就是直接使用了C语言库文件<string.h>里的库函数…
【linux】shell中浮点数运算的加、减、乘、除
bash 不支持浮点运算,如果需要进行浮点运算,需要借助bc,awk 处理。 1、bc #!/bin/bash#加 f$(echo "4.32.5"|bc) echo "4.32.5$f"#减 f$(echo "4.3-2.5"|bc) echo "4.3-2.5$f"#乘 f$(echo "4.30*2.50&qu…
页面加载和解析流程
输入url,浏览器向服务器发出请求,服务器返回html文件,浏览器开始载入html代码,发现head标签有link标签引入外部的css文件,浏览器发出css文件的请求,服务器返回这个css文件,浏览器继续载入body中的代码&…
作为程序员应有10项权利
Scott认为,作为开发人员,应该有权享有以下列表所示的待遇;不过在国内,这个却有点异想天开,能有几个老板愿意给员工如此舒适的环境呢? 1.每位程序员应该拥有一个安静的工作环境 2.每位程序员应该拥有听音乐…
【Qt】QtCreator中自动补全注释
1、简述 在QtCreator中编辑代码,可以自动补全函数注释,供doxygen使用并生成文档。doxygen的使用方法,后续会写一个详细的博文。 2、使用方法 在函数前分别输入“/**”、“/*!”、“//!”、“///”,然后敲击回车键,会自动补全下方函数的注释。 注意:输入的注释一定要紧…
Java内存模型与线程
一、一致性高速缓存的存储交互很好的解决了处理器与内存的速度矛盾,但也存在缓存一致性(cache coherence)问题二、java内存模型内存模型:对特定的内存或高速缓存进行读写访问的过程抽象。 java内存模型(java memory mo…
Google用更少标签生成图像,还提出一个用于训练评估GAN的库
参加 2019 Python开发者日,请扫码咨询 ↑↑↑译者 | 刘畅责编 | 琥珀出品 | AI科技大本营(ID:rgznai100)生成对抗网络(GAN)是属于一种强有力的深度生成模型。GAN 的主要思想是训练两个神经网络:一个是学习如…
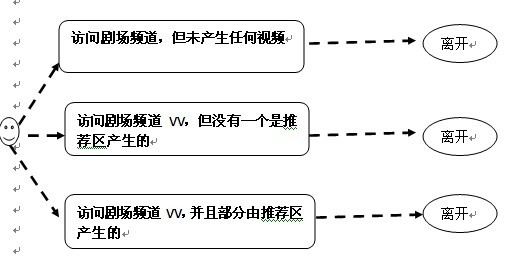
视频用户行为及推荐系统评价KPI-部分
问题 KPI 使用推荐区的用户数量和比率是否显著提升 使用推荐区用户量及其占比与之前进行对比 新老用户使用推荐差异是否明显 新老用户推荐区使用比率占各自类别比,新老用户推荐区产生的VV占各自类别比 推荐区产生的VV占总VV是否显著提升 推荐区VV占总VV占比与…
【linux】用户和组的管理:添加、修改、删除(useradd usermod userdel groupadd groupdel)
一、用户 1、添加 $ useradd -h Usage: useradd [options] LOGINuseradd -Duseradd -D [options]Options:-b, --base-dir BASE_DIR base directory for the home directory of the new account-c, --comment COMMENT 加上备注文字,备注文字保存在pa…

ping命令工具:同时ping多个IP
检测多个ip在同一时间点的响应状态,通过对比来判断哪个ip异常。 下载地址:https://share.weiyun.com/5XCkypG 转载于:https://www.cnblogs.com/leavind/p/8743149.html
顶会论文9篇,又斩获百度奖学金!哈工大NLP“新生代”正崭露头角
参加 2019 Python开发者日,请扫码咨询 ↑↑↑作者 | 琥珀出品 | AI科技大本营(ID:rgznai100)“Static OnePlus”?首次看到这个网名时,激起了笔者不小的兴趣。正如每个网名背后都有一段不一样的故事,Static …
医院数据中心机房建设资料汇总(31篇)
医疗数据中心包括病人基本数据、入出转数据、电子病历、诊疗数据、医学影像数据、医学管理、经济数据,它们围绕着病人这个中心,成为了医 疗信息的主要来源。医疗数据质量的影响表现在医疗数据的实时、近期和远期应用,首先影响医疗信息系统的日…
【linux】CentOS启动后网络自动配置过程
1、启动后如何调用的网络配置脚本 网络配置脚本路径:/etc/init.d/network 根据不同启动级别对network脚本的调用情况: 进入/etc目录后,执行 $ find -name “*network”,结果如下: $ find -name "*network"…
web存储中cookie、session区别
http协议是一种无状态的协议,浏览器对服务器的每一次请求都是独立的。为了使得web能够产生一些动态信息,就需要保存”状态”,而cookie和session机制就是为了解决http协议无状态而产生。cookie是一种在客户端保存状态的方案,sessio…
李沐团队新作Gluon,复现CV经典模型到BERT,简单好用 | 强烈推荐
参加 2019 Python开发者日,请扫码咨询 ↑↑↑责编 | Jane出品 | AI科技大本营(公众号id:rgznai100)【导语】上周,李沐老师公布 GluonNLP0.6 版本,借助 Apache MXNet,大家可以尝试在 Gluon 中复现…
中国科学技术大学 中科大(USTC)UBUNTU源Linux镜像站IPV4/IPV6
Ubuntu下的使用方法:使用如下命令:sudo gedit /etc/apt/sources.list请编辑/etc/apt/sources.list,用下面的内容替换: deb http://mirrors.ustc.edu.cn/ubuntu/ natty main restricted universe multiverse deb http://mirrors.ustc.edu.cn/…
深度分析蔡徐坤的百万流量数据,揭底哪些是假的!
参加 2019 Python开发者日,请扫码咨询 ↑↑↑作者 | Alfred,毕业于暨南大学,数据挖掘算法工程师,主要研究领域为数据挖掘、机器学习来源 | Alfred数据室(公众号id:Alfred_Lab)责编 | Jane前段时…
【Linux】延时函数sleep、usleep、nanosleep、select、pselect的比较
1、简介 sleep()-------以秒为单位 #include<unistd.h> unsigned int sleep(unsigned int seconds); return:若进程暂停到参数seconds 所指定的时间,成功则返回0,若有信号中断则返回剩余秒数。 在linux中,sleep是通过nanos…
特斯拉解锁对汽车电池容量的软件限制,以帮助用户逃离飓风危险
为了对抗飓风,为用户提高逃生的可能性,特斯拉公司在此特殊情况下免费释放了电池容量限制。 据悉,在伊斯玛飓风抵达佛罗里达州之前,特斯拉为佛罗里达特斯拉的电动汽车用户更新解锁了其60kwh型号下电动汽车被封住的电池容量&#x…
nginx安装 问题 1
./configure: error: the HTTP rewrite module requires the PCRE library 有时候,我们需要单独安装nginx,来处理大量的下载请求。单独在Centos5安装nginx遇到的rewrite和HTTP cache错误解决办法:wget http://nginx.org/download/nginx-0.8.3…
【Qt】使用QPalette设置按钮颜色时,不生效
1、问题描述 在练习QStylePlugin示例时,通过插件将按钮颜色设置为红色,但是没有效果,原因是: 使用QPalette设置按钮颜色时,不生效,代码如下 QPalette.setBrush(QPalette::Button, Qt::red)2、问题分析 Q…
Swagger 生成 PHP restful API 接口文档
需求和背景 需求: 为客户端同事写接口文档的各位后端同学,已经在各种场合回忆了使用自动化文档工具前手写文档的血泪史.我的故事却又不同,因为首先来说,我在公司是 Android 组负责人,属于上述血泪史中催死人不偿命的客户端阵营.但血泪史却是相通的,没有自动化文档的日子,对接口…
FPGA技术的未来发展:谁与AI平分秋色
参加 2019 Python开发者日,请扫码咨询 ↑↑↑作者 | 老石来源 | 老石谈芯(公众号id:gh_5ce1d0cb1568)责编 | Jane任何科学技术的发展和进步都离不开两个主要的推动力量,一个是相关领域各大公司的研发,另一个…
一体化设计让容灾变简单
容灾很难实现吗?容灾不仅包括技术方面的问题,而且涉及数据保护策略、投入产出比等方面的问题。从这个角度讲,对于大多数的中小型用户来说,容灾的实施确实比较困难。不过,爱数软件副总裁李基亮认为,容灾的实…
深度研究自然梯度优化,从入门到放弃 | Deep Reading
参加 2019 Python开发者日,请扫码咨询 ↑↑↑作者 | Cold Marie Wild译者 | 刘畅责编 | Jane出品 | AI科技大本营(公众号id:rgznai100)【导语】根据自然梯度的支持者提出一种建议:我们不应该根据参数空间中的距离来定义…
【Qt】QtCreator中关于Style Plugin Example没有效果的修改方法
1、问题描述 在QtCreator练习QStylePlugin的例子时,没有效果,原因是QPalette使用不当造成。 详见:https://blog.csdn.net/u010168781/article/details/88250451 2、解决方法 解决方法很简单,我们只是为了演示QStylePlugin的效果,然而QPushButton不能通过QPalette来改变…