整理《Mastering OpenCV with Practical Computer Vision Projects》中第8章用Eigenfaces或Fisherfaces进行人脸识别操作流程
These generally involve four main steps:(1)、Face detection;(2)、Face preprocessing;(3)、Collect and learn faces;(4)、Face recognition.
一、Face detection(Haar-based、LBP-based)
LBP-based detectors are potentially several times fasterthan Haar-based detectors.
The basic idea of the Haar-based facedetector is that if you look at most frontal faces, the region with the eyes should be darker than the forehead and cheeks, and the region with the mouth should be darker than cheeks, and so on. It typically performs about 20 stages of comparisons like this to decide if it is a face or not, but it must do this at each possible position in the image and for each possible size of the face,so in fact it often does thousands of checks per image. The basic idea of the LBP-based face detector is similar to the Haar-based one, but it uses histograms of pixel intensity comparisons, such as edges, corners, and flatregions.
These cascade classifier detectors are typically trained using at least 1,000 unique face images and 10,000 non-face images (for example, photos of trees, cars, and text), and the training process can take a long time even on a multi-core desktop (typically a few hours forLBP but one week for Haar!).
Type of cascade classifier | XML filename |
Face detector (default) | haarcascade_frontalface_default.xml |
Face detector (fast Haar) | haarcascade_frontalface_alt2.xml |
Face detector (fast LBP) | lbpcascade_frontalface.xml |
Profile (side-looking) face detector | haarcascade_profileface.xml |
Eye detector (separate for left and right) | haarcascade_lefteye_2splits.xml |
Mouth detector | haarcascade_mcs_mouth.xml |
Nose detector | haarcascade_mcs_nose.xml |
Whole person detector | haarcascade_fullbody.xml |
This pretrained LBP face detector that comes with OpenCV v2.x is not tuned as well as the pretrained Haar face detectors, so if you want more reliable face detection then you may want to train your own LBP face detector or use a Haar face detector.
1、 Loading a Haar or LBP detector for object orface detection.
2、 Grayscale color conversion: Face detection only works on grayscale images. So we should convert the color camera frame to grayscale.
3、 Shrinking the camera image: The speed of face detection depends on the size of the input image (it is very slow for large images but fast for small images), and yet detection is still fairly reliable even at low resolutions. So we should shrink the camera image to a more reasonable size. Face detection usually works quite well for any image size greater than 240 x 240 pixels (unless you need to detect faces that are far away from the camera), because it will look for any faces larger than the minFeatureSize (typically 20 x 20 pixels).
4、 Histogram equalization: Face detection is not as reliable in low-light conditions. So we should perform histogram equalization to improve the contrast and brightness.
5、 Detecting the face:we are ready to detect the faces using the CascadeClassi fier::detectMultiScale() function. If we gave a shrunken image to the face detector, the results will also be shrunk, so we need to enlarge them if we want to know the face regions for the original image. We also need to make sure faces on the border of the image stay completely within the image.
二、Face preprocessing
1、 Eye detection:
Eye detectors that detect open or closed eyes are as follows:
(1)、haarcascade_mcs_lefteye.xml (and haarcascade_mcs_righteye.xml)
(2)、haarcascade_lefteye_2splits.xml (and haarcascade_righteye_2splits.xml)
Eye detectors that detect open eyes only areas follows:
(1)、haarcascade_eye.xml
(2)、haarcascade_eye_tree_eyeglasses.xml(can detect the eyes if the person is wearing glasses, but is not reliable if they don't wear glasses)
The list of four eye detectors mentioned is ranked in approximate order from most reliable to least reliable, so if you know you don't need to find people with glasses then the first detector is probably the best choice. Different eye detectors are better suited to different regions of the face, for example, the haarcascade_eye.xml detector works best if it only searches in a very tight region around the actual eye,whereas the haarcascade_mcs_lefteye.xml and haarcascade_lefteye_2splits.xml detectors work best when there is a large region around the eye.
The following table lists some good search regions of the face for different eye detectors (when using the LBP face detector), using relative coordinates within the detected face rectangle:
Cascade Classifier | EYE_SX | EYE_SY | EYE_SW | EYE_SH |
haarcascade_eye.xml | 0.16 | 0.26 | 0.30 | 0.28 |
haarcascade_mcs_lefteye.xml | 0.10 | 0.19 | 0.40 | 0.36 |
haarcascade_lefteye_2splits.xml | 0.12 | 0.17 | 0.37 | 0.36 |
Speed is typically much faster when eyes are found than when eyes are not found, as it must scan the entire image, but the haarcascade_mcs_lefteye.xmlis still much slower than the other eye detectors.
While it is recomended to shrink the camera image before detecting faces, you should detect eyes at the full camera resolution because eyes will obviously be much smaller than faces, so you needas much resolution as you can get.For many tasks, it is useful to detect eyes whether they are opened or closed,so if speed is not crucial, it is best to search with the mcs_*eye detector first, and if it fails then search with the eye_2splits detector. But for face recognition, a person will appear quite different if their eyes are closed, so it is best to search with the plain haarcascade_eye detector first, and if it fails then search with the haarcascade_eye_tree_eyeglasses detector.
2、Geometrical transformation and cropping: This process would include scaling,rotating, and translating the images. Rotate the face so that the two eyes are horizontal. Scale the face so that the distance between the two eyes is always the same. Translate the face so that the eyes are always centered horizontally and at a desired height. Crop the outer parts of the face, since we want to crop away the image background, hair, forehead, ears, and chin.
3、Separate histogram equalization for left and right sides: This process standardizes the brightness and contrast on both the left- and right-hand sides of the face independently.
4、Smoothing: This process reduces the image noise using a bilateral filter.To reduce the effect of pixel noise, we will use a bilateral filter on the face, as a bilateral filteris very good at smoothing most of an image while keeping edges sharp. Histogram equalization can significantly increase the pixel noise.
5、Elliptical mask: The elliptical mask removes some remaining hair and background from the face image.Although we have already removed most of the image background and forehead and hair when we did the geometrical transformation, we can apply an elliptical mask to remove some of the corner region such as the neck, which might be in shadow from the face,particularly if the face is not looking perfectly straight towards the camera.To create the mask, we will draw a black-filled ellipse onto a white image. One ellipse to perform this has a horizontal radius of 0.5 (that is, it covers the face width perfectly), a vertical radius of 0.8 (as faces are usually taller than they are wide), and centered at the coordinates 0.5, 0.4.The elliptical mask can remove some unwanted corners from the face.
三、Collecting faces and learning from them
It is important that you provide a good training set that covers the types of variations you expect to occur in your testing set.
1、 Collecting preprocessed faces for training: Make sure there is at least a one-second gap between collecting new faces.To compare the similarity of two images, pixel by pixel, you can find the relative L2 error, which just involves subtracting one image from the other,summing the squared value of it, and then getting the square root of it. As the result is summed over all pixels, the value will depend on the image resolution. So to get the mean error we should divide this value by the total number of pixels in the image. This similarity will often be less than 0.2 if the image did not move much, and higher than 0.4 if the image did move, so let's use 0.3 as our threshold for collecting a new face.
There are many tricks we can play to obtain more training data, such as using mirrored faces, adding random noise, shifting the face by a few pixels, scaling the face by a percentage, or rotating the face by a few degrees (even though we specifically tried to remove these effects when preprocessing the face!). Let's add mirrored faces to the training set, so that we have both, a larger training set as well as a reduction in the problems of asymmetrical faces or if a user is always oriented slightly to the left or right during training but not testing.
2、Training the face recognition system from collected faces(Eigenfaces(PCA)、Fisherfaces(LDA)、LBPH)
In simple terms, the basic principle of Eigenfaces is that it will calculate a set of special images(eigenfaces) and blending ratios (eigenvalues).If the training set had 5 people with 20 faces for each person, then there would be 100 eigenfaces and eigenvalues to differentiate the 100 total faces in the training set, and in fact these would be sorted so the first few eigenfaces and eigenvalues would be the most critical differentiators, and the last few eigenfaces and eigenvalues would just be random pixel noises that don't actually help to differentiate the data. So it is common practice to discard some of the last eigenfaces and just keep the first 50 or so eigenfaces. Incomparison, the basic principle of Fisherfaces is that instead of calculating a special eigenvector and eigenvalue for each image in the training set, it only calculates one special eigenvector and eigenvalue for each person. So in the preceding example that has 5 people with 20 faces for each person, the Eigenfaces algorithm would use 100 eigenfaces and eigenvalues whereas the Fisherfaces algorithm would use just 5 fisherfaces and eigenvalues.
Both the Eigenfaces and Fisherfaces algorithms first calculate the average face that is the mathematical average of all the training images, so they can subtract the average image from each facial image to have better face recognition results.
四、Face recognition
We can identify the person in a photo simply by calling the FaceRecognizer::predict() function on a facial image.The problem with this identification is that it will always predict one of the given people, even if the input photo is of an unknown person or of a car. It would still tell you which person is the most likely person in that photo. To confirm if the result of the prediction is reliable or whether it should be taken as an unknownperson, we perform face verification. The method we will use is to reconstructthe facial image using the eigenvectors and eigenvalues, and compare this reconstructed image with the input image. If the person had many of their faces included in the training set, then the reconstruction should work quite well from the learnt eigenvectors and eigenvalues, but if the person did not have any faces in the training set (or did not have any that have similar lightingand facial expressions as the test image), then the reconstructed face will look very different from the input face, signaling that it is probably an unknown face. OpenCV's FaceRecognizer class makes it quite easy to generate a reconstructed face from any input image, by using the subspaceProject() function to project onto the eigenspace and the subspaceReconstruct() function to go back from eigenspace to image space.
We can now calculate how similar this reconstructed face is to the input face by using the same getSimilarity() function we created previously for comparing two images, where a value less than 0.3 implies that the two images are very similar. For Eigenfaces, there is one eigenvector for each face, so reconstruction tends to work well and therefore we can typically use a threshold of 0.5, but Fisherfaces has just one eigenvector for each person, so reconstruction will not work as well and therefore it needs a higher threshold, say 0.7.
相关文章:

性能比GPU高100倍!华人教授研发全球首个可编程忆阻器AI计算机
译者 | 陆离责编 | 夕颜出品 | AI科技大本营(ID:rgznai100)导读:近日,密歇根大学研发成功第一台可编程的忆阻器计算机,它不仅是一个通过外部计算机运行的忆阻器阵列,而且还是可以在智能手机等小型设备上进行…
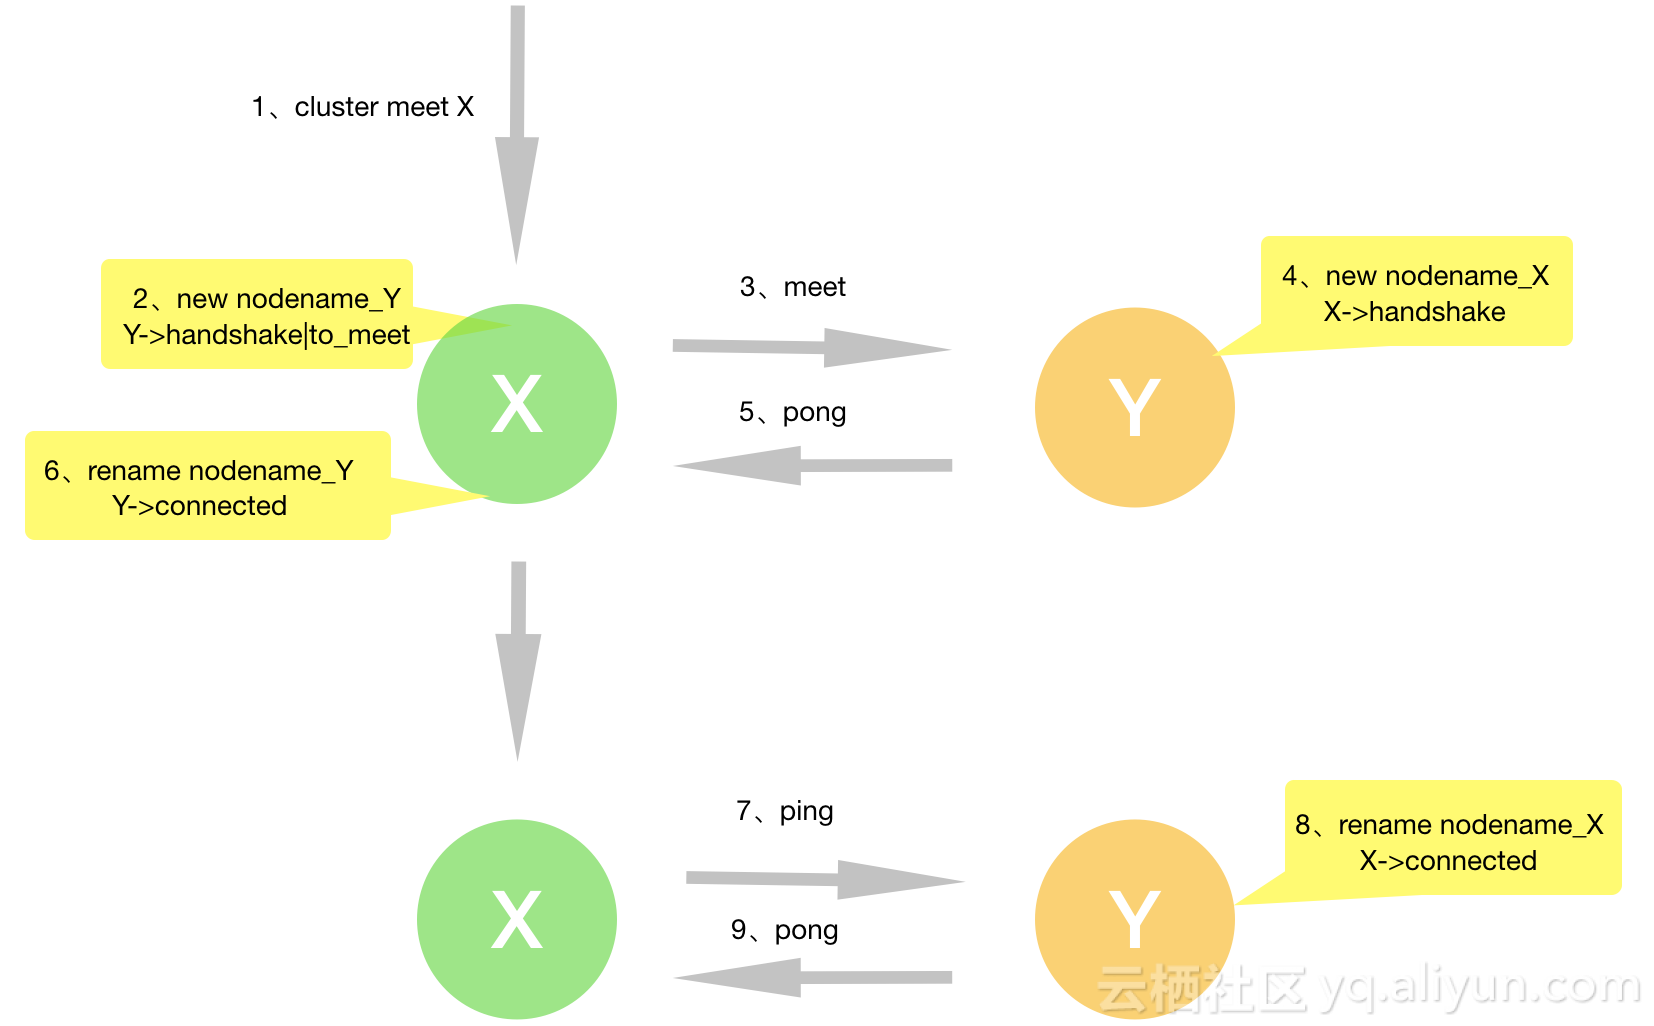
深入解析redis cluster gossip机制
社区版redis cluster是一个P2P无中心节点的集群架构,依靠gossip协议传播协同自动化修复集群的状态。本文将深入redis cluster gossip协议的细节,剖析redis cluster gossip协议机制如何运转。协议解析 cluster gossip协议定义在在ClusterMsg这个结构中&am…

Python 3.8即将发布,这几个变化你必须知道
作者 | Jake Edge译者 | Rachel出品 | Python大本营(ID:pythonnews)【导读】近日, Python 3.8.0b1 版本和 beta 版相继发布, Python 3.8 版的新特征已经基本成型。尽管最终版本的官方发布时间为 10 月,但实际上&#x…

Ubuntu 12.10 拨号上网及停用方法
2019独角兽企业重金招聘Python工程师标准>>> 本人电脑在设置了拨号上网过后,本来原先插上网线就能上网,现在反而不能上了,在网上找了些办法,再进行了些修改,最后成功了,现在把我的方法给大家分享…

011:视图函数介绍
视图: 视图一般都写在 app 的 views.py 中。并且视图的第一个参数永远都是 request (一个HttpRequest)对象。这个对象存储了请求过来的所有信息,包括携带的参数以及一些头部信息等。在视图中,一般是完成逻辑相关的操作…

Windows XP下vs2010中配置OpenCV2.4.3
1、 从http://sourceforge.net/projects/opencvlibrary/files/opencv-win/2.4.3/下载OpenCV2.4.3; 2、 将OpenCV-2.4.3.exe放到D:\Soft\OpenCV2.4.3文件夹下,解压到当前文件夹下,生成一个opencv文件夹; 3、 下载并安装CMake&…
改变shell read命令的隔符
2019独角兽企业重金招聘Python工程师标准>>> orgIFSIFS IFS"." ls */.fst/.txt | while read var1 var2 var3 do IFS$orgIFS fstcompile --isymbols${path1}isymtab.txt --osymbols${path1}osymtab.txt ${var1}/.fst/.txt ${var1}/.fst fstdraw --isymbol…
AutoML前沿技术与实践经验分享 | 免费报名
传统机器学习的解决范式可表示为:ML Solution ML expertise Computation Data新机器学习范式可表示为:New ML Solution 100x Computation 100x Data通过表示的变化,可以看出,传统范式的“ML expertise”被“100x”的“Comput…
传承乡邦文化,展示国学之美,联墨香飘远,文明花放红;
2019独角兽企业重金招聘Python工程师标准>>> 12月16日上午,阳光普照,翰墨飘香。由揭阳市文联指导、揭阳市楹联学会主办、榕城区图书馆协办的“我们的美好生活”原创联墨作品展在榕城区图书馆隆重开幕。 此次活动意在传承乡邦文化,…
VS2010运行速度优化汇总
1、 工具-->选项-->环境:视觉体验,前对勾全去掉; 2、 工具-->选项-->环境-->启动:启动时(P)下拉列表框中选择:显示空环境; 3、 工具-->选项-->文本编辑器-->C/C-->高级&am…

(一)JDBC入门及简介
引用百度对JDBC的解释: JDBC(Java Data Base Connectivity,java数据库连接)是一种用于执行SQL语句的Java API,可以为多种关系数据库提供统一访问,它由一组用Java语言编写的类和接口组成。JDBC为工具/数据库开发人员提供…
OpenCV中OpenCL模块函数
It currently develop and test on GPU devices only. This includes both discrete GPUs(NVidia,AMD), as well as integrated chips(AMD APU and intel HD devices). The ocl module can be found under the “modules”directory. In “modules/ocl/src” you can find the…
这位创造GitHub冠军项目的“老男人”,堪称10倍程序员本尊
作者 | 马超,CSDN博客专家,金融科技从业者来源 | CSDN博客7月12日一款叫做TDengine的时序数据库项目在GitHub上开源了,这个项目一经发布就稳稳占据了GitHub排行榜的C位,目前TdEngine已经累积了5000多个star,并且连续一周排在上升榜…
hdu 1724 Ellipse——辛普森积分
题目:http://acm.hdu.edu.cn/showproblem.php?pid1724 #include<cstdio> #include<cstring> #include<algorithm> #include<cmath> #define db double using namespace std; const db eps1e-5; int T;db a,b,l,r; db f(db x){return sqrt(…
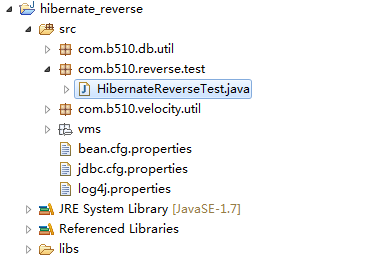
模仿Hibernate的逆向工程_java版_源码下载
在这篇blog:"Hibernate逆向工程原理_java版本"中谈到了Hibernate逆向工程原理。 我喜欢理论和实践相结合....so,今天我试着模仿hibernate的逆向工程,哈哈,我成功啦.... 话不多说....直接上图先: 项目结构: 运…

http协议进阶(三)http报文
一、报文流 http报文是在http应用程序之间发送的数据块(也可称为数据包)、这些数据块以一些文本的元信息(meta-information)开头,描述了报文的内容及含义,后面跟着 可选的数据部分,这些报文在客…
一行Python代码能实现什么丧心病狂的功能?
作者 | 天元浪子来源 | CSDN博客手头有 109 张头部 CT 的断层扫描图片,我打算用这些图片尝试头部的三维重建。基础工作之一,就是要把这些图片数据读出来,组织成一个三维的数据结构(实际上是四维的,因为每个像素有 RGB…
Windows7 32位机上,OpenCV中配置GPU操作步骤
1、 查看本机配置,查看显卡类型是否支持NVIDIA GPU,本机显卡为NVIDIA GeForce 8400 GS; 2、 从http://www.nvidia.cn/Download/index.aspx?langcn下载最新驱动并安装; 3、 从https://developer.nvidia.com/cuda-toolkit根据…

【2018.12.15】【考试总结】【模拟+逆序对+树状数组+贪心+multiset】爆零之旅
这是我悲惨的接近爆零的一次考试,但是本蒟蒻不能放弃,还是要总结的QAQ 答题卡 【题目背景】 八月是个悲惨的月份。先不谈炎热的天气,对于新生来说,八月意味着军训; 而对于高二高三的同学来说,八月意味着开学…
RememberMe 功能的实现(base-auth使用说明)
2019独角兽企业重金招聘Python工程师标准>>> 日常记录,代码是根据SpringSecurity写的。 ###写个Entity类实现UserDetails <!-- lang: java --> package com.lqz.b2c.base.web.controller.member.support;import com.lqz.b2c.base.entity.Passport;…
AutoML前沿技术与实践经验分享 | 免费公开课
传统机器学习的解决范式可表示为:ML Solution ML expertise Computation Data新机器学习范式可表示为:New ML Solution 100x Computation 100x Data通过表示的变化,可以看出,传统范式的“ML expertise”被“100x”的“Comput…
Windows 7 64位机上搭建Android开发环境
1、从http://www.oracle.com/technetwork/java/javase/downloads/jdk7-downloads-1880260.html下载Java JDK,根据机子本身配置,选择jdk-7u25-windows-x64.exe下载,将其安装到D:\ProgramFiles\Java\jdk1.7.0_25文件夹下,并将D:\Pro…
近4万Star,登月源码登顶GitHub,这位女程序员“拯救”了阿波罗
作者 | 伍杏玲转载自CSDN(ID:CSDNnews)1969 年 7 月 20 日,“阿波罗 11 号”飞船登月,宇航员尼尔阿姆斯特朗(Neil Armstrong)成功踏上月球表面,标志着人类第一次踏上月球,…
Eclipse中通过Android模拟器调用OpenGL ES2.0函数操作步骤
1、 先按照http://blog.csdn.net/fengbingchun/article/details/10439281中操作搭建好基本的Android开发环境; 2、 打开Eclipse,-->Window-->AndroidVirtual Device Manager-->New-->AVD Name:Android_OpenGLES, Device:GalaxyNexus(4.65…
animate默认时长所带来的问题及解决
一、需求描述 做一个进度条长度逐渐减少的动画,当进度条长度小于等于0时,关闭动画,并弹出透明底板显示新提示。 二、问题描述 初始代码如下: //设置进度条初始长度 var progressLength 180; //设置一个定时器 var timer …
避坑指南:如何选择适当的预测评价指标?| 程序员评测
作者 | Nicolas Vandeput译者 | Tianyu责编 | Jane出品 | AI科技大本营(ID:rgznai100)【导语】因为不存在一个适用于所有情况的评价指标,所以评估预测精度(或误差)就变成了一件不是那么容易的事情。只有通过…
利用JNI技术在Android中调用C++代码
JNI是Java Native Interface的简称,也就是Java本地接口,它提供了若干的API实现Java和其它语言的通信(主要是C&C)。 1、打开Eclipse,File-->New-->Project…-->AndroidApplication Project-->Application Name:TestJNI,Packag…
微软开源数据处理引擎 Trill,每天可分析万亿次事件
微软近日开源了数据处理引擎 Trill,它每天能够分析万亿次事件。项目地址:https://github.com/Microsoft/trill当下每毫秒处理大量数据正成为一种常见的业务需求,此次微软开源的 Trill,据说每秒能够处理高达数十亿事件,…
【杭电ACM】1097 A hard puzzle
【杭电ACM】1097 A hard puzzle http://acm.hdu.edu.cn/showproblem.php?pid1097 先用int手写了算法结果竟然wrong answer,估计是测试数据很大,直接上BigInteger 和modPow(),轻松解决。 1 //author:pz2 3 import java.math.BigInteger;4 im…
mvc 下的 signalR使用小结
2019独角兽企业重金招聘Python工程师标准>>> sirnal下有两种使用。 一种是 Persistent Connection ,另外一种是Hubs 。详细请看 https://github.com/SignalR/SignalR/wiki ; hubs支持浏览器与客户端互相调用方法。所以应用更广泛。 在前台…