利用JNI技术在Android中调用C++形式的OpenGL ES 2.0函数
1、 打开Eclipse,File-->New-->Project…-->Android-->AndroidApplication Project,Next-->Application Name:FillTriangle, PackageName:com.filltriangle.android,Minimum Required SDK:API 10Android2.3.3(Gingerbread),Next-->不勾选Create customlauncher icon,Next-->选中Blank Activity,Next-->Activity Name:FillTriangle,Finish-->Runas Android Application,查看是否一切运行正常;
2、 打开FillTriangleActivity.java,将其内容改为:
package com.filltriangle.android;import android.app.Activity;
import android.os.Bundle;
import android.util.Log;
import android.view.WindowManager;import java.io.File;public class FillTriangleActivity extends Activity {GL2JNIView mView;@Override protected void onCreate(Bundle icicle) {super.onCreate(icicle);mView = new GL2JNIView(getApplication());setContentView(mView);}@Override protected void onPause() {super.onPause();mView.onPause();}@Override protected void onResume() {super.onResume();mView.onResume();}}
3、 新建2个java文件,选中com.filltriangle.android,点击右键,New-->Class,Name:GL2JNILib和Name:GL2JNIView;
4、GL2JNILib.java文件内容为:
package com.filltriangle.android;//Wrapper for native librarypublic class GL2JNILib {static {System.loadLibrary("gl2jni");}/*** @param width the current view width* @param height the current view height*/public static native void init(int width, int height);public static native void step();
}
5、 GL2JNIView.java文件内容为:
package com.filltriangle.android;import android.content.Context;
import android.graphics.PixelFormat;
import android.opengl.GLSurfaceView;
import android.util.AttributeSet;
import android.util.Log;
import android.view.KeyEvent;
import android.view.MotionEvent;import javax.microedition.khronos.egl.EGL10;
import javax.microedition.khronos.egl.EGLConfig;
import javax.microedition.khronos.egl.EGLContext;
import javax.microedition.khronos.egl.EGLDisplay;
import javax.microedition.khronos.opengles.GL10;/*** A simple GLSurfaceView sub-class that demonstrate how to perform* OpenGL ES 2.0 rendering into a GL Surface. Note the following important* details:** - The class must use a custom context factory to enable 2.0 rendering.*   See ContextFactory class definition below.** - The class must use a custom EGLConfigChooser to be able to select*   an EGLConfig that supports 2.0. This is done by providing a config*   specification to eglChooseConfig() that has the attribute*   EGL10.ELG_RENDERABLE_TYPE containing the EGL_OPENGL_ES2_BIT flag*   set. See ConfigChooser class definition below.** - The class must select the surface's format, then choose an EGLConfig*   that matches it exactly (with regards to red/green/blue/alpha channels*   bit depths). Failure to do so would result in an EGL_BAD_MATCH error.*/class GL2JNIView extends GLSurfaceView {private static String TAG = "GL2JNIView";private static final boolean DEBUG = false;public GL2JNIView(Context context) {super(context);init(false, 0, 0);}public GL2JNIView(Context context, boolean translucent, int depth, int stencil) {super(context);init(translucent, depth, stencil);}private void init(boolean translucent, int depth, int stencil) {/* By default, GLSurfaceView() creates a RGB_565 opaque surface.* If we want a translucent one, we should change the surface's* format here, using PixelFormat.TRANSLUCENT for GL Surfaces* is interpreted as any 32-bit surface with alpha by SurfaceFlinger.*/if (translucent) {this.getHolder().setFormat(PixelFormat.TRANSLUCENT);}/* Setup the context factory for 2.0 rendering.* See ContextFactory class definition below*/setEGLContextFactory(new ContextFactory());/* We need to choose an EGLConfig that matches the format of* our surface exactly. This is going to be done in our* custom config chooser. See ConfigChooser class definition* below.*/  setEGLConfigChooser( translucent ?new ConfigChooser(8, 8, 8, 8, depth, stencil) :new ConfigChooser(5, 6, 5, 0, depth, stencil) );/* Set the renderer responsible for frame rendering */setRenderer(new Renderer());}private static class ContextFactory implements GLSurfaceView.EGLContextFactory {private static int EGL_CONTEXT_CLIENT_VERSION = 0x3098;public EGLContext createContext(EGL10 egl, EGLDisplay display, EGLConfig eglConfig) {Log.w(TAG, "creating OpenGL ES 2.0 context");checkEglError("Before eglCreateContext", egl);int[] attrib_list = {EGL_CONTEXT_CLIENT_VERSION, 2, EGL10.EGL_NONE };EGLContext context = egl.eglCreateContext(display, eglConfig, EGL10.EGL_NO_CONTEXT, attrib_list);checkEglError("After eglCreateContext", egl);return context;}public void destroyContext(EGL10 egl, EGLDisplay display, EGLContext context) {egl.eglDestroyContext(display, context);}}private static void checkEglError(String prompt, EGL10 egl) {int error;while ((error = egl.eglGetError()) != EGL10.EGL_SUCCESS) {Log.e(TAG, String.format("%s: EGL error: 0x%x", prompt, error));}}private static class ConfigChooser implements GLSurfaceView.EGLConfigChooser {public ConfigChooser(int r, int g, int b, int a, int depth, int stencil) {mRedSize = r;mGreenSize = g;mBlueSize = b;mAlphaSize = a;mDepthSize = depth;mStencilSize = stencil;}/* This EGL config specification is used to specify 2.0 rendering.* We use a minimum size of 4 bits for red/green/blue, but will* perform actual matching in chooseConfig() below.*/private static int EGL_OPENGL_ES2_BIT = 4;private static int[] s_configAttribs2 ={EGL10.EGL_RED_SIZE, 4,EGL10.EGL_GREEN_SIZE, 4,EGL10.EGL_BLUE_SIZE, 4,EGL10.EGL_RENDERABLE_TYPE, EGL_OPENGL_ES2_BIT,EGL10.EGL_NONE};public EGLConfig chooseConfig(EGL10 egl, EGLDisplay display) {/* Get the number of minimally matching EGL configurations*/int[] num_config = new int[1];egl.eglChooseConfig(display, s_configAttribs2, null, 0, num_config);int numConfigs = num_config[0];if (numConfigs <= 0) {throw new IllegalArgumentException("No configs match configSpec");}/* Allocate then read the array of minimally matching EGL configs*/EGLConfig[] configs = new EGLConfig[numConfigs];egl.eglChooseConfig(display, s_configAttribs2, configs, numConfigs, num_config);if (DEBUG) {printConfigs(egl, display, configs);}/* Now return the "best" one*/return chooseConfig(egl, display, configs);}public EGLConfig chooseConfig(EGL10 egl, EGLDisplay display,EGLConfig[] configs) {for(EGLConfig config : configs) {int d = findConfigAttrib(egl, display, config,EGL10.EGL_DEPTH_SIZE, 0);int s = findConfigAttrib(egl, display, config,EGL10.EGL_STENCIL_SIZE, 0);// We need at least mDepthSize and mStencilSize bitsif (d < mDepthSize || s < mStencilSize)continue;// We want an *exact* match for red/green/blue/alphaint r = findConfigAttrib(egl, display, config,EGL10.EGL_RED_SIZE, 0);int g = findConfigAttrib(egl, display, config,EGL10.EGL_GREEN_SIZE, 0);int b = findConfigAttrib(egl, display, config,EGL10.EGL_BLUE_SIZE, 0);int a = findConfigAttrib(egl, display, config,EGL10.EGL_ALPHA_SIZE, 0);if (r == mRedSize && g == mGreenSize && b == mBlueSize && a == mAlphaSize)return config;}return null;}private int findConfigAttrib(EGL10 egl, EGLDisplay display,EGLConfig config, int attribute, int defaultValue) {if (egl.eglGetConfigAttrib(display, config, attribute, mValue)) {return mValue[0];}return defaultValue;}private void printConfigs(EGL10 egl, EGLDisplay display,EGLConfig[] configs) {int numConfigs = configs.length;Log.w(TAG, String.format("%d configurations", numConfigs));for (int i = 0; i < numConfigs; i++) {Log.w(TAG, String.format("Configuration %d:\n", i));printConfig(egl, display, configs[i]);}}private void printConfig(EGL10 egl, EGLDisplay display,EGLConfig config) {int[] attributes = {EGL10.EGL_BUFFER_SIZE,EGL10.EGL_ALPHA_SIZE,EGL10.EGL_BLUE_SIZE,EGL10.EGL_GREEN_SIZE,EGL10.EGL_RED_SIZE,EGL10.EGL_DEPTH_SIZE,EGL10.EGL_STENCIL_SIZE,EGL10.EGL_CONFIG_CAVEAT,EGL10.EGL_CONFIG_ID,EGL10.EGL_LEVEL,EGL10.EGL_MAX_PBUFFER_HEIGHT,EGL10.EGL_MAX_PBUFFER_PIXELS,EGL10.EGL_MAX_PBUFFER_WIDTH,EGL10.EGL_NATIVE_RENDERABLE,EGL10.EGL_NATIVE_VISUAL_ID,EGL10.EGL_NATIVE_VISUAL_TYPE,0x3030, // EGL10.EGL_PRESERVED_RESOURCES,EGL10.EGL_SAMPLES,EGL10.EGL_SAMPLE_BUFFERS,EGL10.EGL_SURFACE_TYPE,EGL10.EGL_TRANSPARENT_TYPE,EGL10.EGL_TRANSPARENT_RED_VALUE,EGL10.EGL_TRANSPARENT_GREEN_VALUE,EGL10.EGL_TRANSPARENT_BLUE_VALUE,0x3039, // EGL10.EGL_BIND_TO_TEXTURE_RGB,0x303A, // EGL10.EGL_BIND_TO_TEXTURE_RGBA,0x303B, // EGL10.EGL_MIN_SWAP_INTERVAL,0x303C, // EGL10.EGL_MAX_SWAP_INTERVAL,EGL10.EGL_LUMINANCE_SIZE,EGL10.EGL_ALPHA_MASK_SIZE,EGL10.EGL_COLOR_BUFFER_TYPE,EGL10.EGL_RENDERABLE_TYPE,0x3042 // EGL10.EGL_CONFORMANT};String[] names = {"EGL_BUFFER_SIZE","EGL_ALPHA_SIZE","EGL_BLUE_SIZE","EGL_GREEN_SIZE","EGL_RED_SIZE","EGL_DEPTH_SIZE","EGL_STENCIL_SIZE","EGL_CONFIG_CAVEAT","EGL_CONFIG_ID","EGL_LEVEL","EGL_MAX_PBUFFER_HEIGHT","EGL_MAX_PBUFFER_PIXELS","EGL_MAX_PBUFFER_WIDTH","EGL_NATIVE_RENDERABLE","EGL_NATIVE_VISUAL_ID","EGL_NATIVE_VISUAL_TYPE","EGL_PRESERVED_RESOURCES","EGL_SAMPLES","EGL_SAMPLE_BUFFERS","EGL_SURFACE_TYPE","EGL_TRANSPARENT_TYPE","EGL_TRANSPARENT_RED_VALUE","EGL_TRANSPARENT_GREEN_VALUE","EGL_TRANSPARENT_BLUE_VALUE","EGL_BIND_TO_TEXTURE_RGB","EGL_BIND_TO_TEXTURE_RGBA","EGL_MIN_SWAP_INTERVAL","EGL_MAX_SWAP_INTERVAL","EGL_LUMINANCE_SIZE","EGL_ALPHA_MASK_SIZE","EGL_COLOR_BUFFER_TYPE","EGL_RENDERABLE_TYPE","EGL_CONFORMANT"};int[] value = new int[1];for (int i = 0; i < attributes.length; i++) {int attribute = attributes[i];String name = names[i];if ( egl.eglGetConfigAttrib(display, config, attribute, value)) {Log.w(TAG, String.format("  %s: %d\n", name, value[0]));} else {// Log.w(TAG, String.format("  %s: failed\n", name));while (egl.eglGetError() != EGL10.EGL_SUCCESS);}}}// Subclasses can adjust these values:protected int mRedSize;protected int mGreenSize;protected int mBlueSize;protected int mAlphaSize;protected int mDepthSize;protected int mStencilSize;private int[] mValue = new int[1];}private static class Renderer implements GLSurfaceView.Renderer {public void onDrawFrame(GL10 gl) {GL2JNILib.step();}public void onSurfaceChanged(GL10 gl, int width, int height) {GL2JNILib.init(width, height);}public void onSurfaceCreated(GL10 gl, EGLConfig config) {// Do nothing.}}
}
6、编译该工程,会在bin\classes\com\filltriangle\android文件夹下生成GL2JNILib.class等文件;
7、打开命令行窗口,将其定位到\bin\classes目录下,输入命令:javah –classpath D:\ProgramFiles\Android\android-sdk\platforms\android-10\android.jar;(不用忘掉此分号) com.filltriangle.android.GL2JNILib,会在classes文件夹下生成com_filltriangle_android_GL2JNILib.h(说明:*.jar也可以是其它版本);
8、生成的com_filltriangle_android_GL2JNILib.h文件内容为:
/* DO NOT EDIT THIS FILE - it is machine generated */
#include <jni.h>
/* Header for class com_filltriangle_android_GL2JNILib */#ifndef _Included_com_filltriangle_android_GL2JNILib
#define _Included_com_filltriangle_android_GL2JNILib
#ifdef __cplusplus
extern "C" {
#endif
/** Class:     com_filltriangle_android_GL2JNILib* Method:    init* Signature: (II)V*/
JNIEXPORT void JNICALL Java_com_filltriangle_android_GL2JNILib_init(JNIEnv *, jclass, jint, jint);/** Class:     com_filltriangle_android_GL2JNILib* Method:    step* Signature: ()V*/
JNIEXPORT void JNICALL Java_com_filltriangle_android_GL2JNILib_step(JNIEnv *, jclass);#ifdef __cplusplus
}
#endif
#endif
9、选中FillTriangle工程,点击右键-->New-->Folder新建一个jni文件夹,选中jni, -->New-->File,新建2个文件,名称分别为Android.mk和opengles_code.cpp;
10、Android.mk文件内容为:
LOCAL_PATH:= $(call my-dir)include $(CLEAR_VARS)LOCAL_MODULE    := libgl2jni
LOCAL_CFLAGS    := -Werror
LOCAL_SRC_FILES := opengles_code.cpp
LOCAL_LDLIBS    := -llog -lGLESv2include $(BUILD_SHARED_LIBRARY)
11、opengles_code.cpp文件内容为:
/** Copyright (C) 2009 The Android Open Source Project** Licensed under the Apache License, Version 2.0 (the "License");* you may not use this file except in compliance with the License.* You may obtain a copy of the License at**      http://www.apache.org/licenses/LICENSE-2.0** Unless required by applicable law or agreed to in writing, software* distributed under the License is distributed on an "AS IS" BASIS,* WITHOUT WARRANTIES OR CONDITIONS OF ANY KIND, either express or implied.* See the License for the specific language governing permissions and* limitations under the License.*/// OpenGL ES 2.0 code#include <jni.h>
#include <android/log.h>#include <GLES2/gl2.h>
#include <GLES2/gl2ext.h>#include <stdio.h>
#include <stdlib.h>
#include <math.h>#define  LOG_TAG    "libgl2jni"
#define  LOGI(...)  __android_log_print(ANDROID_LOG_INFO,LOG_TAG,__VA_ARGS__)
#define  LOGE(...)  __android_log_print(ANDROID_LOG_ERROR,LOG_TAG,__VA_ARGS__)static void printGLString(const char *name, GLenum s) {const char *v = (const char *) glGetString(s);LOGI("GL %s = %s\n", name, v);
}static void checkGlError(const char* op) {for (GLint error = glGetError(); error; error= glGetError()) {LOGI("after %s() glError (0x%x)\n", op, error);}
}static const char gVertexShader[] = "attribute vec4 vPosition;\n""void main() {\n""  gl_Position = vPosition;\n""}\n";static const char gFragmentShader[] = "precision mediump float;\n""void main() {\n""  gl_FragColor = vec4(0.0, 1.0, 0.0, 1.0);\n""}\n";GLuint loadShader(GLenum shaderType, const char* pSource) {GLuint shader = glCreateShader(shaderType);if (shader) {glShaderSource(shader, 1, &pSource, NULL);glCompileShader(shader);GLint compiled = 0;glGetShaderiv(shader, GL_COMPILE_STATUS, &compiled);if (!compiled) {GLint infoLen = 0;glGetShaderiv(shader, GL_INFO_LOG_LENGTH, &infoLen);if (infoLen) {char* buf = (char*) malloc(infoLen);if (buf) {glGetShaderInfoLog(shader, infoLen, NULL, buf);LOGE("Could not compile shader %d:\n%s\n",shaderType, buf);free(buf);}glDeleteShader(shader);shader = 0;}}}return shader;
}GLuint createProgram(const char* pVertexSource, const char* pFragmentSource) {GLuint vertexShader = loadShader(GL_VERTEX_SHADER, pVertexSource);if (!vertexShader) {return 0;}GLuint pixelShader = loadShader(GL_FRAGMENT_SHADER, pFragmentSource);if (!pixelShader) {return 0;}GLuint program = glCreateProgram();if (program) {glAttachShader(program, vertexShader);checkGlError("glAttachShader");glAttachShader(program, pixelShader);checkGlError("glAttachShader");glLinkProgram(program);GLint linkStatus = GL_FALSE;glGetProgramiv(program, GL_LINK_STATUS, &linkStatus);if (linkStatus != GL_TRUE) {GLint bufLength = 0;glGetProgramiv(program, GL_INFO_LOG_LENGTH, &bufLength);if (bufLength) {char* buf = (char*) malloc(bufLength);if (buf) {glGetProgramInfoLog(program, bufLength, NULL, buf);LOGE("Could not link program:\n%s\n", buf);free(buf);}}glDeleteProgram(program);program = 0;}}return program;
}GLuint gProgram;
GLuint gvPositionHandle;bool setupGraphics(int w, int h) {printGLString("Version", GL_VERSION);printGLString("Vendor", GL_VENDOR);printGLString("Renderer", GL_RENDERER);printGLString("Extensions", GL_EXTENSIONS);LOGI("setupGraphics(%d, %d)", w, h);gProgram = createProgram(gVertexShader, gFragmentShader);if (!gProgram) {LOGE("Could not create program.");return false;}gvPositionHandle = glGetAttribLocation(gProgram, "vPosition");checkGlError("glGetAttribLocation");LOGI("glGetAttribLocation(\"vPosition\") = %d\n",gvPositionHandle);glViewport(0, 0, w, h);checkGlError("glViewport");return true;
}const GLfloat gTriangleVertices[] = { 0.0f, 0.5f, -0.5f, -0.5f,0.5f, -0.5f };void renderFrame() {static float grey;grey += 0.01f;if (grey > 1.0f) {grey = 0.0f;}glClearColor(grey, grey, grey, 1.0f);checkGlError("glClearColor");glClear( GL_DEPTH_BUFFER_BIT | GL_COLOR_BUFFER_BIT);checkGlError("glClear");glUseProgram(gProgram);checkGlError("glUseProgram");glVertexAttribPointer(gvPositionHandle, 2, GL_FLOAT, GL_FALSE, 0, gTriangleVertices);checkGlError("glVertexAttribPointer");glEnableVertexAttribArray(gvPositionHandle);checkGlError("glEnableVertexAttribArray");glDrawArrays(GL_TRIANGLES, 0, 3);checkGlError("glDrawArrays");
}extern "C" {JNIEXPORT void JNICALL Java_com_filltriangle_android_GL2JNILib_init(JNIEnv * env, jobject obj,  jint width, jint height);JNIEXPORT void JNICALL Java_com_filltriangle_android_GL2JNILib_step(JNIEnv * env, jobject obj);
};JNIEXPORT void JNICALL Java_com_filltriangle_android_GL2JNILib_init(JNIEnv * env, jobject obj,  jint width, jint height)
{setupGraphics(width, height);
}JNIEXPORT void JNICALL Java_com_filltriangle_android_GL2JNILib_step(JNIEnv * env, jobject obj)
{renderFrame();
}
12、利用NDK生成.so文件:选中工程,点击右键-->Properties-->Builders-->New,新建立一个Builder,在弹出的对话框上点中Program,点击OK;在弹出对话框EditConfiguration中,配置选项卡Main:Location中填入NDK安装目录,D:\ProgramFiles\Android\android-sdk\android-ndk-r9\ndk-build.cmd;WorkingDirectory中填入工程的根目录,E:\Test\Android\FillTriangle,点击Apply;配置选项卡Refresh,勾选Refreshresources upon completion, The entire workspace, Recursively includesub-folders,点击Apply;配置Build Options选项卡,勾选Allocate Console(necessary for input), After a “Clean”, Duringmanual builds, During auto builds, Specify working set of relevant resources,点击SpecifyResources..,勾选FillTriangle工程的jni目录,点击Finish,点击Apply,点击OK,会在\libs\armeabi目录下生成相应的libgl2jni.so库;
13、运行该工程,会显示绿色三角。
参考文献:
1、 以上代码来自adt-bundle-windows-x86_64-20130729中的例程;
2、 http://blog.csdn.net/fengbingchun/article/details/11580983
相关文章:
Python三十年技术演变史
作者 | 宋天龙,大数据技术专家,触脉咨询合伙人兼副总裁,前Webtrekk中国区技术和咨询负责人(Webtrekk,德国的在线数据分析服务提供商)。擅长数据挖掘、建模、分析与运营,精通端到端数据价值场景设…

php 扩展包链接
https://pecl.php.net/package-stats.php?cid7转载于:https://www.cnblogs.com/gaoyuechen/p/10148754.html

面向中小企业的视频云服务 视频托管
2019独角兽企业重金招聘Python工程师标准>>> 面向中小企业的视频云服务解决方案 如果你是一个传统的企业网站,想要在网站首页加入一段视频,或者是一个垂直资讯网站想要开设视频频道,又或者想要进行一项活动的在线直播。这时候也许…
VS2010下编译OpenCV2.4.6静态库
1、 从 http://sourceforge.net/projects/opencvlibrary/files/opencv-win/2.4.3/ 下载最新的OpenCV2.4.6; 2、 将OpenCV-2.4.6.0.exe存放到D:\Soft\OpenCV2.4.6文件夹下,解压到当前文件夹下,生成一个opencv文件夹; 3、 下…

【性能优化之道】每秒上万并发下的Spring Cloud参数优化实战
一、写在前面 相信不少朋友都在自己公司使用Spring Cloud框架来构建微服务架构,毕竟现在这是非常火的一门技术。 如果只是用户量很少的传统IT系统,使用Spring Cloud可能还暴露不出什么问题。 如果是较多用户量,高峰每秒高达上万并发请求的互联…

共话数据智能新经济,首届市北·GMIS 2019全球数据智能峰会隆重召开
7月19日,上海市市北高新技术服务业园区(以下简称“市北高新”)成功举办首届「市北GMIS 2019全球数据智能峰会」(以下简称“市北GMIS峰会”)。为期两天的市北GMIS峰会以“拥抱数智经济,赋能产业生态”为主题…

最新剑桥《AI全景报告》出炉:中国发表机器学习学术研究超过美国
来源 | 转载自新智元(ID:AI_era)2019年即将过去一半,剑桥大学的两位研究人员近日推出了本年度的State AI 2019全景报告。本报告基本沿袭去年的大体框架,从产业、人才、政策、预测等方面对过去一年来AI领域的技术的新进步、产业格局…
《OpenMP编译原理及实现技术》摘录
内容摘自《OpenMP编译原理及实现技术》第2章 代码测试环境:Windows7 64bit, VS2010, 4核机。 可以说OpenMP制导指令将C语言扩展为一个并行语言,但OpenMP本身不是一种独立的并行语言,而是为多处理器上编写并行程序而设计的、指导共享内存、多…
C# 36进制转10进制
代码是Java转过来的,变量名都没有改……有空再整理一下好了。public long toDecimal(string input, long bs){try{long Bigtemp 0, temp 1;int len input.Length;for (int i len - 1; i > 0; i--){if (i ! len - 1)temp * bs;long num changeDec(input[i]);…
Oracle Cloud Native Framework推出云原生解决方案
摘要:Oracle Cloud Native Framework云原生平台提供托管云服务和本地软件,同时在现Oracle云基础架构上跨应用程序配置和分析大量服务。developer relations for Oracle Cloud Infrastructure副总裁Bob Quillin讨论了该框架的优势以及对2019年云原生市场的…
OpenMP知识点汇总
1. OpenMP(Open Multi-Processing)官网:http://openmp.org/wp/ 2. OpenMP最新版本4.0,2013年7月发布。Visual Studio 2010内置支持OpenMP2.0,选中工程属性->C/C->Language->Open MP Support:选中Yes(/openmp)即可,然后在…
chsop 兼容jquery(解决与transport.js冲突)
2019独角兽企业重金招聘Python工程师标准>>> $(function() { window.__Object_toJSONString Object.prototype.toJSONString; delete Object.prototype.toJSONString; }); 要用到jquery的页面放入此代码即可 转载于:https://my.oschina.net/netmouse/blog/1241…
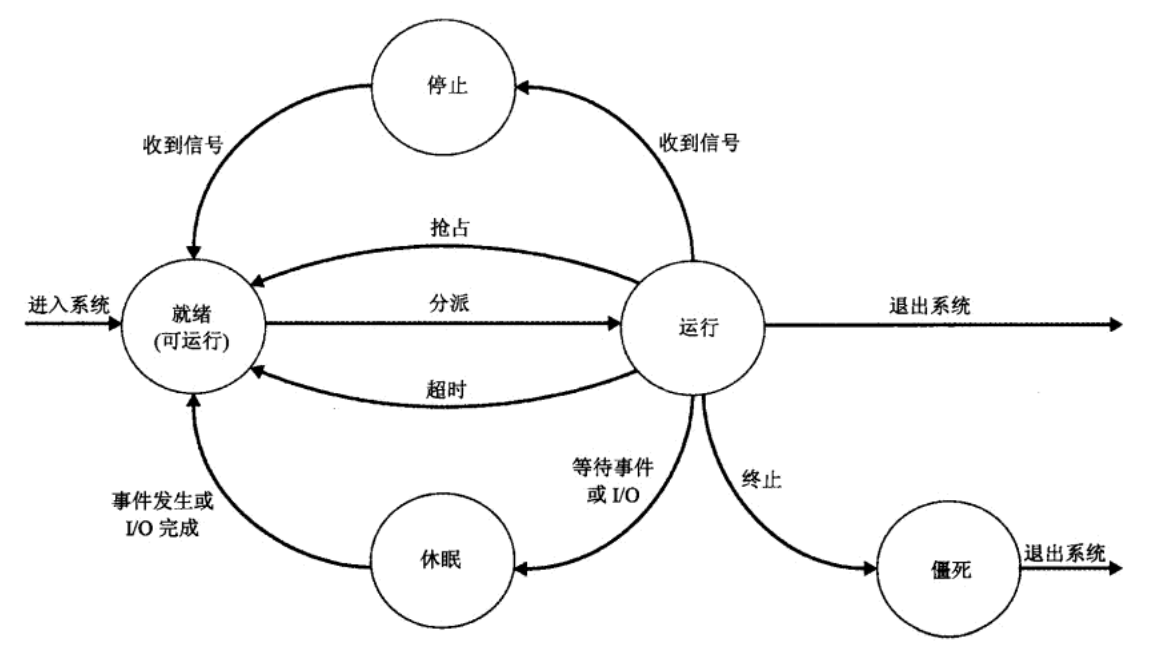
进程详细剖析(二)
摘自《C多核高级编程》 5.6.3 进程状态 在进程执行期间,它的状态会发生改变。进程的状态时指进程的当前状况。在POSIX兼容的环境中,进程可以处于以下状态: 1)运行(running) 2)就绪(runnable, r…

AI算力需求6年增长30万倍,「超异构计算」才能满足下一个10年
今年 3 月,「强化学习教父」Richard Sutton 在《苦涩的教训》一文中指出,「70 年的人工智能研究史告诉我们,利用计算能力的一般方法最终是最有效的方法。要在短期内有所提升,研究人员要利用专门领域的人类知识。但如果想要长期的获…
一览六月最热的5篇AI技术论文
作者 | 神经小姐姐转载自HyperAI超神经(ID: HyperAI)导语:始建于 1991 年的 arXiv.org 至今已收录超过 100 万篇论文预印本,近年来,其每月提交量已经超过 1 万篇。这里成为一个巨大的学习宝库。本文罗列了 arXiv.org 上…
OnCheckedChanged的触发需要AutoPostBack=true
OnCheckedChanged的触发需要AutoPostBack"true"
OpenCV中resize函数五种插值算法的实现过程
最新版OpenCV2.4.7中,cv::resize函数有五种插值算法:最近邻、双线性、双三次、基于像素区域关系、兰索斯插值。下面用for循环代替cv::resize函数来说明其详细的插值实现过程,其中部分代码摘自于cv::resize函数中的源代码。 每种插值算法的前…
企业金融云存储建设之路
当前世界形势千变万化,各种技术创新层出不穷,新兴业务模式也是波谲云诡,企业的信息化建设如何紧跟业务,适应业务乃至驱动业务转型是各级管理者的头等题目。对于底层执行者,如何能够快速满足企业的要求,如何…
【原创】VB利用堆栈实现算术表达式计算
这个抽象算法早已为人所知,只不过在VB的公开文档中鲜见示例代码。于是,为了提高自己的程序设计水平,锻炼自己的能力,我写了如下代码。 【VB代码版权所有,允许转载修改用作学习目的,转载必须注明来源】 【求…
树莓派4与英伟达Jetson Nano性能大比拼,谁是最佳的嵌入式“电脑”?
作者 | Chris Pietschmann译者 | 弯月,责编 | 屠敏转载自CSDN(ID:CSDNnews)导读:日前,Raspberry 基金会发布了开发者为之兴奋的 Raspberry Pi 4,其不仅在性能上进行了全面的升级,而且…

作为互联网流量入口,CDN日志大数据你该怎么玩?
CDN是非常重要的互联网基础设施,用户可以通过CDN,快速的访问网络中各种图片,视频等资源。在访问过程中,CDN会产生大量的日志数据,而随着如今越来越复杂的网络环境变化,和业务的迅速增长,日志数据…

OpenCV中图像旋转(warpAffine)算法的实现过程
在OpenCV中,目前并没有现成的函数直接用来实现图像旋转,它是用仿射变换函数cv::warpAffine来实现的,此函数目前支持4种插值算法,最近邻、双线性、双三次、兰索斯插值,如果传进去的参数为基于像素区域关系插值算法(INTE…
10亿美元续命!OpenAI获微软投资,意在通用人工智能?
来源 | OpenAI官博译者 | 孙薇编辑 | 一一出品 | AI科技大本营(ID:rgznai100) 7 月 22 日,微软宣布将对非营利人工智能研究组织 OpenAI 投资 10 亿美元,用于通用人工智能(AGI)的开发。双方将以微软原有的公…
TrayIcon 类 添加系统托盘不显示托盘图标
为什么80%的码农都做不了架构师?>>> 好久不碰 java swing最近写了一个swing 程序 添加托盘时,怎么也不显示图标,就一空白 ,在网上搜了老半天,大部无效。 边看帖子边看 java api ,结合理解,有一属性设置了一…
Crystal Report 加载模板报错 无法在c++ 堆栈中打开由jrc 引擎处理的文档
2019独角兽企业重金招聘Python工程师标准>>> 纠结了很久, 尝试过录入一个错误的路径,文件读取也是包相同的错误,也就是表示找不到路径文件而已,并不是开发环境的问题 于是设置一个最简单的路径,放置下去rpt模板,代码后续没有报错; 再次之前也修复了一个关于引用的dl…
Ubuntu下makefile及gcc生成静态库动态库的简单使用举例
环境:Ubuntu-13.10 32位(虚拟机)、gcc4.8.1 首先创建一个test_makefile_gcc文件夹,此test_makefile_gcc文件夹下包括:src文件夹用于存放源文件; include文件夹用于存放头文件;bin文件夹用于存放生成的动态库.so文件&…
Exchange Server 2013 安装完成后配置外部URL
Exchange Server 2013 安装完成后配置外部URL 比如 mail.contoso.com 1、转到 EAC → “服务器”,然后单击“配置外部访问域”。2、在“选择要与外部 URL 一起使用的客户端访问服务器”下面,单击“添加”3、选择您要配置的客户端访问服务器,…
Ubuntu下CodeBlocks的安装、配置及静态库动态库的简单使用举例
1、 从Ubuntu Software Center中搜索Code::Blocks并安装; 2、 在第一次启动时选择GNU GCC Compiler作为默认的编译器; 3、 生成静态库并调用操作步骤,代码同 http://blog.csdn.net/fengbingchun/article/details/17994489 3.1、New fil…
React 打怪笔记
介绍 本文为学习react中的记录。 Tips: 当组件的props或state有变化,执行render函数。无论是使用函数或是类来声明一个组件,它决不能修改它自己的propsReact 可以将多个setState() 调用合并成一个调用来提高性能。无状态函数式组件 (stateless functiona…
新闻智能分类练习赛开始报名啦!最先达到80分就可以领GPU,技术书籍!
现代信息爆炸般地产生,信息如海如潮。信息分类,不仅有利于加快信息检索速度,且有利于提高查准率。Internet是信息的重要载体,深入地研究与探讨网上信息自动分类的方法、技术和理论,已成为时代的迫切需求和新的研究热点…