IOS视频编辑功能详解上篇-添加水印
前言
用代码在简单视频编辑中,主要就是加美颜、水印(贴图)、视频截取、视频拼接、音视频的处理,在美颜中,使用GPUImage即可实现多种滤镜、磨皮美颜的功能,并且可以脸部识别实时美颜等功能,这个有很多成熟的处理方案,所以现在主要说后面的水印(贴图)、视频截取、视频拼接、音视频的处理,在文章结尾会给出一个完整的测试demo,该demo可以操作视频之后保存到系统相册,文章主要说明下注意的点。
一、视频加水印
之前为了给视频增加美颜效果,所以主流使用了GPUImage的库,所以在选择添加视频水印的功能时也首先想到了GPUImage的方案。但是使用过程中,发现性能并没有AVFoundation的合成快,但是对视频的兼容性还是GPUImage的比较好,所以如果注重速度,首选AVFoundation的方案。但是如果是考虑对视频的兼容性的话,可以采用GPUImage方案。
1.1、GPUImage方案
GPUImage使用GPUImageUIElement和GPUImageMovieWriter重新进行渲染,通过叠加滤镜来重新生成视频。滤镜可以采用GPUImageDissolveBlendFilter、GPUImageAlphaBlendFilter、GPUImageNormalBlendFilter这个三个滤镜任选一个都可以。
实现代码:
/**使用GPUImage加载水印@param vedioPath 视频路径@param img 水印图片@param coverImg 水印图片二@param question 字符串水印@param fileName 生成之后的视频名字*/
-(void)saveVedioPath:(NSURL*)vedioPath WithWaterImg:(UIImage*)img WithCoverImage:(UIImage*)coverImg WithQustion:(NSString*)question WithFileName:(NSString*)fileName
{[SVProgressHUD showWithStatus:@"生成水印视频到系统相册"];// 滤镜//    filter = [[GPUImageDissolveBlendFilter alloc] init];//    [(GPUImageDissolveBlendFilter *)filter setMix:0.0f];//也可以使用透明滤镜//    filter = [[GPUImageAlphaBlendFilter alloc] init];//    //mix即为叠加后的透明度,这里就直接写1.0了//    [(GPUImageDissolveBlendFilter *)filter setMix:1.0f];filter = [[GPUImageNormalBlendFilter alloc] init];NSURL *sampleURL  = vedioPath;AVAsset *asset = [AVAsset assetWithURL:sampleURL];CGSize size = asset.naturalSize;movieFile = [[GPUImageMovie alloc] initWithAsset:asset];movieFile.playAtActualSpeed = NO;// 文字水印UILabel *label = [[UILabel alloc] init];label.text = question;label.font = [UIFont systemFontOfSize:30];label.textColor = [UIColor whiteColor];[label setTextAlignment:NSTextAlignmentCenter];[label sizeToFit];label.layer.masksToBounds = YES;label.layer.cornerRadius = 18.0f;[label setBackgroundColor:[UIColor colorWithRed:0 green:0 blue:0 alpha:0.5]];[label setFrame:CGRectMake(50, 100, label.frame.size.width+20, label.frame.size.height)];//图片水印UIImage *coverImage1 = [img copy];UIImageView *coverImageView1 = [[UIImageView alloc] initWithImage:coverImage1];[coverImageView1 setFrame:CGRectMake(0, 100, 210, 50)];//第二个图片水印UIImage *coverImage2 = [coverImg copy];UIImageView *coverImageView2 = [[UIImageView alloc] initWithImage:coverImage2];[coverImageView2 setFrame:CGRectMake(270, 100, 210, 50)];UIView *subView = [[UIView alloc] initWithFrame:CGRectMake(0, 0, size.width, size.height)];subView.backgroundColor = [UIColor clearColor];[subView addSubview:coverImageView1];[subView addSubview:coverImageView2];[subView addSubview:label];GPUImageUIElement *uielement = [[GPUImageUIElement alloc] initWithView:subView];NSString *pathToMovie = [NSHomeDirectory() stringByAppendingPathComponent:[NSString stringWithFormat:@"Documents/%@.mp4",fileName]];unlink([pathToMovie UTF8String]);NSURL *movieURL = [NSURL fileURLWithPath:pathToMovie];movieWriter = [[GPUImageMovieWriter alloc] initWithMovieURL:movieURL size:CGSizeMake(720.0, 1280.0)];GPUImageFilter* progressFilter = [[GPUImageFilter alloc] init];[progressFilter addTarget:filter];[movieFile addTarget:progressFilter];[uielement addTarget:filter];movieWriter.shouldPassthroughAudio = YES;//    movieFile.playAtActualSpeed = true;if ([[asset tracksWithMediaType:AVMediaTypeAudio] count] > 0){movieFile.audioEncodingTarget = movieWriter;} else {//no audiomovieFile.audioEncodingTarget = nil;}[movieFile enableSynchronizedEncodingUsingMovieWriter:movieWriter];// 显示到界面[filter addTarget:movieWriter];[movieWriter startRecording];[movieFile startProcessing];//    dlink = [CADisplayLink displayLinkWithTarget:self selector:@selector(updateProgress)];
//    [dlink setFrameInterval:15];
//    [dlink addToRunLoop:[NSRunLoop currentRunLoop] forMode:NSDefaultRunLoopMode];
//    [dlink setPaused:NO];__weak typeof(self) weakSelf = self;//渲染[progressFilter setFrameProcessingCompletionBlock:^(GPUImageOutput *output, CMTime time) {//水印可以移动CGRect frame = coverImageView1.frame;frame.origin.x += 1;frame.origin.y += 1;coverImageView1.frame = frame;//第5秒之后隐藏coverImageView2if (time.value/time.timescale>=5.0) {[coverImageView2 removeFromSuperview];}[uielement update];}];//保存相册[movieWriter setCompletionBlock:^{dispatch_after(dispatch_time(DISPATCH_TIME_NOW, (int64_t)(0.2 * NSEC_PER_SEC)), dispatch_get_main_queue(), ^{__strong typeof(self) strongSelf = weakSelf;[strongSelf->filter removeTarget:strongSelf->movieWriter];[strongSelf->movieWriter finishRecording];__block PHObjectPlaceholder *placeholder;if (UIVideoAtPathIsCompatibleWithSavedPhotosAlbum(pathToMovie)){NSError *error;[[PHPhotoLibrary sharedPhotoLibrary] performChangesAndWait:^{PHAssetChangeRequest* createAssetRequest = [PHAssetChangeRequest creationRequestForAssetFromVideoAtFileURL:movieURL];placeholder = [createAssetRequest placeholderForCreatedAsset];} error:&error];if (error) {[SVProgressHUD showErrorWithStatus:[NSString stringWithFormat:@"%@",error]];}else{[SVProgressHUD showSuccessWithStatus:@"视频已经保存到相册"];}}});}];
}
使用的时候直接调用即可
-(void)useGpuimage{NSURL *videoPath = [NSURL fileURLWithPath:[[NSBundle mainBundle] pathForResource:@"selfS" ofType:@"MOV"]];[self saveVedioPath:videoPath WithWaterImg:[UIImage imageNamed:@"avatar.png"] WithCoverImage:[UIImage imageNamed:@"demo.png"] WithQustion:@"文字水印:hudongdongBlog" WithFileName:@"waterVideo"];
}代码中在progressFilter setFrameProcessingCompletionBlock的回调中,设置了各个元素的显示、移动,这样的话就可以更加自由的设置水印的显示与否,比如水印在刚开始显示,五秒之后消失等功能,这个相当于每一帧都在渲染次,所以如果是采用什么动画效果的话可以直接设置frame即可。
这个相当于把视频先录制一遍,然后边录制边重新添加水印,所以这个兼容性比较好,几乎只要支持的视频格式全都可以处理,但是注意没有声音视频的情况,如果原视频没有声音,在创建新视频采集声音的时候,会出现错误Assertion failure in -[GPUImageMovieWriter createDataFBO],崩溃在这里
NSAssert(status == GL_FRAMEBUFFER_COMPLETE, @"Incomplete filter FBO: %d", status);所以在采集的时候需要先判断是否有声音来源,然后再加判断
if ([[asset tracksWithMediaType:AVMediaTypeAudio] count] > 0){movieFile.audioEncodingTarget = movieWriter;} else {//no audiomovieFile.audioEncodingTarget = nil;}总体来说GPUImage只是简单的提供了加载滤镜的变相方案,原理其实就是加了一个滤镜,这个滤镜的纹理是水印的那个图片,然后混合罢了,并没有提供更深层的编辑功能。
1.2、AVFoundation方案
AVFoundation这种使用之后,发现对于同一个视频AVFoundation处理的更快。并且这个是单独对视频轨、音轨等操作,所以操作性更高,玩过Adobe Premiere、会声会影等视频编辑软件的人都知道,在对一个视频进行操作编辑的时候,只需要在相应的轨道上面拖进去相应的资源即可。
这个就是在视频轨编辑图片,但是试过的人肯定发现如果只是单独编辑视频轨的话,出来的视频是没有声音的,网上有很多这个代码,但是都没有声音,复制粘贴的人也不知道解决方案这个是因为视频只采集了视频轨资源,却没有编辑音轨的资源,所以如果编辑裁剪的视频没有声音的话,需要加上音轨的资源。
实现代码:
///使用AVfoundation添加水印
- (void)AVsaveVideoPath:(NSURL*)videoPath WithWaterImg:(UIImage*)img WithCoverImage:(UIImage*)coverImg WithQustion:(NSString*)question WithFileName:(NSString*)fileName
{if (!videoPath) {return;}//1 创建AVAsset实例 AVAsset包含了video的所有信息 self.videoUrl输入视频的路径//封面图片NSDictionary *opts = [NSDictionary dictionaryWithObject:@(YES) forKey:AVURLAssetPreferPreciseDurationAndTimingKey];videoAsset = [AVURLAsset URLAssetWithURL:videoPath options:opts];     //初始化视频媒体文件CMTime startTime = CMTimeMakeWithSeconds(0.2, 600);CMTime endTime = CMTimeMakeWithSeconds(videoAsset.duration.value/videoAsset.duration.timescale-0.2, videoAsset.duration.timescale);//声音采集AVURLAsset * audioAsset = [[AVURLAsset alloc] initWithURL:videoPath options:opts];//2 创建AVMutableComposition实例. apple developer 里边的解释 【AVMutableComposition is a mutable subclass of AVComposition you use when you want to create a new composition from existing assets. You can add and remove tracks, and you can add, remove, and scale time ranges.】AVMutableComposition *mixComposition = [[AVMutableComposition alloc] init];//3 视频通道  工程文件中的轨道,有音频轨、视频轨等,里面可以插入各种对应的素材AVMutableCompositionTrack *videoTrack = [mixComposition addMutableTrackWithMediaType:AVMediaTypeVideopreferredTrackID:kCMPersistentTrackID_Invalid];//把视频轨道数据加入到可变轨道中 这部分可以做视频裁剪TimeRange[videoTrack insertTimeRange:CMTimeRangeMake(startTime, endTime)ofTrack:[[videoAsset tracksWithMediaType:AVMediaTypeVideo] objectAtIndex:0]atTime:kCMTimeZero error:nil];//音频通道AVMutableCompositionTrack * audioTrack = [mixComposition addMutableTrackWithMediaType:AVMediaTypeAudio preferredTrackID:kCMPersistentTrackID_Invalid];//音频采集通道AVAssetTrack * audioAssetTrack = [[audioAsset tracksWithMediaType:AVMediaTypeAudio] firstObject];[audioTrack insertTimeRange:CMTimeRangeMake(startTime, endTime) ofTrack:audioAssetTrack atTime:kCMTimeZero error:nil];//3.1 AVMutableVideoCompositionInstruction 视频轨道中的一个视频,可以缩放、旋转等AVMutableVideoCompositionInstruction *mainInstruction = [AVMutableVideoCompositionInstruction videoCompositionInstruction];mainInstruction.timeRange = CMTimeRangeMake(kCMTimeZero, videoTrack.timeRange.duration);// 3.2 AVMutableVideoCompositionLayerInstruction 一个视频轨道,包含了这个轨道上的所有视频素材AVMutableVideoCompositionLayerInstruction *videolayerInstruction = [AVMutableVideoCompositionLayerInstruction videoCompositionLayerInstructionWithAssetTrack:videoTrack];AVAssetTrack *videoAssetTrack = [[videoAsset tracksWithMediaType:AVMediaTypeVideo] objectAtIndex:0];//    UIImageOrientation videoAssetOrientation_  = UIImageOrientationUp;BOOL isVideoAssetPortrait_  = NO;CGAffineTransform videoTransform = videoAssetTrack.preferredTransform;if (videoTransform.a == 0 && videoTransform.b == 1.0 && videoTransform.c == -1.0 && videoTransform.d == 0) {//        videoAssetOrientation_ = UIImageOrientationRight;isVideoAssetPortrait_ = YES;}if (videoTransform.a == 0 && videoTransform.b == -1.0 && videoTransform.c == 1.0 && videoTransform.d == 0) {//        videoAssetOrientation_ =  UIImageOrientationLeft;isVideoAssetPortrait_ = YES;}//    if (videoTransform.a == 1.0 && videoTransform.b == 0 && videoTransform.c == 0 && videoTransform.d == 1.0) {//        videoAssetOrientation_ =  UIImageOrientationUp;//    }//    if (videoTransform.a == -1.0 && videoTransform.b == 0 && videoTransform.c == 0 && videoTransform.d == -1.0) {//        videoAssetOrientation_ = UIImageOrientationDown;//    }[videolayerInstruction setTransform:videoAssetTrack.preferredTransform atTime:kCMTimeZero];[videolayerInstruction setOpacity:0.0 atTime:endTime];// 3.3 - Add instructionsmainInstruction.layerInstructions = [NSArray arrayWithObjects:videolayerInstruction,nil];//AVMutableVideoComposition:管理所有视频轨道,可以决定最终视频的尺寸,裁剪需要在这里进行AVMutableVideoComposition *mainCompositionInst = [AVMutableVideoComposition videoComposition];CGSize naturalSize;if(isVideoAssetPortrait_){naturalSize = CGSizeMake(videoAssetTrack.naturalSize.height, videoAssetTrack.naturalSize.width);} else {naturalSize = videoAssetTrack.naturalSize;}float renderWidth, renderHeight;renderWidth = naturalSize.width;renderHeight = naturalSize.height;mainCompositionInst.renderSize = CGSizeMake(renderWidth, renderHeight);mainCompositionInst.renderSize = CGSizeMake(renderWidth, renderHeight);mainCompositionInst.instructions = [NSArray arrayWithObject:mainInstruction];mainCompositionInst.frameDuration = CMTimeMake(1, 25);[self applyVideoEffectsToComposition:mainCompositionInst WithWaterImg:img WithCoverImage:coverImg WithQustion:question size:CGSizeMake(renderWidth, renderHeight)];// 4 - 输出路径NSArray *paths = NSSearchPathForDirectoriesInDomains(NSDocumentDirectory, NSUserDomainMask, YES);NSString *documentsDirectory = [paths objectAtIndex:0];NSString *myPathDocs =  [documentsDirectory stringByAppendingPathComponent:[NSString stringWithFormat:@"%@.mp4",fileName]];unlink([myPathDocs UTF8String]);NSURL* videoUrl = [NSURL fileURLWithPath:myPathDocs];dlink = [CADisplayLink displayLinkWithTarget:self selector:@selector(updateProgress)];[dlink setFrameInterval:15];[dlink addToRunLoop:[NSRunLoop currentRunLoop] forMode:NSDefaultRunLoopMode];[dlink setPaused:NO];// 5 - 视频文件输出exporter = [[AVAssetExportSession alloc] initWithAsset:mixCompositionpresetName:AVAssetExportPresetHighestQuality];exporter.outputURL=videoUrl;exporter.outputFileType = AVFileTypeQuickTimeMovie;exporter.shouldOptimizeForNetworkUse = YES;exporter.videoComposition = mainCompositionInst;[exporter exportAsynchronouslyWithCompletionHandler:^{dispatch_async(dispatch_get_main_queue(), ^{//这里是输出视频之后的操作,做你想做的[self exportDidFinish:exporter];});}];}
- (void)applyVideoEffectsToComposition:(AVMutableVideoComposition *)composition WithWaterImg:(UIImage*)img WithCoverImage:(UIImage*)coverImg WithQustion:(NSString*)question  size:(CGSize)size {UIFont *font = [UIFont systemFontOfSize:30.0];CATextLayer *subtitle1Text = [[CATextLayer alloc] init];[subtitle1Text setFontSize:30];[subtitle1Text setString:question];[subtitle1Text setAlignmentMode:kCAAlignmentCenter];[subtitle1Text setForegroundColor:[[UIColor whiteColor] CGColor]];subtitle1Text.masksToBounds = YES;subtitle1Text.cornerRadius = 23.0f;[subtitle1Text setBackgroundColor:[UIColor colorWithRed:0 green:0 blue:0 alpha:0.5].CGColor];CGSize textSize = [question sizeWithAttributes:[NSDictionary dictionaryWithObjectsAndKeys:font,NSFontAttributeName, nil]];[subtitle1Text setFrame:CGRectMake(50, 100, textSize.width+20, textSize.height+10)];//水印CALayer *imgLayer = [CALayer layer];imgLayer.contents = (id)img.CGImage;
//    imgLayer.bounds = CGRectMake(0, 0, size.width, size.height);imgLayer.bounds = CGRectMake(0, 0, 210, 50);imgLayer.position = CGPointMake(size.width/2.0, size.height/2.0);//第二个水印CALayer *coverImgLayer = [CALayer layer];coverImgLayer.contents = (id)coverImg.CGImage;
//    [coverImgLayer setContentsGravity:@"resizeAspect"];coverImgLayer.bounds =  CGRectMake(50, 200,210, 50);coverImgLayer.position = CGPointMake(size.width/4.0, size.height/4.0);// 2 - The usual overlayCALayer *overlayLayer = [CALayer layer];[overlayLayer addSublayer:subtitle1Text];[overlayLayer addSublayer:imgLayer];overlayLayer.frame = CGRectMake(0, 0, size.width, size.height);[overlayLayer setMasksToBounds:YES];CALayer *parentLayer = [CALayer layer];CALayer *videoLayer = [CALayer layer];parentLayer.frame = CGRectMake(0, 0, size.width, size.height);videoLayer.frame = CGRectMake(0, 0, size.width, size.height);[parentLayer addSublayer:videoLayer];[parentLayer addSublayer:overlayLayer];[parentLayer addSublayer:coverImgLayer];//设置封面CABasicAnimation *anima = [CABasicAnimation animationWithKeyPath:@"opacity"];anima.fromValue = [NSNumber numberWithFloat:1.0f];anima.toValue = [NSNumber numberWithFloat:0.0f];anima.repeatCount = 0;anima.duration = 5.0f;  //5s之后消失[anima setRemovedOnCompletion:NO];[anima setFillMode:kCAFillModeForwards];anima.beginTime = AVCoreAnimationBeginTimeAtZero;[coverImgLayer addAnimation:anima forKey:@"opacityAniamtion"];composition.animationTool = [AVVideoCompositionCoreAnimationToolvideoCompositionCoreAnimationToolWithPostProcessingAsVideoLayer:videoLayer inLayer:parentLayer];}//更新生成进度
- (void)updateProgress {[SVProgressHUD showProgress:exporter.progress status:NSLocalizedString(@"生成中...", nil)];if (exporter.progress>=1.0) {[dlink setPaused:true];[dlink invalidate];//        [SVProgressHUD dismiss];}
}
其中主要编辑音轨和视频轨的资源,
[videoTrack insertTimeRange:CMTimeRangeMake(startTime, endTime)ofTrack:[[videoAsset tracksWithMediaType:AVMediaTypeVideo] objectAtIndex:0]atTime:kCMTimeZero error:nil];[audioTrack insertTimeRange:CMTimeRangeMake(startTime, endTime) ofTrack:audioAssetTrack atTime:kCMTimeZero error:nil];在后面添加背景音乐和视频的代码中就主要是调节这两个轨道的资源内容。
float renderWidth, renderHeight;这两个参数则是控制的输出的渲染大小,在视频裁剪的过程中,控制视频输出大小就是控制的这两个参数。这个在视频裁剪的时候再详细说。
水印图片的编辑则是在- (void)applyVideoEffectsToComposition这个函数中,控制的主要是视频的Layer添加图片和图片动画,从而达到编辑水印的功能。

但是这个加水印的时候其实也是在编辑资源的视频轨和音轨,所以会出现有的资源解析不到视频轨,造成生成的图像是蓝色的,还有的资源解析不到音轨造成生成失败。比如iphone的延迟摄像,是没有音轨的,所以会导致生成失败,这两个问题在视频裁剪里面我做了解决,解析不到视频轨的就是用GPUImage单独的录制一份之后再次解析,而解析不到音轨的就代表视频没有声音,就不添加音轨就可以了。
参考文章
美颜滤镜篇
- IOS使用GPUImage滤镜初级试水
- GPUImage录像的一些备忘
- GPUImage录制加美颜、柔光
- GPUImage详细解析(三)- 实时美颜滤镜
- GPUImage详细解析(十)用GPUImage和指令配合合并视频
- ios GPUImage简单滤镜 -- 录制视频(保存+聚焦)
- GPUImage 实现自定义相机
- GPUImage详细解析(二)
- GPUImage--美颜滤镜GPUImageBeautifyFilter
- 使用GPUImage开启的相机进行摄像,保存写入到Path
水印篇
- 视频编辑功能详解上篇-添加水印
- GPUImage详细解析(七)文字水印和动态图像水印
- 给GPUImage录制的视频添加水印
- iOS 视频剪切、旋转,视频添加音频、添加水印,视频导出
- 视频特效制作:如何给视频添加边框、水印、动画以及3D效果
- ios 视频编辑,添加文字、图片(CA动画)水印,合成视频
- iOS 视频剪辑 (添加水印,裁剪,合并视频,添加背景音乐)
- [Assertion failure in -[GPUImageMovieWriter createDataFBO]](http://blog.csdn.net/think_ma/article/details/43342251)
- The current version, the video processing error at the beginning
相关文章:
《评人工智能如何走向新阶段》后记(再续7)
由AI科技大本营下载自视觉中国66. 谷歌近来研发用于基因科学的人工智能AlphaFold,根据基因序列预测生命基本分子一蛋白质的三维结构(AlphaFold与下国际围棋的AlphaGo似孪生兄弟),这是用来预测蛋白质折叠结构的能力或设计新的蛋白质…

Linux多线程实践(6) --Posix读写锁解决读者写者问题
Posix读写锁 int pthread_rwlock_init(pthread_rwlock_t *restrict rwlock,const pthread_rwlockattr_t *restrict attr); int pthread_rwlock_destroy(pthread_rwlock_t *rwlock);int pthread_rwlock_rdlock(pthread_rwlock_t *rwlock); int pthread_rwlock_wrlock(pthread_r…
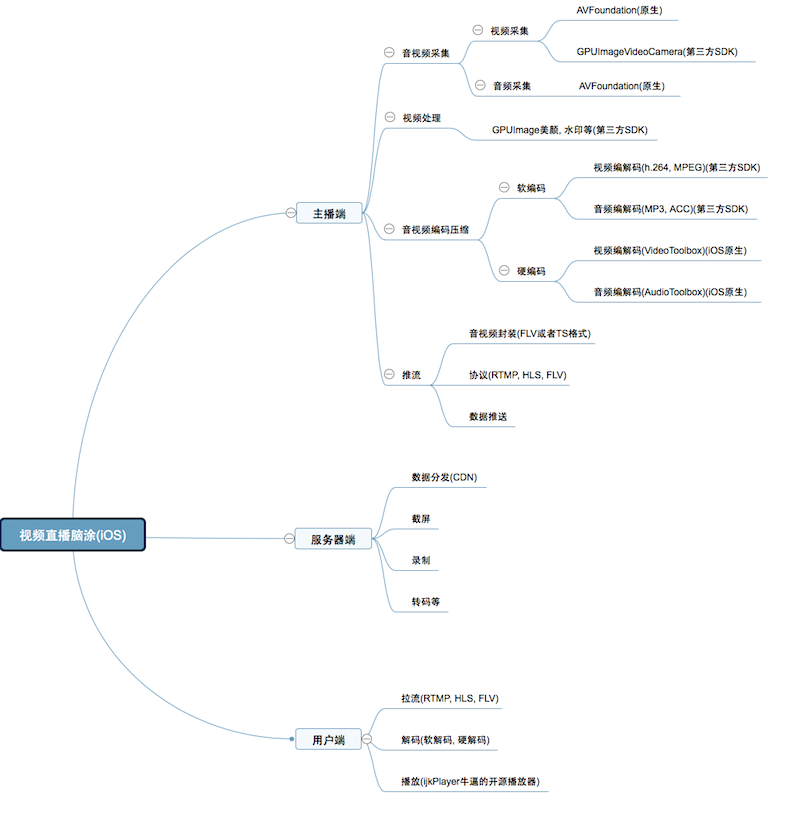
iOS-直播开发(开发从底层做起)
代码链接: Github: https://github.com/jessonliu/JFLivePlaye 技术部分------ ⬇️ 脑涂: ![ 直播思维导图.png ] 视频直播的大概流程就上脑涂上所画的, 还有一些没列出来, 比如, 聊天, 送礼, 踢出, 禁言, 等等一系列功能, 但本文只是针对视频直播的简单实现! 下边来说一下以…

汇编程序设计与计算机体系结构软件工程师教程笔记:函数、字符串、浮点运算
《汇编程序设计与计算机体系结构: 软件工程师教程》这本书是由Brain R.Hall和Kevin J.Slonka著,由爱飞翔译。中文版是2019年出版的。个人感觉这本书真不错,书中介绍了三种汇编器GAS、NASM、MASM异同,全部示例代码都放在了GitHub上,…
《庆余年》值得一看吗?Python告诉你谁在关注 | CSDN原力计划
扫码参与CSDN“原力计划”作者 | A字头来源 | 数据札记倌庆余年电视剧终于在前两天上了,这两天赶紧爬取数据看一下它的表现。庆余年《庆余年》是作家猫腻的小说。这部从2007年就开更的作品拥有固定的书迷群体,也在文学IP价值榜上有名。期待已久的影视版的…
《C语言及程序设计》实践项目——画分支结构流程图
返回:贺老师课程教学链接 【单分支结构流程图-大值】问题:画流程图,输入两个整数a和b,输出其中的大值。提示:当a<b时,交换a和b,最后输出的a一定是其中的大值。流程图中可以直接给出交换a和b…

汇编程序设计与计算机体系结构软件工程师教程笔记:内联汇编与宏
《汇编程序设计与计算机体系结构: 软件工程师教程》这本书是由Brain R.Hall和Kevin J.Slonka著,由爱飞翔译。中文版是2019年出版的。个人感觉这本书真不错,书中介绍了三种汇编器GAS、NASM、MASM异同,全部示例代码都放在了GitHub上,…
无需标注数据,利用辅助性旋转损失的自监督GANs,效果堪比现有最好方法
作者 | Ting Chen译者 | 王红成出品 | AI科技大本营(ID:rgznai100)本文作者提出了一种自检督方式的生成对抗网络,通过辅助性的旋转损失来达到目的。因为通常主流方法来生成自然图像都是通过条件GAN来完成,但是这就需要很多的标签数…
iOS环信聊天界面中点击头像和消息的几种状态
/*环信自带头像点击事件*/ - (void)messageViewController:(EaseMessageViewController *)viewControllerdidSelectAvatarMessageModel:(id<IMessageModel>)messageModel {内容可以根据需要自己添加 }/*!methodbrief 点击了简历消息 (lyq添加)discussion 点击了简历消息,…
ASP.NET将Session保存到数据库中
因为ASP.NET中Session的存取机制与ASP相同,都是保存在进行中, 一旦进程崩溃,所有Session信息将会丢失,所以我采取了将Session信息保存到SQL Server中,尽管还有其它的几个方式(本文不作介绍)&…

iOS App上架流程
一、前言:作为一名iOSer,把开发出来的App上传到App Store是必要的。下面就来详细讲解一下具体流程步骤。 二、准备: 一个已付费的开发者账号(账号类型分为个人(Individual)、公司(Company&#…
不止Markov决策过程,全景式分析强化学习研究内容
作者 | 肖智清编辑 | 刘静来源 | CSDN(ID:CSDNnews)强化学习作为通用人工智能的希望,吸引了很多人工智能爱好者学习和研究。Markov决策过程是最知名的强化学习模型,强化学习教程也常以Markov决策过程作为起点。但是&am…
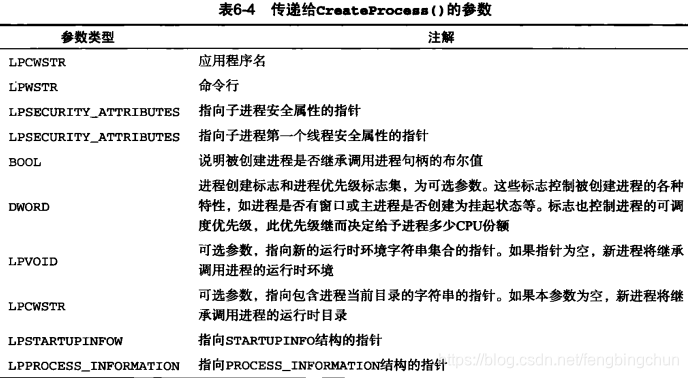
Windows下创建进程简介
正在执行的应用程序称为进程,进程不仅仅是指令和数据,它还有状态。状态是保存在处理器寄存器中的一组值,如当前执行指令的地址、保存在内存中的值,以及唯一定义进程在任一时刻任务的所有其他值。进程与应用程序的一个重要的区别在…
jQuery中鲜为人知的的几个方法
转来学习一下 jQuery中鲜为人知的的几个方法 jQuery近些年来仍旧是web开发中最受欢迎的类库,虽然大家褒贬不一,但是仍旧不失为一款最流行的Javascript,在今天这篇文章中,我们将介绍几个jQuery的相关方法,无论你是入门级…
Linux下创建进程简介
在博文https://blog.csdn.net/fengbingchun/article/details/108940548中简单介绍了Windows下通过函数CreateProcess创建进程的过程,这里简单介绍下Linux下通过fork函数创建进程的过程。很早之前在https://blog.csdn.net/fengbingchun/article/details/45690745中也…

热更新 FrameWork
工作中遇到想要绕过AppStore直接更新App的要求!这里友情提示下,看了很多资料只是是实现了功能,但在项目中并没有真正用到!资料大多都显示会被拒,这个说的是个人级的,好像企业级的不会这样,仅仅是项目需要做…
陆首群:评人工智能如何走向新阶段?
作者 | 陆首群,中国开源软件推进联盟名誉主席 出品 | AI科技大本营(ID:rgznai100) 编者按:近来,业内关于深度学习算法的潜力是否已达天花板的争论陆续发出。有人认为,基于深度学习算法的应用还有深度开拓空…
Mysql INSERT、REPLACE、UPDATE的区别
用于操作数据库的SQL一般分为两种,一种是查询语句,也就是我们所说的SELECT语句,另外一种就是更新语句,也叫做数据操作语句。言外之意,就是对数据进行修改。在标准的SQL中有3个语句,它们是INSERT、UPDATE以及…

软件调试的艺术笔记:GDB
很久之前,在https://blog.csdn.net/fengbingchun/article/details/41413381中简单整理过gdb中常用的一些命令,不齐全,这里按照《软件调试的艺术》一书中关于gdb的介绍再做次整理。《软件调试的艺术》于2009年由人民邮电出版社出版。 1. 预备…
App Store 审核被拒整理
整理以前和现在遇到的审核被拒第一:2.2 DetailsWe discovered one or more bugs in your app when reviewed on iPhone running iOS 8.1.3 on both Wi-Fi and cellular networks. Specifically, we were not able to complete the In App Purchase. When tapped on …
只服这篇“神文”:基于老子哲学、相对论的超级人工智能模型
作者 | Anonymous authors译者 | TroyChang出品 | AI科技大本营(ID:rgznai100)在此前我们为大家介绍 ICLR 2020 论文投稿情况时,提到了一篇“神作”在论文中作者们提出一个 ASI 概念(Artificial Super Intelligence&am…

Navicat Premium使用教程【比较详细】
Navicat Premium使用教程简介:Navicat Premium是众所周知的数据库操作软件。本文比较详细。1、打开Navicat Premium,点击连接,选择MySQL,创建新连接。输入安装MySQL是的用户名和密码。点击确定。2、admin数据连接已经创建成功。下…
如何用Neo4j和Scikit-Learn做机器学习任务?| 附超详细分步教程
作者 | Mark Needham译者 | Tianyu、Shawnice编辑 | Jane出品 | AI科技大本营(ID:rgznai100)图算法不是一个新兴技术领域,在开源库中已经有很多功能强大的算法实现。近两年,业内的学者与科学家都在积极探索可以弥补深度…
Docker在Ubuntu16.04和Windows10家庭版上安装操作步骤
之前在 https://blog.csdn.net/fengbingchun/article/details/109559500 中对Docker作了简单的介绍,这里介绍下Docker在Ubuntu16.04 x86_64 64位上和Windows10 x86_64 64位家庭版上的安装过程。 在Ubuntu上安装Docker(或Docker引擎),Ubuntu必须是64位的…
iOS 不同机型屏幕适配
// .pch 文件中写 // 判断是iPhone机型 /** 4s 960 * 640* 5/5s 1136 x 640* 6/6s/7/8 4.7英寸 1334 x 750* 6p/6sp/7p/8p 5.5英寸 1920 x 1080* X 5.8英寸 2436 x 1125}*/ #define IS_IPHONE_4s [UIScreen instancesRespondToSelector:selector(currentMode)] ? \ CGSizeEqua…
北京中天荣泰视觉检测 仿真
www.romtek.cnhttp://jobs.zhaopin.com/191485013250433.htm?ssidkeyy&ff01&ss101转载于:https://www.cnblogs.com/pengkunfan/p/4316018.html
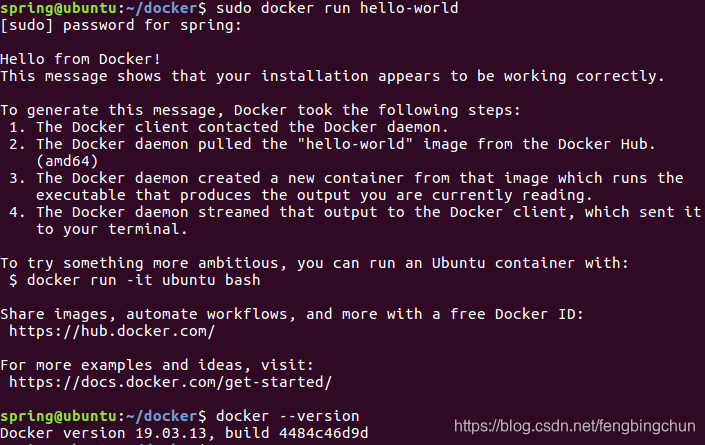
Docker客户端常用命令整理
之前在 https://blog.csdn.net/fengbingchun/article/details/109584460 中介绍过在Windows10家庭版和Ubuntu16.04上安装Docker的操作步骤,这里整理下Docker客户端常用命令。 在Windows10家庭版上运行Docker后,通过VMware就不能打开Ubuntu16.04虚拟机了…
深度学习入门笔记,三流程序员如何凭借实力逆袭高薪?你不服不行!
最近经常有朋友提及,想要入门深度学习,该如何学习?关于深度学习,网上的资料很多,不过貌似大部分都不太适合初学者。 我曾经是一名三流程序员,每天的工作内容就是在前人留下的 bug 上写新的bug,我…
Swift编程语言
The Swift Programming Language中文手册1.【精校版】The Swift Programming Language--欢迎使用Swift--关于Swift2.【精校版】The Swift Programming Language-欢迎使用Swift-Swift 初见3.The Swift Programming Language--语言指南--基础部分4.The Swift Programming Languag…
ondblog 修改informix日志模式
-N No Logging 没有日志-U Unbuffered Logging 非缓冲日志-B Buffered Logging 缓冲日志-A Unbuffered Logging, Mode ANSI ANSI模式No Logging 没有日志----“没有日志”模式只向逻辑日志写很少的信息,它只记录执行的DDL语句,这些语句影响到的行并…