使用卷积神经网络预防疲劳驾驶事故

作者|小白
来源|小白学视觉
疲劳驾驶:一个严重的问题
美国国家公路交通安全管理局估计,每年有 91,000 起车祸涉及疲劳驾驶的司机,造成约50,000 人受伤和近 800 人死亡。此外,每 24 名成年司机中就有 1 人报告在过去 30 天内在驾驶时睡着了。研究甚至发现,超过20个小时不睡觉相当于血液酒精浓度为0.08%——美国的法律规定的上限。
由于这个严重的问题,我和一组其他数据科学家开始开发一种神经网络,可以检测眼睛是否闭着,当与计算机视觉结合使用时,可以检测活人是否闭着眼睛超过一秒钟。这种技术对于任何对提高驾驶安全性感兴趣的人都很有用,包括商业和日常司机、汽车公司和汽车保险公司。
目录
构建卷积神经网络
网络摄像头应用程序
数据采集
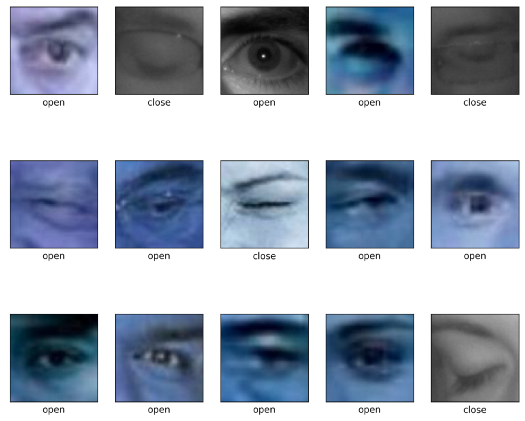
我们使用了多个来源的完整面部数据,即麻省大学阿默斯特分校的睁眼面部数据和南京大学的闭眼面部数据。
然后,我们使用一个简单的 Python 函数从这个数据集中裁剪出眼睛,只剩下 30,000 多张裁剪后的眼睛图像。我们为每个图像裁剪添加了一个缓冲区,不仅可以获取眼睛,还可以获取眼睛周围的区域。此裁剪功能稍后将重新用于网络摄像头部分。
# installations fr
om command line
# brew install cmake # dlib requirement
# pip install dlib # face_recognition requirement
# pip install face_recognition # library for detecting eye location
# imports:
from PIL import Image, ImageDraw
import face_recognition
import os
def eye_cropper(folders):# Establish count for iterative file savingcount = 0# For loop going through each image filefor folder in os.listdir(folders):for file in os.listdir(folders + '/' + folder):# Using Facial Recognition Library on Imageimage = face_recognition.load_image_file(folders + '/' + folder + '/' + file)# create a variable for the facial feature coordinatesface_landmarks_list = face_recognition.face_landmarks(image)# create a placeholder list for the eye coordinateseyes = []try:eyes.append(face_landmarks_list[0]['left_eye'])eyes.append(face_landmarks_list[0]['right_eye'])except:continue# establish the max x and y coordinates of the eyefor eye in eyes:x_max = max([coordinate[0] for coordinate in eye])x_min = min([coordinate[0] for coordinate in eye])y_max = max([coordinate[1] for coordinate in eye])y_min = min([coordinate[1] for coordinate in eye])# establish the range of x and y coordinates    x_range = x_max - x_miny_range = y_max - y_min# to make sure the full eye is captured,# calculate the coordinates of a square that has 50%# cushion added to the axis with a larger rangeif x_range > y_range:right = round(.5*x_range) + x_maxleft = x_min - round(.5*x_range)bottom = round(((right-left) - y_range))/2 + y_maxtop = y_min - round(((right-left) - y_range))/2else:bottom = round(.5*y_range) + y_maxtop = y_min - round(.5*y_range)right = round(((bottom-top) - x_range))/2 + x_maxleft = x_min - round(((bottom-top) - x_range))/2#crop original image using the cushioned coordinatesim = Image.open(folders + '/' + folder + '/' + file)im = im.crop((left, top, right, bottom))# resize image for input into our modelim = im.resize((80,80))# save file to output folderim.save('yourfolderforcroppedeyes')# increase count for iterative file savingcount += 1# print count every 200 photos to monitor progressif count % 200 == 0:print(count)# Call function to crop full-face eye images
eye_cropper('yourfullfaceimagefolder')
以下是我们用来训练模型的数据示例:
创建卷积神经网络
确定指标
因为预测正面类别(熟睡的司机)对我们来说比预测负面类别(清醒的司机)更重要,所以我们最重要的指标是召回率(敏感性)。召回率越高,模型错误地预测清醒(假阴性)的睡眠驱动程序的数量就越少。
这里唯一的问题是我们的正面类别明显多于我们的负面类别。因此,最好使用F1 分数或 Precision-Recall AUC 分数,因为它们还考虑了我们猜测驾驶员睡着但实际上清醒(精确)的次数。否则我们的模型将始终预测我们处于睡眠状态,无法使用。另一种我们在处理不平衡图像数据时没有使用的方法是使用图像增强,我没有在这里使用它,但是 Jason Brownlee 在解释如何在这里使用它方面做得很好。
准备图像数据
下一步是导入图像并用模型进行预处理。
本节所需的导入:
import cv2
import  tensorflow  as  tf
from  tensorflow  import keras
from  sklearn.model_selection  import train_test_split
from  tensorflow.keras.wrappers.scikit_learn  import KerasClassifier
from  keras.models  import Sequential
from  keras.layers  import Dense,Flatten,Conv2D,MaxPooling2D,
导入我们之前创建的图像并调整图像大小,使它们全部匹配,对于这个项目,我们将大小调整为 80x80 像素。这是一个使用 OS 库的简单导入函数:
def load_images_from_folder(folder, eyes = 0):count = 0error_count = 0images = []for filename in os.listdir(folder):try:img = cv2.imread(os.path.join(folder,filename))img = cv2.resize(img, (80,80)) ## Resizing the images## for eyes if it is 0: open, 1: closeimages.append([img, eyes])except:error_count += 1print('ErrorCount = ' + str(error_count))continuecount += 1if count % 500 == 0:print('Succesful Image Import Count = ' + str(count))return imagesfolder="../data/train/new_open_eyes"
open_eyes = load_images_from_folder(folder, 0)folder="../data/train/New_Closed_Eyes"
closed_eyes = load_images_from_folder(folder, 1)
eyes = close_eyes + open_eyes
设置变量,独立的 X 是图像,依赖的 y 是相应的标签(1 表示闭眼,0 表示睁眼):
X = []
y = []
for features, label in eyes: X.append(features)y.append(label)
将图像转换为数组,以便它可以进入模型。此外,将数据除以255进行缩放。
X = np.array(X).reshape(-1, 80, 80, 3)
y = np.array(y)
X = X/255.0
使用scikit learn的train_test_Split将数据拆分为训练集和验证集。重要提示:确保分层,因为我们有不平衡的类。
X_train, X_test, y_train, y_test = train_test_split(X, y, stratify = y)创建模型架构
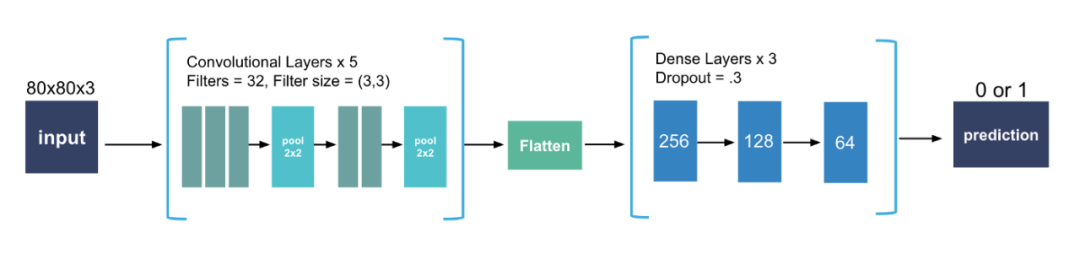
卷积层:
该层创建像素子集而不是完整图像,并允许更快的模型。根据设置的过滤器数量,这可能比原始图像的密度更高或更低,但它们将使模型能够使用更少的资源了解更复杂的关系。我们使用 32 个过滤器,使用至少一个卷积层,通常需要两个或更多。对我们来说,最佳设置是将两个3x3组合在一起,然后将三个3x3组合在一起。CNN 的总体趋势是使用较小的滤波器尺寸。事实上,双3x3层与5x5层基本相同,但速度更快,通常会产生更好的分数。
压平
确保展平图像阵列,以便它可以进入密集层。
密集层
层越密集,我们的模型训练所需的时间就越长,随着这些层中神经元数量的增加,网络学习到的关系的复杂性也会增加。一般来说,通常卷积层的想法是为了避免产生过深的密集层方案。在我们的模型中我们使用了三层,神经元的relu激活率呈下降趋势(256、128、64)。我们还在每一层之后使用了 30% 的dropout。
输出层
最后,因为这是一个二进制分类问题,请确保对外层使用 sigmoid 激活。
编译模型
在 model.compile()中,我们需要将指标设置为 PR AUC(tf.keras.metrics.AUC (curve = 'PR')在 tensorflow 中)或召回率(tf.keras.metrics.recall在 tensorflow 中)。将损失设置为二进制交叉熵,因为这通常是一个二进制分类模型和一个好的优化器。
拟合模型
将批量大小设置得尽可能大。我在 Google Colab 的 32 GB TPU 上运行了 gridsearch,它轻松运行了 1000 多个批次。如有疑问,请尝试 32 个批次,如果没有使内存过载,则增加。就epochs 而言,20 个 epochs 后收益递减,所以我不会比这个特定的 CNN 高太多。
以下是 Tensorflow Keras 的完整设置:
# Instantiate the model
model = Sequential()# Adding first three convolutional layers
model.add(Conv2D(filters = 32, # number of filterskernel_size = (3,3), # height/width of filteractivation = 'relu', # activation function input_shape = (80,80,3) # shape of input (image)))
model.add(Conv2D(filters = 32, # number of filterskernel_size = (3,3), # height/width of filteractivation = 'relu' # activation function ))
model.add(Conv2D(filters = 32, # number of filterskernel_size = (3,3), # height/width of filteractivation = 'relu' # activation function ))# Adding pooling after convolutional layers
model.add(MaxPooling2D(pool_size = (2,2))) # Dimensions of the region that you are pooling# Adding second set of convolutional layers
model.add(Conv2D(filters = 32, # number of filterskernel_size = (3,3), # height/width of filteractivation = 'relu' # activation function ))
model.add(Conv2D(filters = 32, # number of filterskernel_size = (3,3), # height/width of filteractivation = 'relu' # activation function ))# Add last pooling layer.
model.add(MaxPooling2D(pool_size=(2,2)))model.add(Flatten())# Adding first dense layer with 256 nodes
model.add(Dense(256, activation='relu'))# Adding a dropout layer to avoid overfitting
model.add(Dropout(0.3))model.add(Dense(128, activation='relu'))
model.add(Dropout(0.3)) model.add(Dense(64, activation='relu'))
model.add(Dropout(0.3))# adding output layer
model.add(Dense(1, activation = 'sigmoid'))# compiling the model
model.compile(loss='binary_crossentropy',optimizer='adam',metrics=[tf.keras.metrics.AUC(curve = 'PR')])# fitting the model
model.fit(X_train,y_train,batch_size=800,validation_data=(X_test, y_test),epochs=24)# evaluate the model
model.evaluate(X_test, y_test, verbose=1)
曲线下的最终精确召回区域:
0.981033
创建网络摄像头应用程序
获得满意的模型后,请使用model.save('yourmodelname.h5'). 保存生产模型时,请确保运行该模型时没有验证数据,这将在导入时导致问题。
安装和导入:
这些是 Mac 优化的,尽管也可以在 Windows 上使用相同的脚本。
# installations needed for webcam application
# pip install opencv-python #
# if you want to play a sound for the alert:
# pip install -U PyObjC
# pip install playsound
# imports for webcam application
import cv2
from playsound import playsound
# import model saved above
eye_model = keras.models.load_model(‘best_model.h5’)
使用 OpenCV 访问网络摄像头
使用cv2.VideoCapture(0)启动摄像头捕获。如果想根据相对帧大小而不是绝对坐标确定文本位置,请确保使用cap.get(cv2.cap\u PROP\u frame\u width)保存网络摄像头的宽度和高度,还可以每秒查看帧数。
cap = cv2.VideoCapture(0)
w = cap.get(cv2.CAP_PROP_FRAME_WIDTH)
h = cap.get(cv2.CAP_PROP_FRAME_HEIGHT)
print(cap.get(cv2.CAP_PROP_FPS))
if not cap.isOpened():raise IOError(‘Cannot open webcam’)
使用 OpenCV 捕获帧并对其进行裁剪
如果我们打算用框架数数闭着的眼睛,一定要设置一个计数器。A while True:循环将使相机保持开启状态,直到我们完成脚本。在 while 循环中,使用ret, frame = cap.read()格式来捕获网络摄像头视频的帧。最后,调用框架上的函数。它应该从帧中返回一个裁剪过的眼睛,如果在帧中找不到眼睛,函数将返回不能除以255的None,并跳到下一帧。
counter = 0
# create a while loop that runs while webcam is in use
while True:# capture frames being outputted by webcamret, frame = cap.read()# function called on the frameimage_for_prediction = eye_cropper(frame)try:image_for_prediction = image_for_prediction/255.0except:continue
通过模型运行框架
然后我们可以通过模型运行图像并获得预测。如果预测值更接近于 0,那么我们在屏幕上显示“Open”,否则(即它更接近 1),我们显示“Closed”。请注意,如果模型检测到睁开眼睛,计数器将重置为 0,如果眼睛闭上,则计数器增加 1。我们可以使用cv2.putText()显示一些基本文本来指示眼睛是闭着的还是睁开的。
prediction = eye_model.predict(image_for_prediction)
if prediction < 0.5:counter = 0status = ‘Open’cv2.putText(frame, status, (round(w/2)-80,70),
cv2.FONT_HERSHEY_SIMPLEX, 2, (0,255,0), 2, cv2.LINE_4)else:counter = counter + 1status = ‘Closed’cv2.putText(frame, status, (round(w/2)-104,70), cv2.FONT_HERSHEY_SIMPLEX, 2, (0,0,255), 2, cv2.LINE_4)
如果一行中有6帧是闭着眼睛的(“睡眠”),我们还希望显示一个警报。这可以使用一个简单的if语句来完成:
if counter > 5:cv2.putText(frame, ‘DRIVER SLEEPING’, (round(w/2)-136,round(h) — 146), cv2.FONT_HERSHEY_SIMPLEX, 1, (0,0,255), 2, cv2.LINE_4)counter = 5
最后,我们需要显示帧并为 while 循环提供退出键。在cv2.waitKey(1)确定帧的显示时间。括号中的数字是帧将显示的毫秒数,除非按下“k”键(在本例中为27)或escape键:
cv2.imshow(‘Drowsiness Detection’, frame)
k = cv2.waitKey(1)
if k == 27:break
在循环之外,释放网络摄像头并关闭应用程序:
cap.release()
cv2.destroyAllWindows()
最终产品
加上一些文体,这是最终产品。
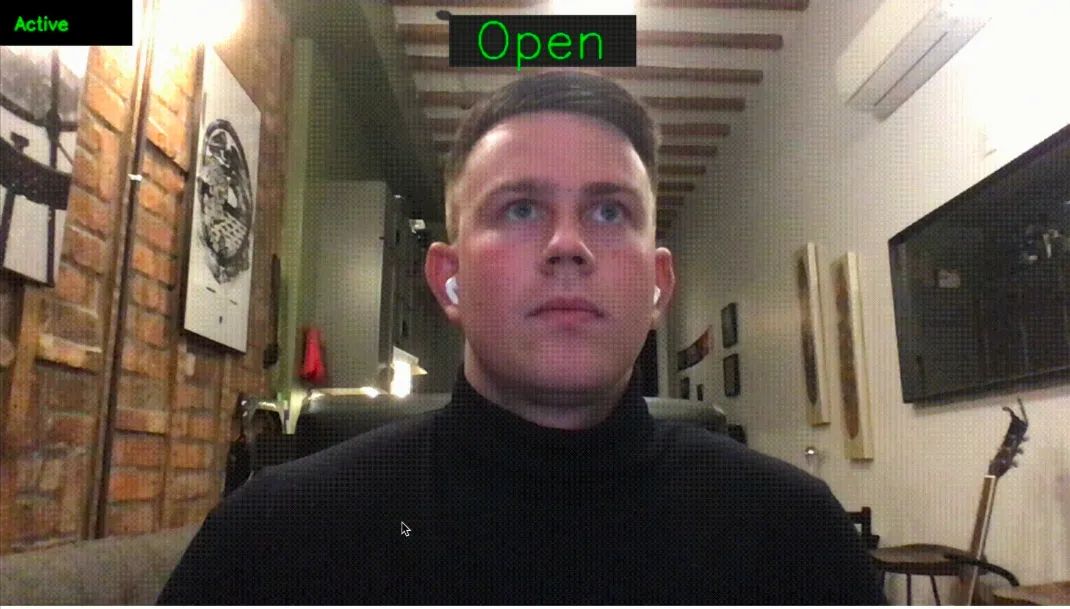
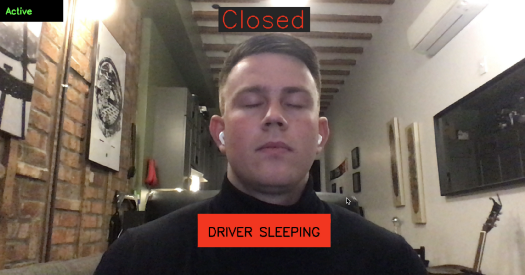
正如我们所见,该模型非常有效,尽管训练时间很长,但仍可在几毫秒内返回预测。通过一些进一步的改进并导出到外部机器,这个程序可以很容易地应用于实际情况,甚至可以挽救生命。
import cv2
import numpy as np
from playsound import playsound
from PIL import Image, ImageDraw
import face_recognition
from tensorflow import keras
eye_model = keras.models.load_model('best_model_2.h5')# webcam frame is inputted into function
def eye_cropper(frame):# create a variable for the facial feature coordinatesfacial_features_list = face_recognition.face_landmarks(frame)# create a placeholder list for the eye coordinates# and append coordinates for eyes to list unless eyes# weren't found by facial recognitiontry:eye = facial_features_list[0]['left_eye']except:try:eye = facial_features_list[0]['right_eye']except:return# establish the max x and y coordinates of the eyex_max = max([coordinate[0] for coordinate in eye])x_min = min([coordinate[0] for coordinate in eye])y_max = max([coordinate[1] for coordinate in eye])y_min = min([coordinate[1] for coordinate in eye])# establish the range of x and y coordinatesx_range = x_max - x_miny_range = y_max - y_min# in order to make sure the full eye is captured,# calculate the coordinates of a square that has a# 50% cushion added to the axis with a larger range and# then match the smaller range to the cushioned larger rangeif x_range > y_range:right = round(.5*x_range) + x_maxleft = x_min - round(.5*x_range)bottom = round((((right-left) - y_range))/2) + y_maxtop = y_min - round((((right-left) - y_range))/2)else:bottom = round(.5*y_range) + y_maxtop = y_min - round(.5*y_range)right = round((((bottom-top) - x_range))/2) + x_maxleft = x_min - round((((bottom-top) - x_range))/2)# crop the image according to the coordinates determined abovecropped = frame[top:(bottom + 1), left:(right + 1)]# resize the imagecropped = cv2.resize(cropped, (80,80))image_for_prediction = cropped.reshape(-1, 80, 80, 3)return image_for_prediction# initiate webcam
cap = cv2.VideoCapture(0)
w = cap.get(cv2.CAP_PROP_FRAME_WIDTH)
h = cap.get(cv2.CAP_PROP_FRAME_HEIGHT)
if not cap.isOpened():raise IOError('Cannot open webcam')# set a counter
counter = 0# create a while loop that runs while webcam is in use
while True:# capture frames being outputted by webcamret, frame = cap.read()# use only every other frame to manage speed and memory usageframe_count = 0if frame_count == 0:frame_count += 1passelse:count = 0continue# function called on the frameimage_for_prediction = eye_cropper(frame)try:image_for_prediction = image_for_prediction/255.0except:continue# get prediction from modelprediction = eye_model.predict(image_for_prediction)# Based on prediction, display either "Open Eyes" or "Closed Eyes"if prediction < 0.5:counter = 0status = 'Open'cv2.rectangle(frame, (round(w/2) - 110,20), (round(w/2) + 110, 80), (38,38,38), -1)cv2.putText(frame, status, (round(w/2)-80,70), cv2.FONT_HERSHEY_SIMPLEX, 2, (0,255,0), 2, cv2.LINE_4)x1, y1,w1,h1 = 0,0,175,75## Draw black backgroun rectanglecv2.rectangle(frame, (x1,x1), (x1+w1-20, y1+h1-20), (0,0,0), -1)## Add textcv2.putText(frame, 'Active', (x1 +int(w1/10), y1+int(h1/2)), cv2.FONT_HERSHEY_SIMPLEX, 0.7, (0, 255,0),2)else:counter = counter + 1status = 'Closed'cv2.rectangle(frame, (round(w/2) - 110,20), (round(w/2) + 110, 80), (38,38,38), -1)cv2.putText(frame, status, (round(w/2)-104,70), cv2.FONT_HERSHEY_SIMPLEX, 2, (0,0,255), 2, cv2.LINE_4)x1, y1,w1,h1 = 0,0,175,75## Draw black backgroun rectanglecv2.rectangle(frame, (x1,x1), (x1+w1-20, y1+h1-20), (0,0,0), -1)## Add textcv2.putText(frame, 'Active', (x1 +int(w1/10), y1+int(h1/2)), cv2.FONT_HERSHEY_SIMPLEX, 0.7, (0, 255,0),2)# if the counter is greater than 3, play and show alert that user is asleepif counter > 2:## Draw black background rectanglecv2.rectangle(frame, (round(w/2) - 160, round(h) - 200), (round(w/2) + 160, round(h) - 120), (0,0,255), -1)cv2.putText(frame, 'DRIVER SLEEPING', (round(w/2)-136,round(h) - 146), cv2.FONT_HERSHEY_SIMPLEX, 1, (0,0,0), 2, cv2.LINE_4)cv2.imshow('Drowsiness Detection', frame)k = cv2.waitKey(1)## Soundplaysound('rooster.mov')counter = 1continuecv2.imshow('Drowsiness Detection', frame)k = cv2.waitKey(1)if k == 27:break
cap.release()
cv2.destroyAllWindows()

往
期
回
顾
资讯
AI 将有自我视觉?Facebook正在研究新系统
资讯
微软、英伟达联手推出最大语言模型
资讯
“倚天”一出,谁与争锋?阿里发布云芯片
技术
ST-GCN 实现人体姿态行为分类

分享

点收藏

点点赞

点在看
相关文章:

详解Apache下.htaccess文件常用配置
.htaccess文件是Apache服务器中最常用的一个配置文件,它负责相关目录下的网页配置。通过htaccess文件,可以帮我们实现:网页301重定向、自定义404错误页面、改变文件扩展名、允许/阻止特定的用户或者目录的访问、禁止目录列表、配置索引入口等…
hadoop HDFS常用文件操作命令
命令基本格式: hadoop fs -cmd < args >1.ls hadoop fs -ls /列出hdfs文件系统根目录下的目录和文件 hadoop fs -ls -R /列出hdfs文件系统所有的目录和文件 2.put hadoop fs -put < local file > < hdfs file >hdfs file的父目录一定要存在,否则…

php缓存技术总结
全页面静态化缓存也就是将页面全部生成html静态页面,用户访问时直接访问的静态页面,而不会去走php服务器解析的流程。此种方式,在CMS系统中比较常见,比如dedecms;一种比较常用的实现方式是用输出缓存:Ob_st…

两个使用 Pandas 读取异常数据结构 Excel 的方法,拿走不谢!
作者 | 周萝卜来源 | 萝卜大杂烩通常情况下,我们使用 Pandas 来读取 Excel 数据,可以很方便的把数据转化为 DataFrame 类型。但是现实情况往往很骨干,当我们遇到结构不是特别良好的 Excel 的时候,常规的 Pandas 读取操作就不怎么好…

ArcEngine中的缩放地图
在ArcEngine地图操作中,缩放地图的功能经常用到,这里做一个小结。 缩放地图一般可分为以下几种情况: 1.缩放地图:与放大地图相对,一般是手动绘制区域或固定比例缩放,可调用命令或Expand函数来; …

【小记】批处理FOR循环中的参数/D
2019独角兽企业重金招聘Python工程师标准>>> 官方说明 FOR /D %variable IN (set) DO command [command-parameters] 如果集中包含通配符,则指定与目录名匹配,而不与文件名匹配。 栗子 REM Eg1.bat REM 与此批处理同级的目录名称全部打印出来…
php 的opcode缓存apc以及其安装
先说说php程序的执行流程吧,说明了这个,才好开始我们的优化之旅。 客户端(譬如浏览器) —》请求Get hello.php —-》cgi服务器接(譬如apache)收到请求,根据配置寻找php的处理程序(…

1024 程序员节专题论坛来袭,权威解读 MindSpore、CANN 5.0 特性和 HCIA MDC 开发者认证...
“授人以鱼不如授人以渔”,一句古话中蕴含的发展真理,我们将其套用到如今炽手可热的 AI 领域之上会发现无比适用。2018 年,华为提出了普惠 AI 的概念,降低 AI 开发门槛,让 AI 开发者获取能力,让技术走近每一…
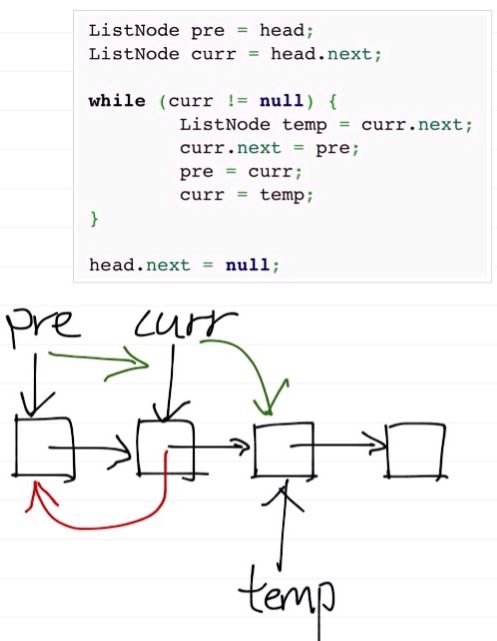
leetcode之Reorder List
Given a singly linked list L: L0→L1→…→Ln-1→Ln,reorder it to: L0→Ln→L1→Ln-1→L2→Ln-2→… You must do this in-place without altering the nodes values. For example,Given {1,2,3,4}, reorder it to {1,4,2,3}. 这道题分三步: 1:首先将…
shiro多realm验证之——shiro实现不同身份使用不同Realm进行验证(转)
转自: http://blog.csdn.net/xiangwanpeng/article/details/54802509 (使用特定的realm实现特定的验证) 假设现在有这样一种需求:存在两张表user和admin,分别记录普通用户和管理员的信息。并且现在要实现普通用户和管理员的分开登…
前端开发中的性能那点事
前端开发中的性能那点事(一)巧用xdebug 前言: 在我们平时的php开发中,一个大的项目经过长时间的积累以后你会发现性能越来越慢,而性能到底消耗在了什么地方,常常是一个令人头疼的问题,function…
运动目标检测ViBe算法
一、运动目标检测简介 视频中的运动目标检测这一块现在的方法实在是太多了。运动目标检测的算法依照目标与摄像机之间的关系可以分为静态背景下运动检测和动态背景下运动检测。先简单从视频中的背景类型来讨论。 静态背景下的目标检测,就是从序列图像中…

急缺开源人才怎么办?来看看大厂和高校怎么解决
开源,是数字中国建设的热点领域之一,也是数字经济时代的基础。在我国加速实现数字化转型的背景下,开源已经从个人行为、企业行为发展到了国家新基建的战略层面。它打破传统的组织架构与商业教条,彻底颠覆了工业经济时代的运转逻辑…
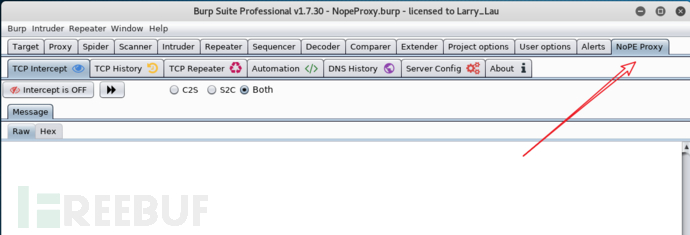
经验分享 | Burpsuite抓取非HTTP流量
使用Burp对安卓应用进行渗透测试的过程中,有时候会遇到某些流量无法拦截的情况,这些流量可能不是HTTP协议的,或者是“比较特殊”的HTTP协议(以下统称非HTTP流量)。遇到这种情况,大多数人会选择切换到Wireshark等抓包工具来分析。下…
Xdebug 配置
第一部分: 安装预编译模块安装预编译模块是很容易的。只需要将它们放到一个目录中,并将下面的内容添加到php.ini中:(不要忘记更改路径和文件名为你自己的值,并确信你使用的是完整路)zend_extension_ts &qu…

yield学习续:yield return迭代块在Unity3D中的应用——协程
必读好文推荐: Unity协程(Coroutine)原理深入剖析 Unity协程(Coroutine)原理深入剖析再续 上面的文章说得太透彻,所以这里就记一下自己的学习笔记了。 首先要说明的是,协程并不是线程࿰…

从神经元谈到深度神经网络
作者 | 泳鱼来源 | 算法进阶本文将从神经元到逻辑回归模型结构,并将其扩展到深度深度网络模型。一、谈谈智慧对于人类智慧奥秘的探索,不同时代、学科背景的人对于智慧的理解及其实现方法有着不同的思想主张。有的主张用显式逻辑体系搭建人工智能系统&…

【阿里聚安全·安全周刊】Intel芯片级安全漏洞事件|macOS存在漏洞
关键词:Intel漏洞丨mac OS漏洞丨三星漏洞丨安卓安全丨CPU漏洞丨phpMyAdmin漏洞丨iOS设备|安卓恶意软件检测|Burpsuite 本周资讯top3 【Intel漏洞】芯片级安全漏洞后续:谷歌表示不止Intel,每个1995年后的处理器都可能受影响 1月3日,…

BigPipe:高性能的“流水线技术”网页
原文地址:http://www.facebook.com/note.php?note_id389414033919 译文地址:http://isd.tencent.com/?p2419 作者:蒋长浩 Facebook的网站速度做为最关键的公司任务之一。在2009年,我们成功地实现了Facebook网站速度提升两倍 。…

超硬核全套Java视频教程(学习路线+免费视频+配套资料)
文内福利,扫码免费领取Hello,各位锋迷们,我是小千。很多学习Java的小伙伴都在找的全套免费java视频教程,这里全都有,资料齐全,拿来吧你!零基础学Java的学习路线图是怎样的?ÿ…

手机触屏滑动图片切换插件swiper.js
今天给大家分享一款手机触屏滑动图片切换插件swiper.js是一款swiper手机触屏滑动图片幻灯片,适合各种尺寸。效果图如下: 在线预览 源码下载 实现的代码。 html代码: <div style"max-width: 640px; margin: 0 auto;"><di…
Nginx防盗链,Nginx访问控制, Nginx解析php相关配置, Nginx代理
2019独角兽企业重金招聘Python工程师标准>>> Nginx防盗链 Nginx防盗链配置需要与不记录日志和过期时间结合在一起,因为都用到了location。 打开配置文件,注释掉一部分内容(红框上方),添加内容(红…
web高性能开发系列随笔
在BlogJava里写了一些关于高性能WEB开发的随笔,因为都是跟前端技术相关(html,http,js,css等),所以也贴到博客园来,吸收下人气。 1、 HTTP服务器. 2、性能测试工具推荐 3、 图片篇. 4、 如何加载JS,JS应该放在什么位置. 5、…
《Effective C++》第8章 定制new和delete-读书笔记
章节回顾: 《Effective C》第1章 让自己习惯C-读书笔记 《Effective C》第2章 构造/析构/赋值运算(1)-读书笔记 《Effective C》第2章 构造/析构/赋值运算(2)-读书笔记 《Effective C》第3章 资源管理(1&am…

观点:AI 与自动化是矛盾的
作者:cerebralab.com译者:张雨佳原文标题:AI and automation are at odds想象一下,我们生活在一个完美、和谐的地方,所有人在某一天同意让电脑代替人类驾驶汽车,而不是像现在逐步推进自动驾驶。那么&#x…
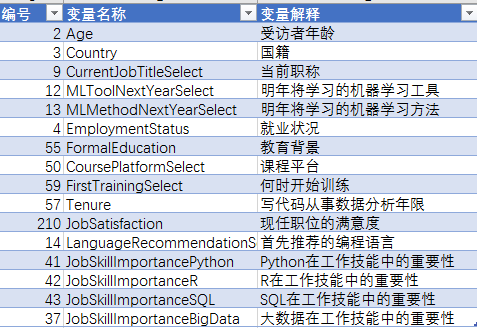
kaggle之数据分析从业者用户画像分析
数据为kaggle社区发布的数据分析从业者问卷调查分析报告,其中涵盖了关于该行业不同维度的问题及调查结果。本文的目的为提取有用的数据,进行描述性展示。帮助新从业的人员更全方位地了解这个行业。 参考学习视频:http://www.tianshansoft.com/ 数据集&am…
mysql读写分离(MySQL Proxy 安装和使用)
一、必备软件: 1、LUA 可以去LUA的官方下载:www.lua.org 2、MySQL Proxy 这里有好多二进制版本。 http://mysql.cdpa.nsysu.edu.tw/Downloads/MySQL-Proxy/ 或者去MYSQL官方下载源代码。 3、测试过程中取消了B和C的REPLICATION。这样SQL语句…

微软副总裁、Kubernetes 头号贡献者的他,给云原生带来奇迹!
我们做了一个街头采访,调查路人眼中的程序员到底是怎样的?提到程序员,大家似乎都有刻板印象:总是格子衬衫牛仔裤双肩包打扮,总是埋头敲代码,加班是常态……谁说程序员呆板木讷,只会埋头敲一行行…
查询Oracle中字段名带.的数据
SDE中的TT_L线层会有SHAPE.LEN这样的字段,使用: SQL>select shape.len from tt_l; 或 SQL>select t.shape.len from tt_l t; 是查询不出来的。 需要这样查询: SQL>select t."SHAPE"."LEN" from tt_l t; 转载于:…
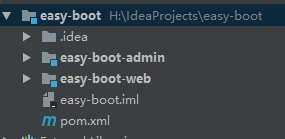
再谈session共享
之前一篇已经写过了《springboot中redis的使用和分布式session共享问题》,但是示例不完全,本文加以完善。 使用spring-session-data-redis解决session共享,而不需要再引入其他jar即可 集成简单,上手迅速。 项目结构 1.pngpom <…