终于效果图:

各个view的关系图:

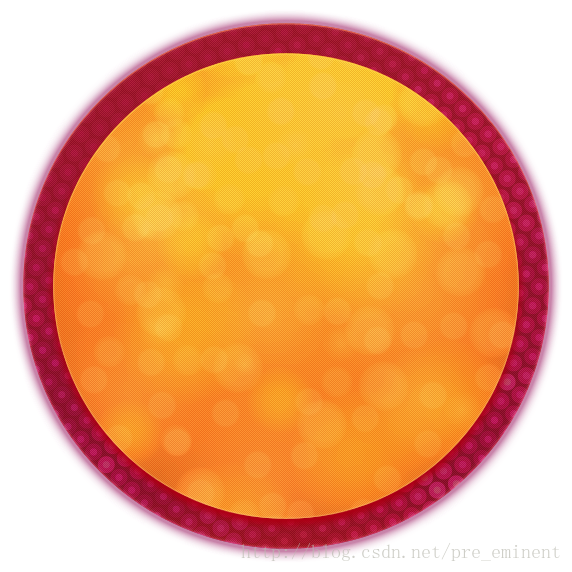
背景圆盘(须要扣图处理)LuckyBaseBackground.png
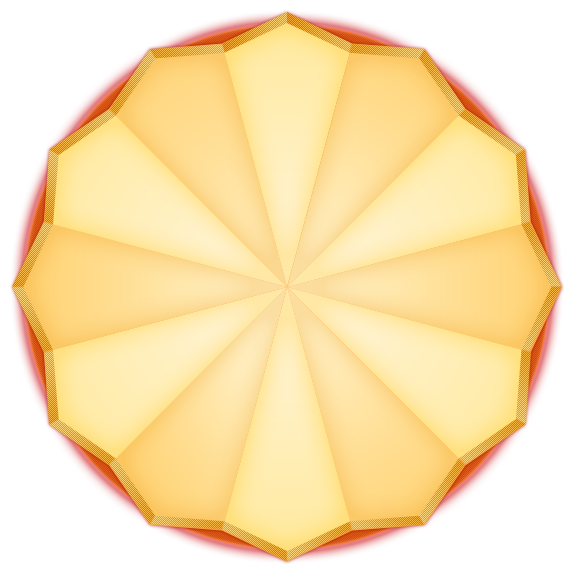
盖在背景圆盘上面的转盘 LuckyRotateWheel.png
代表一个星座或生肖的button背景图片
要创建12个,并以最下方中点为锚点进行旋转

对背景圆盘进行扣图,并在其上面盖上转盘图片的核心代码

在自己定义的背景view中,画好了背景圆盘和背景转盘之后,
一次性加入12个代表星座或生肖的button,并设置旋转角度
一张集合了全部的代表星座的button的背景图片的大图片

一张集合了全部的代表星座的button的背景图片的大图片

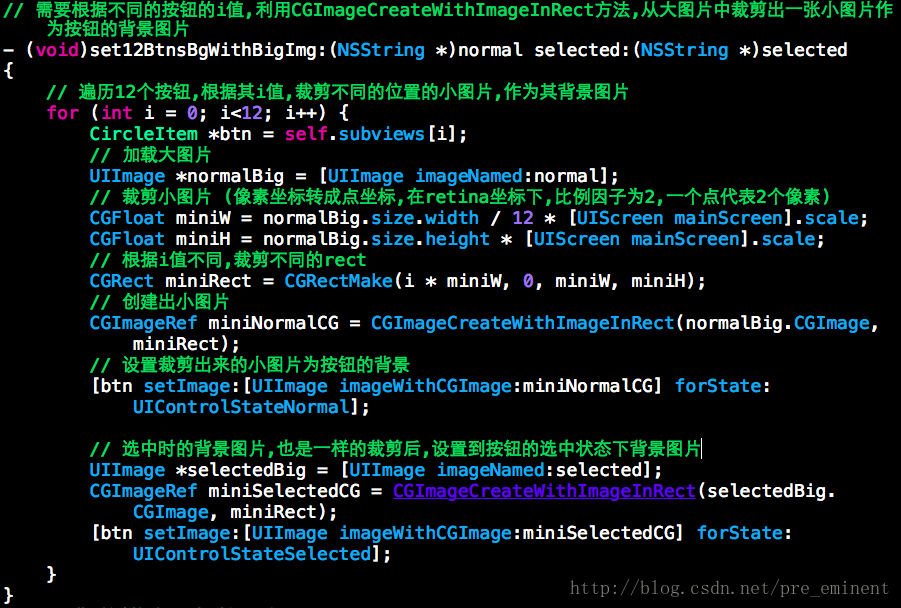
须要依据不同的button的i值,
利用CGImageCreateWithImageInRect方法
从大图片中裁剪出一张小图片作为button的背景图片
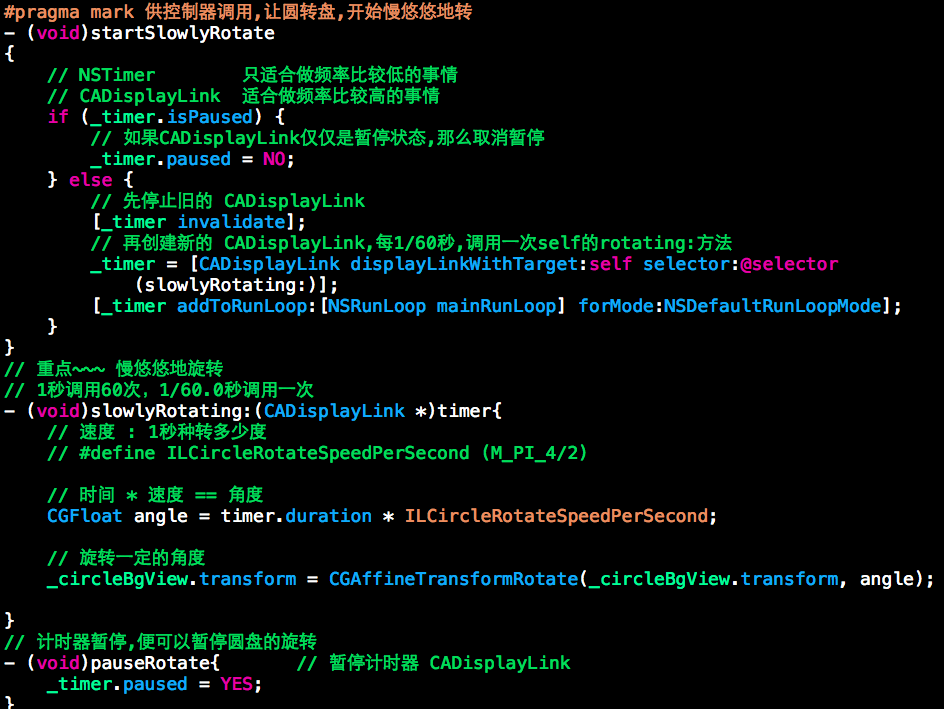
供控制器调用,让圆转盘(circleBgView)慢悠悠地转
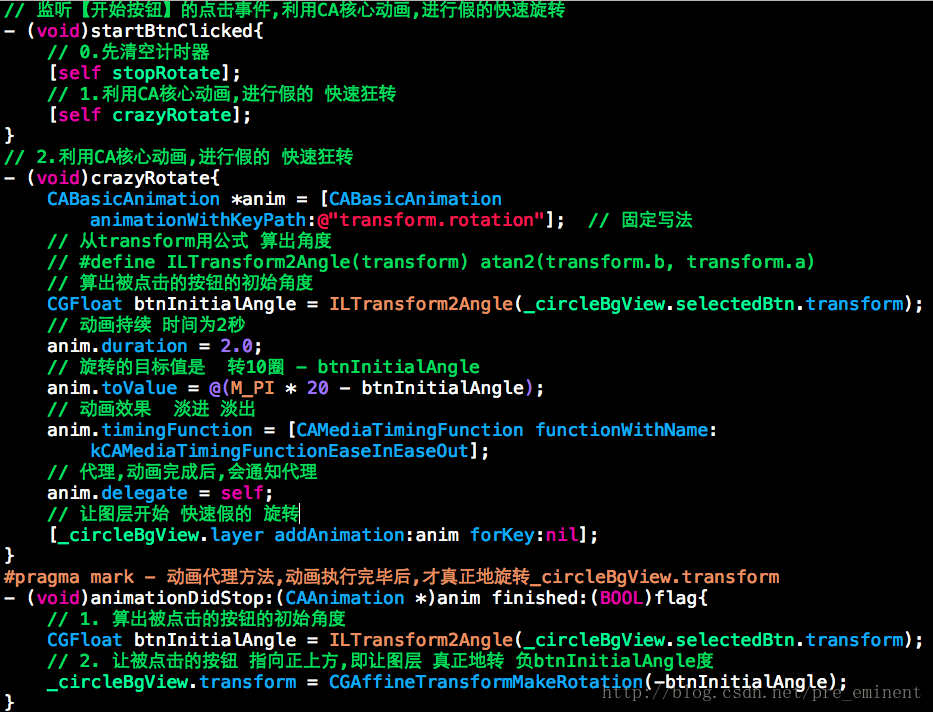
当用户点击圆转盘中心的【開始选号】button时,
让circleBgView所在图层,利用核心动画CA,
进行假的疯狂地高速旋转,而且动画完毕时,
才让cirleBgView的transform真正地旋转负的一定角度,
让被点击的button指向正上方
控制器
//
//  LuckyNumController.h
//  25_彩票
//
//  Created by beyond on 14-8-27.
//  Copyright (c) 2014年 com.beyond. All rights reserved.
//#import <UIKit/UIKit.h>@interface LuckyNumController : UIViewController@end
//
//  LuckyNumController.m
//  25_彩票
//
//  Created by beyond on 14-8-27.
//  Copyright (c) 2014年 com.beyond. All rights reserved.
//#import "LuckyNumController.h"
// 两个封装的view
// 顶部的三个button作为一总体加入到控制器的view
#import "TopThreeBtnsAsOne.h"
// 中间的全部东东,作为一个总体加入到控制器的view
#import "CircleView.h"
#import "CircleViewDelegate.h"@interface LuckyNumController ()<CircleViewDelegate>
{TopThreeBtnsAsOne *_threeButton;CircleView *_circle;
}
@end@implementation LuckyNumController
#pragma mark - 生命周期方法
// 控制器的view消失的时候,能够暂停转盘
- (void)viewDidDisappear:(BOOL)animated
{[super viewDidDisappear:animated];[_circle pauseRotate];
}
// 控制器的view出现的时候,才需慢慢转动转盘
- (void)viewWillAppear:(BOOL)animated
{[super viewWillAppear:animated];[_circle startSlowlyRotate];
}- (void)viewDidLoad
{[super viewDidLoad];// 1.依据4inch或3.5   加入一个全屏的背景[self setupFullScreenBg];// 2.加入顶部3个选择button作为一个总体[self setupTopThreeBtnsAsOne];// 3.加入圆转盘总体[self setupCircleView];
}
// 1.依据4inch或3.5   加入一个全屏的背景
- (void)setupFullScreenBg
{UIImageView *bg = [[UIImageView alloc] initWithFrame:self.view.bounds];bg.image = [UIImage imageNamed:is4inch?@"LuckyBackground-568h@2x.jpg":@"LuckyBackground@2x.jpg"];bg.autoresizingMask = UIViewAutoresizingFlexibleWidth | UIViewAutoresizingFlexibleHeight;[self.view addSubview:bg];
}
// 2.加入顶部3个选择button作为一个总体
- (void)setupTopThreeBtnsAsOne
{TopThreeBtnsAsOne *tb = [TopThreeBtnsAsOne threeBtnsAsOne];CGFloat cx = self.view.frame.size.width * 0.5;CGFloat cy = tb.frame.size.height * 0.5 + 20;tb.center = CGPointMake(cx, cy);[self.view addSubview:tb];_threeButton = tb;
}
// 3.加入圆转盘总体
- (void)setupCircleView
{CircleView *circle = [CircleView circleView];// 设置代理,监听其内部的 12星座或生肖button的点击状态circle.delegate = self;// 设置转盘为星座类型 或生肖类型circle.circleType = CircleViewTypeAstrology;circle.circleType = CircleViewTypeAnimal;// 置于顶部的三个button的下方CGFloat cx = _threeButton.center.x;CGFloat cy = CGRectGetMaxY(_threeButton.frame) + circle.frame.size.height * 0.5;// 对3.5inch作一个调整if (!is4inch) {// 3.5inch屏幕,往上移动20个点cy -= 20;}circle.center = CGPointMake(cx, cy);[self.view addSubview:circle];_circle = circle;
}#pragma mark - 转盘的代理方法 略
@end
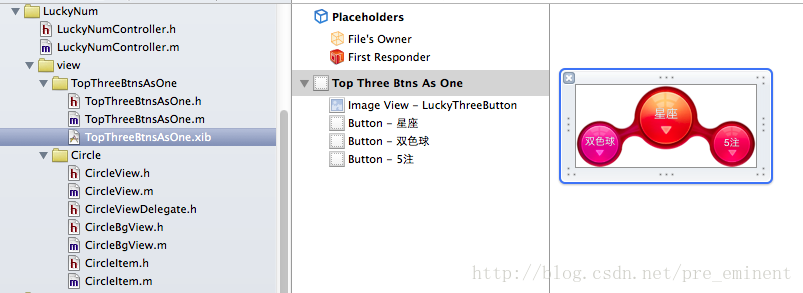
幸运选号顶部的三个button,可作为一总体加入到LuckyNumController控制器中
//
//  TopThreeBtnsAsOne.h
//  25_彩票
//
//  Created by beyond on 14-8-30.
//  Copyright (c) 2014年 com.beyond. All rights reserved.
//  幸运选号顶部的 三个button,可作为一总体加入到LuckyNumController控制器中#import <UIKit/UIKit.h>@interface TopThreeBtnsAsOne : UIView//  类方法返回 从xib创建的对象
+ (instancetype)threeBtnsAsOne;
@end
//
//  TopThreeBtnsAsOne.m
//  25_彩票
//
//  Created by beyond on 14-8-30.
//  Copyright (c) 2014年 com.beyond. All rights reserved.
//  幸运选号顶部的 三个button,可作为一总体加入到LuckyNumController控制器中#import "TopThreeBtnsAsOne.h"@interface TopThreeBtnsAsOne()@end@implementation TopThreeBtnsAsOne//  类方法返回 从xib创建的对象
+ (instancetype)threeBtnsAsOne
{return [[NSBundle mainBundle] loadNibNamed:@"TopThreeBtnsAsOne" owner:nil options:nil][0];
}@end
幸运转盘CircleView,是中部最大的view,
它包含由两个部组成,
各自是一个開始button、一个背景层CircleBgView,
当中背景层CircleBgView又包含三层,
各自是图片1圆盘(要扣图),图片2转盘,12个button
//
//  CircleView.h
//  25_彩票
//
//  Created by beyond on 14-8-30.
//  Copyright (c) 2014年 com.beyond. All rights reserved.
//  幸运转盘CircleView,是中部最大的view,它包含由两个部组成,各自是一个開始button、一个背景层CircleBgView,当中背景层CircleBgView 又包含三层,各自是图片1圆盘(要扣图),图片2转盘,12个button#import <UIKit/UIKit.h>
@protocol CircleViewDelegate;// 让控制器能够选择幸运转盘的类型,选择星座 还是生肖,从而其内部会从不同的图片中裁剪一个个小button的背景图
typedef enum {CircleViewTypeAstrology, // 星座CircleViewTypeAnimal // 生肖
} CircleViewType;@interface CircleView : UIView// 类方法,返回实例对象
+ (instancetype)circleView;
// 让控制器能够选择幸运转盘的类型,选择星座 还是生肖,从而其内部会从不同的图片中裁剪一个个小button的背景图
@property (nonatomic, assign) CircleViewType circleType;
// 成员:代理,告诉控制器,内部点击的button的切换
@property (nonatomic, weak) id<CircleViewDelegate> delegate;// 開始慢悠悠地转动圆盘
- (void)startSlowlyRotate;
// 暂停计时器
- (void)pauseRotate;
// 停止圆盘的转动,而且清空计时器
- (void)stopRotate;
@end
//
//  CircleView.m
//  25_彩票
//
//  Created by beyond on 14-8-30.
//  Copyright (c) 2014年 com.beyond. All rights reserved.
//  幸运转盘CircleView,是中部最大的view,它包含由两个部组成,各自是一个開始button、一个背景层CircleBgView,当中背景层CircleBgView 又包含三层,各自是图片1圆盘(要扣图),图片2转盘,12个button#import "CircleView.h"
// 背景层CircleBgView 又包含三层,各自是图片1圆盘(要扣图),图片2转盘,12个button
#import "CircleBgView.h"
// 代表一个个星座button
#import "CircleItem.h"
#import "CircleViewDelegate.h"// 速度 : 1秒种转多少度
#define ILCircleRotateSpeedPerSecond (M_PI_4/2)
// 从transform用公式 算出角度
#define ILTransform2Angle(transform) atan2(transform.b, transform.a)@interface CircleView ()
{// 背景层CircleBgView,当中背景层CircleBgView 又包含三层,各自是图片1圆盘(要扣图),图片2转盘,12个buttonCircleBgView *_circleBgView;CADisplayLink *_timer;
}
@end@implementation CircleView
#pragma mark - 生命周期方法
+ (instancetype)circleView
{return [[self alloc] init];
}
// 供外部调用,设置【Circle背景View 】上的12个button是星座图,还是生肖
- (void)setCircleType:(CircleViewType)circleType
{_circleType = circleType;// 更换【Circle背景View 】内部要使用的大图片if (circleType ==CircleViewTypeAstrology) {[_circleBgView set12BtnsBgWithBigImg:@"LuckyAstrology" selected:@"LuckyAstrologyPressed"];} else {[_circleBgView set12BtnsBgWithBigImg:@"LuckyAnimal" selected:@"LuckyAnimalPressed"];}
}
// 初始化内部的子控件:1.開始button,2.Circle背景View (圆盘,转盘,12个星座或生肖button)
- (id)initWithFrame:(CGRect)frame
{self = [super initWithFrame:frame];if (self) {//        self.backgroundColor = [UIColor yellowColor];// 1.加入背景层CircleBgView,当中背景层CircleBgView 又包含三层,各自是图片1圆盘(要扣图),图片2转盘,12个button[self setupCircleBgView];// 2.加入浮在圆转盘上面的 開始button[self setupStartBtn];}return self;
}
// 1.加入背景层CircleBgView,当中背景层CircleBgView 又包含三层,各自是图片1圆盘(要扣图),图片2转盘,12个button
- (void)setupCircleBgView
{// 内部固定了宽高CircleBgView *bgView = [CircleBgView circleBgView];[self addSubview:bgView];_circleBgView = bgView;
}
// 2.加入浮在圆转盘上面的 開始button
- (void)setupStartBtn
{UIButton *startBtn = [UIButton buttonWithType:UIButtonTypeCustom];// 開始button,位于圆转盘的中心startBtn.bounds = CGRectMake(0, 0, 81, 81);startBtn.center = CGPointMake(self.frame.size.width * 0.5, self.frame.size.height * 0.5);// 设置button图片[startBtn setBtnBgImgForNormal:@"LuckyCenterButton" highlightedName:@"LuckyCenterButtonPressed"];// 加入监听事件,開始转动转盘[startBtn addTarget:self action:@selector(startBtnClicked) forControlEvents:UIControlEventTouchUpInside];[self addSubview:startBtn];
}#pragma mark - 父类方法
// setFrame:和setBounds:能保证尺寸永远是286x286
- (void)setFrame:(CGRect)frame
{frame.size = CGSizeMake(ILCircleWH, ILCircleWH);[super setFrame:frame];
}- (void)setBounds:(CGRect)bounds
{bounds.size = CGSizeMake(ILCircleWH, ILCircleWH);[super setBounds:bounds];
}#pragma mark - 私有方法
// 监听【開始button】的点击事件,利用CA核心动画,进行假的高速旋转
- (void)startBtnClicked
{// 0.先清空计时器[self stopRotate];// 1.停止交互self.userInteractionEnabled = NO;// 2.利用CA核心动画,进行假的 高速狂转[self crazyRotate];// 通知代理if ([_delegate respondsToSelector:@selector(circleView:willRoateToIndex:)]) {[_delegate circleView:self willRoateToIndex:_circleBgView.selectedBtn.tag];}
}
// 2.利用CA核心动画进行假的 狂转
- (void)crazyRotate
{// 固定写法CABasicAnimation *anim = [CABasicAnimation animationWithKeyPath:@"transform.rotation"];// 从transform用公式 算出角度// #define ILTransform2Angle(transform) atan2(transform.b, transform.a)// 算出被点击的button的初始角度CGFloat btnInitialAngle = ILTransform2Angle(_circleBgView.selectedBtn.transform);// 动画持续 时间为2秒anim.duration = 2.0;// 旋转的目标值是  转10圈 - btnInitialAngleanim.toValue = @(M_PI * 20 - btnInitialAngle);// 动画效果  淡进 淡出anim.timingFunction = [CAMediaTimingFunction functionWithName:kCAMediaTimingFunctionEaseInEaseOut];// 代理,动画完毕后,会通知代理anim.delegate = self;// 让其所在的图层開始假的 高速旋转动画[_circleBgView.layer addAnimation:anim forKey:nil];
}
#pragma mark - 动画代理方法,动画运行完毕后自己主动调用
- (void)animationDidStop:(CAAnimation *)anim finished:(BOOL)flag
{// 1.同意交互了self.userInteractionEnabled = YES;// 从transform用公式 算出角度// #define ILTransform2Angle(transform) atan2(transform.b, transform.a)// 2. 算出被点击的button的初始角度CGFloat btnInitialAngle = ILTransform2Angle(_circleBgView.selectedBtn.transform);// 3. 让被点击的button 指向正上方,即让图层 真正地转 负btnInitialAngle度_circleBgView.transform = CGAffineTransformMakeRotation(-btnInitialAngle);// 通知代理(控制器) 被点击的button的tagif ([_delegate respondsToSelector:@selector(circleView:didRoateToIndex:)]) {[_delegate circleView:self didRoateToIndex:_circleBgView.selectedBtn.tag];}// 4.继续慢悠悠地转[self performSelector:@selector(startSlowlyRotate) withObject:nil afterDelay:1];
}#pragma mark 供控制器调用,让圆转盘,開始慢悠悠地转
- (void)startSlowlyRotate
{// NSTimer        只适合做频率比較低的事情// CADisplayLink  适合做频率比較高的事情if (_timer.isPaused) {// 假设CADisplayLink不过暂停状态,那么取消暂停_timer.paused = NO;} else {// 先停止旧的 CADisplayLink[_timer invalidate];// 再创建新的 CADisplayLink,每1/60秒,调用一次self的rotating:方法_timer = [CADisplayLink displayLinkWithTarget:self selector:@selector(slowlyRotating:)];[_timer addToRunLoop:[NSRunLoop mainRunLoop] forMode:NSDefaultRunLoopMode];}
}
// 重点~~~ 慢悠悠地旋转
// 1秒调用60次,1/60.0秒调用一次
- (void)slowlyRotating:(CADisplayLink *)timer
{// 速度 : 1秒种转多少度// #define ILCircleRotateSpeedPerSecond (M_PI_4/2)// 时间 * 速度 == 角度CGFloat angle = timer.duration * ILCircleRotateSpeedPerSecond;// 旋转一定的角度_circleBgView.transform = CGAffineTransformRotate(_circleBgView.transform, angle);}
// 计时器暂停,便能够暂停圆盘的旋转
- (void)pauseRotate
{// 暂停计时器 CADisplayLink_timer.paused = YES;
}
// 停止圆盘的转动,而且清空计时器
- (void)stopRotate
{[_timer invalidate];_timer = nil;
}@end
//
//  CircleViewDelegate.h
//  25_彩票
//
//  Created by beyond on 14-8-31.
//  Copyright (c) 2014年 com.beyond. All rights reserved.
//  CircleView#import <Foundation/Foundation.h>
@class CircleView;
@protocol CircleViewDelegate <NSObject>@optional
- (void)circleView:(CircleView *)circleView willRoateToIndex:(NSUInteger)index;
- (void)circleView:(CircleView *)circleView didRoateToIndex:(NSUInteger)index;@end
幸运转盘CircleView的背景层是:CircleBgView,
当中背景层CircleBgView又包含三层,
各自是图片1(背景圆盘, 要扣图),图片2(带棱角的转盘),12个星座button(CircleItem)
//
//  CircleBgView.h
//  25_彩票
//
//  Created by beyond on 14-8-30.
//  Copyright (c) 2014年 com.beyond. All rights reserved.
//  幸运转盘CircleView的背景层是:CircleBgView,当中背景层CircleBgView 又包含三层,各自是图片1(背景圆盘, 要扣图),图片2(带棱角的转盘),12个星座button(CircleItem)
//  背景层(3层:最底部圆盘图片、中间转盘图片、顶部的星座小图片)#import <UIKit/UIKit.h>@class CircleItem;// 在.h文件里声明 变量的存在
extern const int ILCircleWH;@interface CircleBgView : UIView// 类方法,返回一个实例对象
+ (instancetype)circleBgView;// 须要依据不同的button的i值,利用CGImageCreateWithImageInRect方法,从大图片中裁剪出一张小图片作为button的背景图片
- (void)set12BtnsBgWithBigImg:(NSString *)normal selected:(NSString *)selected;// 供外界訪问,其内部的当前被点击中的 星座button
@property (nonatomic, readonly) CircleItem *selectedBtn;@end
//
// CircleBgView.m
// 25_彩票
//
// Created by beyond on 14-8-30.
// Copyright (c) 2014年 com.beyond. All rights reserved.
// 幸运转盘CircleView的背景层是:CircleBgView,当中背景层CircleBgView 又包含三层,各自是图片1(背景圆盘, 要扣图),图片2(带棱角的转盘),12个星座button(CircleItem)
// 背景层(3层:最底部圆盘图片、中间转盘图片、顶部的星座小图片)#import "CircleBgView.h"// 一个自己定义的星座button
#import "CircleItem.h"
// 在.m中定义变量
const int ILCircleWH = 286;@implementation CircleBgView#pragma mark - 生命周期方法
// 类方法,返回一个实例对象
+ (instancetype)circleBgView
{return [[self alloc] init];
}- (id)initWithFrame:(CGRect)frame
{self = [super initWithFrame:frame];if (self) {self.backgroundColor = [UIColor clearColor];// 1.加入12个的代表星座或生肖的button[self add12Btns];}return self;
}
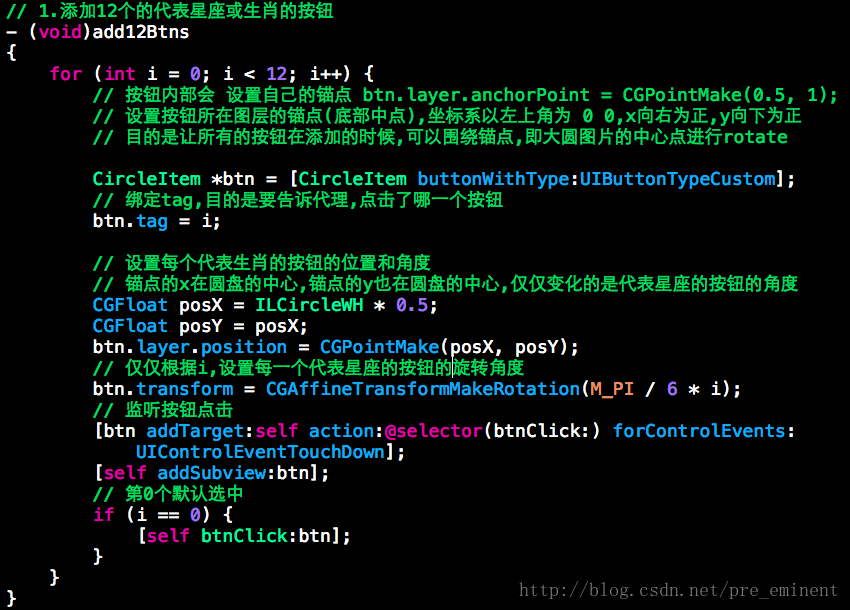
// 1.加入12个的代表星座或生肖的button
- (void)add12Btns
{for (int i = 0; i < 12; i++) {// button内部会 设置自己的锚点 btn.layer.anchorPoint = CGPointMake(0.5, 1);// 设置button所在图层的锚点(底部中点),坐标系以左上角为 0 0,x向右为正,y向下为正// 目的是让全部的button在加入的时候,能够环绕锚点,即大圆图片的中心点进行rotateCircleItem *btn = [CircleItem buttonWithType:UIButtonTypeCustom];// 绑定tag,目的是要告诉代理,点击了哪一个buttonbtn.tag = i;// 设置每个代表生肖的button的位置和角度// 锚点的x在圆盘的中心,锚点的y也在圆盘的中心,只变化的是代表星座的button的角度CGFloat posX = ILCircleWH * 0.5;CGFloat posY = posX;btn.layer.position = CGPointMake(posX, posY);// 只依据i,设置每个代表星座的button的旋转角度btn.transform = CGAffineTransformMakeRotation(M_PI / 6 * i);// 监听button点击[btn addTarget:self action:@selector(btnClick:) forControlEvents:UIControlEventTouchDown];[self addSubview:btn];// 第0个默认选中if (i == 0) {[self btnClick:btn];}}
}
// 须要依据不同的button的i值,利用CGImageCreateWithImageInRect方法,从大图片中裁剪出一张小图片作为button的背景图片
- (void)set12BtnsBgWithBigImg:(NSString *)normal selected:(NSString *)selected
{// 遍历12个button,依据其i值,裁剪不同的位置的小图片,作为其背景图片for (int i = 0; i<12; i++) {CircleItem *btn = self.subviews[i];// 载入大图片UIImage *normalBig = [UIImage imageNamed:normal];// 裁剪小图片 (像素坐标转成点坐标,在retina坐标下,比例因子为2,一个点代表2个像素)CGFloat miniW = normalBig.size.width / 12 * [UIScreen mainScreen].scale;CGFloat miniH = normalBig.size.height * [UIScreen mainScreen].scale;// 依据i值不同,裁剪不同的rectCGRect miniRect = CGRectMake(i * miniW, 0, miniW, miniH);// 创建出小图片CGImageRef miniNormalCG = CGImageCreateWithImageInRect(normalBig.CGImage, miniRect);// 设置裁剪出来的小图片为button的背景[btn setImage:[UIImage imageWithCGImage:miniNormalCG] forState:UIControlStateNormal];// 选中时的背景图片,也是一样的裁剪后,设置到button的选中状态下背景图片UIImage *selectedBig = [UIImage imageNamed:selected];CGImageRef miniSelectedCG = CGImageCreateWithImageInRect(selectedBig.CGImage, miniRect);[btn setImage:[UIImage imageWithCGImage:miniSelectedCG] forState:UIControlStateSelected];}
}
// 三步曲,控制button点击时的切换
- (void)btnClick:(CircleItem *)btn
{_selectedBtn.selected = NO;btn.selected = YES;_selectedBtn = btn;
}#pragma mark - 父类的方法
// setFrame:和setBounds:能保证尺寸永远是286x286
- (void)setFrame:(CGRect)frame
{frame.size = CGSizeMake(ILCircleWH, ILCircleWH);[super setFrame:frame];
}- (void)setBounds:(CGRect)bounds
{bounds.size = CGSizeMake(ILCircleWH, ILCircleWH);[super setBounds:bounds];
}#pragma mark - 重点,画图
// 背景圆盘(须要扣图处理)LuckyBaseBackground.png
- (void)drawRect:(CGRect)rect
{// 1.画最底部的背景圆盘// 取得当前view的上下文,不须再又一次创建上下文对象CGContextRef ctx = UIGraphicsGetCurrentContext();// copy一个ctx对象到栈中,保存现场,而且会复制出一个新的上下文.// 在还原现场之前的全部操作,都将在这个新的上下文中运行CGContextSaveGState(ctx);// 2.在上下文中画一个小点的圆,并裁剪掉上下文,最后将背景圆盘绘制到稍小的圆形上下文中// 2.1.画一个稍小些的圆CGFloat innerCircleXY = 9;CGFloat innerCircleWH = ILCircleWH - innerCircleXY * 2;CGRect innerCircleRect = CGRectMake(innerCircleXY, innerCircleXY, innerCircleWH, innerCircleWH);// 在上下文中的指定坐标处画一个指定大小的圆CGContextAddEllipseInRect(ctx, innerCircleRect);// 2.2.裁剪(CGContextClip会把之前所画的剪下来)// 意思是 将上下文中 不属于刚才 画的圆的东东,全部清空(清空小圆以外的东东)// 上下文中如今只剩下一个稍小的圆形了CGContextClip(ctx);// 2.3.将稍大的背景圆盘图片 画到刚才裁剪后的上下文中,即为小圆形的上下文中// (由于小圆形以外的上下文区域 已经被清空了)[[UIImage imageNamed:@"LuckyBaseBackground"] drawInRect:rect];// 3.为了画下一张转盘图,由于不须要裁剪,所以恢复现场,还原为曾经的正常的rect的上下文(没被裁剪的rect)CGContextRestoreGState(ctx);// 4.画中间的完整的转盘图 到上下文中[[UIImage imageNamed:@"LuckyRotateWheel"] drawInRect:rect];
}@end
CircleItem继承自button,
一个本类实例,就代表着一个可被点击的星座或 生肖
//
//  CircleItem.h
//  25_彩票
//
//  Created by beyond on 14-8-30.
//  Copyright (c) 2014年 com.beyond. All rights reserved.
//  CircleItem 继承自button,一个本类实例,就代表着一个可被点击的星座 或 生肖#import <UIKit/UIKit.h>@interface CircleItem : UIButton@end
//
//  CircleItem.m
//  25_彩票
//
//  Created by beyond on 14-8-30.
//  Copyright (c) 2014年 com.beyond. All rights reserved.
//  继承自button,一个本类实例,就代表着一个可被点击的星座 或 生肖#import "CircleItem.h"// 生肖 或 星座button的宽和高,须与提供的图片一致
const int kCircleItemWidth = 68;
const int kCircleItemHeight = 143;@implementation CircleItem
#pragma mark - 生命周期方法
- (id)initWithFrame:(CGRect)frame
{self = [super initWithFrame:frame];if (self) {// 设置button选中时的背景[self setBackgroundImage:[UIImage imageNamed:@"LuckyRototeSelected.png"] forState:UIControlStateSelected];// 设置button所在图层的锚点(底部中点),坐标系以左上角为 0 0,x向右为正,y向下为正// 目的是让全部的button在加入的时候,能够环绕锚点,即大圆图片的中心点进行rotateself.layer.anchorPoint = CGPointMake(0.5, 1);}return self;
}#pragma mark - 父类的方法
// 重写setFrame:和setBounds:能保证尺寸永远是68x143
- (void)setFrame:(CGRect)frame
{frame.size = CGSizeMake(kCircleItemWidth, kCircleItemHeight);[super setFrame:frame];
}
- (void)setBounds:(CGRect)bounds
{bounds.size = CGSizeMake(kCircleItemWidth, kCircleItemHeight);[super setBounds:bounds];
}
// 中须选中,不要高亮状态
- (void)setHighlighted:(BOOL)highlighted {}
// 调整button的图片的位置
- (CGRect)imageRectForContentRect:(CGRect)contentRect
{// 获得当前屏幕点的比例,假设是2.0代表retina视网膜屏幕,一个点代表2个像素CGFloat scale = [UIScreen mainScreen].scale;// 获得图片本身的大小,从而进行 缩小 为正常的点坐标CGSize size = [self imageForState:UIControlStateNormal].size;// 除以比例因子,得到点坐标下的正常的sizeCGFloat w = size.width/scale;CGFloat h = size.height/scale;// 设置x y坐标CGFloat x = ( contentRect.size.width - w ) * 0.5;CGFloat y = ( contentRect.size.height - h ) * 0.5 - 20;// 返回调整好的图片的framereturn  CGRectMake(x, y, w, h);
}#pragma mark - 触摸事件二慷慨法
// 点击button的时候必然会调用
// 询问鼠标点击的point是否在button身上
// 假设返回YES,代表point在button身上,系统就会让button处理点击事件
// 假设返回NO。代表point部在button身上。系统就不会让button处理点击事件
- (BOOL)pointInside:(CGPoint)point withEvent:(UIEvent *)event
{NSLog(@"----%@", NSStringFromCGPoint(point));return [super pointInside:point withEvent:event];
}
- (UIView *)hitTest:(CGPoint)point withEvent:(UIEvent *)event
{return [super hitTest:point withEvent:event];
}
@end